CloudMinds XI MR-5S User manual

CloudMinds AI Raman Spectrometer
XITM MR-5S
User Guide
Copyright © 2018 CloudMinds, Inc

`

`
Contents
Introduction ........................................................................................................ 1
Warning............................................................................................................... 1
Opening the box................................................................................................. 2
List of parts.......................................................................................................2
External view of device .....................................................................................3
Accessories ......................................................................................................3
Internal view of carrying case............................................................................4
Attaching detection probes................................................................................4
Charging the device..........................................................................................5
Understanding the device.................................................................................. 5
Screen and display ...........................................................................................5
Using the laser.................................................................................................... 6
Operating distance............................................................................................6
Connecting to a network ...................................................................................7
Environmental requirements.............................................................................8
Starting detection............................................................................................13
Exporting records............................................................................................17
Hazardous substance alerts............................................................................17

`
Database............................................................................................................18
Logging in to a database account....................................................................18
Changing your login(cloud database detection service) password...................19
Downloading databases..................................................................................19
Syncing databases..........................................................................................19
Browsing databases........................................................................................20
Searching databases.......................................................................................20
Updating offline detection databases...............................................................20
Resetting the offline detection database..........................................................20
Adding new substances...................................................................................21
Detection settings.............................................................................................22
Account and password settings.......................................................................22
Setting the laser power....................................................................................22
Calibrating the device......................................................................................23
Updating the software .....................................................................................23
Setting up offline detection..............................................................................23
Spectral databases..........................................................................................23
Enabling sound and vibration alerts.................................................................24
Managing cloud databases..............................................................................24
Device specifications .......................................................................................25
Care and maintenance......................................................................................26

`
Routine calibration..........................................................................................26
Safe use .........................................................................................................26
Medical device safety......................................................................................26
Cleaning the device ........................................................................................26
Driving safety..................................................................................................27
Battery care ....................................................................................................27
Avoid condensation.........................................................................................27
For further assistance...................................................................................... 28

`


1
Introduction
Thank you for choosing CloudMinds’s AI Raman spectrometer XITM MR-5S. This
handbook will help you understand the initial settings and basic functionality of the XITM
MR-5S as well as necessary safety information.
Before reading the contents of this manual, please note:
The functions described in this manual are those featured on your device as
originally delivered from the factory. If the descriptions do not match your device’s
actual functions due to software or hardware changes, then please use the
functions as they are on your device.
Warning
Before opening the box, check that the external packaging is intact.
Do not use the laser functions of this device if you have not received
formal training.
The laser diode of this device is a component of the Raman spectrometer.
It can produce lasers with a power between 100 to 500mW and a 785nm
wavelength. The laser uses its own lens to focus on a spot 10mm away.
This device uses a Class 3B laser. And you are required to wear safety
goggles when operating the device.
Exposing human eyes or skin directly to the laser can cause injury. The
safe distance for this laser is no fewer than 50cm from the laser output
window.
Within the 50cm safety zone, use laser safety goggles to protect the
operator's eyes.
Do not disassemble this device by yourself, including but not limited to its
protective case and battery. If disassembly is required, contact an
authorized service center.
Do not use controllers, modulators or software applications that are not
compatible with this device to control this device.
Comply with your organization's safety protocols and rules when using
this device’s Raman laser to detect unknown substances. Using the
smallest possible samples and lowest laser power can help avoid potential
hazards.
Do not detect heat-sensitive materials in closed containers. Doing so can
increase pressure inside the container and lead to the container exploding.
The XITM MR-5S is not an intrinsically safe device. Users must take the
necessary safety precautions when using this device.

`
2
Opening the box
List of parts
The box contains the following items:
•XITM MR-5S
•Protective case (already attached to device)
•Charger
•USB Type-C data cable
•Card ejector pin
•Standard detection probe (already attached to device)
•Solid/powder detection cap (already attached to device)
•Self-verifying calibration cap
•Extended detection probe
•Reagent bottle holder
•Quartz reagent bottles (2)
•Lab scoop
•Sample bags (50)
•Instructions
•Warranty card
If any of the above items are missing when you open the box, please contact us via
support@airaman.com.

`
3
External view of device
Accessories

`
4
Internal view of carrying case
Attaching detection probes
Your device is equipped with two detection probes. Attach and remove the device’s
detection probes in a clean, dry environment. Prevent dust, pollutants, water or
other liquids from entering the device, which can cause electrical faults or influence
the results of the laser detection.
If the solid/power detector cap, reagent bottle holder or self-verifying calibration cap is
attached to the top of the device, remove it first.
1. As shown in the figure below, turn the standard detection probe on top of the device
in a counterclockwise direction to expose the laser emitter. Be careful not to touch
or contaminate the glass lens on the top of the detection probe to avoid influencing
the results of the laser detection.
2. Insert the threaded end of the extended detection probe into the laser emitter
opening and screw in the probe until it is tight.
Do not expose the opening port of the laser for an extended period when changing
the detector probe as it can allow dust to enter the device, potentially influencing
the results of the laser detection.
`
5
Charging the device
Charge the XITM MR-5S before use. The device requires 3.5 hours to fully charge.
1. Connect the data cable to the charger.
2. Plug the data cable into the USB Type C port at the bottom of the device. The
device screen will automatically light up to show that it is charging.
•The charger is not waterproof. Keep it in a dry environment.
•When the device is charging, the charger may become hot. This is normal.
•If the room temperature is below -10°C or above 50°C, do not use the charger to
charge the device.
•Use only the original charger and data cable that came with the device.
Understanding the device
Screen and display
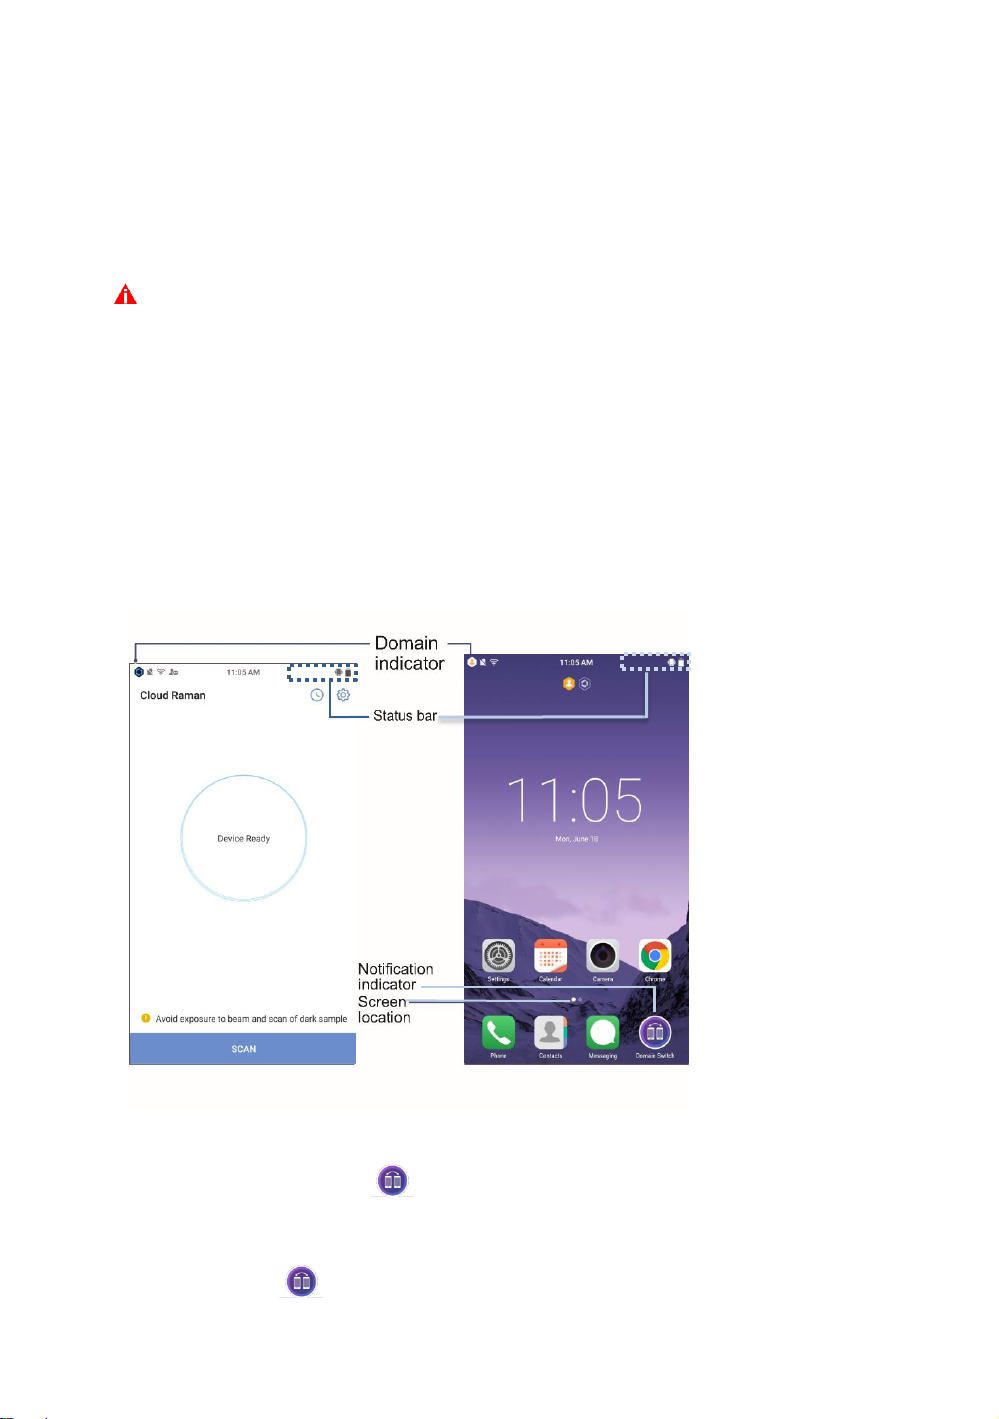
Main screen interfaces
Switching between domains
In the personal domain, tap shortcut on the main screen to switch to the detection
domain.
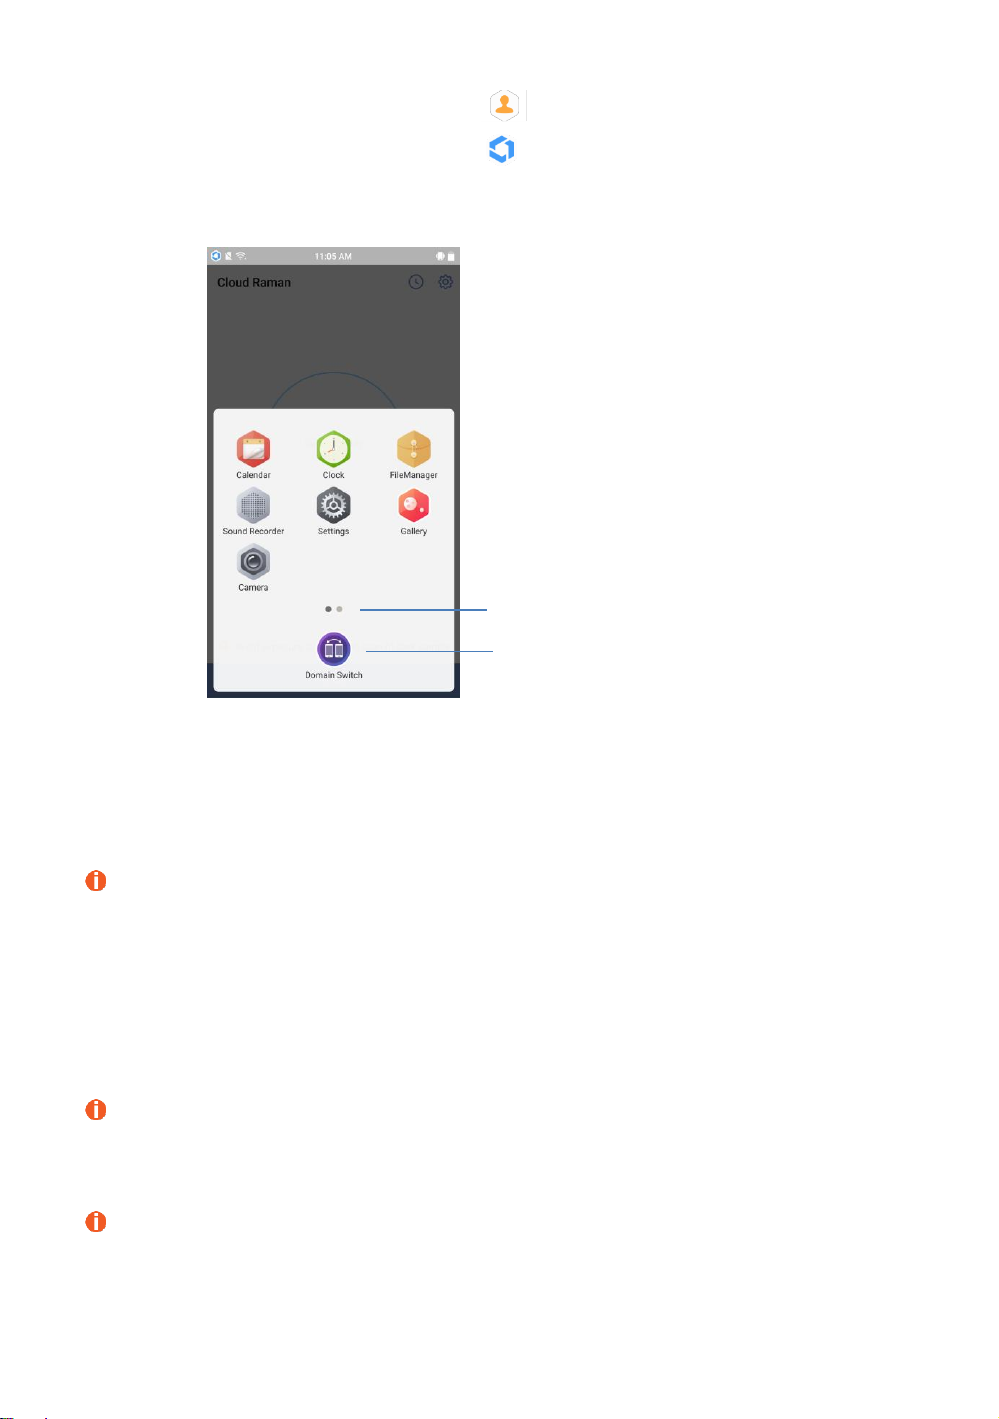
In the detection domain, swipe up from the bottom of the screen to bring up the shortcut
view and then tap to switch to the personal domain.
`
6
•When you are in the personal domain, is displayed in the top left corner.
•When you are in the detection domain, is displayed in the top left corner.
Using the laser
Before you use the XITM MR-5S laser, you must undergo training to understand the
operating principles, performance parameters and safety specifications for the
device.
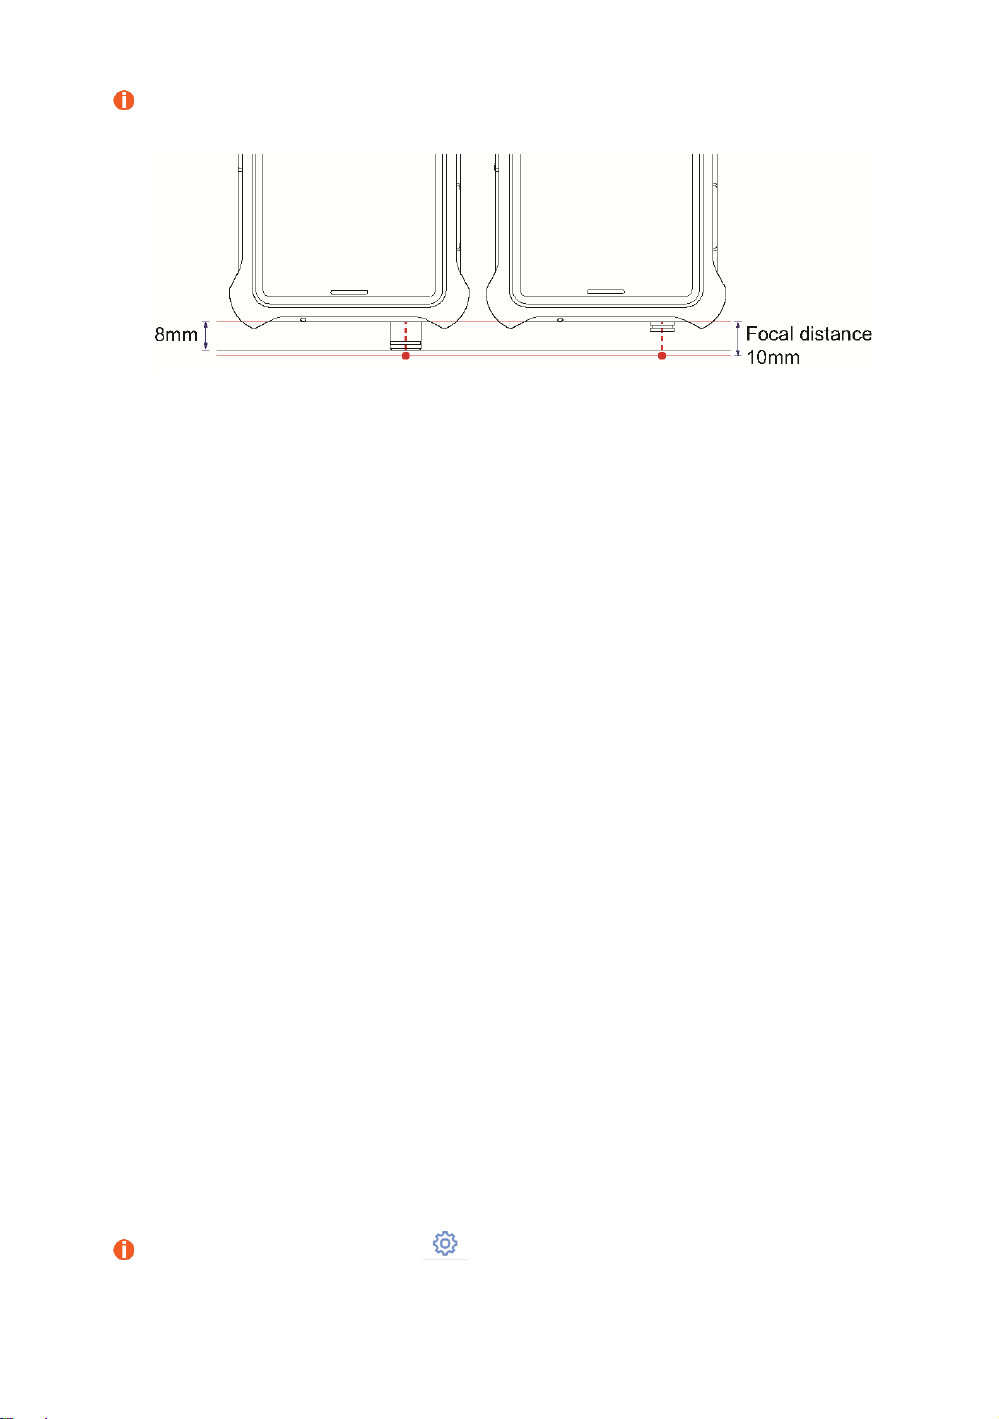
Operating distance
This device’s laser must be used from the correct working distance (10mm) to obtain
the best results. Detection accuracy is impacted if the substance is too near to or too
far from the instrument
The use of the solid/powder detection cap or reagent bottle holder maintains the
laser focal distance. Positioning the solid/powder detection cap flush against the
outside of the detection sample places the sample exactly at the focal point for the
best results.
Remove the solid/powder detection cap to use the laser to detect substances in
transparent or semi-transparent containers such as quartz reagent bottles.
Current Screen Location
Tap to Switch to personal domain
`
7
The distance between the center of the laser lens and the laser focal spot is
approximately 10mm.
Connecting to a network
This device can conduct online detection via mobile networks and wireless local area
networks. It can also be used offline.
Connecting to a mobile network
If you have inserted a SIM card into the device, you may choose to use a mobile
network to connect to the cloud detection service.
Connecting to a wireless local area network
1. Swipe down from the top of the screen to open the notification panel. Tap and hold
WLAN to go to the wireless local area network settings page.
2. Select the network you would like to join from the WLAN list.
3. Depending on the network:
•If the network is not password protected, the device will connect automatically.
•If the network is password protected, enter the password and tap Connect.
Disconnecting from a network
Your device will disconnect from the network in the follow situations:
•When there is no available network.
•When the flight mode is enabled: Swipe down from the top of the screen to open
the notification panel, and then tap Airplane mode
When offline, the device will automatically use the offline detection mode to detect
samples and use the local database for comparison.
In the detection domain, tap >Offline Analysis to use the offline detection
mode. See Offline detection on page 16 for more details.
In the detection domain settings, enable the offline detection mode to carry out offline

`
8
detection. The offline detection mode is the same as detection when there is no network
connection.
Environmental requirements
The penetrability of the laser varies depending on different materials. Often, different
detection accessories need to be used depending on the type of container that holds
the sample.
If the sample in the container is suspected to have heat sensitive or corrosive
properties, do not insert the extended detection probe into the container. Doing so
can result in fire or explosion or corrode the device. Remove a small amount of the
substance to be identified and place it in a quartz reagent bottle. When the bottle
is open, use the delayed detection method. See Starting detection on page 13
for more information about delaying detection.
Thin-walled containers
If the sample container is 5mm thick or less and transparent or semi-transparent glass
or plastic, you may:
•Remove the solid/powder detection cap and press the laser emitter window against
the outside of the container. This way, the laser focal spot will be on the inside of
the container.
•Remove the solid/powder detection cap, attach the reagent bottle holder, and place
the container inside the bottle to carry out detection.

`
9
•If the sample container is a thin and transparent bag such as a reagent bag, you
must attach the solid/powder detection cap and position the detection cap flush
against the outside of the bag. This way, the laser focal spot will be on the inside
of the bag.
Thick-walled containers
When the sample container is thicker than 5mm and transparent or semi-transparent
glass or plastic, the container’s walls are thicker than the laser focal distance. This can
result in the laser focal spot being inside the container walls, which invalidates the
detection. You may choose one of the following methods of detection:
•Remove the accessory attached to the laser emitter window and position the laser
emitter window directly against the outside of the container to carry out detection.

`
10
•Remove the accessory attached to the laser emitter window and attach the
extended detection probe. Remove the lid of the container and place the probe
inside to carry out detection. If the sample has heat sensitive properties, the
extended detection probe cannot be used.
•Transfer the sample into a thin-walled container to carry out detection.
Low transparency containers
If the sample container is solid colored with very low or little transparency container
made of ceramic, dark color glass, frosted glass, or dark color plastic, the laser cannot
penetrate these container walls. You may:
•Remove the accessory attached to the laser emitter window and attach the
extended detection probe. Place the probe inside the bottle to carry out detection.
If the container contains a heat sensitive sample, the extended detection probe
cannot be used.
•Remove the sample from the container for detection.
`
11
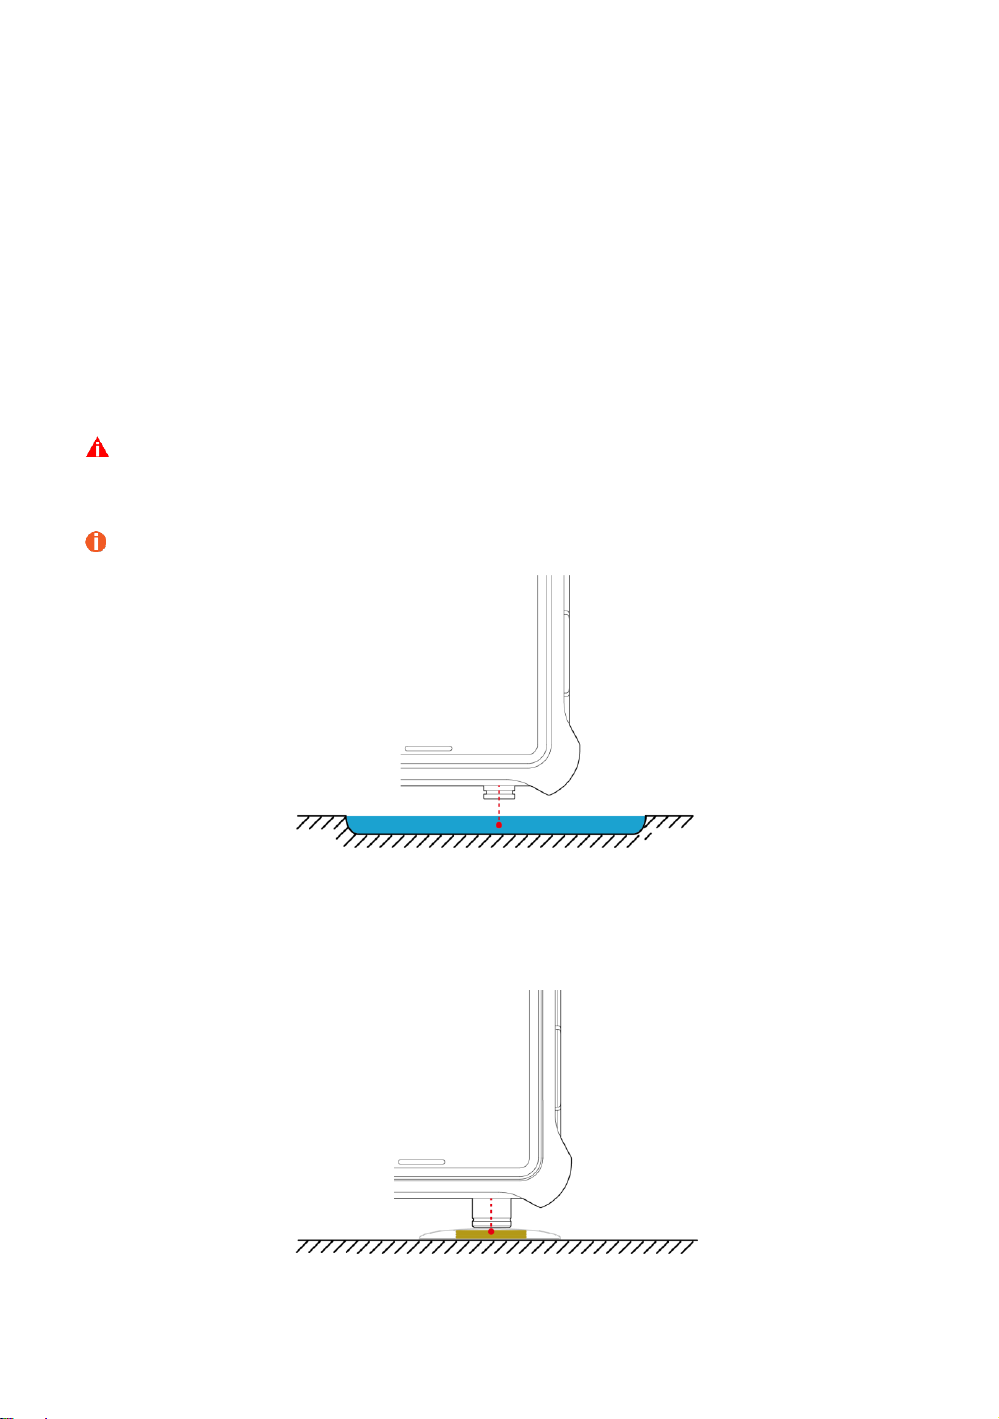
Unpackaged powder samples
If the sample to be tested is unpackaged powder, such as powder on a concrete floor,
choose one of the following methods of detection:
•If conditions allow, transfer a suitable amount of the powder into a reagent bag and
then proceed according to the instructions on page 8 Thin-walled containers.
•Push the powder into a pile and touch the solid/powder detection cap to the top of
the pile to carry out detection.
If the powder pile is not tall or thick enough, the laser beam will pass through it and
the detection will fail.
If the powder sample contains differently colored or differently sized particles, move
the laser focal spot relative to the powder during detection. This allows the laser to
reach the maximum number of particles and increases the accuracy of the
detection comparison.
`
12
Unpackaged liquid samples
If the liquid is sufficiently safe, collect the liquid within a quartz reagent bottle, remove
the accessory attached to the device’s laser emitter window, and use one of the
following methods of detection:
•Place the laser emitter window directly against the outside of the container.
•Attach the extended detection probe and place the probe inside the bottle to carry
out detection.
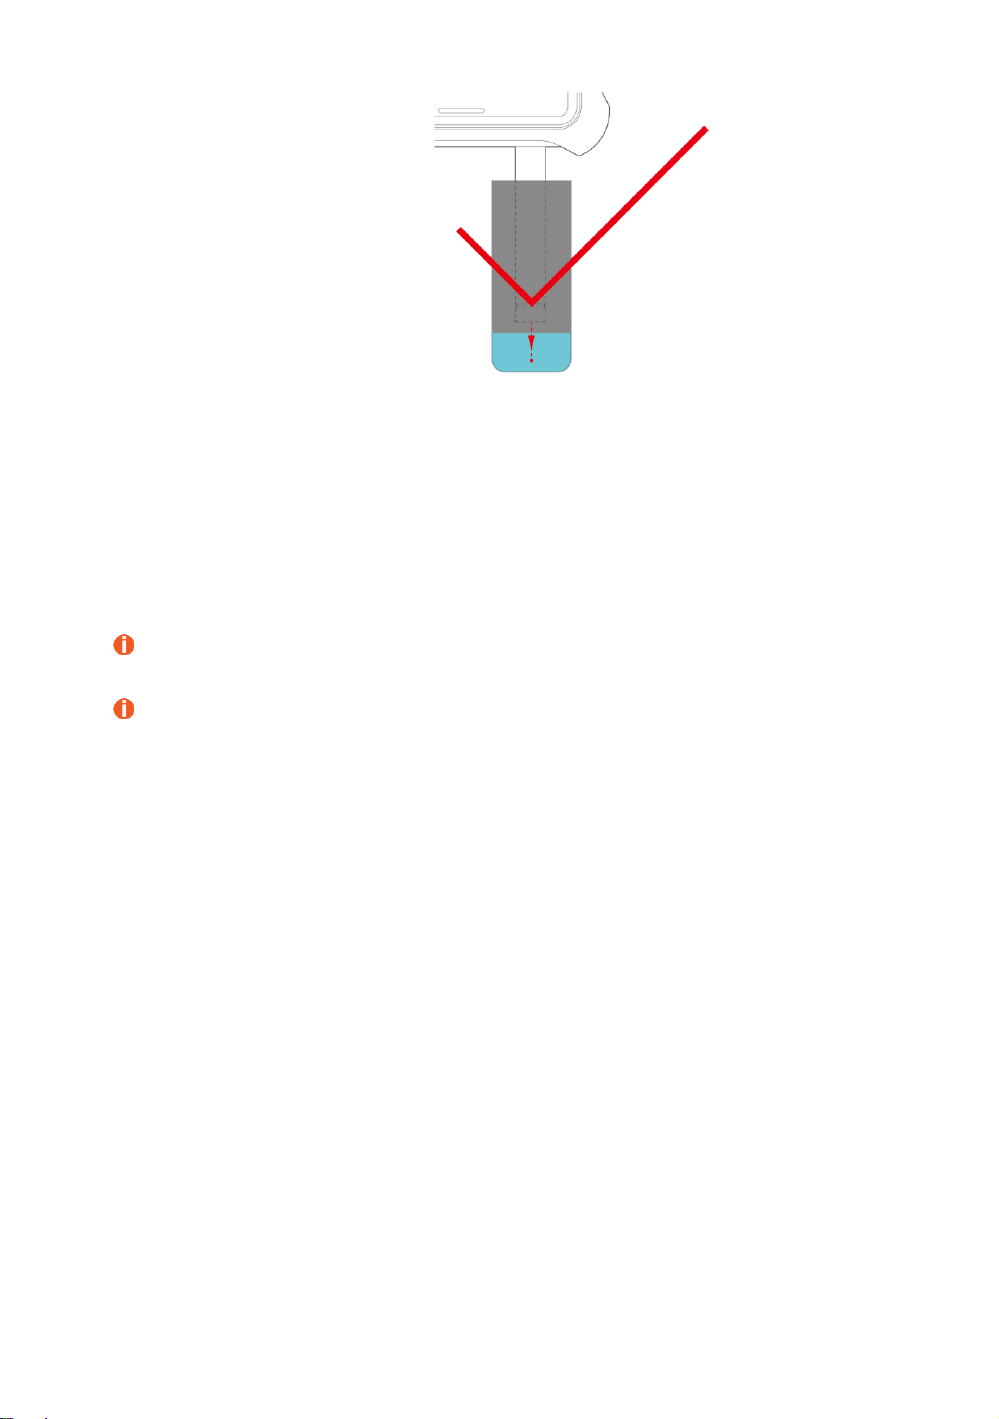
If the liquid collected does not fill the bottle enough, remove the solid/powder detection
cap and position the laser emitter window at a 5mm or lower distance from the surface
of the liquid, and then carry out detection.
If the liquid is suspected to have heat sensitive or corrosive properties, do not
immerse the device or its accessories in the liquid. Doing so can result in hazards
such as corrosion, fire, and explosion.
If the liquid is too shallow, the laser will identify the surface underneath the liquid.
Scanning large, solid samples
If the solid sample to be scanned has a relatively large area (such as a tablet), position
the solid/powder detection cap against the sample surface and then begin detection.

`
13
Scanning thin or loose solid samples
If the solid sample to be scanned is fibrous or thinly spread (such as cotton, plastic
netting, or paste), collect more of the sample, press it into a tight ball and place inside
a reagent bag, then enable the solid/powder detection cap to touch the reagent bag to
carry out detection.
Starting detection
Do not test combustible or flammable substances or substances with
unknown heat sensitivity without protection, to avoid hazards such as fire or
explosion.
Do not shine the laser onto eyes or skin.
Do not test black, brown or dark-colored substances. When these
substances absorb the energy of the laser, they can become hot or start to
burn, resulting in fire.
Do not place the substance to be identified on paper for testing. The paper
may absorb the energy of the laser and become too hot or even start to burn,
resulting in fire.
If the substance to be identified is light in color, any dark spots in the
substance absorb the energy of the laser more easily and quickly heat up.
If you have not determined if the substance to be identified has heat sensitive properties,
prepare in the following way:
Table of contents
Other CloudMinds Measuring Instrument manuals

Popular Measuring Instrument manuals by other brands

FRONIUS
FRONIUS Smart Meter 240-3 UL operating instructions

Promax
Promax PRODIG-5 manual

Trans-Tek
Trans-Tek 1003 instruction manual

Analytical Industries
Analytical Industries ALL-4001 owner's manual

Almaco
Almaco SECURITERRE 640 operating guide

FLOW metrix
FLOW metrix SAFMAG ACP HI-PULS METER Installation & operation instructions


