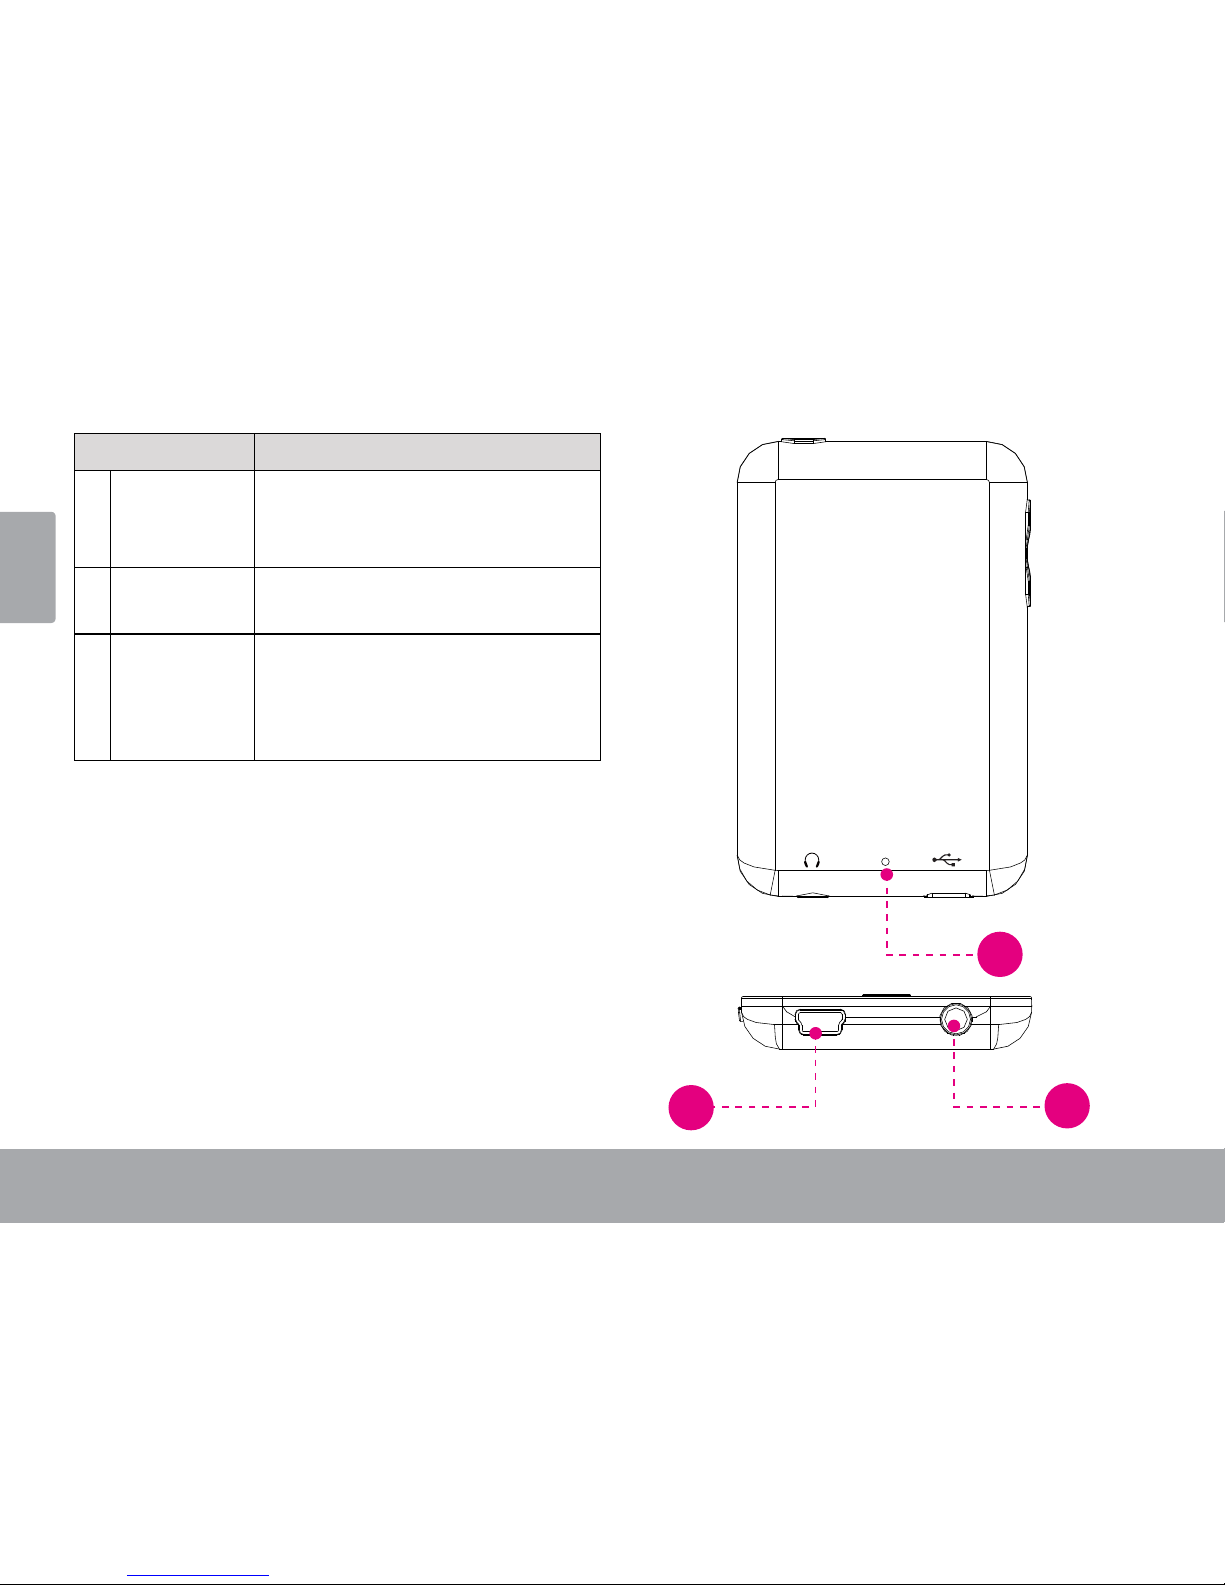
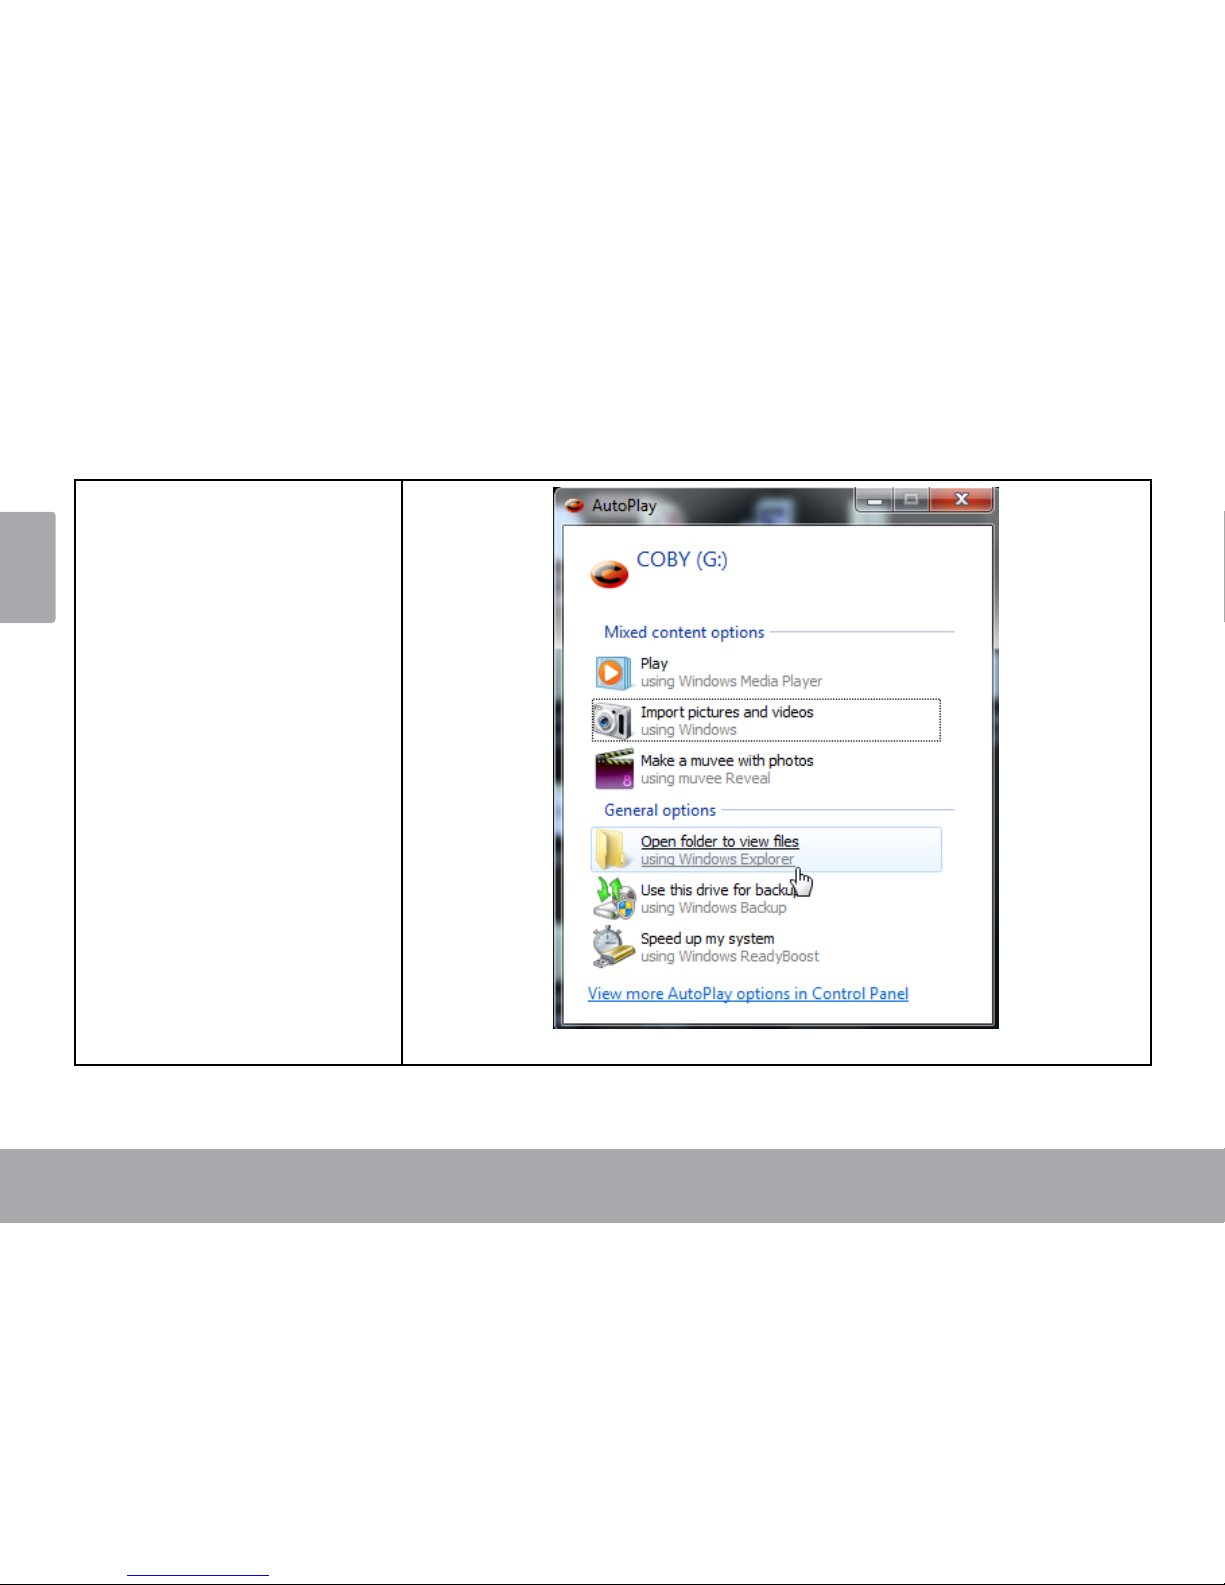
Coby MP820 User manual

EN Touchscreen Video MP3 Player
Quick Start Guide ..............................................Page 2
ES Reproductor de Video y MP3 con Pantalla Táctil
Guía de Inicio Rápido ................................... Pagina 27
FR Lecteur MP3 Vidéo à Écran Tactile
Guide de Démarrage Rapide ............................ Page 52
Please read carefully before use • Léa el manual antes de usar • Veuillez lire ce livret avant utilisation
For series /
Para la serie /
Pour la série
MP820
MP823

Page 2 Thank You
English
ÂÂThankÂYou
Thank you for purchasing the Coby MP & Video Player. This guide is provided to help you get started
quickly with your player; for more detailed instructions, please refer to the instruction manual stored as a
PDF on your player. The manual is also available for download at the Coby website: www.cobyusa.com.
To view PDF documents, download and install the free Adobe Acrobat reader from the Adobe
website at www.adobe.com.
Package Contents
Please make sure that the items shown below are
included in the package. Should an item be miss-
ing, please contact the local retailer from which you
purchased this product.
Coby Video & MP player
USB Cable
Professional Stereo Earphones
Quick start guide
Features
Integrated ash memory
LCD full-color display
Plays music, video, photos and text
ID and LRC support for song and synchronized
lyric information display
Integrated FM Radio
USB . Hi-speed for fast le transfers

Unit At A Glance Page 3
English
ÂÂUnitÂatÂaÂGlance
Name Description
1 <ENTER> Power/Enter.
Press and hold to turn the player on or o.
Press to select an item in a list.
2 <UP> Volume Up.
Press to increase the volume level.
You may also use this button to browse
items in a list.
3 <DOWN> Volume Down.
Press to decrease the volume level.
You may also use this button to browse
items in a list.
4 LCD Touchscreen Touch controls are displayed on the screen.
Tap (or tap and hold) icons with your nger
to control the player.
5 <OPTION>
1
2
3
4
5

Page 4 Unit At A Glance
English
Name Description
6 USB Port Connect to a computer to transfer media
les to the player.
Connect to a computer to charge the player.
7 Headphone Jack Connect a pair of headphones or earphones
with a 3.5mm plug for private listening.
8 <RESET> Reset.
Use a paperclip to press this button to
reinitialize the player if it should freeze or
behave abnormally.
RESET
67
8

Unit At A Glance Page 5
English
Turning the Player On/O
To turn the player on, press and hold the
<ENTER> button until the screen turns on.
To turn the player o, press and hold the
<ENTER> button until the screen turns o.
Resetting the Player
Reset the player if it should freeze and not respond
or otherwise malfunction.
1. Disconnect your player if it is connected to a
computer.
2. Use a paper clip to gently press the <RESET>
button located on the rear of the player.
About the Main Menu
When you turn on the player, you will see the Main
menu. The Main menu gives you access to the dier-
ent function modes of your player. These modes are:
Music: Browse and play music.
Photo: Browse and view Photo.
Video: Browse and play Video.
Radio: Listen to FM radio broadcasts.
Setting: Adjust the player’s options.
Explorer: Browse all les.
Playing: Return to the Now Playing screen.
Text: Browse and read text les.

Page 6 Unit At A Glance
English
Main Menu Controls
Each function mode is represented by an icon on
the Main Menu screen.
To enter a mode, tap the icon with your nger.
To scroll the screen and display other menus,
slide your nger on the screen left or right.
You may also use the player’s standard controls to
access each mode:
To browse through the dierent modes, press
<UP> or <DOWN>.
To select a mode, press the <ENTER> button.
Music Browser Controls.
About the Touchscreen
Your video MP player comes equipped with an
easy-to-use touchscreen which allows access to the
player’s functions. Use your nger tip (or a stylus)
to tap the area of the screen where a control icon is
displayed. If you tap and hold an icon, it will register
as a continuous button press.
To avoid damaging the screen, do not touch
it with excessive force or with any object
other than your nger or a stylus. For best
response, make sure your hands are clean
before using the touchscreen controls.

Getting Started Page 7
English
ÂÂGettingÂStarted
To start playing media on your player:
1. Connect the player to your computer to charge the battery.
2. Install the Coby Media Manager software from the player onto your computer.
3. Use Coby Media Manager to transfer (sync) media les from your computer to the player.
4. Enjoy your synchronized music, video, and photo les on the player!

Page 8 Connect And Charge The Battery
English
ÂÂConnectÂandÂChargeÂtheÂBattery
Upon initial use, the player should be charged fully
to ensure optimal performance and battery life. If
the player has not been used for a long period of
time, the battery may need to be recharged.
With the included USB cable:
1. Connect the small end of the cable to the USB
port of the player.
2. Connect the large end of the cable to an avail-
able USB 2.0 Hi-speed port on your computer.
When the player is connected and charging, the no-
tice “USB Connected” will be displayed on the screen.
The computer must be powered on and not
in sleep mode in order to charge the bat-
tery. The player will not charge if it is con-
nected to a low-power USB port.
If the player is connected to the computer
through a USB hub, the hub must be self-
powered to charge the battery.
The battery used in this device may present
a re or chemical burn if mistreated. Do not
disassemble, incinerate, or heat the battery.
Do not leave the battery in a place subject to
direct sunlight, or in a car with its windows
closed. Do not connect the player to a power
source other than that which is indicated
here or on the label as this may result in the
risk of re or electric shock.

Install Coby Media Manager Page 9
English
ÂÂInstallÂCobyÂMediaÂManager
Please install and use the “Coby Media Manager” (CMM) software provided on the player. Using the CMM
software is the easiest way to:
Transfer (sync) media les to the player
Convert video and audio les to a format compatible with your player
Keep your player’s software up to date
Browse and play your media library on your computer.
Coby Media Manager requires a computer with Microsoft Windows 7/Vista/XP or Macin-
tosh OS X, 100MB hard disk space available, and a USB 1.1 port (USB 2.0 recommended for
high speed transfers).

Page 10 Install Coby Media Manager
English
Microsoft Windows
1. Connect the player to a
computer with the USB
cable provided. Windows
will display an “Autoplay”
screen. Click “Open device
to view les using Win-
dows Explorer”.

Install Coby Media Manager Page 11
English
2. Double-click the player
icon to view the les
stored on the player.

Page 12 Install Coby Media Manager
English
3. Find and double-click the
le “coby-cometlite” and
then wait for the system to
extract the main applica-
tion les.
4. The setup wizard will
launch automatically
once the les have been
extracted. Follow the
on-screen instructions to
complete the installation
process.

Install Coby Media Manager Page 13
English
Macintosh OS X
1. Connect the player to a
computer with the USB
cable provided.
2. Open a nder window.
Click on the ‘Removable
Disk” icon located on
the left side of the nder
window to view the les
stored on the player.
3. Open the “MAC OS X Coby
Media Manager” folder
to view its contents. Find
and then double-click the
le “coby-mediamanager.
dmg”.

Page 14 Install Coby Media Manager
English
4. The setup wizard will
launch. Follow the on-
screen instructions to
complete the installation
process.

Transfer Media To The Player Page 15
English
ÂÂTransferÂMediaÂtoÂtheÂPlayer
Use CMM to transfer media from a computer to the player.
The instruction manual for CMM can be found on your player. You may need to download and install
the free Acrobat PDF reader from Adobe at www.adobe.com/go/getreader/ in order to view the
instruction manual.
1. Connect the player to the
computer with the USB
cable provided.
2. Start the CMM program.

Page 16 Transfer Media To The Player
English
3. To nd music, movies, and
photos on the computer,
click on the Music, Movies,
or Photo tabs located in
the left panel.

Transfer Media To The Player Page 17
English
4. Click to select the les that
you want to synchronize,
then click the “Syncrhonize
selection” button located
at the top of the screen.
Tip
In Windows, hold “Ctrl” or
“Shift” on the keyboard while
clicking with the mouse to
select multiple les.
In Mac OS X, hold “Com-
mand” or “Shift” while click-
ing with the mouse to select
multiple les.

Page 18 Specications
English
ÂÂSpecications
Please visit www.cobyusa.com for the latest product information. Design, specications, and manual are
subject to change without notice.
MP series
Display Type 1.8” TFT LCD @ 128x160
Memory Integrated Flash Memory
Audio Format
Support
MP3, WMA
Video Format
Support
AMV: 160x128, 25fps
Photo Format
Support
JPEG, BMP
Song Info Sup-
port
ID3, Windows Media
FM Frequency
Range
87.5 - 108.0MHz
MP series
PC Interface USB 2.0 (MSC)
Plug and Play
Support
Windows 7/Vista/XP
Macintosh OS X
Audio Output 3.5mm Stereo (Headphone)
Power Rechargeable Li-Poly Battery
USB Charge
Play Time Music: 18 hours*
* Music play time is an estimated value based on playing
an MP3 encoded at 128 kbps. Actual play time may vary
depending on encoding method used and other factors.

Specications Page 19
English
MP series
Display Type 2.0” TFT LCD @ 176x220
Memory Integrated Flash Memory
Audio Format
Support
MP3, WMA
Video Format
Support
AMV: 220x176, 25fps
Photo Format
Support
JPEG, BMP
Song Info Sup-
port
ID3, Windows Media
FM Frequency
Range
87.5 - 108.0MHz
PC Interface USB 2.0 (MSC)
Plug and Play
Support
Windows 7/Vista/XP
Macintosh OS X
MP series
Audio Input Integrated Microphone
Audio Output 3.5mm Stereo (Headphone)
Power Rechargeable Li-Poly Battery
USB Charge
Play Time Music: 18 hours*
* Music play time is an estimated value based on playing
an MP3 encoded at 128 kbps. Actual play time may vary
depending on encoding method used and other factors.

Page 20 Support
English
ÂÂSupport
If you have a problem with this device, please check our website at www.cobyusa.com for Frequently
Asked Questions (FAQ) and product updates. If these resources do not resolve the problem, please contact
Technical Support.
Address Coby Electronics Technical Support
Knowlton Way
Savannah, Georgia
Email techsupport@cobyusa.com
Web www.cobyusa.com
Phone --: Monday to Friday, :AM–:PM EST
Saturday, : AM–:PM EST
--: Monday to Friday, :AM–:PM EST
This manual suits for next models
1
Table of contents
Languages:
Other Coby MP3 Player manuals

Coby
Coby MP-C7057 User manual

Coby
Coby MP-CD450 User manual

Coby
Coby LEDTV2916 Assembly instructions

Coby
Coby MP345-IG User manual

Coby
Coby MP-C7092 - 2 GB Digital Player User manual

Coby
Coby MP-C7052 User manual

Coby
Coby MP-CD500 User manual

Coby
Coby MP-C945 User manual

Coby
Coby MP600-1G User manual

Coby
Coby MP-C351 User manual

Coby
Coby MP601 Series User manual

Coby
Coby MP-C945 User manual

Coby
Coby COBY MP-CD550 User manual

Coby
Coby MP-C885 - 1 GB Digital Player User manual

Coby
Coby MP-C7052 User manual

Coby
Coby MP-C896 User manual

Coby
Coby MPC7095 - 2 GB Digital Player User manual

Coby
Coby MP-C827 User manual

Coby
Coby MPC885 User manual

Coby
Coby MP-300 1GB User manual