CoComm DT200 User manual

Quick guide
DT200


DT200
Quick guide
* Read carefully the instructions contained in this quick start guide before starting to
use the device

(EN) Quick guide
4
Overview
OK
M1 M2 M3 M4
1
2
3
456
7 89
0 #
ABC DEF
JKL
GHI MNO
TUVPQRS WXYZ
1. Notification LED
2. Earphone
3. LCD screen
4. [— ] Left soft key
5. [—] Right soft key
6. Direction and confirmation
buttons
7. [ ] Call key
8. [ ] End call key / Come back
to main menu
9. [ ] Multi-conference key
10. [] Transfer key
1
3
4
6
9
12
14
11
13
10
8
5
16
17
18
19
2
15
7
20
11. Alphanumeric keypad
12. [] Asterisk key and Lock /
Unlock keyboard
13. [ ]Hash key and Silence key
14. [] Speed dial keys
15. Microphone
16. Jack connector (CTIA) for
earphones / hands-free
17. SOS button
18. Speaker
19. Belt clip
20. DC 5V power connector

(EN) Quick guide (EN) Quick guide 5
Installation
1. Remove the battery compartment cover on
the back of the device to install the micro-SIM
card and micro-SD memory card. To install
the micro-SIM card, slide the metal tab to the
right to unlock it, turn it upside down, and
insert the card following the direction shown
in the illustration. Lower the metal tab and
slide it to the left to lock it.
2. Follow the same procedure if you want to
install a micro-SD card, but in this case slide
the metal tab to the left to unlock it, as shown
in the illustration.
3. Insert the battery into it’s compartment,
making sure that the electrodes on the
connector in the terminal match the slots on
the bottom of the battery, as shown.
4. Connect the end of the power adapter cable
to the connector on the back of the charger
cradle, and then connect the power adapter
to an AC outlet.
5. Place the phone on the charging cradle, and
check that the battery level indicator flashes
while the battery charging process is being
completed.
12
12

(EN) Quick guide
6
Precautions for use
This phone complies with current regulations to limit the maximum
output volume. Using headphones at very high volume may cause
hearing damage.
Care and maintenance
●Keep the phone away from children and pets. They could damage the
phone accidentally or choke on small parts. Do not drop or knock the
phone. Rough handling can damage electronic circuits.
●Keep the phone dry and avoid liquids that could corrode the phone. Do
not use the phone with wet hands, which may cause electric shock. Do not
apply paint over the phone, as it can prevent proper operation.
●Do not place the phone in cold areas. When the phone warms up to its
normal operating temperature, moisture can accumulate inside the phone,
which may damage electronic circuits. Do not place the phone in areas of
excessive heat, which may shorten the life of electronic devices, damage
batteries, or melt accessories. Do not place the phone in areas exposed
to sunlight as it may cause overheating. Do not place the phone near
flammable liquids, gases or explosive substances.
●To clean the telephone, use a damp or antistatic cloth. Do not use a dry or
static cloth. Do not use chemicals such as cleaning solvents to clean the
surface of the phone. Turn off your phone before cleaning.
●The manufacturer’s warranty does not cover repair the appliance if the
phone or battery gets wet, or phone label is damaged even when the phone
warranty has not expired.
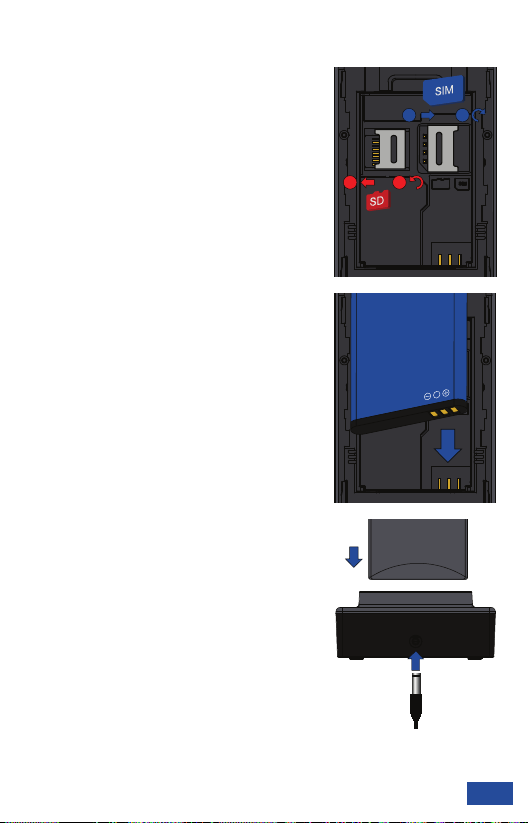
●Always make sure your device is turned off before removing your SIM
card. This will prevent data loss and damage to the SIM card. Do not place
the SIM card near surfaces or electromagnetic environments and avoid
touching the metal connectors.

(EN) Quick guide (EN) Quick guide 7
Precautions for use
Battery use
●Never use any charger or battery if damaged. Use the battery correctly. Do
not short-circuit the battery, as this may damage the battery or cause a fire.
●Do not subject the battery to high temperatures or fire as it may explode.
●Return the old battery to the dealer, or place it in locations designated for
recycling. Do not throw the battery in household waste.
●The charging time depends on the remaining battery charge, the type
of battery and charger used. Use only original chargers, batteries and
accessories approved by the manufacturer.
●The battery can be charged and discharged hundreds of times, but its
duration will gradually decrease.
●When the operation time is noticeably shorter than normal, replace the
battery with a new one.
●Disconnect the charger from the electrical plug and the device when the
phone is not in use.
●Do not overload your battery as it may damage or shorten its life.
●Do not expose the battery to places of extremely hot or cold temperatures,
as it will reduce the battery capacity. The Li-ion batteries are particularly
affected by temperatures below 0° C.
When the battery level is low, the phone will issue a warning tone and a low
battery message. Connect the power adapter into the device to start charging.
Battery level is indicated on the screen during the charging process, and
once it is fully charged, the battery icon will appear full. Charging a completely
discharged battery can comprise 2 to 3 hours.
Fully charge the battery before using the device for the first time.

(EN) Quick guide
8
Display
When the terminal is off, press [ ]for 3 seconds to turn the phone on. The
first time a SIM card is inserted the phone will ask for the PIN code. Then, the
next user interface will be displayed on the screen.
Press [] to access the History. You can also make a call from this interface
by directly dialing the phone number on the keypad.
Use arrow keys [][ ] to decrease and increase the device volume, or press
the [ ]key long to mute the device volume.
A long press of the left softkey, or the [] key takes you to Notify and Switch
screen.
To lock or unlock the terminal, press [ ] for 2 seconds. To turn the device Off
or On, press the [ ] key for 3 seconds.
1. 2G/3G/4G coverage indicator
2. Battery level indicator
3. Status notifications; alarms,
Bluetooth, headsets, etc
4. Network operator
5. Time and date
6. System notifications; SMS
and calls
7. Function assigned to the left
softkey
8. Function assigned to the right
softkey
3
4
5
8
1
2
6
7

(EN) Quick guide (EN) Quick guide 9
Applications menu
Use [ ] or the left softkey to access the application menu. The following
interface will then be displayed.
Use arrow keys [] [ ] [] [ ] to select an application icon, press [ ] or
the left softkey to access it.
Extras
Select the icon and press [ ] to access other applications on the
device such as; Music, Unit Convert, FM Radio,SOS, etc.
From the SOS option you can activate or deactivate the [SOS]key and access
the emergency number settings or create an emergency SMS. You have all the
information about this function in Help.
Messaging
Select the icon and press [ ] to access the phone’s messaging
application. In this application, you can both compose and send SMS text
messages, and check your received messages
1. Contacts
2. History
3. Messaging
4. Calculator
5. Phone
6. Clock
3
6
9
5
1
7
4
2
8
7. Calendar
8. Extra
9. Settings

(EN) Quick guide
10
Calling
Three way calling
1. During an active call, press the left softkey, to access Options, and select
Hold from the pop-up menu to pause the current call.
2. Access Options again, and select Add call, initiate a second call to another
phone number or contact in the phonebook.
1. When the second call is active, press the [ ]key to start the conference
call.
Transfer a call
1. During an active call, press the left softkey, to access Options, and select
Hold from the pop-up menu to pause the current call.
2. Access Options again, and select Add call, initiate a second call to another
phone number or contact in the phonebook.
3. When the second call is active, press the [] key to transfer the call to the
second contact, or press the [] key before the second call is active to
perform a “no query” transfer.
Configuring speed dial keys
1. Access the menu, select the icon and press []to access Phone.
Press Options and select Speed Dial.
2. Select a speed dial key M1-M4, or 2-9 to edit its contents, and select the
contact you wish to associate with the memory key, and press [].
3. In standby mode, press a memory key [ ], or press and hold a key
on the alphanumeric keypad [] to use speed dial. The call will start
automatically. Using the []key will call the voice mailbox.
4. To end the call, press the []key.

(EN) Quick guide (EN) Quick guide 11
Wi-Fi Connection
Setting up a Wi-Fi networks connection
1. Select the icon within the application menu, and press []to access
the system settings menu. Use the arrow keys [][ ] to select Wi-Fi and
press []to access.
2. Press [] on Off, the Wi-Fi function will be activated and display the word
On. All available Wi-Fi networks will be displayed.
3. Use the arrow keys [ ][ ] to select the desired Wi-Fi network and press [
]. A pop-up screen will appear.
4. Enter the password, and use the arrow keys [ ][ ] to select Connect and
press [].
When the Wi-Fi function is on, the icon will be displayed in the notification
bar. When the device is connected to a Wi-Fi network, the icon will
change. A Wi-Fi network that has been previously configured and is within
range of the device will connect directly when the Wi-Fi feature is enabled.
You can turn Wi-Fi On and Off from the Switch screen.
Activate Wi-Fi hotspot
1. Select the icon within the application menu, and press [] to access
the system settings menu. Use the arrow keys [ ][ ] to select Wire
networks settings and press [ ] to access.
2. Use the arrow keys [][ ]to select Tethering & portable hotspot and
press []. Press [] again for Portable Wi-Fi hotspot.
3. Press [ ] on Off, the WI-Fi hotspot will be activated and the word On will
be displayed. The icon will appear in the notification bar.
4. You can change the network name, security or password by [ ] on Set
up Wi-Fi hotspot.
5. To disable the function, press []on On.

(EN) Quick guide
12
Bluetooth�Connection
The Bluetooth� function allows you to pair your telephone with other Bluetooth
devices, allowing you to connect Bluetooth accessories, such as a headset, or
to exchange contacts and media files with other devices.
Paring to a Bluetooth� device
1. Select the icon within the application menu, and press []to access
the settings menu. Use the arrow keys[][ ] to select Bluetooth. Then
press []to activate the Bluetooth function.
2. Make sure that the temporary visibility of both devices is enabled.
3. The devices that are visible within the range of the terminal will be displayed
on the screen. Press []on the device you want to pair with your
telephone, and accept the request in the pop-up window.
When the Bluetooth function is activated, the icon will be displayed on
the notification bar. To deactivate the Bluetooth function, go to the Settings
menu, press [] on Bluetooth, press [ ]again on On. The Bluetooth
function will be switched off immediately. You can also turn the Bluetooth
function On and Off from the Switch screen.
Importing Contacts via Bluetooth
1. Once the devices are paired, access Contacts on your Smartphone and
select Share or Export (depending on the Smartphone), select Share via
Bluetooth, and select the contacts you want to send.
2. A message will appear to confirm the file transfer. Use the arrow keys
[][ ] to select Accept and press [ ].
3. Once sent, the telephone will receive a file in vcf (or vcard) format, you can
access it either in the Notify screen or in the Bluetooth Settings menu by
pressing [] on Show received files.
4. Press [ ]on the file and select the option Contacts to import the contacts
to the DT200 phonebook.

(EN) Quick guide (EN) Quick guide 13
Regulation
SAR certification information
Specific Absorption Rate (SAR) is the unit of measurement for the amount
absorbed radio when using mobile devices. SAR tests are conducted in
standard operating positions with the phone transmitting at its highest certified
power level, however, the actual SAR level of the phone while operating can be
well below the maximum value. In general, the closer you are to a base station,
the lower the power of the phone.
SAR values may vary, depending on the different models of phones. To ensure
the safety and health of users, the phone is designed and manufactured to
meet radio exposure guidelines. The SAR limit recommended by the Council
of the European Union for mobile devices used by the general public is 2 W/kg
and the highest SAR value for this device, which was tested for use at the ear is
for SAR below the recommended limit.
The highest SAR value found during product certification is 1.707 W/kg
averaged over 10g of tissue, measured at the 1 LTE band.
ErP product information
Through this, CO-COMM Servicios Telecomunicaciones S.L. declares that
this product complies with Directive 2009/125/EC and its implementing
regulation (EC) Nº1275/2008 amended by (EC) Nº278/2009, (EC) Nº642/2009,
(EU) Nº617/2013, (EU) Nº801/2013, and its implementing regulation (EC)
Nº278/2009.
The energy consumption of the product, connected to network, in standby,
and with all its physical and wireless interfaces connected, is 0.036 W.
For the information required by the regulations (EU) Nº801/2013 that appears
on websites free access for manufacturers, visit http://www.cocomm.es.

(EN) Quick guide
14
Regulation
CO-COMM Servicios Telecomunicaciones S.L. declares that
this product meets the essential requirements and other relevant
provisions of Directive 2014/53/UE (RED), of the European Parliament and the
Council of April 16, 2014.
You can obtain a copy of the declaration of conformity with the directive
mentioned by sending an email to the address clientes@cocomm.es, adding
the word DoC in the Subject line, and specifying the lot number of the product
in the body of the message. This product can be used in all EU countries (and
other countries following the 2014/53/UE directive).
This product complied with Directives 2012/19/EU (WEEE
Directive) and 2011/65/EU (RoHS2 Directive) and Regulation (EC)
Nº1907/2006 (REACH), and bears the selective sorting symbol for
waste electrical and electronic equipment (WEEE). This means that
this product must be handled pursuant to European Directive 2002/96/EC in
order to be recycled or dismantled to minimize its impact on the environment.
For further information, please contact your local or regional authorities. In the
final product’s price is included the environmental management cost of the
electronic residues, as it is established legally in the R.D. 208/2005.
Bluetooth mark and logos are owned by Bluetooth SIG, Inc.
Wi-Fi, Wi-Fi Protected Access, Wi-Fi Protected Setup and
WPA are trademarks of the Wi-Fi Alliance.
All other trademarks, products, services and company names mentioned
herein belong to their respective owners.
Copyright © CO-COMM Servicios Telecomunicaciones S.L. 2020. All rights
reserved. CO-COMM Servicios Telecomunicaciones S.L. reserves the right
to change or modify any information or specifications contained in this quick
guide without previous notice.

(EN) Quick guide

Copyright © CO-COMM
Servicios Telecomunicaciones S.L. 2020
All rights reserved
Other manuals for DT200
2
Table of contents
Other CoComm Telephone manuals