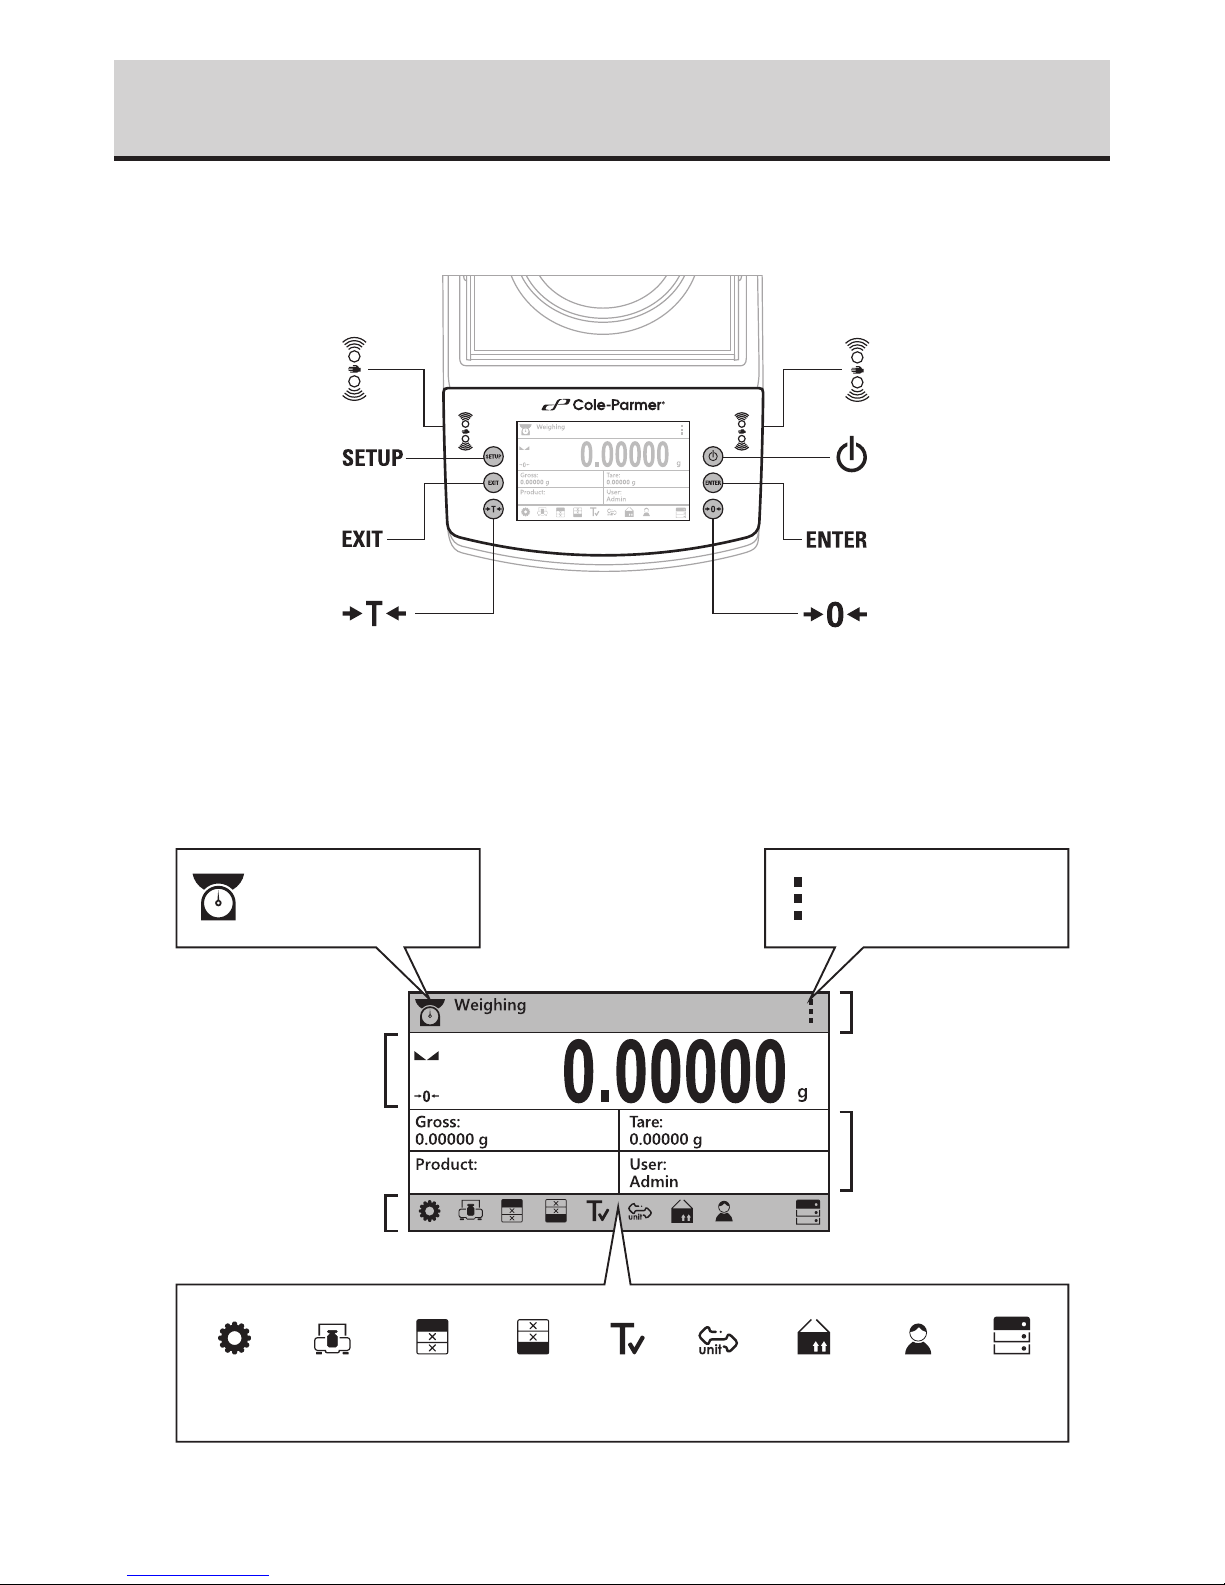
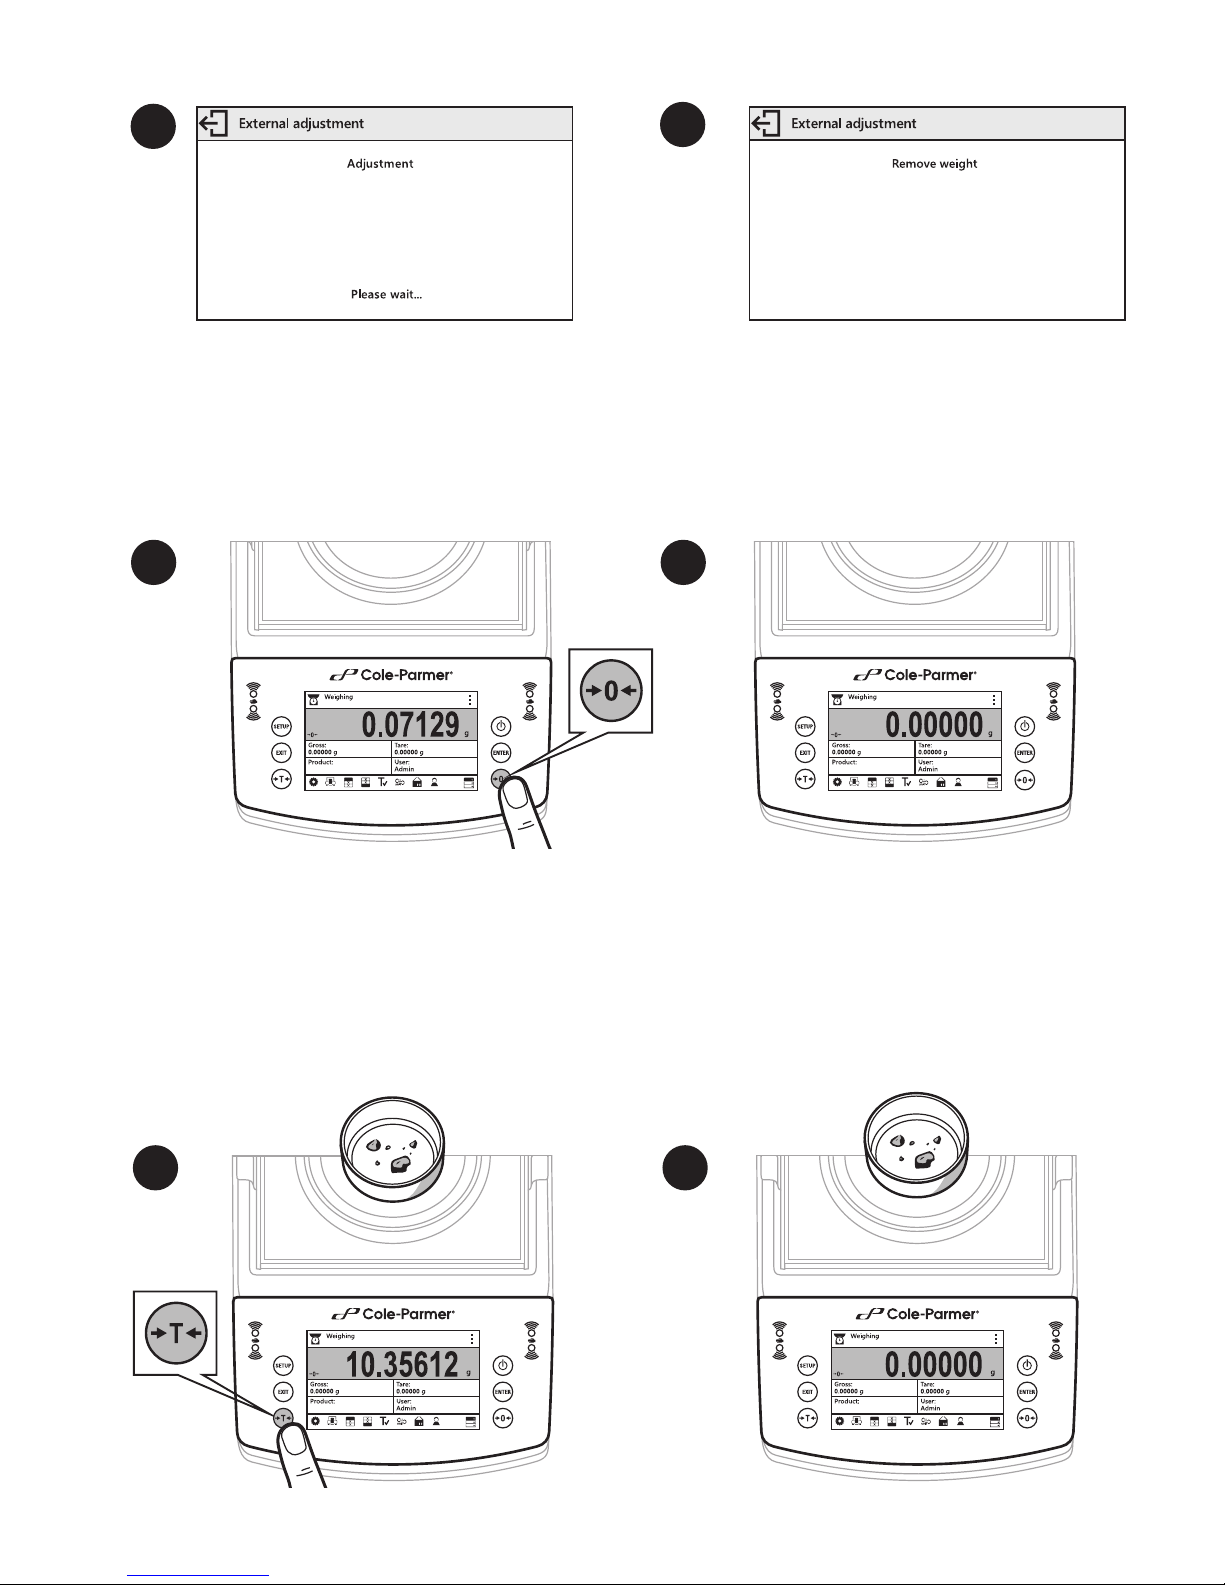
Cole Parmer TA-225.C User guide

TA and TT
Start up Guide
Balance Series


1. CONTENT
Balance
x 1
Power adapter
x 1
Centring ring
x 1
Bottom insert
x 1
Models: TA-225.C | TA-64
Weighing pan
x 1
Draft shield
x 1
Weighing pan
x 1
Balance
x 1
Power adapter
x 1
Draft shield
x 1
Bottom insert
x 1
Models: TA-164.C | TA-224.C | TA-314.C | TA-164 | TA-224 | TA-314
Weighing pan
x 1
Balance
x 1
Power adapter
x 1
Draft shield
x 1
Grounding foot
x 1
Foot
x 3
Models: TT-363.C | TT-603.C | TT-1003.C | TT-363 | TT-603 | TT-1003
Weighing pan
x 1
Weighing pan
x 1
Balance
x 1
Foot
x 3
Grounding foot
x 1
Models: TT-2102.C | TT-4502.C | TT-2102 | TT-4502 | TT-6001 | TT-10001
Balance
x 1
Foot
x 1
Draft shield
x 1
Grounding foot
x 1
Models: TT-6002.C | TT-6002
Power adapter
x 1
Power adapter
x 1
Balance
×1Weighing pan ×1Draft shield
1 ×1
Power adapter
x 1
Models: TT-10102.C

2. WORKROOM AND BASIC OPERATION GUIDELINES
3. UNPACKING
Place the balance away from heat
sources. Avoid exposing the balance
to the sunlight.
Avoid air drafts and air movements
at the workstation.
Avoid exposing the balance to a
magnetic field. Do not weigh
magnetic substances.
Make sure that the balance is placed
on an even surface.
Do not place the balance in a hazardous
area. Do not weigh explosive materials.
Do not place the balance on an unstable
ground exposed to shocks and vibrations.
+104oF
+40 oC
+50oF
+10 oC
Operate the device in a room where the temperature ranges between 10–40 °C
(50–104 °F) and where the relative humidity is below 80%.
Place the balance on a solid surface to ensure stability. To obtain stable and
repeatable weighing results, an anti-vibration table is recommended.
Keep the packaging should a warranty
claim or service be required.
TOP
1 2 3

1 2
Models: TT-363.C | TT-603.C | TT-1003.C | TT-2102.C | TT-4502.C | TT-6002.C | TT-363 | TT-603 | TT-1003 |
TT-2102 | TT-4502 | TT-6001 | TT-10001
Models: TT-363.C | TT-603.C | TT-1003.C | TT-2102.C | TT-4502.C | TT-6002.C | TT-363 | TT-603 |
TT-1003 | TT-2102 | TT-4502 | TT-6001 | TT-10001
4. ACTIVITIES TO BE DONE PRIOR TO OPERATION
4.1. Remove transport lock
Models: TA-225.C | TA-164.C | TA-224.C | TA-314.C | TA-64 | TA-164 | TA-224 | TA-314
Grounding foot
Keep the transport
lock should a
warranty claim or
service be required.
Keep the transport
lock should a
warranty claim or
service be required.
Check the grounding spring.
Make sure that the grounding
spring juts slightly out of the
hole.
Check the grounding spring.
Make sure that the grounding
spring juts slightly out of the
hole.
4.2. Grounding spring check
Models: TA-225.C | TA-164.C | TA-224.C | TA-314.C | TA-64 | TA-164 | TA-224 | TA-314
12

5. COMPONENTS ASSEMBLY
234
1 2 3
1 2 3
1 2
1 2 3
1
Install the
grounding foot
in a freely
selected
opening.
Install the
grounding foot
in a freely
selected
opening.
Install the
grounding foot
in a freely
selected
opening.
Models: TT-6002.C | TT-6002
Models: TT-2102.C | TT-4502.C | TT-2102 | TT-4502 | TT-6001 | TT-10001
Models: TA-164.C | TA-224.C | TA-314.C | TA-164 | TA-224 | TA-314
Models: TA-225.C | TA-64
Models: TT-363.C | TT-603.C | TT-1003.C | TT-363 | TT-603 | TT-1003
1
Models: TT-10102.C
2

6. PREPARING FOR WORK
6.1. Balance temperature stabilization time
Prior to switching the device on,it is necessary
to ensure that ithas reached a temperature
equal to room temperature.
Connect the power adapter to DC connector. Connect the power adapter to the mains.
To level the balance, turn its feet and keep
turning the feet until the air bubble takes
the central position.
Balance temperature stabilization time ranges
between 1 - 8 hours.
BUS 1 USB 2
Ethern

7. PANEL AND SCREEN
Switching on / off
Confirming an operation
or printing a report
Zeroing
Displaying previous
screen
Taring
Proximity sensor
Proximity sensor
Entering balance
setup
7.1. Panel keys
7.2. Home screen
Status bar
Editable information fields
(labels, text fields and buttons)
Editable tool bar with quick
access keys
Weighing result window
Parameters Header
printout
Footer
printout
Adjustment Tare UnitsUnits Operators
database
Databa-
ses
Working modes list List of current working
mode functions

8.1. Adjustment-TA.C AND TT.C Models
8. BASIC OPERATIONS
2
1
Press "Adjustment" button. Wait for the process completion.
Mass
standard [g]
1 000
2 000
5 000
5 000
10 000
TT-1003
TT-2102
TT-4502
TT-6002
TT-6001
TT-10001
Balance
model
Mass
standard [g]
50
100
200
200
200
500
TA-64
TA-124
TA-214
TA-314
TT-363
TT-603
Balance
model
Prior adjustment prepare the right
mass standard. You are recommended
to use mass standard of class F1 or F2.
View the table and select the mass
standard you need.
External adjustment is carried out using an external
mass standard of the right accuracy and weight
value, which value depends on balance type and
capacity.
8.2. Adjustment-TA AND TT Models
21
Press "Adjustment" button. Unload the weighing pan and press
button for confirmation.
43
Load the weighing pan with mass standard and
press button for confirmation.
Wait for completion of the start mass
determination process.
1 000

8.4. Taring
21
Unload the weighing pan and press
"Zeroing" button.
The balance has been zeroed.
The balance has been tared.
21
When the weighing result has been displayed
press "Tare" button.
Wait for the process completion. Unload the weighing pan.
8.3. Zeroing
56

8.5. Working modes / units selection
9.1. Administrator's login
2
4
1
3
9. SETTINGS
Press "Operators" button.
You have logged in the administrator.
Press the pictogram to view list of all
available working modes.
Press the pictogram to view
list of all available units.
Working modes list:
Weighing
Dosing
Checkweighing
Formulas
Percent weighing
Statistics
Parts counting
Animal weighing
Solids density
Liquids density
Peak hold
Users list is displayed, select Admin option.
Units list:
g
mg
ct
lb
oz
ozt
dwt
tlh
tls
tlt
tlc
mom
gr
ti
N
b
aht
tola
msg
u1
u2
Some balance settings are accessible for Administrator exclusively.
Prior balance parameters setup, log in as the Administrator.
Press 123 button to activate numeric keyboard. Enter
"1111" password and press button to confirm.

9.2. User settings
43
Press "Add" button. Select "Name" parameter.
User name has been entered.
65
7
21
Press "Databases" button. Select Operator database.
Enter user name.
Following the above procedure, set remaining parameters:
Code:
Enter user ID
Password:
Enter user password
Access levels:
Set respective access level (user, advanced, admin)
Prior balance users setup, log in as the Administrator.

You can assign the proximity sensors with different functions for each working mode (the sensors will trigger
different operation for each working mode). The diagram presents sensors setup for the weighing mode.
In order to set left sensor function repeat steps 5 and 6, this time select Left Sensor parameter. Following the
above procedure you can also set sensors for remaining working modes.
9.3. Proximity sensors setup
1 2
3 4
56
Press "Parameters" button.
Select Weighing parameter.
Parameters list is displayed, select
Working Modes parameter.
Select Proximity Sensors parameter.
Select Right Sensor parameter. Select function that is to be assigned to the
right proximity sensor.
Prior proximity sensors setup, log in as the Administrator.

10. PERIPHERAL DEVICES CONNECTORS
DB9
USB-A RJ45USB-B
DB9
Power adapter
Computer
Keyboard
Barcode
scanner
Computer Printer
Computer Printer
Printer
Barcode
scanner
Additional
display
Computer Printer
Barcode scanner
Additional
display
USB
USB 1 USB 2 Ethernet
Ethernet
RS 232 RS 232
USB
DC

11.1. General Recommendations
11. DEVICE CLEANING
Avoid using cleansers containing chlorine, corrosive chemicals and bleach. Do not use
cleansers containing abrasive substances or scouring preparations.
Prior to cleaning, it is necessary to
disconnect th e balance from the mains.
Use soft cloths made of microfiber,
natural fiber or man-made fiber. Avoid
using abrasive cloths or cloths that might
scratch the surface.
Apply the cleanser onto the cloth first.
Avoid applying the cleanser directly
onto the device.
11.3. Plastic components
Prior to cleaning the plastic housing, it is necessary to disassemble
weighing pan components (cover, weighing pan, etc.).
Clean plastic components using a solution of water and detergent
(liquid soap, dish-washing detergent, glass cleaner, etc.).
11.2. Glass components
Prior to cleaning the glass panes, it is necessary to disassemble them first.
For detailed instruction on panes disassembly, refer to user manual.
Clean glass components using a solution of water and detergent (liquid soap,
dish-washing detergent, glass cleaner, etc.). In case of heavy contamination,
a mild solution of vinegar or baking soda can be used.
11.4. Stainless steel components
Prior to cleaning the stainless steel components, it is necessary
to disassemble them first.
Clean stainless steel components using a solution of water and detergent
(liquid soap, dish-washing detergent, glass cleaner, etc.). In case of heavy
contamination, a mild solution of vinegar or baking soda. can be used.


625 East Bunker Court Vernon Hills
IL 60061 USA
Phone: 1-800-323-4340
Fax: 1-847-247-2929
E-Mail: sales@coleparmer.com
Other manuals for TA-225.C
1
This manual suits for next models
21
Table of contents
Other Cole Parmer Scale manuals

Cole Parmer
Cole Parmer IPSW-400 Series User manual

Cole Parmer
Cole Parmer IBS-200 User manual

Cole Parmer
Cole Parmer LB-200 Series User manual

Cole Parmer
Cole Parmer PBL-602 User manual

Cole Parmer
Cole Parmer B2 Series User guide

Cole Parmer
Cole Parmer MB-800 Series User manual

Cole Parmer
Cole Parmer Balance LA Series User guide

Cole Parmer
Cole Parmer IPSW Series User manual

Cole Parmer
Cole Parmer CS-200 User manual

Cole Parmer
Cole Parmer TA-225.C User manual