Comfee KWH-TD305-W User manual

A
B
C
A
B
C
D
12
12
日 期
处数 分区
标记 更改文件号 签 名
张
第
张
共
佛山市顺德区美的
洗涤电器制造有限公司
数量
阶 段 标 记
量重
比 例 D
REV.
1
D
1
1
1:1
排版
审 核
编 制
性能
批 准
80G双胶
日期
校对
审 定
技术要求:
1.该 手册 印刷 颜色 均为 黑色 : PA NT ON E BL AC K C
2.纸 张规 格为A
3.如果供应商的排版需要加空白页,请加在封底前
4
6720602490
用户手册
KWH-TD305-W(2605)
COMFEE(英国)
01

Please keep it as a refer
in the later days.
KWH-TD305-W
service_uk@midea.com

QUICK USER GUIDE
Please read the corresponding content on the instruction manual for detailed
operating method.
Connected to power supplies
or
Fix the drain pipe with the back pipe of the machine.The interface
is fitted with clamps and tightened with a screwdriver.
Fix the drain pipe with
suction cups
The connection of the drain pipe: Put end of the drain into a sink or bucket.
Add water into the dishwasher’s tank
There are two ways of prompting the tank that full of water .
1. Before starting:
When the tank is full of water, the machine will beep
fleetly for 3 seconds.
2. After starting :
Water is not enough, light is on;
Water is enough, light will be off and the machine will
beep fleetly for 3 seconds.
Remove the larger residue
Please remove the large residue before placing.
The power supply is 220-240V AC 50Hz
the specification of the socket is 10A 250V AC
There are two ways to add water into the tank:
or
1
2
1
2
Connect inlet hose to the tap;
Open the cap and add water into the dishwasher’s
tank manually
Note: Before adding water , you need to press power
button to turn on the diswasher
Water Inlet
Drain Pipe
Power cord
or

Close the door, select the program and start the dishwasher
Open the door, placing the dishes and adding detergent
Placing order by size and from the two sides to the middle. All cutlery
are suggested to be tilted to improve cleaning preformance.
The arm will be blocked with the improper placement of the cutlery
and cleaning effect may not be ideal.
Left Right
Pull open
DO NOT place the dishwares
in the upper direction or may
affect the cleaning preformance.
Try to leave the dirty face
towards the spray arm.
The place is for adding the detergent

To Wash Feeding Bottles
10-1
10-1
10-2

IMPORTANT SAFETY INSTRUCTIONS
WANING
When using your dishwasher, follow the
precautions listed below:
This appliance is intended to be used in household
and similar applications such as:
-staff kitchen areas in shops, offices and other
working environments;
-farm houses;
-by clients in hotels, motels and other residential
type environments;
-bed and breakfast type environments.
This appliance can be used by children aged from 8
years and above and persons with reduced physical,
sensory or mental capabilities or lack of experience
and knowledge if they have been given supervision
or instruction concerning use of the appliance in a
safe way and understand the hazards involved.
Children shall not play with the appliance. Cleaning
and user maintenance shall not be made by children
without supervision.(For EN60335-1).
This appliance is not intended for use by
persons(including children )with reduced physical,
sensory or mental capabilities, or lack of
5

Earthing instructions
experienceand knowledge, unless they have been
given supervision or instruction concerning use of
the appliance by a person responsible for their
safety(For IEC 60335-1).
This appliance is for indoor use only, for household
use only.
To protect against the risk of electrical shock, do not
immerse the unit, cord or plug in water or other
liquid.
Please unplug before cleaning and maintaining the
appliance.
Use a soft cloth moisten with mild soap, and then use
a dry cloth to wipe it again.
This appliance must be earthed. In the event of a
malfunction or breakdown, earthing will reduce the
risk of an electric shock by providing a path of least
resistance of electric current. This appliance is
equipped with a cord having an equipment-
earthing conductor and a earthing plug.
The plug must be plugged into an appropriate
outlet that is installed and earthed in accordance
with all local codes and ordinances.
6

General use
Do not modify the plug provided with the appliance;
If it does not fit the outlet. Have a proper outlet
installed by a qualified electrician.
Improper connection of the equipment-earthing
conductor can result in the risk of an electric shock.
Check with a qualified electrician or service
representative if you are in doubt whether the
appliance is properly earthed.
Do not abuse, sit on, or stand on the door or dish rack
of the dishwasher.
Do not operate your dishwasher unless all enclosure
panels are properly in place.
Open the door very carefully if the dishwasher is
operating, there is a risk of water squirting out.
Do not place any heavy objects on or stand on the
door when it is open. The appliance could tip forward.
When loading items to be washed:
1) Locate sharp items so that they are not likely to
damage the door seal;
2) Knives and other utensils with sharp
points must be loaded in the basket with their
points down or placed in a horizontal position.
Check that the detergent powder is empty after
completion of the wash cycle.
Warning:
7

Do not wash plastic items unless they are marked
dishwasher safe or the equivalent. For plastic items
without mark, check the manufacturer's
recommendations.
Use only detergent additives designed for an
automatic dishwasher.
Never use soap, laundry detergent, or hand washing
detergent in your dishwasher
Children should be supervised to ensure that they do.
not play with the appliance.
The door should not be left open, since this could
increase the risk of tripping.
If the supply cord is damaged, it must be replaced by
the manufacturer or its service agent or a similarly
qualified person in order to avoid a hazard.
During installation, the power supply must not be
excessively or dangerously bent or flattened.
Do not tamper with controls.
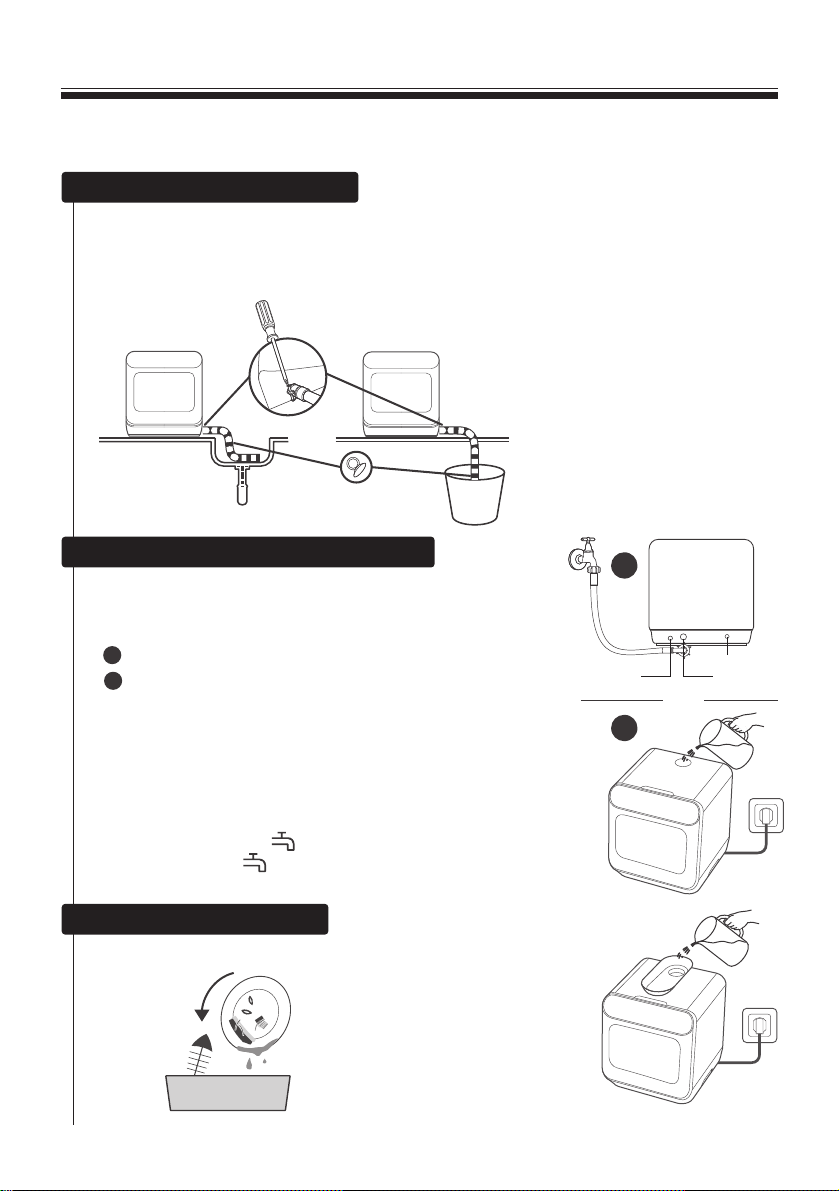
The appliance is to be connected to the water mains
using new hose sets and that old hose-sets should
not be reused.
The maximum number of place settings to be
washed is .
The maximum permissible inlet water pressure is
1MPa.
The minimum permissible inlet water pressure is
0.04MPa.
3
.
8

Disposal
For disposing of package and the
appliance please go to a recycling
centre. Therefore cut off the power
supply cable and make the door closing
device unusable.
Cardboard packaging is manufactured from
recycled paper and should be disposed in the waste
paper collection for recycling.
By ensuring this product is disposed of correctly, you
will help prevent potential negative consequences
for the environment and human health, which
could otherwise be caused by inappropriate waste
handling of this product.
For more detailed information about recycling of
this product, please contact your local city office
and your household waste disposal service.
DISPOSAL: Do not dispose this product as unsorted
municipal waste. Collection of such waste separately
for special treatment is necessary.
9

GETTING TO KNOW YOUR APPLIANCE
IMPORTANT:
Before using this dishwasher for the first time and to get the best performance,
read these instructions.
Dishwasher features
Control panel
Kick board
Cap of water tank
Upper spray arm
Salt container
Filter
Basket
Tableware basket
The place to
Add detergent
Lower spray arm
10-1
Water tray Water kettle

To Wash Feeding Bottles
Feeding bottle rack will help to hold your feeding bottles during washing. It can load 2
sets of feeding bottles at the same time.
10-2

Buttons
Press the button to select Intensive program. For heavily soiled
items include pots and pans with dried-on food.
Press the button to select ECO program. This is the standard
program suitable for normally soiled loads, such as pots, plates,
glasses and lightly soiled pans.
Press the button to select Glass program. For lightly soiled
crockery and glass. Press and together for 3 seconds to
start self-clean program to provides an effective cleaning of the
dishwasher itself.
Press the button to select 58min wash program.
Press the button to select Rapid wash program. A shorter wash for
lightly soiled loads that do not need drying. Press and
together for 3 seconds to switch on/off auto door opening function
in all the programs.
Control panel
Power
1
Intensive
3
To turn on and off.
Press the button to select Hygiene 72° program.
ECO
2Hygiene 72°
58min wash
4
Glass
5
6
Rapid
7
Delay -
8
11
Press this button to reduce the delayed hours for washing.
One press on this button reduce the delay of the start of washing
by one hour.
45
67
12 3 456789 1011 12

Digital Display
Press this button to set the delayed hours for washing.
You can delay the start of washing up to 24 hours. One press
on this button delays the start of washing by one hour.
Delay +
9
To show the remaining time and delay time, functions,
error codes etc.
Press and together for 3 seconds to activate or inactivate
child lock. Child lock allows you to lock the buttons except the
Power button.
98
10
11
12
Control panel
Start/Pause To start the selected washing program or pause it when the
dishwasher is working.
.
Screen
Salt
If the “ ” indicator is lit, it means the dishwasher is
low on dishwasher salt and needs to be refilled.
Water Faucet
If the “ ” indicator is lit, it means the water faucet
closed.
Auto Open
If the “ ” indicator is lit, it means the door will open
automatically for better drying.
Child lock
If the “ ” indicator is lit, it means the child lock is on.
Self Clean
If the “ ” indicator is lit, it means the self-clean program
is running.
12
The color of the ring will turn red if the water temperature is over
59 °C.
Light ring

USING YOUR DISHWASHER
If your model have no water softener, you may skip this section.
NOTE
Loading the salt into the softener
Always use salt intended for use with dishwasher. The salt container is located
beneath the basket and should be filled as follows:
Only use salt specifically designed for dishwashers use!
Every other type of salt not specifically designed for dishwasher use,
especially table salt, will damage the water softener. In case of
damages caused by the use of unsuitable salt the manufacturer does
not give any warranty nor is liable for any damages caused.
Only fill with salt before running a cycle.
This will prevent any grains of salt or salty water, which may have
been spilled, remaining on the bottom of the machine for any period
of time, which may cause corrosion.
WANING
A. Remove the basket and then unscrew and remove the cap from the salt container.
B. Before first wash, add 1lt. of water in the salt container of your machine.
C. Place the end of the funnel (if supplied) into the hole and introduce about, 0.13kg
of salt. It is normal for a small amount of water to come out of the salt container.
D. After filling the container, screw the cap tightly back clockwise.
13

Step 2: select a certain level of salt consumption
Press the button to select the proper set according to your local
environment, the sets will change in the following sequence:
H1->H2->H3->H4->H5->H6.
Rapid
Step 3: Exit the status of salt adjustment
Without any operation in five seconds, the machine will exit from set
mode, the machine is into standby status.
Step 1: Enter the status of salt adjustment
Close the door, within 60 seconds after power on, press button
and hold for 5 seconds, the machine will enter setting mode.
Rapid
NOTE
The salt container must only be refilled when the salt warning light in the
control panel comes on. Depending on how fully the salt dissolves, the salt
warning light may still be on even though the salt container is filled.
If there is no salt warning light in the control panel (For some Models), you
can judge when to load the salt into the softener by the cycles that the
dishwasher had run.
If there are spills of the salt, a soak or a rapid program should be run to
remove the excess salt.
Please follow the steps below for adjustment in salt consumption.
Adjusting Salt Consumption
E. Usually, the salt warning light will be cease to be illuminated within 2-6 days
after the salt container has been filled with salt.
F. Immediately after filling the salt into the salt container, a washing programme
should be started (Suggest choose rapid program). Otherwise filter system, pump
or other important parts of the machine may be damaged by salty water. It is out
of warranty.
14

There are 6 levels of salt consumption in all. It is recommended to select the level
according to below table:
1) German degree of measurement for the water hardness
2) millimol, internationel unit for water hardness
3) factory setting
Contact your local water board for information on the hardness of your water supply.
0 - 5
6 - 11
12 - 17
18 - 22
23 - 34
35 - 55
dH
0 - 0.94
1.0 - 2.0
2.1 - 3.0
3.1 - 4.0
4.1 - 6.0
6.1 - 9.8
Mmol/l
Digital display stalls
WATER HARDNESS
H1
H2
H3
H4
H5
H6
Setting on the
water softener
1
2
3
4
5
6
1) 2)
3)
Loading the dishwasher baskets
Recommendation
Consider buying utensils which are identified as dishwasher-proof.
Use a mild detergent that is described as 'kind to dishes'. If necessary, seek further
information from detergent manufacturers.
For particular items, select a program with as low temperature as possible.
To prevent damage, do not take glass and cutlery out of the dishwasher immediately
after the program has ended.
15
Salt consumption(gram/cycle)
0
4
8
13
20
40

Not suitable for use:
Cutlery with wooden, horn, china or
mother-of-pearl handles
Plastic items that are not heat resistant
Older cutlery with glued parts that are
not temperature resistant
Bonded cutlery items or dishes
Pewter or copper items
Crystal glass
Steel items subject to rusting
Wooden items
Items made from synthetic fibres
(For the best performance of the dishwasher, follow these loading guidelines.
Features and appearance of baskets and cutlery baskets may vary from your model.)
Scrape off any large food paritcles. Soften remnants of burnt food in pans. It is not
necessary to rinse the dishes under running water. Place objects in the dishwasher in
following way:
Items such as cups, glasses, pots/pans, etc. are face downwards.
Curved items, or those with recesses, should be loaded at aslant so that water can
run off.
All utensils are stacked securely and can not tip over.
All utensils are placed in the way that the spray arms can rotated freely during washing.
Attention before or after loading the dishwasher baskets
Limited suitability:
Some glasses can become dull
after a large number of washes.
Silver and aluminium have a
tendency to discolour during
washing.
Glazed patterns may fade if
washed frequently.
Suitability of use in the dishwasher
Very small items should not be washed in the dishwasher as they could
easily fall out of the basket.
NOTE
Load hollow items such as cups, glasses, pans etc. with the opening facing
downwards so that water cannot collect in the container or a deep base.
Dishes and items of cutlery must not lie inside one another, or cover each other.
To avoid damage to glasses, they must not be touched.
Long bladed knives stored in an upright position are a potential hazard!
Long and/or sharp items of cutlery such as carving knives must be positioned
horizontally in the basket.
Please do not overload your dishwasher. This is important for good results and for
reasonable energy consumption.
16

Small-size dishware will drop through the basket and block the rotation of spray arm.
Flip the dishware support inward to support the small-size dishware.
Use of the dishware support
17

Loading basket
Position the dishes and cookware so that they will not get moved by the spray of
water.
18
Loading the basket according to EN50242
99
1
2
3
4
5
6
7
8
9
Item
Number
Oval Plate
Dinner Plate
Soup Plate
Dessert Dish
Saucer
Small Serving Bowl
Medium Serving Bowl
Glass
Cup
55
11
22
33
44
55
66
77
88
88
99
Table of contents
Other Comfee Dishwasher manuals

Comfee
Comfee CS14EFSBK1RCM User manual

Comfee
Comfee KWH-TD602E-S User manual

Comfee
Comfee 348250 Wiring diagram

Comfee
Comfee CDC17P0ABB User manual

Comfee
Comfee CDC17P0AWW User manual

Comfee
Comfee CGV612di Instruction manual

Comfee
Comfee MFD42S110W-IT User manual

Comfee
Comfee CDC17P2AWW User manual

Comfee
Comfee CDC22P4AWW User manual

Comfee
Comfee CDC22P2AWW User manual