manuals.online logo
Brands
  1. Home
  2. •
  3. Brands
  4. •
  5. ComfortHeat
  6. •
  7. Heating System
  8. •
  9. ComfortHeat MTD3 User manual

ComfortHeat MTD3 User manual

ComfortHeat Australia © 2020
www.comfortheat.com.au
ComfortHeat
Hydronic & Electric Floor Heating Systems
MTD3 MANUAL
CABLE ARRANTY & SUGGESTED FLOOR TEMPERATURES
A Comfort Heat floor heating system has been installed in your floor. Floor heating warms from the
ground up providing an unparalleled feeling of comfort. This heating system is controlled by an
electronic thermostat and floor sensor for optimum temperature control and efficiency.
PRIOR TO TURNING ON
Concrete slabs, screeds and tile glues must be fully cured before turning the heating system on. ait at least 3 weeks and
when turning on for the first time, increase the floor temperature gradually over 2-3 days.
Under carpet and timber systems can be turned on once installation is complete.
AREAS TILE [BATH] TILE [LARGE AREA] INSLAB CARPET TIMBER
SUGGESTED TEMPERATURE 24-28ºC 21-22ºC 21ºC 19-21ºC 24ºC
CABLE ARRANTY 10 years 10 years 10 years 5 years 5 years
MTD3 DETAILS
The MTD3 thermostat is a manual ON/OFF thermostat you set to a fixed temperature. Once the floor reaches the set
temperature, the system will turn ON and OFF automatically maintaining the fixed temperature.
TECHNICAL DATA - MTD3
Supply Voltage: 240VAC, 50/60hz
Output Relay: 16A SPST, 3600 max
Switching Differential: 0.4 degC
Built-in Switch: 2 pole 16A
Temperature Range: 0/+40 degC
Housing/protection: IP21
Dimensions (Hx xD): 115mm x 84mm x 40mm
Sensor Length: 3m
Mounted: Vertical/Horizontal Flush mounted
arranty: 2 years
ComfortHeat Australia © 2020
www.comfortheat.com.au
ComfortHeat
Hydronic & Electric Floor Heating Systems
MTD3 OPERATION SETTINGS
TURNING ON
> Open the front cover of the thermostat and slide the power switch ON.
> Press red(up) and blue(down) button to set the fixed set point temperature
> Press Menu/Select [grey] button to set.
The thermostat screen is set to display the set point temperature and not the current running temperature.
The three heating squiggles at the top of the thermostat screen will turn on when the floor is heating.
I
O
SET POINT TEMPERATURE
UP
MENU/SELECT
DO N
HEATINGCLOCK
FROST
NIGHT SETBACK
ON/OFF
LOCK
RUNNING GUIDELINES
Due to the MTD3 being a manual thermostat, it is typically used in small areas, at low temperatures, and not turned ON/
OFF daily. The temperature is set and the thermostat is left to maintain a fixed temperature 24/7.
The MTD3 is also used with large in-slab areas which are connected to a dedicated off-peak circuit. Slabs have a large
thermal mass and the ability to store heat for long periods of time. Heating slabs during off-peak times is a cost efficient
heating option. Please note it must be a dedicated off-peak circuit. Electricity calculated via smart meters and time of
use require a digital M D5 thermostat providing the ability to programme heating at off peak times.
CHILD LOCK
> Press and hold the up and down arrow buttons simultaneously, until a lock appears onscreen.
> Press and hold the up and down arrow buttons simultaneously, until a lock disappears.
CHANGE FRONT COVER
The MTD3 comes with an alternate plain cover plate for a minimal look. To change the cover;
> Open the cover wide
> Hold plate close to the thermostat and pull down.
> Align alternate cover at top of thermostat and apply pressure on the bottom.
ComfortHeat Australia © 2020
www.comfortheat.com.au
ComfortHeat
Hydronic & Electric Floor Heating Systems
TROUBLE SHOOTING
If an error message occurs, the thermostat will display one of the following errors;
E0 : Internal failure. The thermostat is defective. Thermostat must be replaced.
E1 : Internal room sensor defective or short-circuited. Thermostat must be replaced.
E2 : External floor sensor disconnected, defective or short-circuited. Requires floor sensor reconnection or
replacement.
E5 : Internal overheating. Installation requires inspectIon.
SETTING PARAMETER VALUES – MENU MODE
Parameter settings allows you to set a range of values to define heating options and temperatures.
See the MTD3 included manual to view the full range of parameter options. Most default values need no adjustment.
To enter menu mode;
> Press Menu/Select button for 5 seconds.
> Scroll through menu options with arrow buttons
> Press Menu/Select to enter selection. [See full instruction manual]
> Scroll down to [donE] and press Menu/Select to exit menu mode.
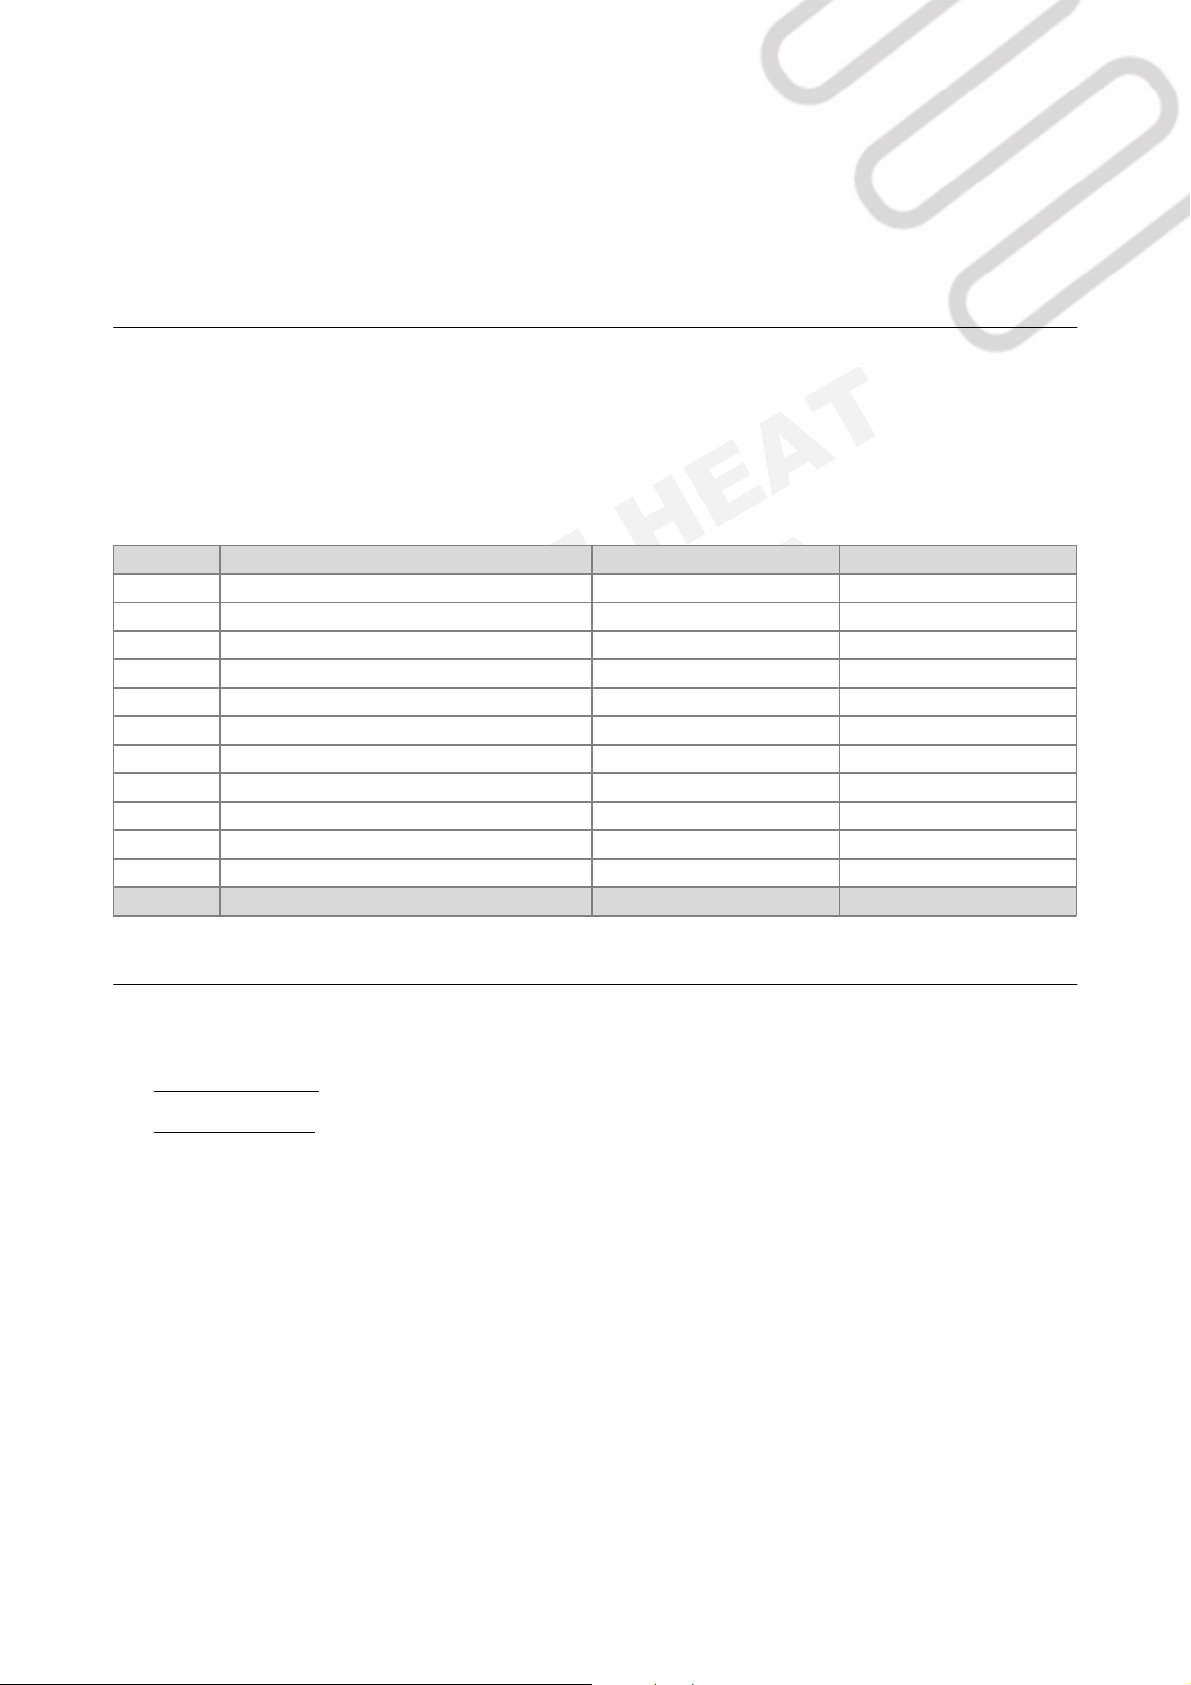
MENU DESCRIPTION SETTINGS DEFAULT
APP Choose sensor to control heating A / F / C / AF / AE F [Floor]
SCA Set the min. and max. temperatures 0ºC - 40.0ºC 0ºC - 40.0ºC
tP Temperature read out Flo / ro Flo [floor]
LCd Select; Temp. setting & Display setting C / F / nu & SP / tP / CL C [celcius] & SP[setpoint]
AdJ Calibrate the measured room temperature
nSb Night setback temperature 2.0ºC - 8.0ºC 5ºC
dEF Frost protection 5.0ºC - 10.0ºC 8ºC
P M Duration of the heating periods oFF / on / Aut
PLi Power limit 0 - 30min 0
tiME Time and ev ent setting ModE / dAY / Hour / Min
S Software v ersion
donE Sav e settings and Exit menu
Comfort Heat Australia Pty Ltd ABN 64 089778941
8/11 Ponderosa Parade arriewood NS 2103
PO Box 220 Mona Vale 1600
Telephone +61 9979 8600
sales@comfortheat.com.au
www.comfortheat.com.au
Local call 1300 13 ARM

Other ComfortHeat Heating System manuals

ComfortHeat ETN Series User manual

ComfortHeat

ComfortHeat ETN Series User manual

ComfortHeat MWD5 User manual

ComfortHeat

ComfortHeat MWD5 User manual

ComfortHeat CTAV-10 User manual

ComfortHeat

ComfortHeat CTAV-10 User manual

Popular Heating System manuals by other brands

RBM PAD INDOO instruction manual

RBM

RBM PAD INDOO instruction manual

Vortice VORT HR 350 AVEL Instruction booklet

Vortice

Vortice VORT HR 350 AVEL Instruction booklet

aoyue 853A quick start guide

aoyue

aoyue 853A quick start guide

Robur Gitie AHAY35/4 manual

Robur

Robur Gitie AHAY35/4 manual

flamco Flexcon Installation and operating instructions

flamco

flamco Flexcon Installation and operating instructions

Nibe UKV 20-220 Installation and operating manual

Nibe

Nibe UKV 20-220 Installation and operating manual

Toyotomi OM-22 Type A Installation and operation instructions

Toyotomi

Toyotomi OM-22 Type A Installation and operation instructions

Valeo THERMO DC 200 Installation and operation instructions

Valeo

Valeo THERMO DC 200 Installation and operation instructions

UFESA Multiaqua Series operating instructions

UFESA

UFESA Multiaqua Series operating instructions

SIC CFR micro E Series Installation, use and maintenance manual

SIC

SIC CFR micro E Series Installation, use and maintenance manual

Okofen PE 08 operating manual

Okofen

Okofen PE 08 operating manual

Myson 7-4 Installation & maintenance manual

Myson

Myson 7-4 Installation & maintenance manual

Robur GAHP Series Installation, use and maintenance manual

Robur

Robur GAHP Series Installation, use and maintenance manual

DeDietrich 220 SHL Installation and service manual

DeDietrich

DeDietrich 220 SHL Installation and service manual

Brugg Pipesystems CASAFLEX UNO instruction manual

Brugg Pipesystems

Brugg Pipesystems CASAFLEX UNO instruction manual

Lampoassa VMI 6-17 Instructions for use, installation and maintenance

Lampoassa

Lampoassa VMI 6-17 Instructions for use, installation and maintenance

Fakir 2003 CT Instructions for use

Fakir

Fakir 2003 CT Instructions for use

Telwin Smart Inductor 5000 instruction manual

Telwin

Telwin Smart Inductor 5000 instruction manual

manuals.online logo
manuals.online logoBrands
  • About & Mission
  • Contact us
  • Privacy Policy
  • Terms and Conditions

Copyright 2025 Manuals.Online. All Rights Reserved.