Comm-Tec ProPLAY User manual
1of29
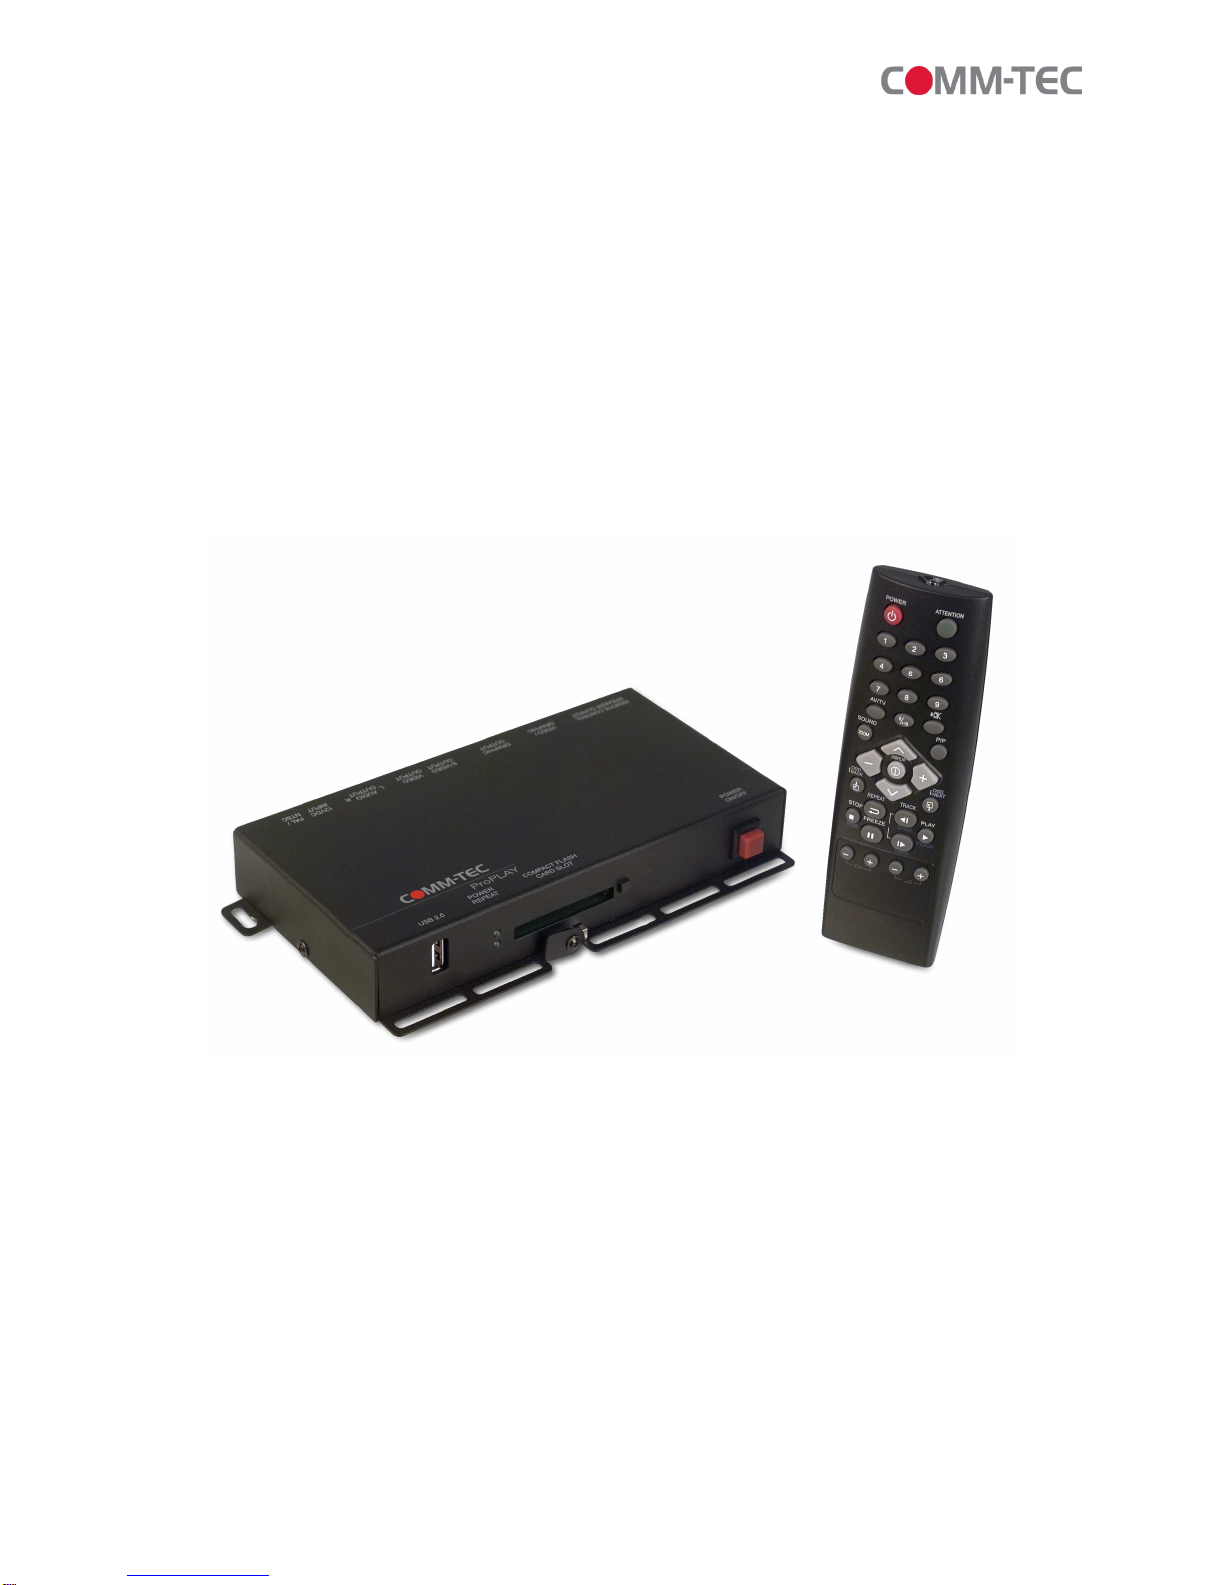
COMM-TECProPLAY
DigitalAudio/ Video Player
UserManual
Version 2.8e

2of29
1. TableOf Content
1. TableOf Content................................................................................................2
2. GeneralNotes....................................................................................................3
3. Product Description.........................................................................................3
3.1Product Dimensions....................................................................................3
3.2SystemFeatures.........................................................................................4
3.3ConnectorAssignment DB-26 pinmale.......................................................5
3.4Infrared RemoteControl..............................................................................6
4. UserInstruction...............................................................................................7
4.1QuickStartInstruction.................................................................................7
4.2NotesforCorrect Use..................................................................................8
4.3SystemSetup..............................................................................................9
4.4Operating Instructions.................................................................................11
5. USB Host Update...........................................................................................13
5.1What do youneed?....................................................................................13
5.2Setup.........................................................................................................14
5.3Content Update..........................................................................................15
6. Content Creation Guide..................................................................................18
6.1Supported Video Formats...........................................................................18
6.2Content Specifications................................................................................20
6.3GeneralDisplayDesign Guidelines.............................................................21
6.4MPEGBackgrounder..................................................................................22
6.5Creating .MPG files....................................................................................22
7. RS-232 Commandson ProPLAY....................................................................25
7.1Connection.................................................................................................25
7.2Command Code.........................................................................................25
7.3Howtocreateand define the command code inbarcode.ini........................27
8. TechnicalSpecifications.................................................................................29
Author: SvenLiebscher
Date: 17/07/09

3of29
2. GeneralNotes
The COMM-TECProPLAYisaremotecontrollableDigitalAudio/ Video Player
designed tousewithTVand Video monitors. The datawillbe played back froma
SandiskCompact FlashCard, whichisnotinthe scope ofdelivery.
Pleasecheck the scope ofsupply,afteryou havereceivedthe shipment. Following
hastobe included:
•ProPLAY
•12Vpowersupply
•IECpowercordwithEUplug
•DB-26pinmaleplug
•Infrared remotecontrolunitincl.2xAAAbatteries
•Usermanual
Ifyourealizeahidden transport damage, pleasecontact yourinsurancecompanyor
supplierimmediately.
3.Product Description
3.1 Product Dimensions
Side View(inmm)

4of29
Top View(inmm)
3.2 SystemFeatures
5of29
Description Type/ Use
CompactFlashCardSlot 25x2pinHiroseCF-IISocket
(acceptsCF Cardtypes1&2)
USB USB 2.0Port
PowerLED On(green)/Off (clear)
StatusLED Enabled (green)/disabled (clear)
PAL/NTSC 6mm stemswitch
Graphicoutput HD-15 pinfemaleconnector
Graphic/ Video 6mm stemswitch
Remotecontrol/Speakeroutput DB-26 pinfemaleconnector
S-Video output 5-pinmini DINsocket
Compositevideo output RCAjack(yellow)
Audiooutput –stereo right RCAjack–Right (red)
Audiooutput –stereo left RCAjack–Left (white)
12VDC Powerinputjack DC powerjack. Centerpinpositive,
2.5mm diam.
Poweron/off Rockerswitch
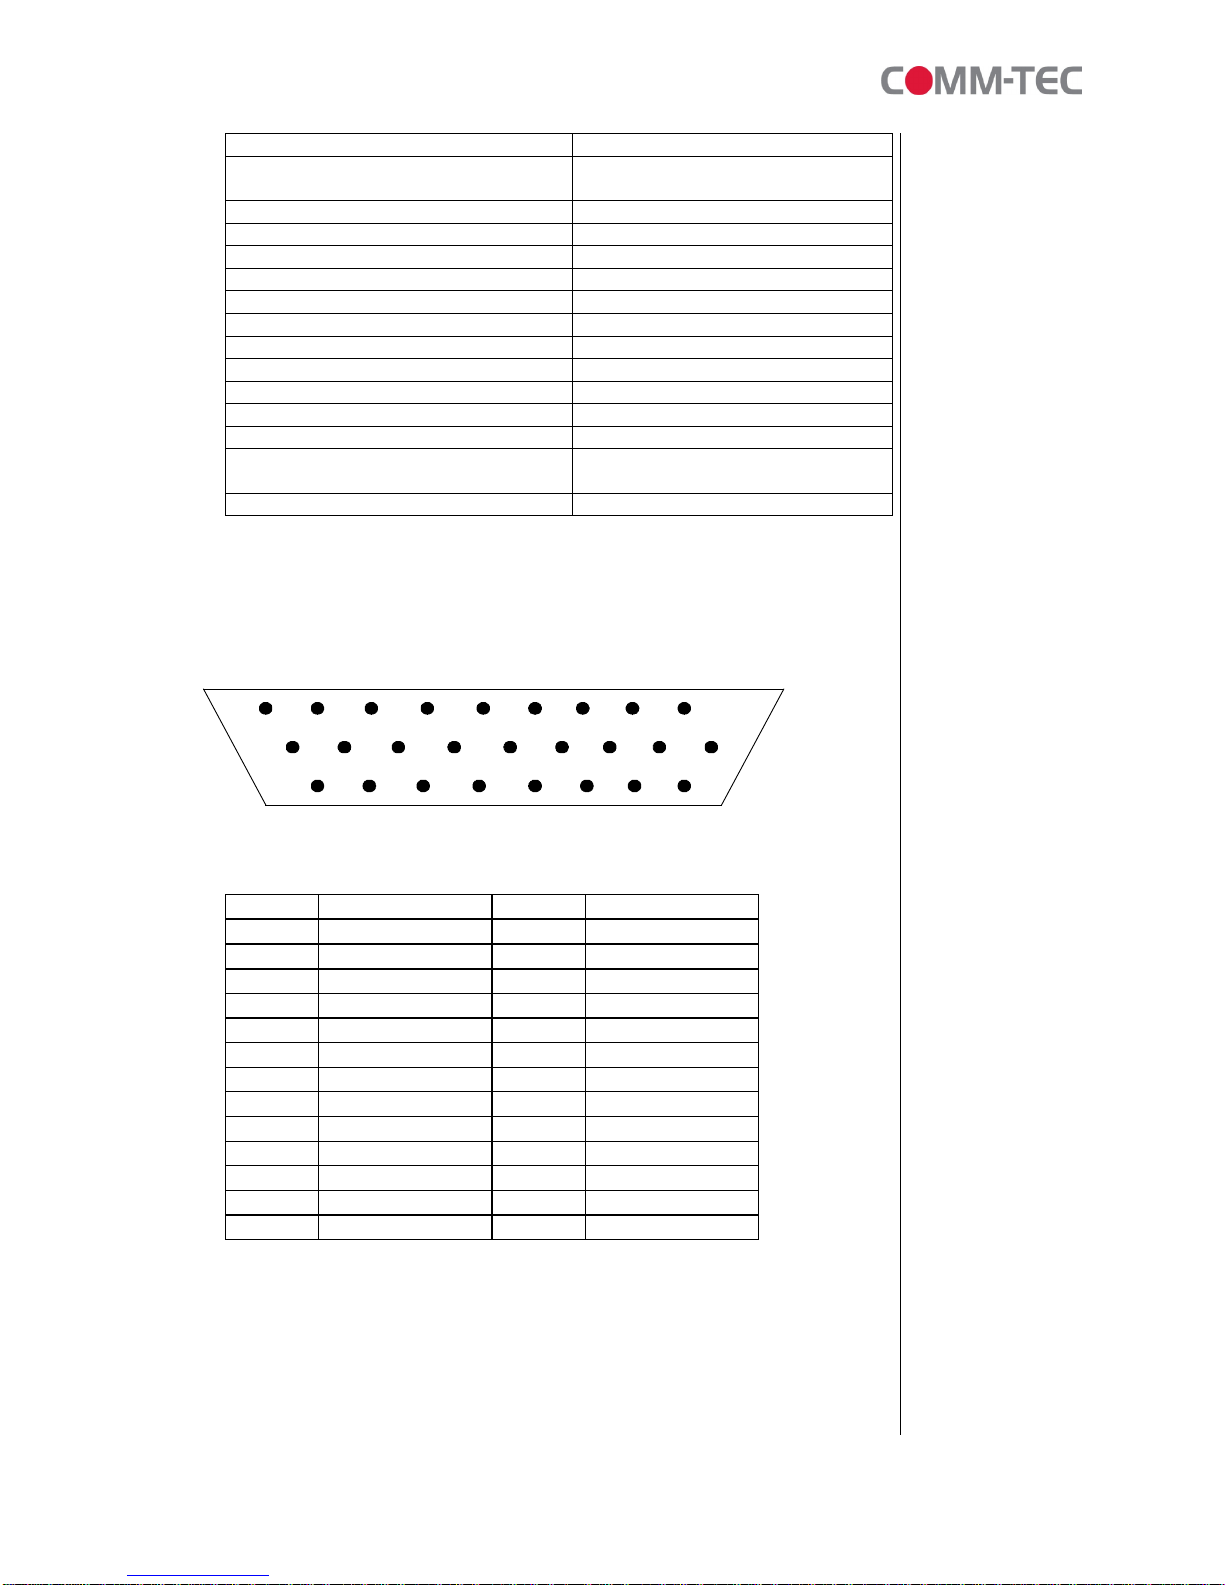
3.3 ConnectorAssignment DB-26 pinmale
frontviewof the plug
PinNo Description PinNo Description
1Button 1 14 Button 13
2Button 2 15 Button 14
3Button 3 16 Button 15
4Button 4 17 Button 16
5Button 5 18 Returnfor9-16
6Button 6 19 RS-232 RX
7Button 7 20 RS-232 TX
8Button 8 21 RS-232 Ground
9 Returnfor1-8 22 SpeakerL
10 Button 9 23 Ground / Signal
11 Button 10 24 SpeakerR
12 Button 11 25 Ground / Signal
13 Button 12 26 +12 Vout
1 9
10
19
6of29
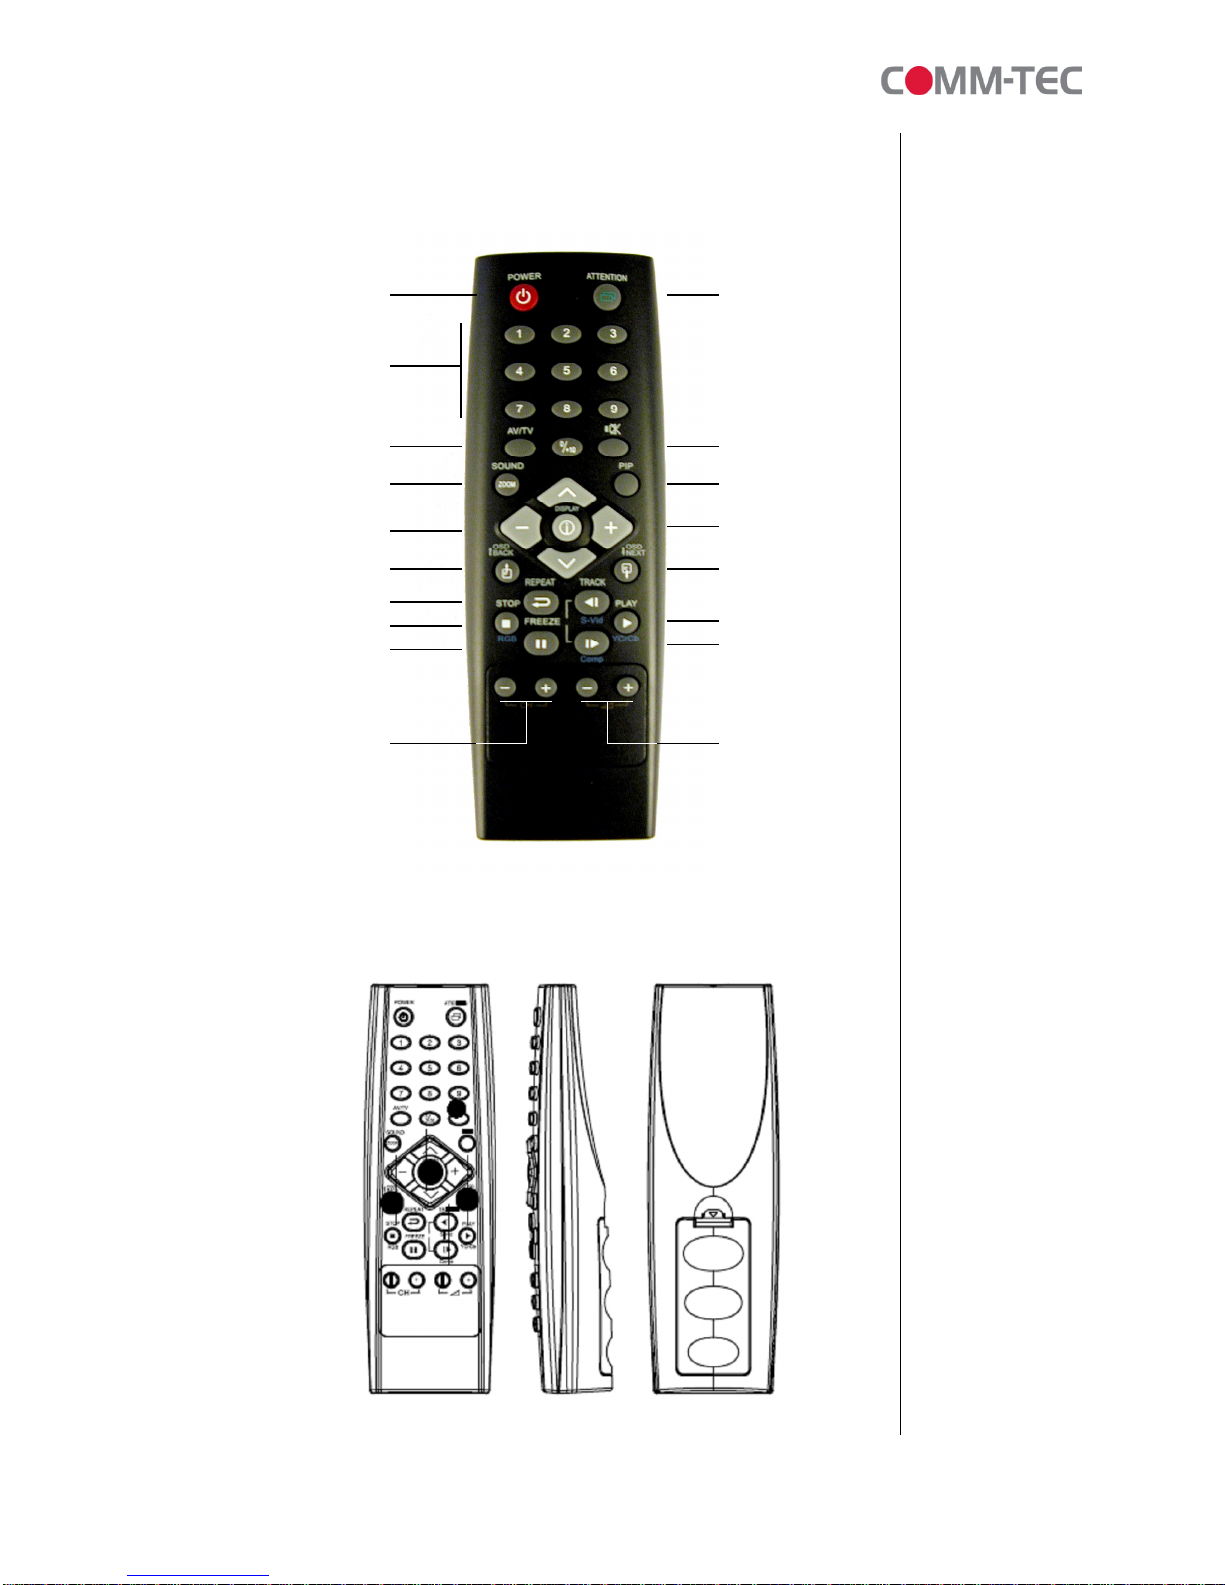
3.4 Infrared RemoteControl
Select StationIDforIR
enable/disable
Mute
Picturein Picture
Up/ Down
Gotonext OSDmenu
Play(YCrCb/Component)
Tracksselect
UpTrack(S-Video)
NextTrack(Composite)
Volume
PowerOn/Off
DigitKeys
Select input source
Zoom/SoundMode Selection
+/-key
BacktopreviousOSDmenu
Repeat
Stop(RGB)
Pause/Freeze
Volume

7of29
Specifications:
OperatingVoltage: DC 3V
Operating Temperature: -10°C~50°C
OperatingCurrent: 20 K10mA
Power Source: 2xAAA sizebatteries
Number ofkeys: 33
Oscillationfrequency: 455 kHzK2.2kHz
Arrival distance: 7m
Dimensions(H)x(W)x(D) 148mm x47.5mm x28mm
Weight Approx.75g (without batteries)
4.UserInstruction
4.1 Quick Start Instruction
Neverconnectordisconnect partsofthe systemwhen the systemispowered up as
thismaycauseseriousdamage.
Connection and usage arestraightforward. However,careneedstobe taken with
the following:
•Ensuring partshavebeen correctlyconnected –bothpower&signal
considerations.
•Checking thatallswitchesareset correctly.
•The inputsignaliscompatible.
•Legal&safetyrequirementshavebeen met.
•Ifyouareusing supplied accessories, ensuretheyarecorrect forthe modelof
video monitor.
Nowconnect the systemasfollows:
•Connect Video Monitorsignalconnections.
•Switchsettings. (e.g. PAL/NTSCswitchsetting)
•Connect the Video and Audiocablesfromthe ProPLAYtothe Video Monitor.
•Connect the powersupply(DC 12V@ 1.2Aminimum. -ensurecorrect+&-
orientation)tothe ProPLAY.
•Poweron the video monitordisplay.
•Poweron the ProPLAY unit.

8of29
4.2 NotesforCorrectUse
The ProPLAYisdesigned forusewithVideo Monitorsand otheranalogue signal
input displays. Herearesomenotesforcorrectuse:
•Preparation- Beforeyou proceed,pleasefamiliarizeyourself withthe various
connectors, jacks, switchesand function buttonsof the ProPLAY unit(see item
3.2-SystemFeaturesdiagrams).
•Theunit -Handlethe unit withcare; anyknockingmaycausecomponentsto
comelooseand disconnect. Operateinacooland dryplace.
•Power Input: 12VDC1.2A(minimum)isrequired;thisshouldbe aregulated
supply. Itisrecommended tousethe powersupply, whichisdelivered withthe
ProPLAY unit.
•Digital Video: useMPEG-1/MPEG-2video.ForMPEG-2video, theencoding
rateislimited to5Mb/s. See item6.-ContentCreation Guide formoredetails
and properencoding rate.
•Audio &Videooutput: Video -displaysPAL&NTSCsignalswitheither
Composite,S-video signal.ThePAL/NTSCswitchshouldbe set correctly. Audio
-Stereo output. Volumeiscontrolledbythe switchmountbuttonsorpreset with
the ProPLAYStudiosoftware.
•Graphicoutput: GraphicdisplayswithVGAresolution (60Hz). Graphic/Video
switchhastobe set correctly. S-Video cableshouldbe disconnected.
•DiscreteControl: Aexternalportforremotebutton control. Usercan usethis
port asatouchscreen orbutton interface.Maximumup to8touches/buttonscan
be accessed.
•DiscreteControl Cable: The cablestoanyremotebutton control shouldbe of
suitablequalityand lengthsothatimpedancedoesnot affectperformance.
Generallylengthsup to1metre(3feet)shouldbe acceptable.
•Power LED: The powerLEDindicatorshowspowerisbeing supplied tothe
player–LEDlightactivated bythe poweron/offswitch.
•StatusLED: The LEDindicatesthe statusof CompactFlashcard.
•USB2.0Port: Please see Chapter5forhowtheUSB2.0Portisbeingused.
•RS-232 Control: Baud ratemust be set to(9600, n,8,1)and recordsuffixisset
toCR (0DH).IndividualRS-232 commandscan be set up withthe ProPLAY
Studiosoftware.
•RS-232 Port: Pleaseconnect yourcontrol systemtothe DB-26 pinport of the
ProPLAY according tothe wirering diagramm shown under3.3
•Service &Warranty: Warrantyisinvalidatedifthe unitisdismantled inanyway.
The unit isnot userserviceableorrepairable.
CAUTION: Do not attempt toremoveanypart of the casing orinternalparts.

9of29
4.3 SystemSetup
•Setup
Toenterthe setup ofthe ProPLAY, pleasepressbutton 8whileyou poweron
the unit.
Usebuttons6and 7tochange settingsand button 8toconfirmand jumptothe
nextsetup item.
Depending on the firmwareversion of theProPLAY, thefollowing settingscan
be changed:
•VOLUME
The volumedefault when you poweron the unit can be changed.
•YMD/HMS
The Year,Monthand Dayaswell asHour,Minuteand Second of the
internal real timeclockcan be set up withthisitem.
•IDNO
Up to10.000 ID’scan be allocatedtodifferent ProPLAYstoidentifythe
units.
•DATALOGGING
The ProPLAYisabletowritealogfileontotheCF Card.IDnumber, date
and timeaswell asthe played trackswillbe reportedasshownbelow.
The logging option can be switched on oroff withthissetting.
•OSD

10 of 29
The OnScreen Displaycan be switched on oroff.
•SelectSwitches
Beforepowering on the ProPLAY:
•Makesurethe corresponding signalcableshavebeen connected from
the Composite, S-Video orgraphicoutputjacks.Incaseofgraphicoutput
use, don’t connect aS-Video cabletothe unit.
•Set the 'PAL/NTSC'switchtothe chosen outputformat.
•Set the ‘Graphic/Video‘ according tothe outputyou haveconnected.
•PowerUp
The Autoplayand Sleep playbackmode areselected when writing the MPEG
fileson tothe CompactFlashCardbyusing ProPLAYStudiosoftware.
Auto-Playstart up mode
•Plug intheexternal powersupply
•Insert CompactFlashCardcontaining ProPLAYStudioexported “.pll/
.prj”and otherdigital files. (e.g..mpg,.jpg)Allfilenamesshouldbe in8+3
format (i.e.xxxxxxxx.xxx) and avoidusing anyillegal characterslike“~”,
“_”, “-“, etc
•Switchthe power'on/off'switchto'on'.
•The first track of the collection of MPEGfileswillbe auto-played.
Sleep mode
•Plug intheexternal powersupply
•Insert CompactFlashCardcontaining ProPLAYStudioexported “.pll/
.prj”and otherdigital files. (e.g..mpg,.jpg)Allfilenameshouldbe in8+3
format (i.e.xxxxxxxx.xxx) and avoidusing anyillegal characterslike“~”,
“_”, “-“, etc
•Switchthe power'on/off'switchto'on'.
•Press the 'play' button'.
•The first track of the collection of MPEGfileswillbe played.
Special specifictrack playback activated byassigned button can alsobe
performedinsleep mode using ProPLAY Studiosoftware.
Auto-Loop Playback
AfterTrack1isset toplay,itwillplaytothe end, then Track2willstartplaying from
beginning toend,then Track 3etc.Whenthe ProPLAYplaystothe end of thelast
track,it willautomaticallyjumpbacktothe beginningofTrack 1, repeating tracks1,2
then 3etc.TheProPLAYwillplayinauto-loop playmode,solong asnone ofthe
functionbuttonsarepressed. Loop playback isthe standardplayback setting ofthe
ProPLAY (insimpleplayand playlistmode)butthe trackplaybacksequencecan be
changed asrequired using ProPLAY Studiosoftware.

11 of 29
4.4 OperatingInstructions
Therearetwooperating modesinProPLAY–“playlist mode”and “simpleplaymode”
.
•Playlistmode
Whenoperating inplaylistmode, bothproject file(*.prj)and playlistfile(*.pll)
must be present on the CompactFlashcard.Theseareused tocontrol the
sequenceforallvideo tracks.
The project and playlistfilearecreated using ProPLAYStudio software. Using
thissoftware, you canset simplesequencesorcomplexsequencesincluding
“jumptrack“or“nexttrack”actions. ProPLAYStudiocan alsoprogrambuttons
withdifferentfunction like“play”, “stop”,“pause”, “mute”,“previous”,“next”and
“volume”aswell asRS-232 commandstoplaytracks.
Note: Makesureall capital lettersinfilenamedefined inplaylist areconsistence
withthe filenameon CompactFlashcard.Allfilenameshouldbe in8+3format
(i.e.xxxxxxxx.xxx)and avoidusing anyillegal characterslike“~”, “_”,“-“,etc
•Simpleplaymode
Insimpleplaymode,the userjust copiesall video files(.mpg)orJPEG files
(.jpg)ontothe CompactFlashcard. TheProPLAYwillplaythesefilesin
alphabeticalsequence.
ForMPEGstillpicturesorJPEGfiles,the playtimecan be set bythe last digit
of the filename.(Forexample: APPLE5.mpg,where“5”meansthe track willbe
displayed for5seconds.)
Note: Do notusethe samefilenameon bothMPEG and JPEG.
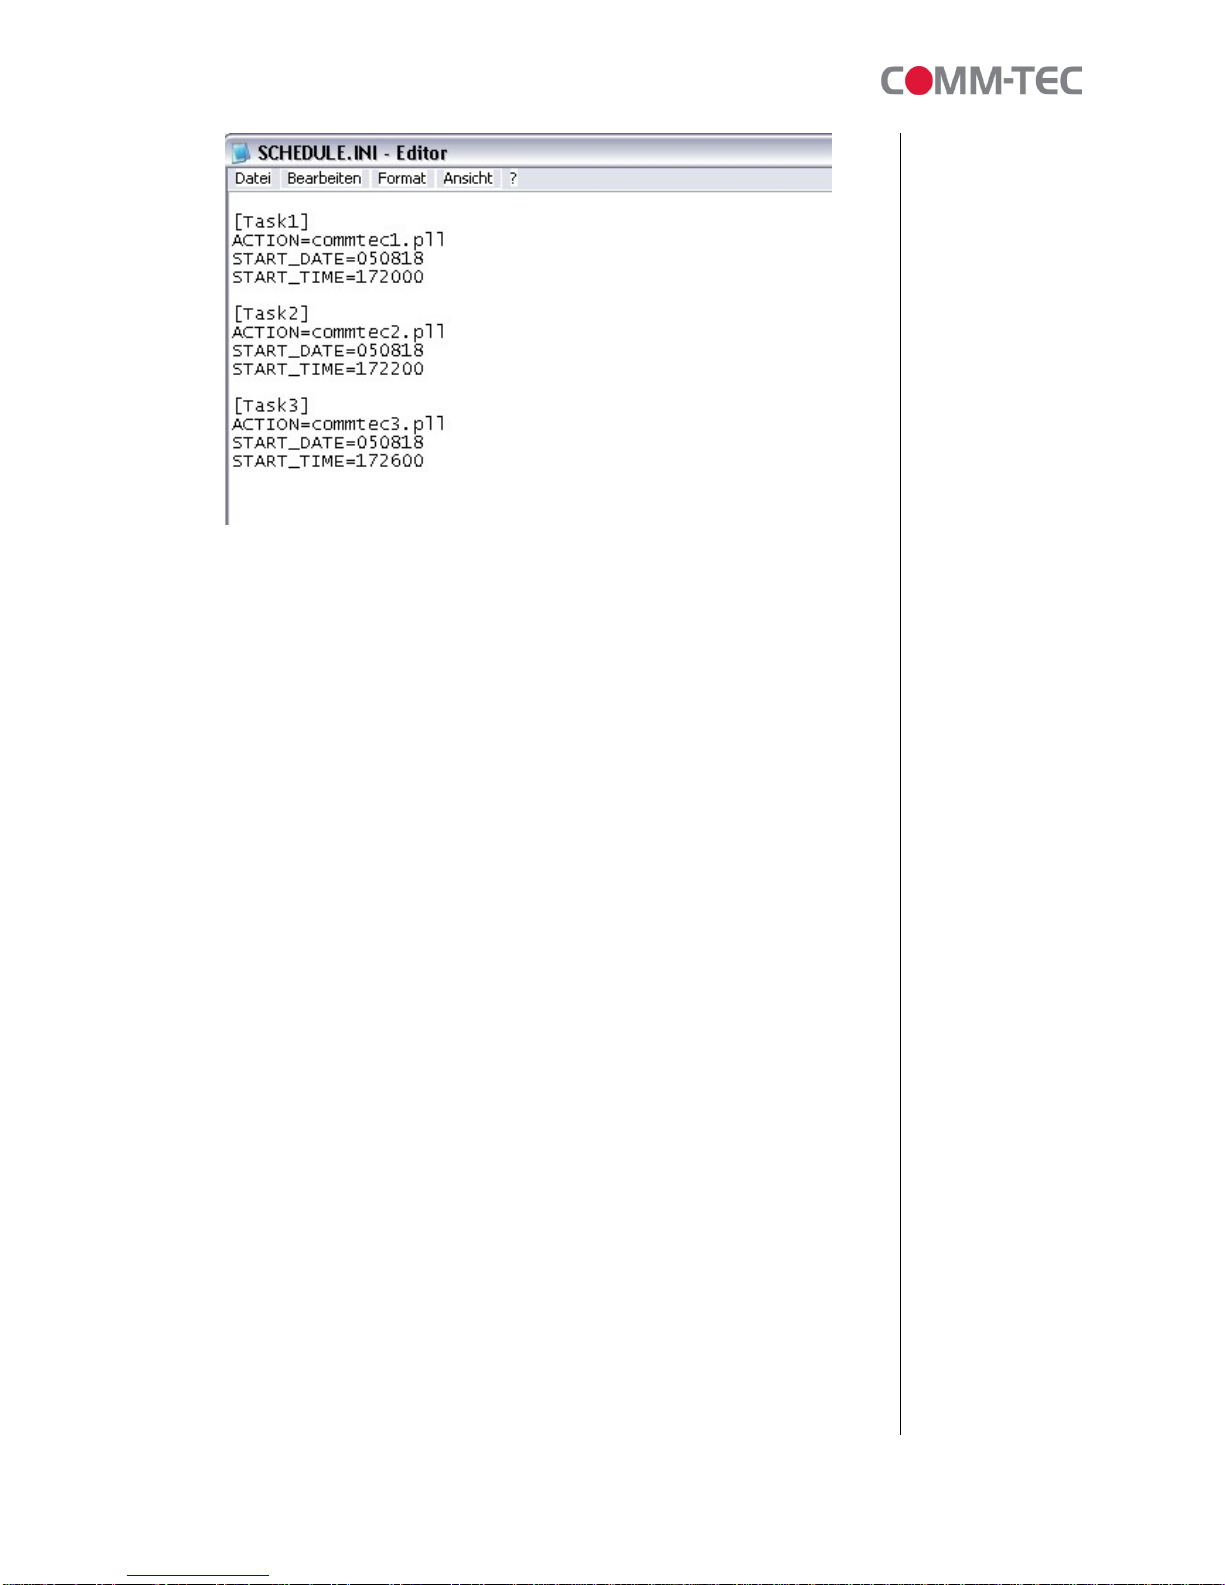
•Scheduleplaymode
The ProPLAYisabletoplaybackplaylists, controlled bydateand timesettings.
Aschedule.ininamed filehastobe written inthebelowshownformat and
copied ontotheCFcard.Tocreatethe corresponding playlistfiles, ProPLAY
Studioisrequired.
12 of 29
Note: The maximumnumberofscheduletasksyou can defined islimited to40.
OperatingFunctions
The following keybuttonsaredefault in“SimplePlaymode”.
PLAY (Button 1)
•Resumesplayback ofvideosfromtrack 1afterSTOPhasbeen pressed.
•Resumesplayback ofthe trackfromthe pointthatit hasbeen set toPAUSE.
•Playback isreset back tothe beginning of the specifictrackwhichisbeing
played atthe timethe PLAYbuttonispressed.
STOP(Button 2)
•WhenSTOPispressed the video stopsplaying and ablankscreen isdisplayed.
PAUSE (Button 3)
•WhenPAUSEispressed the video image instantlyfreezes.
•Press PauseagainorPLAY toresumenormalplayback fromthe position where
itwaspaused.
REPEAT(Button 4)
•WhenREPEATispressedthe currenttrack loop back on itselfcontinuously.
•Todisablethe repeatmode press REPEAT, PLAY, PREVIOUSTRACKor
NEXT TRACK. When thetrackplaystothe end itwillplayback the nexttrack
(and etc.)asnormal.
NEXT TRACK(Button 5)
•The NEXTTRACKfunction can be activated onlywhen atrack isalready
playing.When NEXT TRACKispressed the currentvideo stopsplaying and
jumpsdirectlytothe start of thenexttrack.
VOLUME DECREASE(Button 6)
•Decreasesaudiooutputvolumesetting.
VOLUME INCREASE(Button 7)

13 of 29
•Increasesaudiooutputvolumesetting.
MUTE(Button8)
•WhenMUTEispressed, allthe trackswillhaveno sound.
•Press MUTEagaintoresumethenormal sound inalltracks.
Allabovebuttonscan be re-defined byProPLAY Studiosoftwareifoperating in
playlistmode.
5.USB Host Update
ImportantNotice: Thisfunction willonlybe availableonSerialNumber212000 and
higher.
Ifyouareworking withProPLAYStudioversion 1.4.020 orbelow, you haveto
manuallycopythe filesontothe CompactFlashcard.
5.1 Whatdo you need?
BeforeusingUSB memorystick on ProPLAY, pleasemakesureyouhave
the followingparts:
•USB memorystick
•ProPLAY(startingwithSerialNumber212000)
•Compact Flashcard
•Powersupply(DC12V)
14 of 29
5.2 Setup
Preparation
CompactFlashCard
•EnsureyourCompactFlashCardhasenoughspaceforall yourmedia
content.
•Format the Compact FlashcardwithFAT32.
•Createanewfolder“MEDIA”on CompactFlashCard.
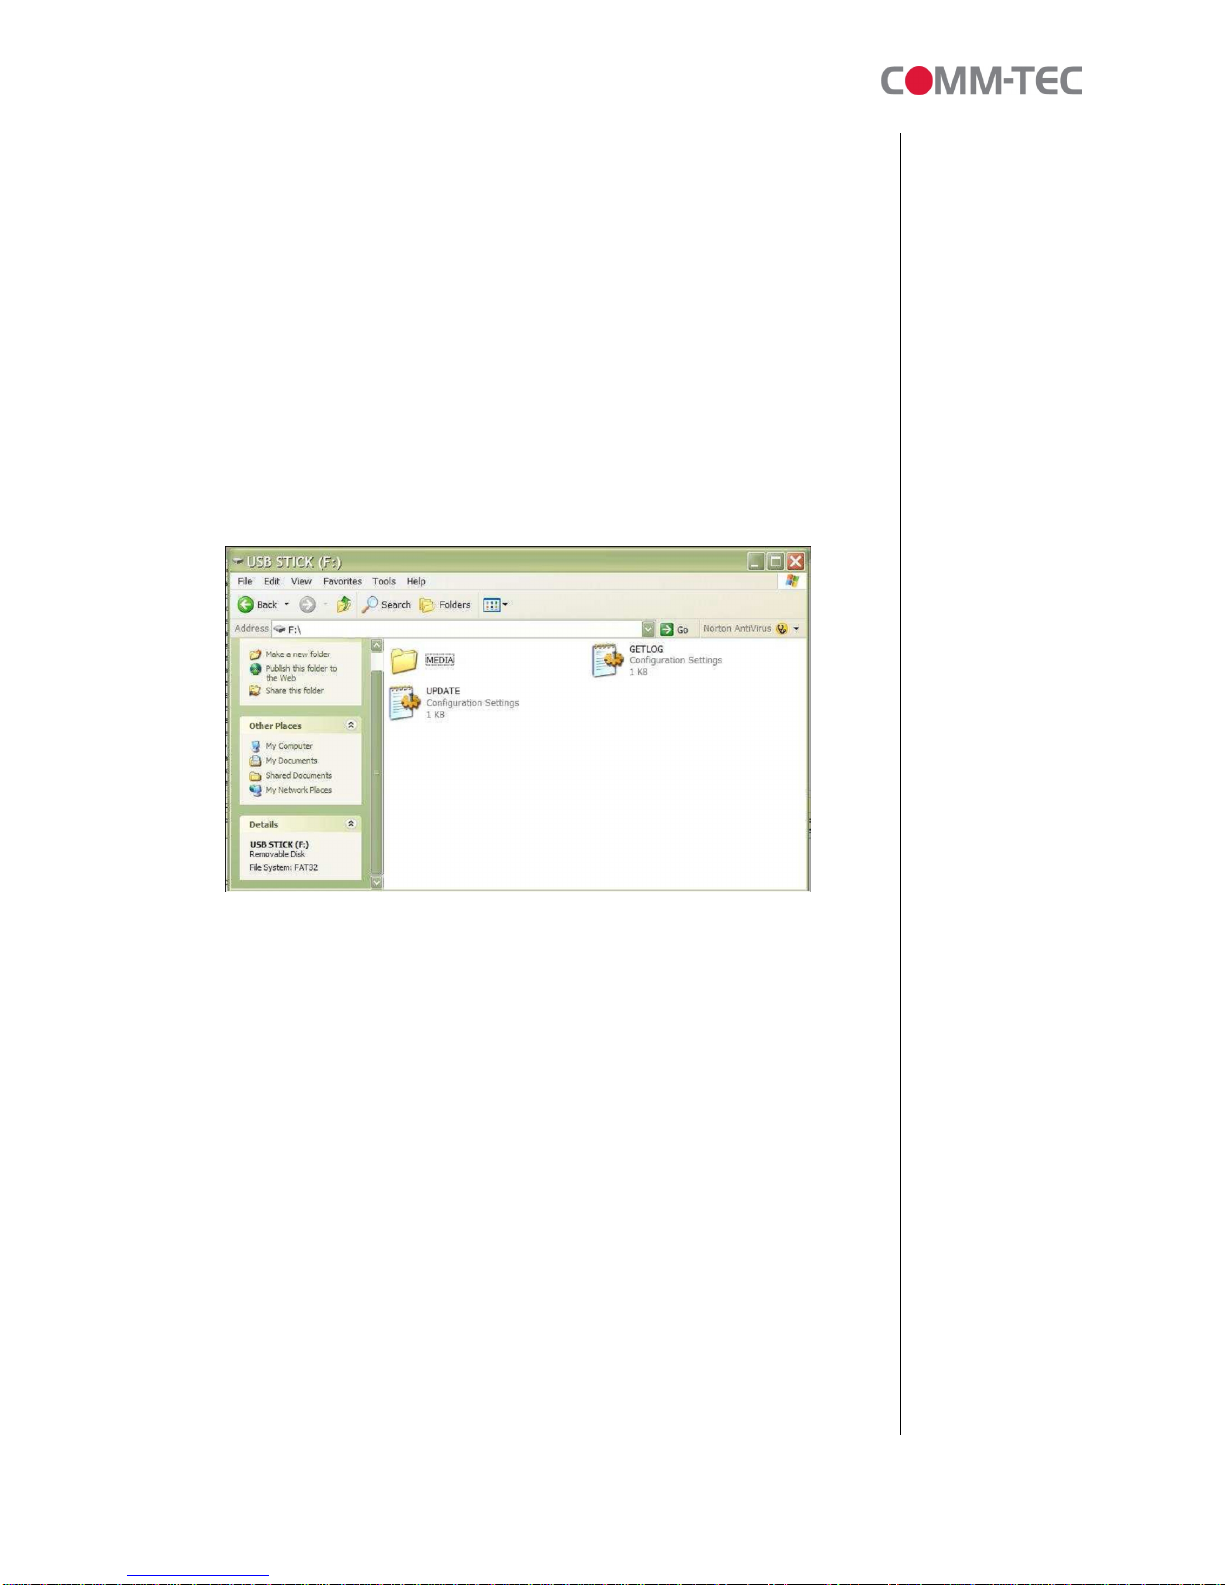
USB MemoryStick
•EnsuretheUSB memorystick hasbeen formatted withFAT32.
•Createanewfolder“MEDIA”on USB memorystick.
•Createatextfilenamed “UPDATE.INI”(The filesizemust not be0KB)on
root directory.Referto ContentUpdate section fordetails.
•Copyall mediacontent (.mpg, .jpg)intothe “MEDIA”folder. Thosefilesare
prepared foruploadingon the CompactFlashcardlater.
Connection
ConnectingUSB memorystick directlytotheUSB port on ProPLAY.

15 of 29
5.3 Content Update
Uploadnewmediacontent
1. Makesurethe ProPLAYmust bepoweroffbeforeinsertingthe
CompactFlashCardand USB memorystick.
2. When the mediacontent isbeingcopied frommemorystick to
CompactFlashCard. Asequenceofscreenswill beshownasbelow:
3. Oncefilescopycompleted, poweroffthe ProPLAYunit and
disconnect the memorystick.
4. Poweron the ProPLAYand seeifall contentareupdated and played.
Note: All mediafilesmustbe stored and running insidethe
“MEDIA”(casesensitive)folderon CompactFlashcard. The mediafile(s)stored
outside “MEDIA”
folderwillnot be played bytheProPLAY.
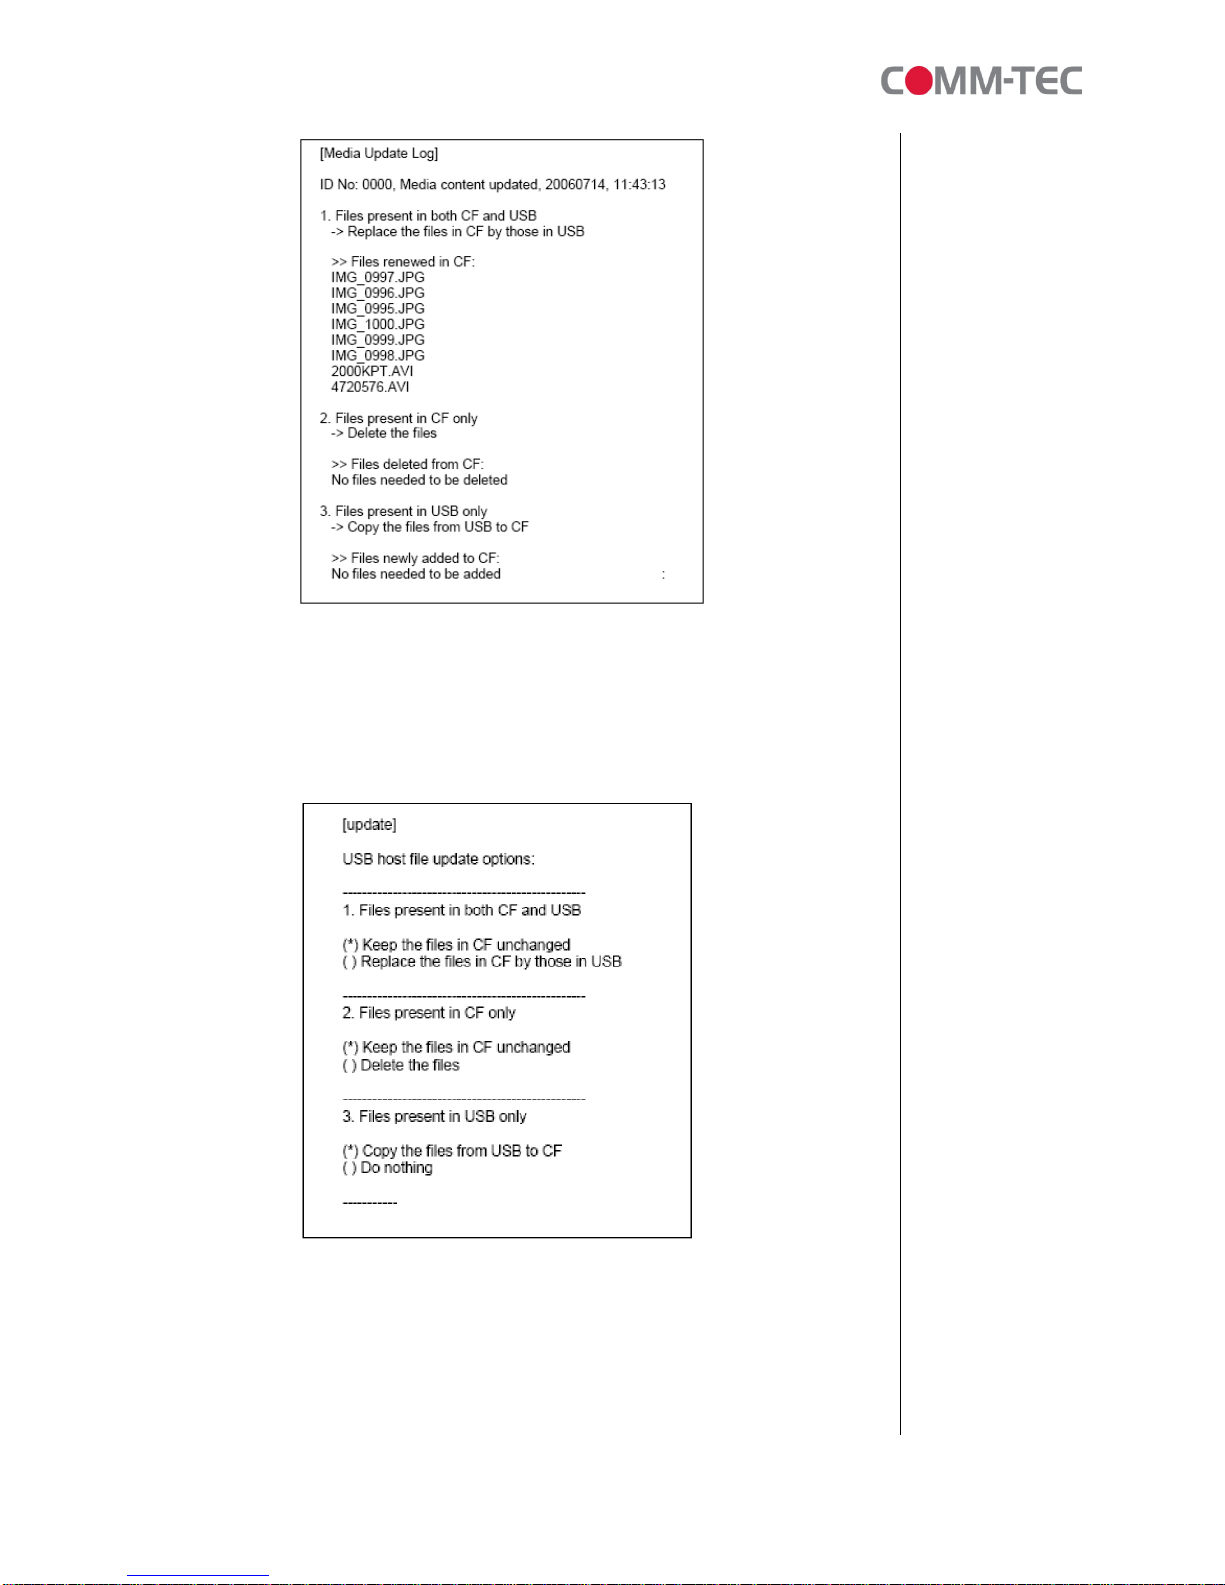
Update.log
Alogfilewill becreated automaticallyon theUSB memorystick oncetheupload
process isdone successfully. Thislogfilerecordsthe historyofcontentupdate
asshownasbelowexample:
16 of 29
Partial Update
You canupdateanyfilesentirelyorpartially. The optionsofpartialupdateare
defined in“update.ini”storedon USBMemoryStick (update.ini). Herebelow
isthe definition of update.ini file:

17 of 29
Filespresent inbothCFandUSB
IfbothCFand USB memorystick hasthe file(s)withsamefilename, you may
havetwooptions:
Option 1–Keepthe filesinCFunchanged
Option 2–ReplacethefilesinCFbythoseinUSB
Filespresent inCFonly
Ifthe file(s)onlybefound on CFbut noton memorystick, thenthosefileswillbe
removed fromCForyou mayhaveanotheroption tokeepthe filesinCF
unchanged.
Option 1–Keepthe filesinCFunchanged
Option 2–Deletethefiles

18 of 29
Filespresent inUSB only
Ifthe file(s)onlybefound on USB memorystick but not onCF, thenthosefiles
will becopied toCF.
Option 1–Copythe filesfromUSB toCF
Option 2–Donothing
6.Content Creation Guide
6.1 Supported VideoFormats
The ProPLAYisconformtobothNTSCand PALvideo formats.Appropriateoutput
toan NTSCorPALmonitorisswitched manuallybypositioning the devicemounted
switchtothe appropriatesetting.
You mayelecttocreatecontentintoeitherformat and displaythiscontent
independent of the requirementsofthe TV.Thisistosaythatyou can send PAL
created contenttoan NTSCmonitor.Thiscan be useful if yourcontent hassmall
text (PALisbest)orif yourcontent hasfastmotion.(NTSCisbest)
The following arethe Pro’sand Con’sofbothformats. You shouldbecomefamiliar
withthe standardof the country you willbe providing contentto, aswell as,the
“rules”forcreating contentforthisformat.
NTSC/525 Advantages
•Higher Frame Rate –Useof30 framespersecond (really29.97)reduces
visibleflicker.
•ColorEdits –WithNTSCitispossibletoedit atany4fieldboundary point
without disturbing the colorsignal.
•Less inherentpicture noise –Almost allpiecesofvideo equipment achieve
bettersignaltonoisecharacteristicsintheirNTSC/525 formthan intheir
PAL/625.
NTSC/525 Disadvantages
•Lower Number ofScanLines –Reduced clarityon large screen TVs,line
structuremorevisible.

19 of 29
•Smaller Luminance SignalBandwidth –Due tothe placing of the colorsub-
carrierat 3.58MHz, picturedefectssuchasmoire, cross-color, and dot
interferencebecomemorepronounced. Thisisbecauseof the greaterlikelihood
of interaction withthe monochromepicturesignalatthe lowersub-carrier
frequency.
•SusceptibilitytoHueFluctuation –Variationsinthe colorsubcarrierphase
causeshiftsinthe displayed color,requiring thatthe TVreceiversbe equipped
withaHue adjustmenttocompensate.
•Lower Gamma Ratio –Thegammavalue forNTSC/525 isset a2.2asopposed
tothe slightlyhigher2.8defined forPAL/625.Thismeansthat PAL/625 can
producepicturesofgratercontrast.
PAL/625 Advantages
•Greater Number ofScanLines –morepicturedetail.
•Wider Luminance SignalBandwidth –The placing ofthe colorSub-Carrierat
4.43MHzallowsalargerbandwidthofmonochromeinformation tobe
reproduced than withNTSC/525.
•StableHues –Due toreversalof sub-carrierphaseon alternatelines, any
phaseerrorwillbe corrected byan equal and oppositeerroron the nextline,
correctingthe originalerror. InearlyPALimplementationsit waslefttothelow
resolution ofthe human eye’scolorabilitiestoprovide the averaging effect;it is
nowdone withadelayline.
•Higher Gamma Ratio –The gammavalue forPAL/625 isset at 2.8asopposed
tothe lower2.2figureofNTSC/525.Thispermitsahigherlevelof contrast than
on NTSC/525 signals.Thisisparticularlynoticeablewhen using multi-standard
equipmentasthe contrast and brightness settingsneed tobe changed togivea
similarlooktosignalsofthe twoformats.
PAL/625 Disadvantages
•More Flicker –Due tothe lowerframerate,flickerismorenoticeableon
PAL/625 transmissions; particularlysoforpeopleused toviewing NTSC/525
signals.
•Lower Signal to Noise Ratio –The higherbandwidthrequirementscause
PAL/625 equipmenttohaveslightlyworsesignaltonoiseperformancethan it’s
equivalent NTSC/525 version.
•Loss ofColorEditing Accuracy –Due tothealternation of thephaseofthe
colorsignal,the phaseand the colorsignal onlyreachacommon point once
every8fields/4frames.Thismeansthat editscan onlybe performedtoan
accuracy of+/-4frames(8fields).
•VariableColorSaturation –SincePALachievesaccuratecolorthrough
canceling outphasedifferencesbetween the twosignals, the act of canceling
out errorscan reducethe colorsaturationwhileholding the hue stable.
Fortunately,the human eyeisfarless sensitivetosaturation variationsthan to
hue variations, sothisisverymuchthe lesserof twoevils.

20 of 29
6.2 Content Specifications
The ProPLAYisadedicated solid-stateMPEG playback machine.Herearethe
recommended specificationsforcontent creation:
•You can usethe following mediatypes:
•MPEG-1
•MPEG-2
•MPEGStills
•JPG(800x600)
•MPEG-1encoding rates:
•Screen size:
•PAL: 352 x288
•NTSC: 352 x240
•BitRate:260kBps(2Mbit/s)
•AudioStreamType:MPEG-1Layer2
•AudioBitRate:224 Kbit/s, 44.1kHzat 16 bitssamplerate
•FrameRate:PAL: 25Hz/NTSC: 30 Hz
•MPEG-2encoding rates
•Screen size(recommended):
•PAL: 720 x576
•NTSC: 720 x480
•BitRate:640kBps(5Mbit/s)
•AudioStreamType:MPEG-1Layer2
•AudioBitRate:224 Kbit/s, 48 kHzat 16 bitssamplerate
•FrameRate:PAL: 25Hz/NTSC: 30 Hz
•You can usedifferentMPEG-2sourceresolutions, butifyoudo, the
playback machine scalesthe output,whichresultsinsomeloss on
quality.Itisthereforebest tousethe optimalresolution asyourinput
resolution:
MPEG-2/PAL (25 Hz)
Source Resolution OutputResolution
720 x576 (recommended) 720 x576
704 x576 720 x576
352 x576 720 x576
352 x288 720 x576
Other manuals for ProPLAY
2
Table of contents
Other Comm-Tec Media Player manuals


