Compaq Inkjet Ij1200 User manual

User’s Guide for Windows 95 and Windows 98

First Edition: 2000
The information in this guide is subject to change without notice.
COMPAQ COMPUTER CORPORATION SHALL NOT BE LIABLE FOR TECHNICAL OR EDITORIAL
ERRORS OR OMISSIONS CONTAINED HEREIN; NOR FOR INCIDENTAL OR CONSEQUENTIAL DAM-
AGES RESULTING FROM THE FURNISHING, PERFORMANCE, OR USE OF THIS MATERIAL.
This guide contains information protected by copyright. No part of this guide may be photocopied or repro-
duced in any form without prior written consent from Compaq Computer Corporation.
Compaq and Presario are registered in the U.S. Patent and Trademark office.
Microsoft, MS-DOS, and Windows are registered trademarks of the Microsoft Corporation.
© Copyright 2000 Compaq Computer Corporation.
All rights reserved.
PCL®is a registered trademark of the Hewlett-Packard Company. PCL 3 is Hewlett-Packard Company's des-
ignation of a set of printer commands (language) and functions included in its printer products. This printer
is intended by Compaq Corporation to be compatible with the PCL 3 language. This means the printer recog-
nizes PCL 3 commands used in various application programs, and that the printer emulates the functions
corresponding to the commands.
The software described in this guide is furnished under a license agreement or nondisclosure agreement. The
software may be used or copied only in accordance with the terms of the agreement.
Product names mentioned herein may be trademarks and/or registered trademarks of their respective com-
panies.
UNITED STATES GOVERNMENT RESTRICTED RIGHTS
This software and documentation are provided with RESTRICTED RIGHTS. Use, duplication or disclosure
by the Government is subject to restrictions as set forth in subparagraph (c)(1)(ii) of the Rights in Technical
Data and Computer Software clause at DFARS 252.227-7013 and in applicable FAR provisions: Compaq
Computer Corporation, Houston, TX 77070.

Contents
iii
•
•
•
•
•
Contents
Contents
Steps to basic printing 1
Step 1: Load the paper 2
Step 2: Customize the printer settings 5
Step 3: Print your document 8
Printing beyond the basics 9
Printing on both sides of a sheet of paper 9
Printing handouts 12
Printing booklets 15
Printing posters 18
Maintaining your printer 21
Using the Control Program 21
Installing or replacing print cartridges 22
Improving print quality 24
Preserving print cartridges 26
Troubleshooting 27
Printer prints slowly or doesn’t print 27
Paper misfeeds or jams 30
Document prints with mistakes or poor quality 32
Problems with transparencies, photos, or envelopes 34
Error messages and flashing lights 35

•
•
•
•
•
iv
Appendix 37
Installing printer software 37
Uninstalling printer software 38
Printing from DOS 38
Notices 38
Energy star 39
Power supply replacement 39
Safety information 39
Index 41

Steps to basic printing
Steps to basic printing
•
•
•
•
•
1
1
Steps to basic printing
This book describes how to use your printer with
Windows 95 and Windows 98.
To view the online User’s Guide for Windows NT 4.0 and
Windows 2000, click the User’s Guide button on the
Printer Software CD for Windows.
Basic printing is as easy as:
1Load the paper (see page 2).
2Customize the printer settings (see page 5).
3Print your document (see page 8).
•
•
•
•
•
Chapter 1
2
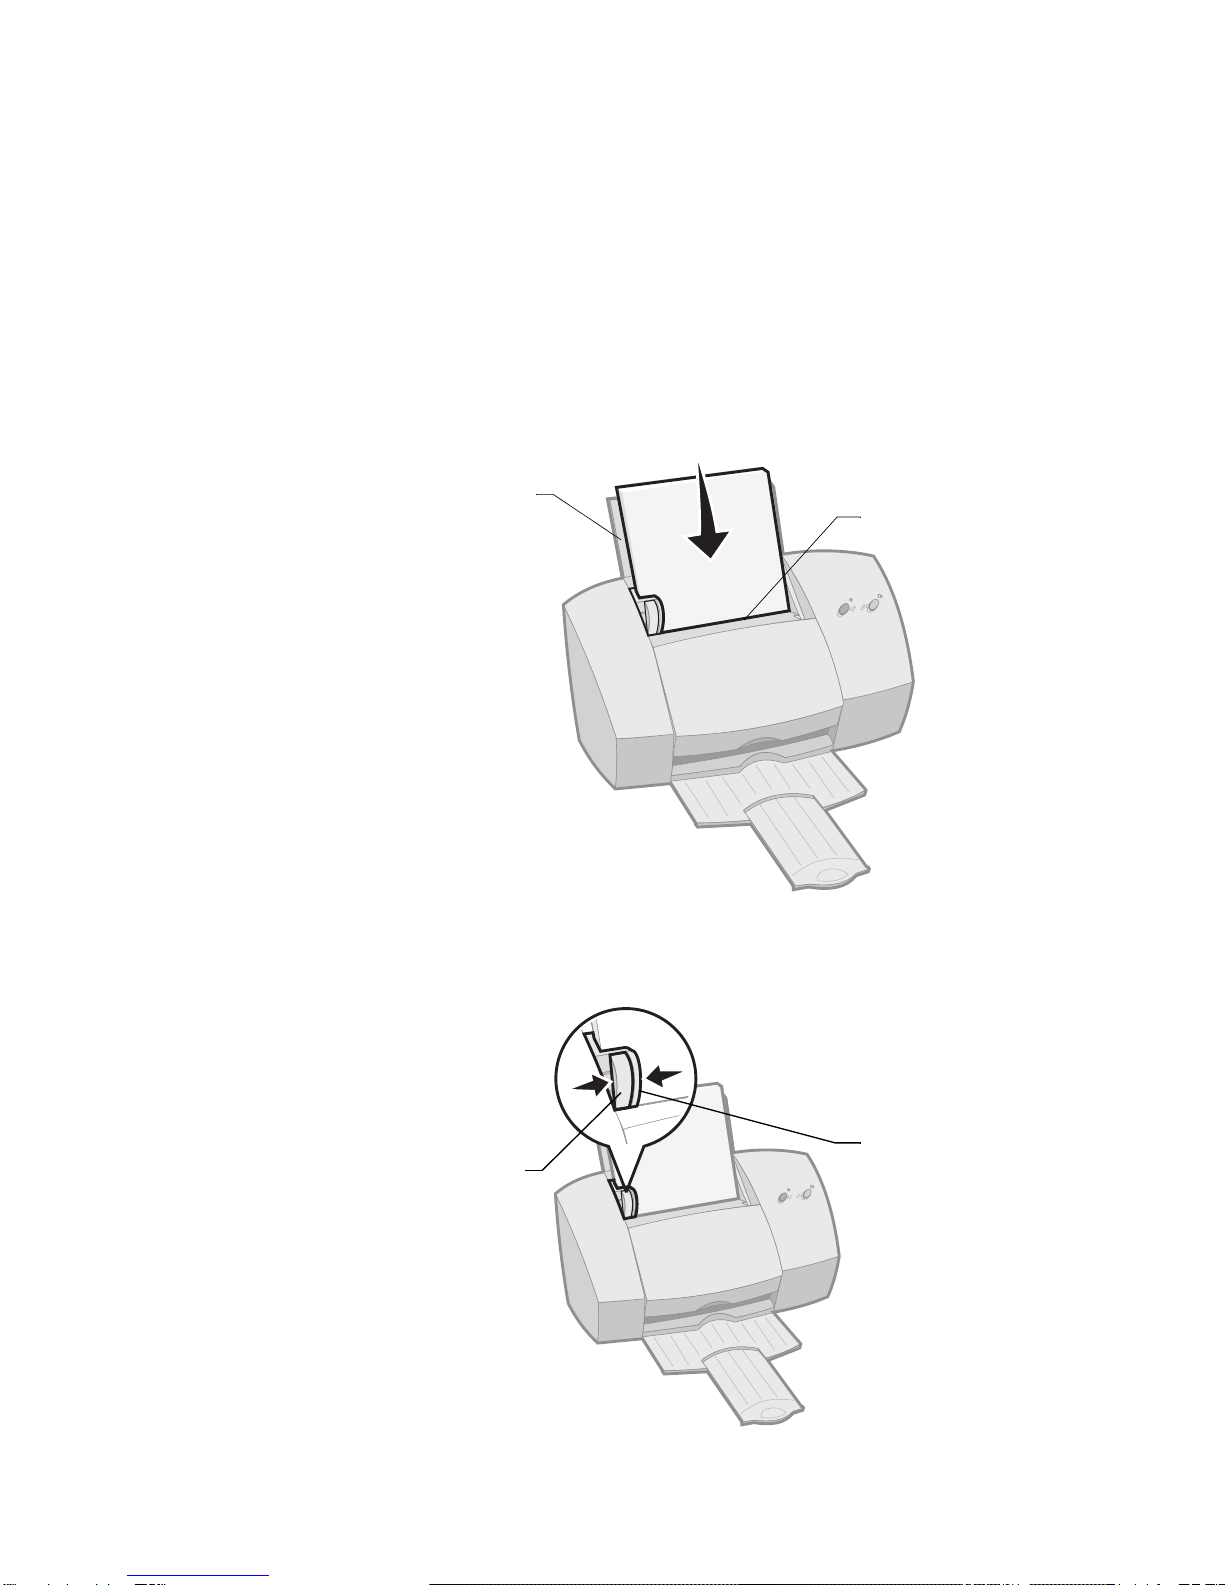
Step 1: Load the paper
You can load up to 100 sheets of paper (depending on
thickness).
1Place the paper against the right side of the sheet feeder, with
the print side facing you.
Note: Make sure you do not force the paper into the sheet
feeder when you load it. For example, letter or A4 size paper
should extend above the top of the paper support
2Squeeze the release tab and the paper guide together and
slide the paper guide to the edge of the paper.
Sheet feeder
Paper support
Release tab Paper guide

Steps to basic printing
•
•
•
•
•
Steps to basic printing
3
Loading specialty papers
Follow these guidelines when loading specialty papers:
Load up to: Make sure:
10 envelopes •the print side is facing you.
•the envelopes are loaded
vertically against the right
side of the sheet feeder.
•the stamp location is in the
upper left corner.
•the paper guide is against the edge of the
envelopes.
10 greeting cards,
index cards,
postcards, or
photo cards
•the print side is facing you.
•the cards are loaded vertically against the right
side of the sheet feeder.
•the paper guide is against the edge of the cards.
25 sheets of photo
paper
•the glossy or coated side is facing you.
•the paper guide is against the edge of the photo
paper.
20 sheets of banner
paper
•you place the paper
behind the printer,
and then bring the
unattached edge of
the first page over the
top of the printer, and
into the sheet feeder.
•the paper guide is against the edge of the
paper.
Note: Make sure you select Banner or Banner A4
paper size in the Printer Properties.

•
•
•
•
•
Chapter 1
4
10 transparencies •the rough sides of the transparencies are facing
you (smooth side down).
•the paper guide is against the edge of the
transparencies.
100 sheets of
custom size paper
•the print side is facing you.
•your paper size fits within these dimensions:
-Width:
76 mm to 216 mm
3.0 in. to 8.5 in.
-Length:
127 mm to 432 mm
5.0 in. to 17.0 in.
•the paper guide is against the side of the paper.
25 iron-on transfers •you follow the instructions on the packaging to
load the iron-on transfers.
•the paper guide is against the side of the iron-
on transfers.
Load up to: Make sure:

Steps to basic printing
•
•
•
•
•
Steps to basic printing
5
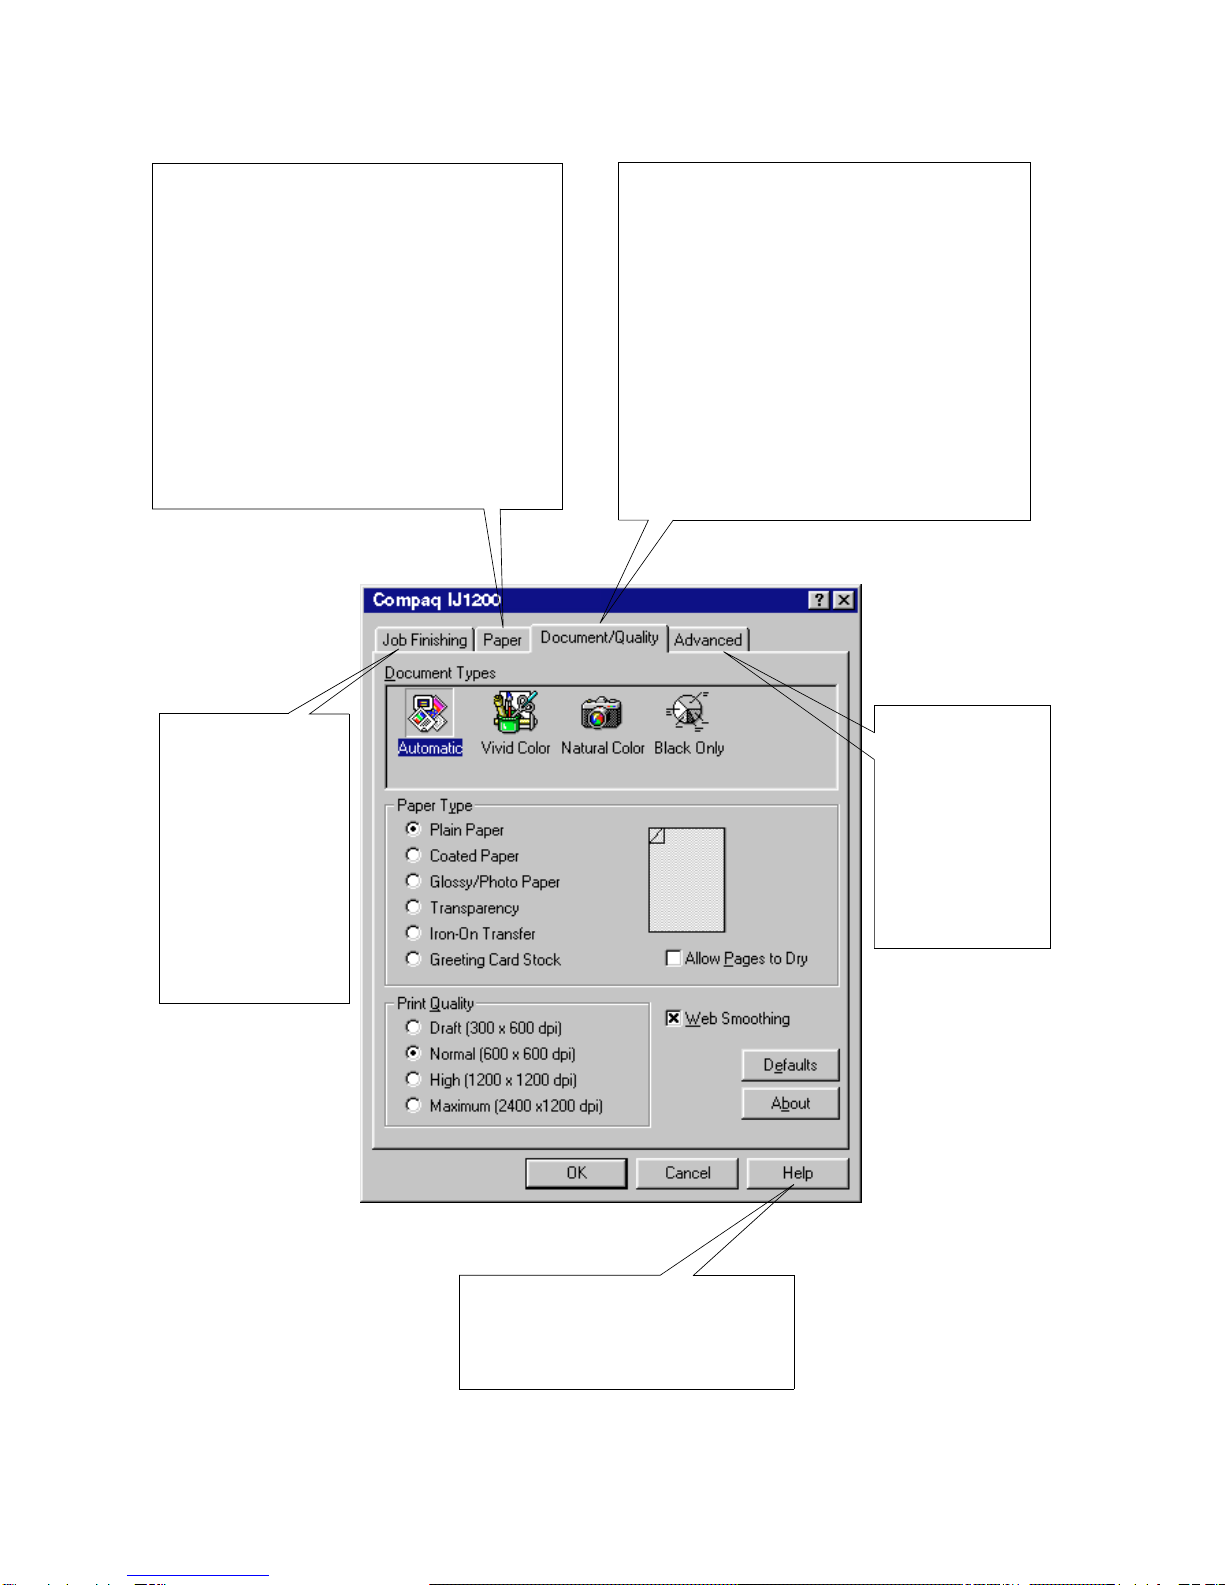
Step 2: Customize the printer settings
Your printer software includes several applications that let
you perform printing tasks. One of these applications is
called Printer Properties.
The Printer Properties has four tabs: Job Finishing,
Paper, Document/Quality, and Advanced. Each tab
has settings for operating your printer and its software.
Opening the Printer Properties from an
application
You can open the Printer Properties from almost every
application. This lets you change printer settings ONLY for
the documents you are currently creating in the
application.
1Open the application’s File menu.
2Choose Print (or Printer) Setup.
3In the Printer Setup dialog box, click the Properties,
Option, or Setup button (depending on the application).
Opening the Printer Properties from
Windows
When you open the Printer Properties from Windows, the
settings apply to ALL documents, unless you change them
from the application.
1From the Start menu, select Settings, and then select
Printers.
2From the Printers folder, right-click the printer icon for
your printer.
3Select Properties from the sidebar menu.
•
•
•
•
•
Chapter 1
6
Click the...
Job Finishing
tab to print:
•Handouts
•Posters
•Booklets
•Two-sided
documents
Paper tab to:
•Select a paper size and orientation
•Set the number of copies to print
•Reverse the printing order of your
document pages. The first page of
your document will be on top of
the stack in the paper exit tray.
•Collate your document
Advanced
tab to adjust:
•Halftone
settings
•Image
settings
Document/Quality tab to select:
•Color settings for the type of
document you are printing
•The type of paper you are using
•A print quality setting
•Web Smoothing when you print
from the internet
•Allow Pages to Dry
•The default settings
Help button on any tab in
the Printer Properties to
access the printer driver Help.
Other manuals for Inkjet Ij1200
1
Table of contents
Other Compaq Printer manuals

Compaq
Compaq Inkjet IJ600 User manual

Compaq
Compaq Compaq IJ750 User manual

Compaq
Compaq A1000 - All-In-One Color Inkjet Printer User manual

Compaq
Compaq A3000 User manual

Compaq
Compaq IJ650 Series User manual

Compaq
Compaq 1400P User manual

Compaq
Compaq 5525B/31/32 User manual

Compaq
Compaq PrintNet 5525B User manual

Compaq
Compaq Inkjet IJ600 User manual

Compaq
Compaq LA36 User manual


