Comptus A70-P User manual

1
Model A70-P
Barometric Pressure Transmitter
Document 1017, Version J
The barometric pressure is sensed by an integrated
silicon absolute pressure sensor with internal
temperature compensation. The sensor is mounted
to the signal conditioner board. A 3/16 inch
diameter tube may be attached to the sensor to
provide remote pressure sensing. The output of
the sensor is scaled to provide the desired output
signal.
Systems are available with outputs of 0-1 mA, 0-
1 V or 4-20 mA. All systems may be powered
from either 120 VAC, 230 VAC or 12 - 24 VDC.
The instruments are available in a variety of
packagesincludingsteelJICboxesmeetingNEMA
12 standards, weatherproof fiberglass enclosures
A70-P-T Track Mounted A70-SDPL-N12 in NEMA 12 Box
ISO 9001 Registered
meeting NEMA 4X, IP66 and IEC 529 standards
andtrack mounted versions. NEMA 12enclosures
provide protection from dust for indoor
applications. NEMA 4X enclosures may be used
indoorsor outdoors. They provide protectionfrom
corrosion, wind blown dust and rain and are
undamaged by ice. Track mounted versions are
intendedformountinginsideanenclosureprovided
by the user. Where required, electrical connection
to the sensor is via terminal block. A barrier strip
is provided for connection to operating power.
Each system is provided with a detailed instruction
manual.
Comptus Inc®
342 Lyndeboro Rd., New Boston, NH USA
Comptus Inc
ISO 9001 Registered ®

2
Specifications
Range: / E 27 - 31 inches of mercury
/M 900 - 1100 mili Bar
Worse case error: + 0.05 inches Hg, + 2 mili Bar
Size: Track Mount 1.75 inches W X 5.0 inches L X 1 inches H
NEMA 12 6 inches W X 8 inches H X 4 inches D
NEMA 4X 6 inches W X 8 inches H X 4 inches D
Weight : Track Mount 1 lbs
NEMA 12 6 lbs
NEMA 4XFG 4 lbs
NEMA 4XSS 6 lbs
Operating Temperature : Electronics 0/60o C
Connectors : Barrier strips to accept AWG #12 or smaller wire
Options : Expanded Ranges
Accessories : A96 Lightning protectors
A70-LPDD Digital Display
A10 Mechanical Chart Recorders
Data Chart - Electronic Chart Recorder
A33 Data Logger / Controller
A70-LPDD
Loop Powered Digital Display
A70-LPDA
Loop Powered Analog Display

3
voltage
Excitation
Minimum
Excitation Voltage
10 14 18 22 26
300
100
0
200
Resistance
Total Loop
600
400
500
Ohms
DESCRIPTION
TheA70-PLprovidesa4-20masignalproportional
to barometric pressure. The instrument utilizes a
temperature compensated IC pressure transducer
to measure the ambient pressure. The output from
thepressure transducer modulates thetransmitter’s
loop current. The instrument as supplied is
calibrated to absolute pressure. The instrument
may be adjusted to sea level pressure if desired by
means of the offset adjustment.
The barometric air pressure sensor has a 3/16 inch
diameter port. Flexible tubing may be attached to
this port if it is desired to monitor air pressure at a
remote location. Other ranges are available up to
100 psi absolute or + 100 psi gage.
The system may be packaged in a rugged steel box
or as a circuit board with mounting track. The steel
boxhas a NEMA 12 rating. Two1/2" conduit hubs
on the side walls provide electrical access to the
unit. Top and bottom ears with two 1/4" holes
each provide means for wall mounting. The track
mounted version is suitable for installation inside
an existing enclosure. The track is easily attached
to a back plane with two screws.
INSTALLATION
Before proceeding verify that the maximum
resistance of the current loop including the wiring
andsensing element does not exceed themaximum
given by Formula 1. If this resistance is exceeded
the loop current will not attain full scale.
Formula 1
Maximum Loop Resistance
R - Maximum Loop Resistance in Ohms
V - DC Excitation Voltage
R = (V - 10 Vdc) X 50
The resistance of various gages of copper wire is
given in Table 1.
Table 1
Wire Gage Resistance in
AWG Ohms per foot
12 .0016
14 .0026
16 .0041
18 .0065
20 .0103
22 .0165
24 .0262
Figure 1
Graph of Maximum Loop Resistance
DataChart
Electronic Chart Recorder

4
Installation Continued
1. Select a suitable mounting location where
the temperature can be maintained between 0 and
50 degrees C.
2. Mount the instrument to a wall or other
suitable panel.
3. Connect the two wiresfromthecurrentloop
to the terminals on the barrier strip, taking care to
observe polarity.
4. Apply power to the loop and allow the
system to stabilize for 20 minutes or more while
proceeding with Step 5.
Note: Adjustment of the “GAIN” potentiometer is
not initially required. If calibration is necessary
after a year or more of service a suitable pressure
reference will be required.
5. Determine local barometric pressure as
referred to sea level. A nearby radio or television
station weather report is generally suitable. Refer
toFormula 2 and calculate the desiredloop current.
6. Refer to Figure #3 and locate the “baro.
offset”adjustment.Use this as a course adjustment.
Turn the small screw on the top to set the loop
current calculated in Step 5 to within + 0.5 mA.
7. Locate the “ZERO” adjustment. Turn the
small screw on top to obtain the final adjustment
for the loop current calculated in Step 5 + 0.02
mA.
Formula 2
Loop Current Given a Known Pressure
I- Loop current in ma
P- Barometric pressure in inches of mercury
I = (P X 4) - 104 ma
Lightning Protection
The Transmitter electronics has integral metal
oxide varistors for protection from lightning
induced surges, electrostatic discharge and other
atmospheric discharges. Wind blown aerosols
such as sand and snow can generate electrostatic
charges with consequences similar to lightning
discharges. The A96 Series of gas tube surge
arrestors can safely dissipate much higher energy
discharges than the internal varistors.
A consequence of the rapid rise time of these
electrostatic discharges is the inductance of the
grounding system and interconnecting wiring is
generally of more concern than resistance. Gas
tube surge arrestors should be placed as close to
the device they are intended to protect to mini-
mize the effect of inductance in the wiring.
A96-100P Surge Arrestor

5
Figure #2
Connection Diagram
Figure #3
Component Layout

6
Figure 4
Multiple Transmitters with One Power
Supply

7
27 29 31
4
12
20
Loop Current in mA
Barometric Pressure
Inches of Mercury (Hg)
900 1000 1100
4
12
20
Loop Current in mA
Barometric Pressure
milli Bar
OPERATION
Operation of the transmitter is fully automatic. A
loop current in the range of 3-4 ma or 20-30 ma
indicates a pressure outside the range of the
instrument.
Refer to Formula 3 to determine barometric
pressure given the loop current.
Formula 3
BarometricPressure Given a KnownLoop Current
P - barometric pressure in inches of mercury
I - loop current in ma
P = (I + 104)/4
Figure 5
Graph of Barometric Pressure Transfer
Function for Range E
Formula 4
BarometricPressure Given a KnownLoop Current
P - barometric pressure in milli Bar
I - loop current in ma
P = (I X 12.5) + 850
Figure 6
Graph of Barometric Pressure Transfer
Function for Range M

8
0 4 8 12 16 20
0.4
1.2
2.0
Voltage
Loop Current
milliamperes
It is possible to monitor the loop current indirectly
by measuring the voltage drop across a known
resistance installed in series with the current loop.
Formula 5
Voltage Across Sensing Resistor
I Loop Current in Milliamperes
R Resistance in Ohms VVoltage in Volts
V = I X R / 1000
Figure 7
Graph of Voltage Vs Loop Current
for 100 ohm Load
A76-T10 Tripod Tower

9
TROUBLE SHOOTING
Philosophy
Effective trouble shooting requires that problem
locations be systematically eliminated until the
problem is found.
There are four basic questions to answer when
trouble shooting (Ref. #1):
1. Did it ever work right?
2. What are the symptoms that tell you it’s
not working right?
3. When did it start working badly or stop
working?
4. What other symptoms showed up just
before, just after, or at the same time as the
failure?
It is best to write down any clues you may obtain.
Be sure to write down anything unusual.
The response to question #3 should probably not
be 3:04 P.M.. A useful response might be, “Just
after an electrical storm.” or, “Just after it fell off
the shelf.”
Double check all the simple solutions to the
problem before searching for complex ones. If the
problem occurs right after installation, it probably
has a simple solution.
If an automobile engine cranks, but doesn’t start,
make sure there is fuel in the tank before replacing
the engine. If the electronic equipment doesn’t
function, verify that it has power and is turned on.
Systems containing parts which can be quickly
interchanged are easy to trouble shoot. Swap parts
until the problem moves. The location has then
been narrowed to the part that caused the problem
to move.
Sometimes there are multiple problems. These
reveal themselves in layers much like peeling an
onion.
It often helps to explain the problem to another
person, even if that person is not knowledgeable
about the particular piece of equipment.
This does two things. First it requires you to
organize the situation so it can be explained to
another. Secondly, it may turn out that you are so
familiar with the situation that you have over
looked the obvious. Another person unfamiliar
with the equipment may be able to help.
If you are unable to solve the problem, put it aside
until the next day. Some new thoughts will
probably occur while working on another project.
References
1. “Troubleshooting is More Effective with
theRight Philosophy”, Robert A. Pease, Electronic
Design News, January 5, 1989.
Trouble Shooting Procedure
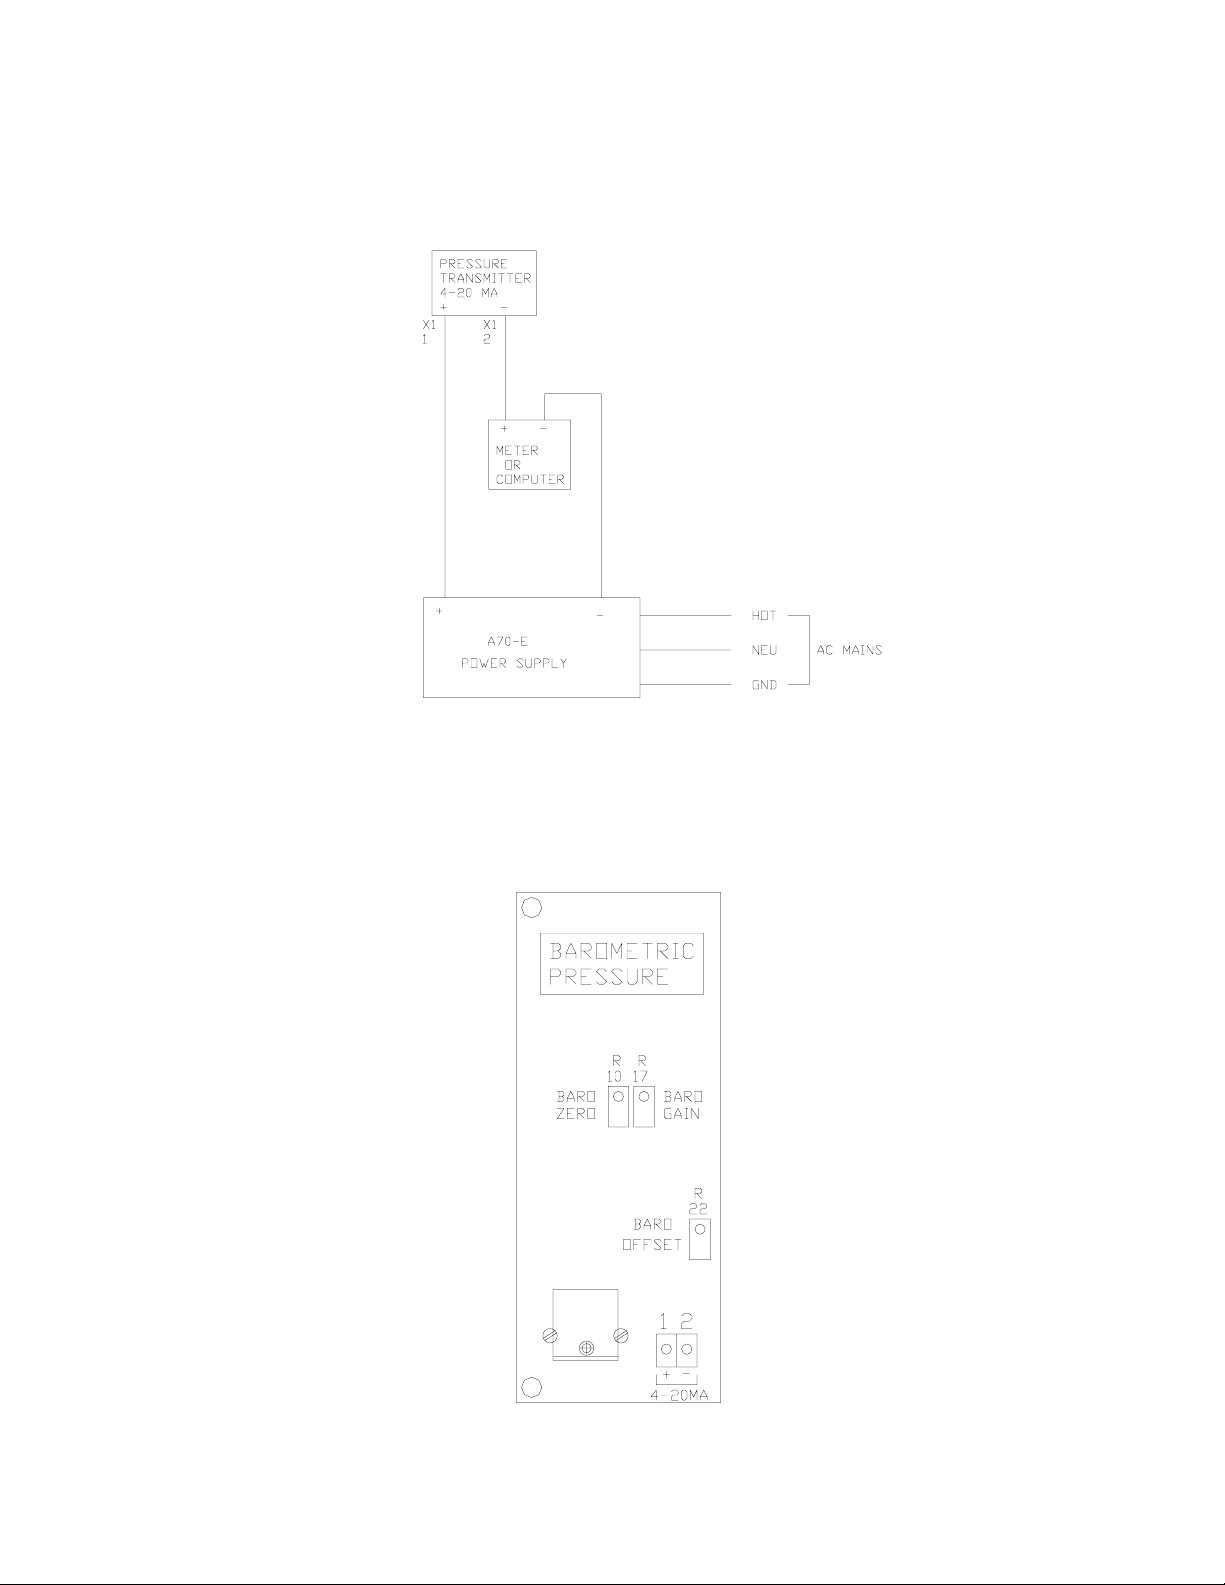
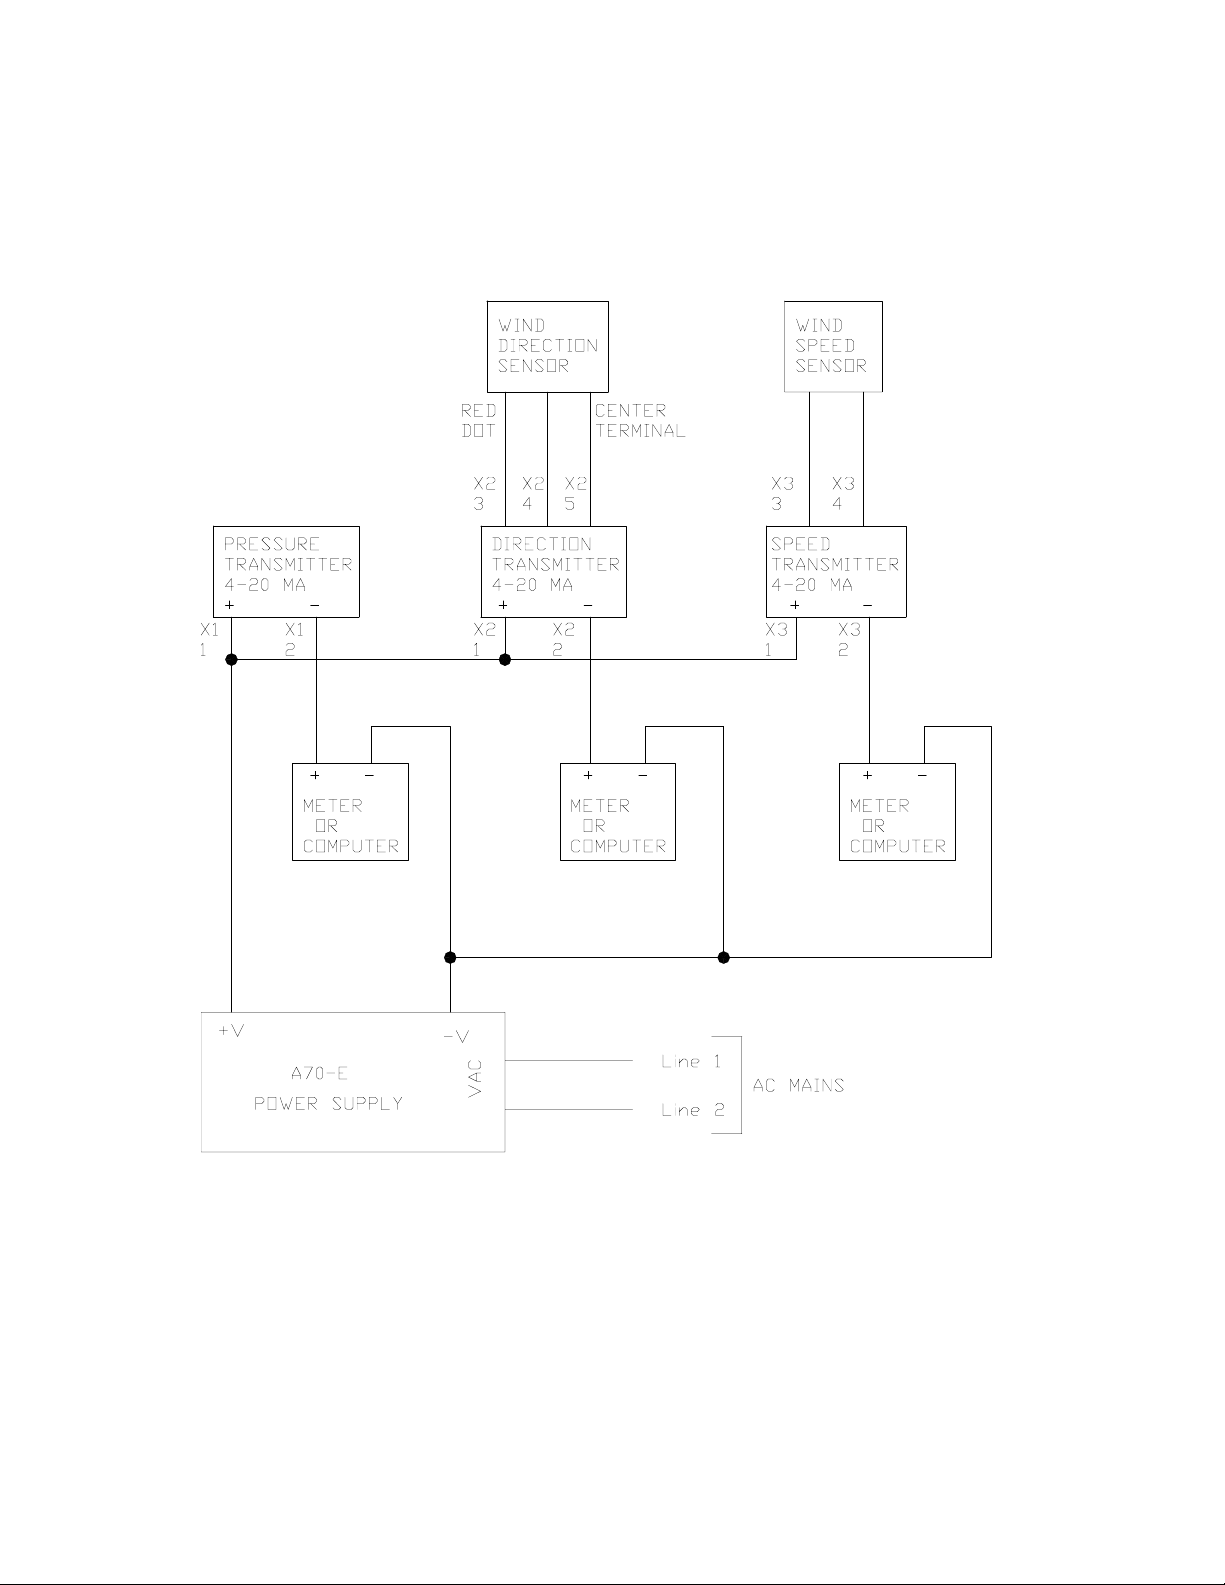
Loop Current :0 mA
Failure Description :
Polarity reversed
Open circuit in cable
Power supply failure
Transmitter failure
Loop Current :Less than 3 ma
Failure Description :
Low power supply voltage
Loop resistance too high
Loop Current : Greater than 20 ma
Failure Description :
Ambient pressure above range Adjust
“Baro. Offset”
Transmitter failure
Loop Current :Does not reach 20 ma, otherwise
operates properly
Failure Description :
Low power supply voltage
Loop resistance too high

10
MAINTENANCE
No maintenance is required except to check
calibration at yearly intervals. See recalibration
section.
CALIBRATION
Altitude Adjustment
1. Apply power to the loop and allow the
system to stabilize for 20 minutes or more.
Note: Adjustment of the “GAIN” potentiometer is
not initially required. If calibration is necessary
after a year or more of service a suitable pressure
reference will be required.
2. Determine local barometric pressure as
referred to sea level. A nearby radio or television
station weather report is generally suitable. Refer
to Formula 2 and calculate loop current.
3. Refer to Figure #3 and locate the “baro.
offset”adjustment.Use this as a course adjustment.
Turn the small screw on the top to set the loop
current calculated in Step 2 to within + 0.5 mA.
4. Locate the “ZERO” adjustment. Turn the
small screw on top to obtain the final adjustment
for the loop current calculated in Step 2 +0.02
mA.
Recalibration
BAROMETER
The transmitter is calibrated when shipped from
the factory. Recalibration requires special
equipment and should only be attempted with
guidance from the factory. A milliammeter &
means of generating the reference pressures are
required.
See Transmitter installation section for altitude
adjustment.
See Figure 2. Connect the transmitter to a power
supply. Allowthecircuittostabilizefor20 minutes
or more for best accuracy.
Calibration Range - E
1. Apply a pressure of 27 inches of Hg to the
pressure transducer using a tube with 3/16" id.
2. Monitor the output current and adjust the “baro.
offset” potentiometer to produce 4.02 mA.
3. Apply a pressure of 30 inches of Hg and adjust
the “baro. gain” potentiometer to produce a loop
current of 15.98 - 16.02 mA
4. Repeat steps 1 - 3 until instrument is in
calibration.
Calibration Range - M
1. Apply a pressure of 900 mBar to the pressure
transducer using a tube with 3/16" id.
2. Monitor the barometer loop output current and
adjust the “baro. offset” potentiometer to produce
a loop current of 3.98 - 4.02 mA.
3. Apply a pressure of 1050 mBar and adjust the
“baro. gain” potentiometer to produce a loop
current of 15.98 - 16.02 mA
4. Repeat steps 1 - 3 until instrument is in
calibration.

11
LIMITED WARRANTY
COMPTUS Inc. extends this warranty to the
original consumer only. Any product manufac-
tured by Comptus is warranted against defect for
a period of ONE YEAR beginning on the date of
purchase by the consumer or two years begin-
ning on the date of purchase from Comptus by
the authorized dealer, whichever expires sooner.
TO OBTAIN WARRANTY SERVICE, the
purchaser must contact Comptus and receive
return authorization. Such correspondence
should be addressed to: Comptus Inc., 342
Lyndeboro Rd., New Boston, NH. 03070. All
warranty service is performed at the factory. All
incidental expenses, including shipment of
products to Comptus by the purchaser, shall be
the sole responsibility of the purchaser. WAR-
RANTY SERVICE is at the sole discretion of
Comptus and free of charge for parts and labor.
Under the above terms, Comptus will repair or
replace the defective component(s), provided
that:
a) the product has not been subjected to abuse,
neglect, accident, alteration, improper installa-
tion or servicing, or used in violation of instruc-
tions furnished by Comptus;
b) the product has not been repaired or altered
by anyone except Comptus or its authorized
service agencies;
c) the serial number has not been defaced,
removed, or otherwise changed;
d) the damage has not been caused by acts of
nature including windstorm and hail beyond
those specified as within the range of operating
conditions;
e) the damage has not been caused by shipping.
THIS WARRANTY IS IN PLACE OF ALL
OBLIGATIONS OR LIABILITIES ON THE
PART OF COMPTUS FOR DAMAGES. IT
DOES NOT APPLY TO ANY COMPONENT
OR EQUIPMENT RESOLD BY COMPTUS
IN ITS ORIGINAL CONDITION AS RE-
CEIVED BY COMPTUS FROM THE
MANUFACTURER OR DISTRIBUTOR,
AMONG THE DAMAGES EXCLUDED
FROM THIS WARRANTY ARE ANY INCI-
DENTAL OR CONSEQUENTIAL DAM-
AGES ARISING OUT OF OR IN CONNEC-
TION WITH THE PRODUCT IN ANY
WAY. Any implied warranties are limited in
duration to the duration of the written war-
ranty. No representative or person is autho-
rized to give any other warranty or assume
for Comptus any other liability in connection
with the sale of its products.
THIS WARRANTY GIVES YOU SPECIFIC
LEGAL RIGHTS, AND YOU MAY ALSO
HAVE OTHER RIGHTS WHICH VARY
FROM STATE TO STATE. SOME STATES
DO NOT ALLOW THE EXCLUSION OR
LIMITATION OF INCIDENTAL OR CONSE-
QUENTIAL DAMAGES OR LIMITATIONS
ON HOW LONG AN IMPLIED WARRANTY
LASTS, SO THE ABOVE LIMITATIONS
AND/OR EXCLUSIONS MAY NOT APPLY
TO YOU. This warranty complies with the
Magnuson-Moss Consumer Warranty Act, and
completely replaces any warranty printed on
promotional material describing products of
Comptus Inc.

12
HOW TO RETURN EQUIPMENT
TO COMPTUS
1. Contact the Comptus Service department with
the model and serial number of the unit. Be
prepared to provide the symptoms of the prob-
lem as many are solved without the need for
returning the equipment. Have a person with
firsthand experience of the trouble on hand to
provide specific information.
2. Comptus will issue a Return Material Authori-
zation Number (RMA#) if required. This will
ensure the fastest response and least cost for all
parties. Please reference this number in all
correspondence. This number should be printed
on the shipping container.
3. Include a description of the service desired
with the returned equipment. If the equipment
is being returned for repair, please include a
description of the problem.
4. If the equipment is packaged in a plastic case,
wrap it in aluminum foil, or other conductive
material. This will protect it from static electric-
ity, as well as prevent the packing material from
jamming mechanical parts, such as switches.
Otherwise, place the equipment in a plastic bag,
again to prevent contamination by packing
material.
Place the equipment in a suitable shipping
container and fill with packing material.
There should be at least one inch of packing
material between the equipment and the shipping
container on all sides.
5. Equipment will be returned C.O.D. to sender
if any charges are incurred, unless other arrange-
ments are made in advance.
SHIP THE EQUIPMENT TO:
Comptus Inc.
342 Lyndeboro Rd.
New Boston NH 03070 U.S.A.
Telephone: 603 487-5512
Telfax: 603 487-5513
E-mail: [email protected]
NOTE: Please be sure to include the RMA
Number, as described in Item 1, on the shipping
container.
342 Lyndeboro Rd., New Boston, NH USA
Comptus Inc
ISO 9001 Registered ®

13
Packing List
Quantity Description
1 Pressure Transmitter
1 Instruction Manual
1 Certificate of Calibration
IMPORTANT: Please check your order on receipt to be certain all listed accessories are included
before discarding shipping container or packing material. All shortages must be reported within 10
days of receipt.
342 Lyndeboro Rd., New Boston, NH USA
Comptus Inc
ISO 9001 Registered ®

14
342 Lyndeboro Rd., New Boston, NH USA
Comptus Inc
ISO 9001 Registered ®
Table of contents
Other Comptus Transmitter manuals