IMPORTANT SAFETY
INSTRUCTIONS
When using electrical appliances, especially
when children are present, basic safety precau-
tions should always be taken, including the
following:
READ ALL INSTRUCTIONS
BEFORE USING
KEEP AWAY FROM WATER
DANGER–Any appliance is electri-
cally live, even when the switch is off.
To reduce the risk of death or injury by
electric shock:
1. Do not place or store appliance where it can
fall or be pulled into a tub or sink.
2. Do not use appliance while bathing or in the
shower.
3. Do not place appliance in, or drop into water
or other liquid.
DO NOT REACH
INTO THE WATER
WARNING–
To reduce the risk of
burns, electric shock, fire, or injury to persons:
1. This appliance should not be used by, on, or
near children or individuals with certain dis-
abilities.
2. Use appliance only for its intended use as
described in this manual. Only use attachments
recommended by the manufacturer. Do not use
an extension cord to operate the appliance.
3. Never drop or insert any object into any open-
ing of the appliance.
4. Do not place the appliance on any surface
while it is operating.
5. Do not use the appliance with a damaged
or broken comb or with teeth missing from the
blades, as injury may result. Before each use,
make certain the blades are aligned properly
and oiled.
6. Do not use the appliance outdoors or operate
where aerosol (spray) products are being used or
oxygen is being administered.
SAVE THESE
INSTRUCTIONS
TROUBLESHOOTING
There are several things to look for if your trimmer
fails to operate:
1. Be sure the trimmer is turned ON.
2. Check if trimmer head is properly placed and
aligned.
3. Check the blades to see if they are clogged
with hair clippings; if so, use the cleaning
brush to remove hair.
4. If the trimmer still fails to operate, take or send
it to a Conair Service Centre (see warranty
procedure and addresses).
FOR HOUSEHOLD
USE ONLY
OPERATING
INSTRUCTIONS
1. To use your trimmer, push ON/OFF switch
upwards to “ON” position.
2. After you finish using your trimmer, push down
on the ON/OFF switch to turn the trimmer off.
ON/OFF SWITCH
To operate, simply push slide toward blade; to
stop, push slide away from blade.
*Requires 2 AAA batteries (not included). We recommend
using alkaline batteries in your trimmer because they
last longer. Do not mix old and new batteries. Do not mix
alkaline, standard (carbon-zinc), or rechargeable (nickel-
cadmium) batteries.
Bring the batteries with the handle of the trimmer
to the nearest collection centre for proper
disposal. DO NOT throw the batteries into the normal
municipal waste system.
TYPES OF BEARDS/MUSTACHES
GROWING A BEARD OR MUSTACHE
There are three key factors that determine which
beard or mustache style is most suitable for your
face:
1. The shape and dimensions of your face.
2.
The natural growth of your beard/mustache.
3. The thickness of your beard/mustache.
If you are unsure of the type of beard or mustache
that most suits your face, speak with a professional
hair stylist and ask for an opinion on what style
would be best. Once your beard or mustache has
been styled, it is essential that you maintain its
appearance. To do this, use your shaper to trim your
beard/mustache weekly.
For the best trimming results, your beard should be
slightly damp (not wet) before using the trimmer.
This will prevent the trimmer from removing more
hair than desired.
CAUTION
The outer foil and inner blades of the shaver are
delicate and must be handled very carefully.
GETTING STARTED
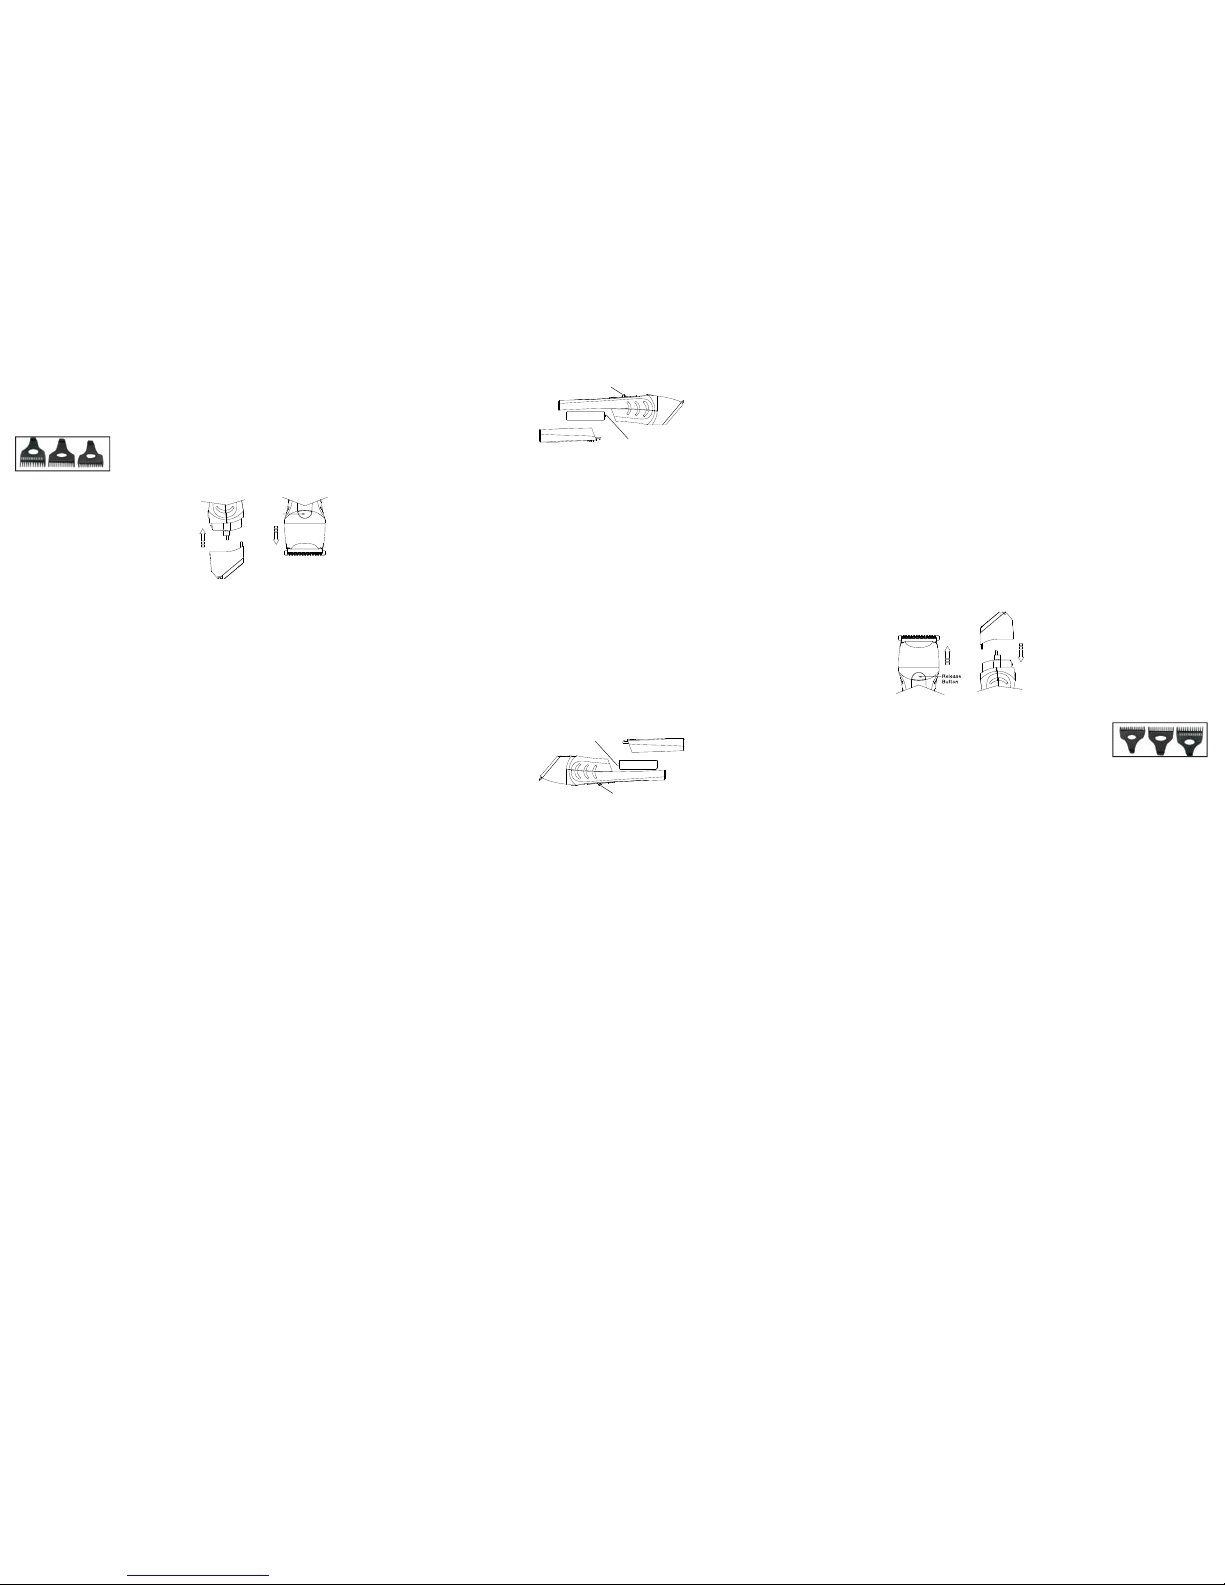
TO SWITCH TRIMMER HEADS
Hold the trimmer handle with the back of the
trimmer facing you.
Removing head: Press the release button and then
pull up (Fig. 1).
Attaching head: Position on top of the trimmer
handle, align the triangle on the trimmer head with
the circle on the side of the handle and push down
(Fig. 2).
OUTLINING YOUR BEARD
1. It is always best to begin with a clean, slightly
damp beard.
2. After you have combed through your beard in
the direction it grows naturally, you will want
to outline the desired shape, beginning under
your jawline.
3. Attach the beard trimmer head. Begin defining
your beard’s shape under your chin and work
upward on each side of your face toward your
ears. Then define the upper outline of your beard
across your cheeks, past your sideburns and
toward your hairline.
NOW YOU’RE READY
TO TRIM YOUR BEARD
1. To use the 5-position comb, slide it over the
trimmer blades and snap down into position.
(There is an indentation on the back of the
trimmer head. Make sure foot of the attach-
ment comb is snapped into that opening. If it
isn’t, then the comb will move). At first, until you
become familiar with the adjustments, use the
longest comb and trim setting. (You can always
go back and make your beard a little shorter.)
2. Begin trimming your beard using smooth, even
strokes. Start with your sideburns and work down-
ward toward your chin. (Never attempt to trim
against the natural growth of your beard, because
the hair will be cut too short.)
3. If you decide you want a closer trim, you can
now adjust the 5-position comb to a shorter
setting and go over your beard again until you
achieve the desired length.
BLENDING THE JAWLINE
1. The three jawline attachments will help you
to achieve a
neat, finished
trim under
your chin. To
use one of the
attachments, press it down over the trimmer
blades until it clicks into position.
2. Hold the trimmer in an upright position and
begin trimming under your jawline, using short,
even strokes.
3. After your beard is blended, turn off the
trimmer and remove the attachment by gently
pulling up on tab.
TO TRIM YOUR MUSTACHE
1. For best results, start with a clean, slightly damp
mustache.
2. Comb through your mustache in the direction
it grows.
3. Place the 5-position comb over the trimmer
blades and snap it into position. It is a good
idea to start with the longest trim setting
adjustment. (You can always go back and cut
your mustache more closely with a shorter
setting.)
Battery Position
On/Off Switch
Fig.1 Fig.2
CONSIGNES
IMPORTANTES
L’utilisation d’appareils ménagers, surtout autour
des enfants, demande la prise de précautions
dont les suivantes :
LIRE TOUTES
LES DIRECTIVES
AVANT L’UTILISATION
TENIR LOIN DE L’EAU
DANGER–Un appareil est sous
tension, même quand il est éteint.
Pour réduire le risque de mort ou blessure par
choc électrique :
1. Ne pas placer ni ranger l’appareil là où il peut
tomber ou être tiré dans une baignoire ou un
évier.
2. Ne pas utiliser l’appareil en prenant une
douche ou un bain.
3. Ne pas placer ni échapper l’appareil dans
l’eau ou un liquide.
NE PAS SAISIR L’APPAREIL
DANS L’EAU.
ATTENTION–
Pour réduire le
risque de brûlures, choc, incendie ou blessure :
1. L’appareil ne devrait être utilisé par, sur ou
près d’enfants ou de personnes souffrant de
certaines infirmités.
2. Ne l’utiliser que tel que prévu dans ce manu-
el. Ne pas utiliser d’accessoires non recom-
mandés par le fabricant. Ne pas l’utiliser
avec une rallonge.
3. Ne jamais échapper ni insérer un objet dans
une ouverture.
4. Ne pas déposer l’appareil sur une surface
alors qu’il est en marche.
5. N’utilisez pas l’appareil si le peigne est
endommagé ou cassé ou s’il manque des
dents aux lames car vous risqueriez de vous
blesser. Avant chaque usage, assurez-vous
que les lames sont bien alignées et huilées.
6. Ne pas l’utiliser à l’extérieur ni là où l’on utilise
des aérosols ou administre de l’oxygène.
CONSERVER CES
DIRECTIVES
DÉPISTAGE DES PROBLÈMES
Si la tondeuse ne semble pas fonctionner
correctement :
1. S’assurer que la tondeuse est en marche.
2. S’assurer que la tête de la tondeuse est bien
posée et alignée.
3. Vérifier si les lames sont bourrées de poils. Si
c’est le cas, nettoyez-les avec la brosse.
4. Si la tondeuse ne fonctionne toujours pas, la
présenter ou l’envoyer au service après-vente
Conair (adresse et procédure dans le texte de
la garantie).
RÉSERVÉ À L’USAGE
MÉNAGER
DIRECTIVES
D’UTILISATION
1. Pousser l’interrupteur vers le haut pour mettre
la tondeuse en marche.
2. Une fois l’utilisation terminée, pousser
l’interrupteur vers le bas pour éteindre la
tondeuse.
INTERRUPTEUR
Pousser la glissière vers les lames pour mettre
la tondeuse en marche. Pousser la glissière
vers le bas pour l’éteindre.
*Nécessite 2 piles AAA (non fournies). Nous recom-
mandons des piles alcalines car elles offrent une plus
longue durée utile. Ne pas mélanger des piles neuves
et usagées. Ne pas mélanger des piles ordinaires,
alcalines ou rechargeables (nickel-cadmium).
Amener les piles avec le manche de la tondeuse,
au centre de recyclage le plus près, pour la mise
aux rebuts. Ne jetez PAS les piles avec les ordures
ménagères.
TYPES DE BARBES/MOUSTACHES
FAIRE POUSSER UNE BARBE OU
UNE MOUSTACHE
Trois principaux facteurs déterminent le style de
moustache ou de barbe qui convient le mieux à
un visage :
1. La forme et la dimension du visage.
2. La croissance naturelle de la barbe/moustache.
3. La densité de la barbe/moustache.
Si l’on n’est pas certain du type de barbe ou de
moustache qui convient le mieux, consulter un coif-
feur pour obtenir son opinion. Une fois la barbe ou
la moustache stylisée, il est essentiel d’en maintenir
l’apparence. Pour ce faire, utiliser la tondeuse à
barbe/moustache chaque semaine.
Afin d’obtenir de meilleurs résultats, la barbe devrait
être légèrement humide (pas détrempée) avant
d’utiliser la tondeuse. On évite ainsi de tondre trop
de poils.
MISE EN GARDE
La grille et les lames de la tondeuse sont délicates
et doivent être manipulées avec soin.
UTILISATION
CHANGER LES TÊTES
Tenir le manche de la tondeuse, le dos face à soi.
Enlever la tête: Appuyer sur le bouton de
dégagement et tirer la tête (ill. 1).
Poser la tête : Placer la tête sur le manche, aligner
le triangle sur la tête avec le cercle sur le manche
et presser (ill. 2).
DÉLIGNER LA BARBE
1. Il est préférable de débuter avec une barbe
propre, légèrement humide.
2. Une fois la barbe peignée dans le sens de la
pousse naturelle, déligner la forme voulue en
débutant sous la ligne de mâchoire.
3. Poser la tête de tonte pour la barbe. Définir la
forme de la barge en partant sous le menton
et travailler en direction des oreilles, d’un côté
et de l’autre du visage. Définir ensuite la ligne
supérieure le long des joues, des favoris et
vers la ligne des cheveux.
TONTE DE LA BARBE
1. Pour utiliser le peigne à 5 positions, l’enfiler sur
les lames et l’enclencher. (Une petite encoche
se trouve au dos de la tête de la tondeuse.
S’assurer que le bas du peigne s’y enclenche,
sinon le peigne bougera.) Au départ et jusqu’à
ce que l’on maîtrise bien la tondeuse, utiliser le
réglage le plus long. (On peut toujours passer de
nouveau avec le peigne réglé plus bas.)
2. Tailler la barbe en mouvements lents et doux.
Commencer par les favoris, en direction du
menton. (Ne jamais tenter de tondre dans le
sens contraire de la pousse sinon les poils
seront tondus trop courts.)
3. Pour une coupe plus à ras, ajuster le peigne à
une position plus basse et repasser sur la barbe
jusqu’à ce que la longueur voulue soit atteinte.
ÉTAGER LA LIGNE DE MÂCHOIRE
1. Les trois peignes de ligne de mâchoire
aident à obtenir
une coupe nette
sous le menton.
Pour utiliser un
de ces peignes, l’enclencher sur les lames de
la tondeuse.
2. Tenir la tondeuse selon la verticale et
commencer à tondre sous le manton, en petits
coups brefs.
3. Une fois la barbe taillée, éteindre la tondeuse
et enlever le peigne en tirant lègèrement la
patte de retenue.
TAILLER LA MOUSTACHE
1. Il est préférable de débuter avec une moustache
propre, légèrement humide
2. Peigner la moustache dans le sens de la
pousse.
3. Poser le peigne à 5 positions sur la tondeuse
et l’enclencher. Il est préférable de débuter
avec une position plus élevée (on peut toujours
revenir et tailler plus court).
Position des piles
Interrupteur
ill.1 ill. 2
Bouton de
dégagement