Conceptronic CLLCHATCAM User manual

NEDERLANDS
1
Conceptronic CLLCHATCAM
Snelstartinstallatie
Gefeliciteerd met de aanschaf van uw
Conceptronic Lounge’n’LOOK Chatcam.
In de bijgaande Snelstart handleiding wordt stap voor stap uitgelegd hoe u de
Conceptronic Lounge’n’LOOK Chatcam installeert.
Ingeval van problemen adviseren wij u onze support-site te bezoeken (ga naar:
www.conceptronic.net en klik op ‘Support’). Hier vindt u een database met
veelgestelde vragen waar u hoogstwaarschijnlijk de oplossing voor uw probleem
kunt vinden.
Heeft u andere vragen over uw product die u niet op de website kunt vinden,
Voor meer informatie over Conceptronic producten kunt u terecht op de
Conceptronic website: www.conceptronic.net.
Bij software/drivers installatie: Het is mogelijk dat onderstaande installatie iets
afwijkt van de installatie op uw computer. Dit is afhankelijk van de Windows
versie die u gebruikt.
1. Introductie
Met de Conceptronic Lounge’n’LOOK Chatcam kunt u elkaar zien tijdens het
chatten! De Lounge’n’LOOK Chatcam is compatible met alle messenger en
chat applicaties. De Lounge’n’LOOK Chatcam met ingebouwde microfoon is
gemakkelijk aan te sluiten en te installeren. U kunt de Lounge’n’LOOK
Chatcam op uw bureau gebruiken of vastklemmen op het scherm van uw
notebook of TFT scherm. De CLLCHATCAM heeft 4 LED’s, het licht van deze
4 LED’s kan ingesteld worden met de draaiknop op de kabel. Op deze manier
kunt u de helderheid van de verlichting naar eigen smaak aanpassen.

NEDERLANDS
2
2. Pakket Inhoud
De volgende onderdelen dienen aanwezig te zijn in de verpakking:
1x Conceptronic Lounge’n’LOOK Chatcam, met gemonteerde voet / clip
1x Product CD-ROM, met stuurprogramma en VP-EYE 4.0
1x Snelstart Handleiding
1x Garantiekaart
3. Minimale Systeemeisen
•Besturingssysteem: Windows 2000 of Windows XP
•64 MB Intern Geheugen (of hoger)
•100 MB Vrije harde schijf ruimte
•1 (vrije) USB poort
•CD-ROM Station
•Geluidskaart
4. Software installatie
Plaats de Lounge’n’LOOK Chatcam Product CD-ROM in uw CD-ROM station en
het installatieprogramma zal automatisch starten. Als het
installatieprogramma niet automatisch gestart wordt kunt u deze starten
door te klikken op ‘Start’ -> ‘Uitvoeren’ en vervolgens het commando
‘x:\Autorun.exe’, te geven (ervan uitgaande dat X: uw CD-ROM station is).
Notitie: Installeer eerst de software voordat u de Lounge’n’LOOK Chatcam
aansluit op uw computer!

NEDERLANDS
3
4.1. Stuurprogramma Installatie
a. Selecteer de optie ‘Install Drivers’ in het menu. De installatie van
het stuurprogramma wordt gestart. Klik op ‘Next’ om door te gaan.
b. Het stuurprogramma zal geïnstalleerd worden. Bij het gebruik van
Windows 2000 of XP zal een popup bericht over Logotest of Digitale
Handtekening getoond worden. Klik op ‘Yes’ of ‘Continue Anyway’
om door te gaan.
c. Klik op ‘Finish’ om de installatie van het stuurprogramma te
voltooien.
4.2. Hardware Installatie
Nadat het stuurprogramma is geïnstalleerd kunt u de Lounge’n’LOOK
Chatcam aansluiten op een vrije USB poort op uw computer of op een USB
hub, verbonden met uw computer. Om gebruik te kunnen maken van de
microfoon dient u de microfoonkabel aan te sluiten op de MIC-In aansluiting
van uw geluidskaart.
a. Windows zal de ‘Found New Hardware Wizard’ tonen. Selecteer
‘No, not this time’ en klik op ‘Next’. (Alleen voor Windows XP
SP2!)
b. Selecteer ‘Install the software automatically (Recommended)’ en
klik op ‘Next’.
c. Een popup bericht over Logotest of Digitale Handtekening zal
worden getoond. Klik op ‘Yes’ of ‘Continue Anyway’.
d. Klik op ‘Finish’ om de installatie te voltooien. Herstart de
computer.
4.3. Applicatie Installatie – VP-EYE
De VP-EYE software is een krachtig softwarepakket met diverse
mogelijkheden. Met de VP-EYE software kunt u video-email en kaarten
creëren, spelletjes spelen en foto’s maken.
a. Als het installatiemenu nog steeds aanwezig is op uw scherm kunt u
op ‘Install VP-EYE Software’ klikken om het VP-EYE
installatiemenu te openen. Klik anders op ‘Start’ -> ‘Uitvoeren’ en

NEDERLANDS
4
geef het commando ‘x:\autorun.exe’ (ervan uitgaande dat X: uw
CD-ROM station is) om het menu te starten.
b. Selecteer de optie “Install VP-EYE 4.0” om het programma VP-EYE
op de computer te installeren. Het installatieprogramma zal
standaard alle opties installeren.
Als u wijzigingen in de installatie wilt maken, klik dan op
‘Change Installation Options for VP-EYE’ in het VP-EYE Menu. U
kunt nu de applicaties van uw keuze selecteren. Na gebruik van
deze optie worden alleen de geselecteerde applicaties
geïnstalleerd als u op ‘Install VP-EYE 4.0’ klikt.
c. Voer het benodigde serienummer voor VP-EYE in. Het serienummer
kan gevonden worden op de achterzijde van het CD-ROM hoesje.
d. Klik op ‘Finish’ om de installatie af te ronden.
4.4.Applicatie Installatie – WebEye
De WebEye applicatie maakt het mogelijk om de beelden van uw webcam
uit te zenden over uw netwerk of over het internet. Als de software actief
is kunt u uw computer benaderen via een webbrowser om de beelden van
de webcam te zien.
a. Als het installatiemenu nog steeds aanwezig is op uw scherm kunt u
op ‘Install WebEye Software’klikken om de installatie te starten.
Klik anders op ‘Start’ -> ‘Uitvoeren’ en geef het commando
‘x:\autorun.exe’ (ervan uitgaande dat X: uw CD-ROM station is) om
het menu te starten.
b. Klik op ‘Next’ om door te gaan met de installatie. U kunt de
installatiemap wijzigen indien gewenst. Klik op ‘Next’ om door te
gaan.
c. Klik op ‘Finish’ om de installatie te voltooien.
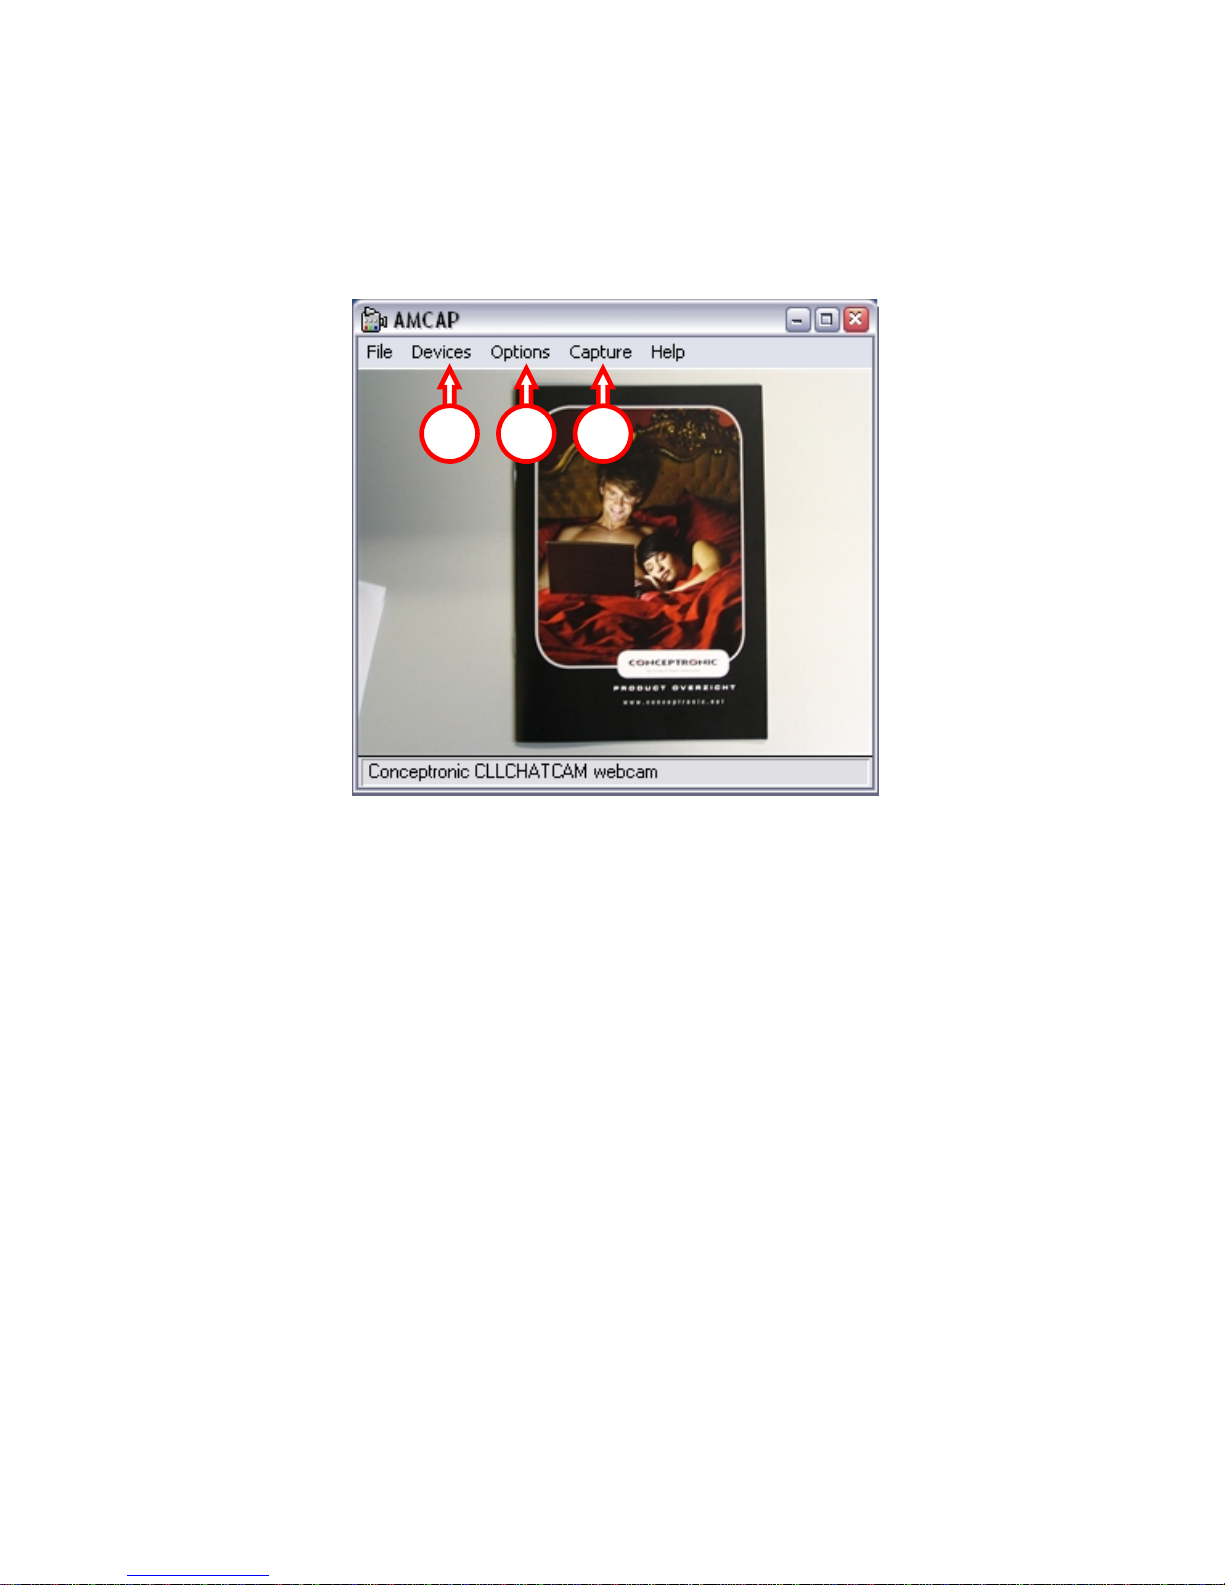
5. De Lounge’n’LOOK Chatcam gebruiken
Om de functionaliteit van de webcam te controleren kunt u het programma
AMCAP gebruiken. Het programma AMCAP is samen met de drivers
geïnstalleerd. Dit programma is een simpel programma om de webcam te
configureren en om videobeelden op te nemen.

NEDERLANDS
5
Om het programma AMCAP te starten, klik op ‘Start’, ‘Programma’s’,
‘Conceptronic CLLCHATCAM webcam’, en ‘AMCAP’. U zult een live beeld
zien van de webcam.
Indien er geen beeld weergegeven wordt, gebruik dan de optie ‘Devices’ (1)
en selecteer de ‘Conceptronic CLLCHATCAM webcam’.
Via het menu ‘Options’ (2) kunt u wijzigingen aanbrengen in de standaard
instellingen van de Lounge’n’LOOK Chatcam. Het menu ‘Capture’ (3) geeft
u de mogelijkheid om videobeelden op te nemen op uw harde schijf.
De Lounge’n’LOOK Chatcam kan ook gebruikt worden in MSN Messenger. U
dient eerst MSN Messenger te configureren voordat u de webcam kunt
gebruiken. Om te configureren, gebruik de optie ‘Extra’, ‘Audio en Video
instellen’ in het hoofdmenu van MSN Messenger.
Als alle instellingen zijn gemaakt is de Lounge’n’LOOK Chatcam klaar
voor gebruik!
1 2 3

ENGLISH
6
Conceptronic CLLCHATCAM
Quick Installation Guide
Congratulations on the purchase of your
Conceptronic Lounge’n’LOOK Chatcam.
The enclosed Quick Installation Guide gives you a step-by-step explanation of how to
install the Conceptronic Lounge’n’LOOK Chatcam.
When problems occur, we advise you to go to our support-site (go to
www.conceptronic.net and click ‘Support’. Here you will find the Frequently Asked
Questions Database.
When you have other questions about your product and you cannot find it at our
For more information about Conceptronic products, please visit the Conceptronic Web
Site: www.conceptronic.net
The Software installation as described below, may be slightly different from the
installation on your computer. This depends on the Windows version you are using.
1. Introduction
With the Conceptronic Lounge’n’LOOK Chatcam, you are able to see each other
while you are chatting! The Lounge’n’LOOK Chatcam is compatible with all
messenger programs and chat applications. The Lounge’n’LOOK Chatcam, with
build-in microphone, is easy to connect and install. You can use the
Lounge’n’LOOK Chatcam on your desk or attached to the screen of your notebook
or TFT screen. The CLLCHATCAM is having 4 LED’s, the Light from the 4 LED’s can
be adjusted by the build-in light control on the cable. In this way you can adjust
the brightness of the illumination to your own taste.

ENGLISH
7
2. Package Contents
The following items must be present in your package:
1x Conceptronic Lounge’n’LOOK Chatcam, with attached foot / clip
1x Product CD-ROM, with driver and VP-EYE 4.0
1x Quick Installation Guide
1x Warranty Card
3. System Requirements
•Operating Systems: Windows 2000 or Windows XP
•64 MB System Memory (or higher)
•100 MB Free Hard disk Space
•One (free) USB port
•CD-ROM Drive
•Sound Card
4. Software installation
Insert the Lounge’n’LOOK Chatcam Product CD-ROM into CD-ROM drive and the
installation program will start automatically. If the installation program does not
start automatically, click on ‘Start’ -> ‘Run’ and type ‘x:\autorun.exe’,
(assuming X: is your CD-ROM drive).
Note: Install the software first, before you connect the CLLCHATCAM
to the
computer!

ENGLISH
8
4.1. Driver Installation
a. Select the option ‘Install Drivers’ in the menu. The installation of the
driver will start. Click ‘Next’ to continue.
b. The driver will be installed. When using Windows 2000 or XP, a pop-up
message will appear that the product is not digitally signed or a message
about the logo test appears. Click ‘Yes’ or ‘Continue Anyway’ to
continue.
c. Click ‘Finish’ to complete the driver installation.
4.2. Hardware Installation
After the driver installation is completed, you can connect the
Lounge’n’LOOK Chatcam to any available USB port on your PC or on any USB
hub attached to your PC.
To use the microphone, connect the microphone cable to the MIC-In of your
soundcard.
a. Windows will prompt a ‘Found New Hardware Wizard’. Select ‘No, not
this time’ and click ‘Next’. (Windows XP SP2 Only!)
b. Select ‘Install the software automatically (Recommended)’ and click
‘Next’.
c. A popup message about digital signature or logo test will appear. Click
‘Yes’ or ‘Continue Anyway’.
d. Click ‘Finish’ to complete. Restart the computer.
4.3.Application installation – VP-EYE
The VP-EYE software is a powerful software package with various options.
With the VP-EYE software, you can create video-email, create postcards, play
games and make photos.
a. When the menu of the CD-ROM is still on your screen, click ‘Install VP-
EYE Software’ to open the VP-EYE installation menu. Otherwise click on
‘Start’ -> ‘Run’ and type ‘x:\autorun.exe’, (assuming X: is your CD-ROM
drive).
b. Select the option “Install VP-EYE 4.0” to install the VP-EYE software on
your computer. The installation will install by default all the available
applications. If you want customize the installation, click ‘Change

ENGLISH
9
Installation Options for VP-EYE’ in the VP-EYE menu. You can select the
preferred applications. After using this option only the selected
applications will be installed when clicking on ‘Install VP-EYE 4.0’.
c. Enter the serial number required for VP-Eye. The serial number can be
found on the back of the CD-ROM Sleeve.
d. Click ‘Finish’ to complete.
4.4.Application Installation – WebEye
The WebEye application makes it possible to broadcast the image of the webcam
on your network or the Internet. With the software active, you can access your
computer through a web browser to see the webcam image.
a. When the menu of the CD-ROM is still on your screen, click ‘Install
WebEye Software’to start the installation. Otherwise click on ‘Start’ ->
‘Run’ and type ‘x:\autorun.exe’, (assuming X: is your CD-ROM drive).
b. Click ‘Next’ to continue the installation. You can change the installation
folder if desired. Click ‘Next’ to continue.
c. Click ‘Finish’ to complete.
5. Using the Lounge’n’LOOK Chatcam
To check the functionality of the webcam, you can use the program AMCAP.
The program AMCAP is installed together with the drivers. This program is a
simple program to configure the webcam and make video captures.
To execute the program AMCAP, click ‘Start’, ‘Programs’, ‘Conceptronic
CLLCHATCAM webcam’, and ‘AMCAP’. You will see the livestream of the
webcam available in the program.

ENGLISH
10
When no image of the webcam is visible, use the option ‘Devices’ (1) to select
the ‘Conceptronic CLLCHATCAM webcam’.
Through the menu ‘Options’ (2), you are able to change the default settings for
the Lounge’n’LOOK Chatcam. Using the menu ‘Capture’ (3) will allow you to save
video captures on your computer hard disk.
The Lounge’n’LOOK Chatcam can also be used within Microsoft MSN Messenger.
You need to configure MSN Messenger before you can use the webcam. To
configure, use the ‘Tools’, ‘Audio and Video setup’ in the main MSN Messenger
window.
After all configurations are made, the Lounge’n’LOOK Chatcam is ready for
use!
1 2 3

ESPAÑOL
11
Conceptronic CLLCHATCAM
Guía de iniciación rápida
Enhorabuena por la compra del
CLLCHATCAM de Conceptronic.
La Guía de instalación del hardware incluida le ofrece una explicación paso a paso de
cómo instalar CLLCHATCAM de Conceptronic.
Si encuentra problemas, le aconsejamos que se dirija a nuestra página web
www.conceptronic.net y haga clic en «Support». Aquí encontrará la base de datos de
las preguntas más frecuentes o FAQ.
Si tiene otras preguntas sobre su producto y no las encuentra en nuestro sitio web,
póngase en contacto con nuestro servicio técnico por correo electrónico:
Para obtener más información acerca de productos de Conceptronic por favor visite el
lugar Web de Conceptronic: www.conceptronic.net
La instalación de software, tal y como se describe a continuación, puede ser algo
diferente de la instalación en su ordenador. Eso depende de la versión de Windows
que esté usando.
1. Introducción
¡Con la Conceptronic Lounge’n’LOOK Chatcam podrán verse mientras chatean! La
Lounge’n’LOOK Chatcam es compatible con todos los programas de mensajería
instantánea y las aplicaciones de chat. La Lounge’n’LOOK Chatcam, con
micrófono integrado, es fácil de conectar e instalar. Puede colocar la
Lounge’n’LOOK Chatcam sobre su escritorio, acoplarla al monitor de su portátil o
a su monitor TFT. La CLLCHATCAM dispone de indicadores luminosos. La luz de
los cuatro LED se puede ajustar mediante el control de iluminación integrado en
el cable. De este modo puede ajustar el brillo de la iluminación a su gusto.

ESPAÑOL
12
2. Contenido del paquete
En el paquete deben encontrarse los siguientes elementos:
1x Conceptronic Lounge’n’LOOK Chatcam, con pie/pinza acoplado
1x CD-ROM del producto, con driver y VP-EYE 4.0
1x Guía de instalación rápida
1x Tarjeta de garantía
3. Requisitos del sistema
•Sistemas operativos: Windows 2000 o Windows XP
•64 MB (mínimo) de memoria libre en el sistema
•100 MB de espacio libre en disco
•Un puerto USB (libre)
•Unidad de CD-ROM
•Tarjeta de sonido
4Instalación del Software
Introduzca el CD-ROM de la Lounge’n’LOOK Chatcam en la unidad de CD-ROM y el
programa de instalación se iniciará automáticamente. Si el programa no se
iniciase automáticamente, pulse ‘Inicio -> ‘Ejecutar y teclee ‘x:\autorun.exe’,
(X: corresponde a su unidad de CD-ROM).
4.1. Instalación de Drivers
a. Seleccione la opción ‘Install Drivers’ en el menú. Se iniciará la
instalación del driver. Pulse ‘Next’ (Siguiente) para continuar.
b. El driver estará instalado. Si usa Windows 2000 o XP, aparecerá un
mensaje emergente según el cual el producto no dispone de firma
electrónica, o bien un mensaje acerca de la prueba de logotipo. Pulsar
‘Yes’ (Sí) o ‘Continue Anyway’ (Seguir de todos modos) para continuar.
c. Pulse ‘Finish’ (Terminar) para terminar la instalación del driver.
Nota: ¡Instale el software antes de conectar la CLLCHATCAM
al ordenador!

ESPAÑOL
13
4.2 Instalación del hardware
Una vez terminada la instalación del driver, puede conectar la Lounge’n’LOOK
Chatcam a cualquier puerto USB disponible de su ordenador o a cualquier hub USB
acoplado a su PC. Para usar el micrófono, conecte el cable del micrófono a la
clavija de entrada de micrófono de su tarjeta de sonido.
a. Windows mostrará un mensaje de ‘Found New Hardware Wizard’
(Encontrado nuevo asistente de Hardware). Seleccione ‘No, not this
time’ (No, no esta vez) y pulse ‘Next’ (Siguiente). (¡Sólo Windows XP
SP2!)
b. Seleccione ‘Install the software automatically (Recommended)’
(Instalar el software automáticamente (Recomendado)) y pulse ‘Next’
(Siguiente).
c. Aparecerá un mensaje emergente acerca de la firma digital o acerca de
la prueba de logotipo. Pulse ‘Yes’ (Sí) o ‘Continue Anyway’ (Continuar
de todos modos).
d. Pulse ‘Finish’ (Terminar) para terminar. Reinicie el ordenador.
4.3. Instalación de la aplicación VP-EYE
El software VP-EYE es un potente paquete de software con varias opciones.
Con el software VP-EYE puede crear e-mails vídeo, postales electrónicas, jugar y
tomar fotografías.
a. Cuando el menú del CD-ROM se muestre en la pantalla, haga clic en
“Instalar software VP-EYE” para abrir el menú de instalación del VP-
EYE. De no ser así, haga clic en “Inicio” -> “Ejecutar” e introduzca
“x:\autorun.exe” (donde X corresponde a la letra de la unidad de CD-
ROM).
b. Seleccione la opción “Instalar VP-EYE 4.0” para instalar el software VP-
EYE en su ordenador. Durante este proceso se instalarán por defecto
todas las aplicaciones disponibles. Si desea personalizar la instalación,
haga clic en “Modificar las opciones de instalación del VP-EYE” en el
menú del VP-EYE. Ahí podrá seleccionar las aplicaciones preferidas. Si
utiliza esta opción, se instalarán únicamente las aplicaciones
seleccionadas cuando haga clic en “Instalar VP-EYE 4.0”.
c. Introduzca el número de serie solicitado para VP-Eye. El número de serie
se encuentra en la parte trasera del envoltorio del CD-ROM.
d. Pulse ‘Finish’ (Terminar) para terminar.

ESPAÑOL
14
4.4. Instalación de la aplicación WebEye
La aplicación WebEye hace posible transmitir la imagen de la webcam en su red o
en Internet. Cuando el software está activo, puede acceder a su ordenador a
través de un navegador para ver la imagen de la webcam.
a. Mientras el menú del CD-ROM todavía está en pantalla, pulse ‘Install
WebEye Software’para iniciar la instalación. Si no, pulse ‘Inicio ->
‘Ejecutar’ y teclee ‘x:\autorun.exe’, (X: corresponde a su unidad de
CD-ROM).
b. Pulse ‘Next’ (Siguiente) para continuar la instalación. Puede cambiar la
carpeta de instalación si lo desea. Pulse ‘Next’ (Siguiente) para
continuar.
c. Pulse ‘Finish’ (Terminar) para completar.
5Usar la Lounge’n’LOOK Chatcam
Para comprobar el funcionamiento de la webcam, puede usar el programa
AMCAP. El programa AMCAP se instala junto con los drivers. Es un sencillo
programa que se usa para configurar la webcam y realizar capturas de vídeo.
Para ejecutar el programa AMCAP, pulse ‘Inicio, ‘Programas’, ‘Conceptronic
CLLCHATCAM webcam’, y ‘AMCAP’. Verá la imagen en directo de la webcam
disponible en el programa.

ESPAÑOL
15
Si no aparece ninguna imagen de la webcam, use la opción ‘Device’ (1)
(Dispositivo) para seleccionar ‘Conceptronic CLLCHATCAM webcam’.
A través del menú ‘Options’ (2) (Opciones), puede cambiar las configuraciones
predeterminadas de la Lounge’n’LOOK Chatcam. El menú ‘Capture’ (3) (Captura)
le permitirá guardar capturas de vídeo en el disco duro de su ordenador.
La Lounge’n’LOOK Chatcam también se puede usar con el Microsoft MSN
Messenger. Para poder usar la cámara deberá configurar el MSN Messenger. Para
configurarla, use los menús ‘Herramientas, ‘Configuración de Audio y Vídeo’ de
la ventana principal del MSN Messenger.
Después de que todas las configuraciones estén hechas, la Lounge’n’LOOK
Chatcam está listo para el uso
1 2 3

DEUTSCH
16
Conceptronic CLLCHATCAM
Quick Installation Guide
Herzlichen Glückwunsch zum Erwerb ihres
CLLCHATCAM von Conceptronic.
In der beigefügten Intallationsanweisung für die Hardware finden Sie schrittweise
Erklärungen für die Verwendung ihres CLLCHATCAM von Conceptronic.
Sollten irgendwelche Probleme auftreten, empfehlen wir ihnen, auf unsere Support-
Seite im Internet zu gehen (www.conceptronic.net) und auf 'Support’ zu klicken. Dort
werden sie die "Frequently Asked Questions" Datenbank finden.
Falls sie andere Fragen zu ihrem Produkt haben und sie diese nicht auf unserer
Website finden können, kontaktieren sie uns bitte per E-Mail:
Weitere Informationen zu den Conceptronic Produkte finden Sie auf der Website von
Conceptronic: www.conceptronic.net
Die nachstehend beschriebene Software-Installation kann sich bei Ihrem Rechner
aufgrund des verwendeten Windows-Version leicht unterscheiden.
1. Einleitung
Mit der Conceptronic Lounge’n’LOOK Chatcam können Sie sich beim Chatten
sehen! Die Lounge’n’LOOK Chatcam ist mit allen Messenger-Programmen und
Chat-Anwendungen kompatibel. Die Lounge’n’LOOK Chatcam mit eingebautem
Mikrophon ist leicht anzuschließen und zu installieren. Sie können Lounge’n’LOOK
Chatcam auf dem Schreibtisch, am Bildschirm eines Notebooks oder an einem
TFT-Bildschirm befestigt verwenden. Die CLLCHATCAM hat 4 LEDs, deren Licht
über die eingebaute Lichtsteuerung am Kabel reguliert werden kann. Damit
können Sie die Helligkeit des Lichts nach Ihrem Geschmack einstellen.

DEUTSCH
17
2. Packungsinhalt
In der Verpackung ist Folgendes enthalten:
1x Conceptronic Lounge’n’LOOK Chatcam, mit Fuß / Clip
1x Produkt-CD-ROM mit Treiber und VP-EYE 4.0
1x Schnellinstallationsanleitung
1x Garantiekarte
3. Systemanforderungen
•Betriebssysteme: Windows 2000 oder Windows XP
•64 MB Systemspeicher (oder mehr)
•100 MB freier Festplattenspeicher
•Einen (freien) USB-Port
•CD-ROM-Laufwerk
•Soundkarte
4. Installation der Software
Legen Sie die Produkt-CD-ROM der Lounge’n’LOOK Chatcam in das CD-ROM-
Laufwerk. Das Installationsprogramm wird automatisch gestartet. Wenn das
Installationsprogramm nicht automatisch startet, klicken Sie auf ‚Start’ ->
‚Ausführen’ und geben Sie ‚x:\autorun.exe’ein (wobei X: für Ihr CD-ROM-
Laufwerk steht).
Hinweis: Installieren Sie zuerst die Software, bevor Sie die Lounge’n’LOOK
Chatcam an Ihren Computer anschließen!

DEUTSCH
18
4.1. Treiberinstallation
a. Wählen Sie die Option ‚Install Drivers [Treiber]’ im Menü. Die
Installation des Treibers wird gestartet. Klicken Sie auf ‚Next’ [Weiter].
b. Der Treiber wird installiert. Wenn Sie Windows 2000 oder XP verwenden,
erscheint eine Meldung, dass das Produkt nicht digital unterzeichnet ist
oder es wird eine Meldung über den Logotest angezeigt. Klicken Sie auf
‚Ja’ oder auf ‚Installation fortsetzen’.
c. Klicken Sie auf Fertigstellen, um die Installation abzuschließen.
4.2. Installation der Hardware
Nachdem die Treiberinstallation abgeschlossen ist, können Sie die Lounge’n’LOOK
Chatcam an einen freien USB-Port Ihres PCs oder an einen USB-Hub Ihres PCs
anschließen.
Um das Mikrophon zu verwenden, schließen Sie das Mikrophonkabel an MIC-In
Ihrer Soundkarte an.
a. Es erscheint der Windows ‚Assistent für neue Hardware’. Wählen Sie
‚Nicht suchen, sondern..’ und klicken Sie auf ‚Weiter’. (Nur Windows
XP SP2!)
b. Wählen Sie ‚Software automatisch installieren (Empfohlen)’ und
klicken Sie auf ‚Weiter’.
c. Es erscheint eine Anzeige über die digitale Unterschrift oder den
Logotest. Klicken Sie auf ‚Ja’ oder auf ‚Installation fortsetzen’.
d. Klicken Sie auf ‚Fertigstellen’, um die Installation abzuschließen.
Starten Sie den Computer neu.
4.3. Installation der Anwendung VP-EYE
Das Programm VP-EYE ist ein leistungsstarkes Softwarepaket mit vielfältigen
Optionen. Mit dem Programm VP-EYE können Sie Video-E-Mails und Postkarten
erstellen, spielen und Fotos schießen.
a. Wenn CD-ROM- Menu noch auf ihrem Bildschirm ist, klicken Sie bitte
‘Install VP-EYE Software’, um das VP-EYE Installationsmenu zu öffnen.
Andererseits klicken Sie bitte auf ‘Start’ -> ‘Run’ und geben
‘x:\autorun.exe’, (ausgehend davon, dass X: Ihr CD-ROM-Laufwerk ist).

DEUTSCH
19
b. Wählen Sie bitte die Option “Install VP-EYE 4.0”, um die VP-EYE
Software auf Ihrem Rechner zu installieren. Die Installation wird als
Vorgabe alle vorliegenden Applikationen installieren. Wenn Sie die
Installation individuallisieren möchten, klicken Sie bitte ‘Change
Installation Options for VP-EYE’ auf dem VP-EYE Menu. Sie können Ihre
bevorzugten Applikationen auswählen. Nach dieser Option werden nur
die ausgewählten Applikationen installiert, wenn Sie ‘Install VP-EYE 4.0’
anklicken.
c. Geben Sie die für VP-Eye benötigte Seriennummer ein. Diese ist auf der
Rückseite der CD-ROM-Hülle angegeben.
d. Klicken Sie auf ‚Fertigstellen’, um die Installation abzuschließen.
4.4. Installation der Anwendung WebEye
Die Anwendung WebEye ermöglicht es, das Bild der Webcam auf Ihrem Netzwerk
oder dem Internet zu übertragen. Wenn das Programm aktiv ist, können Sie über
einen Webbrowser auf Ihren Computer zugreifen, um das Bild der Webcam
anzuschauen.
a. Wenn das Menü der CD-ROM noch auf Ihrem Bildschirm angezeigt wird,
klicken Sie auf ‚Install WebEye Software’ , um die Installation zu
starten. Anderenfalls klicken Sie auf ‚Start’ -> ‚Ausführen’ und geben
Sie ‚x:\autorun.exe’ein (wobei X: für Ihr CD-ROM-Laufwerk steht).
b. Klicken Sie auf ‚Next’ [Weiter], um die Installation fortzuführen. Sie
können den Installationsordner ändern, wenn Sie möchten. Klicken Sie
auf ‚Next’ [Weiter].
c. Klicken Sie auf ‚Finish [Fertigstellen]’, um die Installation
abzuschließen.
5. Verwendung der Lounge’n’LOOK Chatcam
Sie können die Funktionsfähigkeit der Webcam mit dem Programm AMCAP
testen. Das Programm AMCAP wird mit den Treibern installiert. Dabei handelt es
sich um ein einfaches Programm für die Konfiguration der Webcam und die
Aufnahme von Videosequenzen.
Um das Programm AMCAP, zu starten, klicken Sie auf ‚Start’, ‚Programme’,
‚Conceptronic CLLCHATCAM webcam’ und ‚AMCAP’. Es erscheint der Lifestream
der Webcam, der im Programm verfügbar ist.

DEUTSCH
20
Wenn kein Bild der Webcam sichtbar ist, verwenden Sie die Option‚ Device
[Gerät]’ (1) um die ‚Conceptronic CLLCHATCAM webcam’ auszuwählen.
Über das Menü ‚Options’ (2) können Sie die Grundeinstellungen der
Lounge’n’LOOK Chatcam ändern. Über das Menü ‚Capture’ (3) können Sie
aufgenommene Videosequenzen auf der Festplatte Ihres Computers speichern.
Die Lounge’n’LOOK Chatcam kann auch mit dem Microsoft MSN Messenger
verwendet werden. Sie müssen den MSN Messenger konfigurieren, bevor Sie die
Webcam verwenden können. Dies erfolgt über die ‚Audio- und
Videoeinstellungen’ im Menü ‚Extras’ im Hauptfenster des MSN Messengers.
Nachdem alle Konfigurationen gemacht sind, ist der Lounge’n’LOOK Chatcam
bereit für Gebrauch
1 2 3
Other manuals for CLLCHATCAM
2
Table of contents
Languages:
Other Conceptronic Webcam manuals

Conceptronic
Conceptronic FLEXCAM CLLFLCAM20 User manual

Conceptronic
Conceptronic CLLCHATCAM User manual

Conceptronic
Conceptronic CLLCHATCAM v4.0 User manual

Conceptronic
Conceptronic CFUNCAM User manual

Conceptronic
Conceptronic CLLCHATCAM v2.0 User manual

Conceptronic
Conceptronic CLLCLIQCAM User manual

Conceptronic
Conceptronic CLLFLCAMHD User manual

Conceptronic
Conceptronic CDESKCAM User manual

Conceptronic
Conceptronic CLLCHATCAM v3.0 User manual

Conceptronic
Conceptronic CLLCHITCHAT User manual