La sostituzione delle parti di ricambio del ContiComfortKit si rende necessaria nei seguenti casi:
ADopo la scadenza della durata del sigillante.
BDopo aver utilizzato il ContiComfortKits per ermetizzare un pneumatico.
Nelle presenti istruzioni sono riportate passo per passo le operazioni di sostituzione.
Osservate le istruzioni di sicurezza riportate sulla bomboletta del sigillante; evitate il
contatto con la sostanza sigillante.
A Sostituzione della bomboletta ancora piena in seguito alla scadenza della data
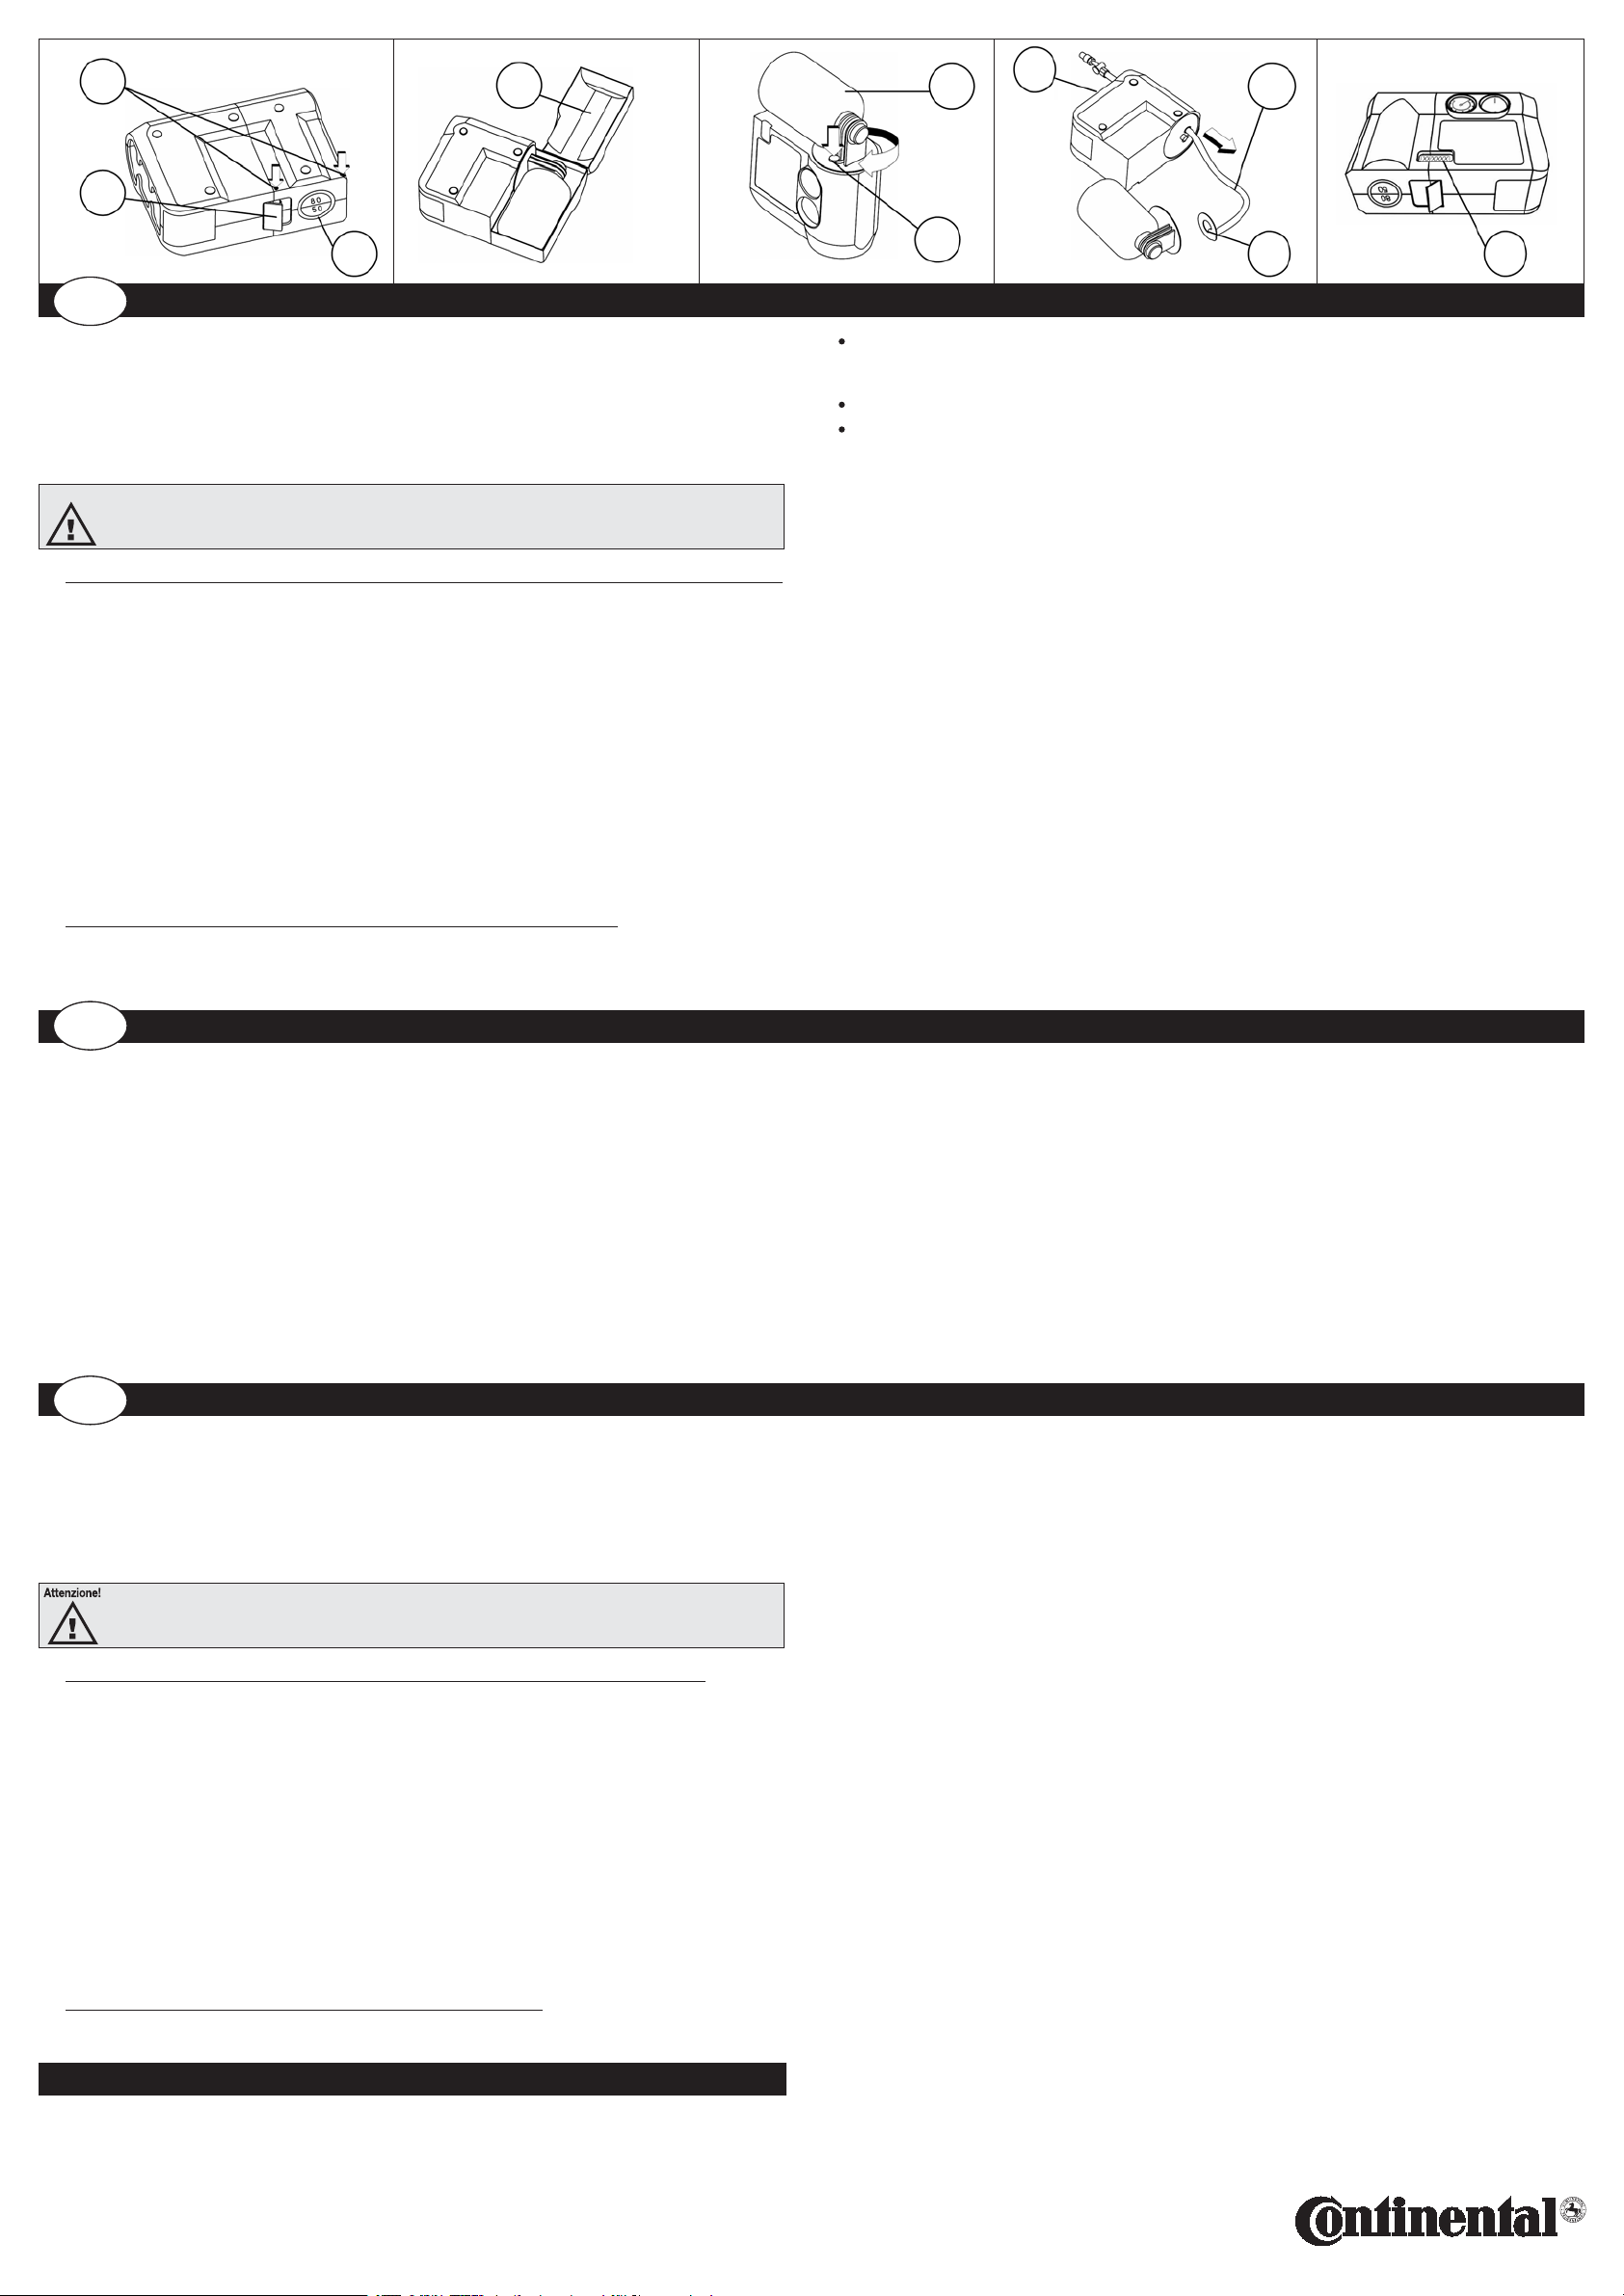
1 Scollegate l'apparecchio dalla fonte di tensione.
2 Con un giravite a croce svitate le due viti (a) sulla parte inferiore della scatola arancione.
3 Levate l'etichetta della velocità max. (b), aprite il fermo di sicurezza (c) della scatola arancione
(d) e levate la scatola.
4 Svitate la bomboletta dal supporto (f) girandola verso sinistra.
5 Controllate che l'anello di tenuta sia inserito correttamente nel supporto. Avvitate la nuova
bomboletta sul supporto girandola verso destra, serrandola a mano e facendo attenzione a
non rovinare il sigillo sulla bomboletta.
6 Rimontate la scatola arancione facendo attenzione a posizionarla correttamente. In seguito
riavvitare correttamente le due viti.
7 Incollate la nuova etichetta adesiva della velocità massima (b) e quella della scadenza del
sigillante (k).
8 Il ContiComfortKit è pronto per l'uso e può essere riposto nell'alloggiamento dell'autoveicolo.
9 Le parti sostituite possono essere riconsegnate al rivenditore.
B Sostituzione della bomboletta e del tubicino dopo l'utilizzo
Si prega di osservare le seguenti avvertenze:
• Lasciate essiccare i resti del sigillante nel pneumatico forato e smaltiteli quindi insieme al
pneumatico. Fate smontare la ruota solo in un'officina specializzata ed informate il meccanico
di aver utilizzato il sigillante nel pneumatico.
• Lasciate essicare il sigillante eventualmente fuoriuscito e staccatelo quindi come un foglio
adesivo.
• Pulite subito con acqua le parti verniciate della carrozzeria venute eventualmente in contatto
col sigillante.
1 Scollegate l'apparecchio dalla fonte di tensione.
2 Con un giravite a croce svitate le due viti (a) sulla parte inferiore della scatola arancione.
3 Levate l'etichetta della velocità max. (b), aprite il fermo di sicurezza (c) della scatola arancione
(d) e levate la scatola.
4 Spingete in basso con un dito il fermo (e) ruotando contemporaneamente la bomboletta e il
supporto (f) in senso orario (con un angolo di ca. 45°), fino a liberarli.
5 Estrarre il cavo e il tubetto dall'alloggiamento (g). Inserite il tubetto (h) in direzione della parte
aperta della scatola e tiratelo fuori dall'altra parte.
6 Pulite i resti liquidi di sigillante sulla scatola utilizzando un panno umido. I resti essiccati pos-
sono essere staccati come un foglio adesivo.
7 Montate il nuovo tubicino seguendo la sequenza inversa delle operazioni di smontaggio, inse-
rendo correttamente la piastrina tonda di plastica (i) nell'apposito incavo.
8 Avvitate il nuovo supporto in senso antiorario fino a sentire chiaramente che innesta.
9 Controllate che l'anello di tenuta sia posizionato correttamente nel supporto. Avvitate la
nuova bomboletta sul supporto girandola verso destra, serrandola a mano e facendo atten-
zione a non rovinare il sigillo sulla bomboletta.
10 Rimontate la scatola arancione (d) facendo attenzione a posizionarla correttamente. In seguito
riavvitare correttamente le due viti.
11 Incollate la nuova etichetta adesiva della velocità massima (b) e quella della scadenza del
sigillante (k).
12 Il ContiComfortKit è pronto per l'uso e può essere riposto nell'alloggiamento dell'autoveicolo.
13 Le parti sostituite possono essere consegnate al rivenditore.
Notice de remplacement des pièces de rechange du ContiComfortKit
1 Couper l'appareil de la source d'alimentation.
2 Desserrer les deux vis (a) sur le fond du boîtier orange avec un tournevis cruciforme.
3 Enlever l'autocollant pour la vitesse maxi (b), ouvrir le verrou de sécurité (c) du boîtier orange
(d) et démonter le boîtier.
4 Enfoncer le verrou (e) avec le doigt tout en tournant le bidon de produit d'étanchéité et le
porte-bidon (f) dans le sens des aiguilles d'une montre (angle d'env. 45°) jusqu'à ce qu'ils se
désolidarisent du raccord à vis.
5 Sortir le câble et le tuyau de leur logement (g), pousser le tuyau (h) dans le sens du côté droit
ouvert du boîtier et le sortir en tirant de l'autre côté.
6 Essuyer avec un chiffon humide les restes liquides de produit d'étanchéité sur le boîtier. Les
restes de produit d'étanchéité séchés peuvent être enlevés comme une pellicule.
7 Monter un nouveau tuyau dans le sens inverse du démontage. La rondelle en plastique (i) à
l'extrémité du tuyau doit être tournée à cette occasion exactement dans l'évidement prévu à
cet effet.
8 Tourner le nouveau porte-bidon dans le sens inverse des aiguilles d'une montre dans le rac-
cord à vis jusqu'à ce qu'un clic soit nettement perceptible.
9 S'assurer que le joint est posé dans le porte-bidon. Visser un nouveau bidon de produit d'ét-
anchéité dans le porte-bidon en le tournant vers la droite et le serrer fortement à la main. Ne
pas endommager le sceau du bidon à cette occasion.
10 Remonter le boîtier orange et le visser. Veiller à cette occasion à son logement correct.
11 Apposer un nouvel autocollant pour la vitesse maximale (b) et la date de péremption (k) du
produit d'étanchéité.
12 Le ContiComfortKit est à présent de nouveau près à l'emploi et peut être remis en place dans
le véhicule.
13 Rendre les pièces remplacées à votre revendeur spécialisé.
a
b
c
df
e
gh
ik
I II III IV V
Istruzioni per la sostituzione di parti di ricambio del ContiComfortKit
Prima di aprire l'apparecchio levare la spina di alimentazione.
F
I
Service
Deutschland: 0180 222 82 82
(Montag–Donnerstag: 8:00 bis 17:30 Uhr; Freitag 8:00 bis 17:00 Uhr)
Britain: 01788 552 937
(Monday–Friday: 8:30 to 17:00)
France: 0800 020 515
(Lundi–Jeudi: 8:00 à 18:30; Vendredi: 8:00 à 18:00)
UMRECCK-REP-0504 Copyright © 2005 Continental. All rights reserved.
Continental AG
Jädekamp 30
D-30419 Hannover
www.conti-online.com
CZ Návod pro výměnu částí ContiComfortKitu
Části ContiComfortKitu je nutné vyměnit v následujících případech:
A je-li dosaženo data maximální použitelnosti.
B Byl-li ContiComfortKit použit k opravě poškozené pneumatiky.
Tento manuál vysvětluje proces výměny krok za krokem. Postupujte podle těchto instrukcí a při
tom dodržujte bezpečnostní pokyny na lahvičce. Vyvarujte se kontaktu kůže s lepicím roztokem.
Varování
A Výměna nepoužité lahvičky s lepícím roztokem když bylo dosaženo data maximální použitelnosti
1 Odpojte soupravu od zdroje elektrického proudu.
2 Křížovým šroubovákem odšroubujte dva šrouby na spodní straně oranžového pouzdra
ContiComfortKitu (a).
3 Odstraňte nálepku s označením rychlosti (b), odklopte bezpečnostní záklopku (c), otevřete oranžové
víko přihrádky s lahvičkou s lepícím roztokem (d) a odstraňte jej.
4 Proti směru hodinových ručiček odšroubujte lahvičku s lepícím roztokem (f).
5 Ujistěte se, že těsnící prstenec uzávěru zůstal na svém místě v držáku lahvičky. Našroubujte ve
směru hodinových ručiček novou lahvičku s lepícím roztokem do držáku lahvičky. Nepoškoďte při
tom uzávěr lahvičky.
6 Uložte oranžové víko do původní pozice tak, aby pouzdro bylo pevně uzavřeno. Šroubovákem
zašroubujte oba šrouby.
7 Nalepte novou nálepku s označením rychlosti (k) na obal.
8 ContiComfortKit je nyní připraven k dalšímu použití. Umístěte ho do vozidla.
9 Starou lahvičku s lepícím roztokem dodejte do pneuservisu který je příslušně vybaven k její likvidaci.
B Výměna hadice a lahvičky s lepícím roztokem po použití lepící soupravy.
Prosíme, dodržujte následující bezpečnostní pokyny:
Než otevřete pouzdro odpojte jednotku od přívodu elektrického proudu.
Je třeba vyčkat, až se zbytky lepícího roztoku, které se nacházejí uvnitř poškozené pneumatiky
vysuší, protože je nutné je odstranit z pneumatiky. Montáž pneumatiky/kola a její/jeho výměnu může
provádět pouze vyškolený montér. Prosíme, informujte montéra, že jste použili lepící roztok.
Dojde-li k úniku (vylití) lepícího roztoku, nechte jej vyschnout a pak jej prostě odloupněte jako lm.
Kdyby došlo k potřísnění laku auta lepícím roztokem, okamžitě jej omyjte vodou.
1 Odpojte soupravu od zdroje elektrického proudu.
2 Křížovým šroubovákem odšroubujte dva šrouby vespod na oranžové části Soupravy na lepení pneu-
matik (a).
3 Odstraňte nálepku s označením rychlosti (b), odklopte bezpečnostní záklopku (c), otevřete oranžové
víko od přihrádky s lahvičkou s lepícím roztokem (d) a odstraňte jej.
4 Zatlačte prstem knoík (e) a současně otáčejte lahvičkou a jejím černým držákem (f) ve směru hodi-
nových ručiček (do cca 45°úhlu) dokud jej neuvolníte z jeho závitu.
5 Vyjměte šňůru a hadici z přihrádky (g). Nejdřív zatlačte hadici (h) ve směru, kde byl právě odstraněn
držák lahvičky, pak ji vytáhněte z protilehlé části.
6 Otřete zbylé stopy latexu na víku vlhkým hadrem. Suché zbytky lepícího roztoku je možné snadno
sloupnout.
7 Vyjměte nové části z jejich obalů. Vložte hadici v opačném pořadí, než jste ji vyjímali a ujistěte se, že
okrouhlá plastová destička (i) na konci hadice sedí přesně na svém místě v prohloubení pro ni určeném.
8 Zatlačte černý držák lahvičky do jeho závitu a otáčejte jím proti směru hodinových ručiček až s klap-
nutím dosedne pevně na své místo.
9 Ujistěte se, že těsnící prstenec závěru je správně nasazen v držáku lahvičky. Zašroubujte novou
lahvičku s lepícím roztokem ve směru hodinových ručiček rukou pevně do držáku lahvičky. Nepo-
škoďte při tom těsnění závěru lahvičky.
10 Vraťte oranžové víko (d) na místo a přitlačte jej, aby pevně drželo. Kontrolujte při tom jeho správné
usazení. Šroubovákem zašroubujte oba šrouby víka.
11 Nalepte novou nálepku (b) s označením rychlosti a novou nálepku s vyznačeným datem použitel-
nosti (k) na obal.
12 ContiComfortKit je nyní připraven k použití. Umístěte ho do vozidla.
13 Staré vyměněné části dodejte do pneuservisu, který je příslušně vybaven pro jejich likvidaci.


