Continental Refrigerator XT Series User manual

Continental eBike System
Original instructions
Display XT


3Continental eBike System – DISPLAY
Table of Contents
1 Overview ....................................................... 4
1.1 CeBS components................................. 4
1.2 Display ....................................................... 4
2 Basic Information ...................................... 5
2.1 Terms used............................................... 5
2.2 Applicable documents........................ 5
2.3 Reading and storing
the user manual..................................... 5
2.4 Intended use............................................ 5
2.5 Key/legend...............................................6
2.5.1 Marking of instructions ................................ 6
2.5.2 Displayed symbols............................................6
3 Display Safety Instructions ................... 7
4 Model Variants
and Technical Data.................................... 8
4.1 Model variants of the display........... 8
4.2 Technical data of the display............ 8
5 Operation ...................................................... 9
5.1 Preparation:
Aligning the display views/
display on the handlebar ...................9
5.1.1 Display views..........................................................9
5.1.2 Aligning the display on the
handlebar.................................................................10
5.2 Use: Changing settings ...................... 11
5.2.1 Switching on the display.............................11
5.2.2 Selecting the display view.........................11
5.2.3 Changing the trip data display
(normal view) .........................................................11
5.2.4 Changing display values
for the main display (zoom view)......12
5.2.5 Configuring settings
in the set-up menu...........................................12
5.2.6 Setting the lighting mode.........................13
6 Cleaning and Maintenance...................13
6.1 Cleaning ...................................................13
6.2 Maintenance...........................................13
7 Rectifying malfunctions ....................... 14
8 Storage......................................................... 14
9 Transporting the eBike with CeBS.... 14
10 Disposal ....................................................... 14

4Continental eBike System – DISPLAY
1 Overview
1.1 CeBS components
Charger
Drive unit
Battery Display
Remote
1.2 Display
Example illustration

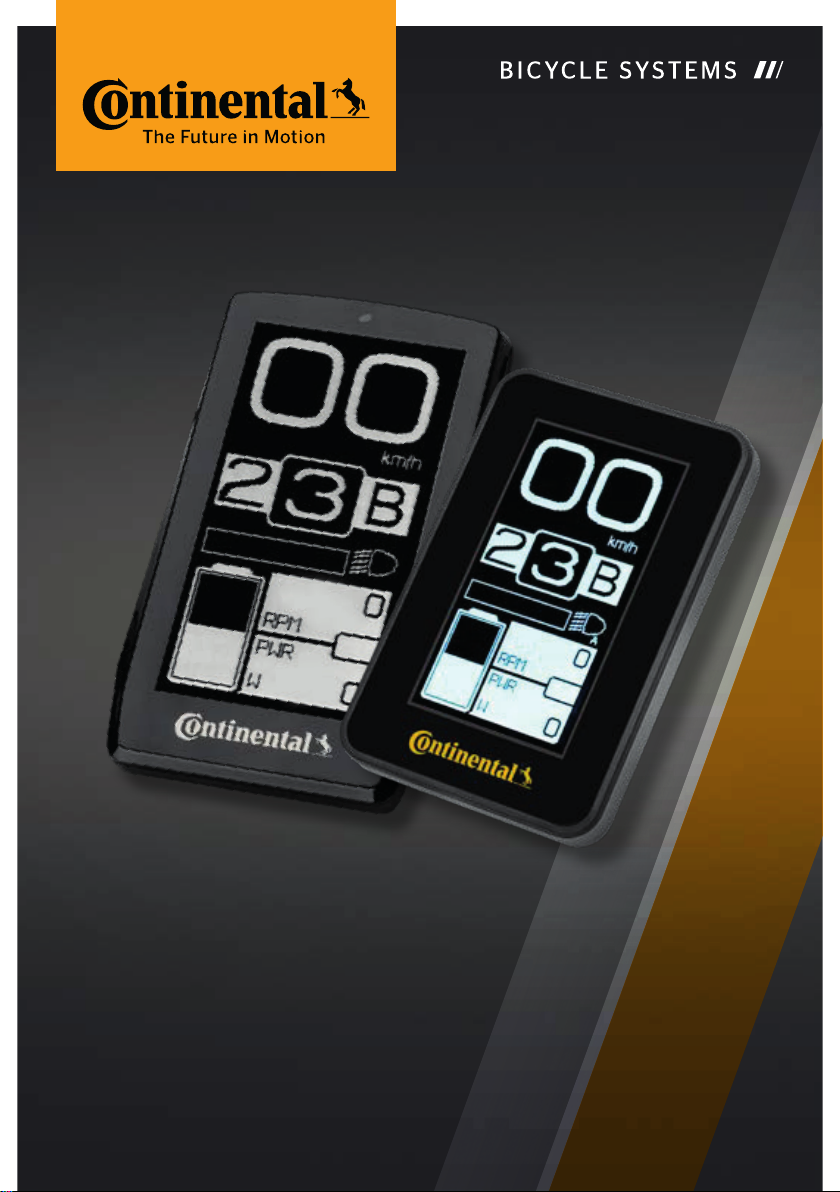
5Continental eBike System – DISPLAY
2 Basic Information
2.1 Terms used
The following abbreviations and terms are used
in this document:
Abbreviation/
term
Used for
User manual Original instructions
CeBS Continental eBike System
eBike Electrically power assisted
cycles or EPAC for short
For example, so-called
"pedelecs" and other types
of cycle with electrical
power assistance.
2.2 Applicable documents
This document is part of the CeBS user manual
and is based on the directives and regulations
valid within the European Union. The complete
CeBS user manual comprises all the documents
relating to the individual CeBS components incor-
porated into your eBike. Refer to the accompany
data sheet from the eBike manufacturer for infor-
mation on the component combination based on
the relevant configuration of the CeBS installed in
your eBike.
2.3 Reading and storing
the user manual
Before using the eBike and installed CeBS, care-
fully read through all the documents in the user
manual, in particular the safety instructions.
Failure to observe the instructions in the user
manual can lead to serious injuries or damage to
the CeBS.
Keep the user manual close at hand for future
reference. Should you ever pass the eBike and
installed CeBS to a third party, always hand over
the complete user manual (incl. all associated
documents) as well.
In addition to the CeBS user manual, always read
and observe the user manual accompanying
your eBike and any add-on parts.
2.4 Intended use
The CeBS is designed as a drive system for
eBikes. The drive provides the rider with pedal-
ling assistance up to a statutory maximum riding
speed. The motor support is adapted to the effort
exerted by the rider depending on the support
level selected. The preset support level affects
the range and wear of the CeBS. The speed is
calculated based on the wheel speed and tyre
circumference. The tyre size, circumference and
height are therefore important influential factors.
Tyre pressure and wear also have an influence on
the resulting speed.
Your local cycle dealer will be able to readjust
the wheel circumference to a certain extent to
compensate for tolerances.
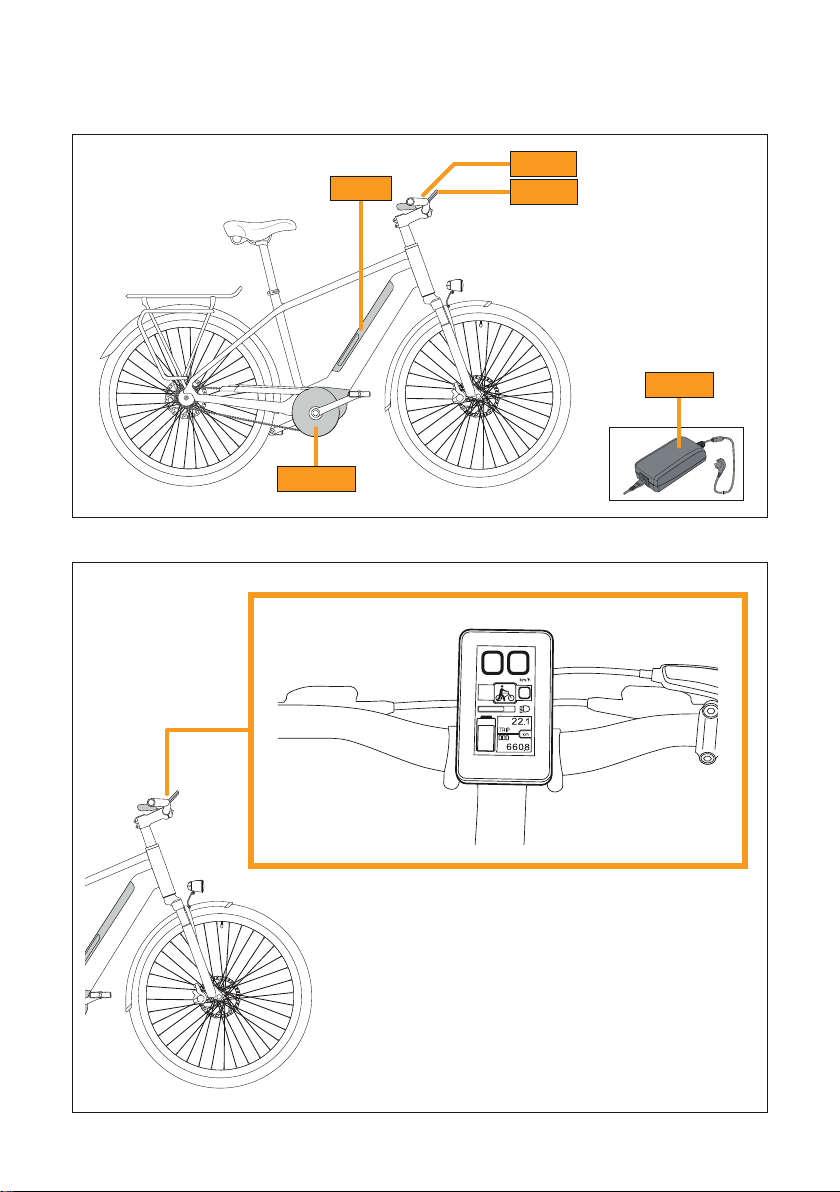
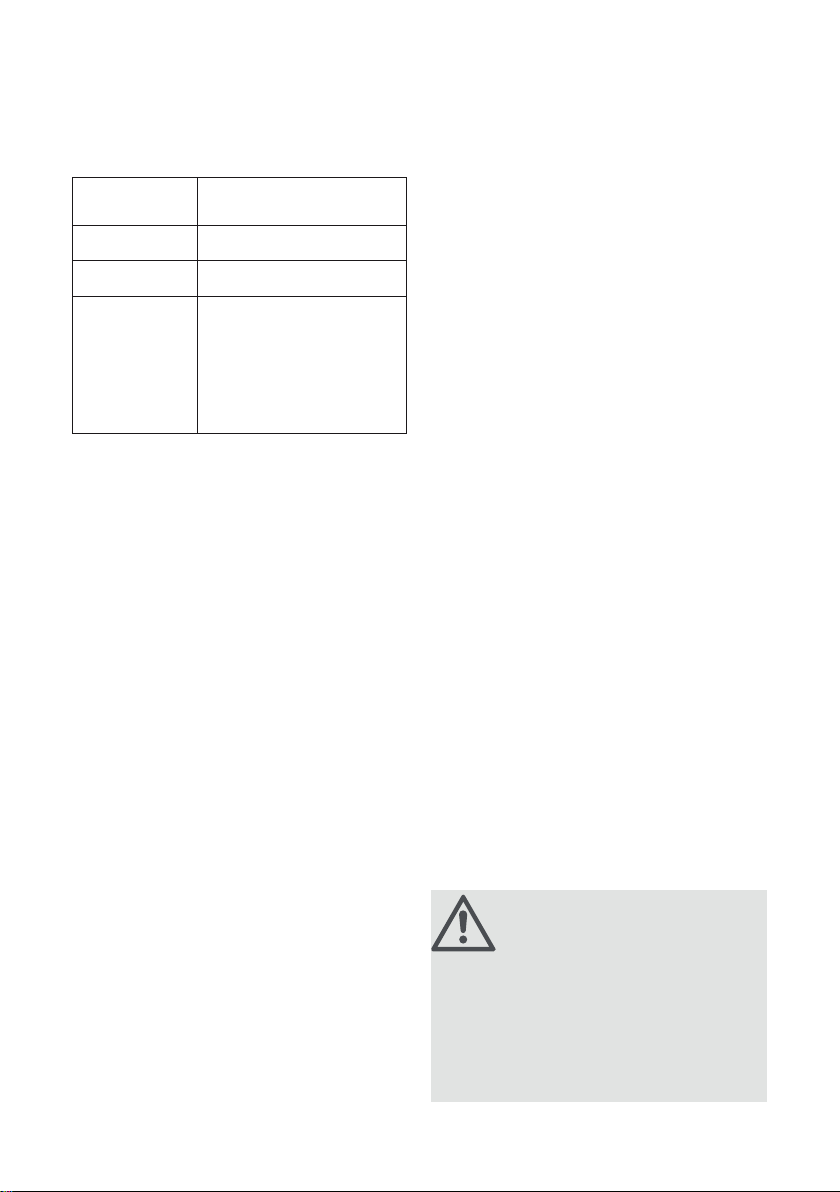
The CeBS comprises several components (
see
"1.1 Overview"
), one of which is the "Display"
described in this document. The display is used
by the rider to operate the CeBS.
The combination of CeBS components installed
on your eBike has been adapted specially to your
eBike and these components may only be used
in the original combination.
Always observe the manufacturer’s instructions
on intended use of the eBike (e.g. use on certain
types of terrain or similar).
In order to avoid hazards, do not misuse the
display or eBike to which the display is fitted in
any of the ways described below:
• Use of the eBike to take part in competitions
and perform jumps, stunts or tricks.
• Incorrectly performed repairs and/or main-
tenance as well as manipulating the display
or the eBike to which the display is fitted
(e.g. tuning).
• Opening and modifying the display.
• Neither the component combination nor the
display may be modified.
WARNING!
Any foreseeable misuse, in particular
resulting from tuning, will forfeit the CE
mark of the eBike (EPAC up to 25km/h) – with all
the legal implications. Tuning includes any unau-
thorised modifications made to the CeBS or eBike
that manipulate the performance in any way. Any
accidents that can be attributed to technical
manipulation may be subject to high personal
liability costs and criminal prosecution.

6Continental eBike System – DISPLAY
Improper use of the CeBS components or the
eBike to which they are fitted can cause accidents,
serious injuries and damage to the CeBS.
Continental Bicycle Systems GmbH & Co. KG shall
assume no liability or warranty for personal injury
and/or material damage caused by improper use.
2.5 Key/legend
2.5.1 Marking of instructions
All safety instructions, warnings and additional or
more detailed information in this user manual is
marked as follows.
WARNING!
Medium level risk that may result in serious or
fatal injury if not prevented.
CAUTION!
Low level risk that may result in moderate or
minor injury if not prevented.
ATTENTION!
Warns of possible material damage.
NOTE:
The signal word highlights additional informa-
tion that may allow you to handle/operate the
unit more easily.
see "XXX"
(e.g.
see "2.5 Key/legend"
)
refers to a chapter in the same document
see document COMPONENT
refers to the document for the specified CeBS
component
2.5.2 Displayed symbols
The following symbols may appear in this user
manual, on CeBS components or packaging.
Read and observe the user manual.
Symbol indicating that electrical
equipment must not be disposed of
together with domestic or residual
waste. Always dispose of marked
electrical equipment at suitable
collection points.
Symbol indicating that batteries
must not be disposed of together
with domestic or residual waste.
Always dispose of marked batteries
at suitable collection points.
Always dispose of lithium-ion
batteries correctly at a suitable
collection point.
This symbol indicates that the
product meets all community regu-
lations applicable in the European
Economic Area.
Symbol indicating that products
must always be used indoors.
The 230 V~/50 Hz mains connection
has double insulation (protection
class II).
Warning of hot surfaces!
Surfaces marked with this symbol
may heat up to temperatures of
60 °C or more.
General warning sign WARNING
Warning: Risk of explosion if battery
is handled incorrectly!
Keep away from naked flames.

7Continental eBike System – DISPLAY
3 Display Safety Instructions
WARNING!
Risk of accident and injury!
Operating or checking the display while riding
may distract you from the road and pose a risk of
accident or injury.
» Before starting your journey, familiarise your-
self with the operation of the CeBS as well as
the different screens and views on the display
(in a safe place away from road traffic).
» Do not allow operation of the CeBS or the
display screens to distract you while riding.
» Always anticipate the traffic situation or terrain
up ahead and do not adjust the settings on
the CeBS (e.g. changing support level) while
riding, especially when performing tricky
manoeuvres and riding in situations that
require your full attention.
Do not short-circuit the battery.
Do not immerse the battery in fluids.
max.60°C
Do not expose the battery to temper-
atures exceeding +60 °C.
Do not destroy the battery.
Do not throw the battery into a fire.
T 2.5A
The charger is fitted with a T 2.5 A
safety fuse.

8Continental eBike System – DISPLAY
4 Model Variants
and Technical Data
4.1 Model variants of the display
The "Display" is available in a range of model
variants with different exterior designs, technical
details and modes of operation.
You can view the CeBS displays using one of the
display models listed below, depending on the
model:
• XT 1.0
• XT 2.0
NOTE: Refer to the information on compatibility
(remote) in the technical data accompanying
your display model.
4.2 Technical data of the display
Product name: XT 1.0 XT 2.0
Article number: 6802200453 6802200476
Display: Full Dot Matrix 248 × 128 px
Connection: Micro USB diagnostic port
(no charging function)
Protection category: IP65 (only when USB cover is closed)
Bluetooth®: Bluetooth® smart 4.0
Supported operating systems: iOS, Android
Weight: 139 g 90 g
Operating temperature: -10 to 50 °C
Storage temperature: -20 to 60 °C
Compatibility (remote): Ergon 1.0 (6802200140)
Shift 1.0 (6802200216)
Ergon 2.0 (6802200500)
Shift 2.0 (6802200478)

9Continental eBike System – DISPLAY
5 Operation
WARNING!
Risk of accident and injury!
Operating or checking the display while riding
may distract you from the road and pose a risk of
accident or injury.
» Before setting off on your first journey, famil-
iarise yourself with the various screens and
views on the display.
» Align the display on the handlebar so that you
can easily see all the relevant trip data on the
display at a glance while you are riding.
5.1 Preparation:
Aligning the display views/
display on the handlebar
5.1.1 Display views
Usually, two different views are used to show trip
data on the display: The normal view and the
zoom view.
NOTE: If you have linked your smartphone to the
display via Bluetooth®, the mobile view and auto
view will also be available (
see "5.1.1 Display views"
|
"Mobile view/auto view"
)
Normal view
1Current riding speed
2Selected support level
3Error code
4Service symbol
(when the service interval is reached)
5Battery charge level
NOTE: The white area indicates the charge level
of the battery. The white area decreases in size
as the charge level diminishes.
6Trip data display
(
see "5.2.3 Changing the trip data display (normal
view)"
.)
7Light symbol (lighting mode) (
see "5.2.6
Setting the lighting mode"
)
8Push help symbol
9Motor power
generated (bar diagram)
1
2
3
4
5
7
6
Fig.: Normal view A
8
9
Fig.: Normal view B
Zoom view
10 Main display (
see "5.2.4 Changing display
values for the main display (zoom view)"
).
11 Current time
10
11
Fig.: Zoom view

10Continental eBike System – DISPLAY
Mobile view/auto view
As well as CeBS trip data, the mobile view also
displays additional information (e.g. navigation,
etc.). You can select which additional values are
displayed using the app on your smartphone.
The Bluetooth®-enabled display can be linked to
the Continental smartphone app. The Continental
app is available for iOS and Android devices and
can be downloaded free of charge. Refer to the
Continental smartphone app for information on
linking your phone with the CeBS. You can find
additional information on the mobile view and
display data in the descriptions in the app.
NOTE: If you have selected mobile view, the
display remains in the mobile view, even if a
smartphone is not linked. The message "Link your
cycle or download the Conti app" appears on the
display together with a QR code connected to
the app. General information about the cycle is
displayed (battery, light, speed, support level).
If you have selected auto view, the display auto-
matically switches from the normal view to the
mobile view when a smartphone is linked.
5.1.2 Aligning the display on the
handlebar
Display model XT 2.0 is bolted directly to the
handlebar stem cap. The display can be tilted
back and forwards with ease (screw tightening
torque: 3.5 Nm).
The display holder for display model XT 1.0 can be
aligned on the handlebar in two ways:
A: In the direction of travel
B: Opposite to the direction of travel
A B
Fig.: Alignment of display holder XT 1.0
If necessary, adjust the alignment of the display
holder as follows:
1. Loosen the fastening screws and remove the
display holder from the handlebar.
Fig.: Removing the display holder from the
handlebar XT 1.0
2. Loosen the screws on the display holder and
then remove the display.
Fig.: Removing the display from the holder
XT 1.0
3. Turn the display 180° and then fit all the
components again (torque for fastening the
display on the handlebar: 3 Nm / torque for
fastening the display in the display holder:
1 Nm).

11Continental eBike System – DISPLAY
5.2 Use: Changing settings
5.2.1 Switching on the display
» Press and hold the button for 1 second to
switch on the CeBS.
5.2.2 Selecting the display view
You can select the display view in the set-up menu
(
see document
REMOTE
).
1. Press and hold the button for approx. 3
seconds to open the set-up menu.
2. Briefly press the button several times to
open the VIEW menu item.
3. Use the / buttons or the joystick to
select the desired view.
4. Press and hold the button for 3 seconds to
exit the set-up menu.
5.2.3 Changing the trip data display
(normal view)
» Briefly press the button several times if
necessary to switch to the desired trip data
display in the normal view.
Trip data
display
Content
Time display
TRP-TIME
= trip time in minutes
CLK
= current time (HH:MM)
Power output
display
RPM
= cadence (revolutions/
minute)
PWR
= rider performance in watt
Range
display
RANGE
= estimated range remaining
at current charge level
BAT = current battery charge
level in %
Trip display
TRIP
= daily trip reading in km
The daily trip reading can
be reset by pressing and
holding the light button for
approx. 3 seconds.
ODO
= total trip reading in km
Trip data
display
Content
Speed sensor
AVG
= average speed in km/h
MAX
= current maximum speed in
km/h
Select
MANUAL or
AUTOMATIC
gear-change
mode
(only in
combination
with the 48 V
Revolution
drive unit)
MANUAL
= manual gear-change mode
In manual gear-change
mode, you can select the shift
settings manually (GEAR).
AUTOMATIC
= automatic gear-change
mode
In automatic gear-change
mode, you can select your
own personal cadence setting
(RPM).
The cadence can be adjusted
to a setting between 20 and
120 rpm in increments of 1.
NOTE: If your eBike is fitted with a 48 V Revolu-
tion drive unit, you can use an additional function:
1. Press and hold the button or push the
joystick forwards for approx. 3 seconds to
access the MANUAL or AUTOMATIC menu
item directly.
You can then configure the settings for the
relevant gear-change mode directly.
2. Press and hold the button for approx. 3
seconds to change the gear-change mode.
3. Briefly press the button once to confirm the
selection and return to the normal view.
NOTE: To reset all temporary values, press and
hold the light button ( / / button) in the
normal view for a minimum of 4 seconds.

12Continental eBike System – DISPLAY
5.2.4 Changing display values for the
main display (zoom view)
» Press the button several times if necessary
to change the desired display value for the
main display in the zoom view.
Available display values
Current riding speed
Selected support level
Trip time in minutes (TRP-Time)
Daily trip reading in km (TRIP)
Current battery charge level in %
Current gear (GEAR)
(only in combination with the Revolution
motor type)
5.2.5 Configuring settings
in the set-up menu
NOTE: You cannot use the set-up menu while
riding. Settings in the set-up menu can only be
modified when the cycle is stationary.
NOTE: If you do not make any entries in the
set-up menu for 10 seconds (press button/operate
joystick), the set-up menu closes automatically
and the unit returns to the preset display view.
1. Press and hold the button for 3 seconds to
open the set-up menu.
2. Use the / buttons or the joystick to
select the desired setting for the displayed
menu item.
3. Briefly press the button once to switch to
the next menu item.
4. Press and hold the button for 3 seconds to
exit the set-up menu.
Menu item Selection/
setting options
DRIVE MODE
(
see docu-
ment
DRIVE
UNIT
)
RANGE
(optimised range &
maximum efficiency)
BALANCE
(balanced & comfortable)
POWER
(powerful & direct)
INPUT OFFSET Manual adjustment of the
total trip reading (ODO)
TIME SETTING Time setting (HH:MM)
BACKGROUND
LIGHTING
Background lighting on
the display
CONTRAST Contrast for the display
screens
LANGUAGE Selection of display
language
VIEW Selection of display views
VERSION INFO Display of software version
(cannot be modified)
TEMPERATURE Selection of °C / °F
UNITS Selection of km/h / mph
STAND-BY
Setting for
automatic switch-off time
when not in use
CALIBRATION
Torque
(for 48 V Prime and
48 V Revolution drive
units)
Gear
(48 V Revolution drive unit
only)
NOTE: To start calibrating the torque sensor
or gearbox, press and hold the light button for
approx. 3 seconds after making your selection in
the set-up menu ( / / button). All further
steps are indicated on the display.

13Continental eBike System – DISPLAY
5.2.6 Setting the lighting mode
NOTE: The lighting symbols shown here are from
software version 48.2.2.
» Press the / / button several times
if necessary to switch from manual to auto-
matic lighting mode or switch the lights on or
off in manual lighting mode (
see document
REMOTE
).
The symbol on the display indicates the active
lighting mode.
Symbol Lighting mode
Automatic lighting mode: Lighting
activated
The lighting was activated auto-
matically. The lighting turns off
automatically as the intensity of
the ambient light increases.
Automatic lighting mode: Lighting
deactivated
The lighting was deactivated auto-
matically. The lighting turns on
automatically as the intensity of
the ambient light decreases.
Manual lighting mode: Light on
Manual lighting mode: Light off
6 Cleaning and Maintenance
6.1 Cleaning
ATTENTION!
Risk of damage!
Improper cleaning can cause material damage.
» Remove the battery before cleaning your
eBike. Never use liquids to clean the battery.
» Do not clean the CeBS components with a
high-pressure cleaner or a powerful water jet.
» Clean the CeBS components with a soft, lint-
free cloth, slightly moistened if necessary.
– Use water or a mild detergent to clean
components (except for the battery!)
– Visually inspect the plug contacts on the
eBike and battery at regular intervals.
Always make sure the contacts are clean
and dry before inserting the battery. Use
a commercially available battery terminal
grease to maintain and protect the
contacts from adverse weather conditions.
» Before inserting the battery, make sure that
the contacts on the battery holder of the
eBike are dry.
6.2 Maintenance
NOTE: If the service symbol appears on the
display, a service interval has been reached. In this
case, contact your local cycle dealer to service
your CeBS.
» Perform regular visual inspections to establish
whether the electrical cables, connections and
contacts are clean and undamaged. Ask your
local cycle dealer to inspect damaged parts.
» Have your local cycle dealer perform any
repair and maintenance work required on the
CeBS.

14Continental eBike System – DISPLAY
7 Rectifying malfunctions
The CeBS detects malfunctions, which then
appear on the display in the form of error codes.
Malfunctions detected by the CeBS appear in the
centre of the display. The displayed error code
specifies the cause of the malfunction to make
the error easier to correct.
WARNING!
Risk of electric shock!
Contact with open cable ends when the CeBS is
switched on can cause electric shocks.
» Do not switch on the CeBS if you notice any
open cable ends.
» Have the cabling inspected and repaired by
your local cycle dealer.
If an error code appears on the display, immedi-
ately check which malfunction has occurred.
The letter in the error code relates to the affected
component on the CeBS:
• M = Motor
• B = Battery
• D = Display
» Error codes that do not affect the function or
safety of the unit can be acknowledged by
pressing the button.
» In the case of permanent or recurrent error
codes, please have your local cycle dealer
check the malfunction using service software.
8 Storage
» Please read the information on the storage
temperature in the technical data for the
display (
see "4.2 Technical data of the display"
).
9 Transporting the eBike with
CeBS
ATTENTION!
Risk of damage!
Impacts and bumps may damage the battery and
display during transportation of the eBike.
» Remove the battery and display from the
eBike and transport both separately.
» Transport the battery with special care.
» Remove the battery from the battery holder
on the eBike and cover the open contacts.
» Always cover the display before transporting
separately from the eBike. A tight seal is only
fully guaranteed when the USB cover is closed.
» When transporting an eBike fitted with a CeBS,
ensure that none of the fitted components are
damaged.
» Secure the eBike fitted with a CeBS appropri-
ately to prevent damage to the CeBS compo-
nents. Before transporting the eBike, observe
all the relevant specifications provided by the
eBike manufacturer.
» If you intend to transport your eBike by bus,
aeroplane, boat or train, contact the relevant
transport company to find out the conditions
under which the battery will be transported.
10 Disposal
Never dispose of
electrical equipment,
electronic devices
or batteries with the
domestic waste. As
a consumer, you are
required by law to
return electrical equipment, electronic devices
and batteries to special public collection points
or a specialist dealer at the end of their useful life.


Continental Bicycle Systems
Contact
Continental Bicycle Systems GmbH & Co. KG
Ludwig-Erhard-Straße 3034
D65760 Eschborn
Germany
[email protected]ontitech.de
www.continental-bicycle-systems.com
Tel: +49 (0)69 7603 9808
Find out more about
this brochure.
The content of this publication is not binding and was written for
informational purposes only. The industrial property rights are the
property of Continental AG and/or its subsidiaries.
Copyright © 2019 ContiTech AG, Hanover, Germany. All rights
reserved. Visit www.contitech.de/discl_en for more information.
2008 EN 2019.10
This manual suits for next models
2
Table of contents
Other Continental Refrigerator Bicycle Accessories manuals