DELAY FUNCTION
If you do not want the coffee maker to start operation immediately, for example now it is 8:10 am, you hope that the
coffee maker will automatically start at 1:00 pm, first follow steps 1 to 5 of above section, and then you can set the
automatic start function as follows:
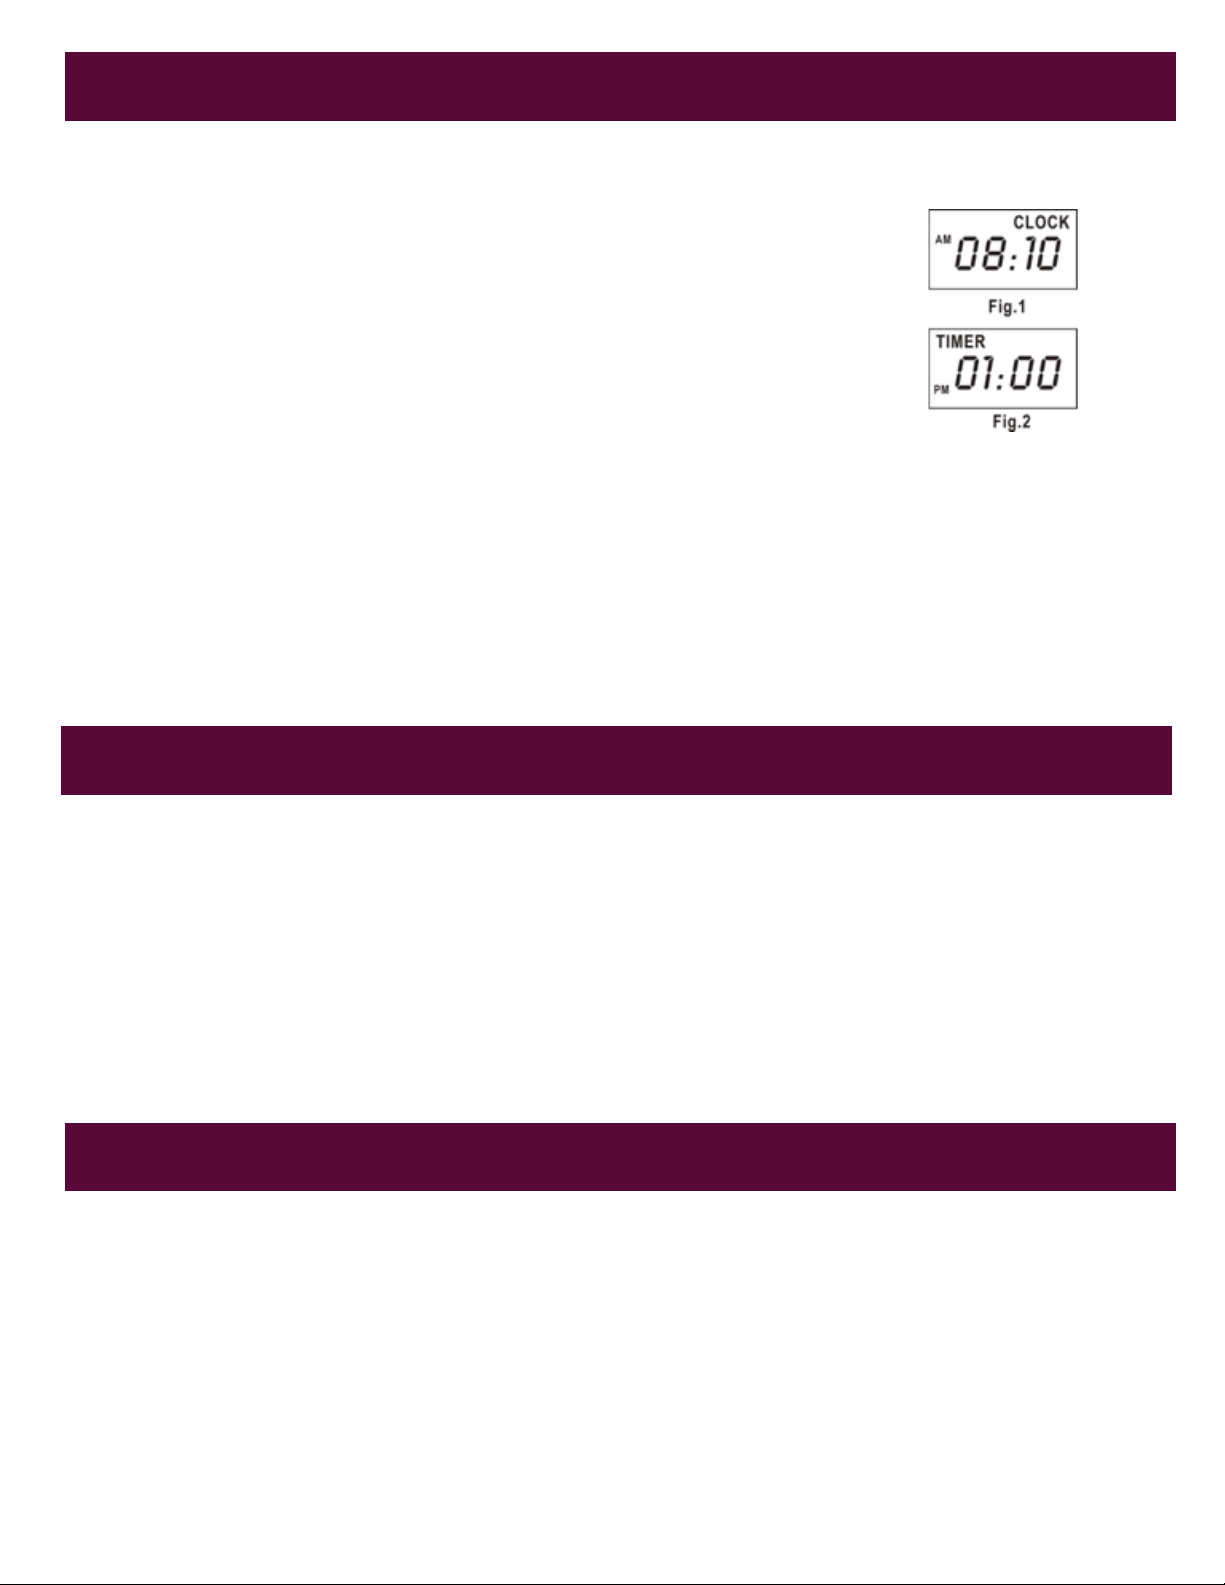
1) Press PROG button for the first time, the word CLOCK is showed at the up-right
corner on display.
2) Press the HOUR and MIN button continuously to set the present time (real clock),
that is AM 8:10(See fig. 1).
Note: The time cycle is 12 hours.
3) Press PROG button for the second time, the word TIMER shows on up-left c
orner of display.
4) Set the delayed starting time by pressing HOUR and MIN button repetitively, that is PM 01:00 (see Fig. 2).
5) Press the PROG for the third time, the indicator of DELAY is illuminated and the LCD will display the current clock.
Note 1: You may cancel the automatic start function by pressing PROG again. If you want to change the automatic start
time, only following the above 1-4 steps again.
Note 2:The appliance will begin working if you press ON/OFF button.
6) When the time is due the indicator of DELAY will be off, while the indicator of BREW turn on and the unit starts
brewing. The appliance will be cut off power automatically after two hours if it has not been manually disconnected at
the completion of brewing.
CLEANING AND MAINTENANCE
CAUTION: Be sure to unplug this appliance before cleaning. To protect against electrical shock, do not immerse c
ord, plug or unit in water or liquid. After each use, always make sure plug is first removed from wall outlet.
1) Clean all detachable parts after each use in hot, sudsy water.
2) Wipe the product’s exterior surface with a soft, damp cloth to remove stains.
3) Water droplets may buildup in the area above the funnel and drip onto the product base during brewing. To control
the dripping, wipe off the area with a clean, dry cloth after each use of the product.
4) Use a damp cloth to gently wipe the warming plate. Never use abrasive cleaner to clean it.
5) Replace all parts and keep for next use.
6)Any other servicing should be performed by an authorized service representative.
REMOVING MINERAL DEPOSITS
To keep your coffee maker operating efficiently, you should clean away the mineral deposits left by the water regularly
according to the water quality in your area and the frequency use the appliance, the detail is as follows:
1. Fill the water tank with water and descaler to the MAX level as indicated in the water tank. (The scale of water and descaler
is 4:1, the detail refers to the instruction of descaler. Please use“household descaler”, you can use the citric acid instead of
the descaler (the one hundred parts of water and three parts of citric acid).
2. Put the carafe on the warming plate and ensure it is placed in position.
3. Press the ON/OFF button once and the indicator of BREW will be illuminated. After a while, water will drop out automati-
cally.
4. After percolate the equivalent of one cup and then switch off the appliance by pressing the ON/OFF button again.
FUNCIÓN DE RETARDO
Si no desea que la cafetera comience a funcionar de inmediato, por ejemplo, ahora son las 8:10 a.m., espera que la
cafetera se inicie automáticamente a la 1:00 p.m., primero siga los pasos 1 a 5 de la sección anterior y luego Puede
configurar la función de inicio automático de la siguiente manera:
1) Presione el botón PROG por primera vez, la palabra RELOJ se muestra en el
esquina superior derecha en la pantalla.
2) Presione el botón HOUR y MIN continuamente para configurar la hora actual
(reloj real), eso es AM 8:10 (Ver fig. 1).
Nota: El ciclo de tiempo es de 12 horas.
3) Presione el botón PROG por segunda vez, la palabra TIMER muestra
en la esquina superior izquierda de la pantalla.
4) Configure el tiempo de inicio diferido presionando los botones HOUR y MIN repetidamente, es decir, PM 01:00
(consulte la Fig. 2).
5) Presione PROG por tercera vez, el indicador de AUTO se iluminará y la pantalla LCD mostrará el reloj actual.
Nota 1: Puede cancelar la función de inicio automático presionando PROG nuevamente. Si desea cambiar la hora de inicio
automático, solo siga los pasos 1-4 anteriores nuevamente.
Nota2: el dispositivo comenzará a funcionar si presiona el botón ON / OFF.
6) Cuando llegue el momento, el indicador de AUTO se apagará, mientras que el indicador de RUN se enciende y la
unidad comienza a prepararse. El aparato se cortará automáticamente después de una hora si no se ha desconectado
manualmente al finalizar la preparación.
LIMPIEZA Y MANTENIMIENTO
PRECAUCIÓN: asegúrese de desconectar este aparato antes de limpiarlo. Para protegerse contra descargas eléctricas, no
sumerja el cable, el enchufe o la unidad en agua o líquido. Después de cada uso, siempre asegúrese de quitar el enchufe
de la toma de corriente.
1) Limpie todas las piezas desmontables después de cada uso en agua jabonosa caliente.
2) Limpie la superficie exterior del producto con un paño suave y húmedo para eliminar las manchas.
3) Las gotas de agua pueden acumularse en el área sobre el embudo y gotear sobre la base del producto durante la
preparación. Para controlar el goteo, limpie el área con un paño limpio y seco después de cada uso del producto.
4) Use un paño húmedo para limpiar suavemente la placa de calentamiento. Nunca use limpiadores abrasivos para
limpiarlo.
5) Reemplace todas las partes y guárdelas para el próximo uso.
6)Cualquier otro servicio debe ser realizado por un representante de servicio autorizado.
QUITANDO DEPÓSITOS MINERALES
Para mantener su cafetera funcionando de manera eficiente, debe limpiar los depósitos minerales que deja el agua
regularmente de acuerdo con la calidad del agua en su área y la frecuencia con la que usa el aparato, el detalle es el
siguiente:
1. Llene el tanque de agua con agua y descalcificador hasta el nivel MAX como se indica en el tanque de agua. (La escala de
agua y descalcificador es 4: 1, el detalle se refiere a las instrucciones del descalcificador. Utilice "descalcificador doméstico",
puede usar el ácido cítrico en lugar del descalcificador (las cien partes de agua y tres partes de cítrico). ácido).
2. Coloque la jarra en la placa de calentamiento y asegúrese de colocarla en su posición.
3. Presione el botón ON / OFF una vez y el indicador de RUN se iluminará. Después de un tiempo, el agua se caerá
automáticamente.
4. Después de filtrar el equivalente de una taza y luego apague el aparato presionando nuevamente el botón ON / OFF.