ENG L ISH ( e n )
en Date of Manufacture YYYY-MM-DD
en Manufacturer en Use-by (Expiry date) YYYY-MM-DD en LOT number
en Sterilized using ethylene oxide
en Reference / model number en Global Trade Item Number en Do not use if package is damaged
en Keep away from sunlight en Keep Dry en Consult instructions for use en Caution: see instructions for use
en Prescription required, does not
apply in all geographies
en Non-pyrogenic
en Do not re-use
en Medical Device
en Single sterile barrier system en Distributed by
2
7
DISCONNECTING
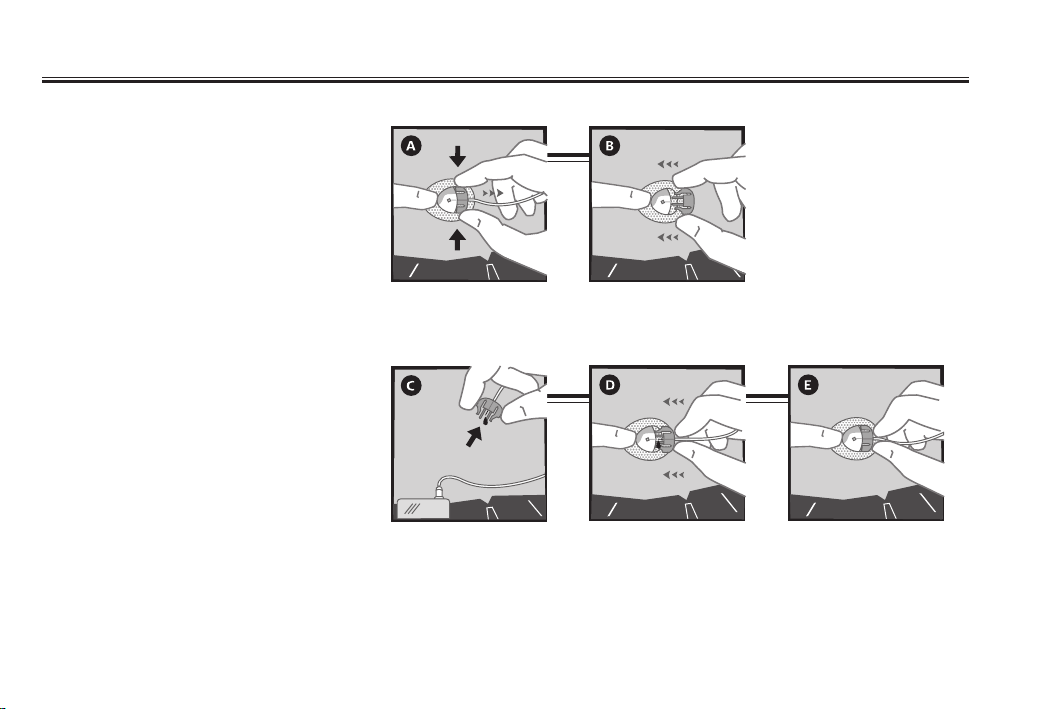
AinsetTM allows you to temporarily disconnect
your pump without having to change the
infusion set. Hold the adhesive tape in place
by placing a finger just in front of the cannula
housing, and gently squeeze the sides of the
connector. Pull the connector needle straight
out from the cannula housing.
BInsert the disconnect cover into the cannula
housing until you hear a “click”.
RECONNECTING
CIf necessary, prime the infusion set until
medication dispenses from the needle.
CAUTION: When priming the infusion set,
hold the infusion set with the needle pointing
down.
DPlace a finger on the adhesive tape just in
front of the cannula housing.
EPush the connector needle straight in until
you hear a “click”.
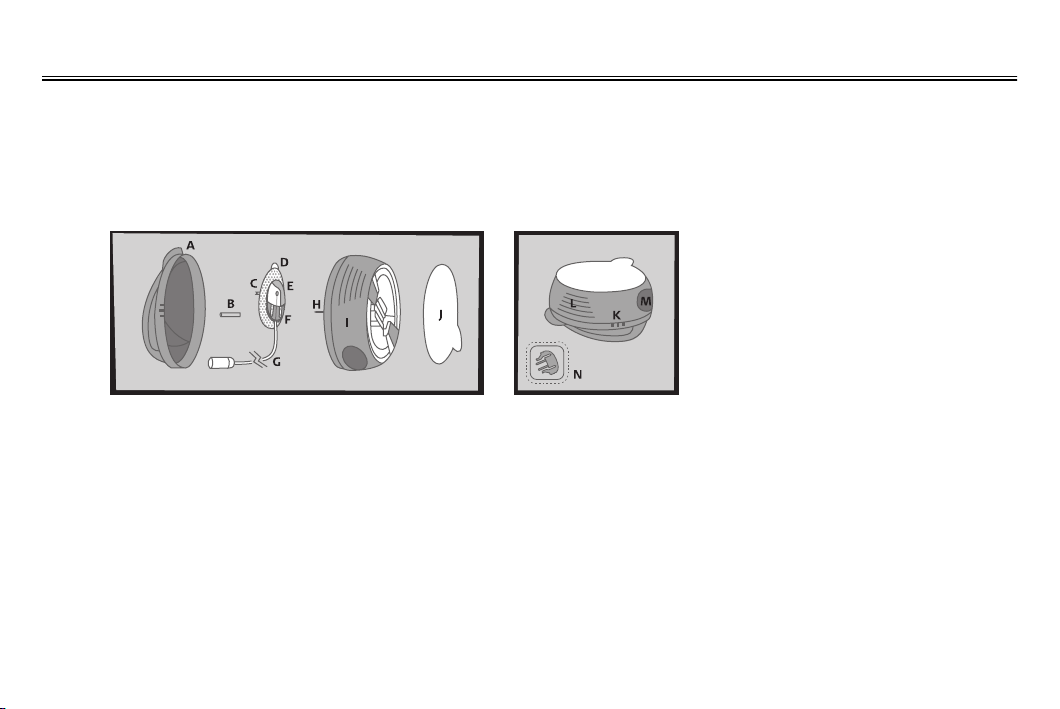
11 Carefully remove the needle guard by gently
twisting and then pulling it. Check that the
soft cannula does not exceed the introducer
needle.
CAUTION: Before positioning insetTM over a
clean insertion site, place the tubing in the
slot to ensure that the tubing is not caught
underneath the infusion set during insertion.
12 Insert insetTM: Position insetTM over the
insertion site. Simultaneously press the
round indentations on either side of the
serter to insert the infusion set.
13 Push gently on the center of the serter to
secure the adhesive on the skin.
14 Remove the serter/introducer needle by
grasping the center and pulling it gently
back. Gently massage the adhesive tape
onto the skin. Fill the empty space in the
cannula with the following amount of insulin:
U-100 insulin:
6 mm : 0.1 units (0.001 ml)
9 mm : 0.2 units (0.002 ml)
15 Push the lid back in place until you hear a
“click.”
the infusion set is not loosened / removed by
accident.
7Unwinding the tubing: ehttsiwtylluferaC
beginning of the tubing out of the slot. Now
unwind the tubing from the serter by pulling it
carefully upwards.
CAUTION: Do not touch the introducer
needle when unwinding the tubing. Be
careful not to pull too hard when the tubing is
fully released. You could accidentally
remove the infusion set from the serter.
8Connect the infusion set to a pump reservoir
and the pump. Prime infusion set. Ensure
there are no air bubbles in the tubing. Consult
pump manufacturer’s instructions for use.
CAUTION: When priming the infusion set,
hold the infusion set with the needle
pointing down to ensure that medication
does not come in contact with the adhesive
backing paper.
9Pull up gently to remove the adhesive
backing paper.
10 Prepare the serter: Place fingers on lined
indentations. Press lined indentations on
each side. Pull spring until you hear a “click”.