Cornelius A.B.S. Unit User manual

McDonald’s® ABS Basic Daily Operation
Complete Daily Top 10 Checklist:11
Is the conveyor clean?
Is the nozzle and diffuser clean?
Is syrup deflector in place?
Are the cup tubes properly filled?
Are the cup tubes cracked?
Are the cup tubes fingers
damaged or missing?
Is the drip tray clean?
Is the cup locator spring
damaged or missing?
Is the water deflector in place?
Are grabber pads cracked,
loose, worn or torn?
01
02
03
04
05
06
07
08
09
10
01
01 02 04 05 06
07 08 09
12
• Pressing the appropriate size cup
button will rotate the cup tube to
the front for proper filling.
• Load cup tubes properly:
1. fan cups to separate
2. support bottom of tube with
your hand while cup tubes are
being filled. This will prevent
damage to the cup tube fingers.
• Do not over fill cup tubes.
• Overfilling cup tubes past label will
damage cup tube fingers and cause
multiple cups to be pulled by ABS.
• Do not hand pull cups from turret.
• Continuous improper loading,
overfilling and manual pulling of cups
will cause damage to the cup tube
fingers and multiple cups to be
extracted.
• Do not operate ABS with cracked
cup tubes or missing hardware.
This may cause damage to other
major components.
• Press the red “AUTO/MANUAL”
button to place the ABS unit into
“MANUAL” mode.
• “MANUAL” mode prevents ABS
moving parts from operating.
• Remove ice bin lid and fill with ice
cubes.
• Bin cover must rest securely on top
of bin. A covered ice bin will prevent
foreign objects or material from
falling inside.
• Do not overfill.
• Visually inspect grabber pads for
tears, cracks, excessive wear or
loose fit. Replace as needed.
• Do not use any cleaning products on
pads, as it will cause pads to slip off
cups.
For ABS Service Call:
Coca-Cola SMILE Service
1-800-241-COKE
2 6 5 3
• Do not pour coffee or hot liquids into
drain pan, as the plastic drain pan will
develop cracks and leaks.
• Drain pan replacement is very expensive.
• Place the lids onto the cup tubes.
Covered cup tubes prevent foreign
objects or material from falling into
a customer’s cup.
10
• Clear drink orders by pressing the
“UP ARROW” to highlight orders
and pressing enter to clear orders.
• Press the red “AUTO/MANUAL”
button to place the ABS unit into
“AUTOMATIC” mode.
03
© 2008 IMI CORNELIUS
WWW.CORNELIUS.COM
620807805A Revision: B
To order job aid cards contact Coca-Cola Parts: 1-800-638-2653 Part #111099 -or- www.3Wire.com 3Wire Part #1039561

01 02 03 04 05 06
07 08 09 10 11 12
13 14 15 17 1816
McDonald’s® ABS Basic Daily Cleaning02
02 Loosen the screws (3) that retain
the cup conveyor cover.
03 Remove the conveyor cover and
conveyor assembly. Do not carry
conveyor by cup holder.
04 Remove the grille from the drip
tray and clean with warm soapy
water.
• Inspect the cup locator spring.
05 Pour warm (NOT HOT) water down
drip tray drain. Flush the drip tray
using carbonated water. Hot water
or coffee will crack drip tray.
06 Wipe down the drip tray area,
splash panel and clean any spills
from the machine exterior using
McD APC with a clean cloth.
01 Press the red “AUTO/MANUAL”
button to place the ABS unit into
“MANUAL” mode.
08 Roll the end of the paper napkin into a point and dip into the carbonated
water and wipe both sensors.
CAUTION: Never use a cleaning cloth, brush or abrasive cleansers on sensors.
07 Make sure water deflector is
properly installed; this will help
prevent motor failures.
(Order replacement if the
deflector is missing.)
11 Prepare sanitize solution by adding one packet of McD Sanitizer to 2 1/2
gallons of lukewarm water in a clean sanitized bucket.
• Remove the nozzle from the dispenser by turning and pulling down.
12 Remove the diffuser from the valve by pulling down. Place the nozzle and
diffuser in the Sanitizer solution.
10 Clean the conveyor assembly using
luke warm soapy water.
• Do not use hot water or place in
dishwasher. Rinse with plain water.
• Reinstall the grille and conveyor
assembly.
14 Clean the diffuser and nozzle using the nylon brush. Rinse with lukewarm water.
• Reinstall the diffuser and nozzle. Ensure they are located correctly in the machine.
• Dirty components can cause excess foaming.
13 Remove collar from diffuser.
• Check to see if syrup deflector
is properly installed.
17 Wipe dirt and dust from the outside of the machine with McD APC solution
and wipe dry with a soft, sanitized cloth.
• Apply McD Stainless Steel Cleaner dressing to all exterior stainless steel
surfaces and wipe dry with a paper towel.
• Drink orders should be cleared before going back to “AUTOMATIC” mode.
18 Press the red “AUTO/MANUAL” button to place the ABS into “AUTO” mode.
16 Do not the clean the holes
in the bottom of diffuser.
© 2008 IMI CORNELIUS
WWW.CORNELIUS.COM
620807805B Revision: B
Daily MaintenanceA Tools: McD APC, Paper Towel, Clean Cloth, Carbonated Water, Clean Paper Napkin,
McD Sanitizer, Sanitizing Bucket, Nylon Nozzle Brush and a Clean Sanitized Cloth.
CAUTION: Do not wipe the keypad or LCD displays with solvents or cleaning agents.
Do not use cleansers containing bleaching agents as they usually contain materials that
will discolor the stainless steel. Heavy discoloration should be removed with McD
“No Scratch” Pad. Never use plain steel wool as it will scratch the panel. Do not use a
cleaning cloth, brush or abrasive cleansers on sensors. The cleaning cloth may leave
oily residue on the lens causing a malfunction.
To order job aid cards contact Coca-Cola Parts: 1-800-638-2653 Part #111099 -or- www.3Wire.com 3Wire Part #1039561

01 02 03 04 05 06
07 08 09 10 11 12
McDonald’s® ABS Planned Maintenance03
02 Remove the top cover and set it
aside.
• Remove and discard all the ice from
the hopper. If necessary, pour clean,
potable water slowly into the hopper
to assist in melting the ice.
03 Remove the agitator retainer, disk, and the ice agitator assembly.
• Using McD APC and a long handled nylon bristle brush, clean the interior of the
hopper, top cover, agitator and agitator cover.
04 Rinse all with clean water.
• Prepare sanitize solution by adding one packet of McD Sanitizer to 2 1/2 gallons
of lukewarm water in a clean sanitized bucket.
05 Using McD Sanitizer and a soft,
sanitized cloth, wipe the interior
of the hopper, top cover, agitator,
and agitator cover.
• Reinstall the agitator retainer, disk,
and the ice agitator assembly.
06 Turn manual ice gate switch “OFF”
to relieve pressure on ice gate
cylinder.
01 Turn ABS unit power switch “OFF”.
CAUTION: Unit will agitate if the ABS
is left “ON”.
07 Push the cylinder open to the left. 08 Pull the locking pin out and rotate
the ice chute clockwise
approximately 1 inch and pull down
the ice chute.
11 Turn ABS unit power switch “ON”. 12 Clear drink orders by pressing
the “UP ARROW” to highlight
orders and pressing enter to
clear orders.
• Refill ice chute.
• Return ABS unit to the “AUTO”
mode by pressing the
“AUTO/MANUAL” button.
10 Turn manual ice gate switch “ON”.09 Using McD Sanitizer and long
handled nylon bristle brush clean
the interior of the ice chute.
• Reinstall ice chute.
Monthly MaintenanceA Tools: McD Sanitizer, McD APC, Long Handle Nylon
Bristle Brush and a Clean Sanitized Cloth.
CAUTION: Do not use sharp objects, metal devices or abrasives on the ice hopper, top cover or agitator disc. Irreparable
damage may result to the units. Do not use any solvents or other cleaning agents because they may attack the plastic material.
Clean the condenser filter (for units with integral water pre-cooler option only).
01 Remove the front lower grille panel.
02 Turn power supply off via the Pre-Cooler power switch.
03 Slide the condenser air filter vertically and remove the unit.
04 Clean the filter using hot water and shake it dry.
05 Reinstall the condenser air filter.
06 Turn power supply “ON”.
07 Reinstall the lower front panel.
NOTE: A dirty condenser restricts
airflow that results in excessively
high operating temperatures.
High operating temperatures reduce
machine capacity and shorten
component life. Any bent condenser
fins must be straightened with a fin
comb. Contact your Service Agent
to perform this service.
Quarterly MaintenanceB Tools: Phillips Head Screw Driver.
For ABS Service Call:
Coca-Cola SMILE Service
1-800-241-COKE
2 6 5 3
© 2008 IMI CORNELIUS
WWW.CORNELIUS.COM
620807805C Revision: B
To order job aid cards contact Coca-Cola Parts: 1-800-638-2653 Part #111099 -or- www.3Wire.com 3Wire Part #1039561

FLOAT
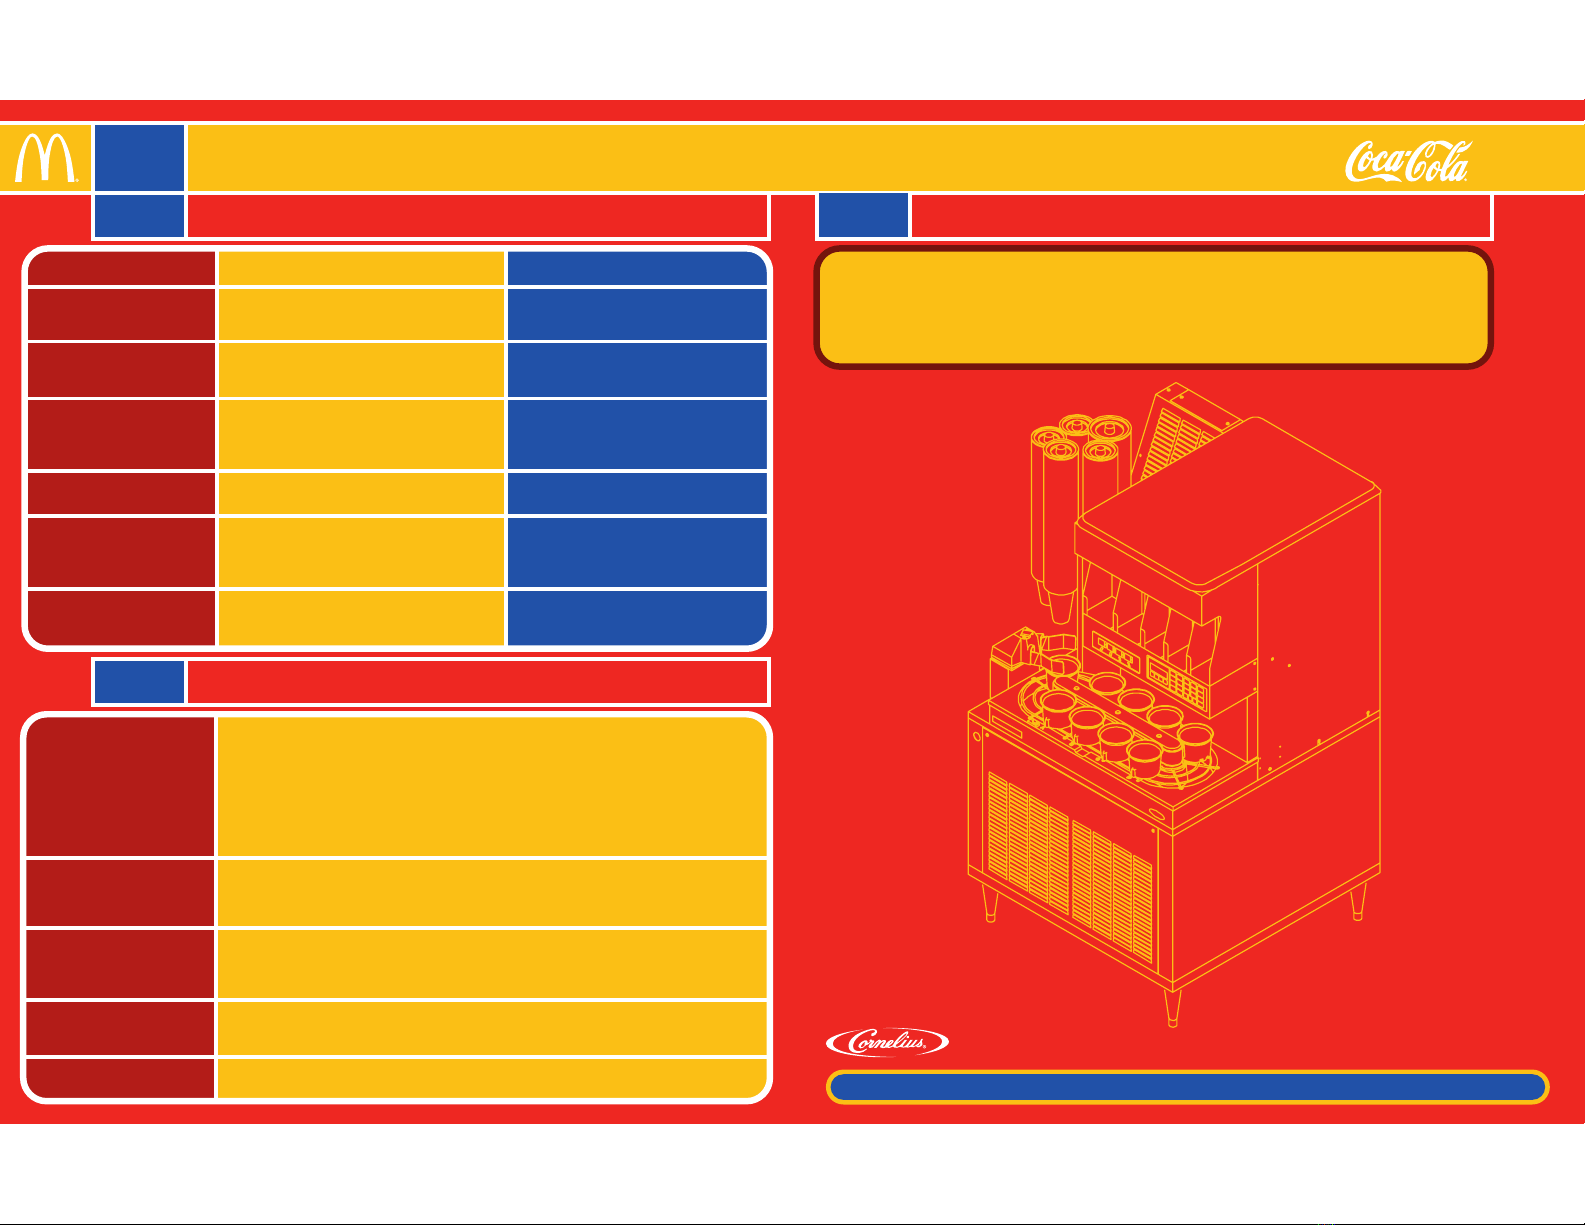
A Alarm & Warning Messages
McDonald’s® ABS Alarms and Troubleshooting04
MESSAGES
OR CONDITIONS EXPLANATION SOLUTION
COKE SMALL PARTS 1-800-241-2653
Ask for Small Parts Department. Part orders less than
$15/order are FREE. Prices subject to change.
Listed below are the most common parts needed.
14461 Conveyor Backing Plate Kit $1.16
16586 Nozzle Brush $0.50
19136 Valve Nozzle $2.63
20297 Deflector, Syrup (Diffuser) $6.10
20482 Small Nut, Cup Tube $3.42
20483 Acorn Nut 6x32 $0.43
20484 Large Nut, Cup Tube $3.27
20582 Plastic Spacer for Cup Tube $0.79
20652 Cup Locator Spring $7.71
20669 Water Deflector $0.97
20763 Screw for Front Panel $0.41
20881 Clinch Stud, Cup Tube $0.29
20882 Lock Nut for Cup Tube $0.03
28074 Cup Fingers 16, 21, 42 oz. $4.75
28075 Cup Fingers 12, 32 oz. $4.93
28076 Ice Chute Brush $8.79
(X) CUP OUT AT STATION (Y) The cup tube for size (X) is empty at
station (Y).
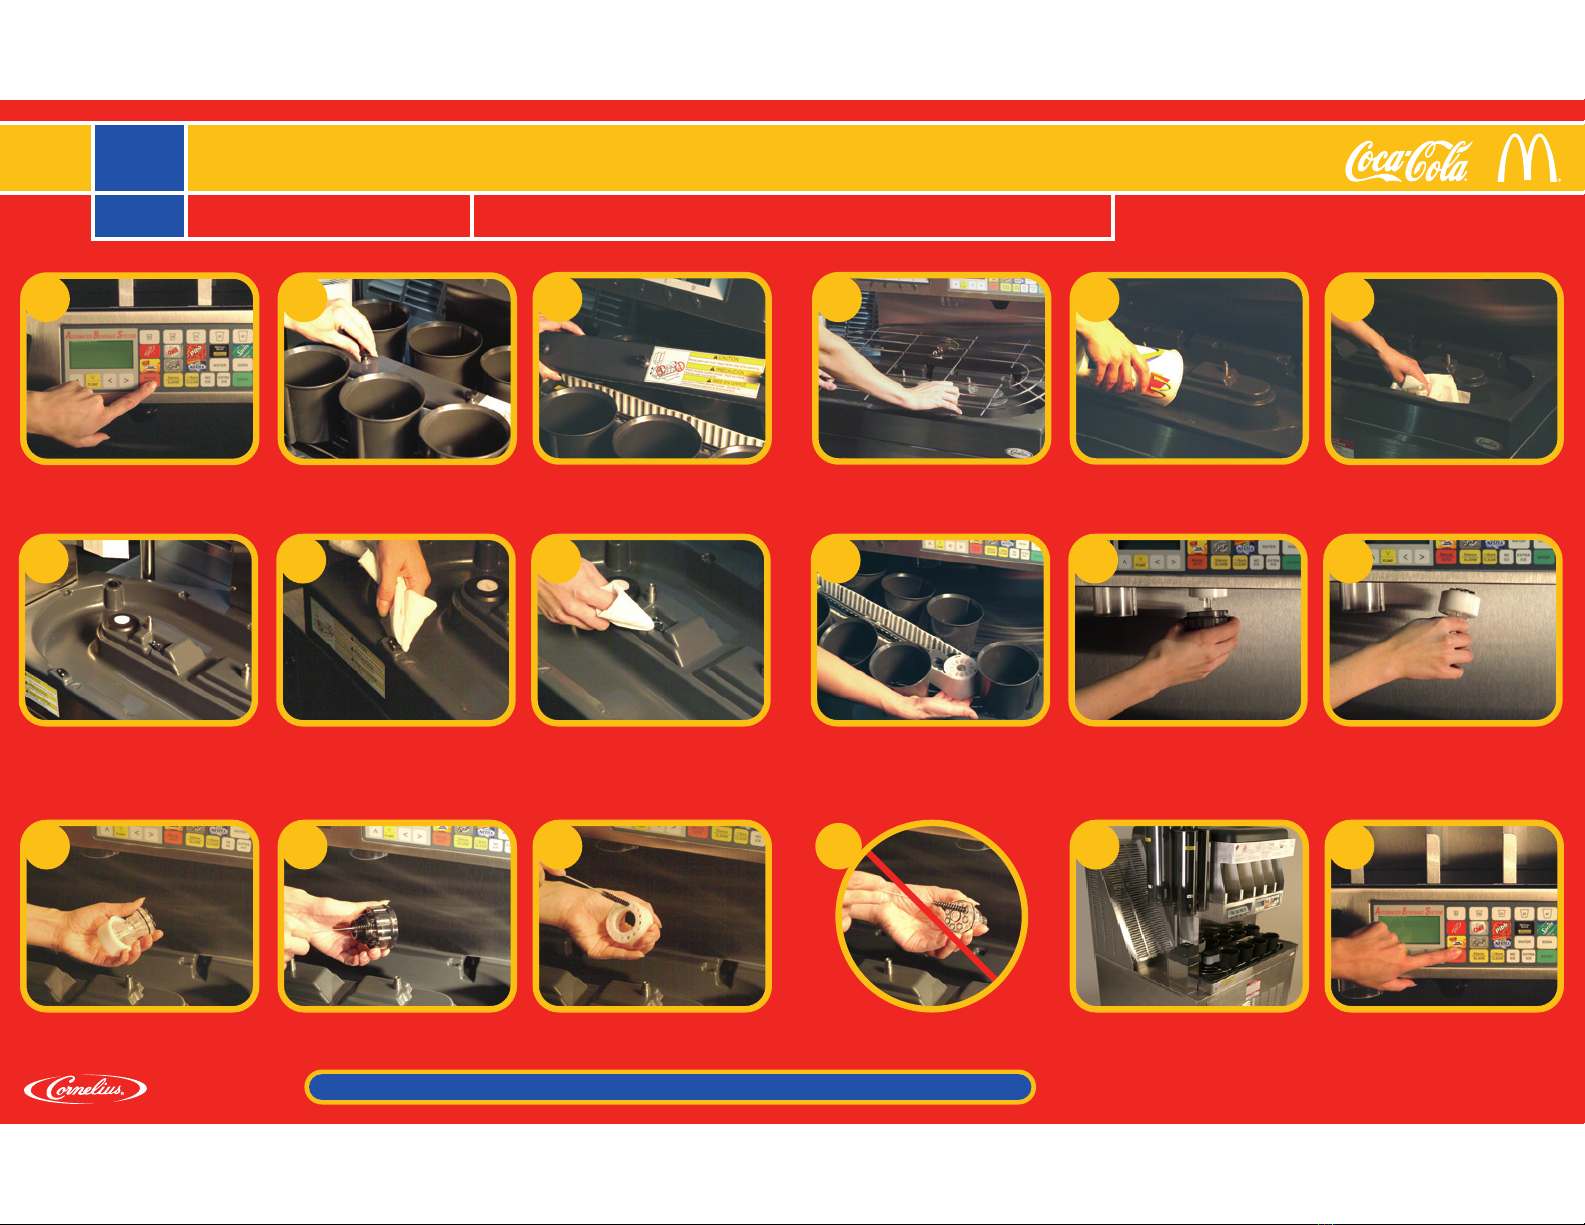
Refill the empty cup tube with the correct cup size and then press ENTER to continue dispensing.
CLEAR SYRUP SOLD OUT The clear syrup (SPRITE) is sold out
(EMPTY B.I.B.).
Connect a new syrup supply and the ABS unit will continue. If the ENTER button is pressed
before the syrup supply is replenished, automatic operation will resume but only the cup and ice
will be dispensed for this flavor.
LOW ICE - REFILL SOON Ice level in the ice bin is too low. Refill the ice bin with ice. Press ENTER. Alarms may continue for up to 15 minutes.
CLEAR CUP JAM Cup(s) jammed in the conveyor at the cup
extraction position and the conveyor and
turret are unable to operate.
Remove all cups from the conveyor cup holders at the EXTRACT POSITION before pressing the
ENTER button. Another cup will be extracted and dispensing will continue.
Cup Tubes. Over stacking of cups in cup tubes. Do not fill above the top of the cup tube.
Loose or Missing Hardware. Check each cup tube to insure all hardware is present on the cup tube. Replace any missing
hardware.
Cups. Cups are packed together and will not separate.
Grabber Pads. Wet, dry off. If damaged, replace.
C02 Check bulk C02 tank, if empty go to back up C02 and turn on.
Cup Tubes. Cup tube fingers are damaged (bent), replace all four fingers.
Cups Cups are packed together and will not separate.
Cup tube fingers are damaged (bent), replace all four fingers.
Cup tubes not properly mounted. Remove and remount cup tubes.
NO CUP EXTRACTED The gripper did not or could not extract a
cup from the cup tube.
Check cup supply at the extract station and make sure the cups are not stuck. Make sure the
gripper pads are not damaged.
AIR OR C02 LOW OR OUT C02 supply is low or empty or air
compressor not operating.
Change C02 cylinder or have bulk tank refilled. Check cause not operating and repair.
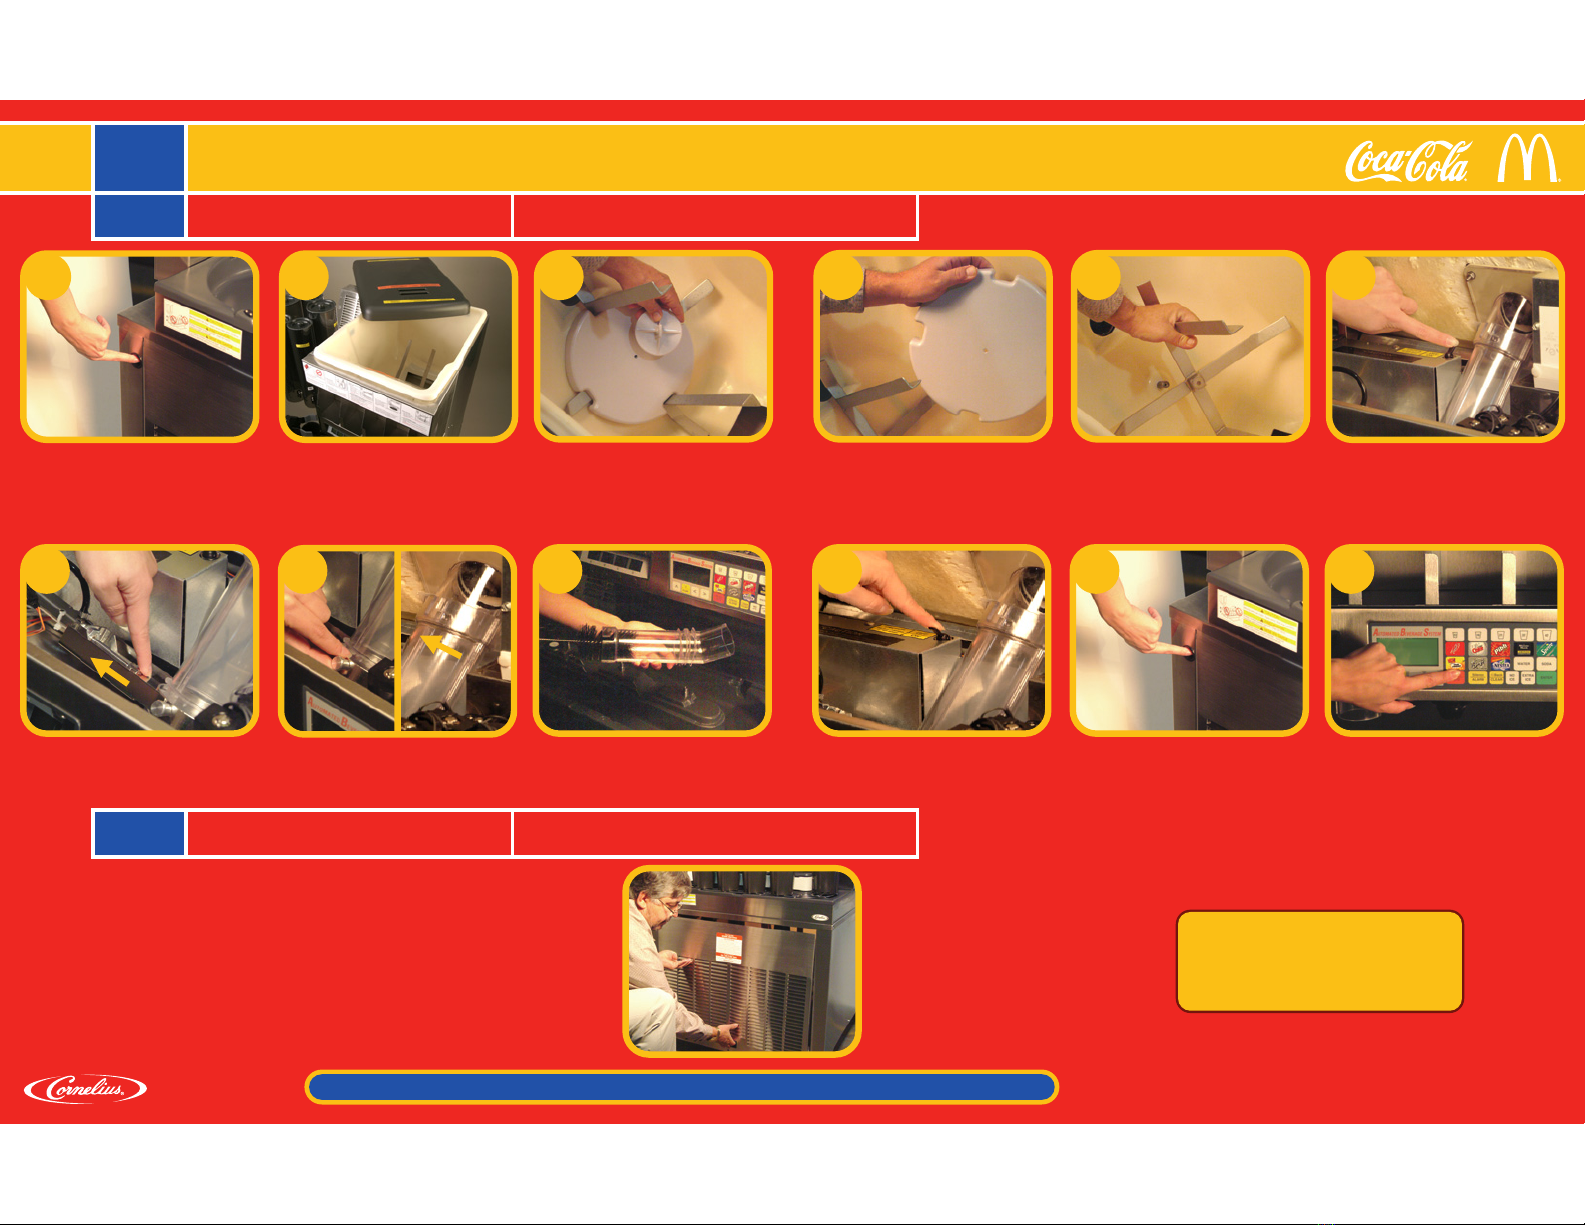
CONVEYOR NOISE Audible noise as conveyor turns. Remove conveyor and clean.
CUP HOLDERS Loose on conveyor belt. Three screws hold the cup holder firm to the conveyor belt. Tighten screws till firm
(DO NOT OVERTIGHTEN). Use kit 14461.
TURRET STALLED Turret unable to rotate clockwise or
counter-clockwise.
Clear obstruction (lid holder, cup tube or cups). Press ENTER
CONVEYOR STALLED Cup(s) jammed in the conveyor at the cup
extraction position and the conveyor and
turret are unable to operate. Does the
conveyor rotate?
Remove all cups from the conveyor cup holders at the EXTRACT POSITION before pressing the
ENTER button. Another cup will be extracted and dispensing will continue. Make sure conveyor
is installed correctly. Repair or Replace.
When an alarm occurs, press the SILENCE/ALARM button to silence the alarm. Read the display to determine the problem so that the
appropriate corrective action can be taken. LEFT and RIGHT arrows are used to scroll the alarm list and the number of unresolved warnings
and alarms are displayed with direction cues to scroll. Listed below are the Alarm and Warning messages that may appear on the display screen.
© 2008 IMI CORNELIUS
WWW.CORNELIUS.COM
620807805D Revision: B
To order job aid cards contact Coca-Cola Parts: 1-800-638-2653 Part #111099 -or- www.3Wire.com 3Wire Part #1039561

B D
C
McDonald’s® ABS Alarms and Troubleshooting04
PROBLEM CAUSE CORRECTIVE ACTION
GATE DOES NOT OPEN
OR IS SLUGGISH
AGITATOR TURNS
• Ask for Phone Fix to assist in troubleshooting
• Ask for the Small Parts Department to order small parts
• Ask for a Service Technician to be dispatched
A. Ice Chute not installed correctly. Reinstall Ice Chute.
ABS UNIT WILL NOT
ENTER AUTO MODE
A. Out of C02.
B. No POS host cable.
C. Unit appears locked up.
Reinstall C02
Press Clear, AUTO.
Power off and Restart.
BEVERAGES TOO SWEET A. Carbonator not working.
B. No C02 pressure in carbonator.
C. Valve ratio requires adjusting.
D. Plugged filter.
Call for service.
Call for service.
Call for service.
Replace.
BEVERAGES NOT SWEET
ENOUGH
A. Empty B.I.B. container.
B. Valve ratio requires adjusting.
Replace.
Call for service.
BEVERAGES NOT COLD A. No ice in hopper.
B. Drains plugged and water standing on
coldplate.
C. Master cooling system not cooling.
Fill ice bin.
Clean ice bin and flush drain
with warm water.
Call for service.
DRINKS FOAMY A. Nozzle & Syrup diffuser not clean.
B. Bulk Coke tank needs to be sanitize.
C. Lower or out of C02.
Clean and Sanitize.
Clean and Sanitize.
Replace or Switch to Back up.
ABS SYSTEM NOT
COMMUNICATING
• Verify that the ABS unit is in AUTOMATIC MODE. If ABS is in MANUAL MODE,
switch ABS to AUTOMATIC MODE.
• Verify that the ABS unit is enabled in the POS Drink Dispenser setup.
• Verify that POS cable is connected to COM2 on the CCU.
• Verify that the POS cable is connected to the ABS unit.
• Verify all programming is correct.
• Verify that no error messages are displayed on the ABS unit.
• Reboot power to the CCU.
• Reboot power to the ABS unit.
ABS UNIT WILL NOT
DISPENSE A DRINK
WITHOUT ICE OR WITH
EXTRA ICE
• For no ice, you must have the modifier enabled as “NO”, “W/O”, or “W/OUT”.
• For extra ice, you must have the modifier enabled as “EXTRA” or “XTRA”.
ABS UNIT IS DISPENSING
THE WRONG SIZE OR
FLAVOR
• Make sure that the order in which the flavors and sizes are the same in Flavor Setup
and Size Setup in the Drink dispenser as it is on the ABS System. Coca-Cola will
provide the Flavor Position Guide for POS programming.
• Call your POS vendor for service.
ABS IS NOT DISPENSING
ONE OR MORE OF A SIZE
OR FLAVOR
• Verify the Flavor and Size spelling is the same in both the Flavor and Size setup as
it is in the Menu Item Setup.
• Call your POS vendor for service.
ABS NOT PROGRAMMED
FOR BREWED TEA
• Brewed tea needs to be programmed in position 14 in the POS flavor table.
Troubleshooting COCA-COLA PHONE FIX®
Coca-Cola SMILE Service 1-800-241-COKE
POS Troubleshooting
To order job aid cards contact Coca-Cola Parts: 1-800-638-2653 Part #111099 -or- www.3Wire.com 3Wire Part #1039561
© 2008 IMI CORNELIUS
WWW.CORNELIUS.COM
620807805D Revision: B
Other manuals for A.B.S. Unit
1
Table of contents
Other Cornelius Commercial Food Equipment manuals

Cornelius
Cornelius ABS 2.0 User manual

Cornelius
Cornelius PRO ED FAST GATE Installation guide

Cornelius
Cornelius ABS 2.0 User manual

Cornelius
Cornelius VIPER User manual

Cornelius
Cornelius VIPER User manual

Cornelius
Cornelius ABS 2.0 User manual

Cornelius
Cornelius McDonald's QLT-2000 HC Supplement

Cornelius
Cornelius IDC PRO 255 User manual

Cornelius
Cornelius VIPER User manual

Cornelius
Cornelius IDC Pro Programming manual