Cornell CAF-E1600G User manual

User Manual
Multi-Airfryer CAF-E1600G

3
INTRODUCTION
Your new innovative Cornell Multi-Airfryer allows you to prepare your favourite ingredients
and snacks in a healthier and nutritious way.
The air fryer uses hot air convection in 360˚and with a removable mixing paddle to rotate
your meals for even and tasty results. It is able to prepare a variety of tasty dishes in a
healthy, fast and hands-free way. This process provides a one-time comprehensive heating,
so, for most food, there is no need to add oil for cooking. For instance, your dynamic air is
able to fry 1kg of potatoes into homemade chips with just one spoonful(14ml) of oil.
PARTS IDENTIFICATION
23
1
4
5
6
7
8
9
10
11
12
13
15
14
16
17
18
1. Cool touch lid
2. Transparent lid
3. Latch for removing lid
4. Measuring Spoon(14ml)
5. Maximum food level
maker (for chips only)
6. Removable mix paddle
7. Air inlet Non-stick
removable cooking pan
8. Cooking pad handle
release button
9. Cooking pan handle
10. Base
11. Lid opening button
12. Power ( n/ ff) Switch
13. Timer setting button
14. Digital timer
15. Control panel
16. Meal spoon
17. Top turntable tray
18. Top turntable grill
TROUBLESHOOTING
PROBLEM POSSIBLE CAUSE SOLUTION
Not plugged in Check that appliances is plugged in correctly
The On/Off switch is not fully pressed ress on the On/off switch
down
The appliance You have pressed the On/Off switch Close the lid
is not working but it is still not working
The motor is running but the appliance Contact your service centre
is not heating
The paddle does not turn Ensure that the paddle is correctly positioned,
If the problem continues, contact your service
centre
The paddle has not been installed Attach the paddle
The food has not been cut in regular Cut food to regular size
sized pieces
Food is not The chips have not been cut in regular Cut the chips to regular size
cooking evenly size pieces
The paddle has been installed correctly Check that it has clicked in position. If the
but it does not turn problem continues, contact your service
centre.
The wrong variety of potatoes has Select a variety of potato recommended
been used for chips
The potatoes are insufficiently washed Wash the potatoes longer to remove excess
The chips are not and or not completed dried starch. They must be drained and completely
crispy enough dry before cooking
The chips are too thick Cut the chips max chips dimensions are
13mm x 13mm
There is not enough oil for quantity Increase oil quantity
of chip (see cooking table Pg6 to Pg8)
The chips break up
The potatoes are recently harvested Reduce the quantity of potatoes down
during the cooking
and hence have a higher water content to 800g and adjust cooking time
The food stays on The cooking pan is too full Adhere to the recommended quantities
the edge of the indicated in the cooking table
cooking pan
14

5
SAFETY INSTRUCTIONS
• Do not allow the appliance to operate unattended.
• During hot air frying, hot steam is released through the air outlet vents. Keep your hands
and face at a safe distance from the steam and from the air outlet openings. Also be
careful of hot steam and air when you remove the pan from the appliance.
• Immediately unplug the appliance if you see dark smoke coming out of the appliance.
Wait for the smoke emission to stop before you remove the pan from the appliance.
• Always use oven mitts when handling the paddle and top tray.
CAUTION: HOT SURFACE!
• Place the appliance on a horizontal, even and stable surface.
• Appliance is not intended to be operated by means of an external timer or separate
remote-control system.
• This appliance is only intended to be used in households and similar environments
such as:
– staff kitchen areas in shops, offices and other working environments;
– farm houses;
– by clients in hotels, motels and other residences;
– bed and breakfast type environments.
• Product warranty will be void if the appliance is used improperly or for professional or
semi-professional purposes not according to the instructions in the user manual. Cornell
refuses to be responsible for any liability or damage caused by negligence.
• Always return the appliance to a service centre authorized by Cornell for examination
or repair.
• Do not attempt to repair the appliance yourself, otherwise the guarantee becomes
invalid.
• Always unplug the appliance from the power supply after use.
• Allow the appliance cool down for approx. 30 minutes before you clean or store it.
• Always ensure the ingredients prepared in this appliance come out golden-yellow instead
of dark or brown. Always remove burnt remnants.
• Automatic switch-off: This appliance is equipped with a timer. When the timer has
counted down to “0”, the appliance produces an alarm bell sound and switches off
automatically. To switch off the appliance manually, press the on/off button instead.
• Electromagnetic fields (EMF): This appliance complies with all standards regarding
electromagnetic fields (EMF). If handled properly and according to the instructions in this
user manual, the appliance is safe to use based on scientific evidence available today.
1. Do not add salt to chips while the chips are in the pan, only add salt once the chips are
removed from the appliance at the end of cooking.
2. When adding dried herbs and spices to the appliances, mix them with some oil or liquid.
3. Please note that strong coloured spices may slightly stain the paddle and parts of the
appliances. This is normal.
4. For best results, use finely chopped garlic instead of crushed garlic to prevent from
adhering to the central paddle..
5. If using onions in recipes, they are best thinly sliced instead of chopped as they cook
better. Separate the onions rings before adding them to the pan and give them a quick
stir so that they are evenly distributed.
6. With meat and poultry dishes, stop the appliance and stir the pan once or twice during
cooking so that the food on the top does not dry out and the dish thickens evenly.
7. Prepare vegetables in small pieces or stir-fry size to ensure they cook thoroughly.
8. This appliances is not suitable for recipes with a high-liquid content
(eg.soups, cook-in sauces)
COOKING TIPS
12

7
PREPARING FOOD
1. Place the appliance on a stable, horizontal and level surface. Do not place the appliance
on non-heat-resistant surfaces.
(fig.8)
(fig.6)
(fig.7)
(fig.9)
3. Add oil to the food using the spoon (fig.7), spreading it
evenly ( ee cooking table Pg6 to Pg8)
(1 spoonful of oil = 14ml of oil)
4. Unlock the handle and fold it completely into its housing
(fig.8)
2. Place the food in the cooking pan, distributing it evenly,
making sure that you adhere to the maximum quantity
( ee cooking table Pg6 to Pg8).
5. Close the lid (fig.9)
Note: Never fill the pan beyond the MA indication on
the paddle or exceed the amount indicated in the table,
as this could affect the quality of the end result.
OTHER VEGETABLES
FOOD TYPE QUANTITY OIL COOKING TIME
(gram) (spoon 14ml) (Minutes)
SWEET E ER Fresh in slices 650 1 spoon oil 20-25
+150ml cold water
MUSHROOM Fresh in quarters 750 1 spoon oil 12-15
TOMATOES Fresh in quarters 650 1 spoon oil 10-15
+150ml cold water
ONIONS Fresh in rings 650 1 spoon oil 15-25
MEAT – POULTRY
To add flavor to meat and poultry, mix some spices (Such as paprika, curry, mixed herbs,
thyme) with the oil
FOOD TYPE QUANTITY OIL COOKING TIME
(gram) (spoon 14ml) (Minutes)
Fresh 750 None 18-20
CHICKEN NUGGETS Frozen 750 None 18-20
Frozen 12 pieces (160g) None 12-15
CHICKEN DRUMSTICKS
Fresh 4 to 6 None 30-32
CHICKEN LEGS Fresh 2 to 4 (120g/pc)None 20-30
CHICKEN BREASTS Fresh 6 None 10-15
(boneless) (about 750g)
CHINESE S RING ROLL
Fresh 4-8 small 1 10-12
LAMB CHO S Fresh 2 to 6 None 20-25
(2.5cm to 3cm thick)
ORK CHO S Fresh (2.5cmthick) 2 to 3 None 18-23
ORK FILLET Fresh 2 to 6 thin slices 1 12-15
or strips
SAUSAGES Fresh 4 to 8 (pricked) None 10-12
TABLE OF COOKING TIMES
10

SET THE COOKING TIME
1. Press the timer setting buttons to set the time up
+/- down until desired time (from 1 to 60mins) as the
feature on the display (fig.10)
( ee cooking table Pg6 to Pg8).
(fig.11)
(fig.11)
(fig.10)
2. Now release, the selected time (in minutes) will be displayed and the countdown will
begin in 3 seconds
3. Timer countdown show seconds in display in last minute
4. The appliance stops after the selected time is achieved.
1. Plug in the power cord. It will sound once and the display on the control panel will
show 2 dashes. The appliance is now in standby mode and will not operate until
the n/ ff switch is selected.
2. Press the n/ ff switch, it will sound and the display on the
control panel will show 10 mins (fig.11) (Pre et cooking time
i 10 minute , if there i no operation within 3 econd , the
appliance will operate automatically)
3. Adjust the timer up+/-down buttons to select desired cooking times. The appliance will
begin operating in 3 minutes, and the paddle will rotate slowly in a clockwise direction.
4. nce cooking is completed, the timer will beep 5 times, and the appliances will stop
automatically.
5. Lift the handle until you hear a “Click” that it is
unlocked and remove the cooking pad (fig.12)
BEGIN COOKINGCOOKING
BEGIN COOKING
6. If more time is needed, press the n/ ff switch, and adjust the desired cooking times
accordingly again.
Caution: Do not touch the pan or lid or any part of the appliance during operation
during and after use other than the cool touch area.
TABLE OF COOKING TIMES
The cooking times below only serves as a guide and may vary according to the variety and
batch of potatoes food used. Adjust cooking time accordingly if actual weight is less or
higher than table list.
POTATOES
* Weight of unpeeled potatoes.
FOOD TYPE QUANTITY OIL COOKING TIME
(gram*) (spoon 14ml) (Minutes)
CHI Fresh 1000 1 40-45
Standard thickness Fresh 750 3/4 35-37
13mm x 13mm Fresh 500 1/2 28-30
Fresh 250 1/4 24-26
OTATOES Fresh 1000 1 40-42
(Quartered) Frozen 750 None 14-16
Diced otato Fresh 1000 1 40-42
Frozen 750 None 30-32
Frozen-suitable for 750 standard None 35-40
deep frying only 13x13mm
CHI S Frozen 2 way or 3 750 Thin None 30-32
way cook suitable 10x10mm
for oven and grill 500 American None 25-27
(and deep frying) type 8x8mm
98

TABLE OF COOKING TIMES
DESSERTS
NOTE: Suggested to turn halfway through cooking.
FOOD TYPE QUANTITY OIL COOKING TIME
(gram) (spoon 14ml) (Minutes)
1 spoon oil
Cut in slices 500g/ 5 bananas +1 spoon 4-6
BANANA brown sugar
Wrapped in tinfoil 2 bananas None 20-25
CHERRIES Whole Up to 1000g 1 spoon oil 12-15
+1 spoon sugar
STRAWBERRIES Cut in quarters if Up to 1000g 1 to 2 spoon sugar 5-7
large or halves if small
A LE Cut in wedges 3 1 spoon oil 15-18
+2 spoon sugar
EARS Cut in pieces Up to 1000g 1 to 2 spoon sugar 8-12
INEA LE Cut in pieces 1 1 to 2 spoon sugar 8-12
FISH—SHELLFISH
FOOD TYPE QUANTITY OIL COOKING TIME
(gram) (spoon 14ml) (Minutes)
BREADED SCAM I Frozen 18pieces (280g) None 10
MONKFISH Fresh cut in pieces 500 1 20-22
RAWNS Cooked 400 None 10-12
JUMBO KING RAWNS Fresh in quarters 300g/ 16pieces None 12-14
116
BEFORE FIRST USE
1. To Remove the lid
Press the lid opening button (fig.1)
and lift the latch (fig.2) to remove
the lid
(fig.1)
(fig.3)
(fig.2)
(fig.4)
(fig.5)
2. Remove the measuring spoon before use.
3. Lift the handle to a horizontal position until you hear a “Click” as it locks.
4. Remove the cooking pan (fig.3)
5. Turn the cooking pan upside down and upclip the
removable paddle by pressing the two pins together (fig.4)
7. To re-fit the paddle into the pan, press the two clips together to lock.
8. During first use, the appliance may give off a slight odour, this is normal and not harmful,
and will disappear quickly.
6. All removable parts are dishwasher safe (fig.5) or can be
washed with a soft cloth and washing up liquid.

EASY CLEANING
• Allow the appliance to cool down completely before cleaning.
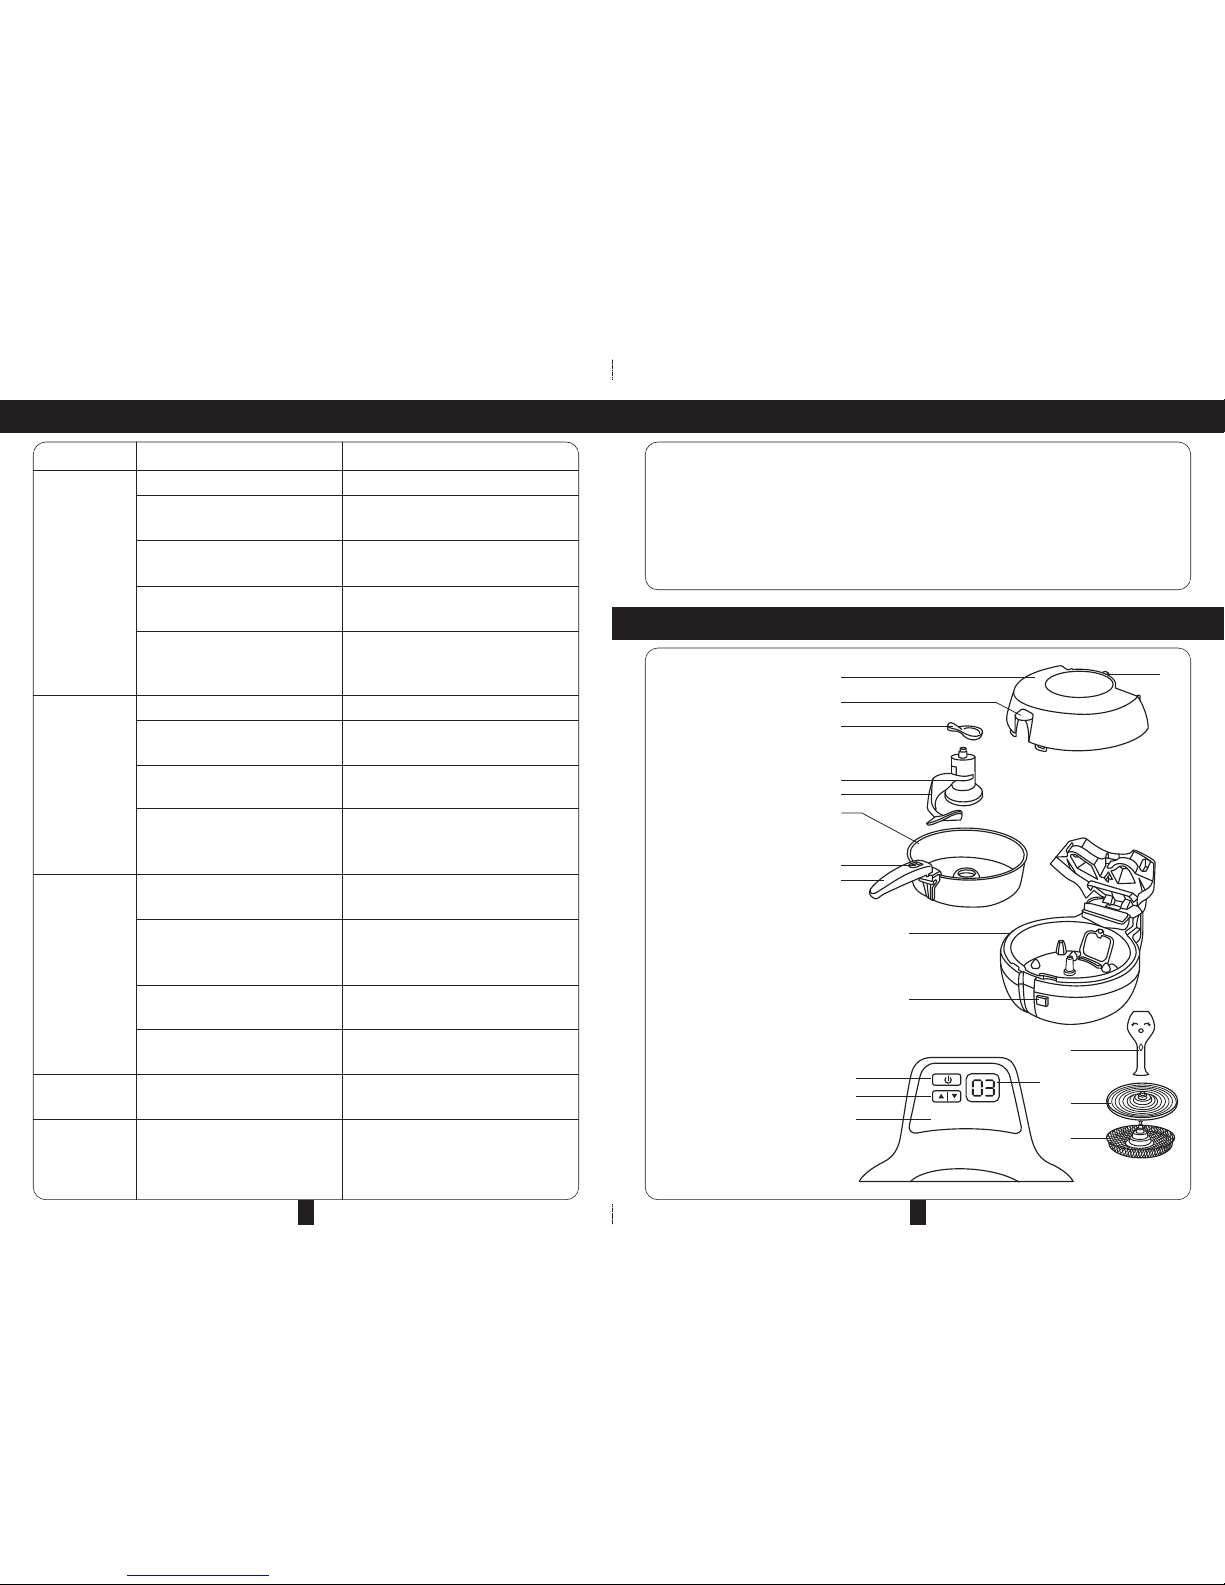
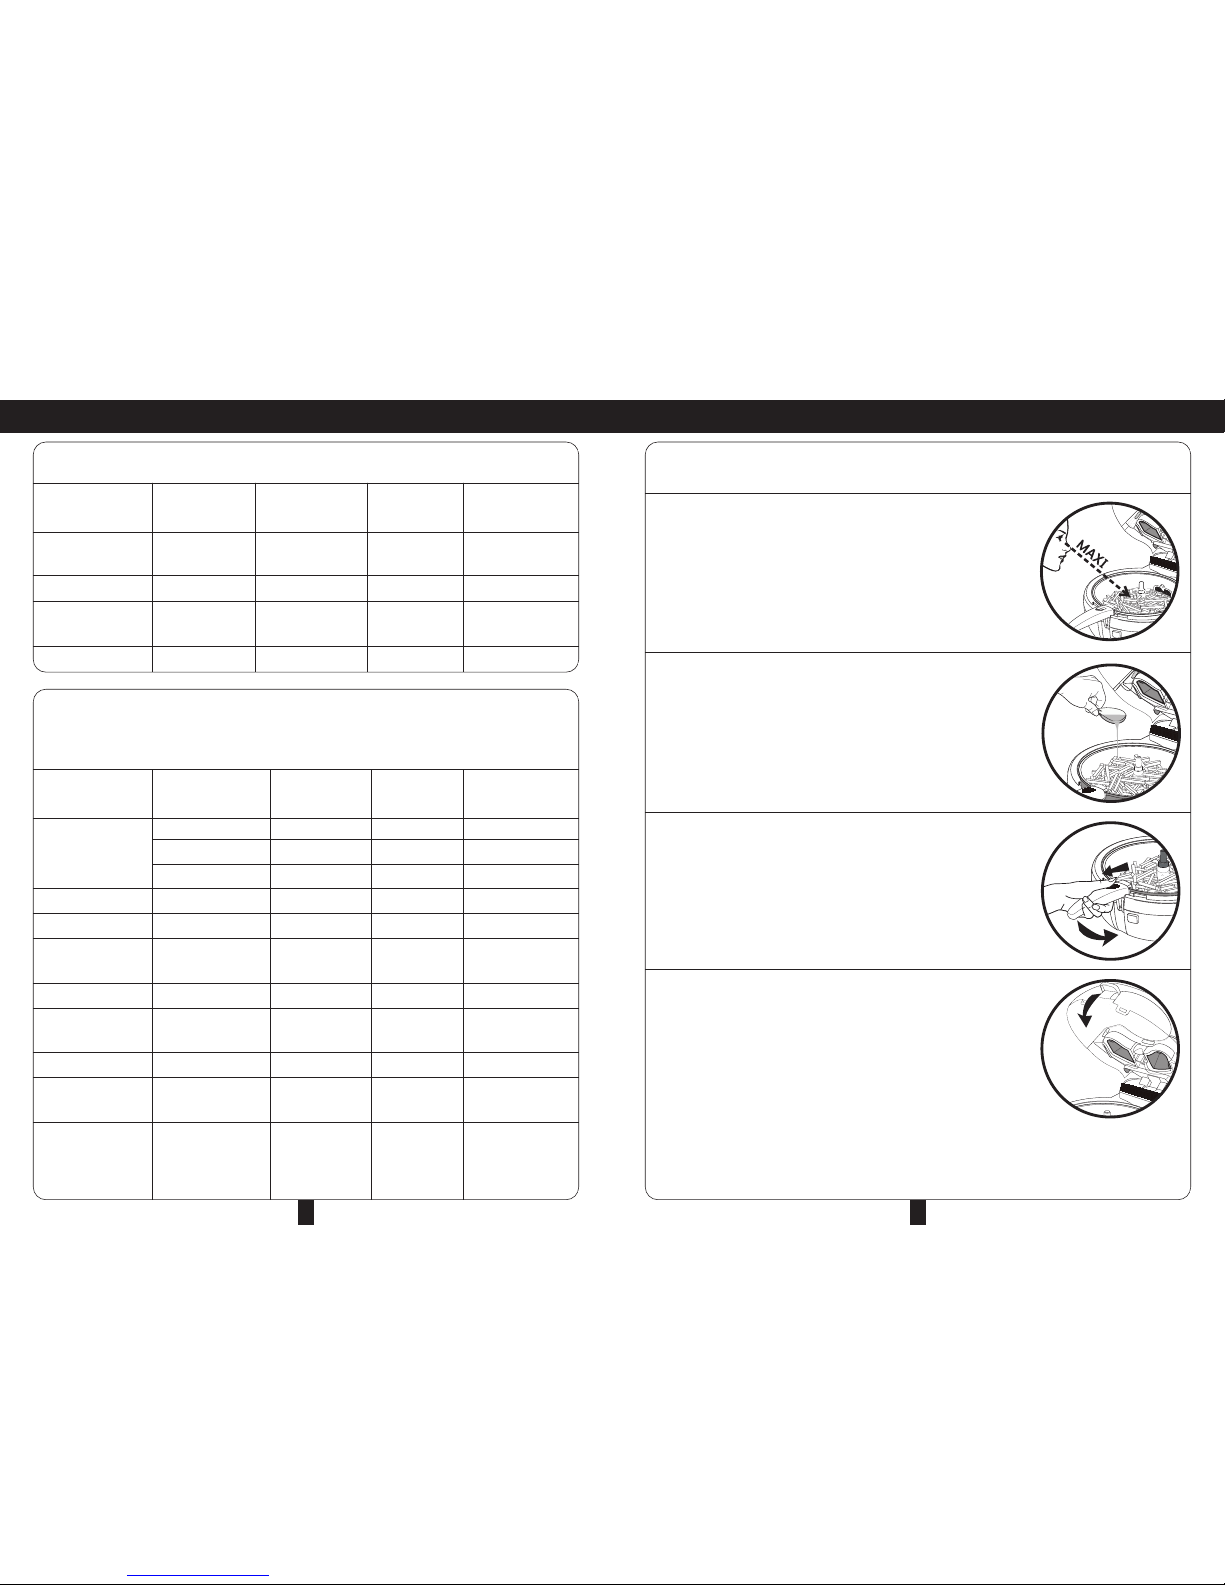
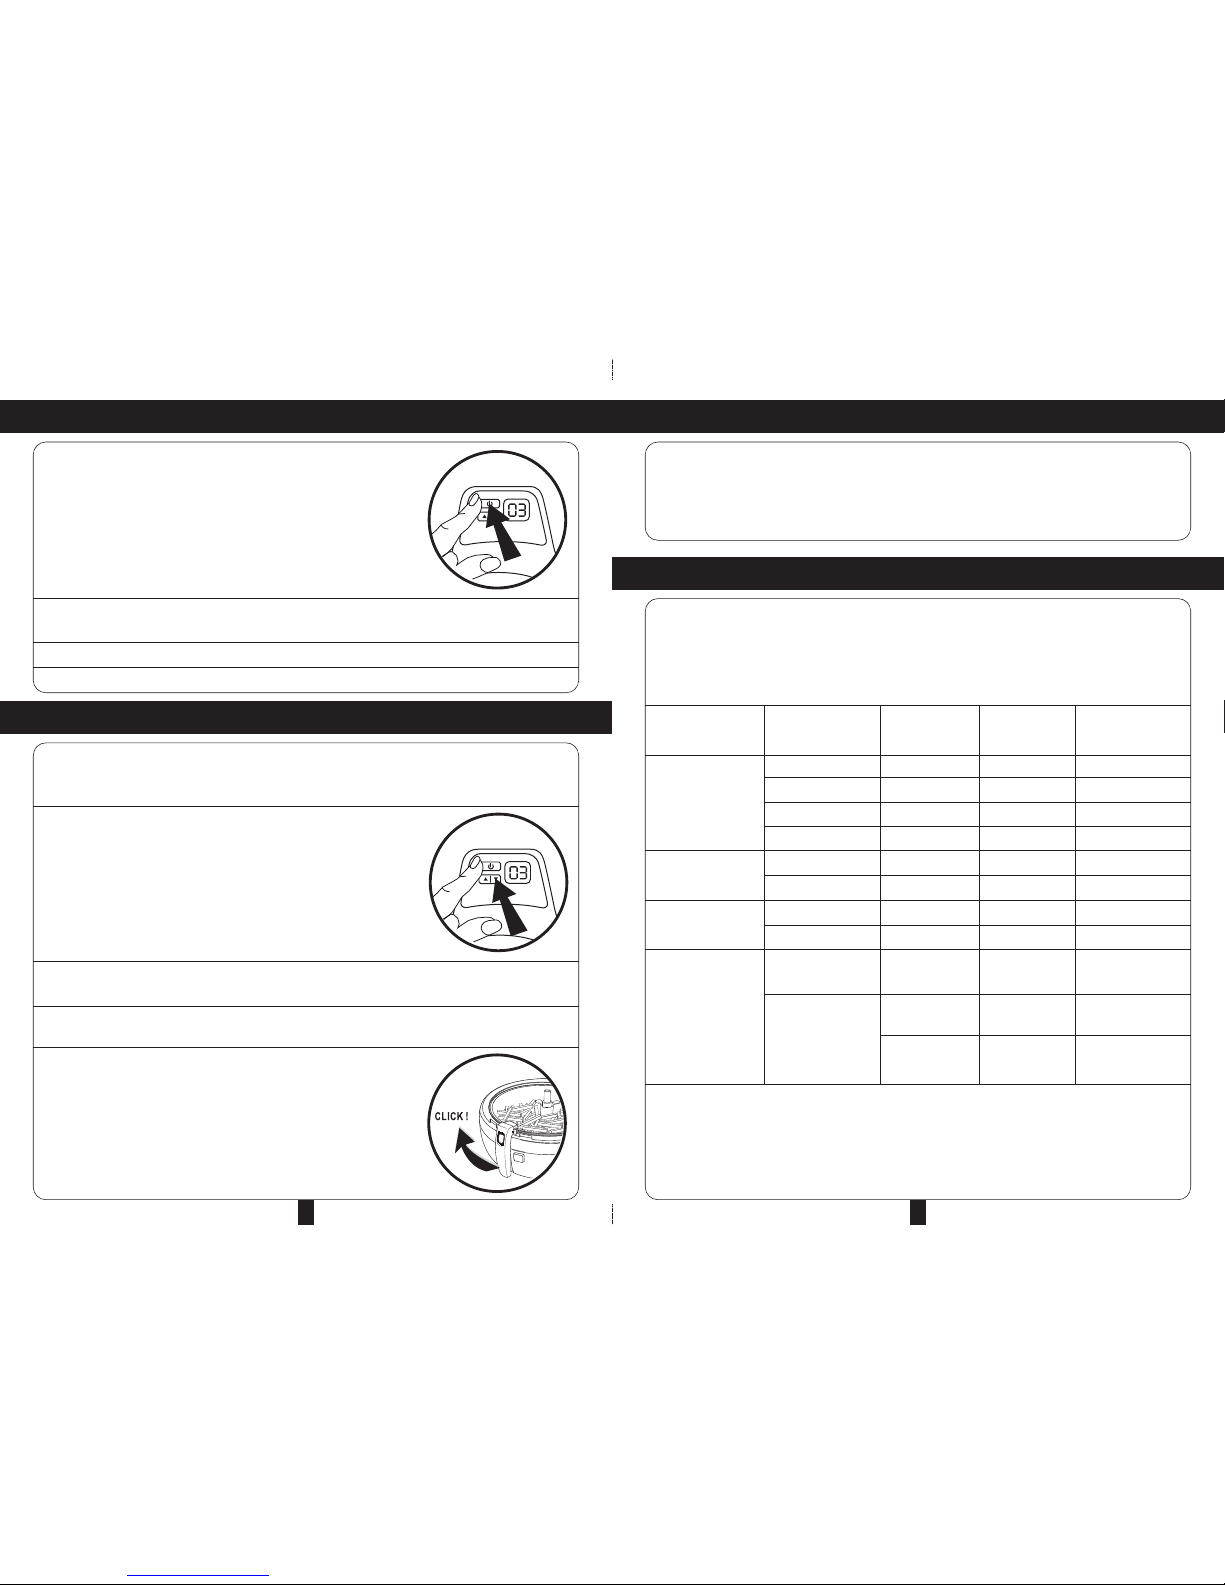
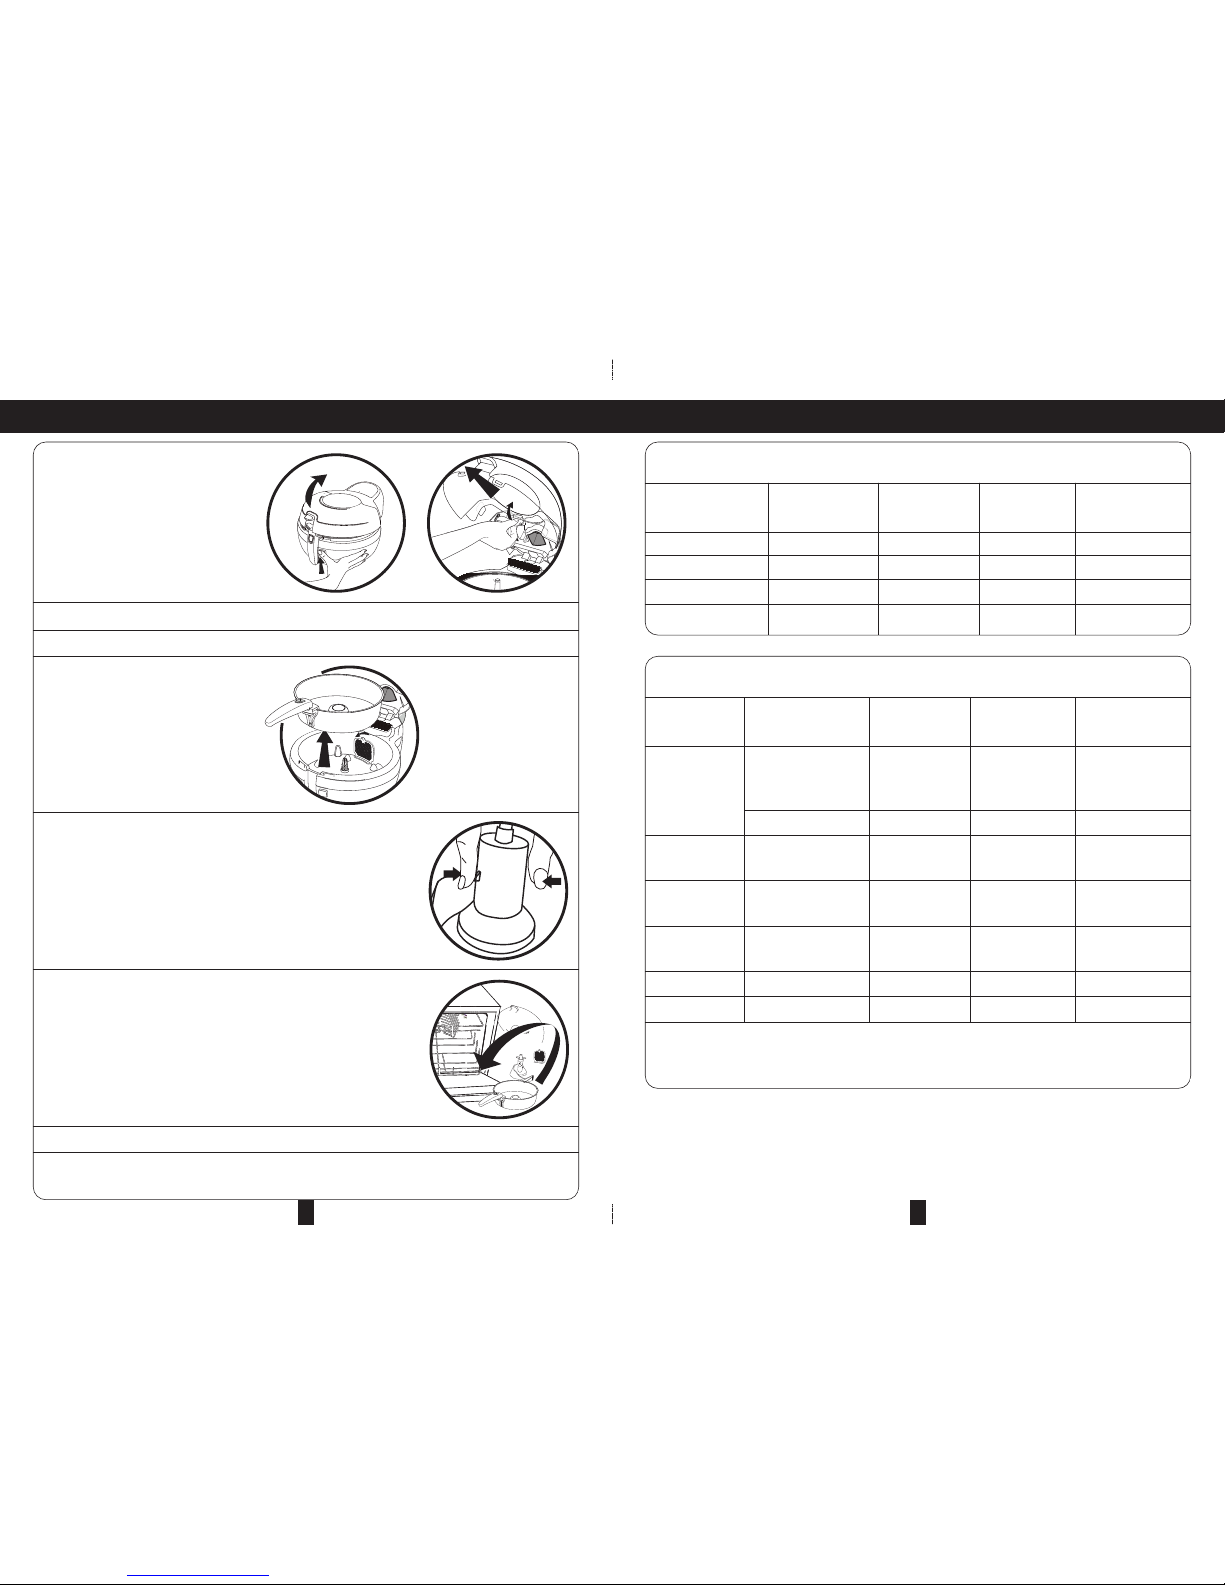
• pen the lid –Fig.1 and lift the latch to detach the lid- Fig 2
• Lift the handle to horizontal position until you hear a”click” as it unlocks- Fig 3
• Remove the cooking pan.
• Turn the cooking pan upside down and unclip the removable paddle by pressing the two
pins together – Fig 4
• All removable parts are dishwasher safe- Fig 5 and can be washed using a soft cloth
and washing up liquid.
• Clean the base of the appliance using a damp cloth and washing up liquid.
• Rinse and dry parts thoroughly before reassembling the parts.
• If food gets stuck or burnt on the pan or paddle, leave them to soak in warm water
before cleaning.
• The appliance has a non-stick cooking pad: thus browning and scratches which may
appear after * prolonged use. This is normal and does not present any problem.
• We assure that the non-stick coating complies with regulations concerning materials in
contact with foodstuffs.
WARNING:
• Never immerse the base in water.
• Do not use harsh or abrasive cleaning product or scourers.
• To retain the non-stick performance of the cooking pan for as long as possible, do not
use metal utensils when serving food.
ENVIRONMENT
- Do not discard the appliance with normal household waste at the end of its life, but hand
it in at an official collection point for recycling. By doing this, you will be helping to preserve
the environment.
134
SAFETY INSTRUCTIONS
• Never immerse the housing, which contains electrical components and heating
elements, in water nor rinse it under the tap.
• Do not allow water or other liquid to enter the appliance to prevent the risk of electric
shock.
• Do not use a power extension cord when operating this appliance.
• Do not obstruct the air inlet and the air vent openings while the appliance is operating.
• Do not unplug the appliance by forcibly yanking on the power cord.
• Never touch the interior of the appliance while it is operating.
WARNING
• Always ensure that the voltage indicated on the appliance corresponds to the local rated
voltage before connecting the appliance to the power supply.
• If the supply cord is damaged, it must be replaced by the manufacturer, its service agent
or similarly qualified persons in order to avoid a hazard.
• This appliance can be used by children aged from 8 years and above and persons with
reduced physical, sensory or mental capabilities or lack of experience and knowledge if
they have given supervision or instruction concerning the use of the appliance in safe
way and understand the hazards involved. Young children should not be allowed to play
with the appliance.
• Children should not be allowed to clean or perform user maintenance services without
adult supervision.
• Always keep the appliance and power cord away from the reach of children younger than
8 years old when the appliance is switched on or when cooling down.
• Do not allow the power cord to come into contact with hot surfaces.
• Do not plug in the appliance or operate the control panel with wet hands.
• nly connect the appliance to an earthed power supply. Always ensure that the power
plug is inserted into the power supply properly.
• Never connect this appliance to an external timer switch in order to prevent hazards.
• Do not place the appliance on or near combustible materials such as a tablecloth or
curtain.
• Do not place the appliance against a wall or against other appliances. Leave at least
10cm free space on the back and sides and 10cm free space above the appliance. Do
not place any objects on top of the appliance.
• Do not use the appliance for any other purpose than described in this manual.
Before using this product, please read the instruction manual thoroughly. Keep this
booklet for future reference.

SPECIFICATIONS
MODEL NO. CAF-E1600G
RATED VOLTAGE / FREQUENCY 220-240V~ 50Hz
RATED WATTAGE 1400W
CAPACITY 4.4L
PROBLEM POSSIBLE CAUSE SOLUTION
Cooking liquids The paddle is not positioned Ensure that the paddle is correctly positioned.
have flowed into correctly or the seal of the paddle If the problem continues, contact your service
the base of is defective centre. Do not use it for making soup or
appearance recipes with a high liquid content
The timer does The C board is not functioning lug off and restart, if problem continues,
not work correctly contact your service centre
The appliance is You suspect the motor is not working Contact your service centre
unusually noisy correctly
The paddle stops The paddle is not positioned correctly Wear oven mitts to push the paddle
turning during downward until it clicks into place, if this
cooking does not work, contact service centre
TROUBLESHOOTING
152
C O N T E N T S
INTRODUCTION
PARTS IDENTIFICATION
SAFETY INSTRUCTIONS
BEFORE FIRST USE
PREPARING FOOD
COOKING
BEGIN COOKING
TABLE OF COOKING TIMES
COOKING TIPS
EASY CLEANING
TROUBLESHOOTING
SPECIFICATIONS
3
3
4-5
6
7
8
8-9
9-11
12
13
14-15
15
Table of contents
Other Cornell Kitchen Appliance manuals

Cornell
Cornell CJX-SP450 User manual

Cornell
Cornell CJX-SP480 User manual

Cornell
Cornell CHM-S808 User manual

Cornell
Cornell CPC-P60CSS User manual

Cornell
Cornell CTP-E50T User manual

Cornell
Cornell CMC-EL380A User manual

Cornell
Cornell CJX-E500 User manual

Cornell
Cornell CTP-E45T User manual

Cornell
Cornell ES 10-234 User manual

Cornell
Cornell CMC-S1600A User manual