CORNING LSE User manual

Corning®LSE™
Mini Incubator
Instruction Manual
Catalog Number:
6800
This manual is available in additional languages at www.corning.com/lifesciences.

2CORNING LSE MINI INCUBATOR
Table of Contents
1. Safety Information ................................................. 3
2. Package Contents................................................... 3
3. Unpacking. ........................................................ 3
4. Installation......................................................... 3
5. Technical Specifications. ............................................ 4
6. Symbols and Conventions........................................... 4
7. Product Specifications. ............................................. 4
8. Description of Buttons and Switches. ............................... 5
9. Getting Started..................................................... 5
10. Operation. ......................................................... 5
11. Troubleshooting. ................................................... 6
12. Maintenance and Cleaning.......................................... 6
13. Limited Warranty. .................................................. 6
14. Product Disposal. .................................................. 7

3
Instruction Manual
1. Safety Information
Please follow the guidelines below, and read this manual in its entirety to
ensure safe operation of the unit.
To avoid electrical shock do not use the incubator near water
sources. Be sure that water doesn’t get on the device, especially
during the cleaning procedures.
To avoid damage to the instrument do not expose the incubator
to aggressive vapors (e.g., organic solvents).
2. Package Contents
Cat. No. Description Quantity
6800 Corning® LSE™ Mini incubator 1
6801 Shelf for mini incubator 1
Instruction manual 1
3. Unpacking
Before starting the installation, carefully examine the incubator.
◗ Open the box and carefully remove the padding. Check that the incubator
has not been visibly damaged during transportation. Keep the packing
material until you are sure that the incubator works properly.
◗ Carefully lift the device out of the box.
◗ Be sure that the following information is included on the serial label
located on the back of the unit: serial number, catalog number, electrical
rating.
◗ Check that the power cord plug has a pin configuration that matches a
wall socket according to the local standard.
Should any kind of damage have occurred during transportation, contact
the carrier immediately. The carrier is responsible for shipping damage.
4. Installation
Place the incubator on a horizontal, level and stable surface. Connect the
plug end of the cord to a grounded wall socket.
Avoid lines on which powerful electric motors, refrigerators, and similar
devices are connected. Use the On/Off switch to control power to the
incubator.
Use caution when plugging into a grounded wall socket. Do not
touch plug with wet hands. Do not unplug by pulling on the cord.

4CORNING LSE MINI INCUBATOR
5. Technical Specifications
The Corning® LSE™ Mini Incubator is a compact general purpose convection
incubator capable of uniformly heating samples up to a maximum of
70°C. The unit comes with a movable shelf and has a door window area, so
samples can be observed without opening the door causing heat loss.
6. Symbols and Conventions
The following chart is an illustrated glossary of the symbols that are used in
this manual.
This symbol indicates a potential risk and alerts you to proceed
with caution.
This symbol indicates the presence of high voltage and warns the
user to proceed with caution.
Be careful if the unit has been used to heat samples because the
internal components can be extremely hot and can cause burns
to uncovered skin. Always check the handle temperature before
changing the platform.
7. Product Specifications
Capacity 9.2 liters (0.375 cubic feet)
Electrical Requirements 115V ±10%, 50/60 Hz, 0.6
Temperature Range Ambient 5°C to 70°C, 70% RH
(Operation)
Controls Analog, hydraulic
Chamber (W x L x H) 9 x 7.9 x 7.9 in. (23 x 20 x 20 cm)
Dimensions (W x L x H) 11.2 x 11 x 14 in. (28.5 x 28 x 33.5 cm)
Weight 18.4 lbs. (8.3 kg)
NOTE: Not recommended to be used in the cold room. Ambient +5°C to 35°C.

5
Instruction Manual
9. Getting Started
Place the unit on a level surface and plug the unit into a properly grounded
outlet of appropriate voltage.
Install the shelf at the desired height, shelf edges down. If you intend to
place samples on the bottom of the chamber, install the shelf so that it sits
edges down on the chamber bottom, thus creating an air gap between the
chamber bottom and your samples. When installing your shelf, remember
to leave clearance for the thermometer bulb which will come down from
the roof of the chamber.
Gently insert the thermometer (supplied separately) into the hole in the top
of the incubator. Inserting or removing the thermometer too quickly can
dislodge the rubber grommet used to hold the thermometer. For maximum
accuracy, insert the thermometer to a point where the thermometer
immersion line is just inside the incubator chamber.
10. Operation
Push the power switch to the ON position. The switch will illuminate.
Set the temperature controller to 10. When the thermometer reaches
the desired operating temperature, turn the control down until the
heating light turns off. Wait for the temperature to stabilize. Make
small adjustments up and down as required until the desired operating
temperature is obtained. Allow the unit to stabilize between each
adjustment. Temperature stability is obtained when the heating lamp is
going on and off automatically and the temperature remains constant.
8. Description of Buttons and Switches
Thermometer
port
Main power
switch
Heating
indicator light
Heater
control knob

6CORNING LSE MINI INCUBATOR
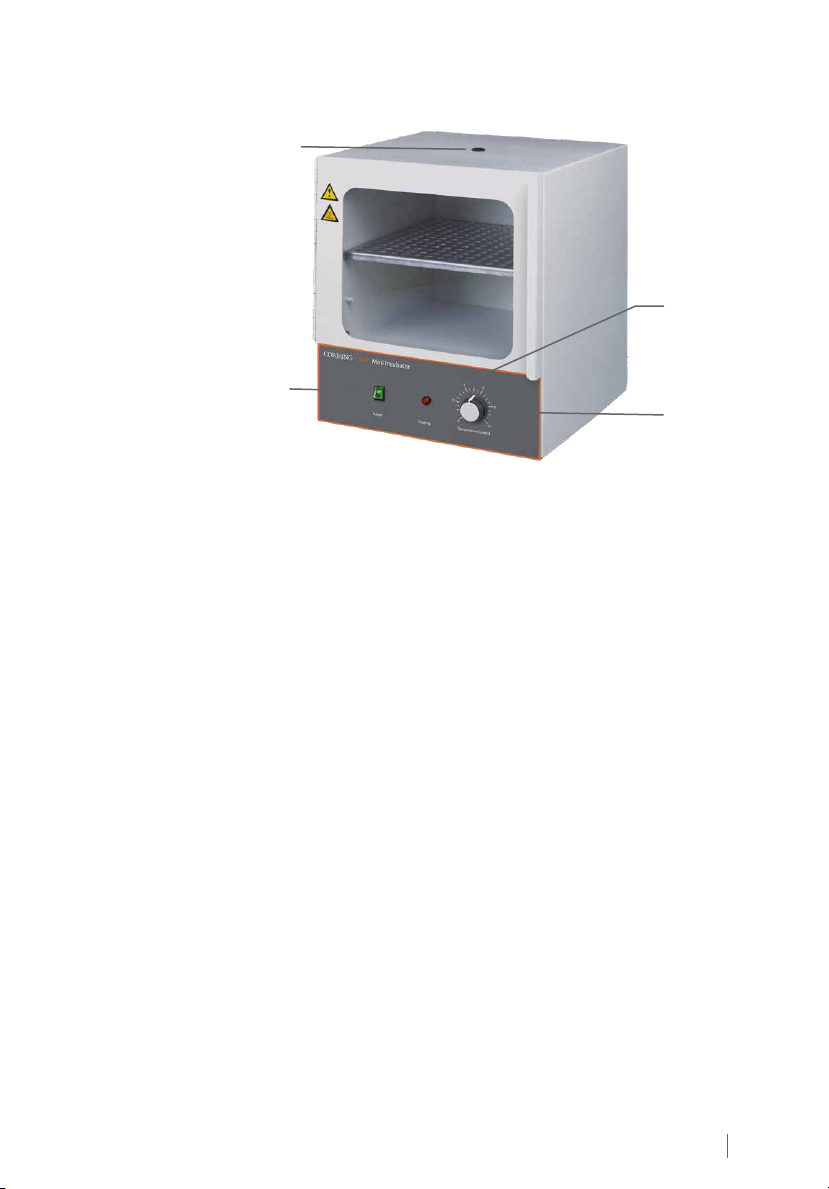
Optional: The oven has a port in the back for the unit for passing a power
cord out of the rear of the unit. This is for powering a small piece of
equipment (shaker, etc.) in the incubation chamber. To pass a cord through,
rotate the inner and outer doors up to reveal the pass through. Then slide
the end of the power cord through the port. Then close both doors, resting
the cord in the notch.
11. Troubleshooting
Problem Cause Solution
Power connection Check power connection
Fuse Check fuse
Temperature set low Adjust temperature control knob higher
12. Maintenance and Cleaning
No routine maintenance is required.
The outside housing can be cleaned with a soft, damp cloth when needed.
Do not use any aggressive or abrasive cleaners (acetone, nitro, polish, etc.)
This may permanently damage the rotator finish.
Before cleaning the incubator, always unplug the power cord from the
wall socket.
13. Limited Warranty
Corning Incorporated (Corning) warrants that this product will be free from
defects in material and workmanship for a period of three (3) years from
date of purchase. CORNING DISCLAIMS ALL OTHER WARRANTIES WHETHER
EXPRESSED OR IMPLIED, INCLUDING ANY IMPLIED WARRANTIES OF
MERCHANTABILITY OR OF FITNESS FOR A PARTICULAR PURPOSE. Corning’s
sole obligation shall be to repair or replace, at its option, any product or
part thereof that proves defective in material or workmanship within
the warranty period, provided the purchaser notifies Corning of any such
defect. Corning is not liable for any incidental or consequential damages,
commercial loss, or any other damages from the use of this product.
This warranty is valid only if the product is used for its intended purpose
and within the guidelines specified in the supplied instruction manual.
This warranty does not cover damage caused by accident, neglect, misuse,
improper service, natural forces, or other causes not arising from defects
in original material or workmanship. This warranty does not cover motor
brushes, fuses, light bulbs, batteries, or damage to paint or finish. Claims for
transit damage should be filed with the transportation carrier.
Oven does
not heat

7
Instruction Manual
In the event this product fails within the specified period of time because of
a defect in material or workmanship, contact Corning Customer Service at:
USA/Canada 1.800.492.1110, outside the U.S. +1.978.442.2200, visit www.
corning.com/lifesciences, or contact your local support office.
Corning Customer Service will help arrange local service where available
or coordinate a return authorization number and shipping instructions.
Products received without proper authorization will be returned. All
items returned for service should be sent postage prepaid in the original
packaging or other suitable carton, padded to avoid damage. Corning will
not be responsible for damage incurred by improper packaging. Corning
may elect for onsite service for larger equipment.
Some states do not allow limitation on the length of implied warranties
or the exclusion or limitation of incidental or consequential damages. This
warranty gives you specific legal rights. You may have other rights which
vary from state to state.
No individual may accept for, or on behalf of Corning, any other obligation
of liability, or extend the period of this warranty.
For your reference, make a note of the model number, serial number, date
of purchase, and supplier here.
Model No. ______________________ Serial No. ________________________________
Date Purchased __________________ Supplier _________________________________
14. Product Disposal
According to Directive 2012/19/EU of the European Parliament and Council
of 4th July 2012 on waste and electronic equipment (WEEE) as amended,
the Corning® LSE™ Mini Incubator is marked with the crossed-out wheeled
bin and must not be disposed of with domestic waste.
Consequently, the buyer shall follow the instructions for reuse and recycling
of waste electronic and electrical equipment (WEEE) provided with the
products and available at www.corning.com/weee.

Register your product warranty online at
www.corning.com/lifesciences/warranty.
For more specific information on claims, visit the Certificates page at www.corning.com/lifesciences.
Warranty/Disclaimer: Unless otherwise specified, all products are for research use only. Not intended
for use in diagnostic or therapeutic procedures. Corning Life Sciences makes no claims regarding the
performance of these products for clinical or diagnostic applications.
For a listing of trademarks, visit www.corning.com/clstrademarks. All other trademarks are the property of their respective owners.
For additional product or technical information, visit www.corning.com/lifesciences or
call 800.492.1110. Outside the United States, call +1.978.442.2200 or contact your local
Corning sales office.
Corning Incorporated
Life Sciences
836 North St.
Building 300, Suite 3401
Tewksbury, MA 01876
t 800.492.1110
t 978.442.2200
f 978.442.2476
www.corning.com/lifesciences
ASIA/PACIFIC
Australia/New Zealand
t 61 427286832
Chinese Mainland
t 86 21 3338 4338
f 86 21 3338 4300
India
t 91 124 4604000
f 91 124 4604099
Japan
t 81 3-3586 1996
f 81 3-3586 1291
Korea
t 82 2-796-9500
f 82 2-796-9300
Singapore
t 65 6572-9740
f 65 6735-2913
Taiwan
t 886 2-2716-0338
f 886 2-2516-7500
EUROPE
France
t 0800 916 882
f 0800 918 636
Germany
t 0800 101 1153
f 0800 101 2427
The Netherlands
t 020 655 79 28
f 020 659 76 73
United Kingdom
t 0800 376 8660
f 0800 279 1117
All Other European
Countries
t +31 (0) 206 59 60 51
f +31 (0) 206 59 76 73
LATIN AMERICA
Brazil
t 55 (11) 3089-7400
Mexico
t (52-81) 8158-8400
© 2020 Corning Incorporated. All rights reserved. 3/20 CLS-AN-559DOC REV1
This manual suits for next models
1
Table of contents
Other CORNING Accessories manuals
Popular Accessories manuals by other brands

Hiland
Hiland P5001 user manual

Oregon Scientific
Oregon Scientific EMR898A user manual

Panasonic
Panasonic MA2SD24 Specification sheet

EXIT Toys
EXIT Toys JumpArenA Round 8ft user manual

Verizon
Verizon Wireless Home Phone Connect user guide

Middle Atlantic Products
Middle Atlantic Products COMP-COOL Quiet-Cool Series instruction sheet