Cosmo COS-12MWDSS User manual

User Manual
IMPORTANT: Read and save these instructions.
NOTICE:
Installer: Leave this guide with the homeowner
Homeowner: Keep this guide for future reference
OPEN
CLOSE
SETUP
CLOCK
KITCHEN TIMER
SOFTEN
MELT POPCORN
BEVERAGE
DEFROST
WEIGHT
DEFROST
TIME
POWER
TIME COOK
POWER START
STOP
+30SEC.
CANCEL
2345
67890
11
Microwave Drawer
COS-12MWDSS

ACKNOWLEDGMENT
7KDQN\RXIRUSXUFKDVLQJRXUSURGXFW:HKRSH\RXHQMR\XVLQJWKHPDQ\IHDWXUHVDQGEHQHILWVLW
SURYLGHV%HIRUHXVLQJWKLV SURGXFWSOHDVHVWXG\WKLVHQWLUH,QVWUXFWLRQ0DQXDOFDUHIXOO\.HHS WKLV
PDQXDOLQDVDIHSODFHIRUIXWXUHUHIHUHQFH(QVXUHWKDWRWKHUSHRSOHXVLQJWKHSURGXFWDUHIDPLOLDU
ZLWKWKHVHLQVWUXFWLRQVDVZHOO
WARNING
z:KHQWKHRYHQLVILUVWVZLWFKHGRQ LW PD\ JLYH RII
DQ XQSOHDVDQW VPHOO 7KLV LV GXH WR WKH ERQGLQJ
DJHQWXVHGIRUWKHLQVXODWLQJSDQHOVZLWKLQWKHRYHQ
3OHDVH UXQ XS WKH QHZ HPSW\ SURGXFW ZLWK WKH
FRQYHQWLRQDO FRRNLQJ IXQFWLRQ PLQXWHV
WRFOHDQRLOLPSXULWLHVLQVLGHWKHFDYLW\
z'XULQJ WKH ILUVW XVH LW LV FRPSOHWHO\ QRUPDO WKDW
WKHUH ZLOO EH D VOLJKW VPRNH DQG RGRUV ,I LW GRHV
RFFXU \RX PHUHO\ KDYH ZDLW IRU WKH VPHOO WR FOHDU
EHIRUHSXWWLQJIRRGLQWRWKHRYHQ
z3OHDVHXVHWKHSURGXFWXQGHUWKHRSHQHQYLURQPHQW
z7KHDSSOLDQFHDQGLWVDFFHVVLEOHSDUWVEHFRPHKRW
GXULQJXVH&DUHVKRXOGEHWDNHQWRDYRLGWRXFKLQJ
KHDWLQJHOHPHQWV&KLOGUHQOHVVWKDQ\HDUVRIDJH
VKDOOEHNHSWDZD\XQOHVVFRQWLQXRXVO\VXSHUYLVHG
z,IWKHVXUIDFHLVFUDFNHGVZLWFKRIIWKHDSSOLDQFHWR
DYRLGWKHSRVVLELOLW\RIHOHFWULFVKRFN
z7KLVDSSOLDQFHFDQEHXVHGE\FKLOGUHQDJHGIURP
\HDUV DQG DERYH DQG SHUVRQV ZLWK UHGXFHG
SK\VLFDO VHQVRU\ RU PHQWDO FDSDELOLWLHV RU ODFN RI
H[SHULHQFHDQGNQRZOHGJHLIWKH\KDYHEHHQJLYHQ
)
2
THANK YOU FOR YOUR PURCHASE
Thank you for your purchase. We know that you have many brands and
products to choose from and we are honored to know that you have decided
to take one of our products into your home and hope that you enjoy it.
COSMO Appliances are designed according to the strictest safety and
performance standard for the North American market. We follow the
most advanced manufacturing philosophy. Each appliance leaves the
factory after thorough quality inspection and testing. Our distributors and
our service partners are ready to answer any questions you may have
regarding how to install, use and care for your products. We hope that this
manual will help you learn to use the product in the safest and most effective
manner.
Before using this product, please read through this manual carefully. Keep this
user manual in a safe place for future reference. Please ensure that other
persons using this product are familiar with these instructions as well.
If you have any questions or concerns, please contact the dealer from whom you
purchased it, or contact our Customer Support at:
1-888-784-3108.
2

TABLE OFCONTENTS
SPECIFICATIONS .......................................................................4
SAFETY & WARNINGS .............................................................4-6
GROUNDING INSTRUCTIONS ...................................................7
RADIO INTERFERENCE .............................................................7
COOKWARE ................................................................................8
Compatible Cookware ...........................................................8-9
Non-Compatible Cookware .......................................................9
OVEN PARTS & ACCESSORIES .......................................10
OPERATING INSTRUCTIONS ............................................11-17
Control Panel & Features ......................................................11
Power On .................................................................................12
Clock Setting ...........................................................................12
Kitchen Timer ..........................................................................12
Microwave Cooking Function .................................................13
Fast Cooking ...........................................................................13
Weight Defrost Function .........................................................13
Time Defrost Function .............................................................14
Auto Menu - Beverage ............................................................14
Auto Menu - Popcorn ..............................................................14
Auto Menu - Melt ...............................................................14-15
Auto Menu - Soften .................................................................15
Buzzer On / Off ........................................................................16
Child Lock Function ................................................................16
Inquiring Function ....................................................................16
Other Specifications ................................................................16
Microwave Drawer Locks .......................................................17
TROUBLESHOOTING .............................................................18
WARRANTY & SERVICE ....................................................19-20
3
z,IWKHVXSSO\FRUGLVGDPDJHGLWPXVWEHUHSODFHG
E\ WKH PDQXIDFWXUHU LWV VHUYLFH DJHQW RU VLPLODUO\
TXDOLILHGSHUVRQVLQRUGHUWRDYRLGDKD]DUG
z'RQRWXVHKDUVKDEUDVLYHFOHDQHUVRUVKDUSPHWDO
VFUDSHUV WR FOHDQ WKH RYHQ GRRU JODVV VLQFH WKH\
FDQ VFUDWFK WKH VXUIDFH ZKLFK PD\ UHVXOW LQ
VKDWWHULQJRIWKHJODVV
z$VWHDPFOHDQHULVQRWWREHXVHG
z7KHDSSOLDQFHVDUHQRWLQWHQGHGWREHRSHUDWHGE\
PHDQV RI DQ H[WHUQDO WLPHU RU VHSDUDWH UHPRWH
FRQWUROV\VWHP
z7KH LQVWUXFWLRQV IRU RYHQV WKDW KDYH VKHOYHV VKDOO
LQFOXGHGHWDLOVLQGLFDWLQJWKHFRUUHFWLQVWDOODWLRQVRI
WKHVKHOYHV
4
ACKNOWLEDGMENT
7KDQN\RXIRUSXUFKDVLQJRXUSURGXFW:HKRSH\RXHQMR\XVLQJWKHPDQ\IHDWXUHVDQGEHQHILWVLW
SURYLGHV%HIRUHXVLQJWKLV SURGXFWSOHDVHVWXG\WKLVHQWLUH,QVWUXFWLRQ0DQXDOFDUHIXOO\.HHS WKLV
PDQXDOLQDVDIHSODFHIRUIXWXUHUHIHUHQFH(QVXUHWKDWRWKHUSHRSOHXVLQJWKHSURGXFWDUHIDPLOLDU
ZLWKWKHVHLQVWUXFWLRQVDVZHOO
WARNING
z:KHQWKHRYHQLVILUVWVZLWFKHGRQLWPD\JLYH RII
DQ XQSOHDVDQW VPHOO 7KLV LV GXH WR WKH ERQGLQJ
DJHQWXVHGIRUWKHLQVXODWLQJSDQHOVZLWKLQWKHRYHQ
3OHDVH UXQ XS WKH QHZ HPSW\ SURGXFW ZLWK WKH
FRQYHQWLRQDO FRRNLQJ IXQFWLRQ PLQXWHV
WRFOHDQRLOLPSXULWLHVLQVLGHWKHFDYLW\
z'XULQJ WKH ILUVW XVH LW LV FRPSOHWHO\ QRUPDO WKDW
WKHUH ZLOO EH D VOLJKW VPRNH DQG RGRUV ,I LW GRHV
RFFXU \RX PHUHO\ KDYH ZDLW IRU WKH VPHOO WR FOHDU
EHIRUHSXWWLQJIRRGLQWRWKHRYHQ
z3OHDVHXVHWKHSURGXFWXQGHUWKHRSHQHQYLURQPHQW
z7KHDSSOLDQFHDQGLWVDFFHVVLEOHSDUWVEHFRPHKRW
GXULQJXVH&DUHVKRXOGEHWDNHQWRDYRLGWRXFKLQJ
KHDWLQJHOHPHQWV&KLOGUHQOHVVWKDQ\HDUVRIDJH
VKDOOEHNHSWDZD\XQOHVVFRQWLQXRXVO\VXSHUYLVHG
z,IWKHVXUIDFHLVFUDFNHGVZLWFKRIIWKHDSSOLDQFHWR
DYRLGWKHSRVVLELOLW\RIHOHFWULFVKRFN
z7KLVDSSOLDQFHFDQEHXVHGE\FKLOGUHQDJHGIURP
\HDUV DQG DERYH DQG SHUVRQV ZLWK UHGXFHG
SK\VLFDO VHQVRU\ RU PHQWDO FDSDELOLWLHV RU ODFN RI
H[SHULHQFHDQGNQRZOHGJHLIWKH\KDYHEHHQJLYHQ
)
2
SAFETY&WARNINGS
PRECAUTIONS TO AVOID POSSIBLE EXPOSURE TO EXCESSIVE MICROWAVE
ENERGY
(a) Do not attempt to operate this oven with the door open since open door operation
can result in harmful exposure to microwave energy. It is important not to defeat or
tamper with the safety interlocks.
(b) Do not place any object between the oven front face and the door or allows soil or
cleaner residue to accumulate on sealing surfaces.
(c) Do not operate the oven if it is damaged. It is particular important that the oven
door close properly and that there is no damage to the:
(1) DOOR (bent)
(2) HINGES AND LATCHES (broken or loosened)
(3) DOOR SEALS AND SEALING SURFACES
(d) The oven should not be adjusted or repaired by anyone except properly qualified
service personnel.
4
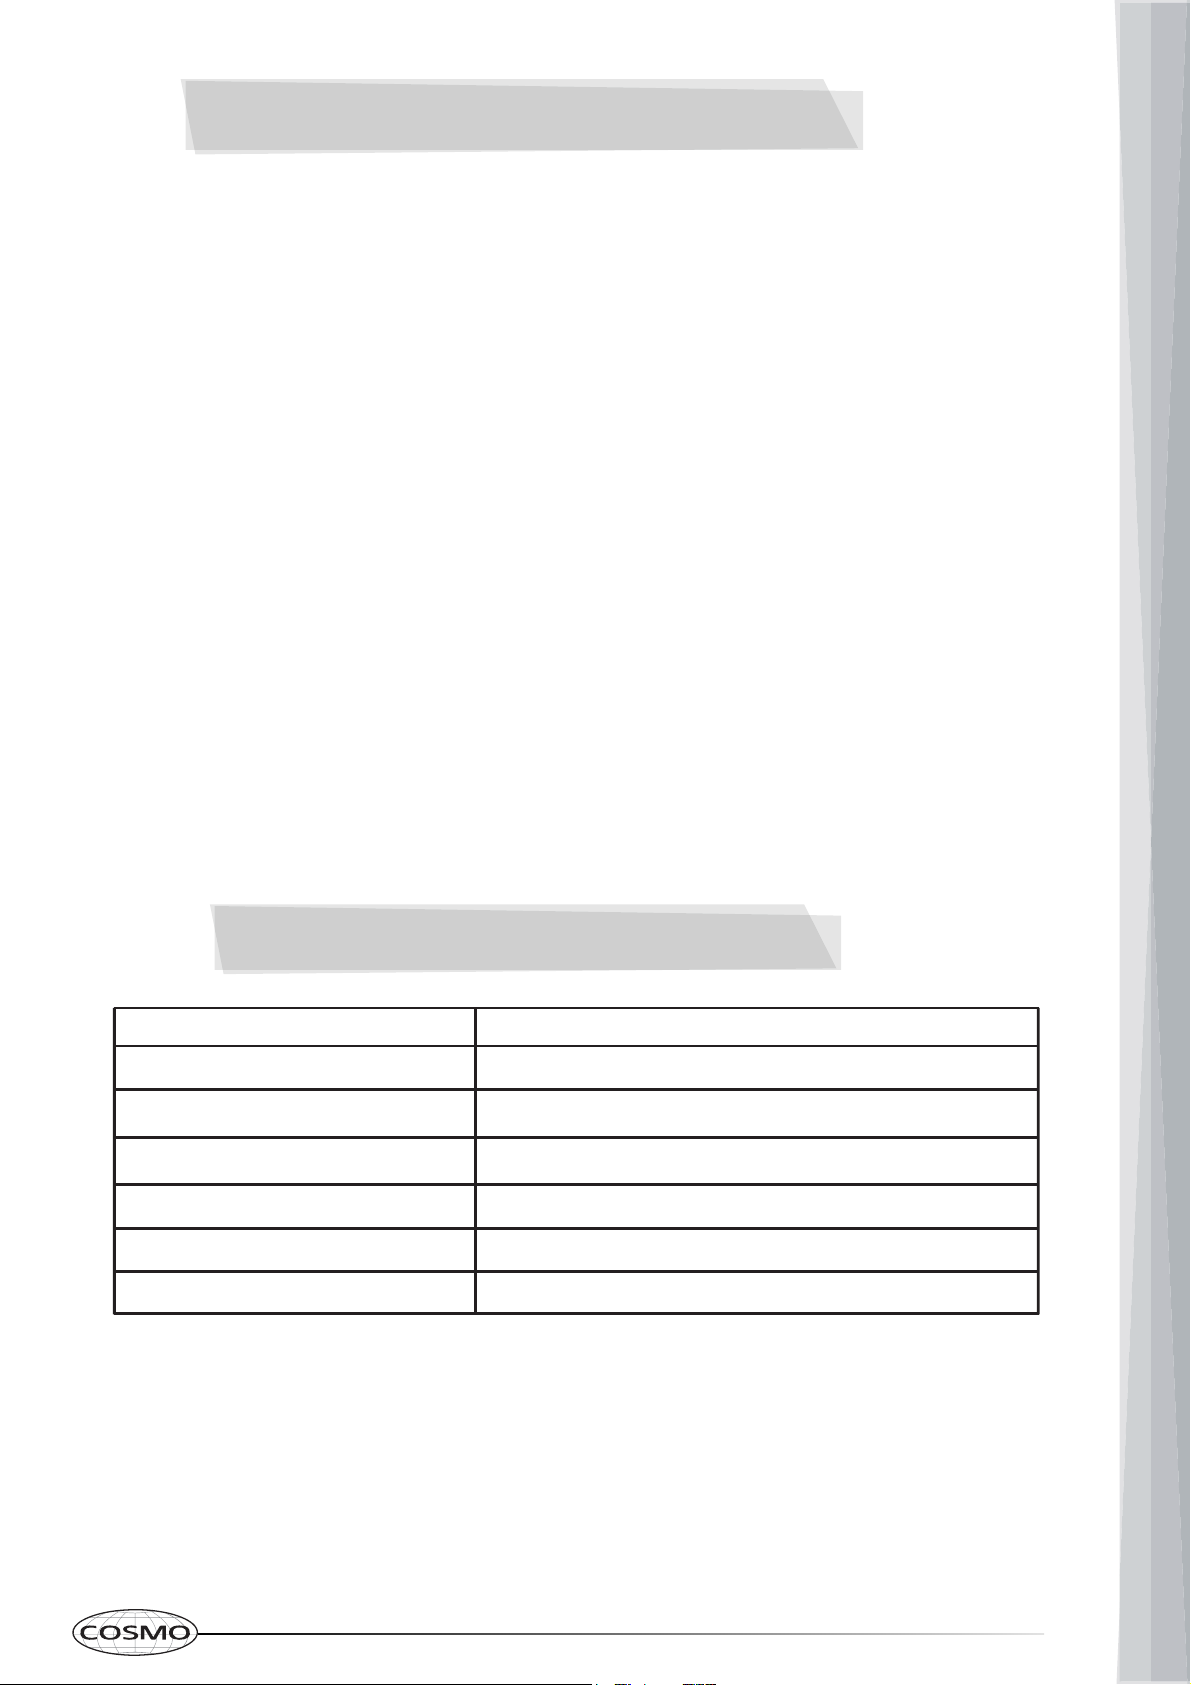
SPECIFICATIONS
120V~ 60Hz
1 0W
Model:
Rated Voltage:
Rated Input Power(Microwave):
Rated Output Power(Microwave):
Oven Capacity:
External Dimensions (WxHxD):
Net Weight:
Approx. 70.4 lbs. / 31.93 kg
1000W
50
COS-12MWDSS
1.2 cu. ft. / 34 Liters
23.8 x 24.5 x 15 in. / 604.5 x 622.3 x 381 mm

ACKNOWLEDGMENT
7KDQN\RXIRUSXUFKDVLQJRXUSURGXFW:HKRSH\RXHQMR\XVLQJWKHPDQ\IHDWXUHVDQGEHQHILWVLW
SURYLGHV%HIRUH XVLQJWKLV SURGXFWSOHDVHVWXG\WKLVHQWLUH,QVWUXFWLRQ0DQXDOFDUHIXOO\.HHS WKLV
PDQXDOLQDVDIHSODFHIRUIXWXUHUHIHUHQFH(QVXUHWKDWRWKHUSHRSOHXVLQJWKHSURGXFWDUHIDPLOLDU
ZLWKWKHVHLQVWUXFWLRQVDVZHOO
WARNING
z:KHQWKHRYHQLVILUVWVZLWFKHGRQLWPD\JLYH RII
DQ XQSOHDVDQW VPHOO 7KLV LV GXH WR WKH ERQGLQJ
DJHQWXVHGIRUWKHLQVXODWLQJSDQHOVZLWKLQWKHRYHQ
3OHDVH UXQ XS WKH QHZ HPSW\ SURGXFW ZLWK WKH
FRQYHQWLRQDO FRRNLQJ IXQFWLRQ PLQXWHV
WRFOHDQRLOLPSXULWLHVLQVLGHWKHFDYLW\
z'XULQJ WKH ILUVW XVH LW LV FRPSOHWHO\ QRUPDO WKDW
WKHUH ZLOO EH D VOLJKW VPRNH DQG RGRUV ,I LW GRHV
RFFXU \RX PHUHO\ KDYH ZDLW IRU WKH VPHOO WR FOHDU
EHIRUHSXWWLQJIRRGLQWRWKHRYHQ
z3OHDVHXVHWKHSURGXFWXQGHUWKHRSHQHQYLURQPHQW
z7KHDSSOLDQFHDQGLWVDFFHVVLEOHSDUWVEHFRPHKRW
GXULQJXVH&DUHVKRXOGEHWDNHQWRDYRLGWRXFKLQJ
KHDWLQJHOHPHQWV&KLOGUHQOHVVWKDQ\HDUVRIDJH
VKDOOEHNHSWDZD\XQOHVVFRQWLQXRXVO\VXSHUYLVHG
z,IWKHVXUIDFHLVFUDFNHGVZLWFKRIIWKHDSSOLDQFHWR
DYRLGWKHSRVVLELOLW\RIHOHFWULFVKRFN
z7KLVDSSOLDQFHFDQEHXVHGE\FKLOGUHQDJHGIURP
\HDUV DQG DERYH DQG SHUVRQV ZLWK UHGXFHG
SK\VLFDO VHQVRU\ RU PHQWDO FDSDELOLWLHV RU ODFN RI
H[SHULHQFHDQGNQRZOHGJHLIWKH\KDYHEHHQJLYHQ
)
2
VXSHUYLVLRQ RU LQVWUXFWLRQ FRQFHUQLQJ XVH RI WKH
DSSOLDQFH LQ D VDIH ZD\ DQG XQGHUVWDQG WKH
KD]DUGV LQYROYHG &KLOGUHQ VKDOO QRW SOD\ ZLWK WKH
DSSOLDQFH&OHDQLQJDQGXVHUPDLQWHQDQFHVKDOOQRW
EHPDGHE\FKLOGUHQZLWKRXWVXSHUYLVLRQ
z'XULQJXVHWKHDSSOLDQFHEHFRPHVYHU\KRW &DUH
VKRXOGEHWDNHQWRDYRLGWRXFKLQJKHDWLQJHOHPHQWV
LQVLGHWKHRYHQ
z'RQRWDOORZFKLOGUHQWRJRQHDUWKHRYHQZKHQLWLV
RSHUDWLQJHVSHFLDOO\ZKHQWKHJULOOLVRQ
z(QVXUH WKDW WKH DSSOLDQFH LV VZLWFKHG RII EHIRUH
UHSODFLQJ WKH RYHQ ODPS WR DYRLG WKH SRVVLELOLW\ RI
HOHFWULFVKRFN
z7KHPHDQVIRUGLVFRQQHFWLRQPXVWEHLQFRUSRUDWHG
LQ WKH IL[HG ZLULQJ LQ DFFRUGDQFH ZLWK WKH ZLULQJ
VSHFLILFDWLRQV
z&KLOGUHQ VKRXOG EH VXSHUYLVHG WR HQVXUH WKDW WKH\
GRQRWSOD\ZLWKWKHDSSOLDQFH
z7KLV DSSOLDQFH LV QRW LQWHQGHG IRU XVH E\ SHUVRQV
LQFOXGLQJ FKLOGUHQ ZLWK UHGXFHG SK\VLFDO VHQVRU\
RU PHQWDO FDSDELOLWLHV RU ODFN RI H[SHULHQFH DQG
NQRZOHGJH XQOHVV WKH\ KDYH EHHQ JLYHQ
VXSHUYLVLRQ RU LQVWUXFWLRQ FRQFHUQLQJ XVH RI WKH
DSSOLDQFHE\SHUVRQUHVSRQVLEOHIRUWKHLUVDIHW\
z$FFHVVLEOH SDUWV PD\ EHFRPH KRW GXULQJ XVH
<RXQJFKLOGUHQVKRXOGEHNHSWDZD\
z$Q DOOSROH GLVFRQQHFWLRQ PHDQV PXVW EH
LQFRUSRUDWHG LQ WKH IL[HG ZLULQJ LQ DFFRUGDQFH ZLWK
WKHZLULQJUXOHV
3
SAFETY&WARNINGS
WARNING
1. Read all instructions before using the
appliance.
2. Read and follow the specific:
EXCESSIVE MICROWAVE ENERGY"
found on page 2.
combustible materials are placed inside the oven to facilitate cooking.
only to properly grounded outlet. See
found on page
accordance with the provided installation
instructions.
To reduce the risk of burns, electric shock, fire, injury to persons or exposure
to excessive microwave energy:
3. This appliance must be grounded. Connect
"PRECAUTIONS TO AVOID POSSIBLE EXPOSURE TO
"GROUNDING INSTRUCTIONS"
4. Install or locate this appliance only in
5. Some products such as whole eggs and sealed containers - for example, closed glass
jars - are able to explode and should not be heated in this oven.
6. Use this appliance only for its intended use as described in the manual. Do not use
corrosive chemicals or vapors in this appliance. This type of oven is specifically
designed to heat, cook or dry food. It is not designed for industrial or laboratory use.
supervision is necessary when used
by children.
7. As with any appliance, close
damaged cord or plug, if it is not
working
properly, or if it has been
damaged or dropped.
8. Do not operate this appliance if it has a
by qualified service personnel.
Contact nearest
authorized service
facility for examination, repair, or
adjustment.
9. This appliance should be serviced only
10. Do not cover or block any openings on the appliance.
11. Do not store this appliance outdoors. Do not use this product near water - for
example,
near a kitchen sink, in a wet
basement, near a swimming pool, or
similar location.
1 . Do not immerse cord or plug in water.2
1 . Keep cord away from heated surface.
14. Do not let cord hang over edge of
table or counter.
3
15. When cleaning surfaces of door and oven that comes together on closing the door,
16. To reduce the risk of fire in the oven cavity:
1). Do not overcook food. Carefully attend appliance when paper, plastic, or other
2). Remove wire twist-ties from paper or plastic bag before placing bag in oven.
3). If material inside of the oven ignite, keep oven door closed, turn oven off, and
disconnect the power cord, shut off power at the fuse or circuit breaker panel.
4). Do not use the cavity for storage purposes. Do not leave paper products, cooking
utensils, or food in the cavity when not in use.
precautions should be followed, including
When using electrical appliances basic safety
following:the
use only mild, nonabrasive soaps, or detergent applied with a sponge or soft cloth.
or
4.
5
(Continued on Page 6)

z,IWKHVXSSO\FRUGLVGDPDJHGLWPXVWEHUHSODFHG
E\ WKH PDQXIDFWXUHU LWV VHUYLFH DJHQW RU VLPLODUO\
TXDOLILHGSHUVRQVLQRUGHUWRDYRLGDKD]DUG
z'RQRWXVHKDUVKDEUDVLYHFOHDQHUVRUVKDUSPHWDO
VFUDSHUV WR FOHDQ WKH RYHQ GRRU JODVV VLQFH WKH\
FDQ VFUDWFK WKH VXUIDFH ZKLFK PD\ UHVXOW LQ
VKDWWHULQJRIWKHJODVV
z$VWHDPFOHDQHULVQRWWREHXVHG
z7KHDSSOLDQFHVDUHQRWLQWHQGHGWREHRSHUDWHGE\
PHDQV RI DQ H[WHUQDO WLPHU RU VHSDUDWH UHPRWH
FRQWUROV\VWHP
z7KH LQVWUXFWLRQV IRU RYHQV WKDW KDYH VKHOYHV VKDOO
LQFOXGHGHWDLOVLQGLFDWLQJWKHFRUUHFWLQVWDOODWLRQVRI
WKHVKHOYHV
4
VXSHUYLVLRQ RU LQVWUXFWLRQ FRQFHUQLQJ XVH RI WKH
DSSOLDQFH LQ D VDIH ZD\ DQG XQGHUVWDQG WKH
KD]DUGV LQYROYHG &KLOGUHQ VKDOO QRW SOD\ ZLWK WKH
DSSOLDQFH&OHDQLQJDQGXVHUPDLQWHQDQFHVKDOOQRW
EHPDGHE\FKLOGUHQZLWKRXWVXSHUYLVLRQ
z'XULQJXVHWKHDSSOLDQFHEHFRPHVYHU\KRW &DUH
VKRXOGEHWDNHQWRDYRLGWRXFKLQJKHDWLQJHOHPHQWV
LQVLGHWKHRYHQ
z'RQRWDOORZFKLOGUHQWRJRQHDUWKHRYHQZKHQLWLV
RSHUDWLQJHVSHFLDOO\ZKHQWKHJULOOLVRQ
z(QVXUH WKDW WKH DSSOLDQFH LV VZLWFKHG RII EHIRUH
UHSODFLQJ WKH RYHQ ODPS WR DYRLG WKH SRVVLELOLW\ RI
HOHFWULFVKRFN
z7KHPHDQVIRUGLVFRQQHFWLRQPXVWEHLQFRUSRUDWHG
LQ WKH IL[HG ZLULQJ LQ DFFRUGDQFH ZLWK WKH ZLULQJ
VSHFLILFDWLRQV
z&KLOGUHQ VKRXOG EH VXSHUYLVHG WR HQVXUH WKDW WKH\
GRQRWSOD\ZLWKWKHDSSOLDQFH
z7KLV DSSOLDQFH LV QRW LQWHQGHG IRU XVH E\ SHUVRQV
LQFOXGLQJ FKLOGUHQ ZLWK UHGXFHG SK\VLFDO VHQVRU\
RU PHQWDO FDSDELOLWLHV RU ODFN RI H[SHULHQFH DQG
NQRZOHGJH XQOHVV WKH\ KDYH EHHQ JLYHQ
VXSHUYLVLRQ RU LQVWUXFWLRQ FRQFHUQLQJ XVH RI WKH
DSSOLDQFHE\SHUVRQUHVSRQVLEOHIRUWKHLUVDIHW\
z$FFHVVLEOH SDUWV PD\ EHFRPH KRW GXULQJ XVH
<RXQJFKLOGUHQVKRXOGEHNHSWDZD\
z$Q DOOSROH GLVFRQQHFWLRQ PHDQV PXVW EH
LQFRUSRUDWHG LQ WKH IL[HG ZLULQJ LQ DFFRUGDQFH ZLWK
WKHZLULQJUXOHV
3
SAFETY&WARNINGS
6
stand in the microwave oven for a short time
before removing the container. spoon or other utensil into the container.
To reduce the risk of injury to persons:
1) Do not overheat the liquid.
2) Stir the liquid both before and halfway through heating it.
3) Do not use straight-sided containers with narrow necks.
4) After heating, allow the container to
5) Use extreme care when inserting a
on top of the appliance surface when the appliance is in
20. Do not mount over sink.
21. Do not store anything directly
operation.
operate any heating or cooking appliance beneath the appliance.18. Do not
19. Do not mount unit over or near any portion of heating or cooking appliance.
GROUNDING INSTRUCTIONS
This appliance must be grounded. In the event of an electrical short circuit, grounding
of electric shock by providing an escape wire for the
appliance is equipped with a cord having a
plugged into an outlet that is properly installed and grounded.
grounding wire with a grounding plug.
reduces the risk electric current. This
The plug
WARNING - Improper use of the grounding can result in a risk of electric shock.
Consult a qualified electrician or serviceman if the grounding instructions are not
completely or if doubt exists as to whether the appliance is properly grounded.
extension cord, use only a 3-wire extension cord that has a
The marked rating of the extension cord shall be equal to or greater than the electrical
appliance.
understood,
If it is necessary to use an
3-blade grounded plug, and 3-slot receptacle that will accept the plug on the appliance.
rating of the
Electric Shock Hazard
Touching some of the internal components can cause serious personal injury or death.
disassemble this appliance.
DANGER -
Do not
Electric Shock Hazard
Improper use of the grounding can result in electric shock. Do not plug into an outlet until
appliance is properly installed and grounded.
WARNING -
must be
point without appearing to be boiling. Visible bubbling or boiling when the container is
removed from the microwave oven is not always present.
17. Liquids, such as water, coffee, or tea are able to be overheated beyond the boiling
THIS COULD RESULT IN VERY HOT LIQUID SUDDENLY BOILING OVER WHEN
THE CONTAINER IS DISTURBED OR A UTENSIL IS INSERTEDINTO THE LIQUID.

z,IWKHVXSSO\FRUGLVGDPDJHGLWPXVWEHUHSODFHG
E\ WKH PDQXIDFWXUHU LWV VHUYLFH DJHQW RU VLPLODUO\
TXDOLILHGSHUVRQVLQRUGHUWRDYRLGDKD]DUG
z'RQRWXVHKDUVKDEUDVLYHFOHDQHUVRUVKDUSPHWDO
VFUDSHUV WR FOHDQ WKH RYHQ GRRU JODVV VLQFH WKH\
FDQ VFUDWFK WKH VXUIDFH ZKLFK PD\ UHVXOW LQ
VKDWWHULQJRIWKHJODVV
z$VWHDPFOHDQHULVQRWWREHXVHG
z7KHDSSOLDQFHVDUHQRWLQWHQGHGWREHRSHUDWHGE\
PHDQV RI DQ H[WHUQDO WLPHU RU VHSDUDWH UHPRWH
FRQWUROV\VWHP
z7KH LQVWUXFWLRQV IRU RYHQV WKDW KDYH VKHOYHV VKDOO
LQFOXGHGHWDLOVLQGLFDWLQJWKHFRUUHFWLQVWDOODWLRQVRI
WKHVKHOYHV
4
VXSHUYLVLRQ RU LQVWUXFWLRQ FRQFHUQLQJ XVH RI WKH
DSSOLDQFH LQ D VDIH ZD\ DQG XQGHUVWDQG WKH
KD]DUGV LQYROYHG &KLOGUHQ VKDOO QRW SOD\ ZLWK WKH
DSSOLDQFH&OHDQLQJDQGXVHUPDLQWHQDQFHVKDOOQRW
EHPDGHE\FKLOGUHQZLWKRXWVXSHUYLVLRQ
z'XULQJXVHWKHDSSOLDQFHEHFRPHVYHU\KRW &DUH
VKRXOGEHWDNHQWRDYRLGWRXFKLQJKHDWLQJHOHPHQWV
LQVLGHWKHRYHQ
z'RQRWDOORZFKLOGUHQWRJRQHDUWKHRYHQZKHQLWLV
RSHUDWLQJHVSHFLDOO\ZKHQWKHJULOOLVRQ
z(QVXUH WKDW WKH DSSOLDQFH LV VZLWFKHG RII EHIRUH
UHSODFLQJ WKH RYHQ ODPS WR DYRLG WKH SRVVLELOLW\ RI
HOHFWULFVKRFN
z7KHPHDQVIRUGLVFRQQHFWLRQPXVWEHLQFRUSRUDWHG
LQ WKH IL[HG ZLULQJ LQ DFFRUGDQFH ZLWK WKH ZLULQJ
VSHFLILFDWLRQV
z&KLOGUHQ VKRXOG EH VXSHUYLVHG WR HQVXUH WKDW WKH\
GRQRWSOD\ZLWKWKHDSSOLDQFH
z7KLV DSSOLDQFH LV QRW LQWHQGHG IRU XVH E\ SHUVRQV
LQFOXGLQJ FKLOGUHQ ZLWK UHGXFHG SK\VLFDO VHQVRU\
RU PHQWDO FDSDELOLWLHV RU ODFN RI H[SHULHQFH DQG
NQRZOHGJH XQOHVV WKH\ KDYH EHHQ JLYHQ
VXSHUYLVLRQ RU LQVWUXFWLRQ FRQFHUQLQJ XVH RI WKH
DSSOLDQFHE\SHUVRQUHVSRQVLEOHIRUWKHLUVDIHW\
z$FFHVVLEOH SDUWV PD\ EHFRPH KRW GXULQJ XVH
<RXQJFKLOGUHQVKRXOGEHNHSWDZD\
z$Q DOOSROH GLVFRQQHFWLRQ PHDQV PXVW EH
LQFRUSRUDWHG LQ WKH IL[HG ZLULQJ LQ DFFRUGDQFH ZLWK
WKHZLULQJUXOHV
3
GROUNDING INSTRUCTIONS
1. A short power supply cord is provided to reduce the risks resulting from becoming
entangled in or tripping over a longer cord.
2. Longer cord sets or extension cords are available and may be used if care is exercised
in their use.
3. If a long cord or extension cord is used:
1) The marked electrical rating of the cord set or extension cord should be at least as
great as the electrical rating of the appliance.
2) The extension cord must be a grounding-type 3-wire cord.
3) The longer cord should be arranged so that it will not drape over the counter top or
tabletop where it can be pulled on by children or tripped over unintentionally.
-
7
RADIO INTERFERENCE
1. Operation of the microwave oven may cause interference to your radio, TV
or similar
2. When there is interference, it may be reduced or eliminated by taking the
following
1) Clean door and sealing surface of the oven
2) Reorient the receiving antenna of radio or television.
3) Relocate the microwave oven with respect to the receiver.
4) Move the microwave oven away from the receiver.
5) Plug the microwave oven into a different outlet so that microwave oven
are on different branch circuits.
equipment.
measures:
and receiver

23(5$7,21,16758&7,216
:KHQWKHRYHQLVILUVWFRQQHFWHGWRWKHHOHFWULFDOVXSSO\ ZDLWIRUWKHGLVSOD\DXWRPDWLFDOO\VKRZ
D EHHS VRXQG RQFH DQG WKH IODVK (QVXUH WKHFRUUHFW WLPH RIWKH
GD\LVVHW EHIRUHXVLQJWKHRYHQ
3OHDVHQRWHWKHUHDUHWZRNLQGVRIWLPHUVWKHKRXUFORFNDQGWKHKRXUFORFNGHSHQGLQJRQWKH
DFWXDOPDFKLQH
)RUH[DPSOHZLWKDKRXUFORFN30VKRZQDV
9
7LPH IXQFWLRQ VHWWLQJ
7RVHWWKHFRUUHFWWLPHRIGD\
! 3UHVVEXWWRQ WRDGMXVWWKHKRXUVHWWLQJ
! 3UHVV WRFRQILUPWKHKRXUVHWWLQJ
! 3UHVVEXWWRQWRDGMXVWWKHPLQXWHVHWWLQJ
! 3UHVVWRFRQILUPWKHPLQXWHVHWWLQJDQGWKHWLPHUZLOOEHLQVWDQGE\PRGH
1RWH,IWKHGLVSOD\GRHVQRWIODVKDGMXVWWKHWLPHRIGD\E\SUHVVLQJWKHDQGEXWWRQVDW
WKH VDPHWLPHIRUPRUHWKDQVHFRQGV
0DQXDOPRGH
,QPDQXDOPRGHRQO\WKHGD\VWLPHDQGWKHV\PERO OLJKWV XS 7KH FRRNLQJGXUDWLRQKDVWR
EHFRQWUROOHGE\WKHXVHU
1RWHV ,Q PDQXDO PRGH WR HQVXUH WKH RYHQ LV QRW OHIW RQ DFFLGHQWDOO\ DIWHU KRXUV QR DQ\ EXWWRQ
SUHVVHGWKHWLPHUZLOOIODVKRQFHDVHFRQGWRZDUQ\RXWKHRYHQZLOOHQWHUVWDQGE\PRGH$IWHUDWRWDORI
KRXUVWKHWLPHUZLOOHQWHUVWDQGE\PRGH
:KHQWKHWLPHULVIODVKLQJLQPDQXDOPRGHSUHVVDQ\EXWWRQ WR UHVHW WKH WLPHU LI \RX LQWHQG WR FRQWLQXH
XVLQJWKHRYHQ2USUHVV DQGWRJHWKHUIRUPRUHWKDQVHFRQGVWRHQWHUVWDQGE\PRGHLI
RYHQZLOOQRWEHXVHG
2YHQ2QDQG2II
,IWKHWLPHULVLQVWDQGE\PRGHˈSUHVV
IRUPRUHWKDQVHFRQGVWKHWLPHUZLOOHQWHUPDQXDO
PRGHDQG WKHV\PERO ZLOOOLJKWXSFRQWLQXRXVO\
! 6HWWKHGHVLUHGFRRNLQJIXQFWLRQDQGWKHWHPSHUDWXUHGHJUHH
! 6HWWKHWLPHIXQFWLRQWKHQWKHRYHQZLOORQ
,I\RXVHWGXURU(QGDIWHUFRRNLQJ WKHRYHQZLOODXWRPDWLFDOO\WXUQRII
,I\RXVHWPDQXDORUPLQXWHPLQGHUDIWHUFRRNLQJEULQJWKHFRRNLQJIXQFWLRQDQGRYHQWHPSHUDWXUH
NQREWRSRVLWLRQ3UHVV
DQGEXWWRQVIRUPRUHWKDQVHFRQGVWRUHWXUQWRVWDQGE\PRGH
FDQHQWHUWKHWLPHIXQFWLRQVHWWLQJWKHVHTXHQFHRIWKHIXQFWLRQ,QPDQXDOPRGHSUHVVLQJ
VHWWLQJLV0DPXDOPRGH0LQXWHPLQGHUGXU(QG0DQXDOPRGH7KHQVHOHFWHGFRRNLQJIXQFWLRQ
DQGDGMXVWWKHFRRNWHPSHUDWXUHLIUHTXLUHG
COOKWARE
8
Personal Injury Hazard
Tightly-closed utensils could explode. Closed containers should be opened and plastic
pierced before cooking.
Utensil T est:
1. Fill a microwave-safe container with 1 cup of cold
water (250ml) along with the
2. Cook on maximum power for 1 minute.
3. Carefully feel the utensil. If the empty utensil is
warm, do not use it for microwave
4. Do not exceed 1 minute cooking time.
See the instructions on "Materials you can use in microwave oven or to be avoided in
There may be certain non-metallic utensils that are not safe to use for microwaving. If
utensil in question following the procedure below.
CAUTION -
pouches should be
microwave oven."
in doubt, you can test the
utensil in question.
cooking.
Utensils Remarks
Follow manufacturer instructions. The bottom of browning dish must be
at least 3/16 inch (5mm) above the turntable. Incorrect usage may cause
the turntable to break.
Microwave-safe only. Follow manufacturer's instructions. Do not use
cracked or chipped dishes.
Always remove lid. Use only to heat food until just warm. Most glass jars
are not heat resistant and may break.
Heat-resistant oven glassware only. Make sure there is no metallic trim.
Do not use cracked or chipped dishes.
Follow manufacturer instructions. Do not close with metal tie. Make
slits to allow steam to escape.
Use for short term cooking/warming only. Do not leave oven unattended
while cooking.
Use to cover food for reheating and absorbing fat. Use with supervision
for a short-term cooking only.
Use as a cover to prevent splattering or a wrap for steaming.
Browning dish
Glass jars
Glassware
Oven cooking
bags
Paper plates
and cups
Paper towels
Parchment
paper
Dinnerware
Compatible Cookware

8
6$)(7<+,176
z'RQRWXVHWKHRYHQXQOHVV\RXDUH ZHDULQJVRPHWKLQJRQ\RXUIHHW'RQRWWRXFKWKHRYHQ
ZLWKZHWRUGDPSKDQGVRUIHHW
z)RURYHQ2YHQGRRUVKRXOGQRWEHRSHQHGRIWHQGXULQJWKHFRRNLQJSHULRG
z7KHDSSOLDQFHPXVWEHLQVWDOOHGE\DQDXWKRUL]HGWHFKQLFLDQDQGSXWLQWRXVH7KHSURGXFHULV
QRWUHVSRQVLEOHIRUDQ\GDPDJHWKDWPLJKWEHFDXVHGE\GHIHFWLYHSODFHPHQWDQGLQVWDOODWLRQ
E\XQDXWKRUL]HGSHUVRQQHO
z:KHQWKHGRRURUGUDZHURIRYHQLVRSHQGRQRWOHDYHDQ\WKLQJRQLW\RXPD\XQEDODQFH\RXU
DSSOLDQFHRUEUHDNWKHGRRU
z6RPHSDUWVRIDSSOLDQFHPD\NHHSLWVKHDWIRUDORQJWLPHLWLVUHTXLUHGWRZDLWIRULWWRFRRO
GRZQEHIRUHWRXFKLQJRQWRWKHSRLQWVWKDWDUHH[SRVHGWRWKHKHDWGLUHFWO\
z,I\RXZLOOQRWXVHWKHDSSOLDQFHIRUDORQJWLPHLWLVDGYLVHGWRSOXJL RII
),77,1*7+(29(1,1727+(.,7&+(181,7
)LWWKHRYHQLQWRWKHVSDFHSURYLGHGLQWKHNLWFKHQXQLWLWPD\EHILWWHGXQGHUQHDWKDZRUNWRSRULQWR
DQXSULJKWFXSERDUG)L[WKHRYHQLQSRVLWLRQE\VFUHZLQJLQWRSODFHXVLQJWKHWZRIL[LQJKROHVLQWKH
IUDPH7RORFDWHWKHIL[LQJKROHVRSHQWKHRYHQGRRUDQGORRNLQVLGH7RDOORZDGHTXDWHYHQWLODWLRQ
WKHPHDVXUHPHQWVDQGGLVWDQFHVDGKHUHGWRZKHQIL[LQJWKHRYHQ
,03257$17
,IWKHRYHQLVWRZRUNSURSHUO\WKHNLWFKHQKRXVLQJPXVWEHVXLWDEOH7KHSDQHOVRIWKHNLWFKHQXQLW
WKDWDUHQH[WWRWKHRYHQPXVWEHPDGHRIDKHDWUHVLVWDQWPDWHULDO(QVXUHWKDWWKHJOXHVRIXQLWV
WKDWDUH PDGH RI YHQHHUHG ZRRG FDQ ZLWKVWDQG WHPSHUDWXUHV RI DW OHDVW ) 3ODVWLFVRU JOXHV
WKDW FDQQRW ZLWKVWDQG VXFK WHPSHUDWXUHV ZLOO PHOW DQG GHIRUP WKH XQLW RQFH WKH RYHQ KDV EHHQ
ORGJHG LQVLGH WKH XQLWV HOHFWULFDO SDUWV PXVW EH FRPSOHWHO\ LQVXODWHG 7KLV LV D OHJDO VDIHW\
UHTXLUHPHQW$OOJXDUGVPXVWEHILUPO\IL[HGLQWRSODFHVRWKDWLWLVLPSRVVLEOHWRUHPRYHWKHPZLWKRXW
XVLQJ VSHFLDO WRROV 5HPRYH WKH EDFN RI WKH NLWFKHQ XQLW WR HQVXUH DQ DGHTXDWH FXUUHQW RI DLU
FLUFXODWHVDURXQGWKHRYHQ7KHKREPXVWKDYHDUHDUJDSRIDWOHDVWPP
'(&/$5$7,212)&203/,$1&(
:KHQ \RX KDYH XQSDFNHG WKHRYHQ PDNH VXUHWKDW LW KDVQRW EHHQ
GDPDJHG LQ DQ\ ZD\ ,I \RX KDYH DQ\ GRXEWV DW DOO GR QRW XVH LW
FRQWDFW D SURIHVVLRQDOO\ TXDOLILHG SHUVRQ .HHSSDFNLQJ PDWHULDOV
VXFKDVSODVWLFEDJVSRO\VW\UHQHRUQDLOVRXWRIWKHUHDFKRIFKLOGUHQ
EHFDXVHWKHVHDUHGDQJHURXVWRFKLOGUHQ
W
7
9
COOKWARE
Utensils Remarks
Microwave-safe only. Follow the manufacturer* instructions. Should be
labeled "Microwave Safe". Some plastic containers soften, as the food
inside gets hot. "Boiling bags" and tightly closed plastic bags should be
slit, pierced or vented as directed by package.
Microwave-safe only. Use to cover food during cooking to retain
moisture. Do not allow plastic wrap to touch food.
Thermometers Microwave-safe only (meat and candy thermometers).
Wax paper Use as a cover to prevent splattering and retain moisture.
Plastic
Plastic wrap
Utensils Remarks
Aluminum tray
Food carton with
metal handle
Metal or metal-
trimmed utensils
Metal twist ties
Paper bags
Plastic foam
Wood
Metal shields the food from microwave energy. Metal trim may
cause arcing.
May cause a fire in the oven.
Plastic foam may melt or contaminate the liquid inside when exposed
to high temperature.
Wood will dry out when used in the microwave oven and may split
or crack.
May cause arcing. Transfer food into microwave-safe dish.
May cause arcing. Transfer food into microwave-safe dish.
May cause arcing and could cause a fire in the oven.
Compatible Cookware
Non-Compatible Cookware
6$)(7<+,176
z'RQRWXVHWKHRYHQXQOHVV\RXDUH ZHDULQJVRPHWKLQJRQ\RXUIHHW'RQRWWRXFKWKHRYHQ
ZLWKZHWRUGDPSKDQGVRUIHHW
z)RURYHQ2YHQGRRUVKRXOGQRWEHRSHQHGRIWHQGXULQJWKHFRRNLQJSHULRG
z7KHDSSOLDQFHPXVWEHLQVWDOOHGE\DQDXWKRUL]HGWHFKQLFLDQDQGSXWLQWRXVH7KHSURGXFHULV
QRWUHVSRQVLEOHIRUDQ\GDPDJHWKDWPLJKWEHFDXVHGE\GHIHFWLYHSODFHPHQWDQGLQVWDOODWLRQ
E\XQDXWKRUL]HGSHUVRQQHO
z:KHQWKHGRRURUGUDZHURIRYHQLVRSHQGRQRWOHDYHDQ\WKLQJRQLW\RXPD\XQEDODQFH\RXU
DSSOLDQFHRUEUHDNWKHGRRU
z6RPHSDUWVRIDSSOLDQFHPD\NHHSLWVKHDWIRUDORQJWLPHLWLVUHTXLUHGWRZDLWIRULWWRFRRO
GRZQEHIRUHWRXFKLQJRQWRWKHSRLQWVWKDWDUHH[SRVHGWRWKHKHDWGLUHFWO\
z,I\RXZLOOQRWXVHWKHDSSOLDQFHIRUDORQJWLPHLWLVDGYLVHGWRSOXJL RII
),77,1*7+(29(1,1727+(.,7&+(181,7
)LWWKHRYHQLQWRWKHVSDFHSURYLGHGLQWKHNLWFKHQXQLWLWPD\EHILWWHGXQGHUQHDWKDZRUNWRSRULQWR
DQXSULJKWFXSERDUG)L[WKHRYHQLQSRVLWLRQE\VFUHZLQJLQWRSODFHXVLQJWKHWZRIL[LQJKROHVLQWKH
IUDPH7RORFDWHWKHIL[LQJKROHVRSHQWKHRYHQGRRUDQGORRNLQVLGH7RDOORZDGHTXDWHYHQWLODWLRQ
WKHPHDVXUHPHQWVDQGGLVWDQFHVDGKHUHGWRZKHQIL[LQJWKHRYHQ
,03257$17
,IWKHRYHQLVWRZRUNSURSHUO\WKHNLWFKHQKRXVLQJPXVWEHVXLWDEOH7KHSDQHOVRIWKHNLWFKHQXQLW
WKDWDUHQH[WWRWKHRYHQPXVWEHPDGHRIDKHDWUHVLVWDQWPDWHULDO(QVXUHWKDWWKHJOXHVRIXQLWV
WKDWDUH PDGH RI YHQHHUHG ZRRG FDQ ZLWKVWDQG WHPSHUDWXUHV RI DW OHDVW ) 3ODVWLFVRU JOXHV
WKDW FDQQRW ZLWKVWDQG VXFK WHPSHUDWXUHV ZLOO PHOW DQG GHIRUP WKH XQLW RQFH WKH RYHQ KDV EHHQ
ORGJHG LQVLGH WKH XQLWV HOHFWULFDO SDUWV PXVW EH FRPSOHWHO\ LQVXODWHG 7KLV LV D OHJDO VDIHW\
UHTXLUHPHQW$OOJXDUGVPXVWEHILUPO\IL[HGLQWRSODFHVRWKDWLWLVLPSRVVLEOHWRUHPRYHWKHPZLWKRXW
XVLQJ VSHFLDO WRROV 5HPRYH WKH EDFN RI WKH NLWFKHQ XQLW WR HQVXUH DQ DGHTXDWH FXUUHQW RI DLU
FLUFXODWHVDURXQGWKHRYHQ7KHKREPXVWKDYHDUHDUJDSRIDWOHDVWPP
'(&/$5$7,212)&203/,$1&(
:KHQ \RX KDYH XQSDFNHG WKHRYHQ PDNH VXUHWKDW LW KDVQRW EHHQ
GDPDJHG LQ DQ\ ZD\ ,I \RX KDYH DQ\ GRXEWV DW DOO GR QRW XVH LW
FRQWDFW D SURIHVVLRQDOO\ TXDOLILHG SHUVRQ .HHSSDFNLQJ PDWHULDOV
VXFKDVSODVWLFEDJVSRO\VW\UHQHRUQDLOVRXWRIWKHUHDFKRIFKLOGUHQ
EHFDXVHWKHVHDUHGDQJHURXVWRFKLOGUHQ
W
7
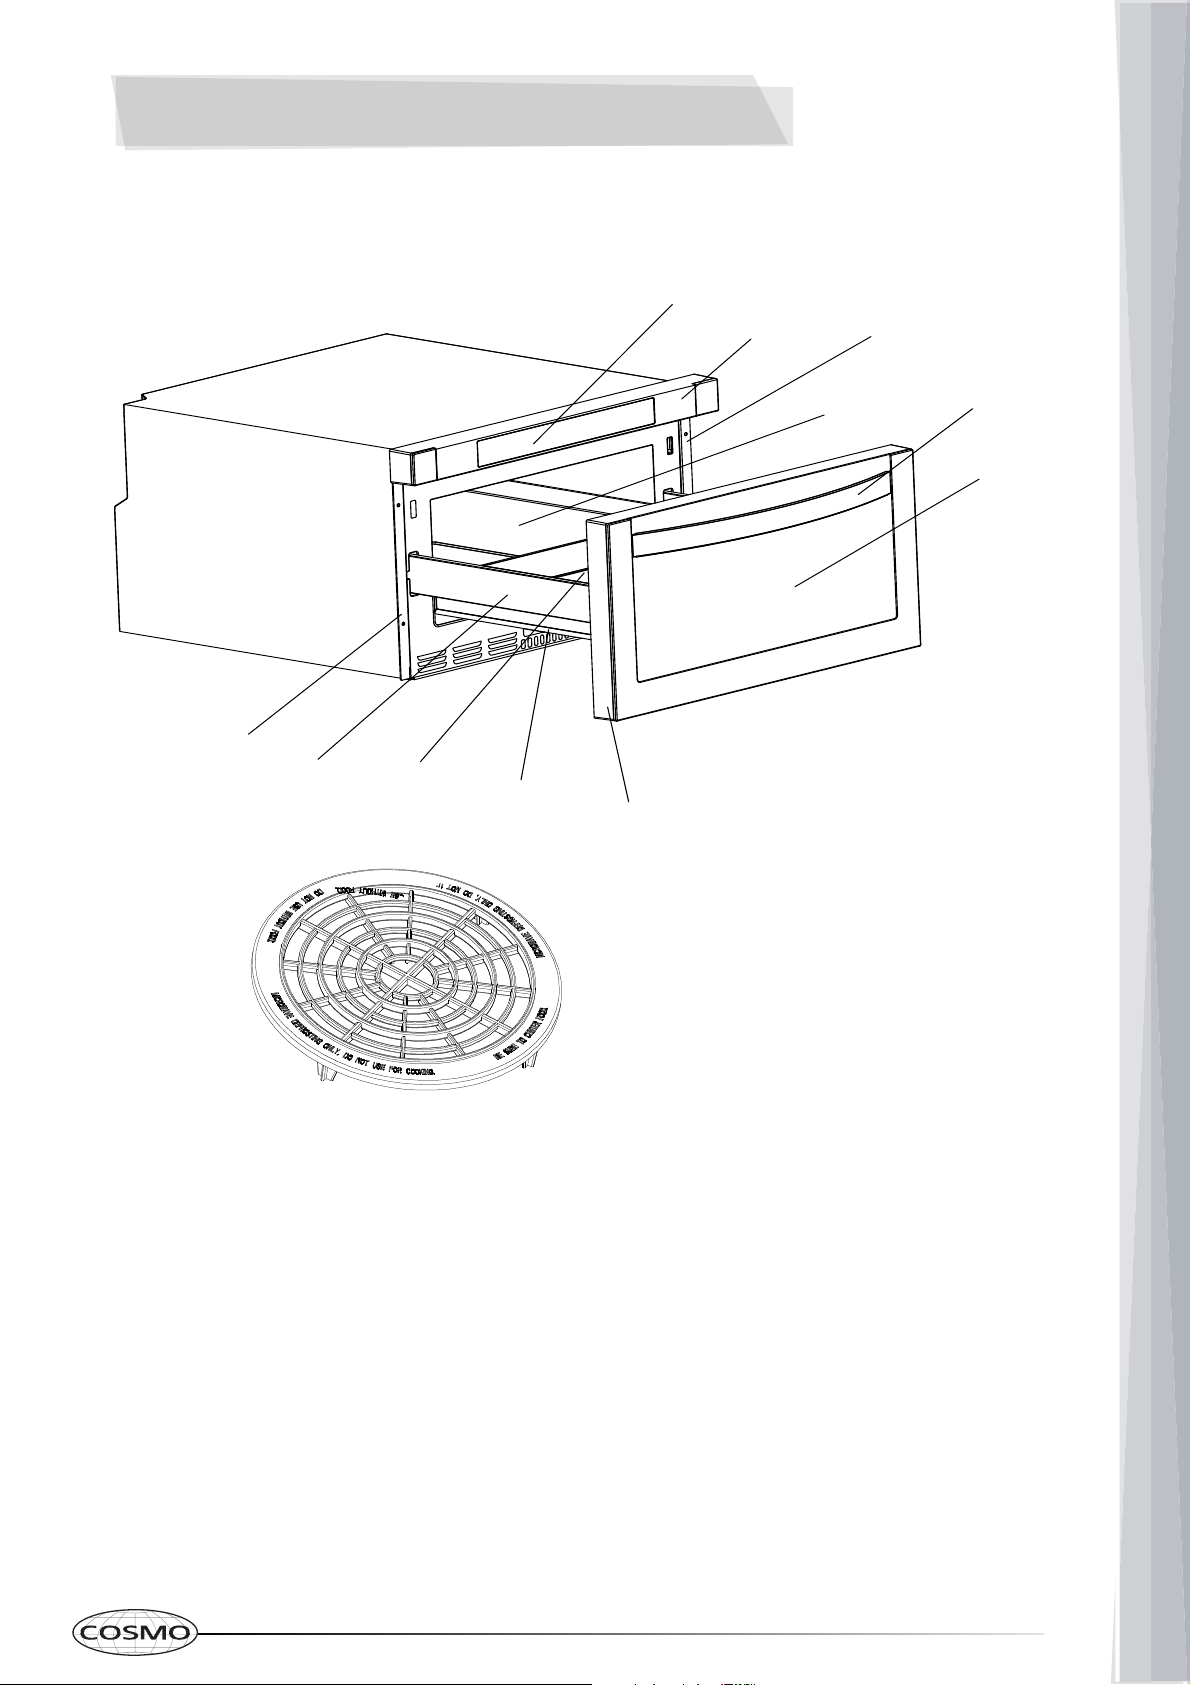
A) Control Patch
B) Control Box
C) Right Mounting Plate
D) Cavity
E) Handle
F) Windows
G) Door Frame
H) Automatic putter
I) Drawer
J) Hinge Joint Board
K) Left Mounting Plate
Remove the oven and all materials from the carton and oven cavity. Your oven
comes with the following accessories:
A
BC
DE
F
G
H
I
J
K
Defrosting Rack: Only used in defrosting
function and do not use for cooking. Do not
use without food
10
OVEN PARTS & ACCESSORIES
OPEN
CLOSE
SETUP
CLOCK
KITCHEN TIMER
SOFTEN
MELT POPCORN
BEVERAGE
DEFROST
WEIGHT
DEFROST
TIME
POWER
TIME COOK
POWER START
STOP
+30SEC.
CANCEL
2345
67890
11
6$)(7<+,176
z'RQRWXVHWKHRYHQXQOHVV\RXDUH ZHDULQJVRPHWKLQJRQ\RXUIHHW'RQRWWRXFKWKHRYHQ
ZLWKZHWRUGDPSKDQGVRUIHHW
z)RURYHQ2YHQGRRUVKRXOGQRWEHRSHQHGRIWHQGXULQJWKHFRRNLQJSHULRG
z7KHDSSOLDQFHPXVWEHLQVWDOOHGE\DQDXWKRUL]HGWHFKQLFLDQDQGSXWLQWRXVH7KHSURGXFHULV
QRWUHVSRQVLEOHIRUDQ\GDPDJHWKDWPLJKWEHFDXVHGE\GHIHFWLYHSODFHPHQWDQGLQVWDOODWLRQ
E\XQDXWKRUL]HGSHUVRQQHO
z:KHQWKHGRRURUGUDZHURIRYHQLVRSHQGRQRWOHDYHDQ\WKLQJRQLW\RXPD\XQEDODQFH\RXU
DSSOLDQFHRUEUHDNWKHGRRU
z6RPHSDUWVRIDSSOLDQFHPD\NHHSLWVKHDWIRUDORQJWLPHLWLVUHTXLUHGWRZDLWIRULWWRFRRO
GRZQEHIRUHWRXFKLQJRQWRWKHSRLQWVWKDWDUHH[SRVHGWRWKHKHDWGLUHFWO\
z,I\RXZLOOQRWXVHWKHDSSOLDQFHIRUDORQJWLPHLWLVDGYLVHGWRSOXJL RII
),77,1*7+(29(1,1727+(.,7&+(181,7
)LWWKHRYHQLQWRWKHVSDFHSURYLGHGLQWKHNLWFKHQXQLWLWPD\EHILWWHGXQGHUQHDWKDZRUNWRSRULQWR
DQXSULJKWFXSERDUG)L[WKHRYHQLQSRVLWLRQE\VFUHZLQJLQWRSODFHXVLQJWKHWZRIL[LQJKROHVLQWKH
IUDPH7RORFDWHWKHIL[LQJKROHVRSHQWKHRYHQGRRUDQGORRNLQVLGH7RDOORZDGHTXDWHYHQWLODWLRQ
WKHPHDVXUHPHQWVDQGGLVWDQFHVDGKHUHGWRZKHQIL[LQJWKHRYHQ
,03257$17
,IWKHRYHQLVWRZRUNSURSHUO\WKHNLWFKHQKRXVLQJPXVWEHVXLWDEOH7KHSDQHOVRIWKHNLWFKHQXQLW
WKDWDUHQH[WWRWKHRYHQPXVWEHPDGHRIDKHDWUHVLVWDQWPDWHULDO(QVXUHWKDWWKHJOXHVRIXQLWV
WKDWDUH PDGH RI YHQHHUHG ZRRG FDQ ZLWKVWDQG WHPSHUDWXUHV RI DW OHDVW ) 3ODVWLFVRU JOXHV
WKDW FDQQRW ZLWKVWDQG VXFK WHPSHUDWXUHV ZLOO PHOW DQG GHIRUP WKH XQLW RQFH WKH RYHQ KDV EHHQ
ORGJHG LQVLGH WKH XQLWV HOHFWULFDO SDUWV PXVW EH FRPSOHWHO\ LQVXODWHG 7KLV LV D OHJDO VDIHW\
UHTXLUHPHQW$OOJXDUGVPXVWEHILUPO\IL[HGLQWRSODFHVRWKDWLWLVLPSRVVLEOHWRUHPRYHWKHPZLWKRXW
XVLQJ VSHFLDO WRROV 5HPRYH WKH EDFN RI WKH NLWFKHQ XQLW WR HQVXUH DQ DGHTXDWH FXUUHQW RI DLU
FLUFXODWHVDURXQGWKHRYHQ7KHKREPXVWKDYHDUHDUJDSRIDWOHDVWPP
'(&/$5$7,212)&203/,$1&(
:KHQ \RX KDYH XQSDFNHG WKHRYHQ PDNH VXUHWKDW LW KDVQRW EHHQ
GDPDJHG LQ DQ\ ZD\ ,I \RX KDYH DQ\ GRXEWV DW DOO GR QRW XVH LW
FRQWDFW D SURIHVVLRQDOO\ TXDOLILHG SHUVRQ .HHSSDFNLQJ PDWHULDOV
VXFKDVSODVWLFEDJVSRO\VW\UHQHRUQDLOVRXWRIWKHUHDFKRIFKLOGUHQ
EHFDXVHWKHVHDUHGDQJHURXVWRFKLOGUHQ
W
7
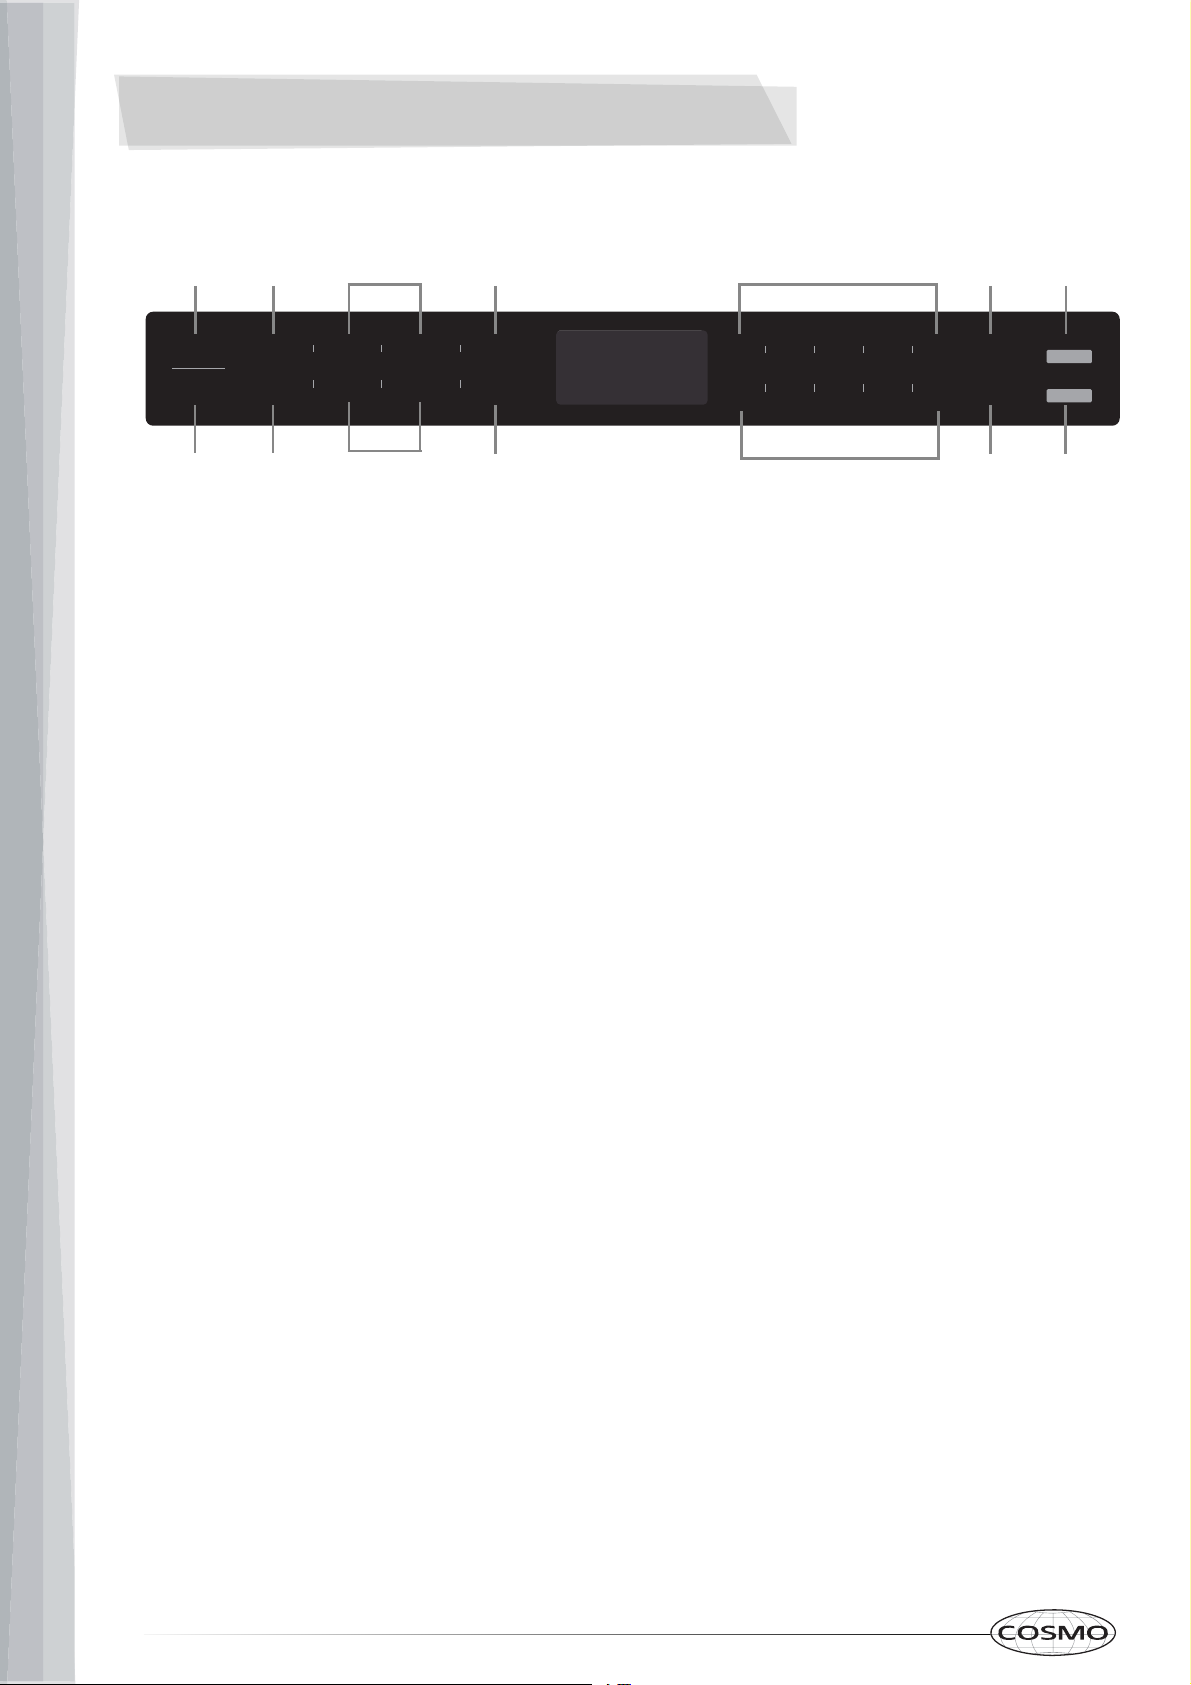
OPERATING INSTRUCTIONS
11
(5)
(2) (3) (4) (9) (10)
(6) (7) (11) (12)
(1) (8)
(3) (8)
Control Panel & Functions
(1) Open
(2) Setup
(3) Auto Menu
(4) Weight Defrost
(5) Close
(6) Clock/Kitchen timer
(7) Time Defrost
(8) Number keys
(9) Power
(10) Start / +30sec.
(11) Time Cook
(12) Stop / Cancel

OPERATING INSTRUCTIONS
12
3. Kitchen Timer
(1) Press "CLOCK/KITCHEN TIMER" button twice,
(2) Press the number
99 seconds.
(3) Press " to confirm setting
(4) When the kitchen time arrives, buzzer will ring 5 times. The oven turns into waiting
state. Screen will display the current time if the clock has been set. Otherwise, Screen will
Note: 1) The kitchen timer is differ from 12-hour system. Kitchen Timer is a timer.
operated.
outlet, buzzer sounds once. Screen displays
"WELCOME". Then the oven turns into waiting state. The screen displays "00:00".
(1) When the microwave oven is plugged into an
(2) In waiting state, the screen will display the current time if the clock has been set.
2. Clock Setting
(1) Press "CLOCK/KITCHEN TIMER" button once. The first hour figure will flash and other
(2) Press the number buttons to enter the correct time. The input time should be between
(3) Press "CLOCK/KITCHEN TIMER" to finish the setting. ":" will flash.
Note: In the process of clock setting, if the "STOP/CANCEL" button is pressed or if there
is no operation within 1 minute, the oven will go back to former setting automatically.
Screen will display 00:00. "FUNCTION"
buttons to enter the time. The maximum cooking time is 99 minutes
START/+30SEC." the . The time begins to count down.
display "00:00".
2) In the process of Kitchen Timer operation, any cooking programme cannot be
)3 "STOP/CANCEL" can be pressed to cancel the Kitchen Timer.
will light.
01:00-12:59.
Otherwise, "00:00" will display.
(3) Press "OPEN" button to open the drawer, and screen displays "OPEN". The screen will
Press "CLOSE" button to close the drawer, and the screen displays "CLOSE". The screen
If there are mistakes to open or close the drawer, buzzer will sound five times, and the
display "PLEASE CLOSE" when the drawer is fully opened.
will display the current time or "00:00" when the drawer is fully closed.
screen will display "OPEN OR CLOSE".
"0" will light.
1. Power On

OPERATING INSTRUCTIONS
(1) Press "TIME COOK" button, will display "00:00". "FUNCTION" will light.
Press number buttons to input the cooking time. The maximum cooking time is 99
minutes 99 seconds.
Level
Power
10
100%
9
90%
8
80%
7
70%
6
60%
5
50%
4
40%
3
30%
2
20%
1
10%
Display PL100 PL90 PL80 PL70 PL60 PL50 PL40 PL30 PL20 PL10
11 power levels are available.
0%
PL00
0
(2) Press "POWER" button to set the power. The default power level is "PL100".
Press number buttons to select different power levels.
(3) Press "START/+30SEC." to start cooking. Buzzer sounds once. The cooking time
begins to count down. When cooking finished, buzzer sounds five times and "FINISH"
displays.
Note: In the process of ing, if the "STOP/CANCEL" button is pressed or if there is no
operation within 1 minute, the oven will go back to the former setting automatically.
sett
. Cooking Function4 Microwave
Screen
(1) Press "DEFROST WEIGHT" button. Screen displays "WEIGHT DEFROST".
(2) Press numeber buttons to input the weight to be defrosted.
(1) In waiting state, instant cooking at 100% power level with 30 seconds' cooking time can
be started by pressing "START/+30SEC". Each press on the same button will increase
cooking time by 30 seconds.
Note: "START/+30SEC." cannot be pressed to increase cooking time for defrost by weight
and Auto menu cooking.
(2) During microwave and defrost by time, "START/+30SEC."
can be pressed to increase
And "FUNCTION" will light.
The input weight should be between 0.1-6.0 lbs.
(3) Press "START/+30SEC." to start defrosting. Buzzer sounds once. The defrosting time
begins to count down. When cooking finished, buzzer sounds five times and "FINISH"
displays.
5. Fast Cooking
6. Weight Defrost Function
cooking time. Each press will increase 30 seconds.
13

OPERATING INSTRUCTIONS
14
(1) Press "DEFROST TIME" button. displays "TIME DEFROST".
"FUNCTION" will light.And
(3) Press "START/+30SEC." to start defrosting. Buzzer sounds once. The defrosting time
begins to count down. When cooking finished, buzzer sounds five times and "FINISH"
displays.
Note: The defrosting power level is PL30.
(2) Press number buttons to enter the ng time between 00:01-99:99.defrosti
(1) Press " " button. displays "1". "AUTO MENU" and " " indicators
(3) Press "START/+30SEC." to start cooking. Buzzer sounds once. The cooking time
begins to count down. When cooking finished, buzzer sounds five times and "FINISH"
displays.
(2)
BEVERAGE
Continue to press "BEVERAGE" button, "1" or "2" will display in order.
will light.
7. Time Defrost Function
8. Auto Menu--Beverage
Screen
Screen
(1) Press "
(3) Press "START/+30SEC." to start cooking. Buzzer sounds once. "OZ" will go out. The
displays.
(2) Continue to press "POPCORN" button, "1.75", "3" or "3.5" will display in order.
POPCORN" button. displays "1.75". "AUTO MENU" and "OZ" indicators
cooking time begins to count down. When cooking finished, buzzer sounds five times
and "FINISH"
(1) Press "
(5) Press "START/+30SEC." to start cooking. Buzzer sounds once. "OZ" will go out. The
displays.
(2)
10. Auto Menu--
Continue to press "MELT" button, "BUTTER", "CHOCOLA", "CHEESE" or "MARSHMA"
cooking time begins to count down. When cooking finished, buzzer sounds five times
and "FINISH"
Melt
MELT" button. displays "BUTTER". "AUTO MENU" indicator will light.
will display in order.
(3) Press "START/+30SEC." to confirm the selection.
(4) Press "MELT" button to select the weight. "OZ" will light .except butter menu
will light.
9. Auto Menu--Popcorn
Screen
Screen
(Auto Menu - Melt Continued on Page 15)
15
OPERATING INSTRUCTIONS
Menu Display
Butter/Margarine BUTTER
1 (STICK)
2 (STICKS)
3 (STICKS)
Weight
Chocolate
Cheese
Marshmallows
CHOCOLA
CHEESE
MARSHMA
4
8
8
16
5
10
(1) Press "
(5) Press "START/+30SEC." to start cooking. Buzzer sounds once. "OZ" will go out. The
displays.
(2)
1 Auto Menu--
Continue to press "SOFTEN" button, "BUTTER", "ICE-CRE" or "CHEESE" will display
cooking time begins to count down. When cooking finished, buzzer sounds five times
and "FINISH"
in order.
(3) Press "START/+30SEC." to confirm the selection.
( Press " " button to select the weight. "OZ" will light .4) except butter menu
Soften
SOFTEN" button. displays "BUTTER". "AUTO MENU" indicator will light.
SOFTEN
1.
Screen
Menu Display
Butter BUTTER
Weight
CHEESE
Ice cream/ Frozen juice ICE-CRE
8
3
8
Cream Cheese
16
32
1(STICH)
2(STICHS)
3(STICHS)

(1) Press "
(2)
12. Buzzer On/Off
SETUP" button. displays "BUZ OFF".
Press "START/+30SEC." button. The oven will turn to waiting state. Buzzer is turned
off. No beep will sound.
(3) Press "SETUP" button. displays "BUZ ON".
(4) Press "START/+30SEC." button. The oven will turn to waiting state. Buzzer is turned
o . .n Buzzer will sound normally
Lock: In waiting state, press "STOP/CANCEL" for 3 seconds, the oven will enter into the
children-lock state. will display the current time if the clock has been set.
Lock quitting: In locked state, press "STOP/CANCEL
13. ChildLock Function
Otherwise, "00:00" will display.
" for 3 seconds to release the lock.
(1) In cooking state, press " " button to check the clock. The
current time will display for 3 seconds.
14. Inquiring Function
(2) In the microwave cooking state, press "POWER" button to inquire
the microwave power. The current microwave power will display for 3 seconds.
CLOCK/KITCHEN TIMER
Screen
Screen
Screen
(2)
( )
(1) The buzzer sounds once by efficient press, inefficient press will be no responce.
In cooking state, "OPEN" cannot be pressed to open the drawer unless "STOP/CANCEL"
button is pressed to pause the cooking. Press "CLOSE" button to close the drawer. Then
"START/+30SEC." button must be pressed to continue cooking.
(3) If the cooking programme has been set , "START/+30SEC." is not pressed in 1 minute,
The current time will be displayed. The setting will be cancelled.
15. Other Specifications
4 If the oven door is open, the lamp will light until the oven is power off.ed
16
OPERATING INSTRUCTIONS

OPERATING INSTRUCTIONS
17
Microwave Drawer Locks
The Instructions only apply to drawer type microwave ovens with protective lock on wagons or other automobiles.
The lock is used to prevent damage to the microwave ovens due to drawer being opened when the automobiles
are driving.
Description of lock state:
Control panel
Plated lock
Facade (drawer)
State A State B
State A -> State B: As shown on the left, rotate the right lock forward 90° to the locking state.
State B -> State A: As shown on the right, rotate the right lock 90° to both sides to the locking state.
NOTES
1.) Before using the microwave oven, you must check whether the lock is in state A.
2.) Before driving the vehicle or the microwave oven hasn’t been used for a long time, the lock must be set in
state B.
3.) To switch the lock between state A and state B, rotate the lock to self-locking position.
4.) To avoid damage to the oven caused by misuse, do not rotate the lock while using the microwave oven.
Description of using the lock:
State B State A
State B
State A
The figure above shows the overall appearance of the drawer type microwave oven and the lock , which are
control panel, lock and facade (drawer) from top to bottom.
Depending the position of the lock, it has two states, which are state A and state B. State A is used when the
microwave oven is in normal use, and state B is used when the automobile is driving and the microwave oven is
not working.

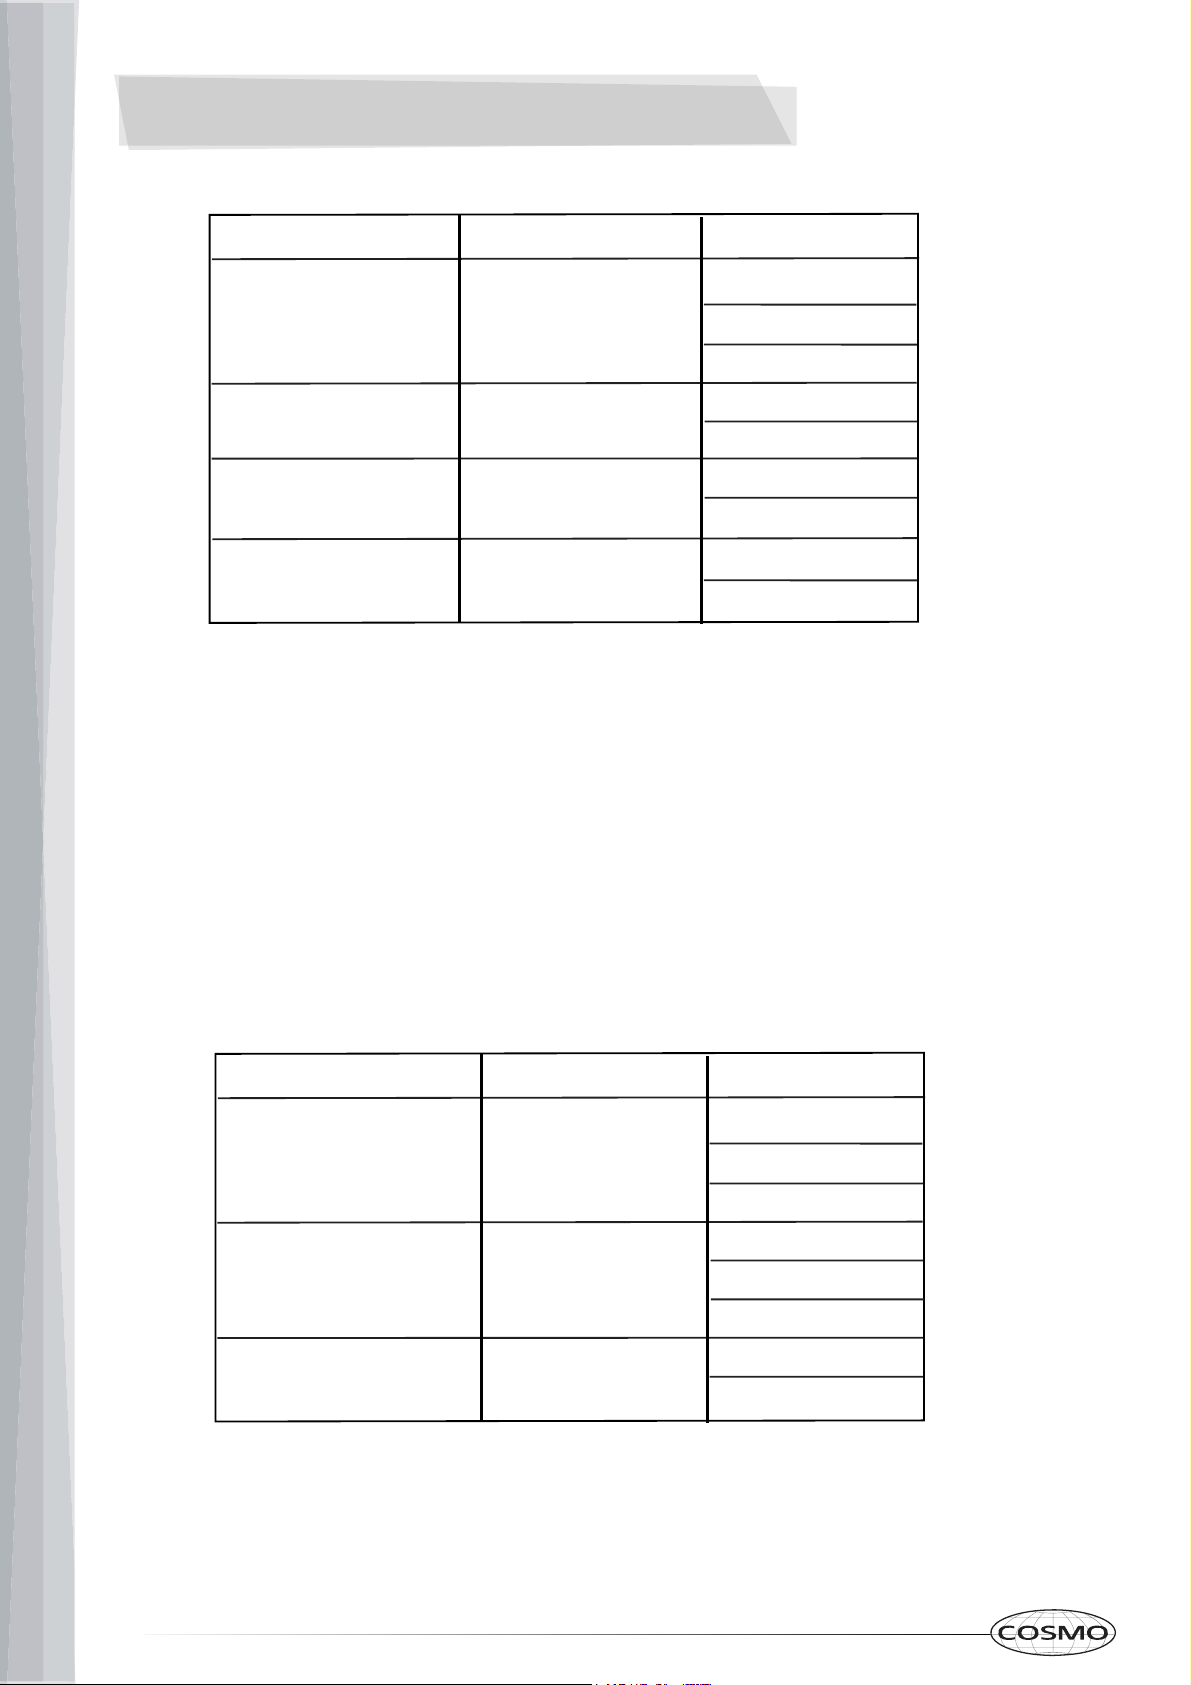
TROUBLESHOOTING
Check your problem by using the chart below and try the solutions for each problem. If the
microwave oven still does not work properly, contact the nearest authorized service center.
ISSUE
Oven will not start
POSSIBLE CAUSE POSSIBLE REMEDY
a. Electrical cord for oven is
not plugged in.
b. Door is open.
c. Wrong operation is set.
a. Plug into the outlet.
b. Close the door and try
again.
c. Check instructions.
Arcing or sparking
a. Materials to be avoided in
microwave oven were
used.
b. The oven is operated when
empty.
c. Spilled food remains in the
cavity.
a. Use microwave-safe
cookware only.
b. Do not operate with oven
empty.
c. Clean cavity with wet towel.
Unevenly cooked
foods
a. Materials to be avoided in
microwave oven were
used.
b. Food is not defrosted
completely.
c. Cooking time, power level
is not suit ble.
d. Food is not turned or stirred.
a. Use microwave-safe
cookware only.
b. Completely defrost food.
c. Use correct cooking time,
power level.
d. Turn or stir food.
Overcooked foods Cooking time, power level is
not suitable. Use correct cooking time,
power level.
Undercooked foods
a. Materials to be avoided in
microwave oven were used.
b. Food is not defrosted
completely.
c. Oven ventilation ports are
restricted.
d. Cooking time, power level is
not suitable.
a. Use microwave-safe
cookware only.
b. Completely defrost food.
c. Check to see that oven venti-
lation ports are not restricted.
d. Use correct cooking time,
power level.
Improper defrosting
a. Materials to be avoided in
microwave oven were used.
b. Cooking time, power level is
not suitable.
c. Food is not turned or stirred.
a. Use microwave-safe
cookware only.
b. Use correct cooking time,
power level.
c. Turn or stir food.
a
18

WARRANTY AND SERVICE
For full warranty details on this product please visit:
http://www.cosmoappliances.com/warranty
TO RECEIVE WARRANTY SERVICE, YOUR
PRODUCT MUST BE REGISTERED. TO REGISTER, VISIT:
WWW.COSMOAPPLIANCES.COM/WARRANTY
SCAN TO REGISTER
19

Correct Disposal of this product:
This marking indicates that this appliance should not
be disposed with other household wastes. To prevent
possible harm to the environment or human health
from uncontrolled waste disposal, recycle it responsibly to
promote the sustainable reuse of material resources.
IMPORTANT
Do Not Return This Product To The Store If
you have a problem with this product, please contact
Cosmo Customer Support at
+1(888)784-3108
DATED PROOF OF PURCHASE, MODEL #, AND SERIAL #
REQUIRED FOR WARRANTY SERVICE
IMPORTANT
Ne pas Réexpédier ce Produit au Magasin
Pour tout problème concernant ce produit, veuillez contacter
le service des consommateurs Cosmo Customer Support au
+1(888) 784-3108
UNE PREUVE D’ACHAT DATEE EST REQUISE POUR BENEFICIER DE
LA GARANTIE.
IMPORTANTE
No regrese este producto a la tienda
Si tiene algún problema con este producto, por favor contacte el
AYUDA AL CLIENTE COSMO al
+1(888)784-3108
(Válido solo en E.U.A).
NECESITA UNA PRUEBA DE DE COMPRA FECHADA, NÚMERO DE
MODELO Y DE SERIE PARA EL SERVICIO DE LA GARANTÍA
20
Other manuals for COS-12MWDSS
2
Table of contents
Other Cosmo Microwave Oven manuals

Cosmo
Cosmo COS-3019ORM2SS User manual

Cosmo
Cosmo COS-2413ORM1SS User manual

Cosmo
Cosmo COS-12MWDSS-NH User manual

Cosmo
Cosmo COS-2413ORM1SS User manual

Cosmo
Cosmo COS-07CTMSSB User manual

Cosmo
Cosmo COS-2413ORM1SS User manual

Cosmo
Cosmo COS-3012ORLP1SS User manual

Cosmo
Cosmo COS-BIM22SSB User manual

Cosmo
Cosmo COS-3019ORM2SS User manual

Cosmo
Cosmo COS-07CTMSSB User manual


