Costway OP70368 User manual

Retractable Awning
OP70368
USER’S MANUAL
THIS INSTRUCTION BOOKLET CONTAINS IMPORTANT SAFETY INFORMATION. PLEASE READ AND KEEP FOR FUTURE REFERENCE.

Before You Start
Please read all instructions carefully.
Retain instructions for future reference.
Separate and count all parts and hardware.
Read through each step carefully and follow the proper order.
We recommend that, where possible, all items are assembled
near to the area in which they will be placed in use, to avoid
moving the product unnecessarily once assembled.
Always place the product on a flat, steady and stable surface.
Keep all small parts and packaging materials for this product
away from babies and children as they potentially pose a serious
choking hazard.
02

x1
A A1 A2
x1
CC1 C2
I-1 I-2
1pc for backup
1pc for backup
2pcs for backup
x1
E
x1
G
x1
I
x2
K
x3
M
x4
N
x1
O
x5
J
x10
L
x1
F
x3
H
x1
D
D1 D2
x1
BB1 B2
03

Non-metallic malletMeasuring tape
Cross screwdriver
Power drill with
14 mm drilling bit Two ladders or very sturdy chairs
Wrench
(wrenches of M17 and M14)
Please prepare below tools before assembly. (Not included)
Preparing Your Work Space
1. Before you begin, it is best to lay out all necessary tools to make setup
smoother. Refer to the required tools section for the list of necessary tools.
04
A1
A2
L
E
F
C2
J
D1
D2 J
K
L
G
I-1
I-2
O
J
J
K
M
M
B1
B2
N
C1

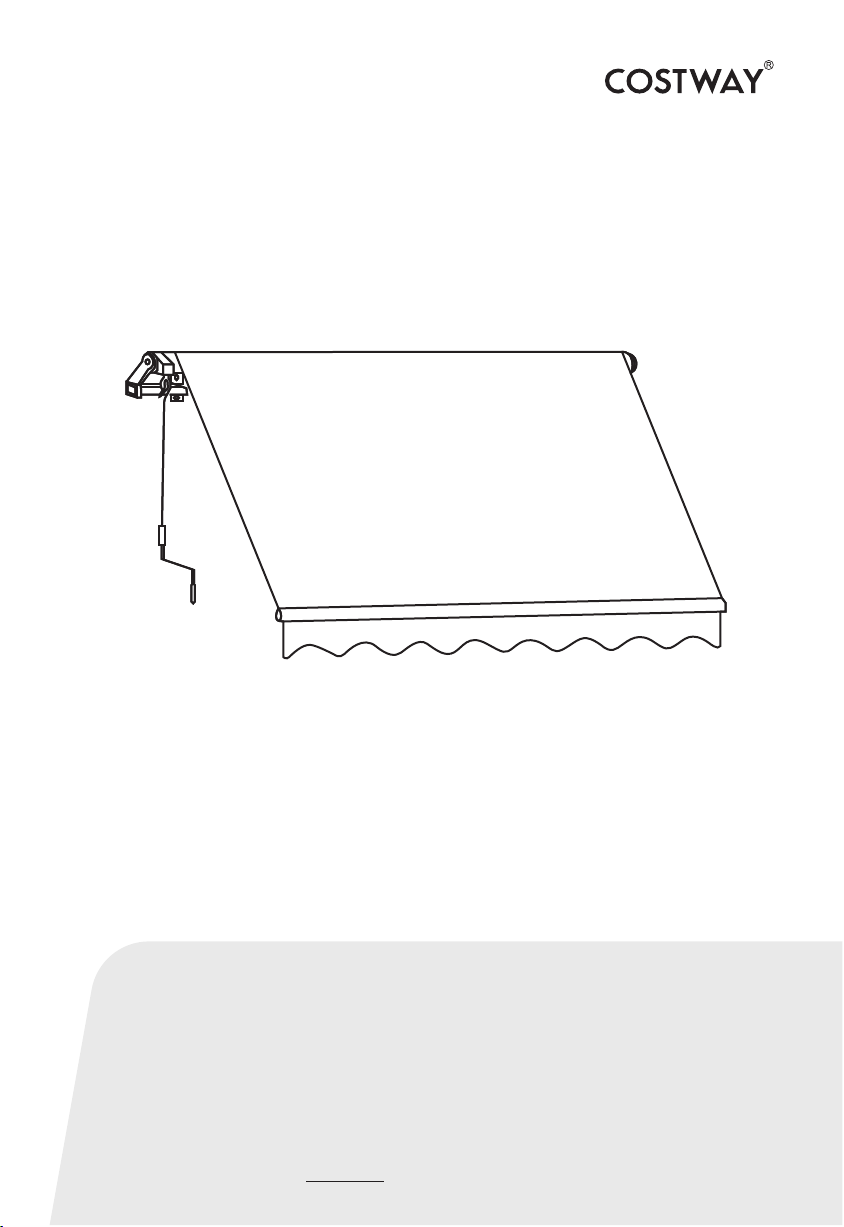
DO NOT remove the safety wrap that holds the awning arms down. Serious injury
can result from removing the wrap too soon.
WARNING
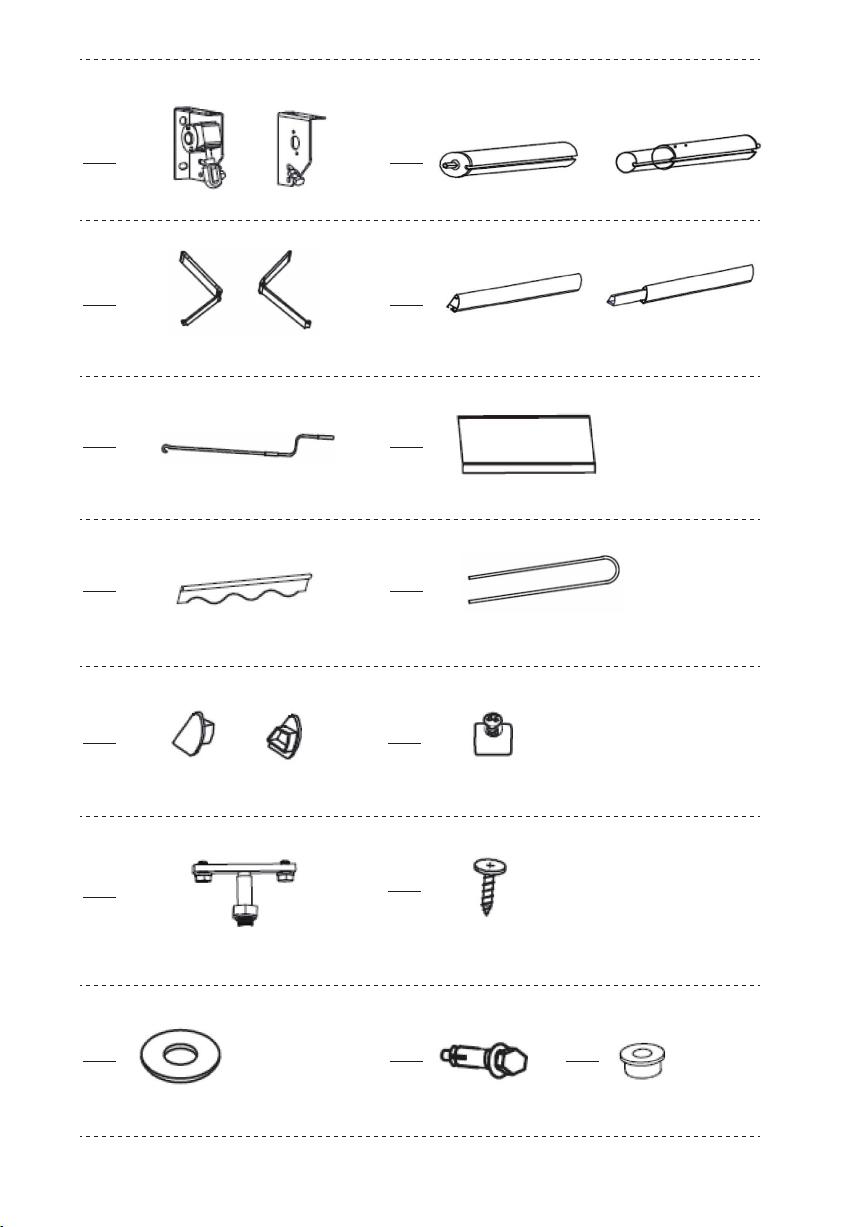
2. Open the awning box and unwrap each piece carefully to avoid damaging
the product.
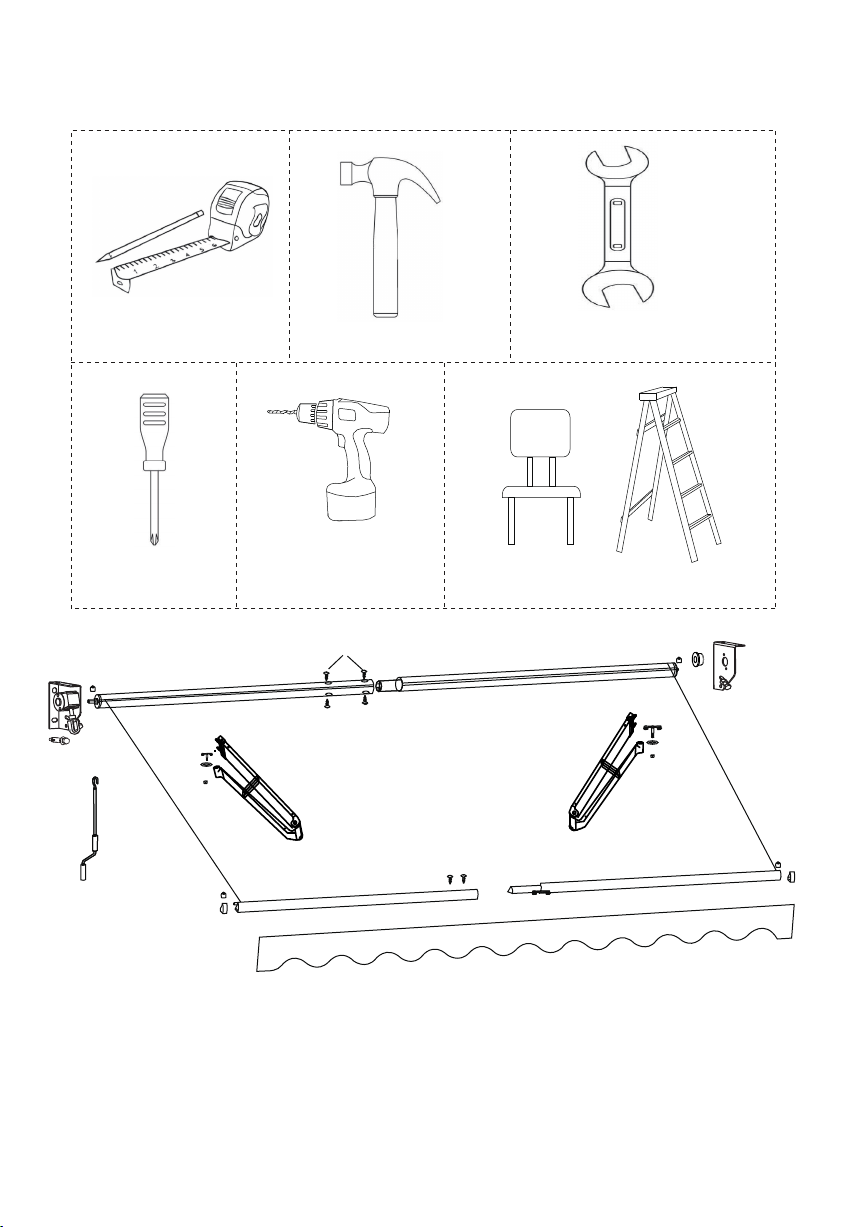
3. Lay out each piece of the awning to ensure that all pieces are present.
Refer to the parts diagram for detailed information regarding parts.
4. Open the small, inner box that contains the small parts and lay them out
as well.
5. It is recommended that at least 2 people install.
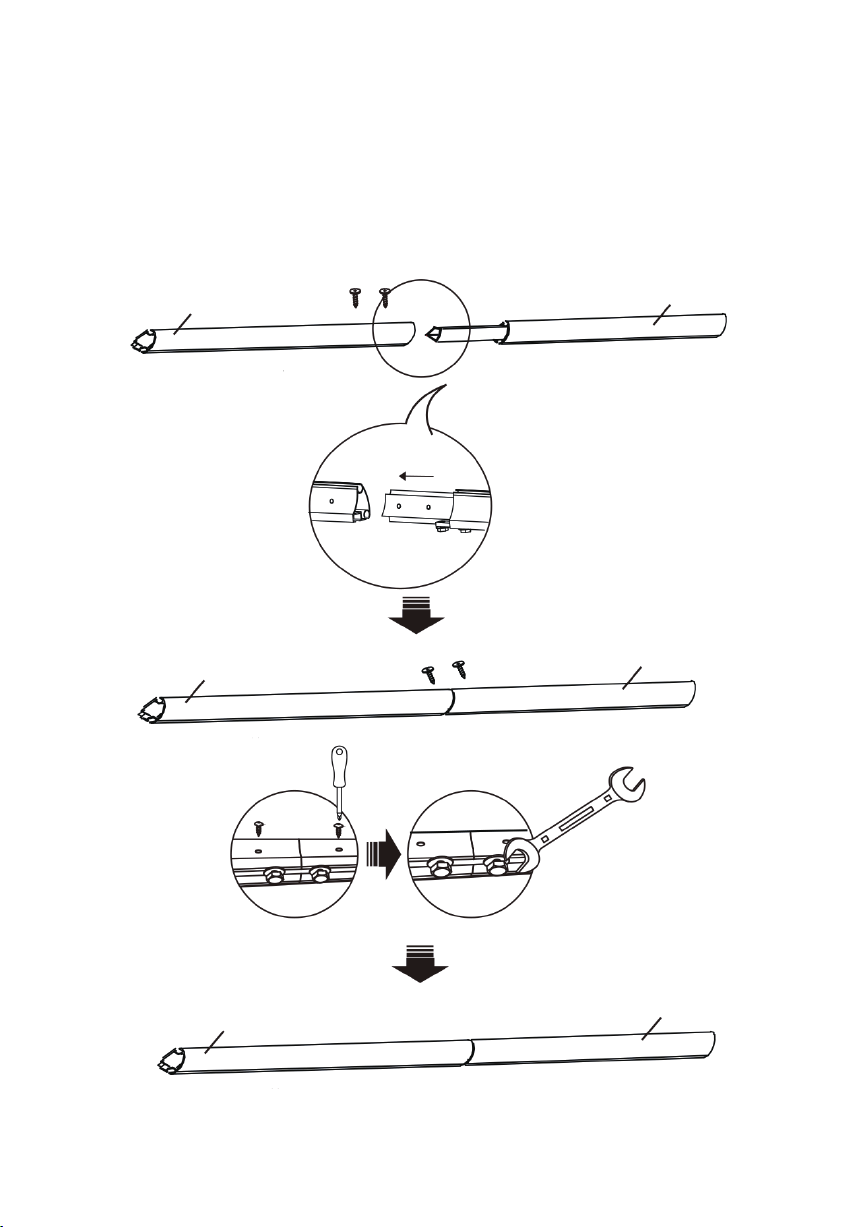
1. Gather the two long silver tubes(B1&B2) and lay them in a line.
2. Insert the roller tube(B2) into the interior end of the roller tube(B1) If
insertion is difficult, use a mallet to tap it gently into place.
3. Once inserted, fix it into place with screws(L).
STEP 1 Connecting Roller Tubes
B1
B2
B1
L
L
B2
B1
B2
05

D1 D2
D1 D2
D1 D2
L
L
STEP 2 Connecting Front Bars
1. Insert the front bar(D2) into the interior end of the front bar(D1). If
insertion is difficult, use a mallet to tap it into place.
2. Once inserted, fix it into place with screws(L) and tighten the screw nut on
the bar.
06

STEP 3 Fabric Assembly
1. Open the fabric carefully to ensure that the product is not damaged.
2. Unfold both pieces of awning fabric.You should have one large fabric piece
(F) and a valance with scalloped edge(G).
3. You should also have three fabric liner cords(H).
4. Thread the fabric liners through both ends of the large awning fabric(F) as
well as the valance(G).
5. Once the liners are threaded through the fabric, find the roller tube.
Thread the fabric and its liner through the slot in the roller tube all the way to
the end.Note:the fabric has a front and a back side. The back side has a
hem, and should face downwards. Then thread the other end of the awning
fabric through the slot in the front bar(Wedge-shaped piece). Thread the
valance(G) throuth the other slot in the front bar all the way to the end.
H
H
H
H
G
G
F
F
07
F
G
F
G
D
B
B
D

6. Roll the awning fabric counter clockwise around the roller tubes as tightly
and evenly as possible.
B
D
F
08
7.Fix the bolt (J) on the hole of the roller bar (B1&B2)on the left& right side.
Screw it tightly.
JJ

9.Slide arm-bar link(K) into the groove of the front bar on the right side. Put
the bolt(J) for fabric inserted,fix the bar end with a plastic cover(I-2). Then
tighten the screw on the bolt.
09
8. Slide arm-bar link(K) into the groove of the front bar on the left side.
Put the bolt(J) for fabric inserted,fix the bar end with a plastic cover(I-1).
Then tighten the screw on the bolt.
KI-1
KI-1
I-2
K
J

Proper location of the brackets is the most important aspect of the awning
installation. It is critical that you fasten all the mounting brackets to studs,
joists, headers or other major structural components.
CAUTION
Failure to securely fasten all the brackets to the wall could result in the collapse
of the awning and cause personal injury or death.
WARNING
Specification
Wall Mounting
Notes about Wall Mounting
This awning can be secured to reinforced concrete, brick.
Expansion bolt is for reinforced concrete, brick.
We recommend a professional installer for the safest and most secure
installation.
Never attempt to secure the wall brackets to loose wall stones or any surfaces
that are not absolutely firm!
Product name
Retractable
awning
(Please see
details on the
package)
Material and
surface treatment
Materials: Steel
tube, aluminum
alloy, plastic parts,
polyester fabric.
Service treatment:
Tubes: spray paint
and oxidation
Cloth surface: PU,
UV, waterproof
Applicable wall
type
Reinforced
concrete walls,
brick walls
Recommended
installation height
2.5m-3m
Applicable
weather
The products
are used to
shield sunshine.
Applicable when
wind is under
level 5. Not
suitable for
rainy weather.
10

STEP 4 Assembly awning on the wall
Mark the position
1. Insert part O into A2 A2
4. After measuring the distance,seprarte A1 and A2.
3. Measure the distance of product installation.
2. Connect A1 and A2 on the left and right side of the roller bar.
11
3.937inch
/10cm
114.37inch/290.5cm

5. Mark the position on the wall
Wall bracket leveled against horizontal line
X
XX
Wall bracket
Level(horizontal line)
Ground
2.5-3m
X
X
Wall bracket
XX
X
Wall bracket Wall bracket
Level(horizontal line)
Ground
Wall bracket leveled against horizontal line
X
X
X
X
Ground
2. m
X
X
X
X
6. Drilling the bolt holes.
12

WARNING
Failure to securely fasten all the brackets to the wall could result in the collapse
of the awning and cause personal injury or death.
Preparing for Mounting
1. Now that all of your holes are drilled, then insert the expansion bolts.
2. It may be necessary to drive the bolts in with a wooden (or other non-metallic)
mallet.
If a mallet is necessary for installation, we recommend placing the nut on
the screw (loosely) before hammering to avoid damaging the bolt threads.
2. Using a 14mm masonry drill bit, drill the first bolt hole approximately 8 cm
deep, as shown in the diagram. This must be drilled through solid brick or
concrete to offer the necessary support for the awning.
All bolt holes must be aligned vertically and horizontally to ensure that the
awning hangs straight.
Double check alignment before drilling if you are not certain.
The diameter and depth of your mounting holes must be the same size as the
expansion bolts.
3. Drill the remaining holes exactly as in step 2.
Drilling the Bolt Holes
1. Now that you have a straight level line
across the wall with the locations of the
wall brackets and their bolt holes marked,
you can drill holes to mount the brackets.
Drill 8 cm deep
13

9. After installation on the left
side, then insert right side of the
roller bar into A2 hole, and then
tighten the bolts on A2 by wrench.
8. Then insert the left side of the roller bar into A1 hole.
3. Make sure that the bolts are firm in place, yet let them stick out of the wall
approximately 2.5 cm or less-enough that the wall bracket can be installed
onto them. Firmly tighten the bolts with a 19 mm hex key. It is best to use the
hex key with a closed end rather than an open end to avoid damaging the nut,
should it slip.
14
Bolt
M10X80MM
7.Please assemble the A1 on the wall by first, tighten the bolts by wrench.
And assemble the A2 on the wall but do not tighten the bolts very much
until step 9.

WARNING
1. Assemble arm C1 on the wall bracket A1's arm holes.
2. Tighten the arm screws.
3. Assemble arm C2 on the wall bracket A2's arm holes.
4. Tighten the arm screws.
STEP 5 Assemble Arms
Don't cut off the rope on the arm.
15

5.Screw two plastic washers (M) into the arm-bar links (K).
16
KM
6.Installation notes:Push C1 arms slightly in the direction of the fold
and hold it. Move K to suitable position,make sure the K and the hole on
the arm in the same vertical line.Then insert the arm-bar links to the holes
on the end of both arms.
K
16

(Installation notes: Do not fully tighten the screw nuts, leaving
about 0.4cm space in between.)
7.Tighten the two screws and nuts with a wrench.
K
8.Installation notes:Push C2 arms slightly in the direction of the fold and
hold it. Move K to suitable position,make sure the K and the hole on the arm in
the vertical line.Then insert the arm-bar links to the holes on the end of both
arms.Then repeat step 7
17

D
C1 C2
When we have completed all the above steps, the product
installation is complete.
Please note: C1 and C2 arms are basically on the same parallel plane in
their natural state
18

D
10.Open the awning with hand crank E.
If you find that the cloth surface has fallen down. Please retract the
cloth surface 3-5cm to ensure that the cloth surface is in a tight state.
19
9.Please cut the straps on arms carefully while making sure that the cloth is
completely tightened.

Attention!
1. Keep this product away from heat and flame.
2. Do not use this product in the rain or in strong winds.
3. Do not leave leaves or water too long on the roof.
4. Do not hang any clothes on any part of awning.
5. You should often check if the fixed barcket has become loose in the
wind. If it is loose, please contact a professional to fix.
6. Make sure that the place where you install the awning is strong enough
to support the weight of the product.
7. Close your awning during the winter,in case the snow increases its
loads.
When we fully unfold the awning, we may find that the left and right sides
of the awning are unbalanced. At this time, we need to adjust the
inclination of the awning so that the left and right sides of the awning can
be on the same horizontal line.
Tips: You can adjust only the left side or only the right side, you can
also adjust both left side and right side. The inclination of the awning is
up to you, but please remember the left side and right side should be
on the same horizontal line finally.
20
Table of contents
Other Costway Accessories manuals
Popular Accessories manuals by other brands

Cisco MERAKI
Cisco MERAKI MT11 Hardware installation guide

Texas Instruments
Texas Instruments SLVP089 user guide

ORION TELESCOPES & BINOCULARS
ORION TELESCOPES & BINOCULARS 8961 instruction manual

Olympus
Olympus AS4000 - AS Transcription Kit instructions

Research
Research C104 instruction manual

Promate
Promate Beam user guide