Costway Saucer Tree Swing User manual

THIS INSTRUCTION BOOKLET CONTAINS IMPORTANT SAFETY INFORMATION. PLEASE READ AND KEEP FOR FUTURE REFERENCE.
EN DEFR ES IT PL
USER'S MANUAL/HANDBUCH
/MANUEL DE L'UTILISATEUR/MANUAL DEL USUARIO
/MANUALE UTENTE/INSTRUKCJA OBSŁUGI
Saucer Tree Swing / Kinderschaukel / Balançoire Nid d’Oiseau
/ Columpio / Altalena per Bambini /Huśtawka dla dzieci
EN
DE
FR
ES
IT
PL
With your inspiring rating, COSTWAY will be more consistent to offer you EASY
SHOPPING EXPERIENCE, GOOD PRODUCTS and EFFICIENT SERVICE!
Mit Ihrer inspirierenden Bewertung wird COSTWAY konsistenter sein, um Ihnen EIN
SCHÖNES EINKAUFSERLEBNIS, GUTE PRODUKTE und EFFIZIENTEN SERVICE zu
bieten!
Avec votre évaluation inspirante, COSTWAY continuera à fournir une EXPÉRIENCE
D’ACHAT PRATIQUE, des PRODUITS DE QUALITÉ et un SERVICE EFFICACE !
Con su calificación inspiradora, COSTWAY será más consistente para ofrecerle
EXPERIENCIA DE COMPRA FÁCIL, BUENOS PRODUCTOS y SERVICIO EFICIENTE.
Con la tua valutazione incoraggiante, COSTWAY sarà più coerente per offrirti ESPE-
RIENZA DI ACQUISTO FACILE, BUONI PRODOTTI e SERVIZIO EFFICIENTE!
Dzięki twojej opinii COSTWAY będzie mógł oferować jeszcze WYGODNIEJSZE
ZAKUPY, LEPSZE PRODUKTY i SPRAWNIEJSZĄ OBSŁUGĘ KLIENTA.
US office: Fontana UK office: Ipswich AU office: Truganina
DE office: FDS GmbH, Neuer Höltigbaum 36, 22143 Hamburg, Deutschland
FR office: Saint Vigor d'Ymonville
PL office: Gdańsk

02 03
IMPORTANT
READ AND FOLLOW ALL SAFETY INFORMATION AND INSTRUCTIONS, KEEP FOR
FUTURE REFERENCE
ESSENTIAL INFORMATION
-Recommended for children 3+ years
-Do not leave child unattended while in use
-CAUTION: Use only under adult supervision
-Good safety practices should be followed at all times
-Read all instructions before using this product.
Intended solely for family and domestic use, not for a commercial playground or
daycare. Two adults needed for the assembly.
Hanging hardware not included. Ideally, the swing body should be hung over grass,
sand, wood chips, or other soft surfaces. Under no circumstances should it be hung
over concrete, asphalt, or other hard surfaces. Distance from ground should not
exceed 40cm; the maximum fall height should not be more than 46cm. Two S
hooks are attached to the rope to allow for adjustment of the rope length.
Please be sure to examine the ropes regularly to check for wear. Rope will, in time,
degrade. If the color of the rope has become pale, frays easily, or gives off a
powdery material when rubbed between the fingers, we recommend you replace
the rope.
Equipment should be hung in such a way that a distance of at least 2m is clear on
either side. It can be hung on an A-frame or swing set or on a tree limb of a
diameter of at least 25cm.
WARNING! CHOKING HAZARD-SMALL PARTS, NOT FOR
CHILDREN UNDER 3 YEARS.
WARNING! DO NOT USE WITHOUT ADULT SUPERVISION!
WARNING! ADULT ASSEMBLING REQUIRED!
WARNING! NOT SUITABLE FOR CHILDREN UNDER 36
MONTHS OLD DUE TO LONG
CORDS. STRANGULATION HAZARD. DANGER OF FALLING.
WARNING!
Small parts are
included, so the
assembly must be
done by adults. Tools Required (included in the
packaging)
Assembling Steps
1
Swing arrives in 4 pieces, 2
hanging ropes, 1 jump body, and 8
flags for the assembly.
Put the jump body on the floor,
and put the 4 Velcros to the black
mat direction.
2

Then connect the body as a round
platform.
Before assembling the screw bolt,
firstly put it through the Velcro
belt.
Screw bolt goes through the Velcro
belt cover.
Assemble the screw bolt to the
frame tube.
78
9 10
Tighten it with screw nut, do not
forget the washer.
11
Use wrench to tighten it before
use.
12
After the bolt assembling, cover
the Velcro belt, and repeat 3 times
on other 3 bolts.
13 14
The appearance from the top is
shown in the figure.
04 05
34
5 6
Put the 4 metal tubes with foam
into the sleeves one by one.
Put the tube like this.
Repeat it, and make it like half
folded as shown.
Put the 2 tube into the sleeve,
small socket to the big socket and
connect it.
nd

15
Fix the flags onto the hanging rope
with Velcros.
Assembly finished, and adjust the
rope length and ready for swing
now.
16
06 07
Ensure the Safety of the Swing
Clearance distance should be 4m around the swing.
A fall onto a hard surface can result in serious injury to the user.
Do not use the equipment until it is properly installed.
This swing is not to be used in any other manner other than its intended
use. Adult supervision is required.
Adults should verify that the hanging ropes are secured and cannot be
looped back on the swing.
It is important for adults to instruct children to:
-Dress appropriately while using the swing (avoid ponchos, scarves, and
other loose-fitting clothing that is potentially hazardous).
-Sit in the center of the swing with full weight on the seat if swinging
alone.
-Avoid swinging the empty seat.
It is important for adults to instruct children NOT to
-Walk close to, in front of, behind, or between moving items
-Twist ropes or loop them over the top support bar since such action may
reduce the strength of the rope.
-Get off the sing while it is in motion.
-Climb on the swing when it is wet.
-Attach additional items to the swing that might cause a strangulation
hazard.
-Wear a bicycle or sport helmet while on the swing.
Maintaining the Swing
At the beginning of each play season, adults should:
-Tighten all hardware.
-Check all protective coverings on pipes, edges, and corners. Replace if
they are loose, cracked, or missing.
-Check all moving parts including swing seat and ropes for wear, rust, or
other deterioration, replace as needed. The hardware used for this
swing(binding post, screw, S hook, lock washer, flat washer, and metal
ring) can be found at a local hardware store.

Sicherheits- und Montagehinweise
LESEN UND BEFOLGEN SIE ALLE SICHERHEITSINFORMATIONEN UND
ANWEISUNGEN, BEWAHREN SIE DIESE GUT AUF.
WESENTLICHE INFORMATIONEN
-Empfohlen für Kinder ab 3 Jahren
-Lassen Sie das Kind nicht unbeaufsichtigt.
-ACHTUNG: Verwendung nur unter Aufsicht von Erwachsenen
-Gute Sicherheitshinweise sind jederzeit einzuhalten.
-Lesen Sie alle Anweisungen vor dem Gebrauch dieses Produkts.
Ausschließlich für familiären und häuslichen Gebrauch, nicht für einen
kommerziellen Spielplatz oder eine Kindertagesstätte. Für den Aufbau sind zwei
Erwachsene erforderlich.
Aufhängebeschlage sind nicht enthalten. Idealerweise sollte der Schaukelkörper
über Gras, Sand, Holzspänen oder anderen weichen Oberflächen aufgehängt
werden. Unter keinen Umständen darf es über Beton, Asphalt oder anderen harten
Oberflächen aufgehängt werden. Der Abstand zum Boden sollte 40 cm nicht
überschreiten; die maximale Fallhöhe sollte nicht mehr als 46 cm betragen. Zur
Einstellung der Seillänge sind zwei S-Haken am Seil angebracht.
Bitte überprüfen Sie die Seile regelmäßig auf Verschleiß. Seile nutzen sich mit der
Zeit ab. Wenn die Farbe des Seils blass geworden ist, es leicht ausfranst oder ein
pudriges Material abgibt, wenn es zwischen den Fingern gerieben wird, empfehlen
wir Ihnen, das Seil zu ersetzen.
Die Aufhängung des Geräts sollte so erfolgen, dass auf beiden Seiten ein Abstand
von mindestens 2 m besteht. Kann an einem A-Rahmen-Schaukel-Set oder an
einem Baumstamm mit einem Durchmesser von mindestens 25 cm aufgehängt
werden.
WARNUNG! ERSTICKUNGSGEFAHR – KLEINE TEILE, NICHT
FÜR KINDER UNTER 3 JAHREN.
WARNUNG! NICHT OHNE AUFSICHT VON EINES
ERWACHSENEN VERWENDEN!
WARNUNG! MONTAGE DURCH ERWACHSENE ERFORDERLICH!
WARNUNG! WEGEN DER LANGEN SCHNÜRE NICHT FÜR
KINDER UNTER 36 MONATEN GEEIGNET.
STRANGULIERUNGSGEFAHR. GEFAHR DES
HERUNTERFALLENS.
WARNUNG!
Kleinteile zur
Montage durch
einen
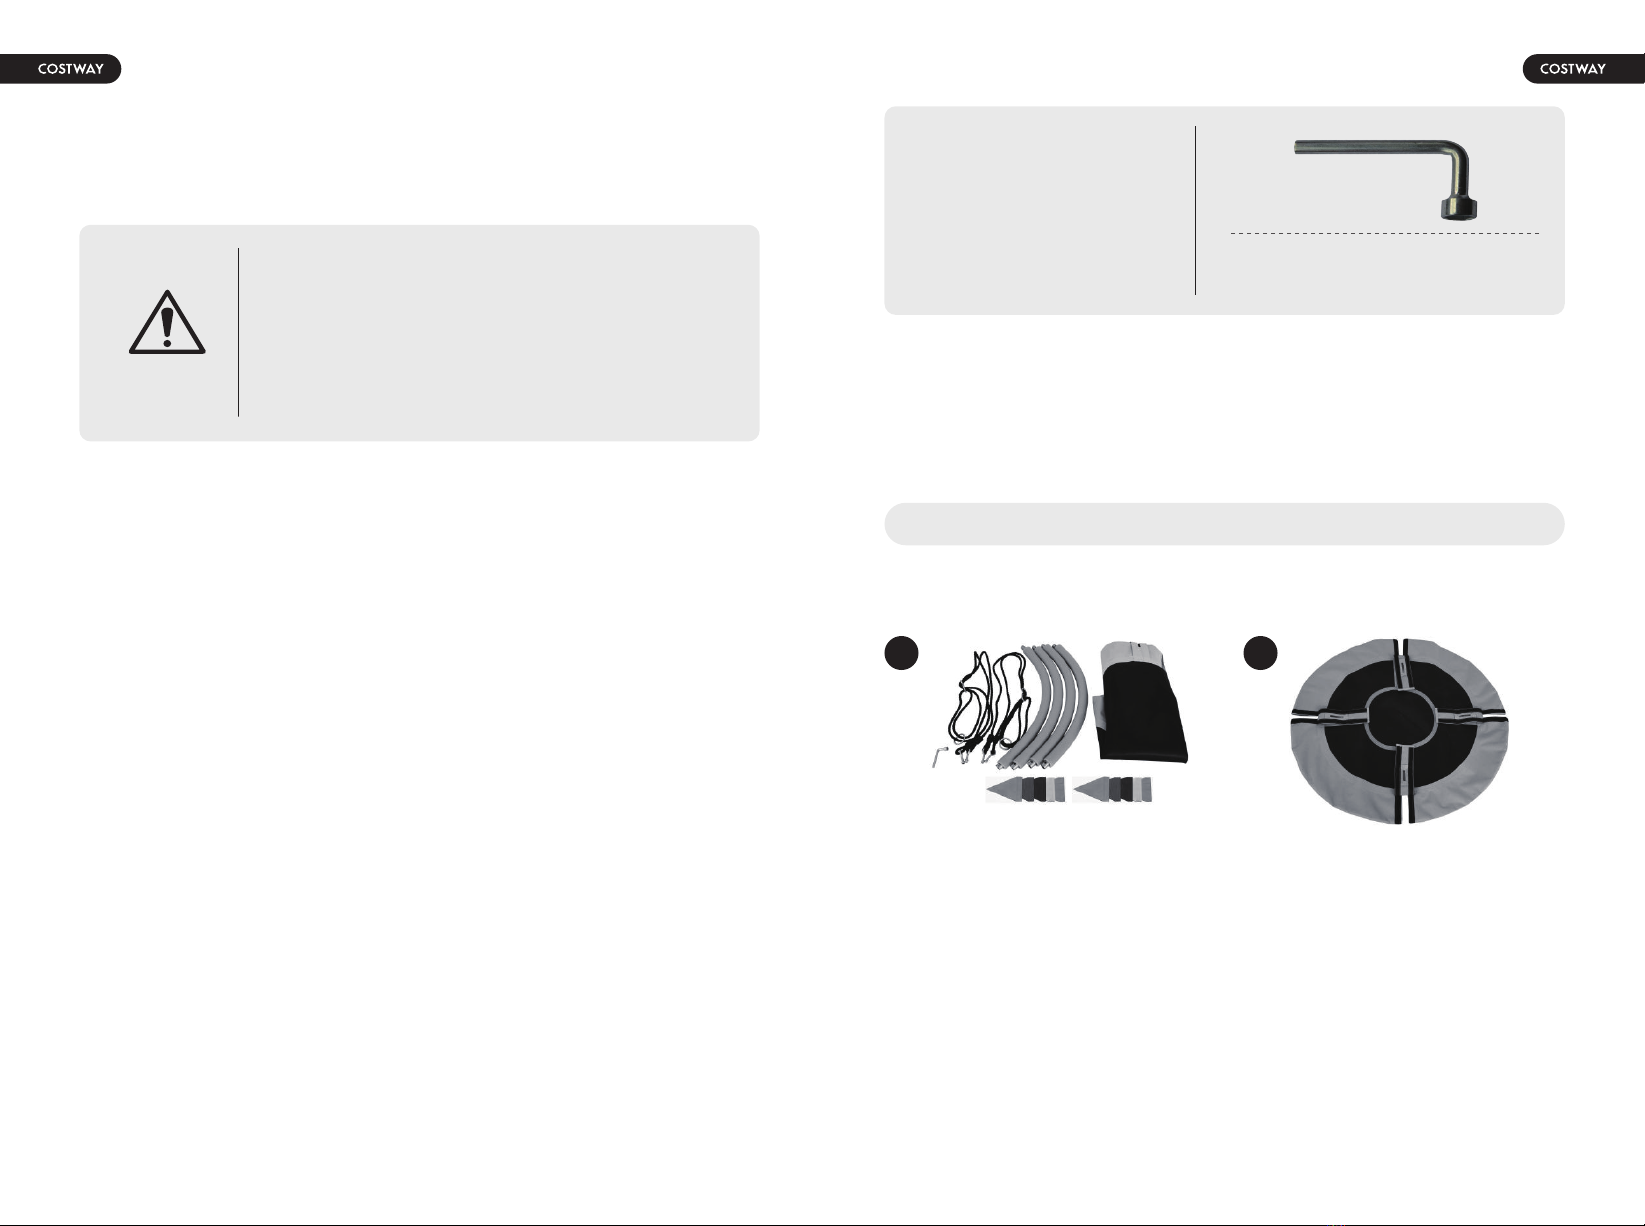
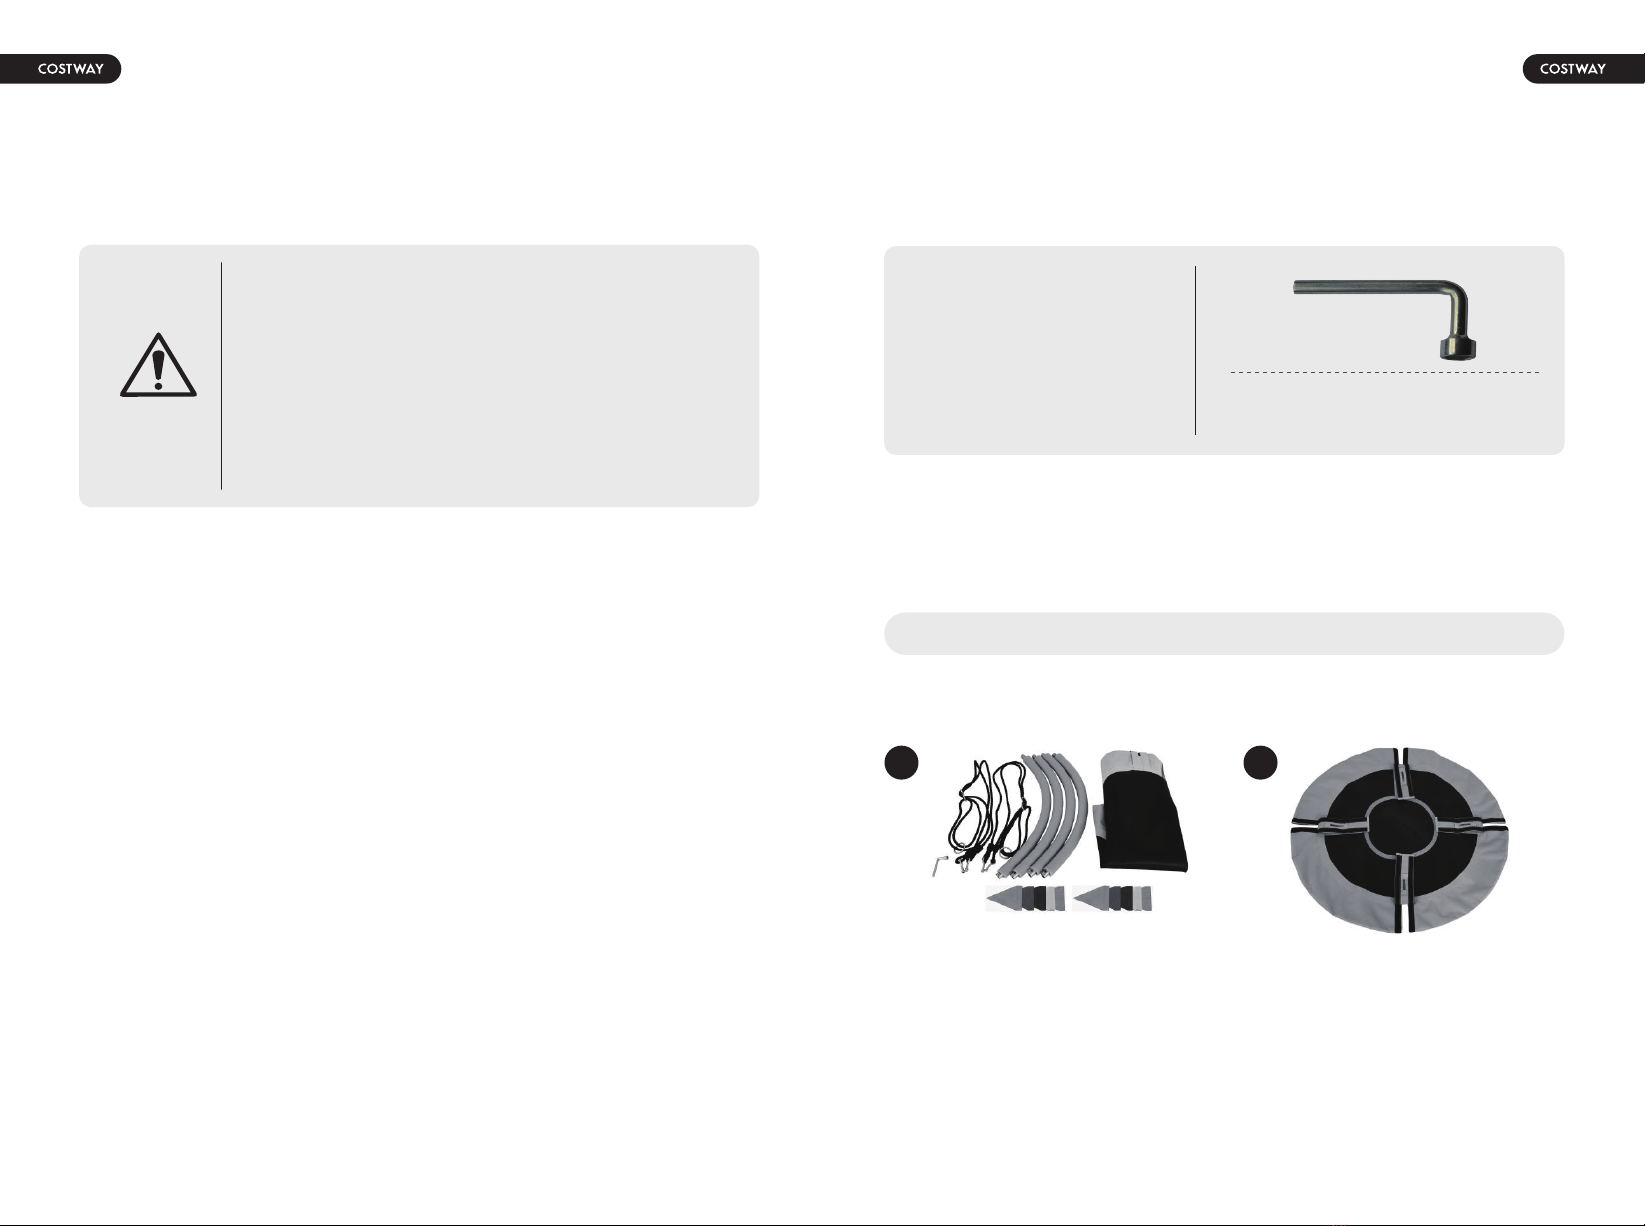
Erwachsenen. Erforderliche Werkzeuge (in der
Verpackung enthalten)
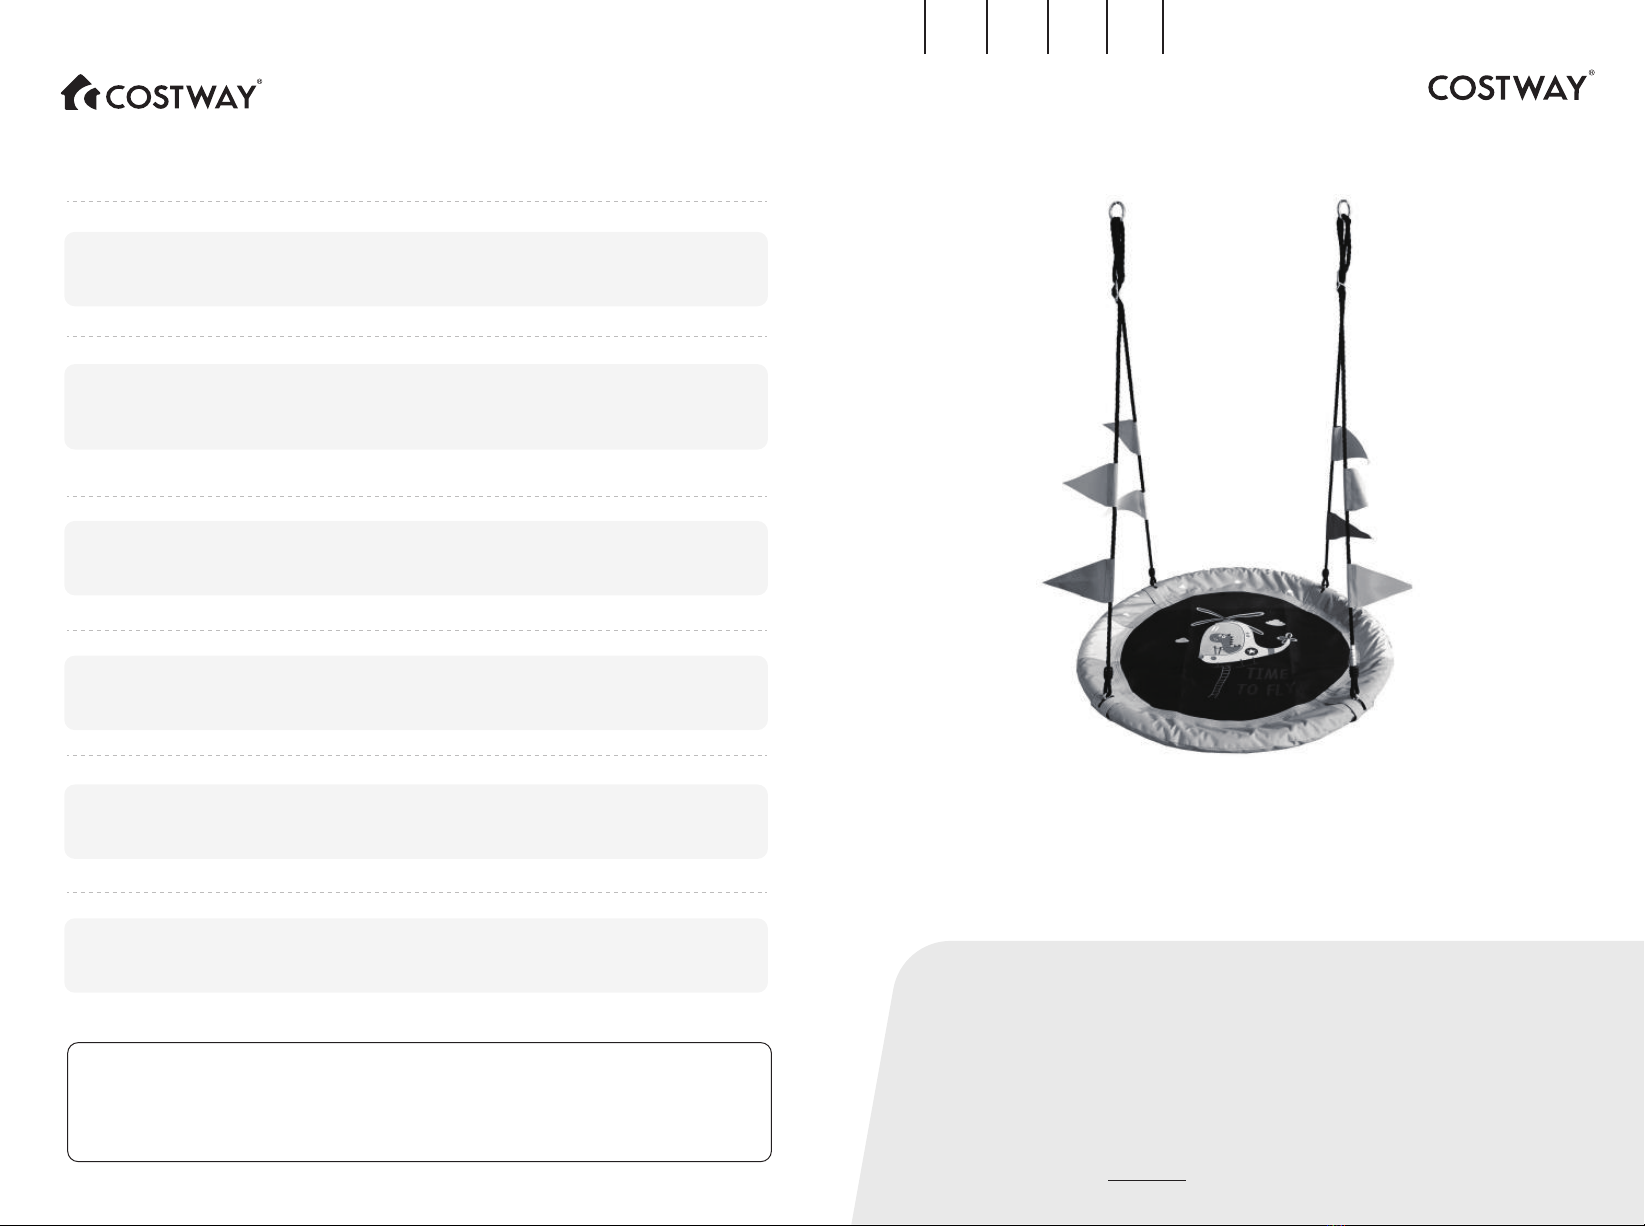
Montage
08 09
1
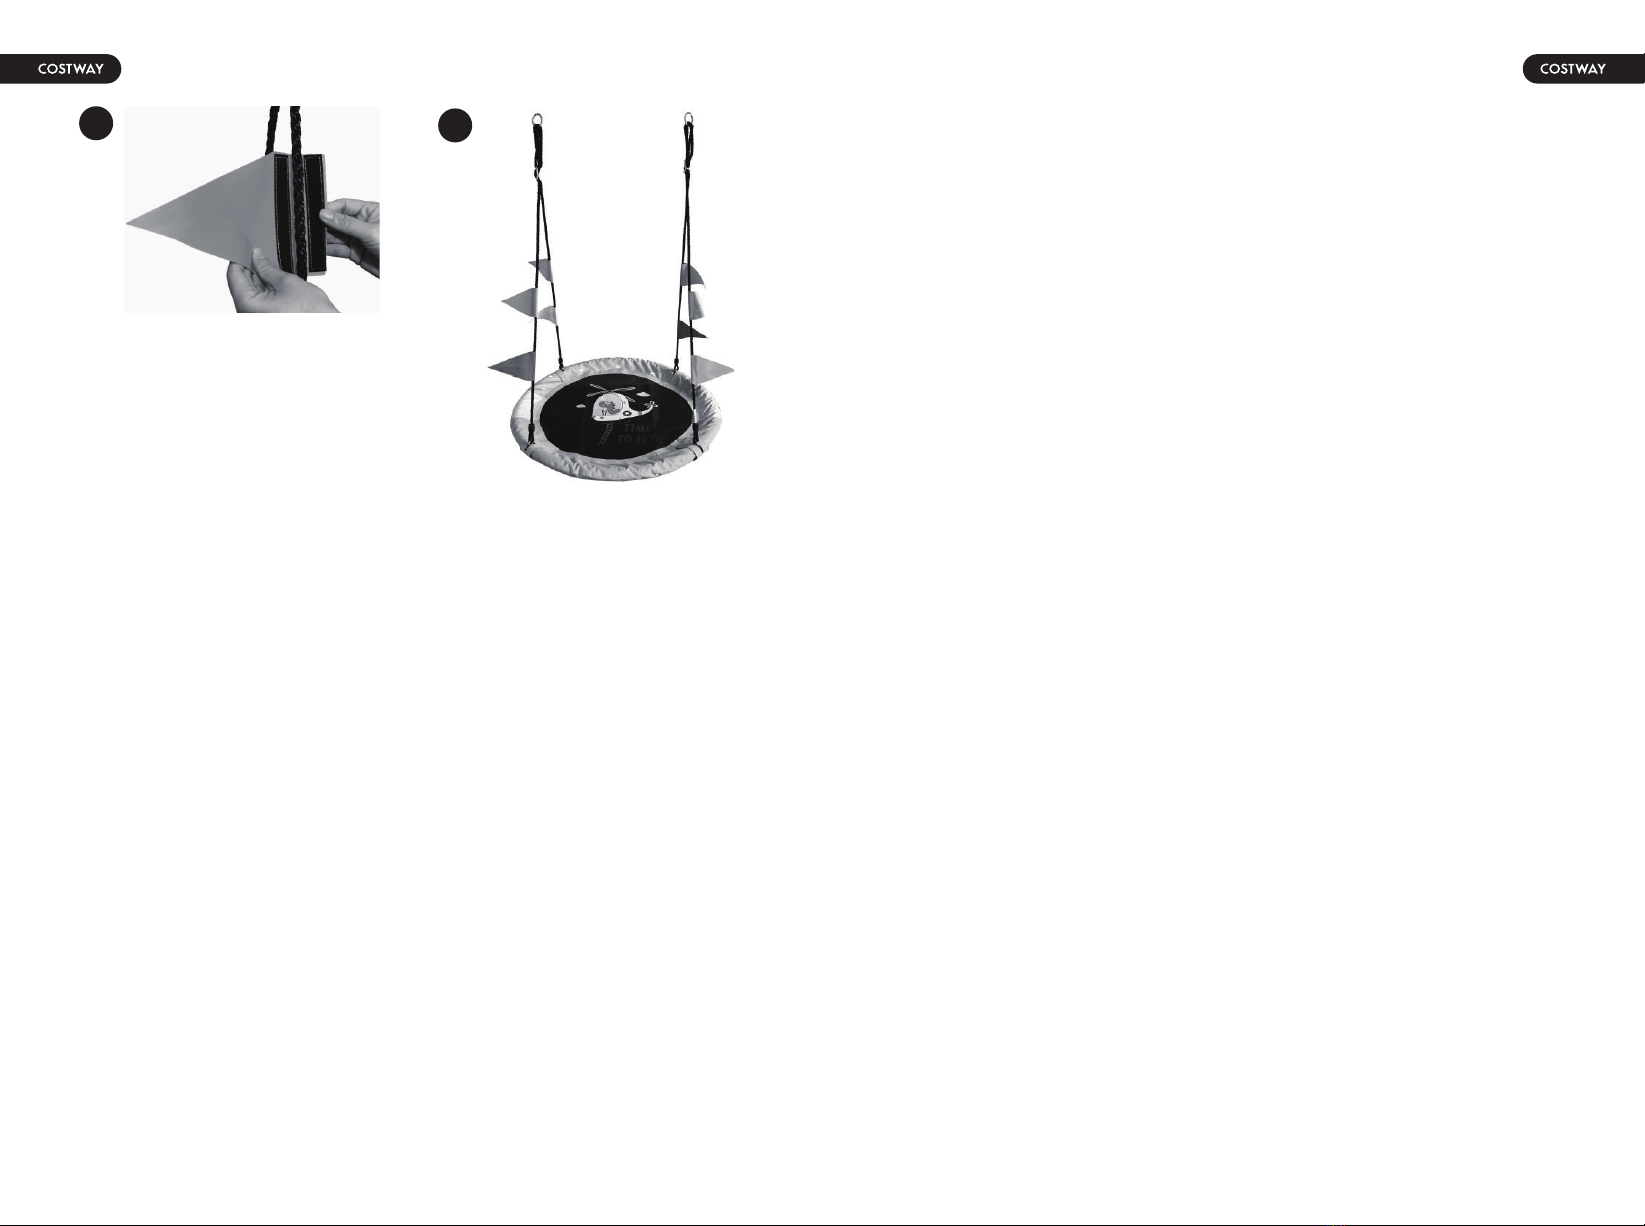
Swing kommt in 4 Teilen, 2
hängenden Seilen, 1 Sprung
Körper, und 8 Flaggen für die
Montage.
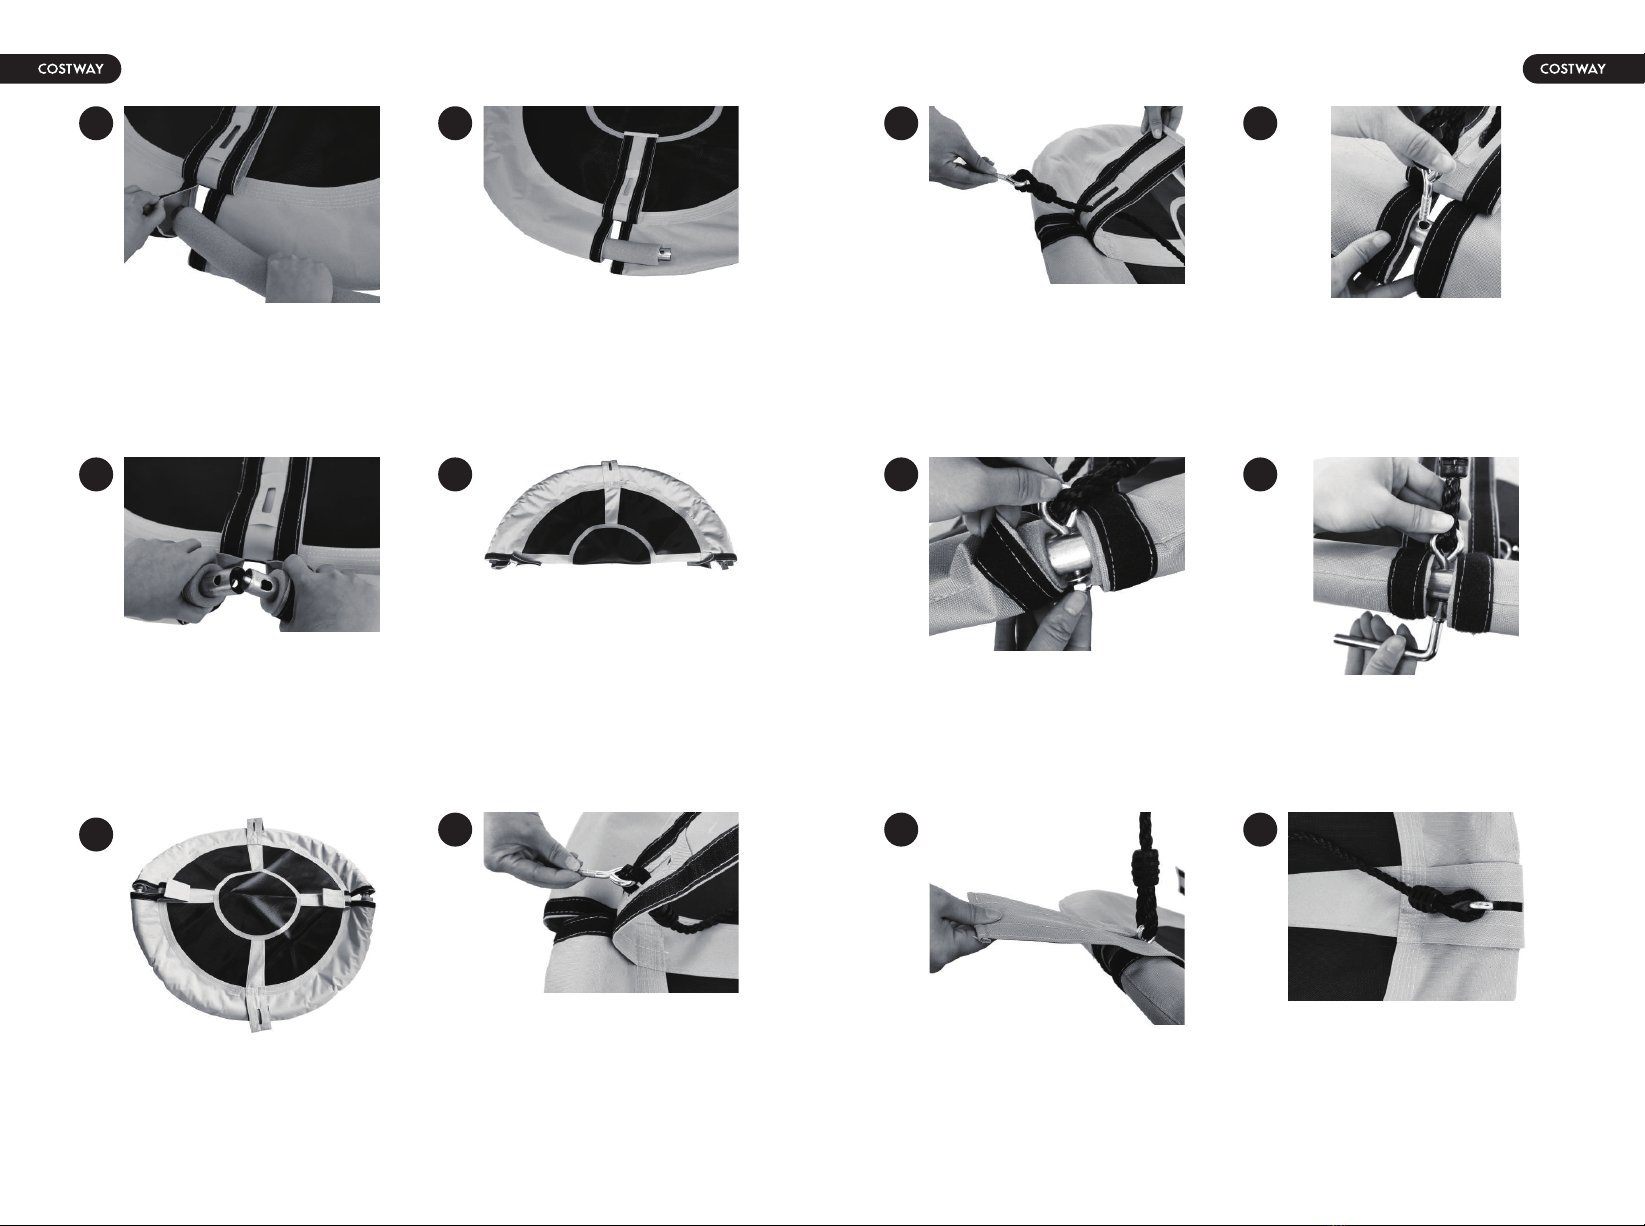
Legen Sie den Sprungkörper auf
den Boden und befestigen Sie die
4 Klettverschlüsse in Richtung der
schwarzen Matte.
2

10 11
Then connect the body as a Dann
verbinden Sie den Körper als runde
Plattform.round platform.
Bevor Sie den Schraubbolzen
montieren, stecken Sie ihn zuerst
durch den Klettverschlussgürtel.
78
34
5 6
Stecken Sie die 4 Metallrohre mit
Schaumstoff nacheinander in die
Hülsen.
Lege die Rohre so ein.
Wiederholen Sie den Vorgang und
falten Sie ihn wie abgebildet halb
zusammen.
Stecken Sie das 2. Rohr in die
Muffe, die kleine Buchse in die
große Buchse und verbinden Sie es.
Der Schraubbolzen wird durch die
Klettbandabdeckung gesteckt.
Montieren Sie den
Schraubenbolzen am Rahmenrohr.
9 10
Ziehen Sie sie mit der Mutter fest,
vergessen Sie die Unterlegscheibe
nicht.
11
Ziehen Sie sie vor dem Gebrauch
mit einem Schraubenschlüssel fest.
12
Nach dem Zusammenbau der
Schraube, decken Sie den
Klettverschluss ab und wiederholen
Sie den Vorgang 3-mal an den
anderen 3 Schrauben.
13 14
Das Aussehen von oben ist in der
Abbildung dargestellt.

12 13
15
Befestigen Sie die Fahnen mit dem
Klettverschluss am Aufhänge Seil.
Die Montage ist abgeschlossen, die
Seillänge eingestellt und die Fahne
kann nun geschwungen werden.
16
Gewährleistung der Sicherheit der Schaukel
Der Sicherheitsabstand um die Schaukel sollte 4 m betragen.
Ein Sturz auf eine harte Oberfläche kann zu schweren Verletzungen des
Gerätebenutzers führen.
Benutzen Sie das Gerät nicht, bis es ordnungsgemäß installiert ist.
Diese Schaukel darf nicht für andere als die vorgesehenen Zwecke
verwendet werden. Die Aufsicht von Erwachsenen ist erforderlich.
Erwachsene sollten sich vergewissern, dass die hängenden Seile gesichert
sind und nicht auf der Schaukel zurückgeschlungen werden können.
-Es ist wichtig, dass die Erwachsenen die Kinder anleiten:
-Ziehen Sie sich während der Benutzung der Schaukel passenden an
(vermeiden Sie Ponchos, Schals und andere locker sitzende Kleidung, die
potenziell gefährlich ist).
-Sitzen Sie in der Mitte der Schaukel und das ganze Gewicht auf den Sitz
zu legen, wenn sie alleine schaukeln
-Vermeiden Sie das Schwingen leerer Sitze
Es ist wichtig, dass die Erwachsenen die Kinder anleiten
- NICHT in der Nähe von, vor, hinter oder zwischen sich bewegenden
Gegenständen zu gehen
- NICHT die Seile zu verdrehen oder sie über die obere Stützstange zu
schlingen, da dies die Stärke des Seils verringern kann
- NICHT von der Schaukel abzusteigen, während sie in Bewegung ist
- NICHT auf die Schaukel zu klettern, wenn sie nass ist
- KEINE zusätzlichen Gegenstände an der Schaukel zu befestigen, die eine
Strangulierungsgefahr darstellen könnten
- KEINEN Fahrrad- oder Sporthelm auf der Schaukel zu tragen

IMPORTANT
LISEZ ET SUIVEZ TOUTES LES INFORMATIONS ET INSTRUCTIONS RELATIVES À LA
SÉCURITÉ, CONSERVEZ-LES POUR TOUTE RÉFÉRENCE ULTÉRIEURE.
INFORMATIONS ESSENTIELLES
- Recommandé pour les enfants de 3 ans et plus
- Ne laissez pas l’enfant sans surveillance pendant l’utilisation.
- ATTENTION : à utiliser uniquement sous la surveillance d’un adulte
- Les consignes de sécurité doivent être respectées à tout moment
- Lisez toutes les instructions avant d'utiliser ce produit.
Destiné uniquement à un usage familial et domestique, et non à une aire de jeux
commerciale ou une garderie. Deux adultes sont nécessaires pour l'assemblage.
Le matériel d’accrochage n'est pas inclus. Idéalement, le corps de la balançoire doit
être suspendu au-dessus de l’herbe, du sable, des copeaux de bois ou d'autres
surfaces molles. En aucun cas, elle ne doit être suspendue sur du béton, de
l'asphalte ou d'autres surfaces dures. La distance par rapport au sol ne doit pas
dépasser 40 cm ; la hauteur de chute maximale ne doit pas être supérieure à 46
cm. Deux crochets en S sont fixés à la corde pour permettre de régler la longueur
de la corde.
Veillez à examiner régulièrement les cordes pour vérifier leur usure. Les cordes se
dégradent avec le temps. Si la couleur de la corde est devenue pâle, si elle
s’effiloche facilement ou si elle dégage une matière poudreuse lorsqu’on la frotte
entre les doigts, nous vous recommandons de la remplacer.
L'équipement doit être suspendu de manière à laisser une distance d'au moins 2 m
de chaque côté. Il peut être accroché à un cadre en A ou à une balançoire ou à une
branche d'arbre d'un diamètre d'au moins 25 cm.
AVERTISSEMENT ! RISQUE D'ÉTOUFFEMENT - PETITES
PIÈCES, NE CONVIENT PAS AUX ENFANTS DE MOINS DE 3
ANS.
AVERTISSEMENT ! NE PAS UTILISER SANS LA SURVEILLANCE
D'UN ADULTE !
AVERTISSEMENT ! ASSEMBLAGE PAR UN ADULTE REQUIS !
AVERTISSEMENT ! NE CONVIENT PAS AUX ENFANTS DE
MOINS DE 36 MOIS EN RAISON DES LONGS CORDONS.
RISQUE DE STRANGULATION. DANGER DE CHUTE.
14 15
ATTENTION !
De petites pièces sont
incluses, le montage
doit donc être effectué
par des adultes. Outils nécessaires (inclus dans
l'emballage)
Étapes de l’assemblage
1
La balançoire est livrée en 4
pièces, 2 cordes de suspension, 1
tapis, et 8 drapeaux pour le
montage.
Posez le tapis sur le sol, et mettez
les 4 Velcros dans la direction du
tapis noir.
2

16 17
Raccordez ensuite le corps comme
une plate-forme ronde.
Avant d’assembler le boulon,
passez-le d’abord dans la bande
velcro.
Passez le boulon à travers le
couvercle de la bande Velcro.
Assemblez le boulon sur le tube du
cadre.
78
9 10
Serrez-le avec l’écrou et la
rondelle.
11
Utilisez une clé pour le serrer
avant de l’utiliser.
12
Après l'assemblage du boulon,
recouvrez avec la bande Velcro, et
répétez l’opération 3 fois pour les
3 autres boulons.
13 14
L’aspect du haut est montré dans
la figure.
34
5 6
Placez les 4 tubes métalliques avec
la mousse dans les manchons, un
par un.
Mettez le tube comme ceci.
Répétez l’étape précédente, et
faites-le comme un demi-plié
comme indiqué.
Mettez le 2ème tube dans le
manchon, la petite douille dans la
grande douille et connectez-la.

18 19
15
Fixez les drapeaux sur la corde de
suspension avec des Velcros.
L’assemblage est terminé, ajustez
la longueur de la corde.
16
Assurer la sécurité de la balançoire
La distance de dégagement doit être de 4 m autour de la balançoire.
Une chute sur une surface dure peut entraîner des blessures graves pour
l'utilisateur.
N'utilisez pas le produit avant qu’il ne soit correctement installé.
Cette balançoire ne doit pas être utilisée à d'autres fins que celles pour
lesquelles elle a été conçue. La surveillance d'un adulte est requise.
Les adultes doivent vérifier que les cordes de suspension sont fixées et
qu'elles ne peuvent pas être enroulées sur la balançoire.
Il est important que les adultes apprennent aux enfants à:
- S'habiller de manière appropriée lorsqu'ils utilisent la balançoire (éviter
les ponchos, les écharpes et autres vêtements amples qui sont
potentiellement dangereux).
- S'asseoir au centre de la balançoire avec tout son poids sur le siège s'il
se balance seul.
- Éviter de se balancer avec le siège vide.
Il est important pour les adultes d'apprendre aux enfants à NE PAS
- Marcher à proximité, devant, derrière ou entre des objets en
mouvement.
- Tordre les cordes ou les faire passer par la barre de soutien supérieure,
car cela peut réduire la résistance de la corde.
- Descendre de la balançoire lorsqu'elle est en mouvement.
- Monter sur la balançoire lorsqu'elle est mouillée.
- Attacher à la balançoire des objets supplémentaires qui pourraient
présenter un risque de strangulation.
- Porter un casque de vélo ou de sport lorsque vous êtes sur la balançoire.
Entretien de la balançoire
Au début de chaque saison de jeu, les adultes doivent :
- Serrer toutes les ferrures.
- Vérifier tous les revêtements de protection des tuyaux, des bords et des
coins. Remplacer s'ils sont lâches, fissurés ou manquants.
- Vérifier l'usure, la rouille ou toute autre détérioration de toutes les
pièces mobiles, y compris le siège de la balançoire et les cordes, et
remplacer si nécessaire. Le matériel utilisé pour cette balançoire (poteau
de fixation, vis, crochet en S, rondelle de blocage, rondelle plate et
anneau métallique) peut être trouvé dans une quincaillerie locale.

20 21
¡ADVERTENCIA!
Se incluyen piezas
pequeñas, por lo que el
montaje debe ser
realizado por adultos. Herramientas Requeridas (incluidas
en el paquete)
Instrucciones de Seguridad y Montaje
IMPORTANTE
LEA Y SIGA TODA LA INFORMACIÓN E INSTRUCCIONES DE SEGURIDAD,
CONSERVE PARA FUTURAS CONSULTAS.
INFORMACIÓN ESENCIAL
- Recomendado para los niños mayores de 3 años
- No deje al niño desatendido mientras está en uso
- PRECAUCIÓN: Úselo solo bajo la supervisión de un adulto
- Se deben seguir las buenas prácticas de seguridad en todo momento
- Lea todas las instrucciones antes de usar este producto.
Destinado únicamente para uso familiar y doméstico, no para un parque infantil
comercial ni para una guardería. Se necesitan dos adultos para el montaje.
No se incluyen los accesorios para colgar. Idealmente, el cuerpo del columpio debe
suspenderse sobre césped, arena, astillas de madera u otras superficies blandas.
Bajo ninguna circunstancia debe colgarse sobre hormigón, asfalto u otras
superficies duras. La distancia desde el suelo no debe exceder los 40 cm; la altura
máxima de caída no debe ser superior a 46 cm. Se adjuntan dos ganchos en forma
de S a la cuerda para permitir el ajuste de la longitud de la cuerda.
Asegúrese de examinar las cuerdas regularmente para verificar si están
desgastadas. La cuerda, con el tiempo, se degradará. Si el color de la cuerda se ha
vuelto pálido, se deshilacha fácilmente o se desprende un material pulverulento
cuando se frota entre los dedos, le recomendamos que reemplace la cuerda.
¡ADVERTENCIA! PELIGRO DE ASFIXIA - PIEZAS PEQUEÑAS,
NO ES ADECUADO PARA NIÑOS MENORES DE 3 AÑOS.
¡ADVERTENCIA! ¡NO UTILICE SIN LA SUPERVISIÓN DE UN
ADULTO!
¡ADVERTENCIA! ¡SE REQUIERE EL MONTAJE DE ADULTOS!
¡ADVERTENCIA! NO ES ADECUADO PARA NIÑOS MENORES DE
36 MESES DEBIDO A LOS CORDONES LARGOS. PELIGRO DE
ESTRANGULAMIENTO. PELIGRO DE CAÍDA.
El equipo debe colgarse de manera que quede libre una distancia de al menos 2 m
en cada lado. Se puede colgar de un marco en A o de un columpio o de una rama
de árbol con un diámetro de al menos 25 cm.
Pasos de Montaje
1
El columpio llega en 4 piezas, 2
cuerdas para colgar, 1 cuerpo de
salto y 8 banderas para el
montaje.
Coloque el cuerpo de salto en el
suelo, y ponga los 4 velcros a la
dirección de la alfombra negra.
2

22 23
A continuación, conecte el cuerpo
como una plataforma redonda.
Antes de montar el perno roscado,
primero póngalo a través del
cinturón de velcro.
El perno roscado pasa a través de
la cubierta del cinturón de velcro.
Ensamble el perno roscado al tubo
del marco.
78
9 10
Apriételo con la tuerca, no olvide la
arandela.
11
Utilice una llave para apretarlo
antes de usarlo.
12
Después de montar el perno, cubra
el cinturón de velcro, y repita 3
veces en otros 3 pernos.
13 14
La apariencia desde arriba se
muestra en la figura.
3 4
5 6
Coloque los 4 tubos de metal con
espuma en las mangas uno por
uno.
Ponga el tubo así.
Repítalo, y hágalo como medio
doblado como se muestra.
Coloque el segundo tubo en la
manga, el enchufe pequeño en el
enchufe grande y conéctelo.

24 25
15
Fije las banderas en la cuerda para
colgar con velcros.
Se completa el montaje, puede
ajustar la longitud de la cuerda, y
ya está listo para columpiarse.
16
Para Garantizar la Seguridad del Columpio
La distancia libre debe ser de 4 m alrededor del columpio.
Una caída sobre una superficie dura puede provocar lesiones graves al
usuario del equipo.
No utilice el equipo hasta que esté correctamente instalado.
Este columpio no debe usarse de ninguna otra manera que no sea su uso
previsto.
Se requiere la supervisión de un adulto.
Los adultos deben verificar que las cuerdas para colgar estén aseguradas
y que no se puedan volver a enrollar en el columpio.
Es importante que los adultos instruyan a los niños:
- Vístase apropiadamente mientras usa el columpio (evite ponchos,
bufandas y otra ropa holgada que sea potencialmente peligrosa).
- Siéntese en el centro del columpio con todo el peso en el asiento si se
columpia solo.
- Evite balancear el asiento vacío.
Es importante que los adultos indiquen a los niños que NO:
- Camine cerca, delante, detrás o entre los objetos en movimiento.
- Retuerza las cuerdas o haga un bucle sobre la barra de soporte superior,
ya que tal acción puede reducir la resistencia de la cuerda.
- Bájese del columpio mientras esté en movimiento.
- Suba al columpio cuando esté mojado.
- Coloque objetos adicionales en el columpio que puedan causar un peligro
de estrangulamiento.
- Use un casco deportivo o de bicicleta cuando está en el columpio.
Mantenimiento del Columpio
Al comienzo de cada temporada de juego, los adultos deben:
- Apretar todos los accesorios.
- Revisar todos los revestimientos protectores en tuberías, bordes y
esquinas. Reemplácelos si están sueltos, agrietados o faltan.
- Revisar todas las partes móviles, incluido el asiento del columpio y las
cuerdas, para ver si hay desgaste, óxido u otros deterioros. Reemplace si
es necesario. Los accesorios utilizados para este columpio (poste de unión,
tornillo, gancho en S, arandela de seguridad, arandela plana y anillo de
metal) se pueden encontrar en la ferretería local.

AVVERTENZA!
Piccole parti sono
incluse, quindi il
montaggio deve essere
eseguito da adulti. Strumenti richiesti (inclusi nella
confezione)
26 27
Istruzioni di Sicurezza e di Montaggio
IMPORTANTE
LEGGERE E SEGUIRE TUTTE LE INFORMAZIONI E LE ISTRUZIONI SULLA
SICUREZZA, CONSERVARE PER FARE RIFERIMENTO
INFORMAZIONI ESSENZIALI
- Consigliato per bambini dai 3 anni in su
- Non lasciare i bambini incustoditi durante l'uso
- Nota: utilizzare solo sotto la supervisione di un adulto
- Seguire sempre le buone pratiche di sicurezza
- Leggere tutte le istruzioni prima di utilizzare questo prodotto
Solo per uso domestico e familiare, non per campi da gioco commerciali o asili nido.
L'assemblea richiede due adulti.
Non include l'hardware di sospensione
Idealmente, l'altalena dovrebbe essere sospesa da erba, sabbia, trucioli di legno o
altre superfici morbide. In nessun caso deve essere sospeso a calcestruzzo, asfalto
o altre superfici dure. La distanza da terra non deve superare i 40 cm; l'altezza
massima di caduta non deve superare i 46 cm e sulla corda sono installati due ganci
a forma di S per regolare la lunghezza della corda.
Assicurati di controllare regolarmente le corde per usura. La corda si degraderà nel
tempo. Se il colore della corda è più chiaro, si sfilaccia facilmente o emette un
materiale polveroso quando viene strofinato tra le dita, si consiglia di sostituire la
corda.
Il dispositivo deve essere sospeso in modo da mantenere una distanza di almeno 2
m su entrambi i lati. Può essere appeso a un telaio ad A o altalena o su un ramo
con un diametro di almeno 25 cm.
AVVERTENZA! RICAMBI DI PICCOLE PARTI PERICOLOSE, NON
PER BAMBINI SOTTO I 3 ANNI.
AVVERTENZA! NON USARE SENZA LA SUPERVISIONE
D’ADULTO!
AVVERTENZA! RICHIEDERE IL MONTAGGIO D’ADULTO!
Montaggio
1
Il prodotto ha 4 pezzi, 2 corde
sospese, 1 il tappetino e 8
bandiere per il montaggio.
Mettere il tappetino sul pavimento,
e mettere i 4 velcri alla direzione
del tessuto nero.
2

28 29
Poi collegare il corpo come una
piattaforma rotonda.
Prima di assemblare il bullone,
farlo passare attraverso il cinturino
in velcro.
Passare il bullone attraverso la
copertura del cinturino in velcro.
Assemblare il bullone al tubo del
telaio.
78
910
Stringerlo con il dado, non
dimenticare la rondella.
11
Utilizzare la chiave per serrarlo
prima dell'uso.
12
Dopo il montaggio del bullone,
coprire il cinturino di velcro, e
ripetere 3 volte su altri 3 bulloni.
13 14
L'aspetto dall'alto è mostrato nella
figura.
34
5 6
Mettere i 4 tubi di metallo con la
schiuma nelle maniche uno per
uno.
Mettete il tubo in questo modo.
Ripetere il passo precedente e
piegare come mostrato.
Inserire il secondo tubo nella
manica, il manicotto piccolo in
quello grande e collegare.

- Sedersi al centro dell'altalena con tutto il peso sul sedile se si oscilla da
solo.
- Evitare di spostare i posti vuoti.
È importante che gli adulti istruiscano i bambini a NON farlo
- Camminare vicino, davanti, dietro o tra gli oggetti in movimento.
- Ruotare le corde o avvolgerle sopra la barra di supporto superiore poiché
tale azione può ridurre la resistenza della fune.
- Scendere dall'altalena mentre è in movimento.
- Salire sull'altalena quando è bagnato.
- Attaccare ulteriori elementi all'altalena che potrebbero causare un
pericolo di strangolamento.
- Indossare una bicicletta o un casco sportivo mentre sei sull'altalena.
Manutenzione dell'altalena
All'inizio di ogni stagione di gioco, gli adulti dovrebbero:
- Stringere tutto l'hardware.
- Stringere tutte le fibbie della tenda.
- Controllare tutte le coperture protettive su tubi, bordi e angoli, sostituire
se sono allentati, incrinati o mancanti.
- Controllare tutte le parti mobili, incluso il sedile girevole, le funi per
usura, ruggine o altri deterioramenti, sostituire se necessario. Gli accessori
utilizzati per questa altalena (vite, gancio a S, rondella di sicurezza,
rondella piatta, anello di metallo) possono essere trovati presso il negozio
di ferramenta locale.
30 31
15
Fissare le bandiere sulla corda
appesa con velcro.
Il montaggio è terminato, regolare
la lunghezza della corda e ora sei
pronto per l'oscillazione.
16
Garantire la sicurezza dell'altalena
La distanza di sicurezza dovrebbe essere di 4 m attorno all'altalena.
Una caduta su una superficie dura può causare gravi lesioni all'utente
dell'apparecchiatura.
Non utilizzare il dispositivo fino a quando non è installato correttamente.
Questa altalena non deve essere utilizzata in altro modo diverso dall'uso
previsto. È richiesta la supervisione di un adulto.
Gli adulti devono verificare che le funi sospese siano fissate e non possano
essere riciclate sull'altalena.
È importante che gli adulti istruiscano i bambini a:
- Vestirsi in modo appropriato durante l'uso dell'altalena (evitare poncho,
sciarpe e altri abiti larghi potenzialmente pericolosi).

32 33
WAŻNA INFORMACJA
PRZECZYTAJ I PRZESTRZEGAJ WSZYSTKICH INFORMACJI I INSTRUKCJI
DOTYCZĄCYCH BEZPIECZEŃSTWA; ZACHOWAJ DO WYKORZYSTANIA W
PRZYSZŁOŚCI.
Sprzęt musi być zawieszony w taki sposób, aby pozostawić odstęp co najmniej 2 m
z każdej strony. Huśtawkę można zawiesić na stelażu lub gałęzi drzewa o średnicy
co najmniej 25 cm.
Istotne informacje
- Polecany dla dzieci od 3 roku życia
NIE POZOSTAWIAĆ DZIECKA BEZ OPIEKI W CZASIE UŻYTKOWANIA.
- UWAGA: do użytku wyłącznie pod nadzorem osoby dorosłej
- Instrukcje bezpieczeństwa muszą być zawsze przestrzegane
- Przeczytaj wszystkie instrukcje przed użyciem tego produktu.
Przeznaczony wyłącznie do użytku rodzinnego i domowego, a nie komercyjnego -
placu zabaw lub przedszkola. Do montażu potrzebne są dwie osoby dorosłe.
Materiał potrzebny do zawieszania nie wchodzi w skład zestawu. Huśtawka powinna
być zawieszona nad trawą, piaskiem, wiórami lub innymi miękkimi powierzchniami.
W żadnym wypadku nie wolno jej zawieszać nad betonem, asfaltem lub inną twardą
powierzchnią. Odległość od ziemi nie może przekraczać 40 cm; maksymalna
wysokość upadku nie może przekraczać 46 cm. Do liny przymocowane są dwa haki
w kształcie litery S, umożliwiające regulację długości liny.
Pamiętaj, aby regularnie sprawdzać liny pod kątem zużycia. Z czasem ulegają one
degradacji. Jeśli liny wyblakły, łatwo się strzępią lub podczas pocierania między
palcami wydziela się sypki materiał, zalecamy ich wymianę.
OSTRZEŻENIE NIEBEZPIECZEŃSTWO ZADŁAWIENIA SIĘ
- MAŁE CZĘŚCI, NIE NADAJĄCE SIĘ DLA DZIECI
PONIŻEJ 3 LAT.
OSTRZEŻENIE NIE UŻYWAJ BEZ NADZORU
DOROSŁYCH!
OSTRZEŻENIE Montażu dokonuje osoba dorosła.
OSTRZEŻENIE NIE NADAJE SIĘ DLA DZIECI PONIŻEJ 36
MIESIĘCY ZE WZGLĘDU NA DŁUGIE PRZEWODY.
RYZYKO UDUSZENIA. ZAGROŻENIE UPADKIEM.
OSTRZEŻENIE!
W komplecie małe części,
więc montaż powinien
być wykonywany przez
osoby dorosłe. Wymagane narzędzia (w zestawie)
Etapy montażu
1
Huśtawka składa się z 4 sztuk
części 2 lin do zawieszania, 1 maty
i 8 akcesoriów montażowych.
Połóż matę na podłodze i umieść 4
rzepy w kierunku czarnego
materiału.
2

34 35
Następnie połącz korpus i utwórz
okrągłą platformę.
Przed zamontowaniem śruby
przełóż ją najpierw przez pasek z
rzepem.
Przełóż śrubę przez osłonę paska
na rzep.
Zamontuj śrubę do rury ramy.
78
9 10
Dokręć nakrętką i podkładką.
11
Użyj klucza, aby go dokręcić przed
użyciem.
12
Po zamontowaniu śruby przykryj
rzepem i powtórz czynność 3 razy
dla pozostałych 3 śrub.
13 14
Górną część pokazano na rysunku.
3 4
56
Włóż kolejno 4 metalowe rurki z
pianką do osłonek.
Włóż rurkę w sposób
przedstawiony na rysunku.
Powtórz poprzedni krok i zegnij,
jak pokazano.
Włóż rurkę w sposób
przedstawiony na rysunku.

36 37
15
Przymocuj flagi (akcesoria
montażowe) do wiszącej liny za
pomocą rzepów.
Montaż zakończony, wyreguluj
długość liny.
16
Zapewnij bezpieczeństwo!
Odstęp wokół huśtawki powinien wynosić 4m.
Upadek na twardą powierzchnię może spowodować poważne obrażenia
użytkownika.
Nie używaj produktu, dopóki nie zostanie prawidłowo zainstalowany.
Ta huśtawka nie może być używana do celów innych niż te, do których
została zaprojektowana. Wymagany jest stały nadzór osoby dorosłej.
Dorośli powinni sprawdzić, czy liny do zawieszania są odpowiednio
zabezpieczone i nie można ich zwinąć na huśtawce.
Ważne jest, aby dorośli przekazali dzieciom następujące zalecenia:
- Ubierz się odpowiednio podczas korzystania z huśtawki (unikaj poncho,
szalików i innej luźnej odzieży, która jest potencjalnie niebezpieczna).
- Usiądź na środku huśtawki z całym ciężarem skupionym na siedzeniu,
gdy huśtasz się sam.
- Unikaj poruszania pustym siedziskiem.
Czego dzieci NIE powinny robić:
- Przechodzenie blisko, przed, za lub między poruszającymi się obiektami.
- Skręcanie lin lub przekładanie ich przez górny wspornik (może to
zmniejszyć wytrzymałość liny).
- Schodzić z huśtawki, gdy jest w ruchu.
- Wsiadać na huśtawkę, gdy jest mokra.
- Przymocowywać do huśtawki dodatkowe przedmioty, które mogą
stwarzać ryzyko uduszenia.
- Nosić na huśtawce kask rowerowy lub sportowy.
Konserwacja i czyszczenie
Na początku każdego sezonu dorośli powinni:
- Dokręcić wszystkie złączki.
- Sprawdzić wszystkie osłony ochronne na rurach, krawędziach i
narożnikach. Wymienić, jeśli są luźne, pęknięte lub ich brakuje.
- Sprawdzić pod kątem zużycia, rdzy lub innego pogorszenia wszystkich
ruchomych części, w tym siedziska huśtawki i lin, i w razie potrzeby
wymienić. Sprzęt używany do tej huśtawki (słupek montażowy, śruba, hak
S, podkładka zabezpieczająca, podkładka płaska i metalowy pierścień)
można znaleźć w lokalnym sklepie z narzędziami.
Table of contents
Languages:
Other Costway Baby Swing manuals

Costway
Costway NP10768 User manual

Costway
Costway PS7335 User manual

Costway
Costway NP11173CL User manual

Costway
Costway Goplus Flying Saucer SP36638 User manual

Costway
Costway NP11270 User manual

Costway
Costway OP70325 User manual

Costway
Costway HW69766 User manual

Costway
Costway OP3101 User manual

Costway
Costway SP37084 User manual

Costway
Costway HW68879 User manual
Popular Baby Swing manuals by other brands

Childcare
Childcare Pendule Trios 037704-389 instruction manual

Fisher-Price
Fisher-Price CHN37 instruction manual

Swing-N-Slide
Swing-N-Slide NE 4630 quick start guide

Outdoor Play
Outdoor Play 1394009 instruction manual

Maico
Maico MV25 Insert for mounting and operating instructions

Fisher-Price
Fisher-Price P0097 instruction sheet