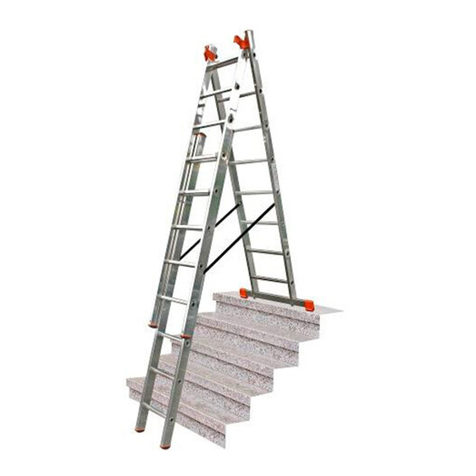
Costway TH10023 User manual

TH10023
Multipurpose Ladder
Échelle Multifonction
THIS INSTRUCTION BOOKLET CONTAINS IMPORTANT SAFETY INFORMATION. PLEASE READ AND KEEP FOR FUTURE REFERENCE.
If you're having difficulty, our friendly
customer team is always here to help.
USA office: Fontana AUS office: Truganina
GBR office: Ipswich FRA office: Saint Vigor d'Ymonville
AUS:cs.au@costway.com
GBR:cs.uk@costway.com
FRA:cs.fr@costway.com

Before You Start
Please read all instructions carefully.
Retain instructions for future reference.
Separate and count all parts and hardware.
Read through each step carefully and follow the proper order.
We recommend that, where possible, all items are assembled near to the area in
which they will be placed in use, to avoid moving the product unnecessarily once
assembled.
Always place the product on a flat, steady and stable surface.
Keep all small parts and packaging materials for this product away from babies
and children as they potentially pose a serious choking hazard.
■To ensure your safety, please read
this instruction manual carefully.
■Keep manual for future reference.
Stabilizers must be fitted before use.
FR
Veuillez lire attentivement toutes les instructions.
Conservez les instructions pour vous y référer ultérieurement.
Vérifiez toutes les pièces et les accessoires.
Lisez attentivement chaque étape et suivez l’ordre correct.
Nous recommandons que, dans la mesure du possible, tous les produits
soient assemblés à proximité de la zone où ils seront utilisés, afin d’éviter tout
déplacement inutile du produit une fois assemblé.
Placez toujours le produit sur une surface plane et stable.
Conservez toutes les petites pièces de ce produit et les matériaux d’emballage
hors de portée des bébés et des enfants, car ils pourraient présenter un risque
d’étouffement.
Avant de Commencer
Safety Instructions
1. Please remove the plastic clasp before use.
2. Place the stabilizer bar into the end of the side rails (see diagram).
3. Secure the stabilizer bar with the nut and bolt.
Assembly Instructions
1. The hinges should be lubricated with a good quality lubricant to
ensure mobility.
2. The hinges should be cleaned after use, especially when the
hinges have been subjected to dust or dirt.
3. Clean the area, or wash with warm water. However should water
be used on the hinges, please remember to re-lubricate after drying.
Care & Maintenance
IMPORTANT:
This ladder should never be used if any part is missing, damaged or
worn.
Following the above instructions will help to maintain your appliance
and ensure its maximum lifespan.
IMPORTANT:
EN131
EN EN
02 03

FOR STORING PURPOSES THE PLATFORM WILL FIT NEATLY
INSIDE THE FOLDED LADDER.
PLATFORM (Not included)
1.To unlock the hinges, simply move the handle to the “O” unlock
position (see diagram) and then fold the ladder section inward.
2.The hinges will automatically lock into position once the ladder is
unfolded.
3.Always check that all hinges are securely locked into position
before using the ladder.
4.Each pair of hinges must be locked simultaneously.
5.It is extremely dangerous to attempt to alter the positioning of the
ladder, hinges or operating joints while the ladder is in use.
6.Always keep the joints clean and free from all foreign materials, it
is advisable to cover the joints during exceptionally messy jobs.
Hinges
L-LOCK O-UNLOCK FIRMLY IN PLACE
To open the ladder section:
Place the locking pin (black) to the “O” position.
The hinge is locked when in the “L” position.
CAUTION
■This ladder may only be used in the positions as shown above.
■Due care and attention should be paid at all times when using the
ladder.
■Always check the stability of the ladder by ensuring that it is placed
on level and solid ground.
■Always check that all hinges are in the correct positions for your
particular use.
■The platform may only be used when the ladder is in one of the
horizontal positions.
■Set at proper (75.5 degree) angle in straight position.
SAFETY INSTRUCTIONS
STRAIGHT
LADDER
STEP
LADDER
SCAFFOLD
OVERHANG
LADDER
STAIRWELL
SCAFFOLD
STORAGE
04 05

EN131
■ Pour assurer votre sécurité, veuillez lire
attentivement ce manuel d'instructions.
■ Conservez le manuel pour référence ultérieure.
Les stabilisateurs doivent être installés
avant utilisation.
Instructions de Sécurité
1. Veuillez retirer le fermoir en plastique avant utilisation.
2. Placez la barre stabilisatrice dans l'extrémité des rails latéraux (voir
schéma).
3. Fixez la barre stabilisatrice avec l'écrou et le boulon.
Instructions de Montage
1. Les charnières doivent être lubrifiées avec un lubrifiant de bonne
qualité pour assurer la mobilité.
2. Les charnières doivent être nettoyées après utilisation, en
particulier lorsqu'elles ont été exposées à la poussière ou à la
saleté.
3. Nettoyez la zone ou lavez à l'eau tiède. Cependant, si de l'eau
doit être utilisée sur les charnières, n'oubliez pas de relubrifier après
séchage.
Entretien & Maintenance
IMPORTANT :
Cette échelle ne doit jamais être utilisée si une pièce est
manquante, endommagée ou usée.
Le respect des instructions ci-dessus vous aidera à entretenir votre
appareil et à garantir sa durée de vie maximale.
Important :
À DES FINS DE STOCKAGE, LA PLATE-FORME S'INSÉRERA
PARFAITEMENT À L'INTÉRIEUR DE L'ÉCHELLE PLIÉE.
PLATE-FORME (Non inclus)
1. Pour déverrouiller les charnières, il suffit de déplacer la poignée
en position de déverrouillage « O » (voir schéma), puis de replier la
section de l'échelle vers l'intérieur.
2. Les charnières se verrouillent automatiquement en position une
fois l'échelle dépliée.
3. Vérifiez toujours que toutes les charnières sont bien verrouillées
en position avant d'utiliser l'échelle.
4. Chaque paire de charnières doit être verrouillée simultanément.
5. Il est extrêmement dangereux d'essayer de modifier le
positionnement de l'échelle, des charnières ou des joints de
fonctionnement pendant que l'échelle est en cours d'utilisation.
6. Gardez toujours les joints propres et exempts de tout corps
étranger, il est conseillé de couvrir les joints lors de travaux
exceptionnellement salissants.
Charnières
L-VERROUILLER
O-DÉVERROUILLER
LES CHARNIÈRES SE VERROUILLENT
FERMEMENT EN PLACE
FR
06 07

Instructions De Retour / Réclamation De Dommages
Dans le cas où un retour est requis, l'article doit être retourné dans sa boîte
d'origine. Sans cela, votre retour ne sera pas accepté.
NE PAS jeter la boîte/l'emballage d'origine.
Prenez une photo des marquages de la boîte.
Prenez une photo des dommages (le cas échéant).
Envoyez-nous un e-mail avec les images demandées.
Une photo des marquages (texte) sur le côté de la boîte est requise au cas où
une pièce serait nécessaire pour le remplacement. Cela aide notre personnel à
identifier votre numéro de produit pour s'assurer que vous recevez les bonnes
pièces.
Une photo des dommages est toujours requise pour déposer une réclamation et
obtenir rapidement votre remplacement ou votre remboursement. Assurez-vous
d'avoir la boîte même si elle est endommagée.
Envoyez-nous un e-mail directement depuis le marché où votre article a été
acheté avec les images ci-jointes et une description de votre réclamation.
FR
In case a return is required, the item must be returned in original box. Without this
your return will not be accepted.
DO NOT discard the box / original packaging.
Take a photo of the box markings.
Take a photo of the damaged part (if applicable).
Send us an email with the images requested.
A photo of the markings (text) on the side of the box is required in case a part is
needed for replacement. This helps our staff identify your product number to
ensure you receive the correct parts.
A photo of the damage is always required to file a claim and get your replacement
or refund processed quickly. Please make sure you have the box even if it is
damaged.
Email us directly from marketplace where your item was purchased with the
attached images and a description of your claim.
EN
Return / Damage Claim Instructions
Instructions De Retour / Réclamation De Dommages
Pour ouvrir la section de l'échelle :
Placez la goupille de verrouillage (noire) en position « O ».
La charnière est verrouillée lorsqu'elle est en position « L ».
ATTENTION
■ Cette échelle ne peut être utilisée que dans les positions
indiquées ci-dessus.
■ Il convient de faire preuve de prudence et d'attention à tout
moment lors de l'utilisation de l'échelle.
■ Vérifiez toujours la stabilité de l'échelle en vous assurant qu'elle
est placée sur un sol plat et solide.
■ Vérifiez toujours que toutes les charnières sont dans les bonnes
positions pour votre utilisation particulière.
■ La plate-forme ne peut être utilisée que lorsque l'échelle est dans
l'une des positions horizontales.
■ Réglez à l'angle approprié (75,5 degrés) en position droite.
INSTRUCTIONS DE SÉCURITÉ
ÉCHELLE DROITE ESCABEAU ÉCHAFAUDAGE
ÉCHELLE EN
SURPLOMB
ÉCHAFAUDAGE DE
CAGE D'ESCALIER
STOCKAGE
08 09
Table of contents
Other Costway Ladder manuals

Costway
Costway NP10122 User manual

Costway
Costway Giantex GT3427 User manual

Costway
Costway TS10068 User manual

Costway
Costway TJ10004WH User manual

Costway
Costway TJ10013 User manual

Costway
Costway JV10317 User manual

Costway
Costway TS10097 User manual

Costway
Costway TY327952 User manual

Costway
Costway BA7555 User manual

Costway
Costway AT5545 User manual