manuals.online logo
Brands
  1. Home
  2. •
  3. Brands
  4. •
  5. Costway
  6. •
  7. Outdoor Cart
  8. •
  9. Costway HW68112 User manual

Costway HW68112 User manual

Other Costway Outdoor Cart manuals

Costway SP37608 User manual

Costway

Costway SP37608 User manual

Costway KC55451 User manual

Costway

Costway KC55451 User manual

Costway KC53797NA User manual

Costway

Costway KC53797NA User manual

Costway KC54829 User manual

Costway

Costway KC54829 User manual

Costway HW61546 User manual

Costway

Costway HW61546 User manual

Costway TL35594 User manual

Costway

Costway TL35594 User manual

Costway OP70393 User manual

Costway

Costway OP70393 User manual

Costway TP10051 User manual

Costway

Costway TP10051 User manual

Costway GOPLUS TL35442 User manual

Costway

Costway GOPLUS TL35442 User manual

Costway HW61720 User manual

Costway

Costway HW61720 User manual

Costway TA10037 User manual

Costway

Costway TA10037 User manual

Costway TL30207 User manual

Costway

Costway TL30207 User manual

Costway TL0400 User manual

Costway

Costway TL0400 User manual

Costway TH10053 User manual

Costway

Costway TH10053 User manual

Costway TA10025 User manual

Costway

Costway TA10025 User manual

Costway KC55044 User manual

Costway

Costway KC55044 User manual

Costway HW56500 User manual

Costway

Costway HW56500 User manual

Costway GT3451 User manual

Costway

Costway GT3451 User manual

Costway KC53113 User manual

Costway

Costway KC53113 User manual

Costway GT3452 User manual

Costway

Costway GT3452 User manual

Costway TL32912 User manual

Costway

Costway TL32912 User manual

Costway SP35778 User manual

Costway

Costway SP35778 User manual

Costway KC53798 User manual

Costway

Costway KC53798 User manual

Costway TH10050 User manual

Costway

Costway TH10050 User manual

Popular Outdoor Cart manuals by other brands

Gearwrench 83167 user manual

Gearwrench

Gearwrench 83167 user manual

Vivo CART-PC02S instruction manual

Vivo

Vivo CART-PC02S instruction manual

Ergotron STYLEVIEW SV42-3162-1 quick reference

Ergotron

Ergotron STYLEVIEW SV42-3162-1 quick reference

VEVOR SC01 quick start guide

VEVOR

VEVOR SC01 quick start guide

Vivo CART-PC01 instruction manual

Vivo

Vivo CART-PC01 instruction manual

Carts Vermont 20 manual

Carts Vermont

Carts Vermont 20 manual

Westward 2CZY4 Operating instructions and parts manual

Westward

Westward 2CZY4 Operating instructions and parts manual

Numatic EcoMatic EM-5 Assembly

Numatic

Numatic EcoMatic EM-5 Assembly

Bosch XL-Cart Operating/safety instructions

Bosch

Bosch XL-Cart Operating/safety instructions

Tennsco Modular Cart Top Component Assembly Assembly Instructions/Parts Manual

Tennsco

Tennsco Modular Cart Top Component Assembly Assembly Instructions/Parts Manual

Clam POLAR TRAILER HD MAX manual

Clam

Clam POLAR TRAILER HD MAX manual

Trinity 1569839 owner's manual

Trinity

Trinity 1569839 owner's manual

Outsunny 845-340 manual

Outsunny

Outsunny 845-340 manual

XPOtool 30261 user manual

XPOtool

XPOtool 30261 user manual

Westfalia 94 59 66 Original instructions

Westfalia

Westfalia 94 59 66 Original instructions

Gorilla Carts GCR-10P quick start guide

Gorilla Carts

Gorilla Carts GCR-10P quick start guide

DRAGONFIRE CART Assembly instructions

DRAGONFIRE

DRAGONFIRE CART Assembly instructions

Westfalia 80 01 52 instruction manual

Westfalia

Westfalia 80 01 52 instruction manual

manuals.online logo
manuals.online logoBrands
  • About & Mission
  • Contact us
  • Privacy Policy
  • Terms and Conditions

Copyright 2025 Manuals.Online. All Rights Reserved.

THIS INSTRUCTION BOOKLET CONTAINS IMPORTANT SAFETY INFORMATION. PLEASE READ AND KEEP FOR FUTURE REFERENCE.
EN DEFR ES IT PL
USER'S MANUAL/HANDBUCH
/MANUEL DE L'UTILISATEUR/MANUAL DEL USUARIO
/MANUALE UTENTE/INSTRUKCJA OBSŁUGI
HW68112
3-Tier Tool Cart/Servierwagen/Chariot de Service/Carro de Servicio/
Carrello di Servizio/Wózek narzędziowy
EN
DE
FR
ES
IT
PL
With your inspiring rating, COSTWAY will be more consistent to offer you EASY
SHOPPING EXPERIENCE, GOOD PRODUCTS and EFFICIENT SERVICE!
Mit Ihrer inspirierenden Bewertung wird COSTWAY konsistenter sein, um Ihnen EIN
SCHÖNES EINKAUFSERLEBNIS, GUTE PRODUKTE und EFFIZIENTEN SERVICE zu
bieten!
Avec votre évaluation inspirante, COSTWAY continuera à fournir une EXPÉRIENCE
D’ACHAT PRATIQUE, des PRODUITS DE QUALITÉ et un SERVICE EFFICACE !
Con su calificación inspiradora, COSTWAY será más consistente para ofrecerle
EXPERIENCIA DE COMPRA FÁCIL, BUENOS PRODUCTOS y SERVICIO EFICIENTE.
Con la tua valutazione incoraggiante, COSTWAY sarà più coerente per offrirti ESPE-
RIENZA DI ACQUISTO FACILE, BUONI PRODOTTI e SERVIZIO EFFICIENTE!
Dzięki twojej opinii COSTWAY będzie mógł oferować jeszcze WYGODNIEJSZE
ZAKUPY, LEPSZE PRODUKTY i SPRAWNIEJSZĄ OBSŁUGĘ KLIENTA.
US office: Fontana UK office: Ipswich
DE office: FDS GmbH, Neuer Höltigbaum 36, 22143 Hamburg, Deutschland
FR office: Saint Vigor d'Ymonville
PL office: Gdańsk
02 03
Part List/Teileliste/Liste de pièces
/Lista de Piezas/Lista delle Parti
/Lista części :
Tray A x2
/Tablett A x 2
/Plateau A x 2
/Bandeja A x2
/Vassoio A x 2
/ Półka A x2
Tray B x1
/Tablett B x 1
/ Plateau B x 1
/Bandeja B x1
/Vassoio B x 1
/Półka B x1
Upright column x4
/Vertikale Stange x 4
/Colonne verticale x 4
/Columna vertical x4
/Colonna verticale x 4
/Wspornik x4
Handle x1
/Griff x 1
/Poignée x 1
/Manija x1
/Impugnatura x 1
/Uchwyt x1
Flange nut x40+2
/Flanschmutter x40 +2
/Écrou à embase x40 +2
/Tuerca con reborde x40 +2
/Dado flangiato x40 +2
/ Nakrętka kołnierzowa x40+2
M8 Screw x40+2
/Schraube M8 x40 +2
/Vis x40 +2
/Tornillo M8 x40 + 2
/Vite M8 x40 +2
/ Śruba M8 x40+2
Castor wheel x2
/Rad x 2
/Roulette x 2
/Rueda x2
/Ruota x 2
/Kółko
samonastawne x2
Castor wheel with brake x 2
/Rad mit Bremse x 2
/Roulette avec frein x 2
/Rueda con freno x2
/Ruota con freno x 2
/Kółko samonastawne
z hamulcem x2
wheel with brake
/Rad mit Bremse
/Roulette avec frein
/Rueda con freno
/Ruota con freno
/Koła z hamulcem
wheel without brake
/Rad ohne Bremse
/Roulette sans frein
/Rueda sin freno
/Ruota senza freno
/Koła bez hamulca
Tray B
/Tablett B
/Plateau B
/Bandeja B
/Vassoio B
/Półka B
1)) Castor wheel assembly/Radmontag
Assemblage des roulettes/Montaje de las ruedas/
Montaggio delle Ruote/Montaż kółek :
wheel with brake
/Rad mit Bremse
/Roulette avec frein
/Rueda con freno
/Ruota con freno
/Koło z hamulcem
wheel without brake
/Rad ohne Bremse
/Roulette sans frein
/Rueda sin freno
/Ruota senza freno
/Koło bez hamulca
Use 8 screws and nuts to fix 2 wheels with brakes to the bottom of tray B.
Note: Fix 2 wheels with brakes to a short side, then fix 2 wheels without brake to the other side of
the bottom according to the picture above.
/Befestigen Sie mit 8 Schrauben und Muttern 2 Räder mit Bremsen am Boden von Tablett B.
Hinweis: Befestigen Sie 2 Räder mit Bremsen an einer kurzen Seite und dann 2 Räder ohne
Bremse an der anderen Seite des Bodens gemäß dem obigen Bild.
/Utilisez 8 vis et écrous pour fixer 2 roulettes avec freins au fond du plateau B.
Remarque : Fixez 2 roulettes avec freins sur le côté court, puis fixez 2 roulettes sans frein de
l’autre côté du fond selon l’image ci-dessus.
/Utilice 8 tornillos y tuercas para fijar las 2 ruedas con freno al fondo de la bandeja B.
Nota: Fije las 2 ruedas con freno a un lado corto, luego fije las 2 ruedas sin freno al otro lado de la
parte inferior de acuerdo con la imagen de arriba.
/Utilizzare 8 viti e dadi per fissare 2 ruote con freni al fondo del vassoio B.
Nota: Fissare 2 ruote con freni su un lato corto, e poi fissare 2 ruote senza freno sull'altro lato del
fondo secondo l'immagine sopra.
/Użyj 8 śrub i nakrętek, aby przymocować 2 kółka z hamulcami do spodu półki B.
Uwaga: Zamocuj 2 kółka z hamulcami na krótszym boku, a następnie zamocuj 2 kółka bez
hamulców po drugiej stronie, jak pokazano na powyższym obrazku.
0405
2)) Upright column assembly/Montage der aufrechten Stang
Assemblage de colonne verticale
/Montaje de las columnas verticales/
Montaggio della Colonna Verticale/Montaż wsporników:
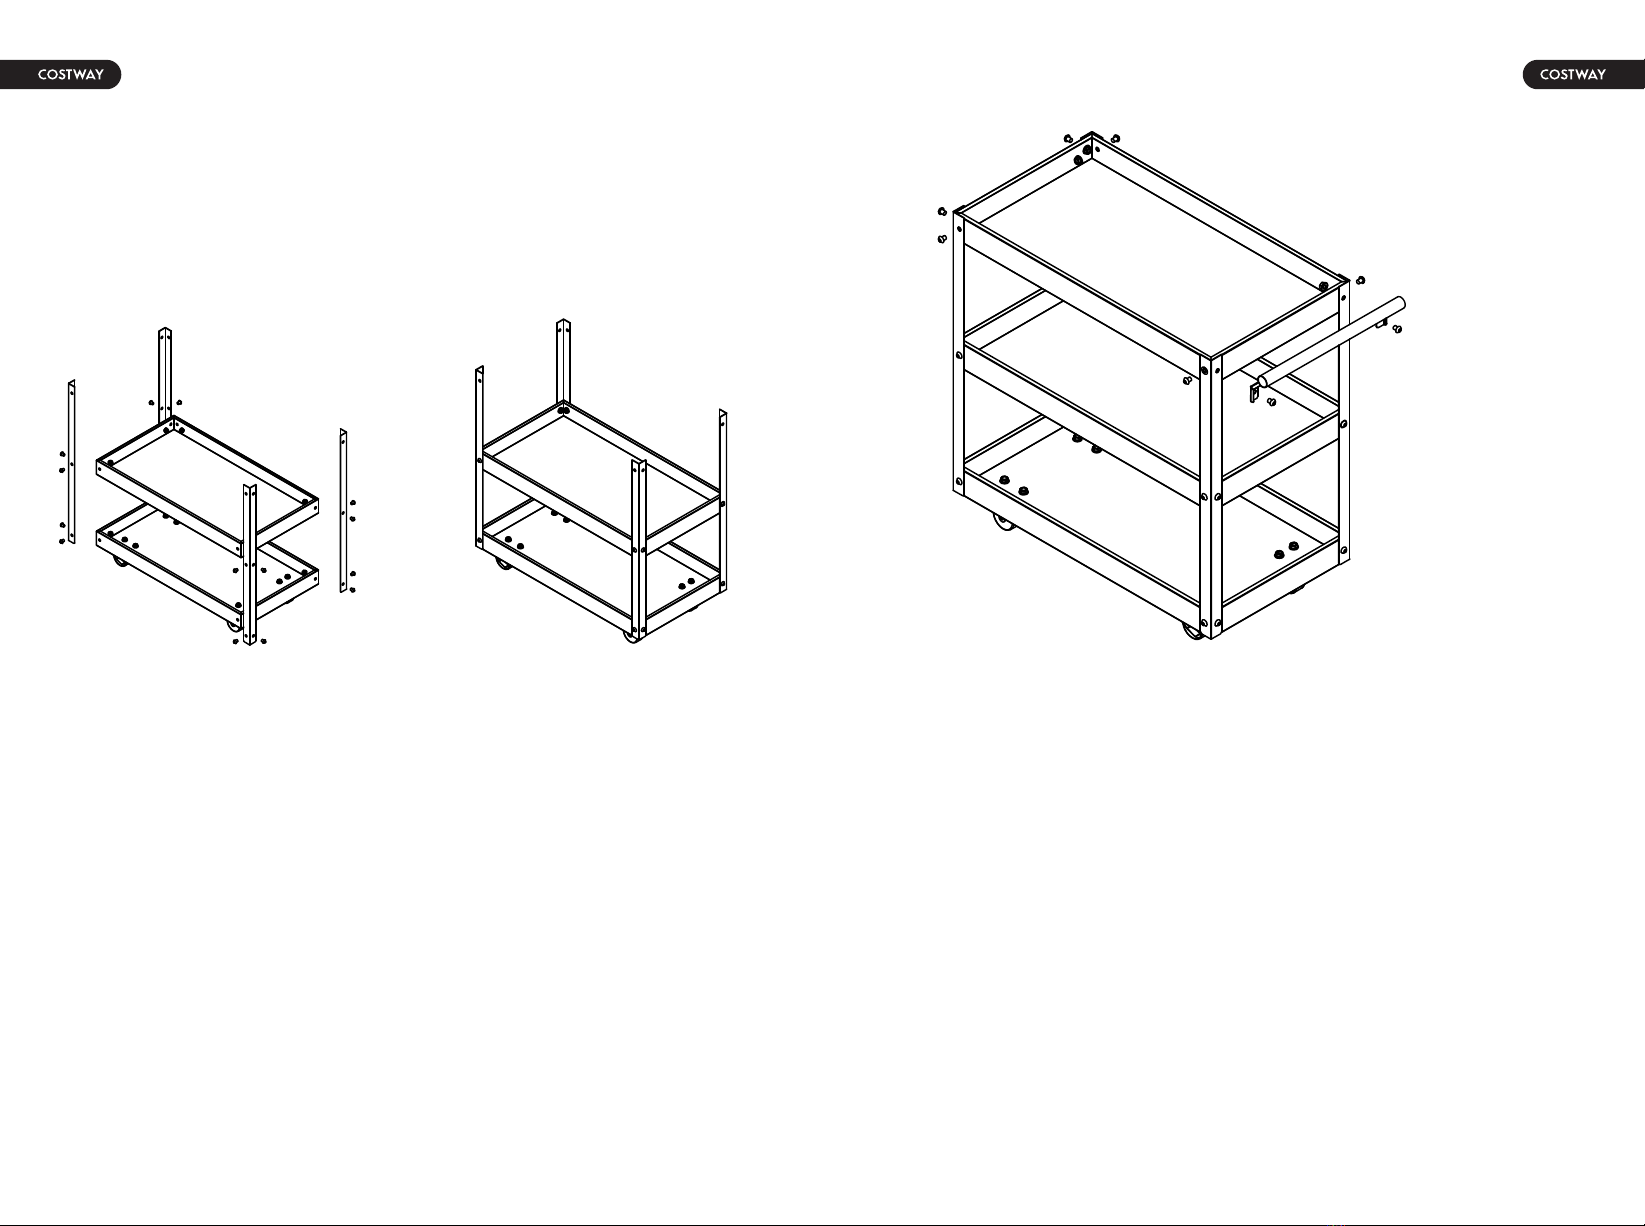
Connect 4 upright columns to two trays (A and B) with 16 screws and nuts.
/Verbinden Sie 4 aufrechte Stangen mit 16 Schrauben und Muttern mit zwei Tabletten (A und B).
/Reliez 4 colonnes verticales à deux plateaux (A et B) à l’aide de 16 vis et écrous.
/Conecte las 4 columnas verticales a las dos bandejas (A y B) con 16 tornillos y tuercas.
/Collegare 4 colonne verticali a due vassoi (A e B) con 16 viti e dadi.
/Połącz 4 pionowe wsporniki z dwoma półkami (A i B) za pomocą 16 śrub i nakrętek.
Tray A
Plateau
nd
/Tablett A
/Ba
asso
/Ban A
/Vłka io A
d
/Pó A /
Tray A
an
Plateau
/Tablett A
/Bass
/Ba A
/V
ółka
/Vas
n
/
/B
/P A
s
Tabl
Tray B
/
a
Plateau
ett B
/Ba
/Band B
/V
ół
/V ej
/P ka B
a
/
/Vas
Tray B
a
Plateau
/Tablett B
/Bas
/Band B
/V
ółk
/V ej
/P a B
a
/
/Va
3) Top tier assembly/Montage der obersten Ebe
/Assemblage de plateau/Montaje del nivel superior
/Montaggio del Ripiano/Montaż górnej półki:
Handle
/Griff
/Poignée
/Manija
/Impugnatura
/Uchwyt
Fix the tray A (top tray) onto the 4 upright columns with screws and nuts.
Then, the side pull handle is also fixed to the top tray with screws and nuts.
Note: The push handle is fixed on the same side with brake wheels. Your tool cart is now ready for use.
/Befestigen Sie das Tablett A (oberes Tablett) mit Schrauben und Muttern an den 4 aufrechten Stangen.
Anschließend wird der seitliche Zuggriff ebenfalls mit Schrauben und Muttern am oberen Tablett befestigt.
Hinweis: Der Griff ist mit Bremsrädern auf derselben Seite befestigt. Ihr Werkzeugwagen ist jetzt einsatzbereit.
/Fixez le plateau A (plateau supérieur) sur les 4 colonnes verticales à l’aide de vis et de écrous.
Ensuite, fixez la poignée latérale au plateau supérieur à l’aide de vis et de écrous.
Remarque : fixez la poignée du même côté avec des roulettes avec frein. Votre chariot est maintenant prêt à
l’emploi.
/Fije la bandeja A (bandeja superior) en las 4 columnas verticales con tornillos y tuercas.
A continuación, la manija lateral también se fija a la bandeja superior con tornillos y tuercas.
Nota: La manija se fija en el mismo lado que las ruedas de freno. Su carrito ya está listo para su uso.
/Fissare il vassoio A (vassoio superiore) sulle 4 colonne verticali con viti e dadi. E poi anche l’impugnatura di
trazione laterale viene fissata al vassoio superiore con viti e dadi.
Nota: L’impugnatura di spinta è fissata sullo stesso lato con le ruote del freno. Il tuo carrello è ora pronto per
l'uso.
/Przymocuj półkę A (górna półka) do 4 pionowych wsporników za pomocą śrub i wkrętów.
Następnie przymocuj uchwyt boczny do górnej półki za pomocą śrub i wkrętów.
Uwaga: Zabezpiecz uchwyt po tej samej stronie za pomocą kółek z hamulcami. Twój wózek jest teraz gotowy
do użycia.
Tray A
an
Plateau
/Tablett A
/Bass
/Ba A
/V
ółka
/Vas
n
/
/B
/P A
s
Tray A
an
Plateau
/Tablett A
/Bass
/Band A
/V
ółka
/Vas e
/Ps
/ A
Tray B
a
Plateau
/Tablett B
/Bas
/Band B
/V
ółk
/V ej
/P a B
a
/
/Va