Cover Pools Autosave User manual

800119 REL-0005
©2017 Cover-Pools Incorporated
Cover-Pools Incorporated
66 East 3335 South
Salt Lake City, UT 84115
800.447.2838
801.484.2724
www.coverpools.com
Cover-Pools Incorporated is a wholly owned subsidiary of Zodiac Pool Systems, Inc.
ZODIAC® is a registered trademark of Zodiac International, S.A.S.U., used under license.
All other trademarks used herein are the property of their respective owners.
Autosave™Safety Spa Cover
Owner’s Manual
This spa cover has been installed with the following features:
Auto-Shutoff (Instructions included separately)
CoverLink™ Control Pad (Instructions included separately)
Automatic Chlorinator (Consult your pool company for use)
Please read operation instructions for these features.

800119 REL-0005©2017 Cover-Pools Incorporated
TABLE OF CONTENTS
INSTALLATION SAFETY CHECKLIST ............................................................................3
AVOID DROWNING RISKS .............................................................................................3
PROTECT YOUR INVESTMENT......................................................................................3
POOL SAFETY................................................................................................................4
OPERATING INSTRUCTIONS .......................................................................................5
Covering the Spa ........................................................................................................................ 5
Uncovering the Spa .................................................................................................................... 5
COVER COMPONENTS..................................................................................................5
REMOVING WATER ON TOP OF THE COVER ................................................................6
Placing the Pump on the Cover ................................................................................................ 6
BASIC MAINTENANCE..................................................................................................7
Motor .......................................................................................................................................... 7
Water Level................................................................................................................................. 7
Track Cleaning ........................................................................................................................... 7
Mechanism Cleaning.................................................................................................................. 7
Replacing a Pulley...................................................................................................................... 7
INSPECTION PROCEDURE FOR WEAR AND DETERIORATION....................................7
Vinyl Cover ................................................................................................................................. 7
Cover Track ............................................................................................................................... 7
FABRIC MAINTENANCE AND CARE.............................................................................8
Debris and Obstacles ................................................................................................................. 8
Cleaning ..................................................................................................................................... 8
Repair Holes .............................................................................................................................. 8
Winterizing Your Cover............................................................................................................... 8
CHEMICALS AND YOUR COVER....................................................................................9
Recommended Chemical Plan .................................................................................................. 9
Lubrication ............................................................................................................................... 10
ADJUSTMENTS AND MINOR REPAIR.........................................................................11
Uneven Cover Retraction ......................................................................................................... 11

800119 REL-0005©2017 Cover-Pools Incorporated 3
PROTECT YOUR INVESTMENT
Your automatic cover is designed to perform reliably
throughout many years of daily use. Since the
automatic cover is easy to use, some people allow
anyone to operate it. Our experience shows that
service requirements increase with the number of
people who operate the cover without having received
instruction. Do not allow anyone to operate the cover
unless they have been properly instructed. Never
allow children to operate the cover.
WARNING 11pt
WARNING 12pt
WARNING 14 pt
WARNING 24pt
WARNING 21pt
WARNING 27pt
WARNING 37
10PT
WARNING Do not walk on the cover except in the
case of an emergency. Playing or walking on the cover
unnecessarily can cause injury and increases the risk
of damage to the cover. The standard aluminum lid over
the cover housing is not strong enough to walk on; to
prevent damage or injury, avoid stepping on the lid. Lids
may be slippery when wet. Before operating the cover,
remove all objects from the spa and cover, including
toys, spa cleaners, cover pumps and hoses. Be sure
you have full view of the spa area when operating the
cover. To reduce the risk of drowning which can result
in serious injury, including loss of life, do not leave a spa
partially covered.
WARNING 11pt
WARNING 12pt
WARNING 14 pt
WARNING 24pt
WARNING 21pt
WARNING 27pt
WARNING 37
10PT
AVOID DROWNING RISKS
• REMOVE STANDING WATER—CHILDREN CAN
DROWN ON TOP OF THE COVER
• REMOVE THE COVER(S) COMPLETELY BEFORE
ENTRY OF BATHERS—ENTRAPMENT IS POSSIBLE.
• NON-SECURED OR IMPROPERLY SECURED
COVERS ARE A HAZARD.
• DO NOT WALK ON THE COVER EXCEPT IN AN
EMERGENCY.
• FAILURE TO FOLLOW ALL INSTRUCTIONS MAY
RESULT IN INJURY OR DROWNING.
MEETS ASTM F 1346-91 CLASS PCS WHEN USED AS
INSTRUCTED.
PLEASE READ AND FOLLOW ALL INSTRUCTIONS!
WARNING 11pt
WARNING 12pt
WARNING 14 pt
WARNING 24pt
WARNING 21pt
WARNING 27pt
WARNING 37
10PT
WARNING When installing and using this electrical equipment, basic safety precautions should always be
followed, including the following.
1. To reduce the risk of injury, do not permit children to operate this product.
2. Remove and safely store the key after covering or uncovering your pool or spa.
3. Turn off the electrical breaker when the cover will not be used for extended periods of time or as an added
layer of protection against unauthorized operation. Always turn off the breaker before servicing the cover.
INSTALLATION SAFETY CHECKLIST
For your benefit, double check the following items with your installer/
representative to aid in your understanding of the use of your cover.
YES NO
1. Has a representative from the company who installed your Autosave
explained to you the proper operation of the system?
a. Roll-up adjustment
b. Chemical application as it affects the cover
c. Authorized operation
d. Proper maintenance
e. Placing the cover pump in position when the cover is closed
2. Did a representative offer you assistance on how to
maintain a safer pool area?
3. Did you receive drowning prevention information?
Please take the time with your representative to go over this list to ensure that you
understand the importance of the proper use of your pool cover.
WARNING 11pt
WARNING 12pt
WARNING 14 pt
WARNING 24pt
WARNING 21pt
WARNING 27pt
WARNING 37
10PT
This product’s leading edge contains trace amounts of styrene, which is known in the state of California to
cause Cancer. For more information go to www.P65Warnings.ca.gov

800119 REL-0005©2017 Cover-Pools Incorporated 4
POOL SAFETY
Thank you for your purchase of a Cover-Pools cover. Cover-Pools make every effort to provide you with the safest
product available and want to stress the following safety precautions.
Cover-Pools recommends “layers” of protection. Your cover is a reliable layer; however, you should not rely on any one
layer to be fail proof.
A swimming pool or spa can provide your family with hours of entertainment and the opportunity for healthy recreation.
As a pool or spa owner, be aware that you must ensure your child’s safety. There is a risk of a child drowning when
around any body of water. There is no substitute for constant adult supervision. Most drowning occurs during a five-
minute-or-less lapse in supervision. By providing barriers between your child and the pool or spa, you can avoid a tragic
accident should your child momentarily slip out of sight.
Don’t rely on one system—layering (pool cover, fence,
alarm...) safety precautions provides the strongest
safeguard.
Never leave a child alone—even for a second.
Maintain constant eye contact with your children when
they are around the pool or spa.
Do not consider young children water-safe because they
have had swimming lessons. Swimming instructions for
children under three years of age are not recommended.
Instruct all care-takers about potential hazards to young
children in and around swimming pools and the need for
constant supervision.
Train all caretakers in life-saving, cardiopulmonary
resuscitation and first aid. No exceptions.
Install a telephone near the pool or spa with emergency
numbers posted.
Keep toys away from the pool or spa when the pool or spa
is not in use. They can lure a child into the pool or spa.
Use inflatable toys only under adult supervision. They may
deflate or your child may slip off.
Post and enforce rules such as No Running, No Pushing,
No Dunking, and Never Swim Alone.
Make sure you have rescue devices accessible near the
pool or spa.
Keep all doors and windows leading from the house to
the pool area secure. Install self-closing mechanisms on
doors.
Enclose the pool or spa with a barrier. In fact, fencing may
be required in certain area. Check your local city or county
building code for more information.
Install only child-proof, self-closing, self-latching gates
around the pool or spa.
Vertical bars on a pool fence should be no more than 3-3/4
inches apart. Avoid fences such as chain link that provide
climbing footholds.
Place table and chairs well away from the pool fence to
prevent children from climbing into the pool area.
Alert your pool maintenance people, utility personnel, and
neighbors to keep covers, gates, and doors to pool closed
and locked at all times.
Check to ensure that spa and pool covers pass minimum
safety requirements set by the American Society of Testing
Materials.
Never use a pool or spa with its cover partially in place
since children may become trapped under it.
Beware of a free-floating pool cover. A child can slip
beneath one unnoticed.
Realize that a child can drown in as little as two inches of
water. Drain standing water off of your spa or pool cover.
Investigate using a pool alarm and/or a monitoring system
that can be worn by a child.
Remove ladders and steps from above ground pools. No
objects should be in the pool area for a child to climb on
and into the water.
Inspect safety and pool equipment regularly. Preventive
devices are only effective if they are in working order.
Sources: Drowning Prevention Society; United States
Consumer Product Safety Commission; National Spa and
Pool Institute’s Operation Water Watch; and the American
Academy of Pediatrics.
800119 REL-0005©2017 Cover-Pools Incorporated 5
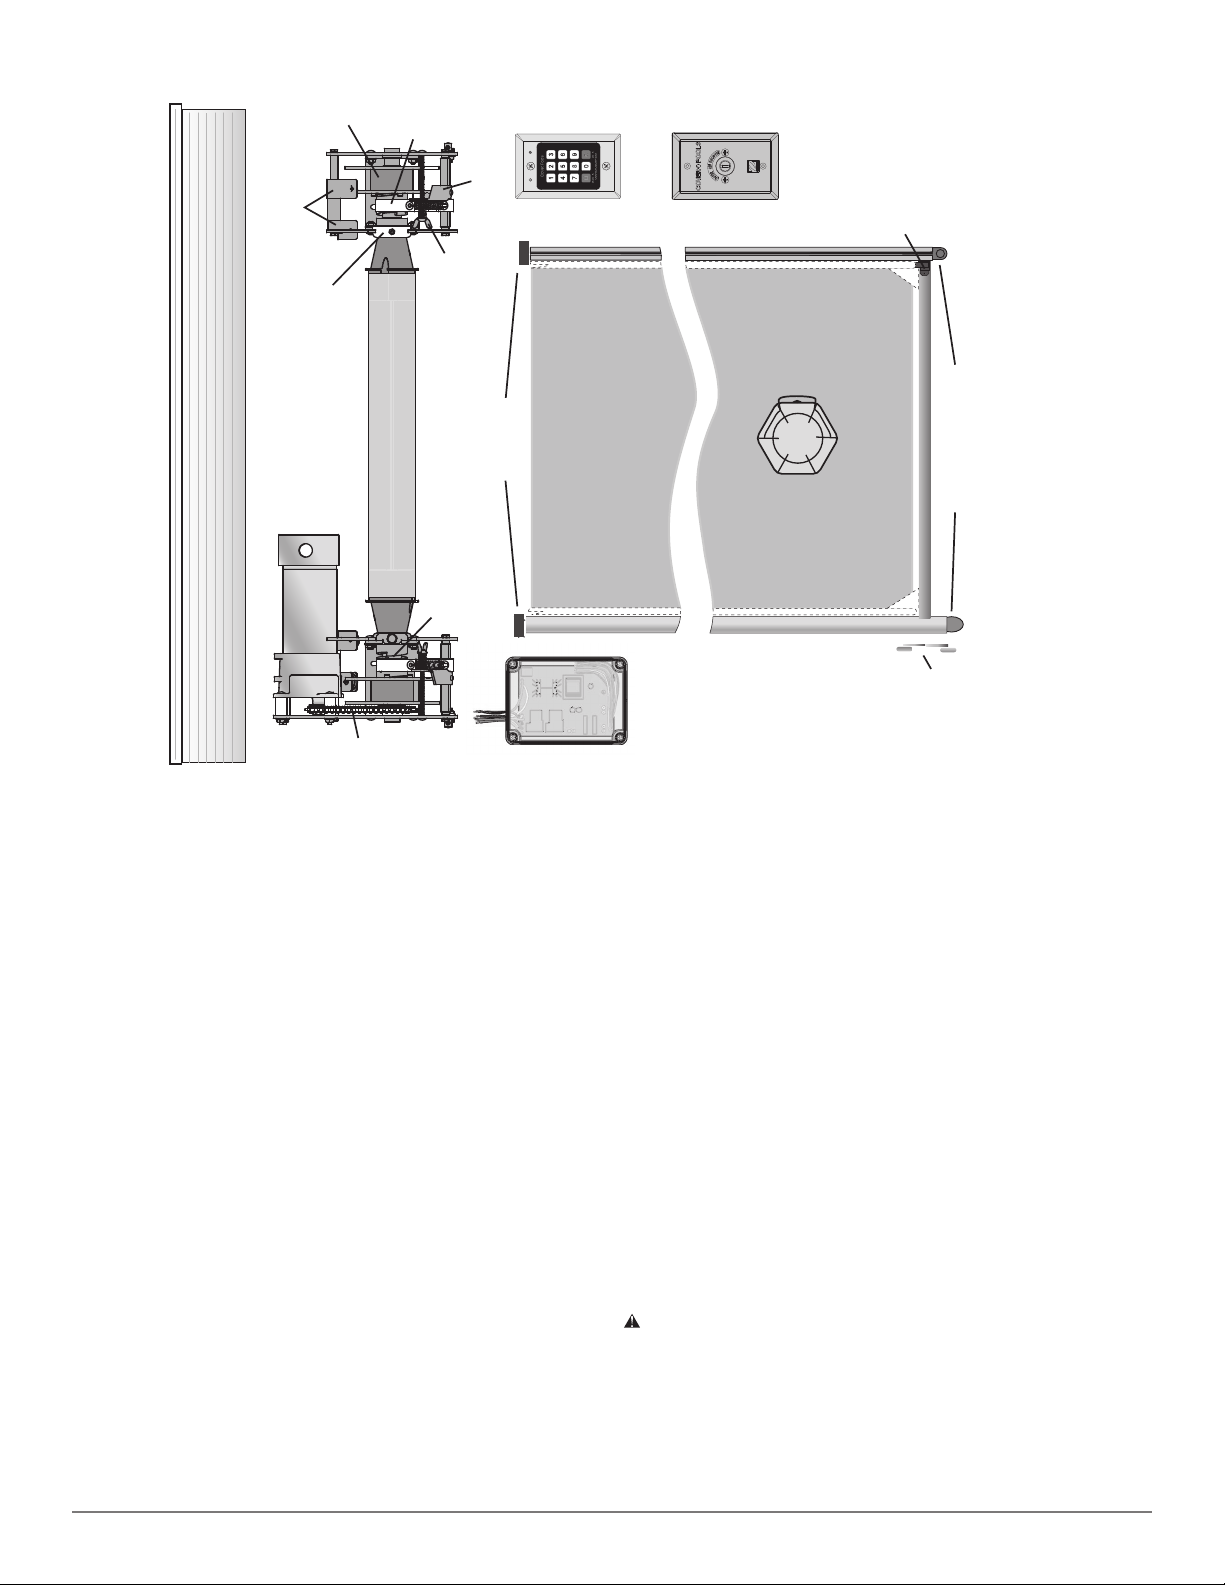
Coverlink Control Pad
Green
Led
Red
Led
Motor
Rope
Reel
Chain
Brake Arms
Wing Nuts
Pulleys
Double Dog
Main Tube
Opposite End
And Bearing
Brake
Strap
Universal
Track
Guides
Leading Edge
Wheels
Track Pulleys
Cover/fabric
Auto-Shutoff
Control
CoverLink
Gliders
Undertrack
Lid Assembly
Pump
Key Switch
COVER COMPONENTS
OPERATING INSTRUCTIONS
Covering the Spa
Remove any objects from the spa.
Keyswitch: Turn the key in the cover direction until the spa
is completely covered. With Auto-shutoff: Turn the key to
“cover” for 1 second, briefly return to “off,” then operate
the cover within 4 seconds. After 20 seconds, the switch
will time out.
CoverLink™ control: Enter the four-digit PIN and press
“cover” until the spa is covered.
For Undertrack Systems, release the key or control pad a
few inches before the end of the spa, let the cover coast to a
stop, then press “close” until the front of the cover taps the
end of the spa. This “soft stop” method will improve the life
of the cover and its components rather than overrunning to
the end of the spa under full motor torque and having the
cover hit the end.
For Universal Track Systems, run the cover up to within
two to three inches of the end of the track and stop. Do not
attempt to close the cover completely against the pulley
castings at the end of the tracks. A convenient way to judge
this is to place a stop mark on the cover, which will align
with a stop mark placed on the tracks at a place where you
can see it from the control.
Remove the control key from the key switch, and store it in a
secure location to prevent unauthorized operation of the cover.
The CoverLink digital control will deactivate after 20 seconds.
Place the cover pump on the cover at this time (see
“Placing the Pump on the Cover” on page 6.) Keep the
pump on the cover whenever the spa is covered.
Uncovering the Spa
Remove the pump and any debris from the cover.
Keyswitch: Insert the key and turn it towards “uncover.”
Note: If you have an auto-shutoff installed, you must
turn the key twice as described in “Covering the Pool.”
CoverLink: Enter the four-digit PIN and press “uncover.”
Continue to uncover the spa until the cover is within a few
inches of the end of the spa. Let the cover coast to a stop, then
operate the cover until the spa is completely uncovered.
Do not retract the spa cover too closely to the end of the
tracks. With most undertrack models, the leading edge
should rest half way across the spa end wall. On universal
track models, the leading edge should stop before the
mechanism housing.
WARNING 11pt
WARNING 12pt
WARNING 14 pt
WARNING 24pt
WARNING 21pt
WARNING 27pt
WARNING 37
10PT
WARNING In order to minimize the risk of drowning
which can result in serious injury or loss of life, the control
pad must be mounted permanently on a wall in full view of
the cover. Do not remove the control pad and carry it like
a portable remote. This may be a direct violation of local
codes.
NOTE: Stop the cover briefly before hitting the spa wall or
track ends to increase the life of the cover components.

800119 REL-0005©2017 Cover-Pools Incorporated 6
REMOVING WATER ON TOP OF THE COVER
WARNING 11pt
WARNING 12pt
WARNING 14 pt
WARNING 24pt
WARNING 21pt
WARNING 27pt
WARNING 37
10PT
WARNING Do not let persons or pets access or play
on the cover. Water which may have collected on top of
the cover poses a potential risk of drowning which could
result in serious injury or loss of life. Isolated puddles
tend to migrate toward a depression. Persons or pets
can create a depression in the cover that could be large
enough to collect potentially dangerous amounts of
water which can pose risk of drowning.
Standing water on top of your cover poses as great a
hazard as an open spa. You have been provided with
a submersible pump designed to reduce this hazard
by sensing water accumulation and turning on or off
automatically. Always place the pump on the cover anytime
your spa is covered.
Water accumulation on top of the cover can come
from holes or leaks in the cover, from over-spray and
misdirected sprinklers, or from rain and snow.
WARNING 11pt
WARNING 12pt
WARNING 14 pt
WARNING 24pt
WARNING 21pt
WARNING 27pt
WARNING 37
10PT
Caution Never attempt to run the cover with water on it.
Damage can occur to the fabric and mechanism.
Placing the Pump on the Cover
1. Place the pump on your cover: (1) set the pump at
the side of the spa, then push it into place with a pool
brush. Or, (2) stand at the lid end of the spa and place
the pump on the cover as a second person closes the
cover.
2. Snake the Hose: Snake a long discharge hose
over as much of your cover as possible to create a
natural channel for water to flow back to your pump
(see diagram). The water will be removed as it is
channelled back to your pump. Isolated puddles of
water will be specific to your cover; after you become
familiar with where puddles occur, position your
discharge hose so you can remove nearly all the water.
3. Plug in the Pump: Plug the pump into a GFCI-
protected outlet.
After the pump has stopped and most of the water has
been removed, the pump should create a depression to
allow consolidation of water.
If you plan on being away from your spa for a long period
of time, ask a neighbor or friend to check your cover
frequently for standing water. Your pump can be left on the
cover all winter. The pump will freeze into the ice without
damage and will activate itself as the ice melts. Make sure
the pump has power and the discharge hose is free of
kinks.
NOTE: Cover-Pools supplies a variety of pumps depending
on the size of your cover and region you live in. Carefully
follow the instructions that have been supplied with your
pump.
WARNING 11pt
WARNING 12pt
WARNING 14 pt
WARNING 24pt
WARNING 21pt
WARNING 27pt
WARNING 37
10PT
WARNINGIn order to prevent the risk of drowning, fire or electric shock, which could result in property damage or
serious injury, including loss of life be sure to adhere to the following:
• Plug the pump into a Ground Fault Circuit Interrupter
(GFCI) - protected outlet only.
• Do not use extension cord.
• If your pump or cord becomes damaged, replace the
pump immediately.
• Place the pump on the cover first; then plug in the pump.
• DO NOT stand on a wet surface while using the pump.
• Avoid contact with accumulated surface water on your
cover when the pump is on the cover.
• Do not use the pump for anything other than what is
specified in these instructions.
• The pump is provided with a stabilizer plate to keep it
upright. To ensure that the automatic on/off feature
operates properly, Do NOT allow the pump to tip over.
• Keep the pump clean and well-maintained at all times.

800119 REL-0005©2017 Cover-Pools Incorporated 7
BASIC MAINTENANCE
Motor
The motor we provide is waterproof and capable of
withstanding short-term submersion. However, you
should not allow the motor to be submersed for periods
longer than a few hours. Your system housing should have
adequate means of drainage for below-deck or recessed
installations. Make sure all drains remain clear. Your
motor has an internal thermal overload switch. If the
motor overheats to the point where the switch activates, it
will reset automatically when cool.
Water Level
The ability of your cover to support any weight is completely
dependent upon your maintaining the pool water at normal
operating level. In many cases, the cover will not support
itself if run over a low or empty pool or spa.
WARNING 11pt
WARNING 12pt
WARNING 14 pt
WARNING 24pt
WARNING 21pt
WARNING 27pt
WARNING 37
10PT
WARNING Severe damage to the cover may occur and
a great hazard may develop if your water level is not
maintained properly! (see “Winterizing Your Cover” on
page 8).
Track Cleaning
The track may collect dirt and debris over a period of time.
A buildup of dirt and debris can affect the operation and
adjustment of your cover. If the channels in your cover
track are not cleaned when necessary, the edging on your
cover and the protective anodized coating on your track
can wear out prematurely. To clean the track, retract the
cover and spray water into the track. The water will flush
out debris if sprayed the full length of the track at close
range. In most situations your track should be cleaned
twice a season. For pools or spas that are used year round,
or if you are in an area that is sandy or windy, cleaning
should be done more often. Never use anything but water to
clean the tracks or other extrusions.
Mechanism Cleaning
Over time, dried chemicals and dirt can build up on your
mechanism. If these components are not rinsed off, the
buildup can become so excessive that damage can occur.
We recommend rinsing the components as soon as you
see a noticeable residue. The metal components of your
pool cover should be rinsed off with fresh water only.
The frequency will vary with the usage of the pool cover.
When in doubt, it is better to rinse too frequently, than not
frequently enough. When rinsing the mechanism, turn off
all electricity to the cover. Make sure you have adequate
drainage in your cover housing. The motor will withstand
direct spray at low force. NOTE: Improper chemical
balance can rapidly affect your system as well as the cover
fabric. Check your water regularly to be sure it is balanced
properly. Please review the rest of this manual for proper
chemical balance recommendations.
Replacing a Pulley
At the end of each track is a pulley. A worn pulley can
cause cover adjustment problems and eventually lead to
a broken rope. Pulleys usually last about three years. If a
pulley in the end of the track causes a noticeable clicking
or grinding sound, it is worn. You should contact your local
dealer for replacement as soon as possible.
INSPECTION PROCEDURE FOR WEAR AND DETERIORATION
You should give the components of your automatic cover a thorough inspection at least two to three times a year.
Vinyl Cover
The vinyl cover material is constructed with a tough
combination of vinyl and a polyester mesh.
Inspect the vinyl: Over the years, depending on your
cover’s exposure to chemicals, heat, and sun, the vinyl
will become brittle and eventually begin to crack. When
this occurs the polyester mesh will be exposed and begin
to change the capability of your cover to hold weight.
Inspection for this kind of deterioration should begin with
an examination for leaks. If you have leaks:
1. Patch the hole immediately.
2. Check the area around the hole to see if it has become
brittle or stiffer than the rest of the cover. Any change
in the feel of the vinyl where it begins to seem brittle
or stiff can indicate a problem.
3. If the normal square pattern you see in your cover
from the polyester mesh changes so that the mesh
pattern appears to be more pronounced than the other
parts of the cover, it could be an indication of the vinyl
becoming weak.
4. In areas where your cover is pulled over your deck or
coping it is possible to gradually wear the vinyl away
from the reinforcing mesh. Once the mesh is exposed
it can begin to deteriorate or break. Have the cover
repaired immediately if you notice this problem.
Inspect the sewing: Inspect the sewing where the vinyl
is attached to the webbing (edging) along the side of your
cover by your tracks. If any threads are broken or if the
webbing has begun to tear or fray, the strength of your
cover will be compromised. Have the cover repaired
immediately if you notice this problem.
Cover Track
Since your track is the main means of anchoring your cover
to your pool, inspection of the fasteners used to hold your
track to the pool sides is as important as inspecting the
cover. Make sure that all screws are tight and replaced if
missing. Some track is contained in a channel with shims.
Be sure to replace missing shims. The channel or opening
that your webbing slides in can wear over the years. If you
feel there is marked difference in any of the items we have
asked you to inspect, please contact your pool cover service
technician immediately for a detailed inspection.

800119 REL-0005©2017 Cover-Pools Incorporated 8
FABRIC MAINTENANCE AND CARE
With over 50 years of experience, we have seen well-maintained covers last far beyond expectations. The key to a long-
lasting, healthy cover has been proper pool chemical balance and regular care and cleaning of the cover.
Extra Slack in the Fabric
Our customers often question the extra slack in the pool
cover. We include slack in our pool covers for the following
reasons:
Rain and Snow Loads: The pool cover needs extra slack
to handle rain and snow loads.
Fabric Shrinks: The pool cover fabric will shrink
between one to two percent, which can equal three to
four inches on a 20-foot wide pool cover. Indoor pools
may shrink more because they are often heated year-
round.
Debris and Obstacles
Sharp Objects: Remove any sharp objects and obstacles
before opening the cover. Sharp objects can damage the
cover.
Obstacles: Remove any obstacles (toys, dirt, rocks etc.)
in the track, on the cover, or in the mechanism housing.
Debris: Remove leaves, water, etc. promptly to pre-
vent residue-buildup on the vinyl. When the cover does
become soiled from dirt, organic matter, or undissolved
chemicals, clean it.
Cleaning
Rinse: Regularly rinse the cover off with a pump in
place to remove water and contaminants. Even if the
cover does not appear dirty, harmful chemical deposits
can accumulate on top of the fabric and can cause pre-
mature fabric failure if the fabric is not rinsed regularly.
Stains: For stains, use a soft bristle brush and scrub the
cover with fresh, clean water.
Oils and Stubborn Stains: For oils, such as suntan
lotion, or stubborn stains that cannot be removed
by scrubbing, use a small amount of non-detergent
cleanser. Never use detergents on the vinyl. One of
the most available non-detergent cleaners is Ivory®bar
soap (not dish-washing liquid). Use the bar soap on a
wet cloth and scrub the soiled area. Rinse well with
fresh water.
Algae: For algae stains, especially black algae, use a
mixture of water and Clorox® bleach. Use one (1) part
Cloroxto nine (9) parts water. Make sure you use Clorox,
not the pool’s chlorine. You can apply this solution
directly on the algae. Some algicides contain detergent
and may damage the cover.
Repair Holes
Use the vinyl patch kit to patch even the smallest holes
as soon as they occur. If water penetrates the vinyl and
comes in contact with the scrim (the reinforcing thread),
the thread will soak up water and carry chemicals and
contaminates to the inside of the material. This may lead
to stiffening and or delamination of the vinyl. Patching
should be done on both sides of the hole in the cover if
possible.
Winterizing Your Cover
The cover can support a limited amount of water, snow,
and ice. Each gallon of water on the cover weighs eight
pounds and a few inches of rain can quickly result in a
ton of water. Without the support of water underneath the
cover, tracks may pull off, the cover may tear, or other
damage could occur to the pool or spa that may create a
hazardous situation. It is important to maintain the same
water level all year.
Make at least monthly inspections of the water level
under the pool cover.
FALL MAINTENANCE: It is important to keep all water
pumped off your cover as freezing weather approaches
so you can go through the winter with as little weight
as possible on the cover. Your pump can be left on the
cover through freezing weather. Follow instructions as
described in the section “WATER ON TOP OF THE COVER”
on page 6.
WINTER MAINTENANCE: Inspect the water level in
the pool or spa at least once a month and add water if
necessary. (One method is to add water via the skimmer.)
Note that your water level may appear to be normal if
there is ice or snow on the cover. The weight on top of
the cover displaces an equal volume of water under the
cover and the pool water may be much lower than it
appears. Adding water will float the ice or snow on the
cover upward, thus relieving stress on the cover. As the
ice or snow melts the cover pump will turn on to remove it.
Your cover will survive the winter if these procedures are
followed.
DRAINAGE:Any drain in the housing should be kept free of
debris to allow water to drain freely. The lid covering the
housing should always be kept in place to avoid the hazard
of someone stepping into the housing area and to prevent
rain from directly entering the housing.
IMPORTANT! If it is not possible to keep your pool or spa
full during the winter, then the cover should be left off
the pool and other safety precautions should be taken.

800119 REL-0005©2017 Cover-Pools Incorporated 9
Please have your pool company fill in the following:
Recommended Chemical Plan
Recommended Alkalinity:
Recommended Sanitizer Level:
Recommended pH:
Sanitizer Type:
Recommended Salt Level:
Shock Frequency:
Other Recommendations:
(Always leave the cover open until the water is back to a safe range for swimming.)
WARNING 11pt
WARNING 12pt
WARNING 14 pt
WARNING 24pt
WARNING 21pt
WARNING 27pt
WARNING 37
10PT
WARNING Never leave an open pool unattended. Instruct anyone you allow to operate your cover about this!
CHEMICALS AND YOUR COVER
The pool’s chemical program may be significantly
different from that of a spa without a cover. With
proper use, the cover will substantially reduce
chemical loss; therefore, any previous chemical
programs may need to be adjusted to maintain proper
chemical balance in your covered pool or spa.
Chemical Build-up: You must avoid a build-up in the
quantity of chemicals in the pool water that can result
in serious damage to pool walls and equipment. Such
a build-up may also create an improper water balance
which may cause deterioration of the vinyl cover. A
deterioration so caused is not covered by the warranty.
To avoid chemical build-up, allow the chemicals to
circulate before closing the cover after adding any
chemicals to your spa. Test the water at the surface
with your test kit to ensure that it is safe to cover.
If it is safe to swim in, it is safe to cover!
High Alkalinity & Chlorine: A high alkalinity or high
chlorine level can begin to break down the cover
prematurely. Some pH adjusters may create harmful
levels of alkalinity (high pH) if they are not allowed
to mix with the water before the cover is closed. The
same is true with chlorine shocks. Some chlorine
shocks require 12-24 hours before returning to swim-
safe range.
Cover-Pools Incorporated recommends using a
non-chlorine shock because you can close the cover
within 30 minutes. Please check with your pool service
company for proper usage.
Extended Covering: Before covering the pool for
extended periods of time, such as winterizing, make
sure the water is balanced. Recheck the water after
the chemicals have mixed completely; this may require
checking the spa water a day or two later.
When covering the spa for long periods of time, adjust
your ozone generators and chemical feeders to an
appropriate level for a covered spa. Constant long-
term buildup of ozone can damage the fabric.
Inform Others: Please make sure your pool service
company or anyone in charge of pool maintenance is
aware of this information.
Obtain a good test kit and use it frequently.
Maintain Proper Balance: Common sanitizers (dry or
liquid) vary in their pH value. Depending upon the pH
value of the specific type of chlorine used, you may use
acid, soda ash, and baking soda to maintain proper pH
and alkalinity values.
Maintain the following swim-safe levels:
*Chlorine pH Alkalinity
1—5 ppm 7.2—7.8 ppm 80—120 ppm
*Sanitizers other than chlorine-based compounds,
per manufacturer guidelines.
800119 REL-0005©2017 Cover-Pools Incorporated 10
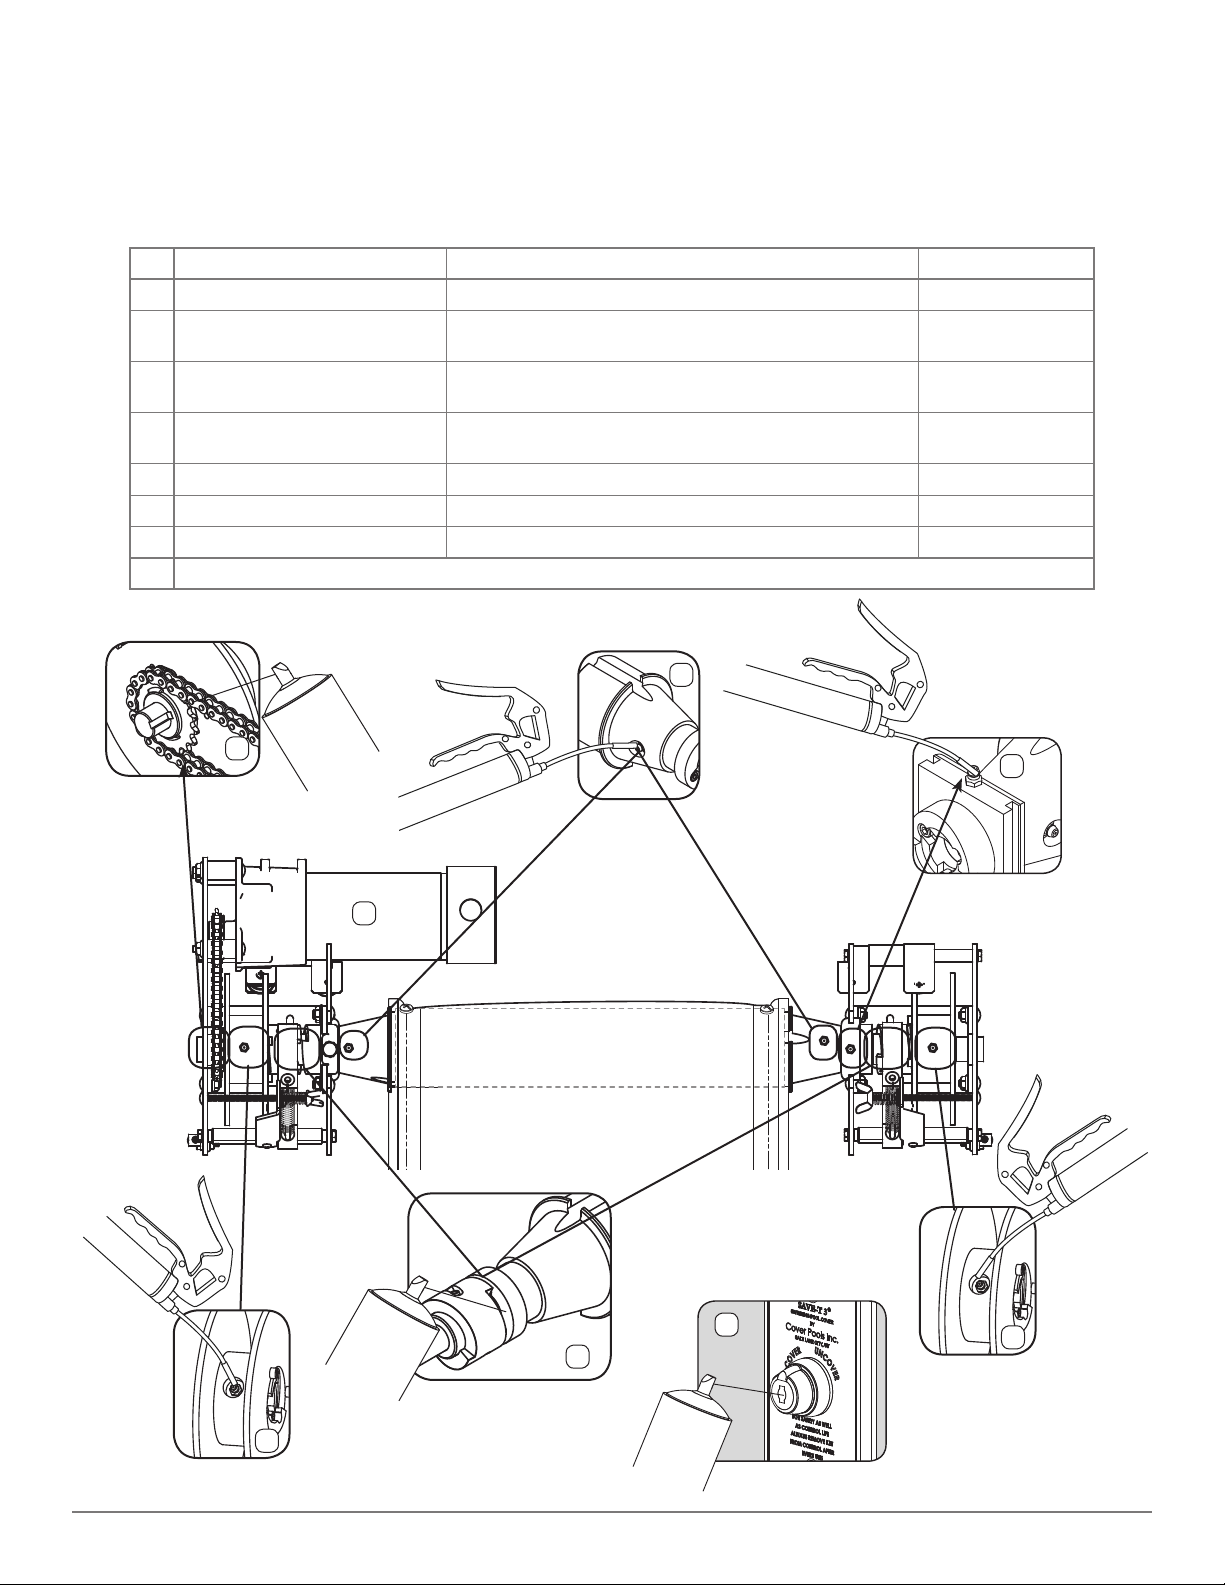
Lubrication
The working life of the mechanism will be enhanced and service problems will be reduced if you follow a regular
lubrication schedule. Never over-grease; excessive lubrication will collect dirt and can possibly get on the vinyl cover or
webbing. Grease on the vinyl or webbing can cause deterioration. Do not grease or put silicone on the rope, webbing, or
tracks; this will cause rapid deterioration of the threads, fabric, and track.
PARTS LUBRICATION REQUIREMENTS
Part Lubrication Frequency
AOpposite End Bearing Waterproof lithium type grease (Lubriplate®#1200-2) Twice per season
BMotor and Opposite End Hubs Waterproof lithium type grease (Lubriplate®#1200-2)
-Note: Cover the pool completely.-
Twice per season
CBoth Rope Reels Waterproof lithium type grease (Lubriplate®#1200-2)
-Note: Uncover the pool completely and rotate rope reels.-
Twice per season
DBoth Double Dogs WD-40®, Motor oil 30w, or similar
-Note: You may need to undo the strap around the double dog.-
Twice per season
EChain WD-40®, Motor oil 30w or similar Once per season
FKey Switch Tumbler Graphite lock lube Twice per year
GMotor does not require lubrication N/A
IMPORTANT: Clean and dry the parts before applying lubrication (e.g. using high-pressure water and/or compressed air).
A
B
C
C
E
G
Lithium Grease
Lithium Grease
Lithium Grease
Lithium Grease
Graphite
Lock Lube
F
WD-40
®
D
WD-40
®
x2
x2
800119 REL-0005©2017 Cover-Pools Incorporated 11
TIGHTEN WING NUT 1
POOL COVER
motor
MOTOR LOCATION ON RIGHT
WING NUT 2 WING NUT 1
POOL COVER
WATER
TIGHTEN WING NUT 2
POOL COVER
TIGHTEN WING NUT 1
WATER
POOL COVER
WATER
TIGHTEN WING NUT 2
MOTOR LOCATION ON LEFT
motor motor motor
WATER
ADJUSTMENTS AND MINOR REPAIR
If your cover stops running during operation, there is
something creating resistance, such as water on the cover,
dirt or debris in the tracks, or something damaged on
the system. Remove any excess water or debris and try
reversing the direction. If the cover moves, then proceed
with operating the cover. If the cover will not move further
in the intended direction, call your service technician.
Service: Some services, such as adjusting the cover
alignment and patching holes, are simple enough that you
might want to do it yourself. Other services are much more
complex than they first appear; therefore, we recommend
that an owner leave repairs to their local authorized
service technician. Contact your local service company for
advice before you undertake any serious service project on
your own; call Cover-Pools at 800-447-2838 to find a local
service company.
WARNING 11pt
WARNING 12pt
WARNING 14 pt
WARNING 24pt
WARNING 21pt
WARNING 27pt
WARNING 37
10PT
WARNING In order to minimize the risk of serious
injury, including loss of life, from electrocution or
moving mechanical parts, be sure to turn off the power
to the cover at the mains circuit breaker. Never adjust the
cover or try to perform any other maintenance while the
cover is running. Keep hands, clothing, etc., away from
the mechanism while operating.
Uneven Cover Retraction
Once your cover is installed it is unlikely that it will require
any adjustment. However, it is possible for extreme
changes in the cover condition to cause the cover to
run unevenly. Our exclusive brake adjustment is simple
enough to adjust yourself, thus avoiding a service call. You
should always determine which adjustment to make by
observing the evenness of the cover as it is coming off the
pool or spa.
Adjusting the cover is accomplished by tightening or
loosening the wing nut on the brake mechanism (see
illustration). Make sure the cover is stopped and the key or
power is in the “off” position. Adjust the cover by tightening
the wing nut (clockwise) on the side that consistently
comes back first. Add only a little brake at a time to avoid
applying too much tension. When possible, take the brake
off the side coming back slowest by loosening the wing
nut on that side. Note that a little brake must be left on
both sides at all times to prevent the rope from becoming
tangled due to backlash.
800119 REL-0005
©2017 Cover-Pools Incorporated
Cover-Pools Incorporated is a wholly owned subsidiary of Zodiac Pool Systems, Inc.
ZODIAC®is a registered trademark of Zodiac International, S.A.S.U., used under license.
All other trademarks used herein are the property of their respective owners.
ZODIAC®FAMILY OF BRANDS | Heritage of Excellence
FEDERAL AGENCY AND NATIONAL COMPLIANCE LISTINGS
Cover-Pools is committed to producing the highest quality pool and spa covers which comply with applicable safety
standards. We are your partners in providing a reliable additional layer of safety for your pool or spa.
UNDERWRITERS LABORATORIES INC. LISTING
ASTM ( American Society for Testing and Materials)
Designation: F 1346-91 (PSC, MSC, OC)
Cover-Pools products Save-T cover, Step-Saver and Auto-Save Spa Covers have been manufactured and are in full
compliance with ASTM F 1346-91 Standard Performance Specification for Safety Covers and Labeling Requirements for
All Covers for Swimming Pools, Spas and Hot Tubs.
FCC ID: P8G–50306 Save-T Cover Wireless 50305
Note: This equipment has been tested and found to comply with the limits for a Class B digital device, pursuant to
Part 15 of the FCC Rules. These limits are designed to provide reasonable protection against harmful interference in
a residential installation. This equipment generates, uses and can radiate radio frequency energy and, if not installed
and used in accordance with the instructions, may cause harmful interference to radio communications. However,
there is no guarantee that interference will not occur in a particular installation. If this equipment does cause harmful
interference to radio or television reception, which can be determined by turning the equipment off and on, the user is
encouraged to try to correct the interference by one or more of the following measures:
• Reorient or relocate the receiving antenna.
• Increase the separation between the equipment and receiver.
• Connect the equipment into an outlet on a circuit different from that to which the receiver is connected.
• Consult the dealer or an experienced radio/TV technician for help.
Note: This equipment has been tested and found to comply with the limits for a Class 1, Class 2, and Class 3 Radio
equipment and systems under Title: ETS EN 300 683 : 97 and ETS EN 300 200-1 (RES) (EMC) (SRD) operating on
frequencies between 9 kHz and 25 GHz. These limits are designed to provide reasonable protection against harmful
interference in a residential installation. This equipment generates, uses and can radiate radio frequency energy and,
if not installed and used in accordance with the instructions, may cause harmful interference to radio communications.
However, there is no guarantee that interference will not occur in a particular installation. If this equipment does cause
harmful interference to radio or television reception, which can be determined by turning the equipment off and on , the
user is encouraged to try to correct the interference by one or more of the following measures:
Reorient or relocate the receiving antenna.
Increase the separation between the equipment and receiver.
Connect the equipment into an outlet on a circuit different from that to which the receiver is connected.
If you have any additional questions please contact Cover-Pools at 1-800-447-2838.
E52841
Table of contents
Other Cover Pools Spa Accessories manuals

Popular Spa Accessories manuals by other brands


Takara Belmont
Takara Belmont YUME ESPOIR installation instructions

COVANA
COVANA EVOLUTION COVER owner's manual

Leisure Concepts
Leisure Concepts Covermate Vanish XL installation instructions

Gecko
Gecko BAHAMA SPAS Quick reference card

Takara Belmont
Takara Belmont YUME SWING installation manual

MAR PLAST SPA
MAR PLAST SPA KOMPATTO SPRAY SENSOR Use and maintenance manual