Covert MPE6 User manual

Page1
2016 MPE6
Covert Scouting Camera
Instruction Manual

Page2
Table of Contents
Button Function Diagram......................................... 2
Introduction ............................................................. 5
Installing the Batteries ............................................. 5
Installing the SD Card............................................... 6
Programming the Camera…………………………………..6-9
Formatting the SD Card…………...............................10
Taking a test photo…………………………………………11-12
Tricks and Tips on Field Setup................................ 14
Troubleshooting:.................................................... 16
Covert Scouting Cameras Warranty:...................... 17
Covert Warranty Policy and Procedure: ................ 18
Covert International Warranty ................................... 19

Page3
What You Will Need To Setup
the Camera:
-Minimum of 4 AA Batteries
-(1) 4GB SD Card (Up to 32GB)
Quick Setup:
1. Install batteries and SD card.
2. Turn camera onto setup.
3. Under the SYS tab, set the time and date.
4. Turn the camera on. (The screen will go
black for “power saver” mode.)

Page4
Button Function Diagram
Function table
Digital read out
Selector
switch
Navigation
arrows/test
photo
OK-Save
settings
Menu
Aux.
Power
Mini
USB
SD card
slot
Figure 1

Page5
Introduction
Congratulations on your purchase of the 2016 MPE6
Covert Scouting Camera! We truly value your
business and will continue to provide you top
quality customer service should you ever need help
with any of our products. Check out our other
products on our website at
www.covertscoutingcameras.com
Installing the Batteries
Your MPE6 can function on 4AA batteries. For
improved battery life, use 8-AA batteries. Using
Lithium AA batteries can extend the battery life
significantly.
Install the batteries by sliding the top battery into
the sleeve first, then depressing the spring with the
other battery and snapping down in place. Pay
attention to the (+) or (-) molded into each sleeve to
determine if you insert the positive or negative end
into the sleeve first. Negative battery terminal
always contacts the spring.

Page6
Installing the SD Card
Before you can turn on the camera, you will need to
install a Covert SD card in the bottom of the
camera. (Or any SD Card). See Figure 1 below for
card orientation. Push in until it clicks and release.
To remove, repeat that process, the card will pop
out enough to remove. You can use any SD card
size up to 16GB. You must have the SD card in the
camera to be able to turn the camera on to set up
mode and proceed with choosing your settings.
Figure 1

Page7
Programming the Camera
Slide the selector switch to the SETUP position. You
will see the digital display light up with a 3 digit
number on it. This is how many photos are on the
SD card. (Figure 2).
Press the menu button and the digital read out will
have A-H on the screen. (Figure 3).
Figure 2

Page8
Choosing the Camera Settings
Your MPE6 has a fixed MP rating of 6MP. You can
choose from 4 different preset camera options.
See Table 1 to explain the settings.
O
Figure 3
Page9
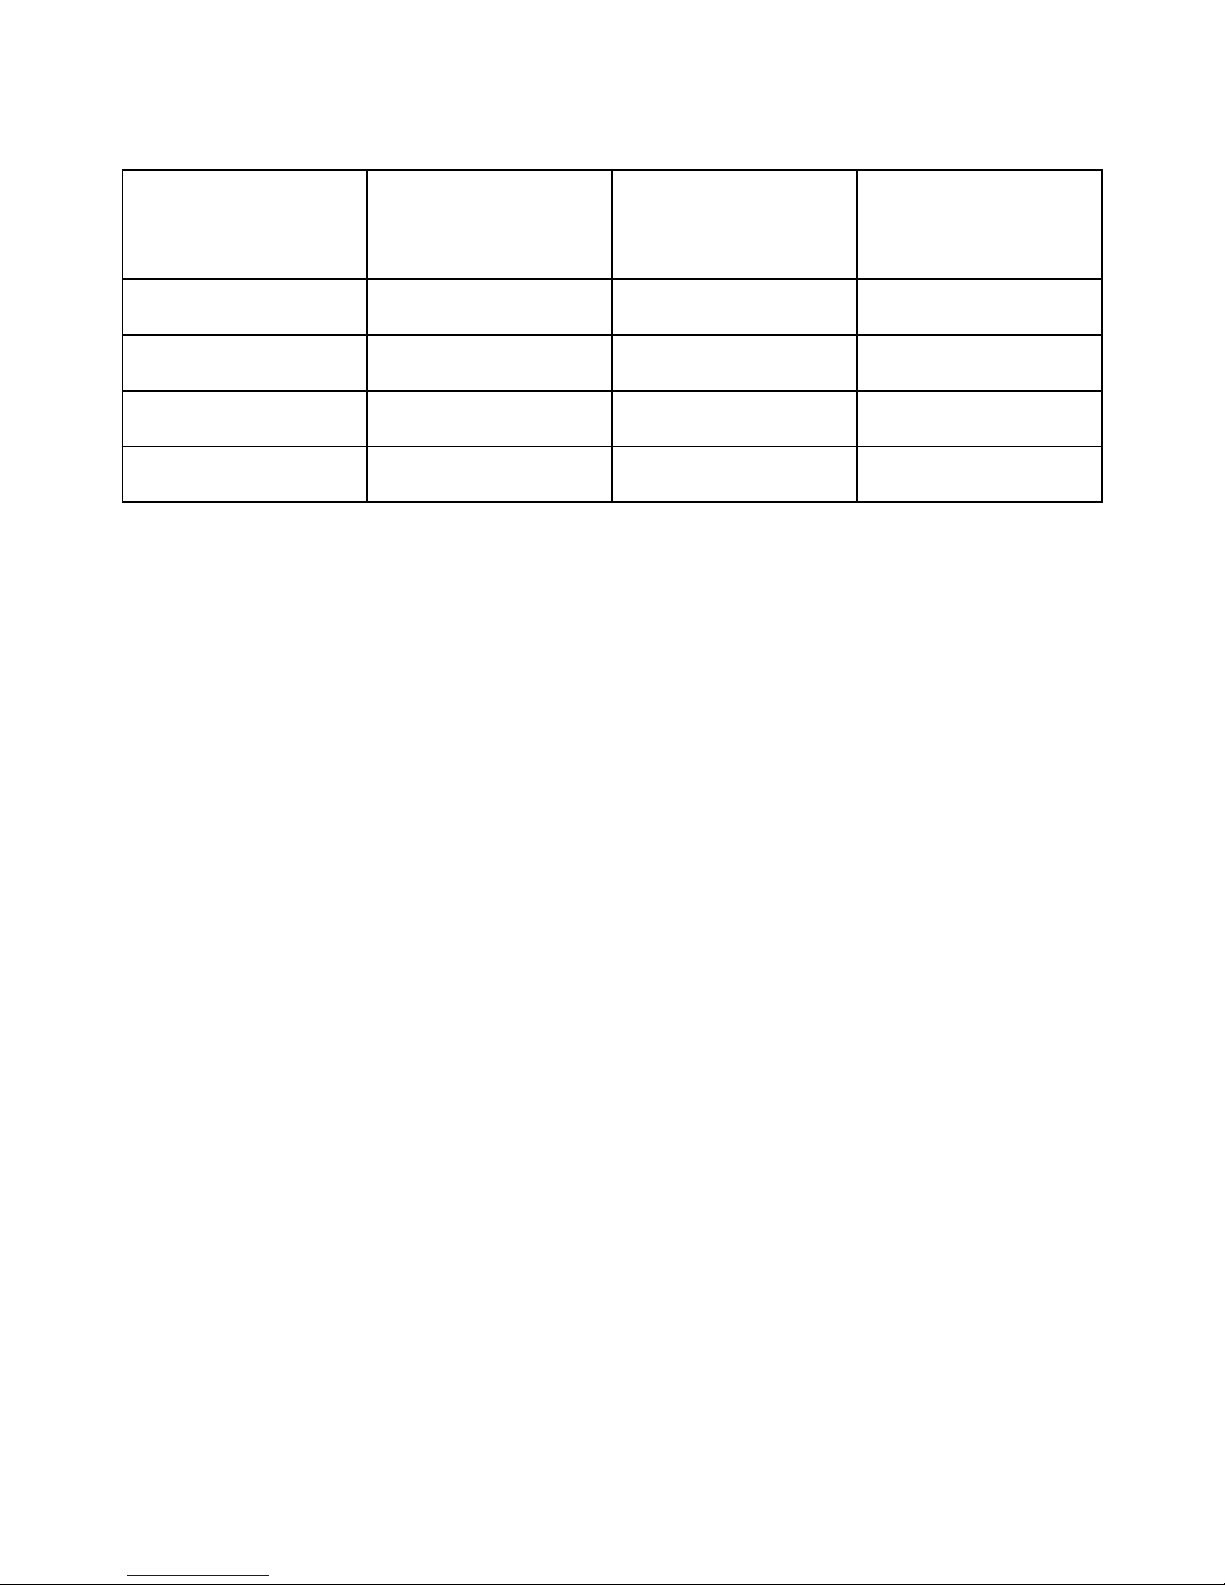
Option
# of
Photos
Timer
Interval
Camera
Mode
A
2
30 sec
Picture
B
2
1 min
Picture
C
3
5 mines
Picture
D
0
10 sec
Video
Table 1
IMPORTANT NOTE: Use caution when getting close
to the number because if you accidently pass the
setting you want, you have to keep pressing the ▼
button all the way through
Setting Date and Time: After you have selected
your camera settings, press the ▼ button until you
see “E” on the display. Press “OK”. You will see
“01” flashing. Press the ▼button repeatedly until
you get the correct month number 1-12, (January –
December).
Once you have the month set, press the ►button
to set the date. Again you will see a blinking
number. Press the ▼button repeatedly until you
reach the proper day.

Page10
Press the ►button again to move to the Year
setting. Again, press the ▼arrow repeatedly until
you reach the correct year.
Press the ►button again to set the hour. H01 will
be flashing. Press the ▼button repeatedly until
you see the correct hour. Press OK to save. Press
the ►button again to set the minutes. M01 will be
flashing. Press the ▼button repeatedly until you
see the correct minute. Press OK to save. Press the
►button again to set the seconds. S01 will be
flashing. Press the ▼button repeatedly until you
see the correct seconds.
The hours are in Military Time only (0-24).
To choose a camera setting you will need to be in
the SETUP-MENU mode. Press the ▼button until
you see the following on the Digital readout. (Fig.4)
Table of contents
Other Covert Scouting Camera manuals

Covert
Covert 2016 MP8 User manual

Covert
Covert 2013 MP6 User manual

Covert
Covert MP32 User manual

Covert
Covert MP16 User manual

Covert
Covert UM565-3GV User manual

Covert
Covert Red Maverick User manual

Covert
Covert Code Black LTE User manual

Covert
Covert Brite Star User manual

Covert
Covert Blackhawk User manual

Covert
Covert NBF30 User manual

Covert
Covert MP8 Black User manual

Covert
Covert WC20-A User manual

Covert
Covert Reveal User manual

Covert
Covert 2014 Code Black User manual

Covert
Covert MP30 User manual

Covert
Covert Code Black LTE 5472 User manual

Covert
Covert 2015 MP8 User manual

Covert
Covert Black Select User manual

Covert
Covert NBF22 User manual

Covert
Covert Code Black 3G User manual


