COXPAL A9D User manual

User Manual
Model No: A9D


Contents:
Safety Instructions
What’s In The Box
At A Glance
Specifications
microSD Card
Installation
Use
Warranty & Support
1. Daily Use
2. Shortcut Keys
3. LED Indicators
4. Screen Overview
5. Main Menu
6. Parking Monitor
7. Watch recordings via PC & TV
8. Reset
9. Firmware Upgrading
1
2
3
7
4
5
6
8
9
/01
/02
/03
/15
/04
/06
/08
/18
/19
Android & iOS APP
FAQs
10 /21

1Safety Instructions
Please read and understand all instructions hereunder before
using this product. If damage is caused by failure to follow the
instructions, the warranty does not apply.
Keep this user manual.
DO NOT operate this product while driving.
DO NOT drop, puncture, or disassemble this product.
DO NOT expose this product to liquid, or open flames.
DO NOT use any corrosive cleaners/oils to clean this product.
DO NOT install this product where it can block the driver’s view.
DO NOT use the power charger if the power cable is damaged, or
broken.
Use original accessories only.
Set time and date correctly before using this product.
Keep the camera lens clean and nothing blocking the lens.
Remove this product from your vehicle when not in use for a long
period.
Avoid long exposure to direct sunlight or high temperature that
may significantly shorten the lifespan of the product.
The Company is NOT responsible for the loss of any data during
the use.
Page / 01

A
F. 1 * Spare Adhesive Tape
D. 1 * Crowbar G. 1 * User Manual
. 1 * Coxpal A9D Dual Dash Camera E . 1 * GPS Mount,
With Adhesive Tape
B . 1 * USB to USB Type-C Cable 3.5M(11FT)
C . 1 * Dual USB Car Charger 5Vdc/2.4A
2What’s In The Box
A
C
B
D
E
G
F
Page / 02

3At A Glance
No Name Description
1
2
3
4
5
6
7
8
9
10
11
12
13
14
15
16
17
18
1
3
17
5
2
6157 8 12
13
14
11
9
10
18
16
4
Working Indicator
LCD Screen
Down
OK
Up
IR LED lights
GPS Mount
USB Type-C port 1
USB Type-C port 2
microSD Card Slot
Parking Indicator
Speaker
Right
Left
Reset
Microphone
Front Camera Lens
Inside Camera Lens
Indicates working modes
1.5’’ TFT Color LCD Display
Navigate; Mute/Unmute
Power on/off; Confirm;
Navigate; Pause Recording Mode
6pcs IR LED lights for infrared night vision
Rotatable, detachable, adhesive
5Vdc power input
5Vdc power input & Video output
For an external microSD card
Indicates parking mode
Plays audio
Switch front/front+inside/inside preview
Return; Emergency lock; WiFi Shortcut Key
Records audio
Rotatable by GPS mount
5° all-direction rotatable
Reset to factory default
Page / 03

4microSD Card
1. This camera supports genuine microSD memory card up to 256GB
with a speed rating of class 10(UHS-1) or above.
2. For 64GB or 128GB or 256GB card, please beforehand format it to
FAT32, the card can be formatted by either this camera or computer
(Windows & Mac).
3. DO NOT remove, or insert the card when this camera is powered
on which may cause card corruption and data loss.
4. Typical recording time in normal recording mode:
Capacity
32GB
64GB
128GB
1440P@30FPS
Front Single
1080P@60FPS
Front Single
1080P@30FPS
Dual
5. Insert the card with the gold contacts facing the screen side of
the camera, push the card until it clicks into the place.
6. To remove the card, gently push its top edge inward until it
clicks, then pull it out of the card slot.
5
6
Page / 04
3 3.5 3.5
5.8 7 7
11.8 14 14

7. The recordings will be saved into following 4 folders respectively:
What’s the folder? Overwritten if set loop recording?
Yes
· Based on “First in first out” when
storage is full;
· If set loop recording off, pop-up
box appears when storage is full.
· Manually locked;
· G-sensor locked;
· Moved from
“Normal”.
· Normal;
· Parking.
1. Loop recording means the memory card is written and
overwritten frequently, therefore, we strongly recommend to use
high endurance card and not recommend to use generic card.
2. Check and format the microSD card every 2 weeks to ensure it
works properly and stores the data securely.
Folder
Front Normal
Front Event
Inside Normal
Inside Event
Note:
No
· Pop-up box appears when
storage is full.
· Need to manually export/delete
the file, or format the SD card.
· Normal;
· Parking.
· Manually locked;
· G-sensor locked;
· Moved from
“Normal”.
Yes
· Based on “First in first out” when
storage is full;
· If set loop recording off, pop-up
box appears when storage is full.
No
· Pop-up box appears when
storage is full.
· Need to manually export/delete
the file, or format the SD card.
Page / 05

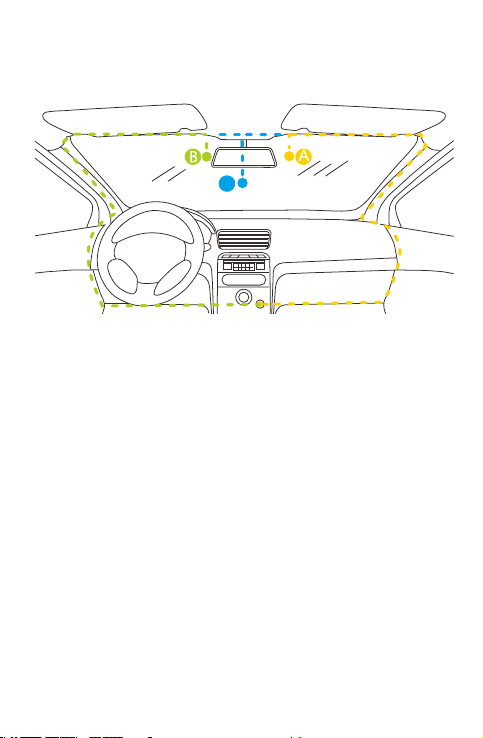
5Installation
1. Install this product near the rear-view mirror to obtain the best open-
field view.
2. DO NOT install it in a location where may obstruct driver’s view.
3. Ensure the lens is within the wiping range of the windscreen wiper
to ensure a clear view in all weather conditions.
4. Keep the lens stays clean to ensure clear videos – be especially
careful not to leave fingerprints.
5. Ensure the surface of the windscreen is clean and dry and attach the
adhesive mount onto the windscreen securely.
6. Store spare adhesive tape in case of future use.
Steps to install:
Insert a memory card into the camera.
Power on the camera by connecting with the supplied power cable
and USB car charger (or, a 5Vdc/2A wall charger if at home, i.e. DO
NOT get power from computer’s USB or car’s own USB ports).
If “SD card error”, please format the microSD card.
Implement the installation if everything works normally.
1. Quick test before installation.
Page / 06
3. Remove the protective film of the adhesive tape and firmly affix the
mount onto the windshield.
4. Use the crowbar to tuck and hide the power cable into the seams
and weatherstrips around the edge of the dashboard.
5. Adjust the viewing angle of front lens and rear lens respectively to
ensure that they are aligned with the road ahead and the cabin
inside.
2. Select an ideal location (A or B or C) on the windshield near the
rear-view mirror, clean with clear water and wait until fully dry.
c
Page / 07
6Use
1. Daily Use
MicroSDcard:If the SD card is functioning abnormally, the
camera will beep.
CameraPowerState:The cameras LED indicates that it is
operating normally.
CameraRecordingMode:The red dot will flash on the screen,
which indicates that it is recording.
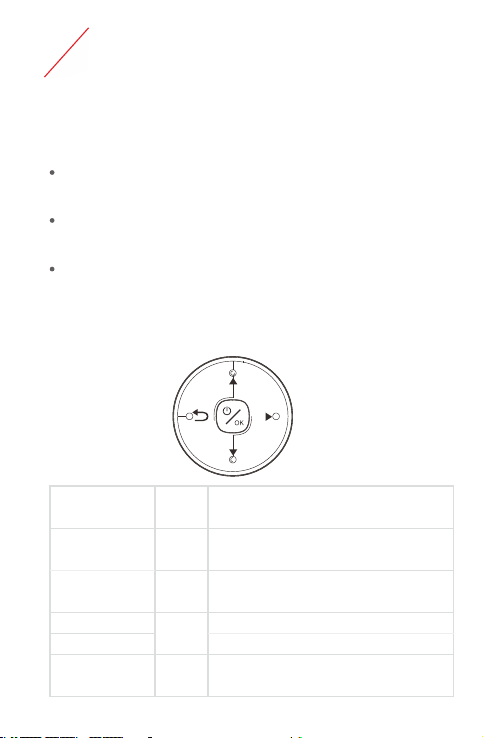
2. Shortcut Keys
The shortcut keys valid under Recording Mode (Red dot flashes on
screen):
Short Press
Short Press
Long Press
Long Press
UP
OK
DOWN
Lock/Unlock the current video clip
Pause Recording Mode
Power off/on the camera
Mute/Unmute, turn off/on
audio recording
Once installed properly, the camera will function without the need for
maintenance. The following are 3 key status indicators:
RIGHT Switch screen between
Front/Picture in Picture/Inside
LEFT WiFi on
Long Press
Short Press
Page / 08
Green Flash
Green Quick Flash
Red Flash(off optional)
Normal recording
Firmware upgrading
Parking mode
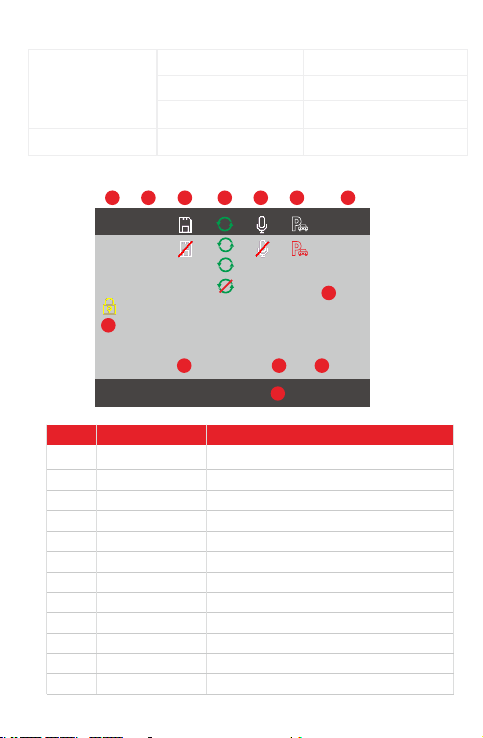
4. Screen Overview
No Name Description
EV
WDR
SD card
Loop Recording
Microphone
Parking Mode
GPS
Emergency lock
Resolution
Time
Recording Mode
Video Duration
Exposure Value
Wide Dynamic Range
SD card normal; abnormal
1min; 3min; 5min; Off
Audio is being recorded; Mute
Parking mode is On; Off
Positioning; GPS normal; No GPS
Current video clip is Locked; Unlock
Video resolution for front & rear
Current time YYYY/MM/DD
Video is being recorded
Current video clip recording time
1
2
3
4
5
6
7
8
9
10
11
12
2020/08/01 12:00:00 00:00:00
1
1080P + 1080P
EV
0.0
WDR
2 3 4 5 6 7
9
8
10 11 12
3. LED Indicators
Working Indicator
Parking Indicator
Green Constant On
1
3
5
000KMH
000KMH
NO GPS
Page / 09
Camera power on

5. Main Menu
1. Enter into Main Menu: Short press UP to pause Recording Mode
(Red dot disappears on screen) Short press LEFT.
2. Set parameters in Main Menu: UP/DOWN to navigate; OK to
confirm.
3. Exit from Main Menu: Short press LEFT Back to Recording
Mode.
4. Main menu logic structure:
Camera Settings
System Settings
Playback
Ready to
Connect
WiFi
connected
WiFi
Inside Normal
Inside Event
System Settings
Camera Settings Submenu
Submenu
Video files
Front Normal
Front Event
2020/06/01 12:00:00 00:00:00
1440P + 720P
EV
0.0
WDR
1000KMH
Recording Mode
Page / 10

Note:
Time Zone: Set Time Zone correct in “Main Menu Camera Settings
GPS” is required for the first use.
Frequency: Generally speaking, 220Vac=50Hz; 110Vac=60Hz.
Infrared LED:
AUTO: The camera automatically turns on/off infrared LED based on
sensing the changes of luminance through the front lens.
The brightness of 6PCS LED lights is 2-level adjustable automatically
according to the ambient brightness.
Loop Recording: Loop Recording “Off” poses risk of no recordings after
the card storage is full.
Auto LCD Off: If screen off by setting “1min off or 3min off or GPS
Screen”, short press any key to screen on.
Format: The data in memory card will be unrecoverable after formatting.
Playback:
When the video file is being played, short press RIGHT key to “Delete”
or “Lock”/”Unlock” current video clip.
After the video file is manually locked, it will be automatically transferred
to the folder of “Event”; After the video file is manually unlocked, it will
be automatically transferred to the folder of “Normal”.
GPS: Signal reception interference from the camera has been eliminated
to the minimum through a series of optimization, GPS positioning is
normally fast, however, positioning speed is also affected by other factors
such as: metallic tinting on the windshield, high-rise buildings on both
sides of the road etc.
Page / 11

6. Parking monitor
1. To realize parking monitor, uninterrupted power is required:
Methods Pros Cons Context of use
Official Coxpal
Hardwire Kit
installed.
Active cigar
lighter
(When car
engine is off,
the cigar
lighter still has
power supply.)
External power
bank
1. Neat
installation
and doesn’t
occupy cigar
lighter;
2. “Low voltage
protection”
to avoid car
battery from
draining.
1. Quick and
direct.
2. Cost-saving.
Quick and
direct.
1. A little extra
cost;
2. It can’t 100%
protect car
battery from
draining
especially for
old car
batteries.
1. No “low
voltage
protection”,
potentially
drain car
battery.
2. Only a few
cars
equipped
with active
cigar lighter.
Poses fire risk.
Regular use
Urgent or
temporary use
Short time use
Page / 12

2. How does parking monitor work?
Parking Monitor “OFF”:
If hardwire is installed: Camera is still recording.
If hardwire is not installed: Camera powers off when vehicle
engine is off (For a few vehicles which is equipped with active
cigarette lighter, please set either "Time lapse 1FPS" or "Low
Resolution 720P" and Guard Time 15 minutes, the camera can
be off after 30 minutes when the vehicle is parked).
Parking Monitor “Time Lapse” or “Low Resolution” + Guard
Time “X”, when vehicle is stationary (zero G-force):
Normal recording
15 minutes
Time Lapse Recording; or,
Low Resolution Recording
Auto shutdownAuto shutdown
Note:
Please selectively choose “Inside Camera On” due to excessive power
consumption from 6pcs infrared LED lights.
If G-sensor is triggered
Guard Time “X”
Parking indicator on
(off optional)
Screen Off
Screen On
Working indicator on
Page / 13

7. Watch recordings via PC & TV
By directly connecting the camera with an USB data cable.
By directly reading the microSD card with a card reader.
1. Two options to watch the recordings:
Note: Inferior data cable affects transfer speed.
2. If watch via Mac or Windows computer, proprietary COXPAL
media player is available:
It supports play 2-channels simultaneously;
It supports play GPS speed & trajectory;
The player can be downloaded from www.coxpal.com.
8. Reset
Use a needle to press the reset hole and hold for several seconds
and then the camera will start to reset automatically.
9. Firmware Upgrading.
1. In System Settings, you can find current firmware version No.
2. How to upgrade the firmware:
1). Copy the firmware ( .bin file ) into the root directory of the
microSD card (FAT32 format is required);
2). Insert the microSD card into the camera;
3). Power on the camera, the camera will boot up automatically
after upgrading successfully.
3. Always stay up-to-date
Note:DO NOT cut off power during the upgrading which may
cause camera failure.
The latest firmware version is always available at the official
website ( ). We strongly recommend registering www.coxpal.com
your product ( ) to receive notification messages www.coxpal.com
when new firmware update available.
Page / 14

7APP
1. Compatible with: Smart phone running android 4.0 or higher & iOS7.0
or higher.
2. User Privacy: We take user privacy very seriously and our APP DOES
NOT collect any kind of personal data but only basic permissions
required, please rest assured to use it.
3. The camera keeps working without connecting the APP, no bother to
get APP connected for most of the time but just let the camera work
alone.
4. Get the APP connected when APP-Operating is more user-friendly, for
example:
Set new parameters of the camera in car seat, elegantly;
Save one or more video clips to the phone, directly and immediately.
1. Download official “Coxpal” APP from either Google Play Store or
Apple App Store, install it into your phone directly.
2. Enable camera WiFi:
By Main Menu WiFi
By shortcut key: Long press LEFT button
1. Launch Coxpal APP Click “Connect the camera” button
WLAN networks Find Coxpal and input password “doourbest”
Back to Coxpal APP The button shows “Enter”.
2. or: Your phone Settings WLAN networks Find Coxpal and
input password “doourbest” Launch Coxpal APP The button
Shows “Enter”.
1. Before connecting:
2. Connecting:
Page / 15

3. Use the APP.
Connected Ready to connect
Preview Album About
Playback Camera Settings
Model No: A9D Model No: A9D
Connected Ready to
Connect
Page / 16

1. If “Coxpal camera” can be found in phone’s WLAN networks:
iPhone: Enable Airplane Mode in phone settings;
Android phone: Disable Mobile Data in phone settings; Or,
Disable “Intelligent Network Connection” if this option available
in phone settings (Some phones can intelligently switch to
mobile data if current WiFi network is not internet capable).
2. If “Coxpal camera” can NOT be found in phone’s WLAN networks:
Check if the camera is powered on;
Or, Check if the camera WiFi is enabled;
Or, Check if the camera is near the phone;
Or, Reset the camera.
3. There is also a possibility that the APP can’t be connected
temporarily due to phone’s new OS, in this case, please don’t worry,
we will update our APP quickly to adapt to the new OS.
4. Troubleshoot connection problems:
Page / 17
Note:
1. To stream preview video smoothly, the image in Preview Mode is not
based on the original resolution but compressed.
2. To play video files in APP’s Album with GPS information, disconnect
with the camera and connect with internet is required.
Table of contents
Other COXPAL Dashcam manuals


