VENTRA VDR-100 User manual

User Guide
VDR-100
Vehicle HD Video Recorder
Innovative solutions in vehicle and mobile video technology
Please read and follow all instructions and features before use. Save for
future reference.
Manual Ver 09 17
1578 W. San Bernardino Rd. # E,
Covina, C 91722 US
www.ventrainc.com / [email protected]
Tel: 888 418 3833

Warning – Safety Precaution
Please read these safety instructions thoroughly before operating
the product and keep this manual for future reference.
Please be aware that micro SD memory card have limited product
life expectancy and will eventually degrade in time - causing errors in
recordings / data corruption.
It is highly recommended to format and check the integrity of the
Micro SD card on a regular basis. Micro SD memory card related
problems are not under warranty and the manufacturer or the
supplier is not responsible for data loss or missing recordings.
Install the device in a manner that does not obstruct the driver’s
view of the front or sides of the vehicle, or interfere with the safety
of operating the vehicle.
Warning – Safety Precaution
Please comply with all local, state and federal driving and traffic
regulations.
To reduce the risk of fire or electric shock, do not expose this unit to
water, liquid, rain or moisture.
Disconnect and replace cable if wire is stripped or damaged.
In the event of an impact or accident, please check to ensure
the equipment is properly secured. Inspect the mounting bracket and
adhesive for any signs of damage.
Do not put foreign material into card insertion slot of the terminal, it may
cause product damage.
The product is designed to be installed inside the vehicle. ny damage
caused
by
placing
the
device
outside
the
vehicle,
or
damage
due
to
When exposed to direct sunlight for extended period of time, the
equipment may become hot. Please exercise caution when
touching the equipment.
Do not operate, adjust or view the VDR-100 while driving or when
vehicle is in motion as it may lead to accidents and or injuries.
Do not place the device insecurely on the dashboard, or place the
device in front of or above an airbag.
ltering and disassembling of the product may result in a fire or
electric shock. Disassembling the product will void the warranty.
Inquire with Ventra in the event the product needs repair.
caused
by
placing
the
device
outside
the
vehicle,
or
damage
due
to
misuse or handling of the product will void the warranty.
The warranty does not cover claims related to mishandling, tampering
and / or disassembling of the product.

WARNING– IMPORTANT NOTICE
ADAS Feature
The ADAS (A vance Driver Assistance System) is an image
an software base feature embe e by the processor
manufacturer which is NOT Ventra.
As with all technologies, the ADAS feature has limitations an
may not etect variations in vehicle operation an
environment.
Do NOT rely on the ADAS feature as an alternative to proper
operation of the vehicle. The feature is NEVER a substitution
for attentive riving at ALL TIMES.
Failure to focus on attentive riving may lea to acci ents
which result in serious injury or eath
Win shiel Mounte Device Legal Notice
Please check and comply with LL local, state and federal laws and or
regulations regarding windshield mounted devices. Some state laws
prohibit drivers from using suction mounts on their windshield when
operating motor vehicles. Other state laws allow the suction mount to
be mounted to be located only in specific locations on the windshield.
Numerous states have enacted restrictions against placing objects on
the windshield in locations that obstruct the driver’s vision.
IT IS THE USER’S RESPONSBILITY TO MOUNT VENTRA EQUIPMENT IN
COMPLIANCE WITH ALL PPLICABLE LAWS AND ORDINCANCE.
Au io an Vi eo Recor ing Legal Notice
Certain local, state and federal laws may prohibit recording of audio and
or video in vehicles or public area, or without knowledge and or consent,
please check and comply with LL local, state and federal laws and
regulations.
Built-In Shock Sensor
The built-in shock sensor may not recognize slight shock or
minor collision as an event. Different sensitivity levels may
be a juste to match the level of sensitivity.
regulations.
Certain local, state and federal laws may require signage or display that
indicate recording of audio and or video in vehicles or public area.
Please check and comply with LL local, state and federal laws and
regulations.
IT IS THE USER’S RESPONSBILITY TO USE VENTRA EQUIPMENT IN
COMPLIANCE WITH ALL PPLICABLE LAWS AND ORDINCANCE.
Use of this product other than its intended purpose is strictly prohibited.
Ventra Technology, Inc. does not assume any responsibility for any
fines, violation, penalties or damages that may be incurred as a result of
the use of the product.
Ventra Technology, Inc. is not responsible for any direct, indirect,
incidental or consequential damages, arising out of use, misuse or
inability to use of our products.

1 Intro uction
Ventra VDR-100 is an all-in-one high performance
Vehicle HD Video Recorder. The plug and play setup
makes this system an ideal choice for both passenger
and commercial vehicle.
1.1 Features
* High Dynamic Range Imaging (HDR)
* Super HD 2304*1296
* Up to 150 Degree Wide ngle Glass Lens & IR-Filter
* Built-in G-sensor
* Motion Detection
* Emergency Recording File
* dvanced Driver ssistance Systems ( D S)
1.2 Package Contents
Camera Bracket
1.3 Pro uct Overview
Car Charger MicroSD Car
Note:
To operate the camera, press the corresponding buttons
(5, 8, 9, 10) according to guide icons shown on the screen.
Nu mb er IT EM Nu mb er ITEM
1 Bracket Socket 8 Up Button ( )
2 Power Switch 9 Down Button ( )
3 Memory Card S lot 10 Enter But ton( )
4 USB Connector 11 Speaker
5 Back Button ( ) 12 Wide ngle Lens
6 LED Indicator 13 Micro phone
7 LC D Panel 14 Mi ni HD MI
02 03

2 Getting Starte
2.1 Inserting the Memory Car
Insert the memory card with the gold contacts facing the
back of the camcorder. Push the memory card until it clicks
into place.
To remove the memory car
Power off the VDR-100 first, then push to
eject the memory card out of the slot.
2.2 Installing in Vehicles
2.2.1 Mount to win shiel
1. ttach the bracket to the camcorder.
Slide it into the bracket holder until you
hear a click.
2. Select the location to mount
the VDR. Ideally in the center
section of the windshield.
Important Note:
1.Do not remove or insert the memory card when the camera is
turned on. This wi damage the memory card.
2.It is recommended to use C ass 10/U1 or above micro SD card.
3. P ease format the micro SD card prior to the initia use.
4.If the screen shows “Low Speed Card” whi e recording, this
means the writing speed of the memory card is too s ow. P ease
rep ace it with a higher-speed memory card.
5.If “Card is too fragmented” is disp ayed whi e recording, it
means the card is unab e to save the recording. P ease make a
copy of existing fi es in the card and then reformat it in the
VDR-100.
3. Before installing the bracket,
please use alcohol to clean the
windshield and suctioncup of the
bracket. Wait for it to dry and
press suction-cup on the
windshield.
4. Hold the base firmly on the
windshield and press down the
clamp to mount the car holder to
the windshield. Make sure the
base is securely locked in place.
04 05

2.2.2 A just the camcor er position
1. Loosen the knob to swivel
the device vertically or
horizontally.
2. Tighten the knob to
make sure the camera is
securely locked in place.
2.3 Connecting Power
Use only the supplied car adapter to power up the
camera
and
charge
the
built
-
in
battery
.
2. Plug the other end of the car charger to the cigarette
lighter socket of the vehicle. Once the vehicle engine is
started, the camera automatically turns on. Car charger
input: DC 12 / 24V.
Important Note:
1.Use the product with the supp ied charger on y. Do NOT use
other power chargers to avoid camera damage or cause battery
exp osion.
2.When using the VDR-100 for the first time, p ease fu y charge
the camera battery.
3.P ease note if the environment temperature reaches 113°F
or above, the car adapter wi continue to supp y power to
VDR-100, but wi not charge the Lithium-ion battery for safety
reasons.
Battery Status Indicator
Ic o n
Desc ription
camera
and
charge
the
built
-
in
battery
.
1. Connect one end of the car adapter to the USB
connector of the VDR-100.
USB port input:DC 5V / 1 .
Ic o n
Desc ription
Fully charged
75% charged
50% charged
25% charged
Low battery
Connect the car adapter
to charge the battery /
Battery is fully charged.
06 07

2.4 Battery Status In icator
Icon Description
Green
LED Light Off
Green
LED Light Off
Power off, battery charging
Power off, battery fully Charged
Power on, battery charging
Power on, battery fully charged
Recording/ Recording and screen off Bl inki ng Red
2.5 Powering the Camcor er On / Off
2.5.1.1 Power On
Slide the Power Switch down to the
ON position. This action will cover
part
of
the
memory
card
slot
.
2.5.2 Set the Date an Time
To set the date and time, do the following:
1. Press the button to enter the
on-screen display (OSD) menu.
2. Press the button to select
Date / Time and press
the button.
3. Press the button to adjust
the value and press the button
to move to another field.
4. Repeat step 3 until the date and time setting is
Complete
.
3 Using the VDR-100
3.1.1 Recor vi eos while riving
When the vehicle engine starts up and the utomatic
Record
function
is
enabled,
the
VDR
-
100
automatically
part
of
the
memory
card
slot
.
2.5.1.2 Power Off
Slide the Power Switch up to the OFF
position. Before removing the
memory card, please wait until
power-off sequence is completed
and the screen turns off. Do not
remove memory card during power-
off sequence to prevent video loss or
file corruption.
2.5.1.3 Reset the camcor er
On rare occasions, the VDR-100 may
experience an error for unknown
reasons. In this case, please press
OK button for at least 8 seconds to
turn off the camera.
Record
function
is
enabled,
the
VDR
-
100
automatically
turns on and starts recording. Recording will automatically
stop when the engine is switched off. Or press the button
to stop recording manually.
Note: On certain vehic es, the cigarette ighters are
constant y ON (Hot) so the recording wi continue when the
engine is switched off. If this happens, p ease manua y turn
off the camera or remove the car adapter from the cigarette
ighter.
3.1.2 Recor all other types of vi eos
1. Press the button to start recording.
2. Press the button to stop recording.
Note:
1.Camera can be configured to save a video fi e for every
3 or 5 minutes of recording segment.
2. If the memory card capacity is fu , the o dest fi e in
the memory card wi be overwritten.
08 09

3.1.3 Emergency Recor ing
During Video Recording, press the
button to enter
emergency recording mode.
The “Emergency” message
will be shown immediatelyon
the upper left corner of the screen,
and the recorded file will
be protected. To stop the recording, press the Button.
Note:
1.If the Collision Detection function is enab ed and a
co ision is detected, the camcorder wi automatica y trigger
the emergency recording. The recording wi ast 20 seconds
after co ision.
2. The emergency recording fi e is created as a new fi e,
which wi be protected to avoid being overwritten by norma
cyc e recording.
3.1.5 Taking Snapshot
You can also use this camera to
take snapshots of the current
scene. From the standby screen,
press the button to take a
snapshot.
Note:
If
recording
is
in
progress,
Num ber It e m De script i on
1 Re c o rdin g Duratio n In d icates the recording duratio n .
2 Da te a ndT ime Ind ic a te s c ur ren t r e co rd in g d at e an d tim e.
3 Guide Ic on (Menu) Press the butto n to enter the O SD menu.
4
Guide Icon
(P aybac k ) Press t he but ton t o sw itch to P a y b ack mode.
5 Battery In dica tes r emain ing b attery power.
6 Guid e Icon (St op) Press the button to stop t he r e c o r din g .
7
Guide Icon
(Eme r g e n c y)
Press t he butt on to cont in uous y reco rd the eme r g e n cy
video in one f i e unt i the rec o r ding is manua y st o pped.
The a ert message of “Emergency files are full” wi pop
up on the screen when the emergency recording fi es are
fu . User wi need to manua y de ete the emergency fi es
in the memory card to record new emergency fi es.
3.1.4 The Recor ing Screen
Note:
If
recording
is
in
progress,
press the button to stop the recording first.
3.2 Playback Vi eos an Photos
3.2.1 Playing Vi eos/ Viewing Photos
To play videos, do the following:
1. If recording is in progress, press
the button to stop recording.
The standby screen is displayed.
button to enter the
2.Press the
OSD menu.
3. Press the button to select
File Playback and press the Button.
button to select Vi eo or Emergency
Button.
button to browse for the desired video file
4.Press the
and press the
5.Press the
and press the button to play the video.
10 11

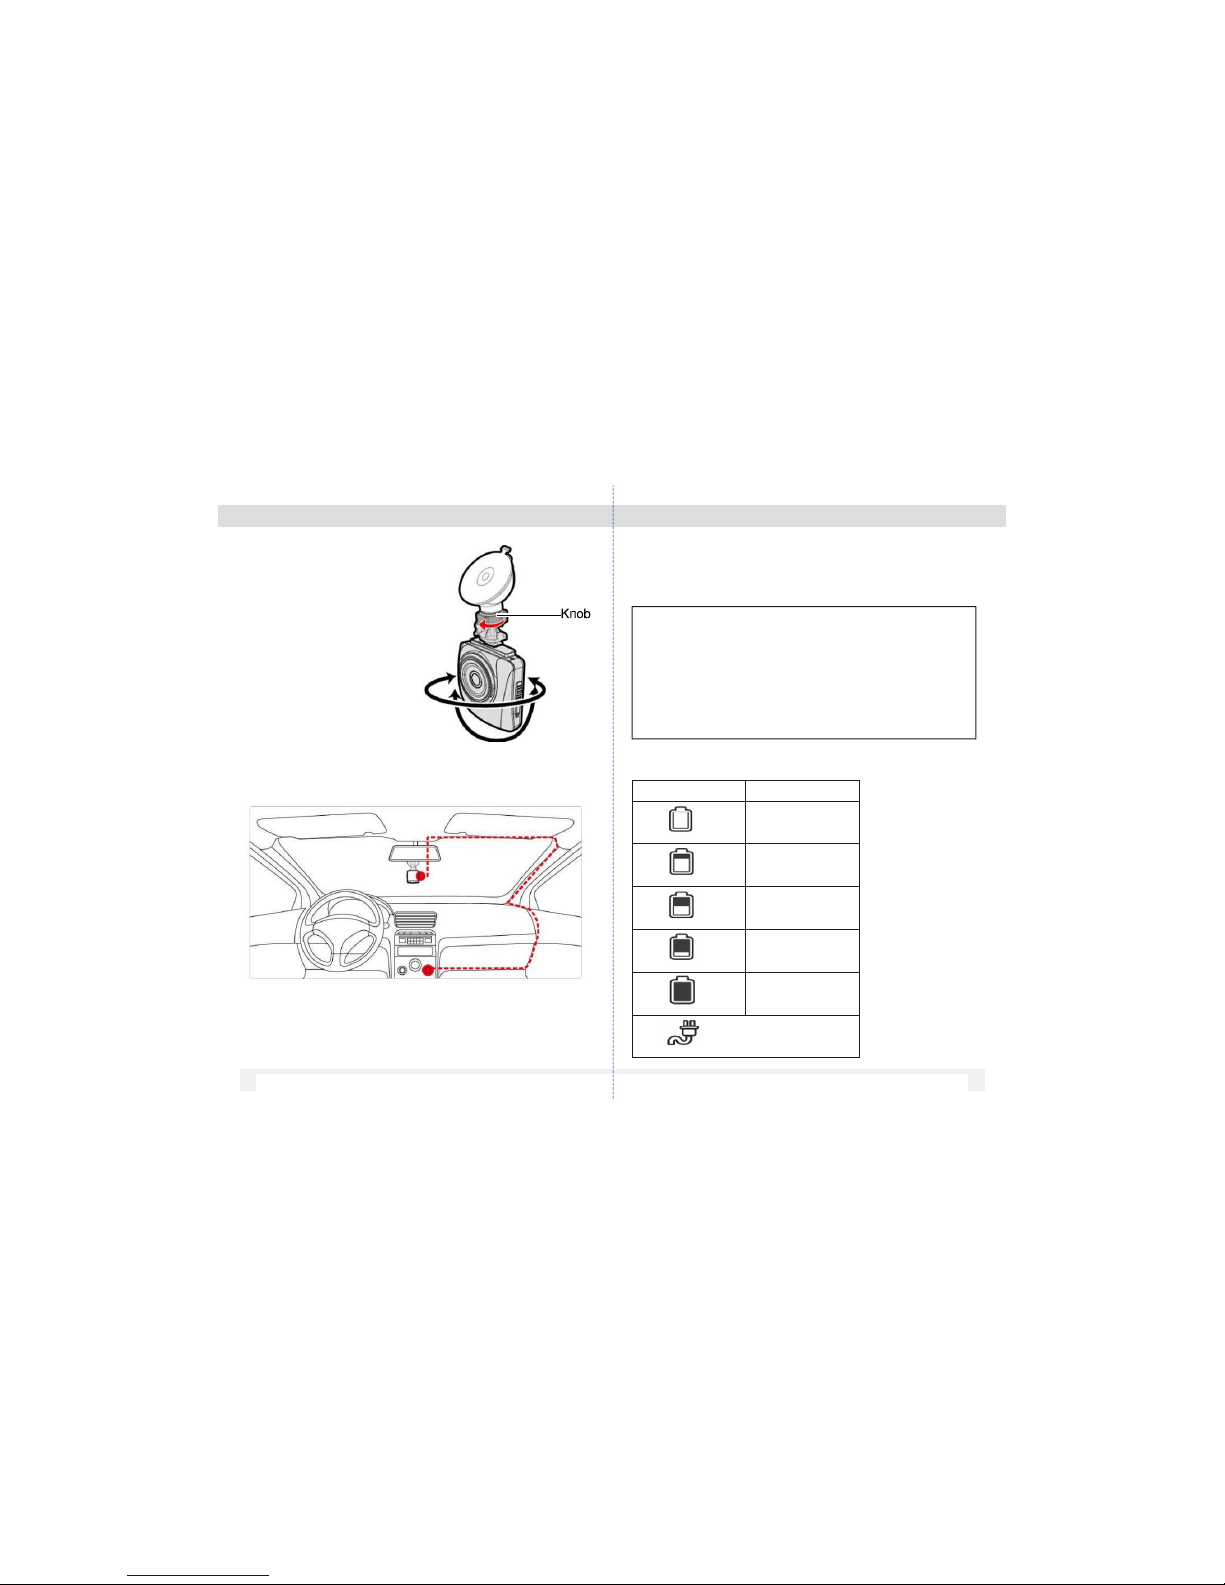
Note: When the VDR-100 is recording, press ▼ button
to stop recording, then press ▲ button, you can direct y
enter P ayback mode. The ast recorded video is
disp ayed on the screen.
3.2.2 The Playback Screen
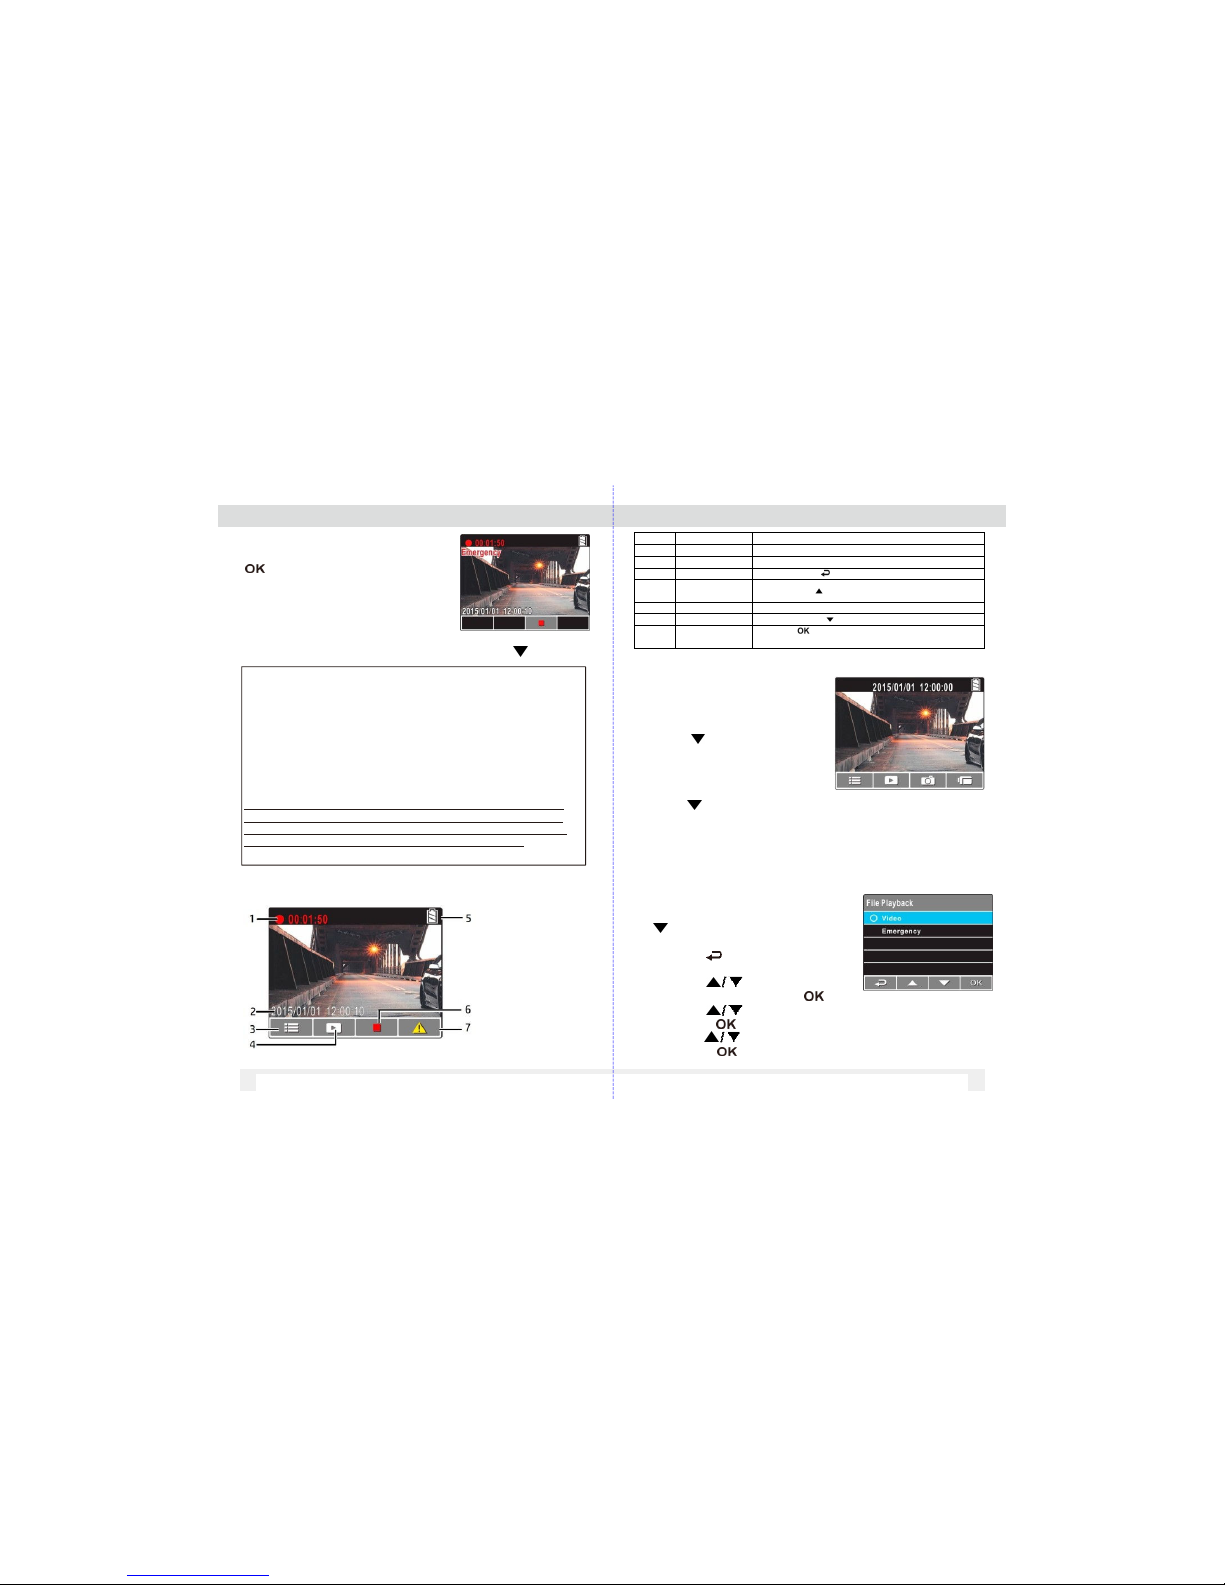
Photo Playback Screen Video Playback Screen
6. Press the button to pause the
playback. Press it again to resume.
3.2.3 DeletingFiles
To delete file(s), do thefollowing:
1.If recording is in progress, press
the button to stoprecording.
1.Press the button to enter the
OSDmenu.
3. Press the button toselect
File Deletion and press the button.
4. Press the button to select the
file category and press the button
5. Press the button to selectthe
file that you want to delete and press
the button to enter the Delete menu.
6. Press the button to select an
Option.
7. Press the button to confirm delete.
Important Note:De eted fi es cannot be recovered. Ensure
the fi es have backup before de etion.
Number It em Description
1 Date and time Indi cates the recorded date and time
2 Stamp Print Indi cates the file nam e, date and time stamp if it was
enabled in the Settings menu
3 Guide icon(Back) Press the button to return to file selection
display
4 Guide icon (Previous) Press the button to view the previous
video/photo.
5 Guide icon(Next)
6 Guide icon (Pause)
7 Total recorded time
Press the button to view the next v ideo/photo
Press the button to pause the video playback
Indi cates total recordedtime
8 Current Duration Indi cates the el apsed time
9 Battery Indicates the remaining battery power
i te m D e s cr i pt io n
Delete One De lete the c u rre n t f ile.
Delete ll Delete a ll files.
12 13

4 A justing the Settings
4.1 Using the Menu
Customize video recording and other general settings via
the on-screen display (OSD) menus.
4.2 Menu Tree
Refer to the table for details on menu items and
available menu options.
Men u Item De scr i p ti o n Av ai lab le o pt io n
File P laybac k Selec t the f ile c ate gor y th at you
wan t to view
Norm al Video / Emer g e n c y
Date / T ime Set the date an d t im e Press / button to
adj us t the val u e , press the
butt on t o s witc h the field an d
conf irm
Time St amp Enable/D isa b le the d at e s tam p. On / Of f
Video Resol u t io n Set t he vid eo res o l ution 2560 X 108 0P 30
2304 X 1296P 30
1920 X 108 0P 30 H D R
1280 X 720 p60
Phot o Res ol u t i on Set t he photo res o lutio n 13M (4800 X 2700)
9M (4000 X 2 25 0 )
4M (2688 X 1 51 2 )
Image Quality S et dif f er ent imag e quali t y f or
the rec or d ing vid e os
S.Fi ne/ Fine/ N or m al
EV Set the expos u r e compens a t i o n P ress / b utt on to s et the
exp osure l evel . You may
cu sto mize
it
bet w e e n
-
2.0
~
+2.0
1.If recording is in progress, press the button to stop
recording.
2. Press the button to enter the OSD menu.
3.Press the button to select a menu option and press
the button to enter the selected menu.
4.Press the button to select the desired settings and
press the button to confirm the setting.
.
5. Press the button to exit the menu.
cu sto mize
it
bet w e e n
-
2.0
~
+2.0
D S Detect Enab le/D isa ble On/ Off
LCD Sett in g Set th e du r ation for th e displ a y to
aut o m atic a l l y turn off aft er
vid eo recor d i ng starts
On / Turn O f f f ter 30 s ec. /Tur n
Of f fter 3 mi n. / Off
Voi ce Rec ord En ab le/D is a b le the voic e
rec or d i ng
On / O ff
Bee p Enabl e /Dis a ble the be ep sound
when naviga t i n g the VDR- 100
Pr es s / butt o n to set the
volume. You may cust omize it
bet w een 0 ~ 5
Record Interv al Set the rec o r d i ng durati o n f or
eac h rec orded vid e o f ile s eg ment
3 m in . / 5 mi n.
Mot i o n Det ec t i o n If Moti o n Det ecti o n is ac tiva t e d,
the VD R-100 will automat i c a lly
trig ger recordin g when the
came r a detec t s any mot i on i n
fron t. W hen th e battery is f ully
ch ar g ed an d is
in goo d condi t i on, Moti o n
Detection can record continuously
On / Off
15
14

VDR-100 Specifications
Collis i o n Detec t i o n
(S hock Sen s o r)
The buil t -in sh oc k sens o r will
det ec t the lev el of imp act bas e d
on the sett i n gs. VDR-1 0 0 will
aut o m atic a l l y trig ger emergenc y
rec or d i ng when c or r e s p on ding
level of shock is d et ected
Of f /Low/M edi u m /High
Freq u e nc y R educ e fl ic ker on L CD. uto/ 60Hz/ 50Hz
Lan g u ag e S et the O S D men u language. Engli s h ,Deu ts c h , Franç ais ,
Italiano , Españ o l ,
Por t u guês , T ü r kçe, Pols ki
File D el etion Del ete the file(s ). Video / E m erg enc y
For m a t Format the me m o r y card ins ert e d in
the dev ic e. ll the files in the card wil l
be er as ed.
Yes / No
Defa ult Rese t all s et t in gs to f ac tor y def a ult
settings .
Yes / No
bou t Firmwa r e Versi on
Item De scription
Image sensor 1/ 3” CMOS se nsor
Effective pi xels 26 88 (H) x 1520 (V )
Stora ge m edi a Sup port Mi c r o S DHC, up to 64GB class 10
or a bo v e
LC D di sp lay 2. 4” L CD c ol or T F T ( 26 2K p i xe ls)
Le ns W i de n gl e F i xe d F o cu s l en s
F/2.0, f =2.6m m
F oc us r an ge 0. 5 m~ I nf in it y
Video (Format: MOV) Resol ut ion: WFHD (256 0 x 1080), 30fps
Super HD (2304 x 1296), 30fps
Full HD ( 1920 x 1080), 30fps HDR
HD (1280 x 720 ), 60fps
S ti ll i ma ge
(Pho t ograph) (Format: DCF
(JPEG ))
In P ho to m o de , a v ai la b le r es ol u ti on s a re
av ailable from digital enhan c ement:
13 Megapixel (4800 x 2700)
9 Megapixel (4000 x 2250)
4 Megapixel (2688 x 1512)
Certain features and settings may change due to constant
product enhancement.
Ventra reserves the righ t to change specification without prior
S hu tt er E le ct r on ic s hu t te r
uto:1/2 ~1 / 2 000 sec .
G -Sens or 3- x is G - Fo rc e s enso r
ISO uto
W hi t eB al an ce ut o
Microph one Yes
Spe aker Yes
Co nn ec ti o n Mi ni USB
Bat tery Bui lt-in 470m H Li- polymer rechargeable (This
ba t t e r y is NO T r eplaceable)
Oper a t i n g
Temperature
32° ~ 120° F
Oper a t i n g Hum i d i t y 20 ~ 70 % RH
Stora ge
Temperature
-2° ~ 155° F
Di mensi ons 65 x 70 x 27 . 5 m m
W ei gh t pp r ox . 8 0g ( wi t ho ut m e mo ry c ar d)
16 17
Ventra reserves the righ t to change specification without prior
notice.

5 View Recor ings on PC
5.1 Using Me ia Player
VDR-100 videos are saved as MOV files and can be
viewed via standard Media Players.
To view recordings:
1. Safely remove the Memory card from the VDR-100
after it has been powered off.
2. Insert Memory card to a computer. SD card slot
is required.
3. Select the Drive the SD card is located and select
the file folder to view (Normal / Emergency).
Date and Time Stamp are watermarked if feature is
enabled.
4. Select the file to view via Media Player.
.
19
18

VENTRA LIMITED WARRANTY
Ventra Technology, Inc. warrants the system against defects in material and
workmanship for a period of one (1) year from the date of original purchase.
During this period, Ventra’s liability for any defective product, or any product part,
shall be limited to the repair or replacement of the product, at Ventra’s sole
discretion.
This warranty does not apply to defects or damages resulting from mishandling,
accident, abuse, negligence, lightning, water/liquid, power surges, improper
interfacing, operation outside of design limits, misapplication, improper repair, or
unauthorized modification.
The term "Ventra Product" is limited to the hardware components and required
firmware. It DOES NOT include software applications or programs, non-Ventra
products or peripherals. To the extent permitted by local law, all non-Ventra
products or non-Ventra branded peripherals - such as external storage SD card
are provided with the respective manufacturer's own warranties directly to you,
and are not covered by this Limited Warranty.
To
obtain
service
within
the
warranty
period,
please
contact
Ventra
at
(
888
)
418
The information in this specification sheet reflects the current
technical specifications at the time of print. Ventra reserve the right to
change the technical or physical specifications and features without prior
notification.
While every effort has been made to ensure the accuracy of the information,
certain specifications are based on approximate figures.
ll trademarks, service marks, trade names, product names and logos are the
property of their respective owners.
Ventra Technology Inc.
T: 888 418 3833 Web: www.ventrainc.com Email: info@ventrainc.com
20 21
To
obtain
service
within
the
warranty
period,
please
contact
Ventra
at
(
888
)
418
3833 or tech@ventrainc.com for assistance. If product repair or replacement is
necessary, a Return Merchandise uthorization (RM ) will be issued. The
Customer will be solely responsible for shipping charges, insurance and proper
packaging to prevent breakage in transit, whether or not the product is covered by
this warranty. ll shipments of repaired or replaced products by Ventra will be
F.O.B. California.
VENTRA MAKES NO OTHER WARRANTIES, EXPRESS OR IMPLIED, AS TO
MERCHANTABILITY OR FITNESS FOR A PARTICULAR PURPOSE OF ANY
PRODUCT SOLD UNDER THIS CONTRACT. UNDER NO CIRCUMSTANCES
SHALL VENTRA BE LIABLE FOR ANY INDIRECT, INCIDENTAL, SPECIAL,
PUNITIVE OR CONSEQUENTIAL DAMAGES INCLUDING, WITHOUT
LIMITATION, INFRINGEMENT OF THIRD PARTY RIGHTS, LOST GOODWILL,
LOST REVENUES OR PROFITS, WORK STOPPAGE, DATA LOSS, SYSTEM
FAILURE, IMPAIRMENT OF OTHER GOODS, COSTS OF REMOVAL AND
REINSTALLATION OF THE SYSTEM, LOSS OF USE, INJURY TO PERSONS
OR PROPERTY ARISING OUT OR RELATED TO THE SYSTEM WHETHER
BASED ON BREACH OF WARRANTY, BREACH OF CONTRACT, TORT OR
OTHERWISE. IN NO EVENT SHALL VENTRA’s LIABILITY EXCEED THE
ACTUAL PURCHASE PRICE OF THE SYSTEM WITH RESPECT TO WHICH
ANY CLAIM IS MADE.
Table of contents
Other VENTRA Dashcam manuals

VENTRA
VENTRA VDR-700 User manual

VENTRA
VENTRA VDR-130 Series User manual

VENTRA
VENTRA RVC -1XC433 User manual

VENTRA
VENTRA RVM-2XC433 User manual

VENTRA
VENTRA RVM-2XC233 User manual

VENTRA
VENTRA RVM-1XC233 User manual

VENTRA
VENTRA RVM-1XC260 User manual

VENTRA
VENTRA RVM-2XC460 User manual

VENTRA
VENTRA VDR-760 User manual

VENTRA
VENTRA RVM-1XC433 User manual