Craftsman AIR HAMMER 875.19119 User manual

Owner's Manual
PNEUMATIC
AIR HAMMER
Model No.
875.191190
WARNING:
Before operating tool, read this
manual and follow all
Safety Recommendations and
Operating Instructions.
• Safety
• Warranty
• Features & Operation
• Maintenance
• EspaSol
Sears, Roebuck and Co., Hoffman Estates, IL 60179 USA
www,sears,com

Read Operating Instructions
Please become familiar with all the instructions and
warnings before operating any pneumatic tool.
Always Wear Approved Eye Protection
Impact resistant eye protection should meet or exceed
the standards set forth in ANSI Z87.1, Occupational and
Educational Eye and Face Protection. Look for marking
Z87.1 on your eye protection to ensure that it is an
approved style.
Hearing Protection is Recommended
Hearing protection should be used when the noise level
exposure equals or exceeds an 8 hour time-weighted
average sound level of 85dBA. Process noise, reflective
surfaces, other tools being operated nearby, all add to the
noise level in a given work area. If you are unable to
determine your noise level exposure, we recommend the
use of hearing protection.
Avoid Prolonged Exposure to Vibration
Pneumatic tools can vibrate during use. Prolonged
exposure to vibration or very repetitive hand and arm
movements, can cause injury. Discontinue the use of any
tool if you experience tingling, numbness, discomfort or
pain in your hands or arms. You should consult your
physician before resuming use of tool.
90 PSI Maximum
This tool is designed to operate at an air pressure of 90
pounds per square inch gauge pressure (90 PSI)
maximum, at the tool. Use of higher air pressure can, and
may cause injury. Also, the use of higher air pressure
places the internal components under loads and
stresses they were not designed for, causing premature
tool failure.
NOTE: THE AIR SUPPLY SHOULD BE CLEAN AND DRY,
PREFERABLY LUBRICATED. FOR BEST RESULTS
DRAIN THE MOISTURE FROM YOUR COMPRESSOR
DAIL'_
Use May Produce Flying Objects
Care should be taken when using any percussion tool.
Keep the point of the chisel in contact with the work
surface. Inspect all accessories carefully for damage
before use. Chisels and chisel retainers should be kept
in good condition and replaced as needed. Discard any
accessory that has been damaged to prevent anyone
from using it.
Some dust created by power sanding, sawing, grinding,
drilling, and other construction activities contains chemi-
cals known to cause cancer, birth defects or reproductive
harm. Some examples of these chemicals are:
Lead from lead-based paint
Cystalline silica from bricks, cement and other
masonry products
Arsenic and chromium from chemically treated
lumber
Your risk from these exposures varies, depending on how
often you do this type of work. To reduce your exposure to
these chemicals, work in a well-ventilated area and work
with approved safety equipment such as dust masks that
are specially designed to filter out microscopic particles.
(2)
FULL TWO YEAR WARRANTY ON
CRAFTSMAN AIR-DRIVE TOOLS
If this Craftsman tool fails to give complete satisfaction
within two years from the date of purchase, RETURN IT
TO THE NEAREST SEARS STORE IN THE UNITED
STATES, and Sears will repair it free of charge. If this
Craftsman tool is used for commercial or rental
purposes, this warranty applies for only 90 days from the
date of purchase. This warranty gives you specific legal
rights, and you may also have other rights which vary
from state to state.
Sears, Roebuck and Co., Dept. 817WA, Hoffman
Estates, lL 60179.
The Craftsman Model 875.191190 Air Hammer is
designed for chipping, trimming, riveting, cutting, piercing
and peening.
Features
Uses standard .401 inch shank chisels.
Alloy steel barrel and heat-treated piston for long life.
Produces 4,900 powerful blows per minute with
a 1-5/8" stroke.
Specifications
Blows per minute ............................................. 4,000
Stroke length .................................................... 15/8"
Bore diameter ................................................ 3/4"
Overall Length .................................................. 6.1"
Weight ........................................................ 2.3 lbs.
Recommended hose size ............................. 3/8" I.D.
Air Inlet ...................................................... 1/4" NPT
Average Air Consumption ............................... 4 CFM
Maximum Operating Pressure ......................... 90 psi
Pre-Operation
Before the tool is connected to the air supply, clear the air
hose of accumulated dust and moisture by running air
freely through the air hose for 5-10 seconds. Before
removing a tool for service or changing chisels, make
sure the air line is shut-off at the compressor. This will
prevent the tool from operating if the throttle is accidenfiy
engaged.
Installation (See figure 1)
This tool is designed to operate at 90 psi. Lower pres-
sure (below 90 psi) will reduce performance of the tool
while higher air pressure (over 90 psi) raises the perfor-
mance of the tool beyond its rated capacity and could
cause serious damage to tool and user.
Always use clean dry air. Excessive moisture and dirt will
greatly reduce the life of any air motor. We recommend
the installation of an in-line filter-regulator-lubricator as
close to the tool as possible. (Fig 1)
A 3/8" air hose is required up to a length of 8 ft. If more
length is required a 1/2" air hose should be used at the
compressor. Attach a 3/8" whip hose for the remaining 4 -
8 ft. for flexibility. Be sure all hoses and fittings are the
correct size and tightly secured before using air tool.

_Branch line = 2 times[_ j
I Tool inlet_os_
i_ jAute Drain
I_ Valve
More than 1/100 slope _ _1
Filter I
Stop Regulator
Valve Lubricator
Air Tool
Figure 1 * Air Hose Hook Up
Main line =3 times
Tool inlet/hose size
Stop I
Valve
K%
LCompressor J
Air
..\ ..\\..............t....,
USING QUICK CHANGE RETAINER
1. Disconnect air supply and remove all accessories.
2. Thread quick change chisel retainer onto end of
barrel.
3. While pushing end of spring to side of the tool, insert
a standard .401" taper shank chisel into barrel and
allow spring tension to rest against chisel. Make sure
chisel collar is between barrel and retaining part of
spring.
4. Remove chisel by pushing spring to side of tool and
pull chisel out of barrel.
5. Always hold chisel to work surface before operating
tool.
Spring R_tainer
Trigger lever
Air inlet
_ Regulator
Figure2-Tool Diagram
Place chisel against work surface and pull trigger in
short bursts until chisel sets in work. Use both hands to
hold hammer for better control.
Lubrication
An in-line tilter-regulator-lubricator (fig 1) is
recommended as it increases tool life and keeps the
tool in sustained operation. The in-line lubricator should
be regularly checked and filled with air tool oil Proper
adjustment ofthe in-line lubricator is performed by
placing a sheet of paper next to the tools exhaust
ports and holding the throttle open approximately 30
seconds. The lubricator is properly set when a light
stain of oil collects on the paper. Excessive amounts of
oil should be avoided.
In the event that it becomes necessary to store the
tool for an extended period of time (overnight, weekend,
etc.), itshould receive a generous amount of
lubrication through the air inlet (fig 2). The tool should
be run for approximately 30 seconds to ensure oil has
been evenly distributed throughout the tool. The tool
should be stored in a clean and dry environment.
Recommended lubricants: Use air tool oil or any
other high grade turbine oil containing moisture
absorbent, rust inhibitors, metal wetting agents and an
EP (extreme pressure) additive. (See Fig. 2 for
location/air inlet).
I,ACAUTION]
Never operate hammer without a chisel installed and
placed against the work surface. Doing so may result in
personal injury or damage to the tool.
Sears offers a variety of chisels for this hammer.
(3)

Sears CRAFTSMAN Model 875.191190
Pneumatic Air Hammer
Exploded View and Parts List
Ref. Description Part No. Ref. Description Part No.
1
2
3
4
5
6
7
8
9
Handle 9AH-15001
Spring Pin (2) 9AH-15002
Steel Washer 9AH-15003
Coil Spring 9AH-15004
Air Regulator 9AH-15005
Trigger 9AH-15006
Coil Spring 9AH-15007
Valve Stem 9AH-15008
Valve 9AH- 15009
10 Spring 9AH-15010
11 Air Inlet 9AH-15011
12 Upper Valve 9AH-15012
13 Valve Disc 9AH-15013
14 Lower Valve 9AH-15014
15 Piston 9AH-15015
16 Cylinder 9AH-15016
17 Spring Retainer 9AH-15017
(4)

Troubleshooting
Tool runs slowly or will not operate 1, Grit or gum in tool
2, No oil in tool
3, Low air pressure
4, Air hose leaks
5, Pressure drops
1. Flush the tool with air tool oil or gum
solvent,
2. Lubricate the tool according to the lubrication
instructions in this manual
3.a. Adjust the regulator on the tool to the maxi-
mum setting
b. Adjust the compressor regulator to tool
maximum of 90 psi.
4. Tighten and seal hose fittings if leaks are found,
Use teflon tape.
5.a. Be sure the hose is the proper size, Long
hoses or tools using large volumes of air may
require a hose with an I.D. of 1/2" or larger
depending on the total length of the hose.
b. Do not use a multiple number of hoses
connected together with quick connect fittings,
This causes additional pressure drops and
reduces the tool power. Directly connect the
hoses together
Moisture blowing out of tool exahust 1, Water in tank 1.Drain tank. (See air compressor manual), Oil tool
and run until no water is evident, Oil tool again and
run 1-2 seconds
(5)

Lea las instrucciones de operacibn
Por favor familiadcese con todas las instrucciones y
advertencias antes de operar cualquier herramienta
neum_tica.
Siempre use proteccibn aprobada para la vista
La protecci6n a la vista resistente al impacto debe
satisfacer o exceder las normas establecidas en ANSI
Z87.1, Protecci6n Educativa yOcupacional de los Ojos y
el Rostro. Busque la marca Z87.1 en su protecci6n de la
vista para asegurarse que es un estilo aprobado.
Se recomienda proteccibn del oido
La protecci6n del ofdo debe usarse cuando la exposici6n
al nivel del ruido iguala o excede un nivel promedio de
sonido ponderado de tiempo en 8 horas, de 85dBA.
Ruido del proceso, superficies reflectoras, otras
herramientas que se operan en la cercania, todos
agregan al nivel del ruido en una _rea de trabajo dada. Si
usted no puede determinar su exposici6n al nivel de
ruido, recomendamos el use de protecci6n de oido.
Evite exposicibn prolongada ala vibracibn
Las herramientas neum_ticas pueden vibrar durante el
uso. Una exposici6n prolongada a la vibraci6n o
movimientos muy repetitivos de la mano y el brazo
pueden causar lesiones. Discontin6e el uso de
cualquiera herramienta si usted experimenta cosquilleo,
entumecimiento, incomodidad o dolor en sus manos o
brazos. Usted debe consultar con su medico antes de
reanudar el uso de herramienta.
90 PSI m_lximas
Esta herramienta est_ diseSada para operar auna
presi6n atmosf6rica m_xima de 90 libras por pulgada
cuadrada de medidor de presi6n (90 PSI), en la
herramienta. El uso de presiones atmosf6ricas m_s
altas puede causar lesiones. Tambi6n, el uso de
presiones atmosf6ricas m_s altas coloca alos
componentes interiores bajo cargas y tensiones para las
que no fueron diseSados, causando una falla prematura
de la herramienta.
DOS AI_IOS COMPLETOS DE GARANTIA DE LAS
HERRAMIENTAS DE OPERACION NEUMATICA CRAFTSMAN
Siesta herramienta Craftsman no le proporciona una satisfacci6n
completa dentro de los dos aSosde lafecha de compra,
DEVUELVALAALATIENDA MASCERCANA DE SEARSEN LOS
ESTADOS UNIDOS, y Sears la raparaci6n libre de cargo. Siesta
herramienta Craftsman se usa para fines comerciales ode alquiler,
esta garantfa sdlo sa aplica durante 90 dfas desde la fecha de
compra. Esta garantia le proporciona darechos legales
especificos, y usted tambi6n puede tener otros derechos que
varian de estado a estado.
Sears, Roebuck y Cia., Dept. 817WA, Hoffman
Estates, IL 60179.
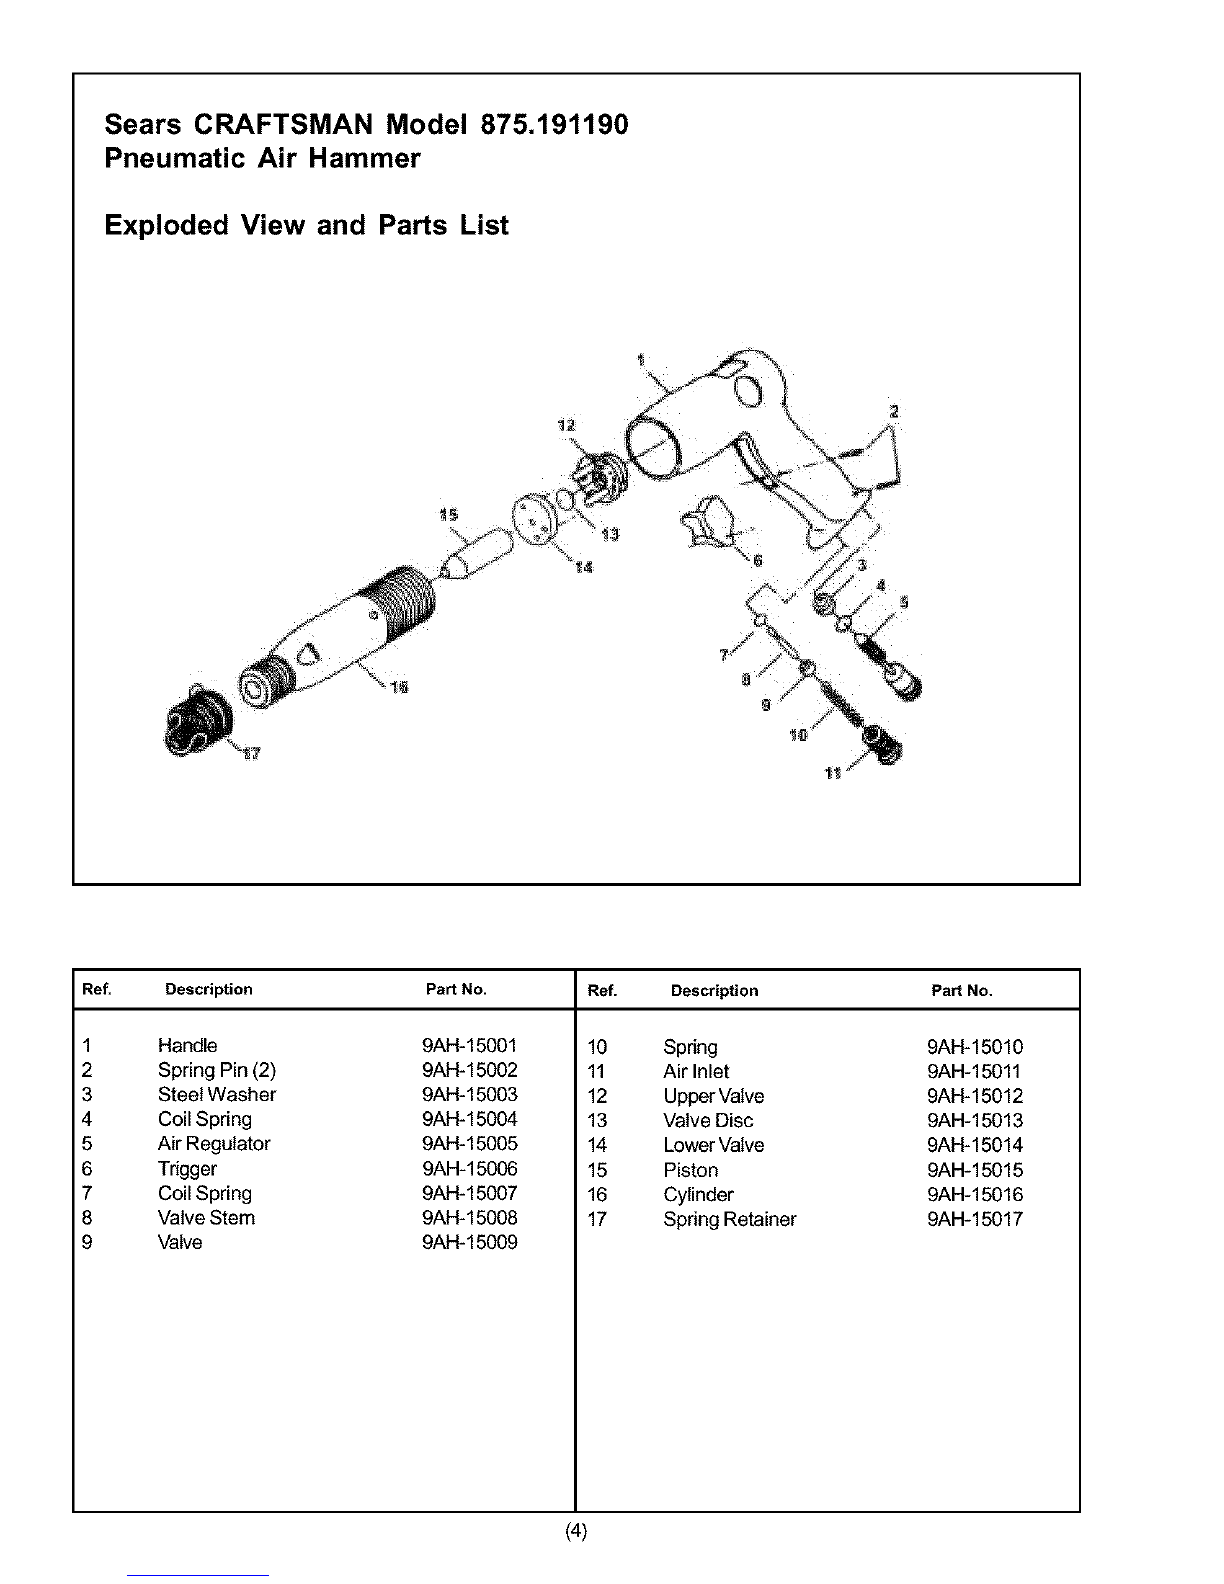
El martillo de aire modelo 875.191190 Craftsman est_
diseSado para cincelar, recortar, remachar, perforar y
martillar.
Caracteristicas
•Usa cinceles de vbstago est_ndar de .401 de pulgada.
•Tambor de aleaci6n de acero y pist6n t6rmicamente
tratado para una larga duraci6n.
• Produce 4000 golpes potentes por minuto con una
carrera de 1-5/8".
Especificaciones
Golpes por minuto ............................. 4000
Largo de la carrera ............................ 1-5/8"
Di_metro del hueco ........................... 3/4"
Largo total........................................... 6.1"
Peso..................................................... 2.3 Ibs.
TamaSo recomendado de
]a manguera ........................................ 3/8" D.L
Entrada de aire ................................... 1/4" NPT
Consumo neum_tico promedio ......... 4 PCM
Presi6n m_xima operativa ................. 90 psi
NOTA: EL SUMINISTRO NEUMATICO DEBE ESTAR
LIMPIO, SECO Y PREFERENTEMENTE LUBRIFICADO.
PARA OBTENER LOS MEJORES RESULTADOS, DRENE
DIARIAMENTE LA HUMEDAD DE SU COMPRESOR.
ADVERTENCIA
AIgo del polvo creado por lijado, aserrado, desgastado
mec_nico, y otras actividades de construcci6n, contienen
quimicos conocidos como causantes de c_ncer,
defectos cong6nitos o otras lesiones al sistema
reproductivo. AIgunos ejemplos de estos qufmicos son:
• El plomo en la pintura basada en plomo.
• La silice cristalina de los ladrillos y cemento
y otros productos de albaSileria, y el ars6nico y
cromo de la madera qufmicamente tratada.
Su riesgo de esas exposiciones varfa, dependiendo de
cu_n a menudo usted hace este tipo de trabajo. Para
reducir su exposici6n a estos qufmicos: trabaje en una
_rea bien ventilada, y con un equipo de seguridad
aprobado, como m_scaras protectoras contra el polvo
que se diseSan especfficamente para filtrar particulas
microsc6picas.
Pre-Operacibn
Antes que laherramienta seconecte al suministro neum_tico,
limpie lamanguera neum&tica depolvo y humedad acumulados,
haciendo circular aire atrav6s de la manguera neum_tica durante
5-10 segundos. Antes de extraer unaherramianta para prestar
servicio o cambiar cubos, aseg_rese que la tuberia neum&tica est6
cerrada en el compresor. Esto evitar_ que la herramienta funcione
si el aceleradar saactiva accidentalmente.
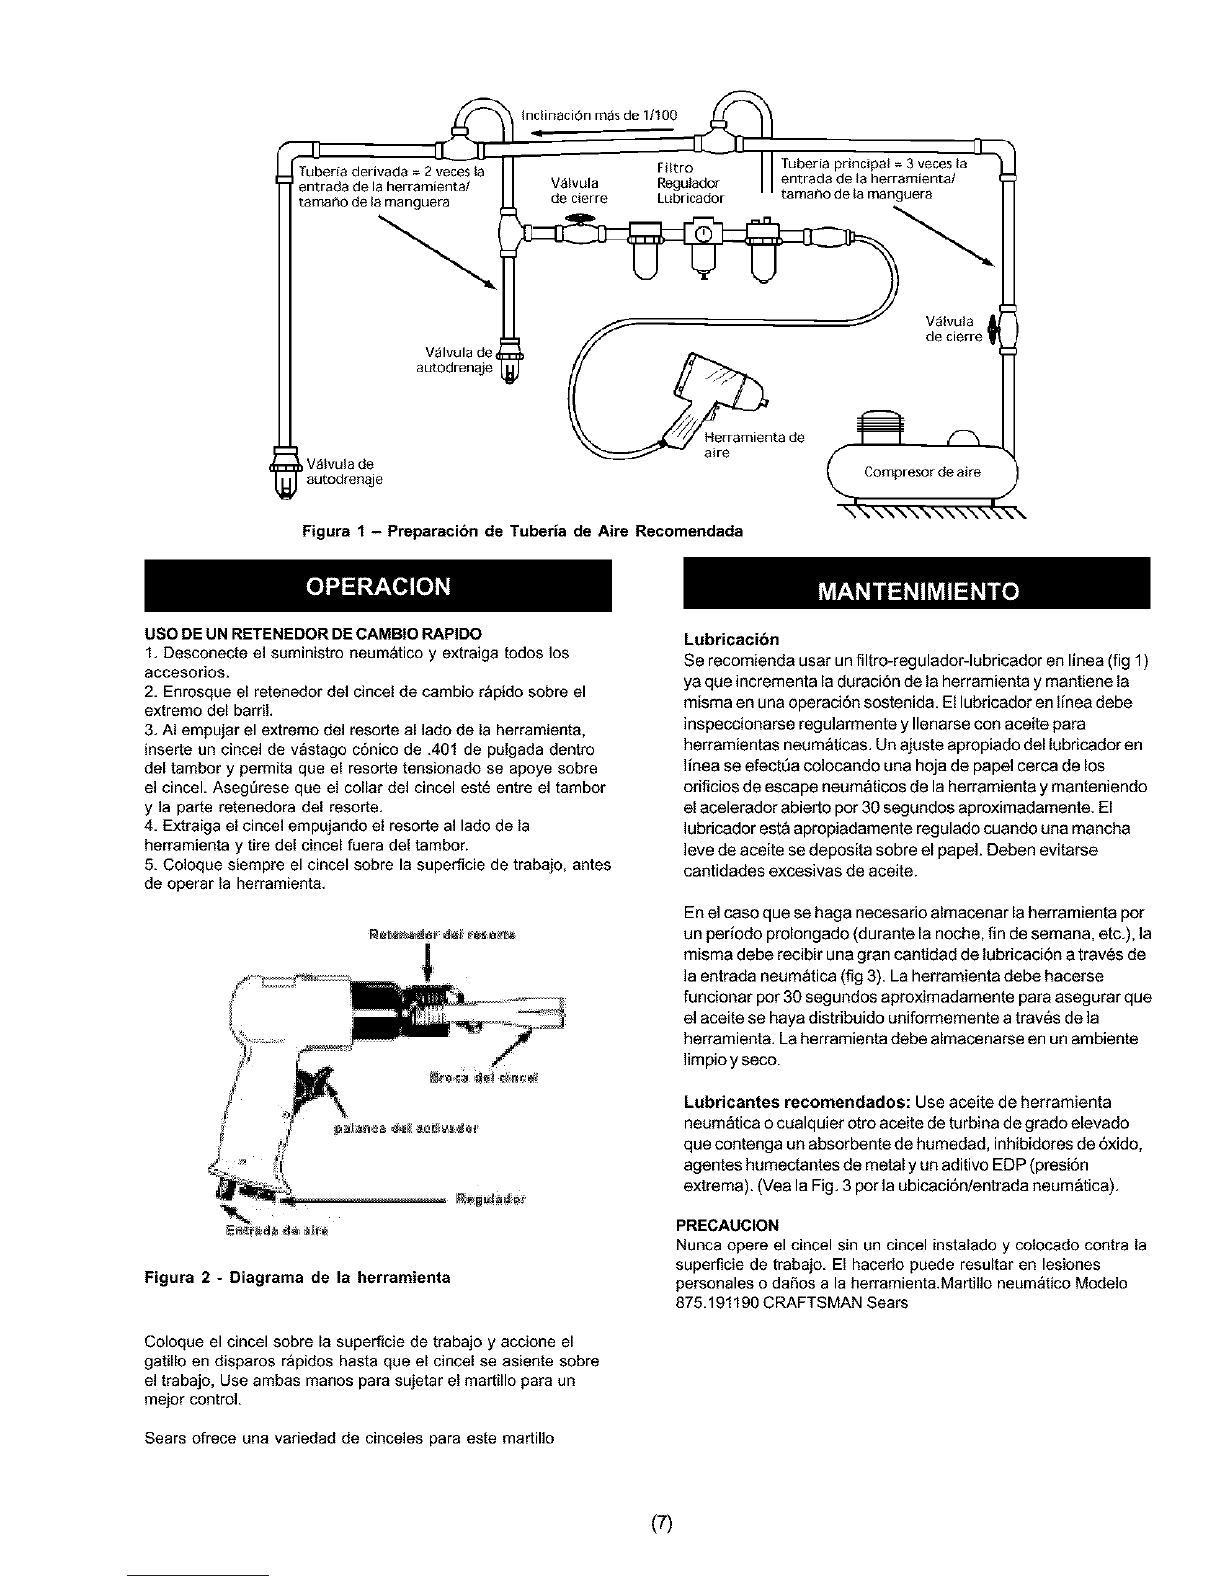
Instalacibn (Vea la figura t)
Esta herramienta est&diseSada para operar a90 psi, una presi6n
menor (menor de 90 psi) reduce el rendimiento de la herramienta,
mientras que una presi6n neum&tica mayor (mayor de 90 psi)
eleva el rendimiento de la herramienta m_s all_ de su capacidad
nominal y puede causar lesiones graves y daSos extensos al
usuario y a la herramienta.
(6)
Use siempre aire limpio seco. Una humedad y suciedad excesivos
reducirAsubstancialmente la duracidn de cualquier motor
neum&tico. Recomendamos la instalacidn de unfiltro-regulador-
lubricador en linea tan cercacomo sea posible de la herramienta.
Se requiere una manguera neum&tica de 3/8" hasta un largo de 8
pies. Si se requiere una largo mayor debe usarse una manguera
neum&ticade 1/2"en el comprasor. Fije una manguera de tipo
'1_tigo"de 3/8" para los 4-8 pies restante, porflexibilidad. Antes
de usar la herramienta neum&tica, asegQrese que todas las
mangueras y adaptadores sean deltamaSo correcto y est6n bien
asegurados

Tubeea derivada =2vecesla
entrada de laherramienta/
tarnar_ode I
t V_lvula de
autedrenaje
q _VSlvulade
autodrena]e
_,, in_inaciOn m_sde 11100 [_ IT
Filtro I I Zuberia princip al =3 vecesla
V_lvula Reguladcr entrada de la herramienta/
de cierre Lubricador tama_o de la manguera
V_Ivula
de cierre
Herramienta de
aire
Figura 1 - Preparacibn de Tuberia de Aire Recomendada
USO DE UN RETENEDOR DE CAMBIO RAPIDO
1, Desconecte el suministro neumatico yextraiga todos los
accesorios.
2, Enrosque el retenedor del cincel de cambio r_pido sobre el
extreme del barriL
3, AI empujar el extremo del resorte al lado de la herramienta,
inserte un cincel de v_stago c6nico de .401 de pulgada dentro
del tambor y permits que el resorte tensionado se apoye sobre
el cincel, Asegtirese que el collar del cincel est_ entre el tambor
y la parte retenedora del resorte,
4, Extraiga el cincel empujando el resorte al lado de la
herramienta y tire del cincel fuera del tambor.
5. Coloque siempre el cincel sobre la superficie de trabajo, antes
de operar la herramienta.
Figura 2 -Diagrama de la herramienta
Coloque el cincel sobre la superficie de trabajo y accione el
gatille en disparos rapides hasta que el cincel se asiente sebre
el trabajo, Use ambas manos para sujetar el martillo para un
meier control.
Sears ofrece una variedad de cinceles para este martillo
Lubricacide
Se recomienda usar unfiltro-reg ulador-lubricador en linea (fig 1)
ya que incrementa la duraciSnde la herramienta y mantiene la
misma an una operaciSn sostenida. El lubricador en llnea debe
inspeccionarse regularmente y Ilenarse con aceite para
herramientas neum&ticas. Un ajuste apropiado del lubricador en
lines se efect6a co]ocando una hoja de papel cerca de los
oriflcios deescape neumAticos de la herramienta y manteniendo
el acelerador abierto por30 segundos aproximadamente. El
lubdcador est_ apropiadamente regulado cuando una mancha
lave de aceite se deposita sabre el papeL Deben evitarse
cantidades excesivas de aceite.
Enel caso que se haga necesario almacenar la herramienta par
un periodo prolongado (durante lanoche, fin de semana, etc.), ]a
misma debe recibir una gran cantidad de lubricaci6n atrav6s de
la entrada neum_tica (fig 3). La herramienta debe hacerse
funcionar pot 30 segundos aproximadamente para asegurar que
el aceite se haya distribuido uniformemente atrav6s de ]a
herramienta. Laherramienta debe almacenarse en un ambiente
limpio y seco.
Lubricantes recomendados: Use aceite de herramienta
neumAticao cualquier otro aceite de turbina degrade elevado
que contenga unabsorbente de humedad, inhibidores de 5xido,
agentas humectantes de metaly un aditivo EDP(presi6n
extrema). (Veala Fig. 3 perla ubicaciSn/entrada neum&tica).
PRECAUCION
Nunca opere el cincel sin un cincel instalado y colocado contra la
superficie de trabaje, El hacerle puede resultar en lesiones
personales o daSos a la herramienta.Martillo neum_tico Modelo
875.191190 CRAFTSMAN Sears
(7)

Martillo neumbtico Modelo 875.191190 CRAFTSMAN Sears
Vista desplegada y lista de piezas
Ref. Descripcibn No. de pieza Ref. Descripcibn No. de pieza
1
2
3
4
5
6
7
8
9
Mango 9AH-15001
Clavija del resorte (2) 9AH-15002
Arandela de acero 9AH-15003
Muelle 9AH-15004
Regulador neumatico 9AH-15005
Activador 9AH-15006
Muelle 9AH-15007
V_stago de la v_lvula 9AH-15008
Valvula 9AH-15009
10
11
12
13
14
15
16
17
Resorte 9AH-15010
Entrada neum_tica 9AH-15011
Valvula superior 9AH-15012
Disco de v_lvula 9AH-15013
Valvula inferior 9AH-15014
Pist6n 9AH-15015
Cilindro 9AH-15016
Retenedor del resorte 9AH-15017
(8)

Localizacibn de fallas
La herramienta funciona con lentitud o no funciona
1, Suciedad o goma en la herramienta
2, No hay aceite en la herramienta
3. Presi6n neum_tica baja
4, Pedida de la manguera neum_tica
5, Baja de presi6n
1. Limpie la herramienta con aceite de herramienta
neum_tica o solvente para goma,
2. Lubrique la herramienta de acuerdo con las
instrucciones de lubricaci6n en este manual
3. a. Ajuste el regulador en la herramienta a la
graduaci6n m_xima
b. Ajuste el regulador del cempreser a la m_xima de
la herramienta de 90 psi,
4. Ajuste y selle los adaptadores de la manguera si
se hallan p6rdidas, En ese case use cinta de tefl6n.
5. a. AsegDrese que la manguera tenga el tamaSo
apropiado. Mangueras largas o herramientas que
usan un gran volumen de aire pueden requerir una
manguera con un di_metro interne de 1/2" o mayor
dependiendo de la Iongitud total de la manguera,
b. No use una cantidad mt_ltiple de mangueras
conectadas juntas con adaptadores de conexi6n
r_pida, Esto causa caidas de presi6n adicionales y
reduce la potencia de la herramienta. Conecte
directamente las mangueras juntas
Escape hQmedo de la
herramienta 1. Agua en el tanque 1, Drene el tanque. (Vea el manual del compresor
neum_tice). Aceite la herramienta y haga funcionar
hasta que no sea evidente la presencia de agua.
Aceite nuevamente la herramienta y haga funcionar
per 1-2 segundes
(9)

Your Home
For repair- in your home - of all major brand appliances,
lawn and garden equipment, or heating and cooling systems,
no matter who made it, no matter who sold it!
For the replacement parts, accessories and
owner's manuals that you need to do-it-yourself.
For Sears professional installation of home appliances
and items like garage door openers and water heaters.
1-800-MY-HOME ® (1-800-469-4663)
Call anytime, day or night (U.S.A. and Canada) .......
www.sears.eomwww.sears.ca
Our Home
orreocrnemevcumaen
iii
and electronics, call or go on-line for the location ofyour nearest
Sears Parts & Repair Center.
1-800-488-1222
Call anytime, day or night (U.S.A. only)
www.sears.com
To purchase aprotection agreement on a product serviced by Sears:
1-800-827-6655 (U.S.A.) 1-800=361-6665 (Canada)
For after sale
support and assistance
1-800-290-9054
®Registered Trademark /TM Trademark /SMService Mark of Sears, Roebuck and Co.
® Marca Registrada /TMMarca de F_brica /SMMarca de Servicio de Sears, Roebuck and Co.
MCMarque de commerce /MDMarque d6pos6e de Sears, Roebuck and Co. ® Sears, Roebuck and Co.
This manual suits for next models
1
Table of contents
Languages:
Other Craftsman Tools manuals

Craftsman
Craftsman 17125455 User manual

Craftsman
Craftsman 922217 User manual

Craftsman
Craftsman CMPCS38 User manual

Craftsman
Craftsman 50347 User manual

Craftsman
Craftsman CMXPTSG1010NB User manual

Craftsman
Craftsman 351.219061 User manual

Craftsman
Craftsman CMCGG001 User manual

Craftsman
Craftsman 50168 User manual

Craftsman
Craftsman CMXQCHS30UBB User manual

Craftsman
Craftsman 25980 - Accu-Rip Saw Guide User manual