RAMMER 2155E User manual

Original instructions
9/19
OPERATOR'S MANUAL
OM2155ESENG.919
HYDRAULIC HAMMER
RAMMER 2155E
STD

OPERATION. . . . . . . . . . . . . . . . . . . . . . . . . . . 3
1. Foreword . . . . . . . . . . . . . . . . . . . . . . . . 4
This manual . . . . . . . . . . . . . . . . . . . . . . 4
Important safety information . . . . . . . . . 6
Warranty. . . . . . . . . . . . . . . . . . . . . . . . . 6
Spare part orders. . . . . . . . . . . . . . . . . . . 7
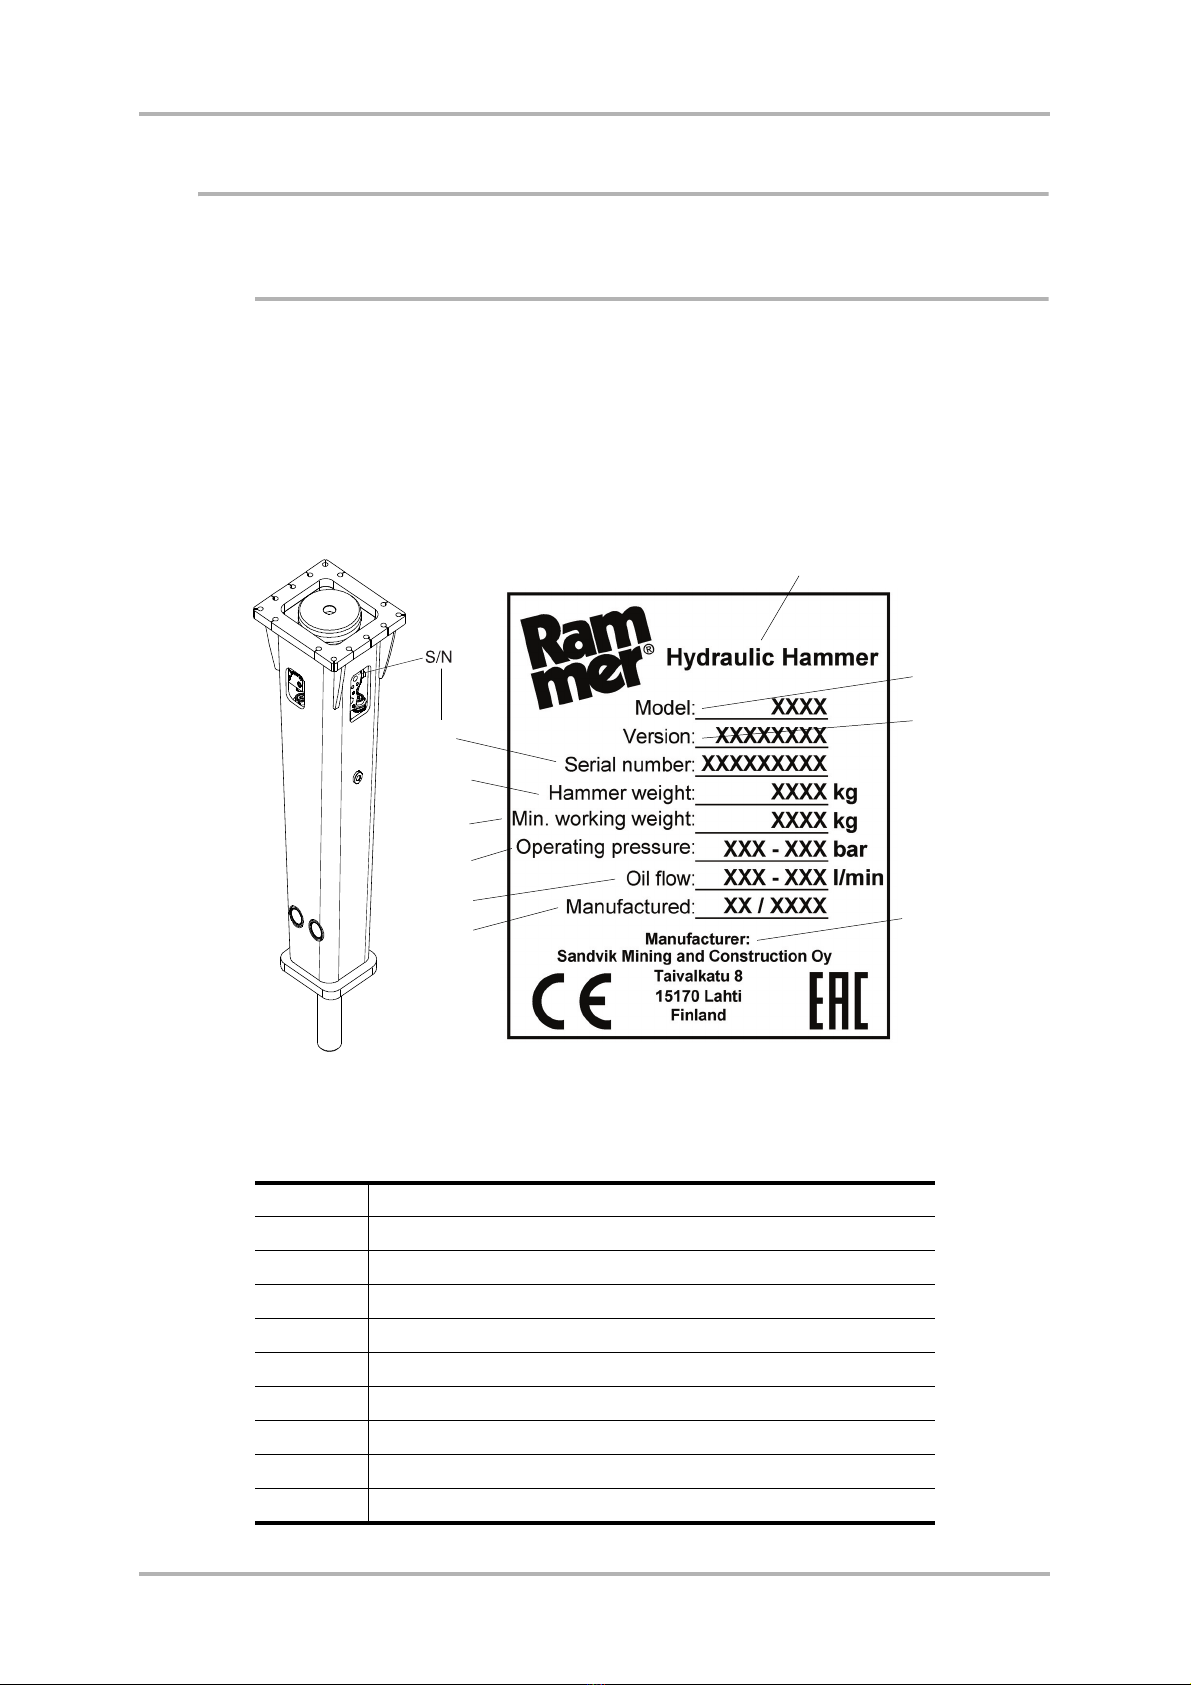
2. Product numbers. . . . . . . . . . . . . . . . . . . 8
Model and serial number . . . . . . . . . . . . 8
3. Product introduction. . . . . . . . . . . . . . . . 9
Overview. . . . . . . . . . . . . . . . . . . . . . . . . 9
Removal from package . . . . . . . . . . . . . . 9
Lifting instructions . . . . . . . . . . . . . . . . . 9
Main parts . . . . . . . . . . . . . . . . . . . . . . 13
Ramlube II . . . . . . . . . . . . . . . . . . . . . . 14
RD3 remote monitoring device . . . . . . . 14
Environmental protection and recycling
policy . . . . . . . . . . . . . . . . . . . . . . . . . . 16
4. Safety . . . . . . . . . . . . . . . . . . . . . . . . . . 17
General safety . . . . . . . . . . . . . . . . . . . . 17
Safety instructions . . . . . . . . . . . . . . . . . 17
5. Operation . . . . . . . . . . . . . . . . . . . . . . . 26
Operating instructions. . . . . . . . . . . . . . 26
Daily operation . . . . . . . . . . . . . . . . . . . 29
Mounting and dismounting the hammer 36
Movement. . . . . . . . . . . . . . . . . . . . . . . 38
Special conditions of use . . . . . . . . . . . . 39
Storage . . . . . . . . . . . . . . . . . . . . . . . . . 39
LUBRICATION . . . . . . . . . . . . . . . . . . . . . . . . 41
1. Hammer tool greasing. . . . . . . . . . . . . . 42
Recommended greases. . . . . . . . . . . . . . 42
Automatic greasing . . . . . . . . . . . . . . . . 43
Ramlube II . . . . . . . . . . . . . . . . . . . . . . 46
Adjusting the dose. . . . . . . . . . . . . . . . . 47
Manual greasing . . . . . . . . . . . . . . . . . . 49
2. Carrier hydraulic oil . . . . . . . . . . . . . . . 51
Requirements for hydraulic oil . . . . . . . 51
Oil cooler . . . . . . . . . . . . . . . . . . . . . . . 53
Oil filter . . . . . . . . . . . . . . . . . . . . . . . . 54
MAINTENANCE . . . . . . . . . . . . . . . . . . . . . . . 57
1. Routine maintenance . . . . . . . . . . . . . . 58
Overview. . . . . . . . . . . . . . . . . . . . . . . . 58
Inspection and maintenance by the
operator . . . . . . . . . . . . . . . . . . . . . . . . 58
Inspection and maintenance by the
dealer . . . . . . . . . . . . . . . . . . . . . . . . . . 59
Maintenance intervals in special
applications. . . . . . . . . . . . . . . . . . . . . . 60
Other maintenance procedures . . . . . . . 60
2. Changing the tool . . . . . . . . . . . . . . . . . 61
Wear limits and lubricants for tool
removal . . . . . . . . . . . . . . . . . . . . . . . . . 61
Removal of tool . . . . . . . . . . . . . . . . . . 61
Installation of tool. . . . . . . . . . . . . . . . . 62
3. Lower tool bushing . . . . . . . . . . . . . . . 64
Wear limits and lubricants for lower tool
bushing. . . . . . . . . . . . . . . . . . . . . . . . . 64
Removal of lower tool bushing. . . . . . . 64
4. Troubleshooting. . . . . . . . . . . . . . . . . . 65
The hammer operates irregularly but the
blow has full power . . . . . . . . . . . . . . . 65
The hammer operates irregularly and blow
has no power . . . . . . . . . . . . . . . . . . . . 65
Impact rate slows down . . . . . . . . . . . . 65
The hammer does not stop or has
run-on . . . . . . . . . . . . . . . . . . . . . . . . . 66
Oil overheats . . . . . . . . . . . . . . . . . . . . 66
Recurrent tool failure . . . . . . . . . . . . . . 67
Automatic greasing device Ramlube II
problems. . . . . . . . . . . . . . . . . . . . . . . . 67
Further assistance . . . . . . . . . . . . . . . . . 68
SPECIFICATIONS. . . . . . . . . . . . . . . . . . . . . . 69
1. Hammer specifications . . . . . . . . . . . . . 70
Technical specifications . . . . . . . . . . . . 70
Main dimensions . . . . . . . . . . . . . . . . . 71
Mounting bracket specifications. . . . . . 72
RD3 Technical specifications . . . . . . . . 73
2. Tool specifications . . . . . . . . . . . . . . . . 74
3. CE mark and EC Declaration of
Conformity . . . . . . . . . . . . . . . . . . . . . 75
Important information concerning the
remote monitoring device and data
privacy . . . . . . . . . . . . . . . . . . . . . . . . . 76

Operation - Page 3COPYRIGHT © 2019 SANDVIK MINING AND CONSTRUCTION OY
2155E STD
OPERATION

COPYRIGHT © 2019 SANDVIK MINING AND CONSTRUCTION OYPage 4 - Operation
Foreword 2155E STD
1. FOREWORD
1.1 THIS MANUAL
This manual is arranged to give you a good understanding of the equipment and its
safe operation. It also contains maintenance information and technical
specifications. Read this manual from front to back before installing, operating or
maintaining the attachment for the first time.
In this manual, the units of measurement are metric. For example, weights are given
in kilograms (kg). In some cases the other unit follows in parenthesis (). For
example 28 litres (7.4 US gal).
The specifications and designs presented in this manual are subject to change
without prior notice.
R010483
BG: Поискайте от дистрибутора на Rammer версия на български език на това ръководство.
CS: Českou/Slovenskou verzi této příručky získáte o vašeho prodejce společnosti Rammer.
DA: Bed om en dansksproget version af denne manual hos din Rammer-forhandler.
DE: Fragen Sie Ihren Rammer-Händler nach der deutschen Fassung dieses Handbuchs.
EL: Ζητήστε την ελληνική έκδοση του παρόντος εγχειριδίου από τον τοπικό αντιπρόσωπο της Rammer.
EN: Ask for the English language version of this manual from your Rammer dealer.
ES: Pídale a su distribuidor de Rammer la versión en español de este manual.
ET: Käesoleva kasutusjuhendi eestikeelse versiooni saate Rammeri edasimüüjalt.
FI: Pyydä suomenkielinen ohjekirja Rammer-jälleenmyyjältäsi.
FR: Adressez-vous à votre revendeur Rammer pour obtenir la version française de ce manuel.
HR: Hrvatsku verziju ovog priručnika zatražite od zastupnika tvrtke Rammer.
HU: Ez a kézikönyv magyar nyelven is elérhető, kérje Rammer forgalmazójától.
IS: Biðjið Rammer dreingaraðila ykkar um íslenska útgáfu af þessari handbók.
IT: È possibile richiedere la versione in lingua italiana di questo manuale presso il rivenditore Rammer.
LT: Paprašykite savo Rammer platintojo lietuviškos instrukcijos versijos.
LV: Rokasgrāmatas tulkojumu latviešu valodā jautājiem savam Rammer dīlerim.
NL: Vraag bij uw Rammer-dealer naar de Nederlandse versie van deze gebruiksaanwijzing.
NO: Be om den norske versjonen av denne håndboken fra din Rammer-leverandør.
PL: Proszę zwrócić się do dystrybutora Rammer, aby otrzymać niniejszą instrukcję w języku polskim.
PT: Solicite a versão em português deste manual ao seu representante Rammer.
RO: Solicitaţi versiunea în limba română a acestui manual de la distribuitorul dumneavoastră Rammer.
RU: Запросите версию данного руководства на русском языке у вашего дилера компании Rammer.
SK: Českú/Slovenskú verziu tejto príručky získate u svojho predajcu spoločnosti Rammer.
SL: Vprašanje svojega Rammer predstavnika za ta priročnik v slovenskem jeziku.
SR: Tražite verziju ovog priručnika na srpskom jeziku od vašeg Rammer dilera.
SV: Be om den svenskspråkiga versionen av denna manual hos din Rammer-återförsäljare.
T
R: Bu kılavuzun Türkçe versiyonunu Rammer temsilcinizden isteyebilirsiniz.

Operation - Page 5COPYRIGHT © 2019 SANDVIK MINING AND CONSTRUCTION OY
Foreword2155E STD
SYMBOLS USED IN THIS MANUAL
This symbol identifies important safety messages within this manual. Carefully read
the message that follows. Failure to understand and obey this safety warning could
result in injury to you or others, and could also cause damage to equipment. See
illustration 1.
This symbol identifies a prohibited action or a hazardous location. Failure to
understand and obey this safety warning could result in injury to you or others, and
could also cause damage to equipment. See illustration 2.
This symbol identifies correct and recommended action. See illustration 3.
This symbol identifies environmental and recycling matter. See illustration 4.
R010265

COPYRIGHT © 2019 SANDVIK MINING AND CONSTRUCTION OYPage 6 - Operation
Foreword 2155E STD
1.2 IMPORTANT SAFETY INFORMATION
Basic safety precautions are outlined in the "Safety" section of this manual and in
the description of operations where hazards exist. Warning labels have also been put
on the machine to provide instructions and to identify specific hazards which if not
observed could cause bodily injury or death to you or other persons. These warnings
in the guide and on the machine labels are identified by the warning symbol.
To use the attachment correctly, you must also be a competent operator of the carrier
machine. Do not use or install it if you can not use the carrier machine properly. The
attachment is a powerful tool. If used without proper care, it can cause damage.
Do not rush when you are learning to use the product. Take your time and most
importantly, take it safely. Do not guess. If there is anything you do not understand,
ask your local dealer.
Improper operation, lubrication or maintenance of this machine can be dangerous
and could result in injury.
Do not operate this machine until you have read and understood the instructions in
this manual.
Do not perform any lubrication and maintenance on this machine until you have
read and understood the instructions in this manual.
1.3 WARRANTY
Check that a separate warranty sheet explaining the export warranty terms is
delivered with the attachment. If not, contact your local dealer immediately.
WARRANTY REGISTRATION CARD
A warranty registration card is filled out after the installation inspection by the
dealer and a copy of it is sent to the manufacturer. This card is very important
because no warranty claims are handled without it. Make sure that you get a copy
of it after the installation inspection and that it is correctly filled out.
INSTALLATION INSPECTION
An installation inspection must be carried out after the product has been installed on
the carrier. In the installation inspection certain specifications (such as operating
pressure and oil flow) are checked so that they are within given limits. See
“Hammer specifications” on page 70.

Operation - Page 7COPYRIGHT © 2019 SANDVIK MINING AND CONSTRUCTION OY
Foreword2155E STD
1.4 SPARE PART ORDERS
When you need spare parts or some information concerning maintenance to your
machinery, please contact your local dealer. Quick deliveries are ensured by exact
orders.
Required information:
1. Name of customer, contact person
2. Order number (when available)
3. Delivery address
4. Mode of delivery
5. Required delivery date
6. Invoicing address
7. Model and serial number of product
8. Name, number and required amount of spare parts

COPYRIGHT © 2019 SANDVIK MINING AND CONSTRUCTION OYPage 8 - Operation
Product numbers 2155E STD
2. PRODUCT NUMBERS
2.1 MODEL AND SERIAL NUMBER
The product serial number is stamped on the valve body. Both the model and serial
number are located on the product identification plate. Check that the model
corresponds to the one given on the cover of this manual.
It is important to make correct reference to the serial number of the attachment when
making repairs or ordering spare parts. Identification of the serial number is the only
proper means of maintaining and identifying parts for a specific product.
CONTENT OF THE PRODUCT IDENTIFICATION PLATE
1 Hydraulic Hammer
2 Model
3Version
4 Serial Number
5 Hammer weight (kg)
6 Min working weight (kg)
7 Operating pressure (bar)
8 Oil flow (l/min)
9 Manufactured or Manufacturing date
10 Manufacturer
R010540
1
2
3
4
5
6
7
8
9
10

Operation - Page 9COPYRIGHT © 2019 SANDVIK MINING AND CONSTRUCTION OY
Product introduction2155E STD
3. PRODUCT INTRODUCTION
3.1 OVERVIEW
The product is a hydraulically operated hammer. It can be used on any carrier which
meets the necessary hydraulic and mechanical installation requirements. The unit
functions by repeatedly raising a steel piston and driving it down onto the head of a
removable breaking tool.
No additional pressure accumulators are necessary since the integrated pressure
accumulator absorbs hydraulic pressure peaks. The impact energy of the hammer is
almost constant and independent of the carrier's hydraulic system.
3.2 REMOVAL FROM PACKAGE
Remove all the steel belts from the package. Open the package and remove all
plastics covering the product.
Recycle all package materials (steel, plastic, wood) properly.
3.3 LIFTING INSTRUCTIONS
Use a hoist when lifting components which weigh 23 kg (51 lb) or more, to avoid
back injury. Make sure all lifting equipment is in good condition and are in the
correct capacity. Be sure hooks are positioned correctly. Lifting eyes are not to be
side loaded during a lifting operation. Do not use the hammer's tools for lifting.

COPYRIGHT © 2019 SANDVIK MINING AND CONSTRUCTION OYPage 10 - Operation
Product introduction 2155E STD
PROVIDED LIFTING POINTS
Use the lifting eyes located on the product housing only to lift or handle the product
itself. The lifting capacity calculation is based on the product's working weight
including a normal working tool and an average sized mounting bracket.
Warning! To avoid falling objects, do not use the product to lift other products.
Use the lifting eyes located on the product housing only to lift or handle the
product itself.
The maximum allowed total weight is shown on the product's CE-plate and
specification page. See “Hammer specifications” on page 70. If the weight exceeds
the maximum allowed total weight shown on the CE-plate and specification page,
you have to use other lifting points/methods than originally provided on the product.
The other threaded holes on the product (for example on the hammer impact unit)
are intended for handling single parts only. It is forbidden to lift the entire assembly
by using these threaded holes (for example on the cylinder outer surfaces). For
handling the parts, see product workshop documentation for suitable lifting
methods and lifting adapters.
LIFTING EYE SCREWS
Tighten the lifting eye screws completely. Put a burden on the lifting eye only if the
screw is properly tightened to the housing.
Failure to properly tighten the screw before allowing load pressure on the
lifting eye may cause lifting eye to break and free fall of the product.
If you use mechanical tools for tightening, make sure not to overstrain the shank.
Before lifting make sure that the chain and/or hook is stretched.
When two lifting eye screws are used, the lifting capacity depends on the angle of
the lifting chains. The angle should not be less than 45°, as shown in the illustration.
When the lifting eye screws are tightened, both rings should be aligned.
The loading capacity calculation applies to temperatures between -10 °C (14 °F)
and 40 °C (104 °F).
Before reuse of lifting eye screws make sure there are no surface flaws (for example
rust, pits, voids, folds and seams, deformation of the ring, or missing or broken
threads).
The local, national safety standards for machines and lifting-equipments must
always be strictly observed.
Note: Before starting to operate the hammer, always replace the lifting eye with a
blanking screw.

Operation - Page 11COPYRIGHT © 2019 SANDVIK MINING AND CONSTRUCTION OY
Product introduction2155E STD
Lifting devices must safely carry the working weight of the product. See “Hammer
specifications” on page 70. Place chains or slings, as shown by the illustration, to
lift the product.
Note: Before starting to operate the hammer, always replace the lifting eye with a
blanking screw.
R010266
R010274

COPYRIGHT © 2019 SANDVIK MINING AND CONSTRUCTION OYPage 12 - Operation
Product introduction 2155E STD
SAFETY INSTRUCTIONS FOR LIFTING
Below are some common safety instructions concerning lifting operations. In
addition to this, the local, national standards for machines and lifting-equipments
must always be strictly observed. Please note that the list below is not all inclusive,
you must always ensure the procedure you choose is safe for you and others.
■Do not lift load over people. No one shall be under the hoisted load.
■Do not lift people and never ride the hoisted load.
■Keep people clear from lift area.
■Avoid side pull of the load. Make sure you take up the slack slowly. Start and
stop carefully.
■Lift the load a few centimeters and verify it before proceeding. Make sure the
load is well balanced. Check for any loose items.
■Never leave the suspended load unattended. Maintain load control at all times.
■Never lift the load over the rated capacity (see product's operating weight from
specification page).
■Inspect all lifting equipment before use. Do not use twisted or damaged lifting
equipment. Protect lifting equipment from sharp corners.
■Obey all local safety instructions.

Operation - Page 13COPYRIGHT © 2019 SANDVIK MINING AND CONSTRUCTION OY
Product introduction2155E STD
3.4 MAIN PARTS
The main parts of the hammer are shown below.
A. Housing
B. Mounting flange
C. Vibration dampening elements
D. Hose connections (pressure line marked "IN" and return line marked "OUT")
E. Pressure accumulator
F. Tool retaining mechanism
G. Greasing device
H. Lifting eye
I. Grease nipple
R010276

COPYRIGHT © 2019 SANDVIK MINING AND CONSTRUCTION OYPage 14 - Operation
Product introduction 2155E STD
3.5 RAMLUBE II
The hammer can be equipped with an automatic greasing device Ramlube II. The
tool grease is supplied from the greasing device into the hammer by the grease lines.
See “Ramlube II” on page 46.
3.6 RD3 REMOTE MONITORING DEVICE
RD3 is a hammer-mounted device that enables remote monitoring of a hammer
units. During hammer operation, RD3 collects and transmits operating and location
information. This information will be made available through an online service and
can be used, for example, to view hammer work history, manage service schedules,
optimize hammer performance, plan operator training and conduct fleet
management.
For more information, contact your local Rammer dealer and See “Important
information concerning the remote monitoring device and data privacy” on page 76.

Operation - Page 15COPYRIGHT © 2019 SANDVIK MINING AND CONSTRUCTION OY
Product introduction2155E STD
Warning! RD3 contains a SIM card to enable remote connections and an
encased lithium metal battery. Both items are regulated for air transport.
Consult your forwarder about any restrictions for air freight.
Warning! Lithium is a highly flammable substance. Store damaged lithium
batteries in a fire proof container. Never transport a damaged or unprotected
lithium battery. Follow local laws and regulations on proper disposal of
damaged lithium batteries.
Warning! Inhalation, skin contact and eye contact can occur when the battery
is opened. Upon exposure to internal contents, the corrosive fumes will be very
irritating to the skin, eyes and mucous membranes. Overexposure can cause
symptoms of non-fibrotic lung injury and membrane irritation.
R010541
RD3

COPYRIGHT © 2019 SANDVIK MINING AND CONSTRUCTION OYPage 16 - Operation
Product introduction 2155E STD
3.7 ENVIRONMENTAL PROTECTION AND RECYCLING POLICY
Rammer products contribute to the recycling of materials to help customers achieve
their environmental objectives. During the manufacturing, all the necessary
precautions are taken to make sure that no harm is done to the environment.
Every effort is made to foresee and minimize the risks that might be associated with
the operation and maintenance of Rammer products, and which could pose danger
to humans or the environment. We support customers in their efforts to consider
environmental protection in their everyday work.
When working with a Rammer product please follow these guidelines:
■Dispose of packaging materials properly. Wood and plastic can be burned or
recycled. Deliver the steel belts to metal recycling center.
■Protect environment from oil spills.
In case of hydraulic oil leaks, the equipment should be serviced immediately.
Follow the product's greasing instructions and avoid excessive greasing.
Be careful when handling, storing and transporting oils.
Dispose of empty oil or grease containers appropriately.
Consult local authorities for detailed instructions.
■All metal parts of the product can be recycled by delivering them to an
authorized scrap metal collection facility.
■Comply with local waste classification rules when disposing of used rubber or
plastic parts (buffers, wear plates, seals).
■When scrapping the whole product or pressure accumulator, consult your local
Rammer dealer for instructions on depressurizing the accumulator.
■Do not take the product or accumulator to a scrap metal collection center
without depressurizing the accumulator first.
■Dispose of batteries in accordance with applicable federal, state and local
regulations. For safety precaution, properly insulate batteries for disposal.
Cover both terminals of the battery with tapes, wrap the battery in an insulated
bags, or pack the battery in its original packaging in order to prevent ignition
due to short-circuit.
Consult with your local dealer for more information.

Operation - Page 17COPYRIGHT © 2019 SANDVIK MINING AND CONSTRUCTION OY
Safety2155E STD
4. SAFETY
4.1 GENERAL SAFETY
All mechanical equipment can be hazardous if operated without due care or correct
maintenance. Most accidents involving machine operation and maintenance are
caused by failure to observe basic safety rules or precautions. An accident can often
be avoided by recognizing potentially hazardous situations before an accident
occurs.
Because it is impossible to anticipate every possible circumstance that might
involve a potential hazard, the warnings in this guide and on the machine are not all
inclusive. If a procedure, tool, working method or operating technique not
specifically recommended by manufacturer is used, you must satisfy yourself that
it is safe for you and others. You should also ensure that the product will not be
damaged or made unsafe by the method of operation or maintenance procedures you
choose.
Safety is not just a matter of responding to the warnings. All the time you are
working with your attachment you must pay attention to what hazards there might
be and how to avoid them. Do not work with the product until you are sure that you
control it. Do not start any job until you are sure that you and those around you will
be safe.
Warning! Read the following warning messages carefully. They tell you of
different hazards and how to avoid them. If proper precautions are not taken
you or others could be seriously injured.
4.2 SAFETY INSTRUCTIONS
MANUALS
Study this manual before installing, operating or maintaining the product. If there is
anything you don't understand, ask your employer or your local dealer to explain it.
Keep this manual clean and in good condition.
The related safety label on the hammer and the text on the label are shown below.
"IGNORING INSTRUCTIONS HAZARD
Faulty handling practice could cause death or serious injury.
Read and follow the instructions in the operator's manual."

COPYRIGHT © 2019 SANDVIK MINING AND CONSTRUCTION OYPage 18 - Operation
Safety 2155E STD
CARE AND ALERTNESS
All the time you are working with the product, take care and stay alert. Always be
alert for hazards. The possibility of a serious or even fatal accident is increased
when you are intoxicated.
CLOTHING
You can be injured if you do not wear proper clothing. Loose clothing can get
caught in the machinery. Wear protective clothing to suit the job.
Examples are: a safety helmet, safety shoes, safety glasses, well-fitting overalls,
ear-protectors and industrial gloves. Keep cuffs fastened. Do not wear a necktie or
scarf. Keep long hair restrained.
PRACTICE
You and others can be killed or injured if you perform unfamiliar operations without
practising them first. Practice away from the job site, in a clear area.
Keep other people away. Do not perform new operations until you are sure you can
do them safely.
REGULATIONS AND LAWS
Obey all laws, work site and local regulations which affect you and your equipment.
COMMUNICATIONS
Bad communications can cause accidents. Keep people around you informed of
what you will be doing. If you will be working with other people make sure they
understand any hand signals you will be using.
Work sites can be noisy. Do not rely only on spoken commands.
R010354
IGNORING
INSTRUCTIONS HAZARD
Faulty handling practice could
cause death or severe injury.
Read and follow the
instructions in the operator’s
manual.
WARNING
169400_ENG-3

Operation - Page 19COPYRIGHT © 2019 SANDVIK MINING AND CONSTRUCTION OY
Safety2155E STD
WORK SITE
Work sites can be hazardous. Inspect the site before working on it.
Poor visibility can cause accidents and damage. Make sure that visibility and
lighting of the working area are adequate.
BANKS AND TRENCHES
Banked material and trenches can collapse. Do not work too close to banks and
trenches where there is a danger of collapse.
SAFETY BARRIERS
Unguarded equipment in public places can be dangerous. Place barriers around the
machine to keep people away.
AIRBORNE POLLUTANTS
The related safety label on the hammer and the text on the label are shown below.
"DUST HAZARD
Breathing dust will cause death or severe injury.
Always wear approved respirator."
Airborne pollutants are microscopic particles, which will damage your health, when
inhaled. Airborne pollutants on construction sites can be, for example, silica dust,
oil fumes or diesel exhaust particles, visible or invisible. Especially in demolition
sites, there may be other dangerous substances, such as asbestos or lead paints or
other chemical substances.
The effect of airborne pollutants may be immediate if the substance is poisonous.
The main danger with airborne pollutants comes from long term exposure, where
particles are inhaled but not removed from the lungs. The disease is called silicosis,
asbestosis or other, and will result in death or serious injury.
R010356
DUST HAZARD
Breathing dust will cause death
or severe injury.
Always wear approved
respirator.
DANGER
169400_ENG-1

COPYRIGHT © 2019 SANDVIK MINING AND CONSTRUCTION OYPage 20 - Operation
Safety 2155E STD
To protect yourself from airborne pollutants, always keep excavator doors and
windows closed during operation. Excavators with pressurized cabins should be
utilized in hammer operation. Proper maintenance of fresh air filters of the
excavator is essential. Where pressurized cabins are not available, proper respirators
must be utilized.
Stop working, when bystanders are in the area of airborne pollutants and make sure
they have proper respirators. Respirators are as important for bystanders as hard
hats.
Respirators for both operator and bystanders must be approved by the respirator
manufacturer for the application in question. It is essential that the respirators
protect from the tiny dust particles which cause silicosis and which may cause other
serious lung diseases. You should not use the equipment until you are sure the
respirators are working properly. This means the respirators must be checked to
make sure that it is clean, that its filter has been changed, and to otherwise make sure
the respirator will protect in the way it is meant to.
Always make sure dust has been cleaned off your boots and clothes when you leave
your shift. The smallest particles of dust are the most harmful. They may be so fine
that you can not see them. Remember, you MUST protect yourself and bystanders
from the danger of breathing or inhaling dust.
Always follow local laws and regulations for airborne pollutants in the working
environment.
FLYING CHIPS OF ROCK
The safety label on the hammer is shown below:
"FLYING OBJECTS HAZARD
Fragments fly up to 40 m (130 ft) and could cause death or serious injury.
Stop operation when a person enters hazard zone.
Wear approved personal protective equipment."
Protect yourself and your neighbourhood against flying chips of rock. Do not
operate the product or carrier if someone is too close.
R010355
FLYING OBJECTS
HAZARD
Fragments fly up to 40 m
(130 ft) and could cause death
or severe injury.
Stop operation when a person
enters hazard zone.
Wear approved personal
protective equipment.
WARNING
169400_ENG-2
Table of contents
Other RAMMER Tools manuals
Popular Tools manuals by other brands

Interpump Group
Interpump Group General Pump DHRGH150 manual

Kreg
Kreg r3 Instructional manual

RectorSeal
RectorSeal UpperCut IV Operating, Safety and Parts Manual

Bench Dog Tools
Bench Dog Tools Pro-Builder Series owner's manual

Cembre
Cembre HTEP-S Operation and maintenance manual

Yokota
Yokota RED ROOSTER RRI-T5625 manual

Westward
Westward 13G264 Operating instructions and parts manual

Cleco
Cleco LiveWire 47BC Series manual

Volkswagen
Volkswagen VAS 6910 operating manual

Atlas Copco
Atlas Copco LPD Series Safety and operating instructions

Vivo
Vivo DESK-V000V Series instruction manual

Bostitch
Bostitch BTMT72394 Operation and maintenance manual