Crescent duo lightway User manual

comfort
instruction manual
Read these instructions carefully before use.
Important - Keep these instructions for future use
duo lightway instruction manual
Read these instructions carefully before use.
Important - Keep these instructions for future use.

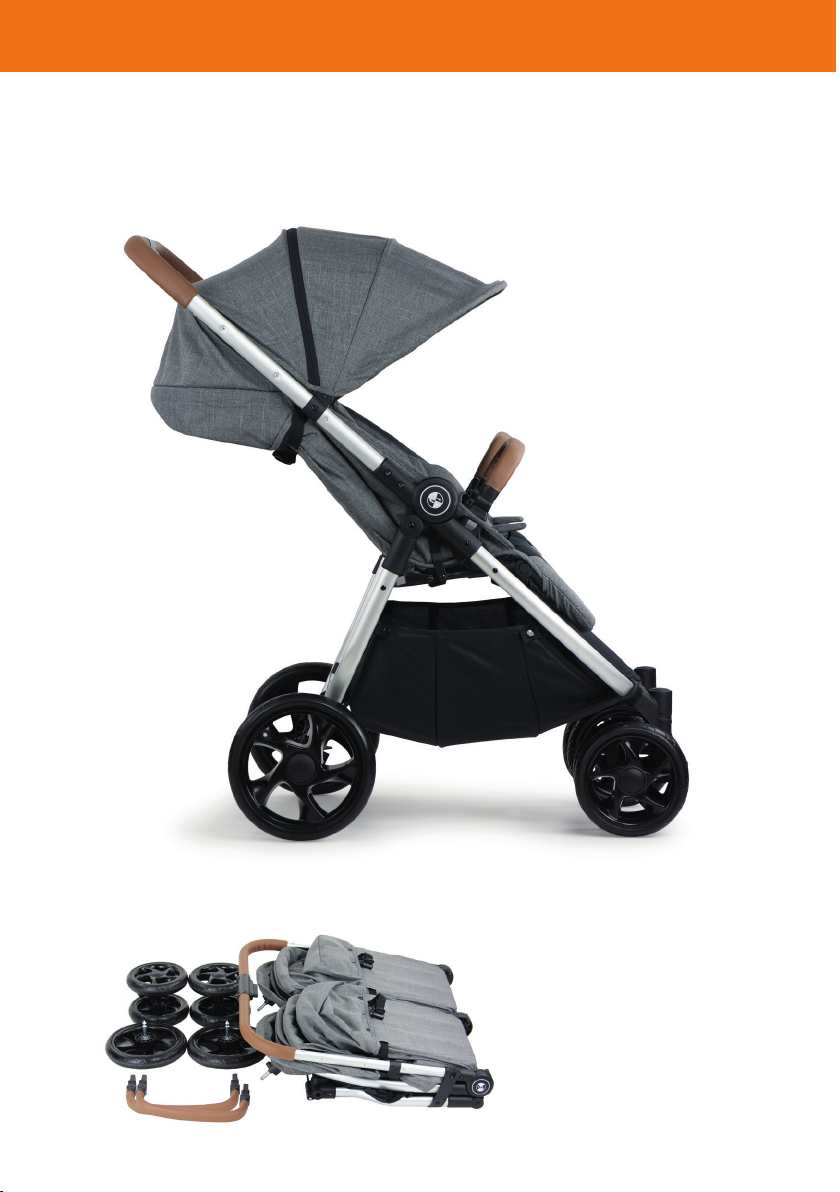
AAdjustable handle height
BAdjustable backrest
CSeat release button
DFolding handle
EWheel lock
FRestraining system
G
Safety lock
HAdjustable footrest
A
F
G
H
B
C
D
E
comfort
instructions
duo lightway instructions
A Chassis
B Rear Axle
C Front Wheels
D Bumper Bars
E Rear wheels
A
B
C
D
E

Assembly instructions
1. To open the chassis
Pull the folding catch to the side and lift the
handle upwards (2) until the handle locks in
place.
3. Attach rear axle and wheels and functions
Push the axle onto the rear legs (4) until the
spring clips have popped through the holes.
Push the stems of the rear wheels into the
axle until they click in place. Pull the wheel
gently to make sure they are secure. To re-
move the rear wheels, push the silver button
in and pull the wheel outwards.
5. To operate the brakes
With your foot, push the foot pedal on the
right si de down until it clicks in to place (3).
Lift upwards to release the breaks.
WARNING! Ensure that all the locking
devices are engaged before use.
6. Front wheel assembly and functions
Push the front wheels on to the front legs of
the chassis until they click into place. Pull
them gently to make sure they are secure.
Push the swivel catch up to select xed
wheels or down for swivel wheels.
To remove the front wheels you can either
push the button in and pull the wheel unit
and stem off or you can just remove the
wheel unit by pushing the button located
on the bottom of the leg and pull the wheel
unit off.
1. Chassis
Out of the box the Comfort is fully assemb-
led and ready for use except wheels, seatu-
nit and canopy.
2. To unfold
To open the Comfort chassis stand behind
the pushchair and, with both hands on the
pushbar, pull-up until the chassis clicks into
place.
3. Attach the wheels
Open the wheel lock by pressing. Place the
wheel into the axle. Release locking catch
when fully inserted and wheel should lock
into position. Pull on wheel to ensure that it
is securely tted. This process is repeated
all around.
4. Attaching the seat unit or carrycot
Engage the brake and place the seat unit
or carrycot over the chassis. When the seat
unit or carrycot is correctly tted a click will
be heard on each side. Ensure that it is se-
curely attached before use.
4b. Detaching seat unit or carrycot
Press the release buttons on both sides
and lift straight up. Marked by arrow.
5. Attaching the canopy
Fit the canopy by linserting the canopy hol-
ders in the holes on both sides.
6. Adjusting the backrest
Use the handle on the rear of the backrest
to adjust the backrest to desired position.
32
4
1
5 6

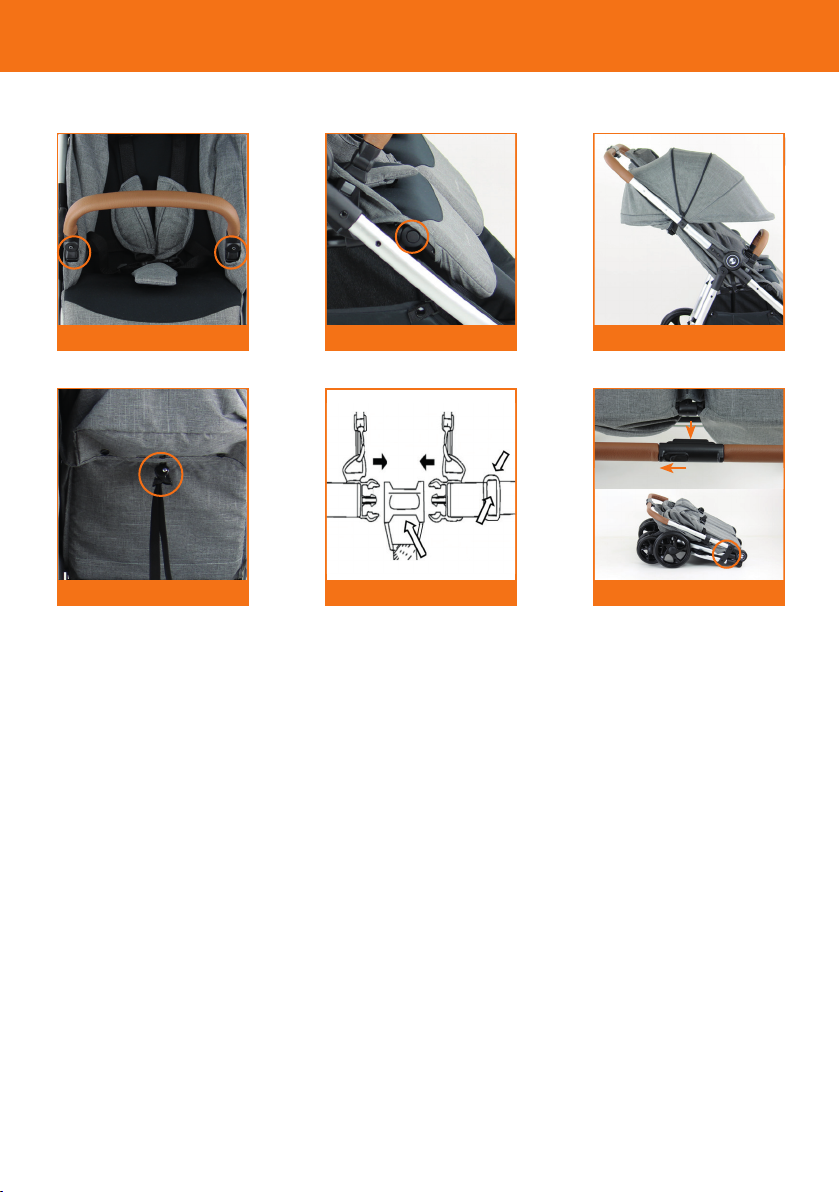
7. Attach the bumper bars
Push the ends of the bumper bars in to the
slots on the chassis until they ’click’ in to pla-
ce. To remove the bars, push the buttons on
both sides and pull the bars off.
8. Foot rest adjustment
Push the buttons on both sides of the leg rest
and select desired position.
9. To operate the canopy
Pull the canopy forward by the front rim. For
added shade/weatherprotection,the canopy
can be unzipped further.
10. To operate the seat recline function
Squeeze the clasp on the back of the seat unit
and pull downwards. When the backrest has
reached the desired position, release. To raise
the backrest, hold both straps with one hand
and push the backrest up with your other.
11. To adjust and secure the harness
Push the buckle prongs in to the buckle
housing until they click. Adjust sliders to t for
your child. After making adjustments to the
seat always re adjust the harness. Release
the harness by pressing the button on the
buckle housing unit.
WARNING! Always use the crotch strap in
combination with the waist belt.
WARNING! For children aged 0 - 6 months
the harness must be fed through the retaining
loops to prevent risk of strangulation.
12. To fold the stroller
Make sure the seats are in the upright posi-
tion, the canopy is retracted and the brake
are engaged. Slide the primary lock button
(A) to the side and then squeeze the secon-
dary lock button(B). Keep the secondary lock
button held in and push up and forward on
the handle. Fold until folding catch locks.
7. Adjusting the footrest
In order to adjust the footrest a push/pull
technique must be applied. Push the footrest
inwards to make it adjustable. When the de-
sired position is reached pull outwards until
it locks into position.
8. Canopy locking
To lock the canopy in fully unfolded position,
use your hand to drag it out to position. A
click should be felt when the canopy is fully
unfolded and locked in position. Someti-
mes a small force/handpress from above is
needed to reach the locking position.
9. Swivel lock/release
To change the front wheels from xated or
swiveled function adjust the button left or
right.
10. Handle height adjustment
There are multiple handle height positions.
To adjust, press the centre button on both
sides and simultaneously and adjust to desi-
red level. Release button and engage at the
desired height.
11. Using the brakes
To apply brake, press down gently on the
middle of the brake bar. To release brake,
place foot under brake bar and pull upwards.
Warning always apply the brakes when the
pushchair is stationary and placing or remo-
ving the child.
7
A
B
8 9
10 11
A
B
12
A
B
C
1
2

13. Carrycot accessory
The carrycot is aquired separately and can
easily be attached to the seat.
14. See section 10 on how to recline the back-
rest to fully at position
15. Attach the carrycot by putting it in the
reclined seat
16. Secure the carrycot to the seat unit.
13. Using a hardlift
Adjust the backrest to full sleeping mode
and place the hardlift inside the seat.
Lock the hardlift to the chassis with the four
safety straps, two on each side.
14. Carrycot features
The carrycot is equipped with inner lining
that is washable. Under the mattress in the
bottom of the carrycot is a small backrest
that can be xed with the legs on the back.
The carrycot may be equipped with an ad-
ditional mattress of maximum 15mm thick-
ness.
15. Hardlift warning
The hardlift is suitable for a child who can-
not sit up by itself, roll over and cannot push
itself up on its hands and knees. Maximum
weight of the child: 9kg.
13 14
15 Carrycot
Hardlift
16
15b. Hardlift and carrycot assembly
Open/unfold by raisíng the support legs un-
der the matress to its raised positions.
Make sure that the hardlift/carrycot is cor-
rectly opened by checking that the legs are
securely locked in its positions
16. Your Comfort should now be fully assem-
bled and ready for use.
Hardlift / Carrycot:
WARNING: This product is only suitable for
a child who cannot sit up unaided
use only on a rm, horizontal level and dry
surface
WARNING: Do not let other children play
unattended near the carry cot
WARNING: Do not use if any part is broken,
torn or missing.
12. Folding the chassis
Pull the folding handles on both sides (A)
whilst folding the backrest/chassi forward to
initiate the folding sequence (B)
Lift the safety latch on the right side to com-
plete the folding process (C)
13. 5-point safety harness
Feed the buckle tongues 1 & 2 into the
buckle housing 3 and click together.
Adjust your ve-point harness at the points
indicated. To unfasten the harness squeeze
in the buckle tongues 1 & 2 and pull out of
the buckle housing 3.
D-Rings are provided for attaching an extra
harness complying to BS 6684.
Warning. To avoid serious injury, always use
the 5-point safety harness.
The harness shall not be removed from the
seat.
14. (XT Air*) The canopy can be extended
with the zipper on the canopy, extending it.
15 & 16. Please note that there are two ver-
sions of the Compact 360, Regular and XT
Air. The Regular version is equipped with
EVA-wheels and the XT Air version is equip-
ped with Air wheels.
general instructions
13
12
3
14 15
EVA AIR
16

maintenance and care
safety warning
• Use the Comfort for only one child at a
time.
• Comfort with seat unit is suitable for child-
ren from 6 months to approx 3-4 years (up
to 15kg), and when seated, the midpoint of
the childs head is at or below the top of the
stroller seat.
• It is recommended that you do not use the
comfort seat unit until your child is able to sit
up unassisted, usually at around 6 months.
• Make sure the chassis is fully unfolded and
locked before placing your child in it.
• Keep your child away from all moving parts
when folding, unfolding or adjusting the
pushchair.
• Always apply brakes when parking, even
when standing still for a few moments.
• Inspect and clean your pushchair
frequently. Never use abrasive cleaners or
lubricants.
• Never lift the Comfort or use escalators or
stairs when there is a child in it.
• Use original accessories and manufactu-
rer-approved parts only.
Failure to do so may affect your warranty.
• Do not make any changes to this product. If
you have any problems or complaints, con-
tact your retailer or importer.
• To avoid the risk of suffocation, keep all
plastic packaging materials out of the reach
of children.
• Cleaning, washing and drying:
Clean your comfort and it’s accessories
with a fresh cloth and handwarm water
by hand. Do not wash in washing mach-
ine, or dry in dryer. If wet, please dry
the fabrics hanging, away from the sun.
All moving parts shall be cleaned regularily
and lubricated with silicone spray or similar.
The Crescent Comfort requires
regular maintenance by you.
• Regularly inspect the locking devices,
brakes, harness assembly, catches, seat
adjusters, joints and xings to ensure
they are secure and in full working order.
• The brakes and wheels are subject to
wear and should be maintained frequently
and replaced when necessary.
• Should any parts of your Comfort
pushchair become stiff or difcult to
operate, ensure that dirt is not the
cause. Then try a light application of a
sprayable lubricant e.g. silicon spray,
ensuring that the lubricant penetrates
between the components, but take care
as excessive application may encourage
the accumulation of dirt. Regular light
lubrication of moving parts will extend
the life of your pushchair and make
opening and folding easier.
• Do not leave the Comfort pushchair
in sunlight for prolonged periods as the
colour of some fabrics may fade.
• Store the pushchair in a dry, well
ventilated and safe place.
• Your pushchair should be serviced and
reconditioned before using it for a
second baby, or within 18 months,
whichever is the sooner. This can be
arranged by contacting your Crescent
dealer.
The correct use and maintenance of this
stroller is essential.
• Do not use excessive force when folding the
stroller. If you are having problems, fully open
the stroller and repeat the folding procedure.
• Always let wheels down as gently as pos-
sible when mounting and dismounting kerbs.
• Always fold the stroller when going up or
down stairs. Never bump the buggy over
these or similar obstacles.
• In some climates mould and mildew can
affect the fabric and rain cover. To avoid this,
do not fold the stroller when it is wet. Leave it
open in a ventil ated area until completely dry.
• Always store the stroller in a dry place.
• When storing the stroller in the car, never
place other items on top of it.
• Do not exceed the maximum load of 2 kgs in
the shopping basket. (Where provided).
Cleaning
• Fabric covers and trims may be spot washed
using mild detergent and warm water. Leave
to dry in aventilated area away from direct
sunlight
• Avoid leaving your buggy in direct sunlight
for prolonged periods of time as this may
cause fabric to fade.
• Do not dry clean, machine wash or tumble
dry. Metal parts may be cleaned with a damp
cloth. Always wipe dry. Clean plastic parts with
a mild soap and water solution, wipe dry.
Maintenance
Maintain your stroller by lubricating all metal
moving parts with a light machine oil e.g.
WD-40.
Do not use heavy machine oil or grease as
this can attract dirt or grit.
Check that nothing is loose or broken and
that no sharp edges have been exposed.
Inspect all joints and the harness, replace
any damaged parts immediately.
Inspect any nuts and bolts regularly to ensure
none have worked loose. Tighten as ne-
cessary. Only use replacement parts and
accessories that have been approved by the
manufacturer. Failure to do this may invalida-
te your warranty.

safety warning
WARNING Never leave your
child unattended
WARNING Ensure that all the locking
devices are engaged before use.
WARNING To avoid injury ensure
that your child is kept away when
unfolding and folding this product.
WARNING Do not let your child play
with this product
WARNING Always use the restraint
system.
WARNING Please ensure that your
child wears a correctly tted and
adjusted harness at all times. For
extra safety, ’D’ - ring loops are
provided for the attachment of a
separate safety harness, if desired,
approved to BS 6684.
WARNING Keep children clear of
moving parts before making
adjustments. To avoid entrapment,
keep your own and your children’s
ngers clear of any folding parts.
Overloading, incorrect folding and
the use of non-approved accessories
may damage, break or otherwise
render the pushchair unsafe for use.
WARNING Do not allow your child
to climb unassisted into the
pushchair.
WARNING The seat unit is not suitable
for children under 6 months.
WARNING Do not use replacement
parts or accessories, e.g. child seats,
bag hooks, rain covers, etc. other
than those approved by Crescent.
WARNING Check that the pram body
or seat unit or car seat attachment
devices are correctly engaged before use.
WARNING This pushchair is intended for
children up to 15kgs
WARNING Do not overload the
pushchair with additional children,
heavy packages, goods or
accessories. Bags and other items
must not be hung from the handle
bars as they may damage the frame
or otherwise cause the pushchair to
become unbalanced and tip over.
WARNING Hold on to your pushchair
when close to any moving road
vehicle or train. Even with the brakes
on, the draught from the vehicle may
cause the pushchair to move. The
pushchair should only be used under
adult supervision.
WARNING Do not use the pushchair
in a manner for which it is not
designed.
WARNING if the pushchair is to
be used by someone unfamiliar with
it (e.g. by grandparents) always
show them how it works.
WARNING always use the crotch
strap in combination with the waist
belt.
WARNING never use the carrycot
on a stand.
WARNING This product is not
suitable for running or skating.
WARNING The maximum load for
the shopping basket is 5kg.
WARNING always keep this
instruction Manual with the Crescent
Comfort pushchair for future use.
WARNING This product is not suitable for
running or skating
WARNING Always ensure all wheels is
securely attached after folding.
WARNING Before use, always ensure all
wheels are securely attached, chassis is
correctly unfolded and brake is working
WARNING Never leave your child unatten-
ded.
WARNING To avoid injury ensure your child
is kept away when unfolding and folding this
product.
WARNING Do not let your child play with this
product.
WARNING Always use the restraint system.
WARNING This product is not suitable for
running or skating.
WARNING Your childs safety is your respon-
sibility.
WARNING Any load attached to the handle
affects the stability of the pram / pushchair.
Not intended for children weighing more than
15kgs.
This stroller is designed for two children only.
Total combined weight of 30kg maximum.
The brake must always be engaged when
placing and removing children from the
stroller.
Any load attached to the handle and/or on
the backrest and/or on the sides of the vehic-
le will affect the stability of the stroller.
Lift a child in and out of the stroller.
Do not allow a child to stand on the footrest
or seat.
Do not use accessories that have not been
approved by the manufacturer.
Never use the buggy to carry a child up and
down stairs or escalators.
For newborns, it is advisable to use the seat
units in the fully reclined position.
AAdjustable handle height
BAdjustable backrest
CSeat release button
DFolding handle
EWheel lock
FRestraining system
G
Safety lock
HAdjustable footrest
A
F
G
H
B
C
D
E
comfort
instructions
duo lightway instruktioner
A Chassi
B Bakaxel
C Framhjul
D Frontbågar
E Bakhjul
A
B
C
D
E

Monteringsanvisningar
1. För att fälla upp chassit
Dra fästhaken åt sidan och lyft handtaget
uppåt (2) tills handtaget låser på plats.
3. Montera bakaxel och hjul
Tryck axeln upp i sina fästen på chassit (4)
tills det klickar på båda sidor. Klicka på bak-
hjulen. Dra försiktigt i hjulet så att de sitter
säkert fast. För att ta bort bakhjulen trycker
du in silverknappen och drar hjulet utåt.
5. För att använda bromsen
Med foten trycker du fotpedalen nedåt tills
den klickar. Lyft uppåt för att släppa på
bromsen.
VARNING! Kontrollera att alla låsanord-
ningar är inkopplade före användning.
6. Framhjulsmontering och funktioner
Skjut framhjulen på framkanten på chassit
tills de klickar på plats. Drag i dem försiktigt
för att kontrollera att de är säkra.
Tryck justeringen uppåt för att välja fasta
hjul eller nerår för svängbara hjul.
För att ta bort framhjulen kan du antingen
trycka in knappen och dra i hjulet nedåt
eller så kan du ta bort hjulet genom att
trycka på knappen på botten av benet och
dra av hjulet.
1. Chassis
Out of the box the Comfort is fully assemb-
led and ready for use except wheels, seatu-
nit and canopy.
2. To unfold
To open the Comfort chassis stand behind
the pushchair and, with both hands on the
pushbar, pull-up until the chassis clicks into
place.
3. Attach the wheels
Open the wheel lock by pressing. Place the
wheel into the axle. Release locking catch
when fully inserted and wheel should lock
into position. Pull on wheel to ensure that it
is securely tted. This process is repeated
all around.
4. Attaching the seat unit or carrycot
Engage the brake and place the seat unit
or carrycot over the chassis. When the seat
unit or carrycot is correctly tted a click will
be heard on each side. Ensure that it is se-
curely attached before use.
4b. Detaching seat unit or carrycot
Press the release buttons on both sides
and lift straight up. Marked by arrow.
5. Attaching the canopy
Fit the canopy by linserting the canopy hol-
ders in the holes on both sides.
6. Adjusting the backrest
Use the handle on the rear of the backrest
to adjust the backrest to desired position.
32
4
1
5 6
7. Fästa bygeln
Skjut in ändarna av byglarna i motsvarande
fästen på chassit tills de klickar fast. För att
ta bort dem trycker du på knapparna på båda
sidor och drar i bygeln uppåt.
8. Fotstödsjustering
Tryck på knapparna på båda sidor av fotstödet
och välj önskat läge.
9. Suettjustering
Drag suetten framåt i framkant. För extra
skugga / väderskydd kan suetten expande-
ras med hjälp av dragkedjan.
10. Ryggstödsjustering
Tryck ihop spärren på baksidan av ryggen
och dra nedåt. När ryggstödet har nått önskat
läge, släpp. För att höja ryggstödet, håll båda
banden med en hand och tryck ryggstödet
uppåt med den andra.
11. Justera och säkra selen
Skjut in spännena i spännhuset tills de klick-
ar. Justera för att passa ditt barn. Efter juste-
ring av ryggstödet ska du justera selen igen.
Släpp selen genom att trycka på knappen på
spännhuset.
VARNING! Använd alltid axelremmarna i
kombination med midjebältet.
VARNING! För barn i åldrarna 0-6 månader
måste selen matas genom fasthållningsöglor-
na för att förhindra risk för kvävning.
12. Ihopfällning
Se till att ryggstöden är i upprätt läge, suet-
terna uppfälda och bromsen tillslagen. Skjut
den primära låsknappen (1) åt sidan och
tryck sedan på den sekundära låsningsknap-
pen (2). Håll den sekundära låsningsknappen
intryckt och tryck uppåt och framåt på hand-
taget. fäll tills chassilåset håller fast.
7. Adjusting the footrest
In order to adjust the footrest a push/pull
technique must be applied. Push the footrest
inwards to make it adjustable. When the de-
sired position is reached pull outwards until
it locks into position.
8. Canopy locking
To lock the canopy in fully unfolded position,
use your hand to drag it out to position. A
click should be felt when the canopy is fully
unfolded and locked in position. Someti-
mes a small force/handpress from above is
needed to reach the locking position.
9. Swivel lock/release
To change the front wheels from xated or
swiveled function adjust the button left or
right.
10. Handle height adjustment
There are multiple handle height positions.
To adjust, press the centre button on both
sides and simultaneously and adjust to desi-
red level. Release button and engage at the
desired height.
11. Using the brakes
To apply brake, press down gently on the
middle of the brake bar. To release brake,
place foot under brake bar and pull upwards.
Warning always apply the brakes when the
pushchair is stationary and placing or remo-
ving the child.
7
A
B
8 9
10 11
A
B
12
A
B
C
1
2

13. Liggdel (tillbehör)
Liggdelen köps separat och kan med enkelhet
monteras i sitsen.
14. Se avsnitt 10 om hur du fäller tillbaka
ryggstödet till fullt liggläge.
15. Placera liggdelen i sitsen
16. Säkra liggdelen med hjälp av remmarna
som håller den på plats.
13. Using a hardlift
Adjust the backrest to full sleeping mode
and place the hardlift inside the seat.
Lock the hardlift to the chassis with the four
safety straps, two on each side.
14. Carrycot features
The carrycot is equipped with inner lining
that is washable. Under the mattress in the
bottom of the carrycot is a small backrest
that can be xed with the legs on the back.
The carrycot may be equipped with an ad-
ditional mattress of maximum 15mm thick-
ness.
15. Hardlift warning
The hardlift is suitable for a child who can-
not sit up by itself, roll over and cannot push
itself up on its hands and knees. Maximum
weight of the child: 9kg.
13 14
15 Carrycot
Hardlift
16
15b. Hardlift and carrycot assembly
Open/unfold by raisíng the support legs un-
der the matress to its raised positions.
Make sure that the hardlift/carrycot is cor-
rectly opened by checking that the legs are
securely locked in its positions
16. Your Comfort should now be fully assem-
bled and ready for use.
Hardlift / Carrycot:
WARNING: This product is only suitable for
a child who cannot sit up unaided
use only on a rm, horizontal level and dry
surface
WARNING: Do not let other children play
unattended near the carry cot
WARNING: Do not use if any part is broken,
torn or missing.
12. Folding the chassis
Pull the folding handles on both sides (A)
whilst folding the backrest/chassi forward to
initiate the folding sequence (B)
Lift the safety latch on the right side to com-
plete the folding process (C)
13. 5-point safety harness
Feed the buckle tongues 1 & 2 into the
buckle housing 3 and click together.
Adjust your ve-point harness at the points
indicated. To unfasten the harness squeeze
in the buckle tongues 1 & 2 and pull out of
the buckle housing 3.
D-Rings are provided for attaching an extra
harness complying to BS 6684.
Warning. To avoid serious injury, always use
the 5-point safety harness.
The harness shall not be removed from the
seat.
14. (XT Air*) The canopy can be extended
with the zipper on the canopy, extending it.
15 & 16. Please note that there are two ver-
sions of the Compact 360, Regular and XT
Air. The Regular version is equipped with
EVA-wheels and the XT Air version is equip-
ped with Air wheels.
general instructions
13
12
3
14 15
EVA AIR
16

underhåll och skötsel
• Använd Comfort för endast ett barn i taget.
• Comforts sittdel är lämplig för barn från 6
månader till ca 3-4 år (upp till 15 kg), och
när barnet sitter, mittpunkten i barnets huvud
är på eller under toppen av barnvagnen sits.
• Använd inte vagnens sittdel förrän barnet
kan sitta själv, vanligtvis när barnet nått 6
månaders ålder.
• Se till att din Comfort är korrekt uppfälld
innan barnet placeras i vagnen
• Håll barn borta från vagnens rörliga delar,
låsningar och justeringar vid upp- och ihop-
fällning.
• Använd alltid bromsen vid parkering av
vagnen även om det bara är en kort stund.
• Inspektera och rengör din barnvagn ofta.
Använd aldrig slipande rengöringsmedel el-
ler smörjmedel.
• Lyft aldrig vagnen eller kör i rulltrappa med
ett barn i vagnen.
• Endast reservdelar som är godkända av
tillverkaren får användas.
• Gör inga förändringar i denna produkt.
Om du har några problem eller behöver sup-
port, kontakta din återförsäljare.
• För att undvika risken för kvävning, se till
att alla plastförpackningar och förpacknings
material hålls utom räckhåll för barn.
• Rengöring, tvättning och torkning:
Rengör din comfort och dess tillbehör med
en ren trasa och ljummet vatten för hand.
Tvätta inte i tvättmaskin, eller torka i tork-
tumlare. Om våt, vänligen torka tygerna
hängande, ej i solljus.
Alla rörliga delar skall rengöras regelbun-
det och smörjas med silikonspray eller lik-
nande.
• Din Comfort kräver regelbundet underhåll
av dig.
• Kontrollera regelbundet att låsanordningar,
broms, sele, knappar, sitsjusteringsanord-
ningar, leder och infästningar för att säker-
ställa att de är säkra och i fullt fungerande
skick.
• Bromsarna och hjul är föremål för
slitage och bör underhållas regelbundet och
bytas ut vid behov.
• Om någon del av på din Comfort blir stel el-
ler svår att justera, dvs bristande funktion, se
till att smuts inte är orsaken. Försök sedan
en lätt tillämpning av ett spraybart smörjme-
del, vi rekommenderar silikonspray.
Se till att smörjmedlet tränger in mellan alla
komponenter, men ta hand om överbliven
smörjvätska då det enkelt blir en smutsan-
samling annars. Regelbunden smörjning av
rörliga delar kommer att förlänga livslängden
för din Comfort och göra ihopfällning lättare.
• Lämna inte din Comfort i direkt solljus un-
der längre perioder eftersom färgen på vissa
tyger kan blekna.
• Förvara vagnen på en torr och väl ventile-
rad och säker plats.
• Din sittvagn skall servas och gås igenomin-
nan du använder det för ett andra barn, eller
inom 18 månader, beroende på vilket som
inträffar först.
Detta kan arrangeras genom att kontakta din
Crescent återförsäljare.
Korrekt användning och underhåll av denna
barnvagn är viktigt.
• Använd inte för mycket kraft vid ihopfällning
av barnvagnen. Om du har problem fäller du
upp du barnvagnen och upprepar ihopfäll-
ningsförfarandet.
• Släpp alltid ner hjulen försiktigt mot marken
när du exempelvis går upp eller ner från trotto-
arkanter och liknande.
• Fäll alltid ihop barnvagnen innan du går upp
eller ner för trappor med den.
• I vissa klimat kan mögel och fukt påverka
tyget och regnskyddet. För att undvika detta,
fäll inte ihop barnvagnen när den är våt. Låt
den vara uppfälld i ett ventilerat torrt utrymme
tills den är helt torrt.
• Förvara alltid barnvagnen på ett torrt ställe.
• Placera aldrig andra föremål ovanpå vagnen
när du transporterar barnvagnen i bilen.
• Överskrid inte den maximala belastningen
på 2 kg i varukorgen.
Rengöring
• tyger kan rengöras med ett mildt rengö-
ringsmedel och varmt vatten. Låt torka i ett
ventilerat område, icke i direkt solljus
• Undvik att lämna din barnvagn i direkt solljus
under långa perioder, eftersom det kan göra
att tyget bleknar.
• Maskintvätta eller torktumla inte tygerna.
Metalldelar kan rengöras med en fuktig trasa.
Torka alltid torrt. Rengör plastdelarna med en
mild tvål och vattenlösning, torka torrt.
Underhåll
Underhåll din barnvagn genom smörjning av
alla rörliga delar i metall med en lätt maskin-
olja, t.ex. WD-40.
Använd inte tung maskinolja eller fett efter-
som detta kan locka smuts eller grus.
För plastdetaljer rekommenderas sili-
konspray.
Kontrollera att ingenting är löst eller trasigt
och att inga skarpa kanter har blivit expone-
rade innan varje användning.
Kontrollera alla leder och sele, ersätt alla
skadade delar omedelbart.
Kontrollera regelbundet muttrar och skruvar
för att säkerställa
ingen har lossnat eller släppt. Dra åt vid be-
hov. Använd endast reservdelar och tillbehör
som har godkänts av tillverkaren. Om du inte
gör detta kan din garanti ogiltigförklaras.

säkerhetsvarning
VARNING lämna aldrig ditt barn utan upp-
sikt.
VARNING Se till att alla låsmekanismer är
låsta innan användning
VARNING Se till att ditt barn inte är nära
när vagnen fälls upp eller ned
VARNING Låt inte barnet leka med denna
produkt
VARNING Använd alltid säkerhetsselen
VARNING Håll ditt barn i sikt medan vag-
nen är i bruk.
VARNING Se till att ditt barn använder en
korrekt monterad och anpassad sele hela
tiden.
För extra säkerhet, ”D” - ringarna på
5-punktsselen möjliggör för att fästa en
separata säkerhetssele, om så önskas,
godkända enligt BS 6684.
VARNING Håll barn borta från rörliga de-
lar innan justeringar. För att undvika att
fastna, håll dina egna och dina barns ng-
rarna borta från alla rörliga delar.
Överbelastning, felaktig ihopfällning och
användning av icke-godkända tillbehör
kan skada eller på annat sätt göra vagnen
farlig för användning.
VARNING Låt inte ditt barn klättra på egen
hand i sittvagnen.
VARNING Den här sittvagnen är inte
lämplig för barn under 6 månader.
VARNING Denna vagn är avsedd för barn
upp till 15kg.
VARNING Använd inte tredjeparts de-
lar eller tillbehör, t.ex. barnstolar, krokar,
regnskydd, etc.
Enbart de som godkänts av Crescent.
VARNING Se alltid till att sittdelens eller
liggdelens låsanordningar sitter korrekt
innan du använder vagnen.
VARNING Överbelasta inte sittvagnen
med ytterligare barn, tunga paket, varor el-
ler tillbehör. Väskor och andra föremål
får inte hängas från handtaget eftersom de
kan skada vagnen eller på annat sätt or-
saka obalanserad och ge vältrisk.
VARNING Använd vagnen med gott om-
döme i närheten av vägar, bilar, tåg eller
andra rörliga fordon. Även om bromsen
är tillslagen skall aktsamhet bejakas och
vagnen skall alltid nnas i uppsyn av en
vuxen.
VARNING Använd inte vagnen på annat
sätt än den är utformad för.
VARNING Om vagnen skall brukas av
någon som ej är van vid den (exempelvis
mor- eller farföräldrar), visa dem alltid hur
vagnens alla delar fungerar.
VARNING Använd alltid selens grenband i
samband med användning av selen.
VARNING Placera aldrig liggdelen på ett
bord eller liknande yta.
VARNING Denna produkt är inte avsedd
för användning i samband med löpning el-
ler skridskoåkning.
VARNING Den maximala belastningen för
varukorgen är 5 kg.
VARNING Spara alltid denna manual till-
sammans med din Crescent Comfort för
framtida bruk.
VARNING Denna produkt är inte avsedd
för löpning eller skridskoåkning
VARNING Kontrollera alltid alla hjul sitter
korrekt efter ihopfällning.
VARNING Innan promenad, kontrollera all-
tid att vagnen är korrekt uppfälld, alla hjul
siter som de ska och att bromsen fungerar.
VARNING Lämna aldrig ditt barn obevakat.
VARNING För att undvika skador, se till att
ditt barn hålls borta vid uppfällning och ihop-
fällning av denna produkt.
VARNING Låt inte ditt barn leka med den här
produkten.
VARNING Använd alltid selen.
VARNING Denna produkt är inte lämplig för
löpning eller skridskoåkning.
VARNING Ditt barns säkerhet är ditt ansvar.
VARNING All belastning som är fäst på
handtaget påverkar stabiliteten på barnvag-
nen. Barnvagnen är inte avsedd för barn som
väger mer än 15 kg.
Denna barnvagn är endast avsedd för två
barn. Sammanlagd totalvikt på 30 kg max.
Bromsen måste alltid vara inkopplad vid
placering och borttagning av barn från barn-
vagnen.
Varje last som är fäst på handtaget och / eller
på ryggstödet och / eller på vagnens sidor
påverkar barnvagnens stabilitet.
Lyft ett barn in och ut ur barnvagnen.
Låt inte barn klättra på fotstödet.
Använd inte tillbehör som inte har godkänts
av tillverkaren.
Använd aldrig barnvagnen för att transportera
barn upp och nerför trappor eller rulltrappor.
För nyfödda är det lämpligt att använda ligg-
delen som nns som tillbehör.

IMPORTANT
Read these instructions carefully before use and keep this manual for future reference.
Your child’s safety may be affected if you do not follow these instructions.
WARNING! It may be dangerous to leave your child unattended.
Crescent Comfort © Elite Group Sweden

IMPORTANT
Read these instructions carefully before use and keep this manual for future reference.
Your child’s safety may be affected if you do not follow these instructions.
WARNING! It may be dangerous to leave your child unattended.
contact [email protected]
Crescent Comfort © Elite Group Sweden

crescentbarnvagnar.se
Table of contents
Other Crescent Stroller manuals

Crescent
Crescent trike User manual

Crescent
Crescent Performance User manual

Crescent
Crescent compact User manual

Crescent
Crescent Comfort User manual

Crescent
Crescent infinity S User manual

Crescent
Crescent ultra User manual

Crescent
Crescent twist User manual

Crescent
Crescent Nordic XT User manual

Crescent
Crescent DIVA User manual

Crescent
Crescent classic User manual


