CRH CRL GLASS-CHECK PRO GC3001 User manual

GLASS DRILL INSTRUCTION MANUAL
GLASS-CHEK PRO OPERATING MANUAL
crlaurence.com
C.R. Laurence Co., Inc. •2503 E. Vernon Ave., Los Angeles, CA 90058 •1.800.421.6144 •crlaurence.com
SEPTEMBER 2020
AVDB3409_09/20
Glass Thickness Meter and
Low-E Detector with Laminates
Cat. No. GC 3001

GLASS DRILL INSTRUCTION MANUAL
GLASS-CHEK PRO OPERATING MANUAL
crlaurence.com
C.R. Laurence Co., Inc. •2503 E. Vernon Ave., Los Angeles, CA 90058 •1.800.421.6144 •crlaurence.com
SEPTEMBER 2020
P. 2
The Glass-Chek PRO enables you to measure glass and air space thickness of single, double and triple pane
windows from a single side. The GC3001 allows you to determine the presence, location and type of invisible Low-E
coatings. There are numerous other applications described within this operating manual.
This manual will outline how to use the meter, including choosing language and measurement settings, explanations of
“results” screens, proper use, and maintenance of the meter. Additionally, it will outline appropriate applications, technical
details and warranty information.
Table of ConTenTs
PAGE 1 INTRODUCTION AND TABLE OF CONTENTS
PAGE 2 METER LAYOUT RESULTS SCREEN EXPLANATION, MENU OPTIONS
PAGE 3 NAVIGATING THE MENU, UNIT OF MEASURE, & RESULTS SCREEN SPEED
PAGE 4 OPERATING MODES
LANGUAGE SELECTION
PAGE 5 PROPER OPERATION, BEST LOCATION FOR MEASUREMENTS ON WINDOW, HAND PLACEMENT
PAGE 6 APPLICATION EXAMPLE 1: DOUBLE PANE IG WITH LOW E ON SURFACE 2
APPLICATION EXAMPLE 2: DOUBLE PANE IG WITH LOW E ON SURFACE 3
APPLICATION EXAMPLE 3: TRIPLE PANE IG WITH LOW E ON SURFACE 5
APPLICATION EXAMPLE 4: DOUBLE PANE IG WITH SUSPENDED FILM
APPLICATION EXAMPLE 5: LAMI + LOW E (LOW E COATING AGAINST LAMI INNER LAYER)
PAGE 8 LOW E DETECTION CAPABILITIES
PAGE 9 HELPFUL OPERATING TIPS & EXPLANATIONS EXPLANATION OF ERROR MESSAGES
PAGE 10 TROUBLESHOOTING GUIDE
PAGE 11 SPECIFICATIONS: GLASS THICKNESS RANGE
PAGE 12 ASTM GLASS STANDARD THICKNESS TABLE
FRACTIONS TABLE WITH LOW E COATING LIST
GC3001 WARRANTY

GLASS DRILL INSTRUCTION MANUAL
GLASS-CHEK PRO OPERATING MANUAL
crlaurence.com
C.R. Laurence Co., Inc. •2503 E. Vernon Ave., Los Angeles, CA 90058 •1.800.421.6144 •crlaurence.com
SEPTEMBER 2020
P. 3
MeTeR laYoUT
EXPLANATION OF THE RESULTS SCREEN
MENU OPTIONS
There are various OPERATING MODES and user-selectable options that will make your experience with the Glass-Chek
PRO more convenient All of these options are available in the MENU system. To access the MENU system, turn the meter
on by pressing and releasing the POWER BUTTON and wait for the WELCOME screen to complete its display. The
WELCOME screen will show you the version of software that is in your meter, as well as confirm the current OPERATING
MODE that the meter is operating in. Be sure you have selected the proper operating mode for your application. Choosing
the wrong mode can result In Incorrect measurement results, or no results at all. Remember If you change the operating
mode, It will stay In that mode for all future measurements, until you change It again by entering the MENU system.
Powering the meter OFF will NOT reset the operating mode.
Results display: DATA
- Digital measurement results of the
glass, air space, and overall IG thickness
- Also displays the type of Low E coating
In the window, and the surface location
The ARROW keys are used to:
- Scroll between measurement result screens
(forward and backwards)
- Press & Hold to enter the MENU system
- Move the cursor up and down in the MENU
- Toggle between options in the MENU
Glass thickness typically shown
in the left column
Air Space thickness typically shown
in the right column
The POWER button is used to:
- Turn the power ON (Momentary press)
- Turn the power OFF (Press & Hold)
- Take a measurement (Momentary press)
- Make a selection in the MENU

GLASS DRILL INSTRUCTION MANUAL
GLASS-CHEK PRO OPERATING MANUAL
crlaurence.com
C.R. Laurence Co., Inc. •2503 E. Vernon Ave., Los Angeles, CA 90058 •1.800.421.6144 •crlaurence.com
SEPTEMBER 2020
P. 4
MENU OPTIONS (CONT.)
After the WELCOME SCREEN, the meter will go to its measurement reminder screen, reminding you to place the GC3001
meter at the bottom center of the window for ALL MEASUREMENTS, approximately 1 to 2 inches up from the frame/sash!!
This is the preferred measurement location that should be used for ALL MEASUREMENTS. Testing in this location will
eliminate effects from glass that is flexing inward, resulting in a concave glass surface. The most accurate measurements
of a window will be obtained in this location when using the GC3001 meter.
After the measurement reminder screen appears, PRESS and HOLD one of the ARROW buttons for several seconds until
the ENTERING MENU screen appears. Release the ARROW button once that screen appears. You can enter the MENU
system any time the meter is powered on by pressing and holding one of the ARROW buttons. Please note that you may
need to hold the ARROW button down for several seconds before entering the MENU system.
NAVIGATING THROUGH THE MENU
A small arrow will appear next to the top option. In the illustration below, the arrow is next to the “MODE” option.
To move the cursor from line to line, press the UP or DOWN arrow buttons to navigate through the MENU. To select an
option, press the POWER button one time. Once a category is selected, your options will be displayed. Use the ARROW
buttons to scroll through the available options for that selection. Once you have the desired option on the display, press
the POWER button one time to select that option. You will then move back one level in the MENU system. If you make a
selection by mistake, press the POWER button again to select that option a second time and make your correct selection.
Once you are finished making changes, use the ARROW buttons to move to the EXIT options: “EXIT - SAVE CHANGES”
OR “EXIT - DO NOT SAVE”.
WELCOME SCREEN MEASUREMENT REMINDER SCREEN
software version #
current operating mode

GLASS DRILL INSTRUCTION MANUAL
GLASS-CHEK PRO OPERATING MANUAL
crlaurence.com
C.R. Laurence Co., Inc. •2503 E. Vernon Ave., Los Angeles, CA 90058 •1.800.421.6144 •crlaurence.com
SEPTEMBER 2020
P. 5
SELECTING UNIT OF MEASURE:
The GC3001 can display thickness measurements in various units. You also have the option of rounding measurements
to the nearest “Glass Thickness Standard” (Refer to GC3001 Glass Standards chart on page 19). To choose the display units
appropriate for your application, follow these steps:
In the MENU, select the “DISPLAY UNITS” option. The sub-menu to the right will be displayed:
First, select the “DIMENSIONS” option by pressing the POWER button. Choose if you want your unit of measure to be
millimeters or inches. Use the ARROW keys to toggle between units and press the POWER button to make your selection.
Next, determine whether you want the meter to: 1.) round measurements to the nearest Glass STANDARD, 2.) display the
ACTUAL glass thickness dimensions or 3.) display both STANDARD and ACTUAL. To turn STANDARD rounding on or off,
select the “STANDARD” option. If your dimensions are set to inches, you will have the options: FRACTION, DECIMAL or
OFF. If your dimensions are set to millimeters, you will have the options: ON or OFF. Use the ARROW button to find your
desired setting and press the POWER button to select it. PLEASE NOTE, if the STANDARD option is selected in inches,
the glass thickness designations will always be shown in fractions. If decimal inches are chosen, only the air space thickness
and overall IG unit thickness will be shown in decimal inches. The glass thickness will always be shown in fractions of an inch
when STANDARD is turned on.
Next, choose your ACTUAL setting. If this setting is activated, your meter will display actual glass thickness dimensions
without rounding. If your dimensions are set to inches, you will have the options: FRACTION, DECIMAL or OFF. If your
dimensions are set to millimeters, you will have the options: ON or OFF. Use the ARROW buttons to find your desired
setting and press the POWER button to select it.
NOTE: STANDARD and ACTUAL cannot both be set to OFF. If they are both activated, the measurements will alternate on
the screen after a measurement has been taken. For an illustration of this feature, see the “Measurement Examples” section.
When you exit the Display Units menu, the meter will show an example of what the measurement results screen will look like
according to your selections. This will help you determine whether you chose the correct options. Press the POWER button
to exit the example display.
RESULTS SCREEN DISPLAY SPEED:
Measurement results are displayed across multiple screens. These screens can be controlled two different ways. If you take
no action, the screens will automatically advance from one to the next. If you do not want to wait for the screen to advance,
you can use the ARROW keys to advance or go back to a previous screen. If you let the meter advance the screens for you,
the speed at which these screens advance can be set in the MENU system. Select DISPLAY SPEED in the MENU. You can
independently select the number of seconds you want the THICKNESS measurement screens to display as well as
the LOW-E results screen. Use the ARROW keys to change the time, and then press the POWER button to confirm the
selection. Exit when complete to go back to the main MENU.
Page 3
Navigating Through the Menu
A small arrow will appear next to the top option. In the illustration below, the arrow is next to the “MODE” option.
To move the cursor from line to line, press the UP or DOWN arrow buttons to navigate through the MENU. To select an option, press the
POWER button one time. Once a category is selected, your options will be displayed. Use the ARROW buttons to scroll through the available
options for that selection. Once you have the desired option on the display, press the POWER button one time to select that option. You will
then move back one level in the MENU system. If you make a selection by mistake, press the POWER button again to select that option a
second time and make your correct selection. Once you are finished making changes, use the ARROW buttons to move to the EXIT options:
“EXIT - SAVE CHANGES” OR “EXIT - DO NOT SAVE”.
Selecting Unit of Measure:
The GC3200 can display thickness measurements in various units. You also have the option of rounding measurements
to the nearest “Glass Thickness Standard” (Refer to GC3200 Glass Standards chart on page 16). To choose the display units appropriate for
your application, follow these steps:
In the MENU, select the “DISPLAY UNITS” option. The sub-menu to the right will be displayed:
First, select the “DIMENSIONS” option by pressing the POWER button. Choose if you want your unit of measure to be millimeters or inches.
Use the ARROW keys to toggle between units and press the POWER button to make your selection.
Next, determine whether you want the meter to: 1.) round measurements to the nearest Glass STANDARD, 2.) display the ACTUAL glass
thickness dimensions or 3.) display both STANDARD and ACTUAL. To turn STANDARD rounding on or off, select the “STANDARD” option. If
your dimensions are set to inches, you will have the options: FRACTION, DECIMAL or OFF. If your dimensions are set to millimeters, you will
have the options: ON or OFF. Use the ARROW button to find your desired setting and press the POWER button to select it. PLEASE NOTE, if
the STANDARD option is selected in inches, the glass thickness designations will always be shown in fractions. If decimal inches are chosen,
only the air space thickness and overall IG unit thickness will be shown in decimal inches. The glass thickness will always be shown in
fractions of an inch when STANDARD is turned on.
Next, choose your ACTUAL setting. If this setting is activated, your meter will display actual glass thickness dimensions without rounding. If
your dimensions are set to inches, you will have the options: FRACTION, DECIMAL or OFF. If your dimensions are set to millimeters, you will
have the options: ON or OFF. Use the ARROW buttons to find your desired setting and press the POWER button to select it.
NOTE: STANDARD and ACTUAL cannot both be set to OFF. If they are both activated, the measurements will alternate on the screen after a
measurement has been taken. For an illustration of this feature, see the “Measurement Examples” section.
When you exit the Display Units menu, the meter will show an example of what the measurement results screen will look like according to your
selections. This will help you determine whether you chose the correct options. Press the POWER button to exit the example display.
Results Screen Display Speed:
Measurement results are displayed across multiple screens. These screens can be controlled two different ways. If you take no action, the
screens will automatically advance from one to the next. If you do not want to wait for the screen to advance, you can use the ARROW keys to
advance or go back to a previous screen. If you let the meter advance the screens for you, the speed at which these screens advance can be
set in the MENU system. Select DISPLAY SPEED in the MENU. You can independently select the number of seconds you want the
THICKNESS measurement screens to display as well as the LOW-E results screen. Use the ARROW keys to change the time, and then press
the POWER button to confirm the selection. Exit when complete to go back to the main MENU. PLEASE NOTE: If you would prefer that the
meter only advances to the next result screen when you push the ARROW key, then change the Result Screen times to the maximum value of
60 seconds for both the THICKNESS and LOW E screens. This will maximize the time each screen is displayed, allowing you to advance the
screens via the ARROW buttons when ready (as long as you do so before 60 seconds).

GLASS DRILL INSTRUCTION MANUAL
GLASS-CHEK PRO OPERATING MANUAL
crlaurence.com
C.R. Laurence Co., Inc. •2503 E. Vernon Ave., Los Angeles, CA 90058 •1.800.421.6144 •crlaurence.com
SEPTEMBER 2020
P. 6
RESULTS SCREEN DISPLAY SPEED (CONT.):
PLEASE NOTE: If you would prefer that the meter only advances to the next result screen when you push the ARROW key,
then change the Result Screen times to the maximum value of 60 seconds for both the THICKNESS and LOW E screens.
This will maximize the time each screen is displayed, allowing you to advance the screens via the ARROW buttons when
ready (as long as you do so before 60 seconds).
OPERATING MODES
Depending on your application, you may need to choose a different operating MODE. In the MENU, select MODE by
pressing the POWER button. Then use the ARROW buttons to scroll through all of the available MODE options. Here is a
list of the MODES you can choose from, as well as an explanation of the applications you would select for each MODE.
Page 3
Navigating Through the Menu
A small arrow will appear next to the top option. In the illustration below, the arrow is next to the “MODE” option.
To move the cursor from line to line, press the UP or DOWN arrow buttons to navigate through the MENU. To select an option, press the
POWER button one time. Once a category is selected, your options will be displayed. Use the ARROW buttons to scroll through the available
options for that selection. Once you have the desired option on the display, press the POWER button one time to select that option. You will
then move back one level in the MENU system. If you make a selection by mistake, press the POWER button again to select that option a
second time and make your correct selection. Once you are finished making changes, use the ARROW buttons to move to the EXIT options:
“EXIT - SAVE CHANGES” OR “EXIT - DO NOT SAVE”.
Selecting Unit of Measure:
The GC3200 can display thickness measurements in various units. You also have the option of rounding measurements
to the nearest “Glass Thickness Standard” (Refer to GC3200 Glass Standards chart on page 16). To choose the display units appropriate for
your application, follow these steps:
In the MENU, select the “DISPLAY UNITS” option. The sub-menu to the right will be displayed:
First, select the “DIMENSIONS” option by pressing the POWER button. Choose if you want your unit of measure to be millimeters or inches.
Use the ARROW keys to toggle between units and press the POWER button to make your selection.
Next, determine whether you want the meter to: 1.) round measurements to the nearest Glass STANDARD, 2.) display the ACTUAL glass
thickness dimensions or 3.) display both STANDARD and ACTUAL. To turn STANDARD rounding on or off, select the “STANDARD” option. If
your dimensions are set to inches, you will have the options: FRACTION, DECIMAL or OFF. If your dimensions are set to millimeters, you will
have the options: ON or OFF. Use the ARROW button to find your desired setting and press the POWER button to select it. PLEASE NOTE, if
the STANDARD option is selected in inches, the glass thickness designations will always be shown in fractions. If decimal inches are chosen,
only the air space thickness and overall IG unit thickness will be shown in decimal inches. The glass thickness will always be shown in
fractions of an inch when STANDARD is turned on.
Next, choose your ACTUAL setting. If this setting is activated, your meter will display actual glass thickness dimensions without rounding. If
your dimensions are set to inches, you will have the options: FRACTION, DECIMAL or OFF. If your dimensions are set to millimeters, you will
have the options: ON or OFF. Use the ARROW buttons to find your desired setting and press the POWER button to select it.
NOTE: STANDARD and ACTUAL cannot both be set to OFF. If they are both activated, the measurements will alternate on the screen after a
measurement has been taken. For an illustration of this feature, see the “Measurement Examples” section.
When you exit the Display Units menu, the meter will show an example of what the measurement results screen will look like according to your
selections. This will help you determine whether you chose the correct options. Press the POWER button to exit the example display.
Results Screen Display Speed:
Measurement results are displayed across multiple screens. These screens can be controlled two different ways. If you take no action, the
screens will automatically advance from one to the next. If you do not want to wait for the screen to advance, you can use the ARROW keys to
advance or go back to a previous screen. If you let the meter advance the screens for you, the speed at which these screens advance can be
set in the MENU system. Select DISPLAY SPEED in the MENU. You can independently select the number of seconds you want the
THICKNESS measurement screens to display as well as the LOW-E results screen. Use the ARROW keys to change the time, and then press
the POWER button to confirm the selection. Exit when complete to go back to the main MENU. PLEASE NOTE: If you would prefer that the
meter only advances to the next result screen when you push the ARROW key, then change the Result Screen times to the maximum value of
60 seconds for both the THICKNESS and LOW E screens. This will maximize the time each screen is displayed, allowing you to advance the
screens via the ARROW buttons when ready (as long as you do so before 60 seconds).
MODE APPLICATIONS
1. NORMAL GLASS
This is the default operating mode. NORMAL GLASS MODE will be used for the majority of all
measurements. This mode will test single, double and triple pane (IG) windows. If you use this
mode to test laminated glass, the meter will display the overall thickness of the laminated glass,
but not identify It as laminated glass nor provide details about the Inner-layer thickness. You will
need to upgrade to the GC3200 Glass-Chek ELITE if you want to test laminated glass.
2. LAMI + LOW E
Select this MODE if you are tasting a laminated piece of glass that has a Low E coating placed
against the laminate inner layer (Surface 2 or3). This MODE will estimate the thickness of both
pieces of glass in the assembly, and also identify if the Low E coating is on Surface 2 versus
Surface 3. PLEASE NOTE: ONLY USE THIS MODE WHEN THE LOW E COATING IS PLACED
AGAINST THE LAMINATE INNER LAYER. USING THIS MODE ON ANY OTHER GLASS
COULD CAUSE ERRORS IN YOUR MEASUREMENT RESULTS.
3. SUSPENDED FILM
If you encounter a window that has film (polyester) suspended between the panes of glass, use
this MODE to measure the glass and multiple air spaces that occur in the window. In this MODE,
the meter will only test the nearest pane of glass for low e coatings. This MODE will only test for
1 piece of suspended film in the air space of the window. Testing regular windows in this MODE
will cause an error.

GLASS DRILL INSTRUCTION MANUAL
GLASS-CHEK PRO OPERATING MANUAL
crlaurence.com
C.R. Laurence Co., Inc. •2503 E. Vernon Ave., Los Angeles, CA 90058 •1.800.421.6144 •crlaurence.com
SEPTEMBER 2020
P. 7
CHOOSE YOUR LANGUAGE
In the MENU, select the “LANGUAGE” option. Use the ARROW buttons to select LANGUAGE, then press the POWER
button. Use the ARROW buttons to scroll through the available languages. Press the POWER button when your desired
language appears. Save your changes and exit.
WARNING: Once the meter’s language is changed, the menu will immediately change to the language selected. If you
choose the wrong language and can’t get back to your desired language, stop navigating the menu and allow the meter to
automatically power down. The meter will automatically shut off after 1 to 2 minutes of inactivity. When the meter powers
back up, it will display the previously selected language.
The following languages are available in the GC3001: English, German, French, Spanish, Dutch, Italian, Swedish and Danish.
PROPER OPERATION OF THE GLASSCHEK PRO
Place the meter at the bottom center of the window to be tested. Press and release the POWER button to take a
measurement. Do not hold the POWER button down, as this will cause the meter to shut off. The “TAKING READING”
message will be displayed while your measurement is being completed. The “TAKING READING” screen also indicates
the remaining battery life, as well as confirms the operating MODE the meter is in.
ENGLISH
ITALIAN
SPANISH
DANISH
GERMAN
DUTCH
FRENCH
SWEDISH

C.R. Laurence Co., Inc. •2503 E. Vernon Ave., Los Angeles, CA 90058 •1.800.421.6144 •crlaurence.com
SEPTEMBER 2020
P. 8
C.R. Laurence Co., Inc. •2503 E. Vernon Ave., Los Angeles, CA 90058 •1.800.421.6144 •crlaurence.com
GLASS DRILL INSTRUCTION MANUAL
crlaurence.com
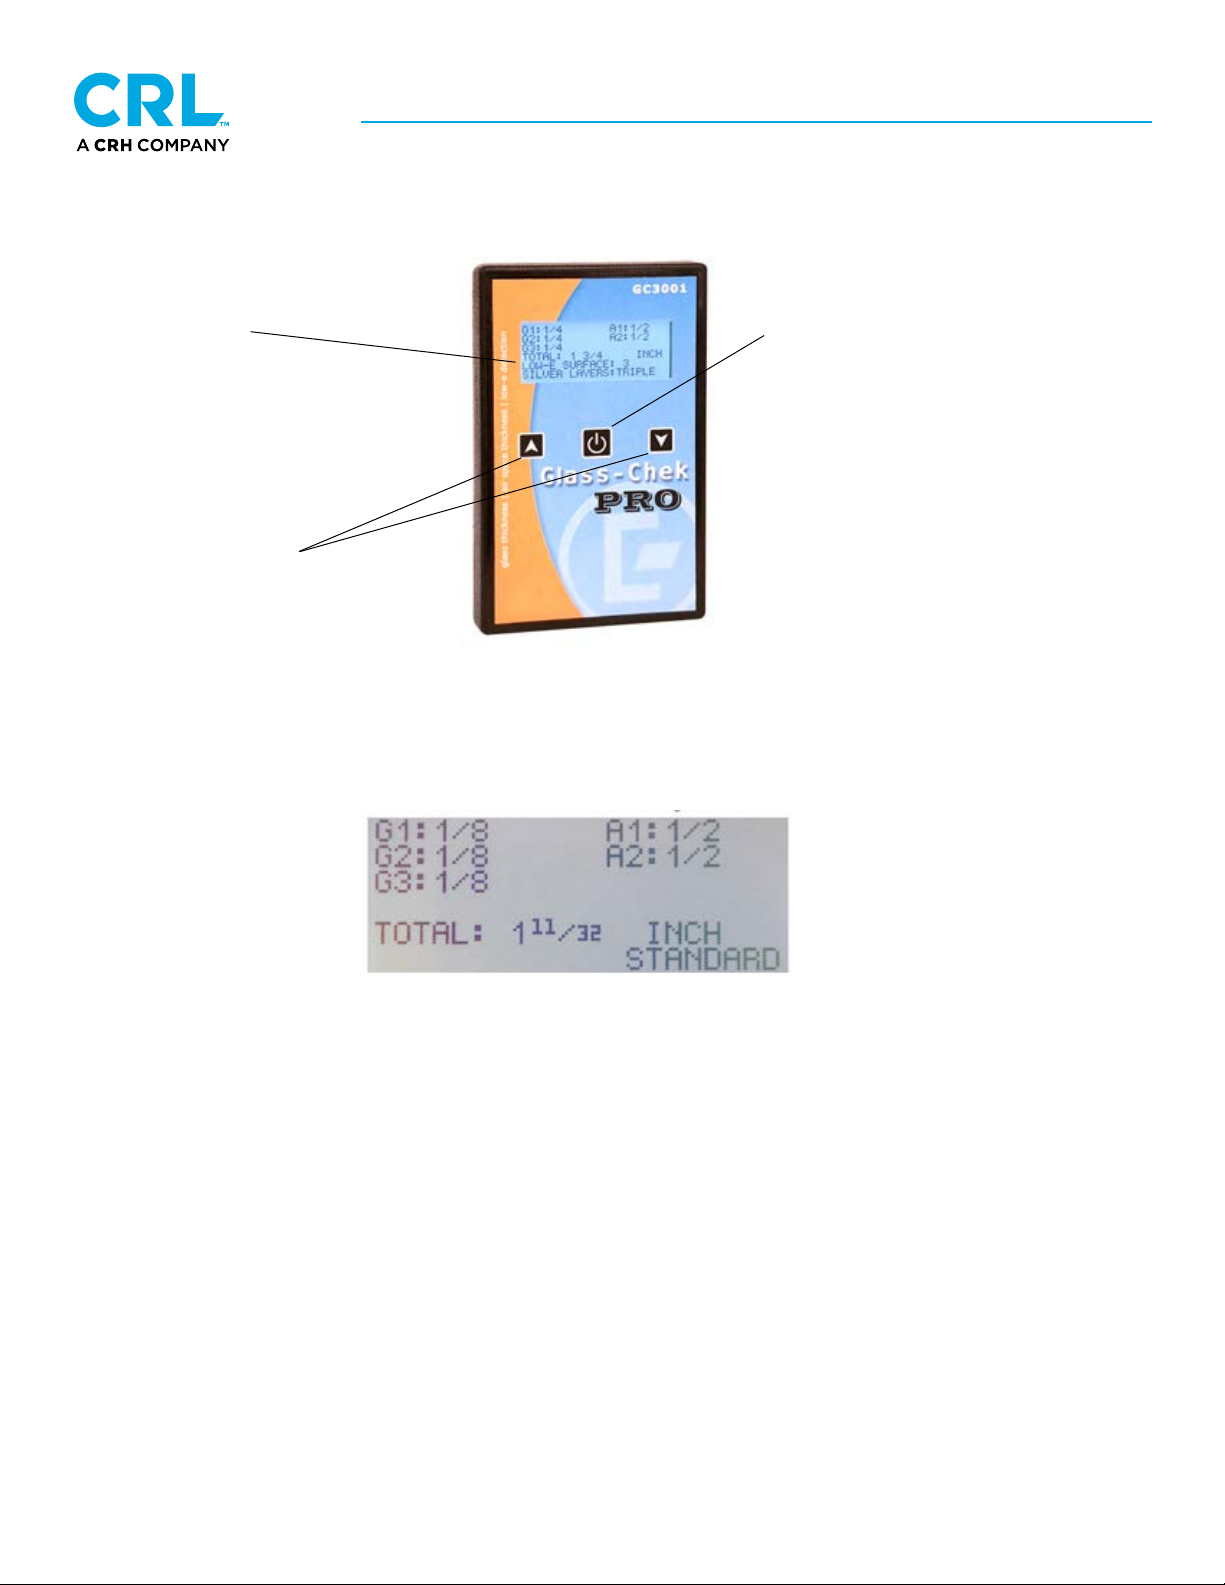
PROPER OPERATION OF THE GLASSCHEK PRO (CONT.)
TURNING THE METER OFF
Hold the button down for several seconds to turn off the meter. A message will display on the screen notifying you that the
meter is about to power down. Continue holding the button down until the screen goes blank. If the meter is left unused for
a period of time, the unit will automatically shut off. To conserve battery life, it is recommended to turn the meter off
manually when you are finished using it.
Guidelines For Most Accurate Results:
• Hold the meter steady and flat against the test surface during
measurement
• Do not touch the glass with your hand while taking the reading
• Take readings at the BOTTOM CENTER of the window for
best thickness accuracy (see explanation below)
• Take multiple measurements to verify results
• Make sure the window being measured is clean
• Make sure the two lenses on the back of the GC3001 are clean.
See Image to the right. -------->
Use only clean compressed air to clean the lenses. Only use a lint
free cloth if absolutely necessary to clean smudges, fingerprints, etc.
• Make sure nothing is touching the far side surface of the window
during the measurement
• It is best to test windows in free air, not resting on a tabletop surface, or
stacked on other pieces of glass.
4 OPTIMAL TEST LOCATIONS FOR MOST ACCURATE RESULT
Proper Operation of the Glass-Chek ELITE Page 6
Place the meter at the bottom center of the window to be tested. Press and release the POWER button to take a measurement. Do not hold
the POWER button down, as this will cause the meter to shut off. The “TAKING READING” message will be displayed while your
measurement is being completed. The “TAKING READING” screen also indicates the remaining battery life, as well as confirms the operating
MODE the meter is in.
Turning The Meter Off
Hold the button down for several seconds to turn off the meter. A message will display on the screen notifying you that the meter is about to
power down. Continue holding the button down until the screen goes blank. If the meter is left unused for a period of time, the unit will
automatically shut off. To conserve battery life, it is recommended to turn the meter off manually when you are finished using it.
Guidelines For Most Accurate Results:
• Hold the meter steady and flat against the test surface during measurement
• Do not touch the glass with your hand while taking the reading
• Take readings at the of the window for best thickness
accuracy (see explanation below)
• Take multiple measurements to verify results
• Make sure the window being measured is clean
• Make sure the two lenses on the back of the GC3200 are clean. See Image
to the right. -------->
Use only clean compressed air to clean the lenses. Only use a lint
free cloth if absolutely necessary to clean smudges, fingerprints, etc.
• Make sure nothing is touching the far side surface of the window during the
measurement
• It is best to test windows in free air, not resting on a tabletop surface, or
stacked on other pieces of glass.
BOTTOM CENTER
Above: Back of GC3200 meter with the two lenses
circled. Use clean compressed air to clean the
lenses.
At Right: Incorrect hand placement.
• DO NOT hold the POWER button while taking a measurement. This will cause
the meter to turn off. Rest your index finger next to the button as shown above.
• DO NOT touch the glass with your hand while taking readings. The picture at
right shows the user’s thumb resting on the window while taking a measurement.
This could cause incorrect results for the low-E measurement.
4 OPTIMAL TEST LOCATIONS FOR MOST ACCURATE RESULTS
At Left: Recommended placement of meter:
Hold the meter steady AND FLAT against the glass during measurement.
The meter should be centered on one of the four edges of the window with the
bottom edge of the meter placed parallel to the edge of the window (see image
to the left). BOTTOM CENTER IS THE PREFERRED LOCATION. This will
minimize the effect of a concave (or collapsed) window. As you move away
from the edge of a window, many windows will bow inward (concave).
Because the sensor runs parallel to the bottom edge of the meter, it is
important to place the bottom edge of the meter along the edge of the window
as shown. You can place the meter approximately 1 to 2 inches from the edge
of the window.
DO NOT touch the glass with your hand or thumb while taking measurements.
Note the hand placement used in the picture at left. The user’s thumb is
resting on the GC3200 without touching the glass being measured. Also, be
sure there are no other metallic objects touching the glass.
DO NOT continue to hold down
the button while taking a
measurement.
Place your index finger next to
the button as shown at left.
Above: Back of GC3001 meter with the two lenses
circled. Use clean compressed air to clean the lenses.
At Left: Recommended placement of meter:
• Hold the meter steady AND FLAT against the glass during measurement.
• The meter should be centered on one of the four edges of the window with the
bottom edge of the meter placed parallel to the edge of the window (see image
to the left). BOTTOM CENTER IS THE PREFERRED LOCATION. This will
minimize the effect of a concave (or collapsed) window. As you move away
from the edge of a window, many windows will bow inward (concave).
Because the sensor runs parallel to the bottom edge of the meter, it is
important to place the bottom edge of the meter along the edge of the window
as shown. You can place the meter approximately 1 to 2 inches from the edge
of the window.
• DO NOT touch the glass with your hand or thumb while taking measurements.
Note the hand placement used in the picture at left. The user’s thumb is
resting on the GC3001 without touching the glass being measured. Also, be
sure there are no other metallic objects touching the glass.
• DO NOT continue to hold down the button
while taking a measurement.
• Place your index finger next to the button as shown at left.
At Right: Incorrect hand placement.
• DO NOT hold the POWER button while taking a measurement. This will cause the meter to turn off. Rest your index
finger next to the button as shown above.
• DO NOT touch the glass with your hand while taking readings. The picture at right shows the user’s thumb resting on
the window while taking a measurement. This could cause incorrect results for the low-E measurement.

GLASS DRILL INSTRUCTION MANUAL
GLASS-CHEK PRO OPERATING MANUAL
crlaurence.com
C.R. Laurence Co., Inc. •2503 E. Vernon Ave., Los Angeles, CA 90058 •1.800.421.6144 •crlaurence.com
SEPTEMBER 2020
P. 9
APPLICATION EXAMPLES
The Glass-Chek PRO offers various display formats. The following illustrations are examples of measurement displays with
explanations of the application being tested and how the display format was configured.
- Measurement Example One - Double Pane IG with Low E on Surface 2
- Measurement Example Two - Double Pane IG with Low E on Surface 3
- Measurement Example Three - Triple Pane IG with Low E on Surface 5
Application Examples Page 7
The Glass-Chek ELITE offers various display formats. The following illustrations are examples of measurement displays with explanations of
the application being tested and how the display format was configured.
Display Format
• Dimensions: Inch
• Standard: Fraction
• Actual: Decimal
Display Format
• Dimensions: Inch
• Standard: Fraction
• Actual: Decimal
Display Format
• Dimensions: MM
• Standard: OFF
• Actual: ON
Display Format
• Dimensions: MM
• Standard: ON
• Actual: OFF
Resulting Measurement Displays: Due to the application and display format, the
measurement will alternate the following three messages:
Resulting Measurement Displays: Due to the application and display format, the
measurement will alternate the following three messages:
Resulting Measurement Displays: Due to the application and display format, the
measurement will alternate the following 2 messages:
Resulting Measurement Displays: Due to the application and display format, the
measurement will alternate the following two messages:
Display 1 shows fractional inches rounded to the nearest standard. Display 2 shows the actual
measurements in decimal inches. Notice how the actual measurements in 2 are slightly different than
the measurements in 1 because Display 1 shows the readings rounded to the nearest standard.
Display 3 shows that the low-E coating is on surface 2, and it indicates that the coating properties are
soft coat and have the performance of double-silver Low-E.
Display 1 shows fractional inches rounded to the nearest standard. Display 2 shows the actual
measurements in decimal inches. Display 3 shows that the meter did not detect a low-E coating on G1
or G2. Since the GC3200 only detects coatings on the first 2 panes, you may be required to test both
sides of a triple pane window to verify the presence of a low-E coating on the glass on the opposite
side of the window.
Display 1 shows the actual thickness of the window in MM. Since the “Standard” setting is set to
OFF, STANDARD dimensions are not displayed. The word “FILM” indicates suspended film between
the two panes of glass. Display 2 indicates that G1 does not have any low e coatings (“CLEAR” of
any low-E coating). In Suspended Film Mode, the GC3200 will NOT test G2 for Low E Coatings.
Display 1 shows millimeters rounded to the nearest standard. Since the “Actual” setting is set to OFF,
there is no display showing the actual dimensions of the glass - only the dimensions rounded to the
nearest standard. Display 2 shows that the low-E coating is on surface 3. Please note there are
times where the meter will not specifically designate surface 3, and may show the result as Surface 3
or 4. This means that the meter is only indicating the coating is on the second pane of glass. In that
instance, the user must test the window from the opposite side to confirm the exact low e surface.
GLASS 1
GLASS 1
GLASS 2
GLASS 2
AIR SPACE
AIR SPACE
SURFACE 2
SURFACE 3
Double Pane
Window
Triple Pane
Window
Double Pane
Window
Low-E
Low-E
Low-E
1)
1)
1)
1)
2)
2)
2)
2)
3)
3)
— Measurement Example One — Double Pane IG with Low E on Surface 2
— Measurement Example Three — Triple Pane IG with Low E on Surface 5
— Measurement Example Four — Double Pane IG with Suspended Film
— Measurement Example Two — Double Pane IG with Low E on Surface 3
GLASS 1
GLASS 2
AIR SPACE 1
AIR SPACE 2
GLASS 3
SURFACE 5
Double Pane with
Suspended Film
Suspended
Film
GLASS 1
AIR SPACE 1
AIR SPACE 2
GLASS 2
Application Examples Page 7
The Glass-Chek ELITE offers various display formats. The following illustrations are examples of measurement displays with explanations of
the application being tested and how the display format was configured.
Display Format
• Dimensions: Inch
• Standard: Fraction
• Actual: Decimal
Display Format
• Dimensions: Inch
• Standard: Fraction
• Actual: Decimal
Display Format
• Dimensions: MM
• Standard: OFF
• Actual: ON
Display Format
• Dimensions: MM
• Standard: ON
• Actual: OFF
Resulting Measurement Displays: Due to the application and display format, the
measurement will alternate the following three messages:
Resulting Measurement Displays: Due to the application and display format, the
measurement will alternate the following three messages:
Resulting Measurement Displays: Due to the application and display format, the
measurement will alternate the following 2 messages:
Resulting Measurement Displays: Due to the application and display format, the
measurement will alternate the following two messages:
Display 1 shows fractional inches rounded to the nearest standard. Display 2 shows the actual
measurements in decimal inches. Notice how the actual measurements in 2 are slightly different than
the measurements in 1 because Display 1 shows the readings rounded to the nearest standard.
Display 3 shows that the low-E coating is on surface 2, and it indicates that the coating properties are
soft coat and have the performance of double-silver Low-E.
Display 1 shows fractional inches rounded to the nearest standard. Display 2 shows the actual
measurements in decimal inches. Display 3 shows that the meter did not detect a low-E coating on G1
or G2. Since the GC3200 only detects coatings on the first 2 panes, you may be required to test both
sides of a triple pane window to verify the presence of a low-E coating on the glass on the opposite
side of the window.
Display 1 shows the actual thickness of the window in MM. Since the “Standard” setting is set to
OFF, STANDARD dimensions are not displayed. The word “FILM” indicates suspended film between
the two panes of glass. Display 2 indicates that G1 does not have any low e coatings (“CLEAR” of
any low-E coating). In Suspended Film Mode, the GC3200 will NOT test G2 for Low E Coatings.
Display 1 shows millimeters rounded to the nearest standard. Since the “Actual” setting is set to OFF,
there is no display showing the actual dimensions of the glass - only the dimensions rounded to the
nearest standard. Display 2 shows that the low-E coating is on surface 3. Please note there are
times where the meter will not specifically designate surface 3, and may show the result as Surface 3
or 4. This means that the meter is only indicating the coating is on the second pane of glass. In that
instance, the user must test the window from the opposite side to confirm the exact low e surface.
GLASS 1GLASS 1
GLASS 2GLASS 2
AIR SPACE AIR SPACE SURFACE 2
SURFACE 3
Double Pane
Window
Triple Pane
Window
Double Pane
Window
Low-E
Low-E
Low-E
1)
1)
1)
1)
2)
2)
2)
2)
3)
3)
— Measurement Example One — Double Pane IG with Low E on Surface 2
— Measurement Example Three — Triple Pane IG with Low E on Surface 5
— Measurement Example Four — Double Pane IG with Suspended Film
— Measurement Example Two — Double Pane IG with Low E on Surface 3
GLASS 1
GLASS 2
AIR SPACE 1
AIR SPACE 2
GLASS 3
SURFACE 5
Double Pane with
Suspended Film
Suspended
Film
GLASS 1
AIR SPACE 1
AIR SPACE 2
GLASS 2
Resulting Measurement Displays: Due to the application and display format, the measurement
will alternate the following three messages:
Resulting Measurement Displays: Due to the application and display format, the measurement
will alternate the following two messages:
Resulting Measurement Displays: Due to the application and display format. the
measurement will alternate the following three messages:
Display 1 shows fractional inches rounded to the nearest standard. Display 2 shows the actual
measurements in decimal inches. Notice how the actual measurements in 2 are slightly different than
the measurements in 1 because Display 1 shows the readings rounded to the nearest standard. Display
3 shows that the low-E coating is on surface 2, and it indicates that the coating properties are soft coat
and have the performance of double-silver Low-E.
Display1showsmillimetersroundedtotheneareststandard.Sincethe•Actual”settingIssetto
OFF, there Is no display showing the actual dimensions of the glass - only the dimensions rounded
to the nearest standard. Display 2 shows that the low-E coating Is on surface 3. Please note there
are times where the meter will not specifically designate surface 3, and may show the result as
Surface 3 or 4. This means that the meter Is only Indicating the coating Is on the second pane of
glass. In that Instance, the user must test the window from the opposite side to confirm the exact.
low e surface.
Display 1 shows fractional inches rounded to the nearest standard. Display 2 shows the actual
measurements In decimal inches. Display 3 shows that the meter did not detect a low-E coaling on
G1 or G2. Since the GC3001 only detects coatings on the first 2 panes, you may be required to test
both sides of a triple pane window to verify the presence of a low-E coating on the glass on the
opposite side of the window.
Display Format
• Dimensions: Inch
• Standard: Fraction
• Actual: Decimal
Display Format
•Dimensions:MM
•Standard:ON
•Actual:OFF
Double Pane
Window
Double Pane
Window
Triple Pane
Window
1) 2) 3)
1) 2) 3)
1) 2)
Display Format
•Dimensions:Inch
•Standard:Fraction
•Actual:Decimal

GLASS DRILL INSTRUCTION MANUAL
GLASS-CHEK PRO OPERATING MANUAL
crlaurence.com
C.R. Laurence Co., Inc. •2503 E. Vernon Ave., Los Angeles, CA 90058 •1.800.421.6144 •crlaurence.com
SEPTEMBER 2020
P. 10
APPLICATION EXAMPLES (CONT.)
- Measurement Example Four - Double Pane IG with Suspended Film
- Measurement Example Five - LAMI + LOW E (Low E Coating against LAMI inner layer)
When working with laminated glass that has a low e coating placed against the laminate lnner-
layer, the Glass-Chek PRO helps identify which surface has the low-E coaling (2 vs 3). To perform
this function, the meter must be switched into LAMI + LOW E mode (see page 4 & 6). Please note
for the example below, that STANDARD Mode has been set to FRACTIONS of an Inch, and the
ACTUAL Mode has been set to DECIMAL Inches.
The LAMI + LOWE Mode of the GC3001 meter will allow you to test laminated Low E places of
glass monolithically, and also with the laminated Low E glass assembled into a double pane (IG)
window. For IG’s, the GC3001 meter must be placed on the side of the window that contains the
laminated low-E glass. The first screen that appears will show the thickness of the overall lami-
nated piece of glass, the air space, the second pane of glass thickness, and also the overall thick-
ness of the IG. The laminated piece of glass will be denoted as G1/L1/G2 on the display screens.
Screen 1 and 3 below show this example. Screen 1 is displaying the information infractions of an
inch (STANDARD), while screen 3 shows the data in decimal inches (ACTUAL).
Application Examples Page 7
The Glass-Chek ELITE offers various display formats. The following illustrations are examples of measurement displays with explanations of
the application being tested and how the display format was configured.
Display Format
• Dimensions: Inch
• Standard: Fraction
• Actual: Decimal
Display Format
• Dimensions: Inch
• Standard: Fraction
• Actual: Decimal
Display Format
• Dimensions: MM
• Standard: OFF
• Actual: ON
Display Format
• Dimensions: MM
• Standard: ON
• Actual: OFF
Resulting Measurement Displays: Due to the application and display format, the
measurement will alternate the following three messages:
Resulting Measurement Displays: Due to the application and display format, the
measurement will alternate the following three messages:
Resulting Measurement Displays: Due to the application and display format, the
measurement will alternate the following 2 messages:
Resulting Measurement Displays: Due to the application and display format, the
measurement will alternate the following two messages:
Display 1 shows fractional inches rounded to the nearest standard. Display 2 shows the actual
measurements in decimal inches. Notice how the actual measurements in 2 are slightly different than
the measurements in 1 because Display 1 shows the readings rounded to the nearest standard.
Display 3 shows that the low-E coating is on surface 2, and it indicates that the coating properties are
soft coat and have the performance of double-silver Low-E.
Display 1 shows fractional inches rounded to the nearest standard. Display 2 shows the actual
measurements in decimal inches. Display 3 shows that the meter did not detect a low-E coating on G1
or G2. Since the GC3200 only detects coatings on the first 2 panes, you may be required to test both
sides of a triple pane window to verify the presence of a low-E coating on the glass on the opposite
side of the window.
Display 1 shows the actual thickness of the window in MM. Since the “Standard” setting is set to
OFF, STANDARD dimensions are not displayed. The word “FILM” indicates suspended film between
the two panes of glass. Display 2 indicates that G1 does not have any low e coatings (“CLEAR” of
any low-E coating). In Suspended Film Mode, the GC3200 will NOT test G2 for Low E Coatings.
Display 1 shows millimeters rounded to the nearest standard. Since the “Actual” setting is set to OFF,
there is no display showing the actual dimensions of the glass - only the dimensions rounded to the
nearest standard. Display 2 shows that the low-E coating is on surface 3. Please note there are
times where the meter will not specifically designate surface 3, and may show the result as Surface 3
or 4. This means that the meter is only indicating the coating is on the second pane of glass. In that
instance, the user must test the window from the opposite side to confirm the exact low e surface.
GLASS 1GLASS 1
GLASS 2GLASS 2
AIR SPACE AIR SPACE SURFACE 2
SURFACE 3
Double Pane
Window
Triple Pane
Window
Double Pane
Window
Low-E
Low-E
Low-E
1)
1)
1)
1)
2)
2)
2)
2)
3)
3)
— Measurement Example One — Double Pane IG with Low E on Surface 2
— Measurement Example Three — Triple Pane IG with Low E on Surface 5
— Measurement Example Four — Double Pane IG with Suspended Film
— Measurement Example Two — Double Pane IG with Low E on Surface 3
GLASS 1
GLASS 2
AIR SPACE 1
AIR SPACE 2
GLASS 3
SURFACE 5
Double Pane with
Suspended Film
Suspended
Film
GLASS 1
AIR SPACE 1
AIR SPACE 2
GLASS 2
Resulting Measurement Displays: Due to the application and display format, the
measurement will alternate the following 2 messages:
Display1showstheactualthicknessofthewindowinMM.Sincethe•standard”settingissetto
OFF, STANDARD dimensions are not displayed. The word “FILM” indicates suspended film between
the two panes of glass. Display 2 indicates that G1 does not have any low E coatings (“CLEAR” of
any low-E coating). In Suspended Film Mode, the GC3001 will NOT test G2 for Low E Coatings.
Double Pane with
Suspended Film
1) 2)
Display Format
•Dimensions:MM
•Standard:OFF
•Actual:ON

GLASS DRILL INSTRUCTION MANUAL
GLASS-CHEK PRO OPERATING MANUAL
crlaurence.com
C.R. Laurence Co., Inc. •2503 E. Vernon Ave., Los Angeles, CA 90058 •1.800.421.6144 •crlaurence.com
P. 11
SEPTEMBER 2020
APPLICATION EXAMPLES (CONT.)
The next screens will show the make-up of the laminated Low E piece of glass by Itself. The meter has been designed to
add the thickness of the LAM I layer to the thickness of the glass that contains NO low-E coating. For the Low E piece of
glass, the meter will display the actual thickness of the glass itself. Therefore the piece of glass that is displayed as a “nor-
mal” standard thickness (0.128” or 1/8” for example) Is the pane that has the low-E coating on it. This means that the piece
of glass that has an abnormal (larger) glass thickness (caused by adding the LAM I thickness to the glass thickness) will be
the glass pane that is clear of any Low E coating. In the example the clear glass + lami = . 159’’ or 5/32”.
On screens 2 and 4, you will see that these two thickness values are denoted by the letter ”D” (D1 & D2). Because the
meter does not know which thickness value is the glass, and which one contains the glass+ lami, an arbitrary value of D as-
signed to the thickness values.
Screen 5 takes the evaluation one step further and makes the assumption that both pieces of glass comprising the lam-
inated piece are the same thickness (G1 + G2). This Is called the ASSUMPTION SCREEN. If G1 = G2 for your application,
then Screen 5 will show the glass thickness, the laminate inner-layer thickness, and it will also confirm that the low e coating
is on Surface 2 versus Surface 3. You will also notice on Screen 5, the meter actually identifies SURFACE 2 as the Low E
surface in this example.
The final Screen 6 in the sequence confirms the presence of the Low E Coating against the laminate inner-layer, and also
indicates the type of low E coating.
1) 2) 3)
4) 5) 6)
STANDARD IN FRACTIONS
(inches)
ACTUAL IN DECIMAL
(inches)
STANDARD IN FRACTIONS
(inches)
ASSUMPTION SCREEN
(inches)
ACTUAL IN DECIMAL
(inches)
LOW E
RESULTS SCREEN

GLASS DRILL INSTRUCTION MANUAL
GLASS-CHEK PRO OPERATING MANUAL
crlaurence.com
C.R. Laurence Co., Inc. •2503 E. Vernon Ave., Los Angeles, CA 90058 •1.800.421.6144 •crlaurence.com
SEPTEMBER 2020
P. 12
LOWE DETECTION CAPABILITIES
The electronics that detect the presence of the Low-E coatings are impacted by the surroundings of the meter. This has
been explained elsewhere in the manual by showing proper hand placement on the meter and positioning of the glass when
testing. The Low-E detection circuitry is affected by conductive materials that are detected by the meter. Conductive
materials could include the metal spacer in the window or muntin bars (grid) inside the window itself, just to name a few.
Keeping the meter at least 2 inches away from any metal/conductive material when taking measurements will result in the
most accurate Low-E measurements.
One additional note regarding Low E detection. If your application contains more than one low e coating in the window,
the Glass-Chek PRO will only identify the first (nearest) Low E coating that it encounters. Testing from the opposite side
of the window would allow you to identify the other Low E coating in the window. The GC3001 detects the presence and
location of low-E coatings on the following applications:
SEPTEMBER 2020
DOUBLE PANE WINDOWS
The GC3001 will specify if the coating is located on
Surface 1, Surface 2, Surface 3, OR Surface 3 or 4. If the
meter does not specifically identify Surface 3, you can
move to the other side of the window to confirm the
low e surface.
SINGLE PANE WINDOWS
The GC3001 will specify if the coating is located on
Surface 1 or Surface 2 of a single piece of glass.
Single Pane Window
Monolithic
Double Pane Window Double Pane Window

GLASS DRILL INSTRUCTION MANUAL
GLASS-CHEK PRO OPERATING MANUAL
crlaurence.com
C.R. Laurence Co., Inc. •2503 E. Vernon Ave., Los Angeles, CA 90058 •1.800.421.6144 •crlaurence.com
SEPTEMBER 2020
P. 13
LOWE DETECTION CAPABILITIES (CONT.)
IDENTIFYING THE TYPE OF LOWE
In addition to identifying the location of low-E coatings, the GC3001 determines the type of low-E on your window. The
meter will specify it as “hard coat’’( aka pyrolytic or on-line coating) or “soft coat” (aka sputtered or off-line coating). If the
Low E is soft coat, the meter will also specify the number of silver-layers as single, double, or triple, based on the coating’s
energy performance. If you happen to know the manufacturer of the glass, in many cases you can identify the exact type
of low-E coating used to make the window. A convenient reference chart is included with the GC3001 meter that lists many
of the common Low E coatings used in the USA. Here are some examples.
TRIPLE PANE WINDOWS
The GC3001 will specify if the coating is located on
Surface 1, Surface 2, Surface 3, or Surface 3or4. By
moving to the other side of the window, the meter can
specify Surface 5 and Surface 6. The GC3001 detects
the presence of low-E coatings on the middle pane of
a triple pane unit. It will either show results of Surface 3,
or Surface 3or4. If there are multiple low E coatings, the
GC3001 will only identify the nearest coating.
Triple Pane Window Triple Pane Window
SOFT COAT (sputtered)
HARD COAT (pyrolytic)
Triple Silver Double Silver Single Silver
- Cardinal 366
- PPG SolarBan 70
- Guardian CG 62/27
- Cardinal 270 & 272
- PPG SolarBan 60
- AFG TIPS, TIR, & TIAC
- Guardian ClimaGuard 71/38
- Cardinal 180
- PPG Sungate 100 & 400
- Guardian ClimaGuard 75/68
- Pilkington Energy Advantage
- PPG Sungate 500
- AFG Comfort E2

GLASS DRILL INSTRUCTION MANUAL
GLASS-CHEK PRO OPERATING MANUAL
crlaurence.com
C.R. Laurence Co., Inc. •2503 E. Vernon Ave., Los Angeles, CA 90058 •1.800.421.6144 •crlaurence.com
SEPTEMBER 2020
P. 14
HELPFUL OPERATING TIPS AND EXPLANATIONS
1. The darker the glass, the longer it will take to complete a measurement
2. If testing dark glass in a window, try to test from the side of the window that contains the clear piece of glass.
3. Always conduct your measurements in the BOTTOM CENTER of the window.
4. Take multiple measurements to confirm your test results, but always test near the bottom center of the window
(either side).
5. If the window has more than one low e coating, the GC3001 will only identify the first (nearest) coating it encounters.

GLASS DRILL INSTRUCTION MANUAL
GLASS-CHEK PRO OPERATING MANUAL
crlaurence.com
C.R. Laurence Co., Inc. •2503 E. Vernon Ave., Los Angeles, CA 90058 •1.800.421.6144 •crlaurence.com
SEPTEMBER 2020
P. 15
EXPLANATION OF ERROR MESSAGES
ERROR MESSAGES: EXPLANATIONS:
This error indicates a problem with the measurement. Be sure you are following the
guidelines for the most accurate results outlined on Page 5, and attempt to take the
reading again. Make sure the meter is flat against the glass during the measurement,
and do not move the meter during the course of a measurement.
If the window area under test is excessively dirty or contaminated, the Glass-Chek
PRO may give improper thickness or low-E results or issue an error message. The
window area under test must be CLEAN as well as the lenses on the back of the
meter. Clean the lenses on the back of the GC3001 with compressed air. Use a
lint-free cloth if absolutely necessary to clean smudges, fingerprints, etc., as shown
on Page 5.
The Glass-Chek PRO uses a laser to measure the thickness of the glass and air
space. The unit may be affected by extremely bright lights or facing the sun directly.
The screen will display this error message if this condition occurs. Simply move to a
different location, go to the other side of the window, or shade the laser aperture.
If the window is operable you may be able open the window and reach through the
opening to block the incident light from the back side of the meter.
This error message indicates that your application is most likely out of the maximum
thickness range for low-E measurement. See the “Specifications” section on Page 11
of this manual for more details on the GC3001’s maximum thickness ranges.
Battery and replacement:
The GC3001 meter is powered by a 9-volt alkaline battery. When the battery is
starting to get low, an error message will appear that recommends replacing the
battery soon. This gives the user plenty of warning that a battery replacement is
needed soon, but the meter will still function for a period after this initial warning.
Once the battery voltage gets below a dangerous level that could impact the
performance of the instrument, an error message appears that tells you to
replace the battery immediately. The instrument will NOT take measurements once
it reaches this level.
Please remember to ALWAYS replace the battery with a 9-volt ALKALINE battery.
ERROR: 1 CLEAN & PLACE
METER BOTTOM CENTER
PRESS POWER BUTTON
TO TAKE NEW READING.
EXCESS LIGHT: MOVE
TO OPPOSITE SIDE
LOW BATTERY
REPLACE SOON
REPLACE BATTERY NOW
GC3001 WILL POWER
DOWN IN:
GLASS EXCEEDS LOW-E
RANGE: GLASS IS
TOO THICK
Explanation of Error Messages
Page 13
This error indicates a problem with the measurement. Be sure you are following the guidelines for
the most accurate results outlined on Page 6, and attempt to take the reading again. Make sure the
meter is flat against the glass during the measurement, and do not move the meter during the
course of a measurement.
If the window area under test is excessively dirty or contaminated, the Glass-Chek ELITE may give
improper thickness or low-E results or issue an error message. The window area under test must
be CLEAN as well as the lenses on the back of the meter. Clean the lenses on the back of the
GC3200 with compressed air. Use a lint-free cloth if absolutely necessary to clean smudges,
fingerprints, etc., as shown on Page 6.
LOW BATTERY
REPLACE SOON
REPLACE BATTERY NOW
GC3200 WILL POWER
DOWN IN:
GLASS EXCEEDS LOW-E
RANGE: GLASS IS
TOO THICK
MEASUREMENT ERROR: 1
CLEAN, MOVE & RETEST
PRESS BUTTON TO TAKE
NEW READING
EXCESS LIGHT: MOVE
TO OPPOSITE SIDE
ENSURE GLASS AND
METER ARE CLEAN.
TEST AGAIN TO VERIFY
READING.
Error Messages: Explanations:
The Glass-Chek ELITE uses a laser to measure the thickness of the
glass and air space. The unit may be affected by extremely bright lights
or facing the sun directly. The screen will display this error message if
this condition occurs. Simply move to a different location, go to the
other side of the window, or shade the laser aperture. If the window is
operable you may be able open the window and reach through the
opening to block the incident light from the back side of the meter.
This error message indicates that your application is most likely out of the maximum thickness range
for low-E measurement. See the “Specifications” section on Page 15 of this manual for more details
on the GC3200’s maximum thickness ranges.
Battery and replacement: The GC3200 meter is powered by a 9-volt alkaline battery. When the
battery is starting to get low, an error message will appear that recommends replacing the battery soon.
This gives the user plenty of warning that a battery replacement is needed soon, but the meter will still
function for a period after this initial warning. Once the battery voltage gets below a dangerous level that
could impact the performance of the instrument, an error message appears that tells you to replace the
battery immediately. The instrument will NOT take measurements once it reaches this level.
Please remember to ALWAYS replace the battery with a 9-volt ALKALINE battery.
Helpful Operating Tips & Explanations
1. Thin glass will measure the fastest, while thicker glass such as 1/4” will take longer to measure.
2. The darker the glass, the longer it will take to complete a measurement
3. To speed up measurements, switch the OPERATING MODE to NORMAL GLASS (NO LAMI) if you know there is no laminated glass.
4. If testing dark glass in a window or laminated piece, try to test from the side of the window that contains the clear piece of glass.
5. For a reminder of any Low E Coatings, check the drawing at the bottom of the display as the Low E coated surface #’s will be blinking.
6. Always conduct your measurements in the of the window.
7. Take multiple measurements to confirm your test results, but always test near the bottom center of the window (either side).
8. If you do not receive a complete set of results when testing laminated glass or multi-laminate, move to the other side and test again.
9. If the window has more than one low e coating, the GC3200 will only identify the first (nearest) coating it encounters.
BOTTOM CENTER

GLASS DRILL INSTRUCTION MANUAL
GLASS-CHEK PRO OPERATING MANUAL
crlaurence.com
C.R. Laurence Co., Inc. •2503 E. Vernon Ave., Los Angeles, CA 90058 •1.800.421.6144 •crlaurence.com
SEPTEMBER 2020
P. 16
TROUBLESHOOTING GUIDE
If you are having difficulty obtaining an accurate measurement, please follow these steps:
1. Be sure you are following the guidelines for most accurate results outlined on Page 5 of
this manual. Make sure you are testing the BOTTOM CENTER of the window.
2. Ensure that the Glass-Chek PRO is placed flat against the glass surface and that you are
testing at one of the four optimal locations detailed on Page 5. The meter must be used with
the surface opposite the Power button against the window. Using the small end surface of the
unit or tilting the unit away from the surface will give improper results.
3. Clean the glass surface or move to a cleaner area of the glass.
4. Remove dust particles from the two lenses on the back of the Glass-Chek PRO. To clean the lenses: WE STRONGLY
RECOMMEND USING CLEAN COMPRESSED AIR ONLY TO CLEAN THE LENSES. However, if there are fingerprints or
other smudge marks on the lenses that can not be removed in any other way, a lint free cloth can be used to wipe off the
smudges.
5. If only a partial reading occurs, move to another location on the glass or take a reading from the other side of the window.
Page 10
6. Be sure nothing is touching the glass while taking measurements. Placing your hand or any metallic object against the lite
of glass you are testing may cause the Glass-Chek PRO to yield improper Low E results. Remove your hand or object.
Do not touch any part of the glass with your hand while taking readings.
7. Verify the operating temperature range
8. If measurements seem to take a long time:
The amount of time it takes the GC3001 to complete a measurement will vary by application. This does not mean your
meter is defective, it simply takes varying amounts of time depending on the application. Be sure to hold the meter
steady against the window until the results are displayed. Measurements that will take longer include: Thick Glass, Dark
Glass
9. For operating in cold temperatures:
a) Keep the unit in a warmer environment until you are ready to take the readings. The meter will record accurate read-
ings until the point the electronics reach the temperature below the operating range. Depending on the degree of cold-
ness, this will allow for several readings to be taken.
b) Carry the meter close to your body or in some other manner that will keep the unit near a warmer temperature.
c) When temperature is only slightly below the temperature range, operate the unit several times repeatedly in attempt
to warm up the laser.
Troubleshooting Guide Page 14
If you are having difficulty obtaining an accurate measurement, please follow these steps:
1)
manual. Make sure you are testing the BOTTOM CENTER of the window.
2) Ensure that the Glass-Chek ELITE is placed flat against the glass surface and that you are testing
at one of the four optimal locations detailed on Page 5. The meter must be used with the surface
opposite the Power button against the window. Using the small end surface of the unit or tilting the
unit away from the surface will give improper results.
3) Clean the glass surface or move to a cleaner area of the glass.
4) Remove dust particles from the two lenses on the back of the Glass-Chek ELITE.
To clean the lenses: WE STRONGLY RECOMMEND USING CLEAN COMPRESSED AIR ONLY TO
CLEAN THE LENSES. However, if there are fingerprints or other smudge marks on the lenses that can
not be removed in any other way, a lint free cloth can be used to wipe off the smudges.
5) If only a partial reading occurs, move to another location on the glass or take a reading from the other
side of the window.
6) Be sure nothing is touching the glass while taking measurements. Placing your hand or any metallic object against the
lite of glass you are testing may cause the Glass-Chek ELITE to yield improper Low E results. Remove your hand or
object. Do not touch any part of the glass with your hand while taking readings.
7) Verify the operating temperature range
8) If measurements seem to take a long time:
The amount of time it takes the GC3200 to complete a measurement will vary by application. This does not mean your
meter is defective, it simply takes varying amounts of time depending on the application. Be sure to hold the meter steady
against the window until the results are displayed. Measurements that will take longer include: Laminated Glass, Thick
Glass, Dark Glass, and Multi-Laminate Glass.
9) For operating in cold temperatures:
a) Keep the unit in a warmer environment until you are ready to take the readings. The meter will record accurate
readings until the point the electronics reach the temperature below the operating range. Depending on the degree of
coldness, this will allow for several readings to be taken.
b) Carry the meter close to your body or in some other manner that will keep the unit near a warmer temperature.
c) When temperature is only slightly below the temperature range, operate the unit several times repeatedly in attempt to
warm up the laser.
9) For operating in hot temperatures:
Keep the unit in a cooler environment until you are ready to take the readings. The meter will record accurate readings
until the point the electronics reach the temperature above the operating range. Depending on the degree of heat, this will
allow for several readings to be taken.
TEMPERATURES INSIDE VEHICLES COMMONLY EXCEED
THE MAXIMUM ALLOWED TEMPERATURE IN SUMMER MONTHS, AND ALSO DROP BELOW MINIMUM ALLOWED
TEMPERATURES IN WINTER MONTHS. CARRY YOUR METER INDOORS EVERY DAY.
Be sure you are following the guidelines for most accurate results outlined on Page 5 of this
10) DO NOT STORE THE METER IN YOUR VEHICLE.
Important Safety Consideration:
The GLASS-CHEK family of glass thickness and air space meters use a Class 2M
laser to take its measurements. Do NOT push the power button and point the
instrument laser at a persons’ eyes. Always check the other side of the window
being tested to ensure that no one will be looking directly into the laser.

GLASS DRILL INSTRUCTION MANUAL
GLASS-CHEK PRO OPERATING MANUAL
crlaurence.com
C.R. Laurence Co., Inc. •2503 E. Vernon Ave., Los Angeles, CA 90058 •1.800.421.6144 •crlaurence.com
SEPTEMBER 2020
P. 17
TROUBLESHOOTING GUIDE (CONT.)
10. For operating in hot temperatures:
Keep the unit in a cooler environment until you are ready to take the readings. The meter will record accurate readings
until the point the electronics reach the temperature above the operating range. Depending on the degree of heat, this
will allow for several readings to be taken.
11. DO NOT STORE THE METER IN YOUR VEHICLE. TEMPERATURES INSIDE VEHICLES COMMONLY EXCEED
THE MAXIMUM ALLOWED TEMPERATURE IN SUMMER MONTHS, AND ALSO DROP BELOW MINIMUM ALLOWED
TEMPERATURES IN WINTER MONTHS. CARRY YOUR METER INDOORS EVERY DAY.
Important Safety Consideration:
The GLASS-CHEK family of glass thickness and air space meters use a Class 2M
laser to take its measurements. Do NOT push the power button and point the
instrument laser at a persons’ eyes. Always check the other side of the window
being tested to ensure that no one will be looking directly into the laser.
SPECIFICATIONS
Power Source: 9 volt alkaline battery (NEDA 1604A) only
Physical Dimensions: 3.5” x 5.5” x 1.7 inch (89 x 140 x 43 mm)
Weight: 0.75 pounds
Maximum Laser Output: <1mW (2M laser product)
Laser Wavelength: 650 - 680 nm
Storage Temperature: +14 to 140 degrees F (-10 to +60 degrees Celsius)
Operating Temperature: +32 to 104 degrees F (0 to +40 degrees Celsius)
Display: Graphic
Accuracy: Glass: 0.008 inch (0.2 mm)
Air Space: 0.012 inch (0.3 mm)
This product complies with IEC 60825-1 and FDA regulation 21 CFR 1040.10. The thickness tolerance is calibrated to NIST
traceable standard No. 821/268634-03.
GLASS THICKNESS RANGE
Minimum Glass Thickness Allowed: 0.080 inch or 2.0 mm
Minimum Air Space Allowed: 0.187 inch or 4.7 mm
Glass Thickness Allowed for Low-E readings: up to 0.5 inch or 12.7 mm
Troubleshooting Guide Page 14
If you are having difficulty obtaining an accurate measurement, please follow these steps:
1)
manual. Make sure you are testing the BOTTOM CENTER of the window.
2) Ensure that the Glass-Chek ELITE is placed flat against the glass surface and that you are testing
at one of the four optimal locations detailed on Page 5. The meter must be used with the surface
opposite the Power button against the window. Using the small end surface of the unit or tilting the
unit away from the surface will give improper results.
3) Clean the glass surface or move to a cleaner area of the glass.
4) Remove dust particles from the two lenses on the back of the Glass-Chek ELITE.
To clean the lenses: WE STRONGLY RECOMMEND USING CLEAN COMPRESSED AIR ONLY TO
CLEAN THE LENSES. However, if there are fingerprints or other smudge marks on the lenses that can
not be removed in any other way, a lint free cloth can be used to wipe off the smudges.
5) If only a partial reading occurs, move to another location on the glass or take a reading from the other
side of the window.
6) Be sure nothing is touching the glass while taking measurements. Placing your hand or any metallic object against the
lite of glass you are testing may cause the Glass-Chek ELITE to yield improper Low E results. Remove your hand or
object. Do not touch any part of the glass with your hand while taking readings.
7) Verify the operating temperature range
8) If measurements seem to take a long time:
The amount of time it takes the GC3200 to complete a measurement will vary by application. This does not mean your
meter is defective, it simply takes varying amounts of time depending on the application. Be sure to hold the meter steady
against the window until the results are displayed. Measurements that will take longer include: Laminated Glass, Thick
Glass, Dark Glass, and Multi-Laminate Glass.
9) For operating in cold temperatures:
a) Keep the unit in a warmer environment until you are ready to take the readings. The meter will record accurate
readings until the point the electronics reach the temperature below the operating range. Depending on the degree of
coldness, this will allow for several readings to be taken.
b) Carry the meter close to your body or in some other manner that will keep the unit near a warmer temperature.
c) When temperature is only slightly below the temperature range, operate the unit several times repeatedly in attempt to
warm up the laser.
9) For operating in hot temperatures:
Keep the unit in a cooler environment until you are ready to take the readings. The meter will record accurate readings
until the point the electronics reach the temperature above the operating range. Depending on the degree of heat, this will
allow for several readings to be taken.
TEMPERATURES INSIDE VEHICLES COMMONLY EXCEED
THE MAXIMUM ALLOWED TEMPERATURE IN SUMMER MONTHS, AND ALSO DROP BELOW MINIMUM ALLOWED
TEMPERATURES IN WINTER MONTHS. CARRY YOUR METER INDOORS EVERY DAY.
Be sure you are following the guidelines for most accurate results outlined on Page 5 of this
10) DO NOT STORE THE METER IN YOUR VEHICLE.
Important Safety Consideration:
The GLASS-CHEK family of glass thickness and air space meters use a Class 2M
laser to take its measurements. Do NOT push the power button and point the
instrument laser at a persons’ eyes. Always check the other side of the window
being tested to ensure that no one will be looking directly into the laser.

GLASS DRILL INSTRUCTION MANUAL
GLASS-CHEK PRO OPERATING MANUAL
crlaurence.com
C.R. Laurence Co., Inc. •2503 E. Vernon Ave., Los Angeles, CA 90058 •1.800.421.6144 •crlaurence.com
SEPTEMBER 2020
P. 18
TRIPLE PANE WINDOWS
The GC3001 will display the thickness of each pane of glass, the thickness of each air space,
and the total IG thickness. Depending on the thickness of the glass, the maximum allowable
range for the total IG thickness changes according to the data below:
DOUBLE PANE WINDOWS
The GC3001 will display the thickness of each pane of glass, the thickness of each air space,
and the total IG thickness. Depending on the thickness of the glass, the maximum thickness
range for the total IG thickness changes according to the data below. **Note** these same
dimensions apply when measuring a double pane window with suspended film.
SINGLE PANE MONOLITHIC GLASS
The GC3001 will display the thickness of single pane monolithic glass up to 2.75 inches or
70 mm thick.
Page 15
Glass Thickness Range
• Minimum Glass Thickness Allowed: 0.080 inch or 2.0mm
• Minimum Air Space Allowed: 0.187 inch or 4.7mm
• Glass Thickness Allowed for Low-E readings: up to 0.5 inch or 12.7mm
Triple Pane Windows
The GC3200 will display the thickness of each pane of glass, the thickness of each air space, and the
total IG thickness. Depending on the thickness of the glass, the maximum allowable range for the total
IG thickness changes according to the data below:
Double Pane Windows
The GC3200 will display the thickness of each pane of glass, the thickness of each air
space, and the total IG thickness. Depending on the thickness of the glass, the
maximum thickness range for the total IG thickness changes according to the data
below. **Note** these same dimensions apply when measuring a double pane window
with suspended film.
Single Pane Monolithic Glass
The GC3200 will display the thickness
of single pane monolithic glass up to
2.75 inches or 70mm thick.
GLASS 1
GLASS 1
SINGLE LITE GLASS
GLASS 2
GLASS 2
AIR SPACE 1
AIR SPACE 1
AIR SPACE 2
GLASS 3
3/32” or 2.5mm
5/32” or 4mm
1/4” or 6mm
1/2” or 12mm
1.9” or 48mm
2.0” or 50mm
2.1” or 53mm
2.5” or 63mm
Glass Thickness Maximum Overall Thickness Range
3/32” or 2.5mm
1/4” or 6mm
1/2” or 12mm
1.9” or 48mm
2.0” or 50mm
2.2” or 55mm
Glass Thickness Maximum Overall Thickness Range
• Power Source: ................................................
• Physical Dimensions: .....................................
• Weight: ...........................................................
• Maximum Laser Output: .................................
• Laser Wavelength: .........................................
• Storage Temperature: ....................................
• Operating Temperature: .................................
• Display: ..........................................................
• Accuracy: .......................................................
9 volt alkaline battery (NEDA 1604A) only
3.5” x 5.5” x 1.7 inch (89 x 140 x 43mm)
0.75 pounds
<1mW (2M laser product)
650 - 680 nm
+14 to 140 degrees F (-10 to +60 degrees Celsius)
+32 to 104 degrees F (0 to +40 degrees Celsius)
Graphic
Glass: 0.008 inch (0.2mm)
Air Space: 0.012 inch (0.3mm)
This product complies with IEC 60825-1 and FDA regulation 21 CFR 1040.10. The thickness tolerance is calibrated to NIST traceable
standard No. 821/268634-03.
Specifications
Page 15
Glass Thickness Range
• Minimum Glass Thickness Allowed: 0.080 inch or 2.0mm
• Minimum Air Space Allowed: 0.187 inch or 4.7mm
• Glass Thickness Allowed for Low-E readings: up to 0.5 inch or 12.7mm
Triple Pane Windows
The GC3200 will display the thickness of each pane of glass, the thickness of each air space, and the
total IG thickness. Depending on the thickness of the glass, the maximum allowable range for the total
IG thickness changes according to the data below:
Double Pane Windows
The GC3200 will display the thickness of each pane of glass, the thickness of each air
space, and the total IG thickness. Depending on the thickness of the glass, the
maximum thickness range for the total IG thickness changes according to the data
below. **Note** these same dimensions apply when measuring a double pane window
with suspended film.
Single Pane Monolithic Glass
The GC3200 will display the thickness
of single pane monolithic glass up to
2.75 inches or 70mm thick.
GLASS 1
GLASS 1
SINGLE LITE GLASS
GLASS 2
GLASS 2
AIR SPACE 1
AIR SPACE 1 AIR SPACE 2
GLASS 3
3/32” or 2.5mm
5/32” or 4mm
1/4” or 6mm
1/2” or 12mm
1.9” or 48mm
2.0” or 50mm
2.1” or 53mm
2.5” or 63mm
Glass Thickness Maximum Overall Thickness Range
3/32” or 2.5mm
1/4” or 6mm
1/2” or 12mm
1.9” or 48mm
2.0” or 50mm
2.2” or 55mm
Glass Thickness Maximum Overall Thickness Range
• Power Source: ................................................
• Physical Dimensions: .....................................
• Weight: ...........................................................
• Maximum Laser Output: .................................
• Laser Wavelength: .........................................
• Storage Temperature: ....................................
• Operating Temperature: .................................
• Display: ..........................................................
• Accuracy: .......................................................
9 volt alkaline battery (NEDA 1604A) only
3.5” x 5.5” x 1.7 inch (89 x 140 x 43mm)
0.75 pounds
<1mW (2M laser product)
650 - 680 nm
+14 to 140 degrees F (-10 to +60 degrees Celsius)
+32 to 104 degrees F (0 to +40 degrees Celsius)
Graphic
Glass: 0.008 inch (0.2mm)
Air Space: 0.012 inch (0.3mm)
This product complies with IEC 60825-1 and FDA regulation 21 CFR 1040.10. The thickness tolerance is calibrated to NIST traceable
standard No. 821/268634-03.
Specifications
Glass Thickness Maximum Overall Thickness Range
3/32” or 2.5mm 1.9” or 48mm
1/4” or 6mm 2.0” or 50mm
1/2” or 12mm 2.2” or 55mm
Glass Thickness Maximum Overall Thickness Range
3/32” or 2.5mm 1.9” or 48mm
5/32” or 4mm 2.0” or 50mm
1/4” or 6mm 2.1” or 53mm
1/2” or 12mm 2.5” or 63mm

GLASS DRILL INSTRUCTION MANUAL
GLASS-CHEK PRO OPERATING MANUAL
crlaurence.com
C.R. Laurence Co., Inc. •2503 E. Vernon Ave., Los Angeles, CA 90058 •1.800.421.6144 •crlaurence.com
SEPTEMBER 2020
P. 19
GLASS STANDARDS TABLE
When operating the GC3001 in “STANDARD” mode, the glass measurements will be rounded to the nearest standard
thickness according to the table below:
GC3001 Standards - Tolerance Specifications for Flat Glass
Based on the American Society for Testing and Materials (ASTM) Standards
Glass Tolerance
Designation mm inches
SEE GLASS STANDARDS TABLE NEXT PAGE.
GC3001 WARRANTY
The manufacturer warrants all models of the GC3001 to be free from defects in material and workmanship under normal
use and service as specified within the operator’s manual. The manufacturer shall repair or replace the unit within twelve (12)
months from the original date of shipment after the unit is returned to the manufacturers factory, prepaid by the user, and
the unit is disclosed to the manufacturers satisfaction, to be thus defective. This warranty shall not apply to any unit that has
been repaired or altered other than by the manufacturer. The aforementioned provisions do not extend the original war-
ranty period of the unit which has been repaired or replaced by the manufacturer. Batteries are not covered by warranty.
The manufacturer assumes no liability for the consequential damages of any kind through the use or misuse of the GC3001
product by the purchaser or others. No other obligations or liabilities are expressed or implied. All damage or liability claims
will be limited to an amount equal to the sale price of the GC3001, as established by the manufacturer.
Traditional Designation mm inches min max min max
3/32 in. (single) 2.5 0.09 2.16 2.57 0.085 0.101
1/8 in. (double) 3 0.12 2.92 3.4 0.115 0.134
5/32 in. 4 0.16 3.78 4.19 0.149 0.165
3/16 in. 5 0.19 4.57 5.05 0.18 0.199
1/4 in. 6 0.23 5.56 6.2 0.219 0.244
5/16 in. 8 0.32 7.42 8.43 0.292 0.332
3/8 in. 10 0.39 9.02 10.31 0.355 0.406
1/2 in. 12 0.5 11.91 13.49 0.469 0.531

GLASS DRILL INSTRUCTION MANUAL
GLASS-CHEK PRO OPERATING MANUAL
crlaurence.com
C.R. Laurence Co., Inc. •2503 E. Vernon Ave., Los Angeles, CA 90058 •1.800.421.6144 •crlaurence.com
SEPTEMBER 2020
P. 20
GLASS STANDARDS TABLE (CONT.)
FRACTION TABLE
1/32
1/16
3/32
1/8
5/32
3/16
7/32
1/4
9/32
5/16
11/32
3/8
13/32
7/16
15/32
1/2
17/32
9/16
19/32
5/8
21/32
11/16
23/32
3/4
25/32
13/16
27/32
7/8
29/32
15/16
31/32
1
Low-E Coating Table
Triple Silver Soft Coat
Guardian ClimaGuard 62/67
Cardinal LoE - 336
PPG SolarBan 70XL
Double Silver Soft Coat
Cardinal LoE - 240
Guardian ClimaGuard 55/27
PPG SolarBan 67
Guardian ClimaGuard 63/31
Guardian ClimaGuard 70/36
Cardinal LoE - 270
Guardian ClimaGuard 71/38
AGC Comfort TIAC
PPG SolarBan 60
Cardinal LoE - 272
AGC Comfort TIR
Single Silver Soft Coat
AGC Comfort TIPS
PPG Sungate 100
Cardinal ClimaGuard 75/68
PPG SolarBan 400
Cardinal LoE -180
Guardian ClimaGuard 80/70
Hard Coat Pyrolytic
Pilkington Solar E
AGC Comfort E2
PPG Sungate 500
Pilkington Energy Advantage
Table of contents
Popular Test Equipment manuals by other brands

Midtronics
Midtronics Honda ED-18V3 instructions

ARIES INDUSTRIES
ARIES INDUSTRIES PE34 Series Service manual

Tektronix
Tektronix 177 instruction manual

Elcometer
Elcometer 106 Scale 6 operating instructions

Agilent Technologies
Agilent Technologies Agilent 34980A brochure

PANCONTROL
PANCONTROL PAN VOLTFINDER manual