CRUSSIS OLI Guera 8.8-S User manual

Electric bicycle
user manual
CZECH MANUFACTURER OF E-BIKES
Enjoy your ride!
E
OLI Guera 8.8-S / 8.8-M
OLI Atland 8.8-S / 8.8-M
OLI Fionna 8.8-S / 8.8-M
OLI Largo 8.8-S / 8.8-M
OLI Cross 8.8-S / 8.8-M
OLI Cross low 8.8-S / 8.8-M
ONE-OLI Guera 8.8-S / 8.8-M
ONE-OLI Largo 8.8-S / 8.8-M
ONE-OLI Cross 8.8-S / 8.8-M
ONE-OLI Cross low 8.8-S / 8.8-M

Content
Foreword ..................................................................................................................................3-4
General warnings .....................................................................................................................5-9
Electric bike system .............................................................................................................10-13
Electric bike control (color LCD display) ............................................................................13-18
Troubleshooting .......................................................................................................................19
Maintenance and storage ........................................................................................................20
Notice .........................................................................................................................................21
Warranty ....................................................................................................................................21

3
FOREWORD
Dear users,
thank you for purchasing a CRUSSIS e-bike! We appreciate you choosing our product.
For proper operation of the CRUSSIS e-bike, read the product information carefully be-
fore using it. In this manual we inform you about all the details related to the use of the
e-bike (including the installation of the device, settings and normal use of the display).
This manual will also help you solve any ambiguities and problems.
CRUSSIS ELECTROBIKES s.r.o wishes you many beautiful and safe kilometers on the
new e-bike.
A list of CRUSSIS dealers can be found on the website www.crussis.com.
WHAT IS AN E-BIKE?
It is a classic bicycle that is equipped with an electric motor. This can be located in the centre, rear
or front hub. The maximum assist speed is limited to 25 km/h and this limitation corresponds to the
European standard EN 15194-1 (the electric motor is switched offwhen exceeding this speed and
switches on as soon as the speed falls below this limit). Furthermore, the bike is equipped with a
battery that can be placed in the frame or on the rear rack. The most important parameters of the
battery are voltage and capacity. The higher the values, the greater the range of the e-bike. Current-
ly, lithium-ion (Li-ion) batteries are the most commonly used. The advantage of these batteries is
mainly in their low weight and long service life. It is important to keep the battery regularly rechar-
ged to prolong its life. The communication between the individual electrical components is provided
by a control unit that evaluates the data from the individual sensors, according to which it controls
the performance of the electric motor. Operation of the electric motor is provided by a control panel
which provides information on battery status, support level and remaining range. Time, speed and
distance travelled are standard on most displays. The motor function is activated by pedalling, which
is sensed by a special sensor located in the pedal centre. So you have to keep pedaling the e-bike,
the motor only helps you. The pedalling sensor is responsible for informing the control unit whether
the rider has started or stopped pedalling and informs about the pedalling frequency. This function
is taken care of by either a magnetic waist sensor or a torsion sensor. The magnetic waist sensor is a
basic sensor that works on the magnetic principle. This sensor, which is installed on the center axis,
checks the pedaling frequency. Activation of the sensor by back pedalling is impossible due to the
magnets being out of phase. Torsion sensors are used on more expensive sports bikes. Compared
to magnetic sensors, they provide information about both the frequency of pedalling and the force
exerted on the pedal. A torsion sensor is ideal for off-road riding where there are frequent changes
in pedaling frequency. If we need to pedal with more force, the motor will immediately help us with
more power. On the other hand, when riding downhill, when less pedal pressure is applied, the mo-
tor function is reduced, thus saving battery power. You can set the e-bike in motion using the control
button , which is located on the display controller, but only up to the maximum speed limit, i.e.
6km/h (used to assist walking). On an electric bicycle that complies with the European standard
4
EN 15194-1, is considered as a normal bicycle in terms of the Road Traffic Act. This means that
you can ride on cycle paths, you do not need a driving licence and a helmet is only compulsory
up to the age of 18. We recommend the use of a bicycle helmet to all users regardless of age.
.
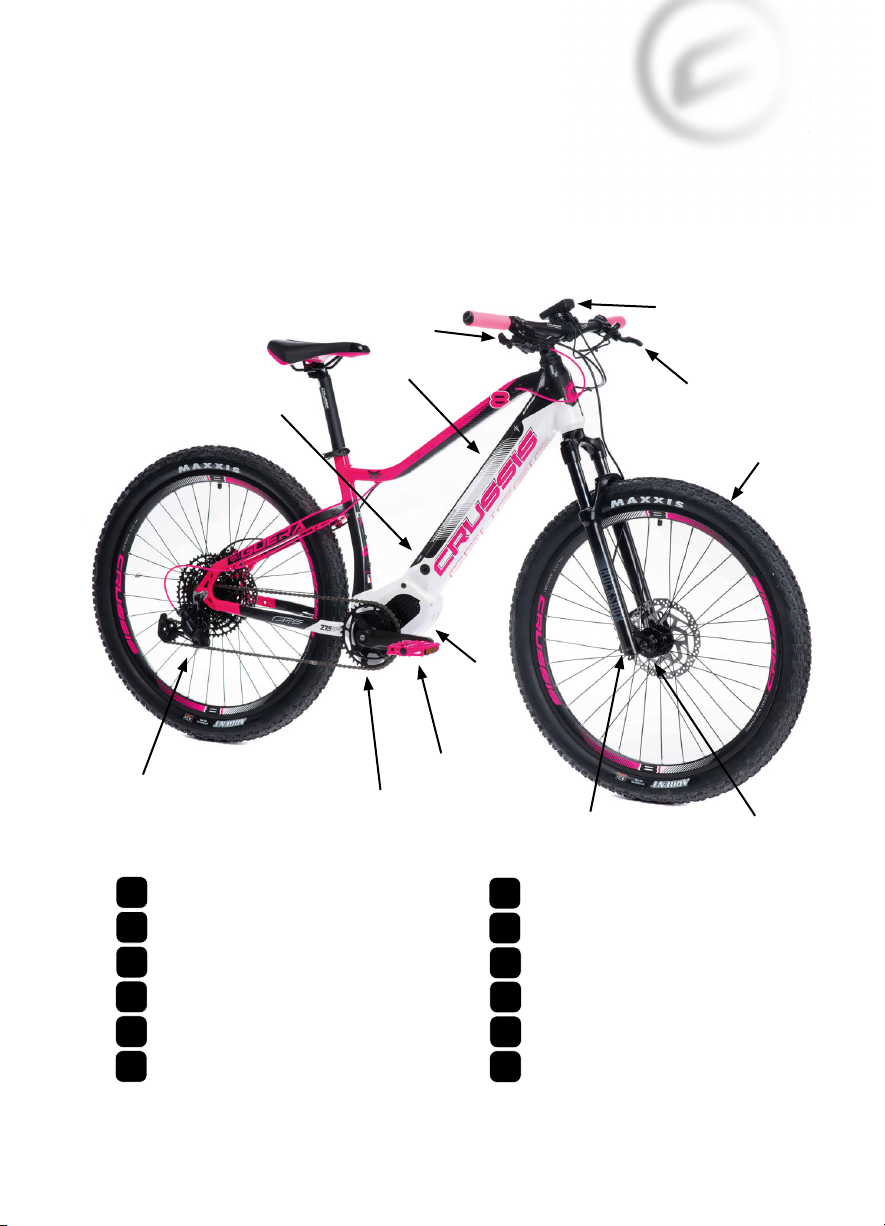
Electric bike components
1
2
3
4
5
6
7
8
9
10
11
12
8. shifter lever
6. battery lock
1. battery
12. tire and rim
5. brake levers
3. control panel
(lcd display)
11. derailleur 4. torque sensor (inside of the motor)
2. motor
9. cranks and pedals
10. quick release
skewer
7. brakes
battery
motor
control panel (lcd display)
torque sensor (inside of the motor)
brake levers
battery lock
brakes
shifter lever
cranks and pedals
quick release skewer
derailleur
tire and rim
R
oad Tra
ffi
c Act. This means that
a
nd a helmet is onl
y
com
p
ulsor
y
e
t to all users re
g
ardless o
f
a
g
e
.

5
GENERAL WARNINGS
Riding an e-bike, like other sports, can pose a risk of injury and damage. If you want to use an e-bike,
you must learn and follow the rules of safe riding, proper use and maintenance of an e-bike. Regular
maintenance and proper use will reduce the risk of injury and extend the life of the product.
The electric bike models OLI Atland, OLI Fionna, OLI Guera, ONE-OLI Guera, OLI Largo,
ONE-OLI Largo are suitable for riding on paved roads, cycle paths, gravel and forest roads,
off-road riding. The e-bikes are equipped with tires with a coarser tread pattern to ensure
sufficient grip for off-road riding. Therefore, vibrations may occur when riding on smooth
surfaces (asphalt, concrete...).
The OLI Cross , ONE-OLI Cross, OLI Cross low, ONE-OLI models are suitable for riding on paved
roads, bike paths, gravel and forest roads.
E-bikes should not be used for wading, for any jumping and impacts from height, do not use
them for extreme riding in difficult terrain (downhill, enduro, riding on obstacles)!
We recommend that you have your e-bike assembled and adjusted by a professional e-bike
workshop.
The e-bike can be used as a conventional bicycle without the assistance of an electric motor. During
unassisted riding (i.e. assistance OFF), every e-bike puts some resistance caused by the transmission
in the motor.
Check before your first ride:
• The right size of e-bike: An inappropriately chosen bike size can affect the handling of an e-bike.
• Saddle adjustment: the correct height and position of the saddle affects the comfort and han-
dling of the bike. The position of the saddle on the seat tube is determined by the scale on the
seat rails, there is a marking for the maximum distance and proximity to the handlebars!
Please note: The maximum permissible height of the seat tube is marked with a line on the
seat tube. Never set the seat tube above this height! This will prevent damage to the frame of
the e-bike or the seat tube and possible injury.
• The correct height of the stem and handlebars.
Regular check:
Check the condition of your e-bike regularly before each ride. In this way, many technical problems
can be prevented in time. The consequences of an irregular check can be disastrous in many cases.
The life expectancy of the frame or components is influenced by the construction and material used,
as well as maintenance and intensity of use. Regular inspections by qualified professionals should
be a matter of course. Lift the e-bike to a height of 5-10 cm above the ground and drop it. This should
reveal any loose components. Then carry out a visual and tactile check of the whole e-bike, especi-
ally the correct tightening of all bolts, nuts, pedal centre, pedals etc.

6
Wheels and tires: Check that the tires are properly inflated. Riding on an underinflated or overinfl
ated tire can lead to poor e-bike control. We recommend to follow the maximum and minimum pre-
ssure values specified by the manufacturer on the tire. Check the tires for wear and proper shape. If
bumps or cracks appear on the tires, you must replace the tires before use. Then check whether the
wheels are correctly centered by turning them. Check if spokes are thight or are not missing. Make
sure that the front and rear wheels are properly secured (Fig. 1). If it is a wheel with a Thru-Axle,
make sure that the axle is fitted in the correct direction (at the front wheel).
Brakes: Check the function of the brakes. Press both brake levers and push the e-bike forward. Are
the brake pads in full contact with the disc without the levers touching the handlebars? If not, the
brakes must be adjusted (bled). Check the brake pads for wear. Brake pads and discs are worn out
during use, so it is necessary to service the brakes regularly and replace worn parts in time.
Gear shifting and chain: The chain requires regular maintenance to extend its lifetime. Before
lubrication, it is advisable to clean the chain and pinions first. Lubricate the chain with the lubricant
designated for the bicycle chain. The chain stretches over time. The lifespan of the chain is very
individual and depends on the quality of the chain, the mileage, the riding style and the terrain in
which you ride. Regular replacement is necessary. The condition of the chain can be checked with
a special gauge. A stretched or damaged chain can damage the gears and pinions. During shifting,
the shifter cable becomes worn and stretched. The shifting needs to be adjusted regularly to switch
correctly. By loosening or tightening the bowden nut at the shifter lever, fine corrections can be
achieved.
Forks: You can find different types of forks on Crussis e-bikes.
You should never lock the fork when riding off-road or jumping. The fork may be damaged
when compressed under heavy loads. This can also result in an accident and injury.
Also note that the fork is not intended for extreme terrain, jumps, downhill, freeride or dirt
jumps. Failure to follow this information may result in damage to the fork, accident or death.
Failure to follow this information will void the warranty.
Suspension fork ROCKSHOX
RockShox FS Judy Silver TK Solo Air 29“
(OLI Fionna 8.8-S / 8.8-M,
OLI Largo 8.8-S / 8.8-M,
ONE-OLI Largo 8.8-S / 8.8-M)
Stroke: 100 mm
Fork column: 1 1/8“
Suspension: vzduchové Solo Air
Locking: from fork (crown)
Axis: RU 9 mm
ng
on an underin
fl
ated or overin
fl
the maximum and minimum
p
re-
ires
f
or wear and
p
ro
p
er sha
p
e. I
f
f
ore use. Then check whether the
e thi
g
ht or are not missin
g
. Make
.
I
f
it is a wheel with a Thru-Axle,
n
t wheel
).
1.
RockShox FS Judy Silver TK Solo Air 27,5“
(OLI Atland 8.8-S / 8.8-M,
OLI Guera 8.8-S / 8.8-M,
ONE-OLI Guera 8.8-S / 8.8-M)
Stroke: 100 mm
Fork column: 1 1/8“
Suspension: vzduchové Solo Air
Locking: from fork (crown)
Axis: RU 9 mm

7
RockShox FS Paragon Gold RL Solo Air 700c
(OLI Cross 8.8-S / 8.8-M,
ONE-OLI Cross 8.8-S / 8.8-M,
OLI Cross low 8.8-S / 8.8-M,
ONE-OLI Cross low 8.8-S / 8.8-M)
Stroke: 65 mm
Fork column: 1 1/8“
Suspension: vzduchové Solo Air
Locking: from fork (crown)
Axis: RU 9 mm
IMPORTANT SAFETY INFORMATION
1. It is very important to have the RockShox suspension fork installed correctly by a qualified bicycle
mechanic. Improperly installed forks are extremely dangerous and can cause serious or fatal inju
ries.
2. The fork on your bike is designed for use by a single rider on mountain roads and similar terrain
conditions. It is not advisable to drive off-road when the fork is locked.
3. Before driving, make sure that the brakes are properly installed and adjusted. Use the brakes
carefully and familiarize yourself with their properties and braking performance in non emergency
conditions. Hard braking or improper use of the front brake can cause you to fall. If the brakes are
not properly adjusted or improperly installed, the rider can be seriously or fatally injured.
4. The fork may malfunction under certain circumstances. For instance if oil is lost, components or
parts of the fork are bent or cracked. The fault in the fork may not be visible. Do not ride a bicycle if
you notice bent or broken fork parts, oil loss, sounds due to excessive suspension, or other indicati-
ons of a possible fork defect, such as loss of shock absorbing properties. Take your bike to a qualifi
ed dealer for inspection and repair. Damage to the fork may result in wheel damage or personal
injury. Suspension forks and rear shock absorbers contain highly pressurized liquids and gases. The
warnings in this manual must be followed to prevent injury or death. Never try to open the cartridge
or the rear silencer, they are under a lot of pressure, as mentioned above. If you try to open the
cartridge or the rear absorber, you risk serious injuries.
5. Always use genuine RockShox parts. The use of non-original spare parts will void the wa-
rranty and may cause a structural defect in the fork. A structural failure can cause you to lose
control of your bicycle with possible serious or fatal injuries.
6. If you use a bike carrier on a car, the instructions for use of the bike carrier must be followed du-
ring any handling. If you are carrying the bike in a carrier on or behind the car in bad weather, you
need to protect the bike from water with a suitable cover. Because when driving in the rain, e-bike is
exposed to pressure of the water and it i is equal to a pressure washing, which can seriously damage
the bike.

8
7. The fork is designed to secure the front wheel with a quick release or thru-Axle . Make sure you
understand which shaft your wheel has and how to handle it properly. Do not use a screw on the
shaft. An incorrectly mounted wheel can allow the wheel to move or release, this can cause the da
mage to the bicycle and serious injury or death to the rider.
8. Follow all instructions in the user manual regarding care and maintenance of this product.
INSPECTION AND MAINTENANCE
Before each ride
If you find any cracks, dents, abrasions, deformations, or oil leaks on the fork or other components,
contact a qualified mechanic to inspect the fork or e-bike.
Check air pressure. Load the fork with all your weight. If you find it soft, pump the fork to the requi-
red hardness. (For more information, see the section „Setting the air pressure“).
Check the wheel mounting and cable and bowdens routing - they must not restrict the movement
of the handlebars.
After each ride
Clean all dirt. Do not use high-pressure cleaners - water may flow through the dusters into the fork.
Lubricate the dust seals and fork legs. Do not use other oil than designed for forks lubrication. Con-
sult your dealer for the use of a suitable oil.
Every 25 hours of drive
Oil inspection.
Check the correct tightening torque of the fork holders and other components.
Cleaning and lubrication of the outer cable and bowden cable.
Every 50 hours of drive
Removal of shock absorbers, cleaning / checking inserts and changing oil (if necessary).
Cleaning and lubrication of the air damper mounting kit.
Every 100 hours of drive
Complete cleaning of the fork inside and out, cleaning and lubrication of dust caps and cleaning
rings, oil change in the damping system, tightening control and adjustment to the driver‘s preferen-
ces.
Prior to disassembly, check the fork clearance by braking the front wheel and gently pushing the
stem forwards and backwards. If there is clearence in the fork, contact a qualified mechanic.
AIR PRESSURE ADJUSTMENT
1. Unscrew the valve cap. Screw the pump inflator onto the valve.
2. Pump the fork to the required pressure. Never exceed the maximum permissible pressure from
the manufacturer. The recommended pressure and maximum pressure can be found in the table
below or on the fork leg.
e
ase or thru-Axle . Make sure
y
ou
op
erl
y
. Do not use a screw on the
or release, this can cause the da
a
intenance o
f
this
p
roduct
.

9
Use only pumps designed to inflate forks and shock absorbers to inflate RockShox forks.
Using an unsuitable inflator can damage the fork! The fork must be unlocked when inflating,
otherwise there is a risk of damage! Note that all Rock Shox forks are subject to normal wear
and tear and that their durability and proper functioning are very individual and depend on
the mileage, driving style, terrain and environment in which you ride. We do not recommend
using oils containing Teflon on a fork with plastic bushings, there is a risk of etching the
bushing.
Frame: Do not use a bent or cracked frame. You must never repair or straighten the frame under
any circumstances. Consult your Crussis e-bike dealer for frame damage. Crusis frames have a
mounting place for bottle holder. We recommend using side bottle holder (to remove the bottle to
the side) to avoid breaking the screws.
E-bike load: The e-bike load stated in the specifications of the individual models is the sum of the
rider‘s weight and the weight of the bike and the weight of all currently attached accessories (carrier,
fenders, child seat, bags ....) and cargo!
Always keep all components clean.
If you wash the e-bike with water (do not use high-pressure cleaners to clean the e-bike or
its parts) - always remove the battery from the e-bike before washing. Dry the e-bike before
returning the battery. We recommend drying the e-bike after each ride, especially all electri-
cal components. In winter, pay special attention to the maintenance of the e-bike, always
clean the components from salt and moisture after riding. Perform maintenance at regular
intervals. Information on the recommended tire pressure can be found directly on the side of
the tire!
This manual is universal for OLI SPORT drive system
System: OLI SPORT
Torque: 83 Nm
Rated Power: 250 W
Weight: 3,5 kg
Resistance: IP54
Pedal sensor: Torque and speed sensor

10
ELECTRIC BIKE SYSTEM
The motor is activated by means of a torsion (pressure, force) sensor integrated into the central axis.
The torsion sensor evaluates the frequency and force of pedaling, which it transmits to the control
unit, which doses the motor power according to the force you pedal with. The e-bike motor swit-
ches on after about one turn of the pedal cranks. It switches offagain after 1-2 sec. when you stop
pedalling. The motor disengages when the speed reaches 25 km/h and re-engages when the speed
drops below this limit. It thus complies with all European standards and is still a bicycle. The e-bike is
equipped with an LCD panel that controls the electric drive. On the display (LCD panel) it is possible
to select different modes of assistance 0 - 5. The highest assistance mode is 5, the 0 assistance mode
is without the help of the electric motor. The LCD panel also contains a „walking assist“ function. In
this mode the bike travels at speeds up to approx. 6 km/h without pedal assistance. The pedestrian
assist helps when pushing or starting. The function is not intended for continuous riding.
Optional driving programs:
without motor assistance (display records mileage data)
low motor assistance
medium motor assistance
high motor assistance
The motor assistance can vary depending on weather conditions, road conditions, the bicycle
or driving style.The motor assistance modes are graded, i.e. ECO (lowest assistance) - HIGH
(highest assistance) up to a speed of 25 km/h. The torsion sensor transmits information about
the pedaling force, the more you pedal, the more the electric motor assists. Walk assist: the
bike rides on its own at speeds up to approx. 6 km/h and helps when starting or pushing. This
function is not intended for continuous riding! The speed and power of the walking assist is
dependent on the gear (larger pinion less speed but more power, can be used on hills - smaller
pinion more speed but less power, can be used on flat ground). We recommend using smaller
pinions for proper function of the walking assist.
RECOMMENDED! ALWAYS turn offthe e-bike after riding by pressing the button on the battery
for 2 seconds.
BATTERY INFORMATION
Lithium-ion (Li-ion) batteries are the most commonly used batteries today. The advantage of these
batteries is mainly their light weight and long life. Li-ion batteries have a very low self-discharge rate.
From the first charge, the battery needs to be kept in its working cycle (discharge/charge), even when
not in use, the battery discharges naturally. It is recommended to recharge the battery regularly
even when not using the electric bike about once a month and store it charged to 60 - 80% capacity.
Otherwise, the battery may be damaged, which may cause a shorter range or, in the worst case, com-
plete non-functionality. By recharging regularly you extend the life of the battery. We recommend
that you fully charge the battery before first use. Since batteries do not have a memory effect, they
can be recharged at any time. The maximum capacity is reached after approx. 5 - 10 charges. Always
keep the battery charged and recharge it after a ride, not before the next ride. Li-Ion batteries are
100% recyclable. You can drop offthe battery at any collection point or directly at the dealer. The
battery is recharged using the included 230/240V charger, charging time is approximately 5 - 9 hours
(depending on battery capacity and state of discharge). The battery can be left on the bike while
charging, or it can be removed. To remove the battery, turn the key and then remove the battery.
0
1-2
3
4-5
11
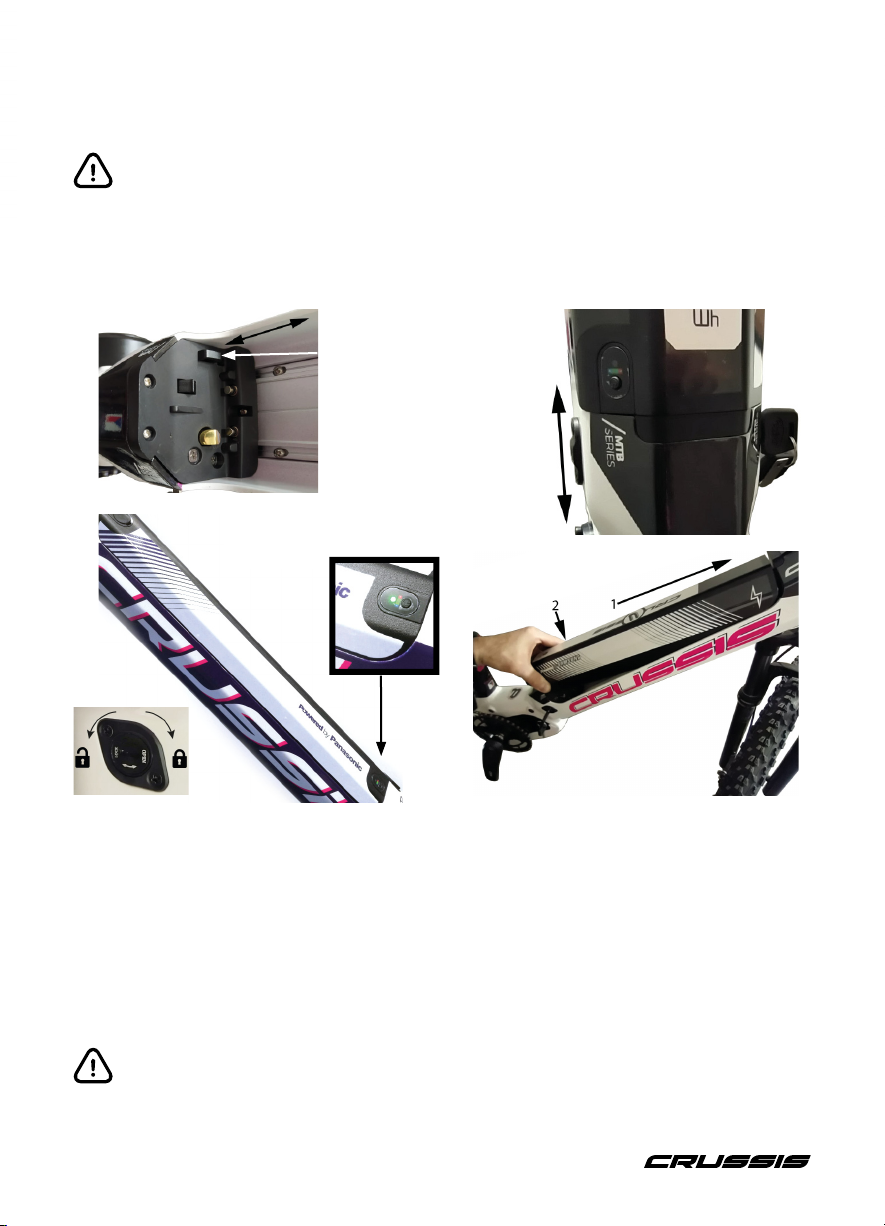
Never immerse the battery in water (any liquids), do not store it in a humid environment
and do not disassemble it. Before each ride, please make sure that the battery is properly
seated and locked. There are several types of batteries available with Crussis e-bikes. Unlock
the battery by turning the key to the left and release by pressing the button (if equipped),
lock by turning to the right. Or unlock the battery by turning the key to the right, lock by
snapping the battery into the frame. Some models may also be equipped with a latch pin,
see picture below. the latch pin must be pushed down towards the motor.
The battery may sleep after about 3 days. You may not be able to wake up the battery from
this mode by pressing the battery power button. In this case, revive the battery by connecti-
ng a powered charger.
Frame battery - fully integrated
To switch on the battery, press and hold the button (approx. 2 seconds). By Pressing the button
LED lights up for few seconds by color which representes the charge level of the battery. If the LED
is blue, the battery chargé level is 100 - 75%. If the LED is green, the battery is 75 - 50% charged.
If the LED is red, the battery capacity is less than 50%. The battery charge status display on the
control panel is for reference only. If the motor stops running smoothly and runs intermittently,
the battery charge level is too low. In this case, the electric drive system must be switched off. Con-
tinue driving without motor assistance and ensure that the battery will be recharged.
The battery charge status shown on the control panel display is for reference only. In case
of excessive overheating, the battery will automatically shut down. The battery is protected
by a temperature sensor. Once the battery has cooled down to operating temperature, it is
possible to continue driving. Overheating of the battery is a common phenomenon associa-
ted with battery operation. If you leave the e-bike in a public place, we recommend locking
the battery with a key. We recommend separating the keys of the battery, do not carry them
all in one bundle in case of loss.
Battery indicator,
power button
Battery latch
First, attach the connector,
then push the battery
towards to the lock
Ejected battery
latch pin

12
Charging
Connect the charger to the battery and then plug the electrical plug into the electrical socket. Once
the charger is connected to the electrical socket, the red LED on the charger lights up to indicate that
the charging process has started. Charging stops automatically when the battery is fully charged.
The charge status is indicated by a green LED. First disconnect the charger from the electrical socket,
then from the battery. The battery charging time to 100% takes 5 - 9 hours (depending on the state
of discharge). Interrupting the charging process does not damage the battery. The battery is a Li-ion
type and its nominal voltage is 36V, it charges 42V, fully charged it reaches 42V, which can be mea-
sured about a second after disconnecting the charger. After that, it immediately drops to 41V and
below. This is a standard behaviour of the battery.
Recharge the battery at room temperature (approx. 20°C). Always keep the battery (e-bike)
under supervision when charging.
Charging the battery at temperatures below 10°C and above 40°C can seriously damage the
battery.
Only use the charger that came with your e-bike to charge the battery.
The battery is sensitive to accurate charging, using a different charger may result in damage
to the battery or other parts of the e-bike.
If the charger (or its cables) is damaged, never connect it to the electric bike or el. socket.
Always switch offthe battery and the e-bike system before charging!
battery connector
LED light
electric plug
battery connector
LED light
electric plug
This charger is
designed for M/L
720 Wh 20 Ah
900 Wh 25 Ah
batteries only
13
FACTORS AFFECTING THE RANGE OF THE ELECTRIC BIKE
It is not possible to determine the range of an e-bike accurately because it is influenced by many
factors.
1. Route profile and surface: on flat terrain, the range is higher than when riding on long steep
climbs and worse surfaces.
2. Rider and load weight: higher rider and load weight means higher energy consumption.
3. Inflation and tire tread: correct tire inflation is important. Riding on under-inflated tires redu-
ces the range of the e-bike.
4. Battery condition: a fully charged, new battery has a greater range than a battery that has
been charged and discharged many times. The battery capacity also has an effect on the range.
Higher capacity = higher range. The battery reaches its maximum capacity after 5-10 charges.
5. Assist mode: more motor assistance means lower range.
6. Driving style and smoothness: if you pedal a lot, the motor uses less energy. The smoothness
of the drive also its influence, as frequent ride start reduces the range.
7. Weather conditions: temperatures around 20°C and no wind are ideal. If the temperature is
lower and there is a strong headwind, the range is reduced.
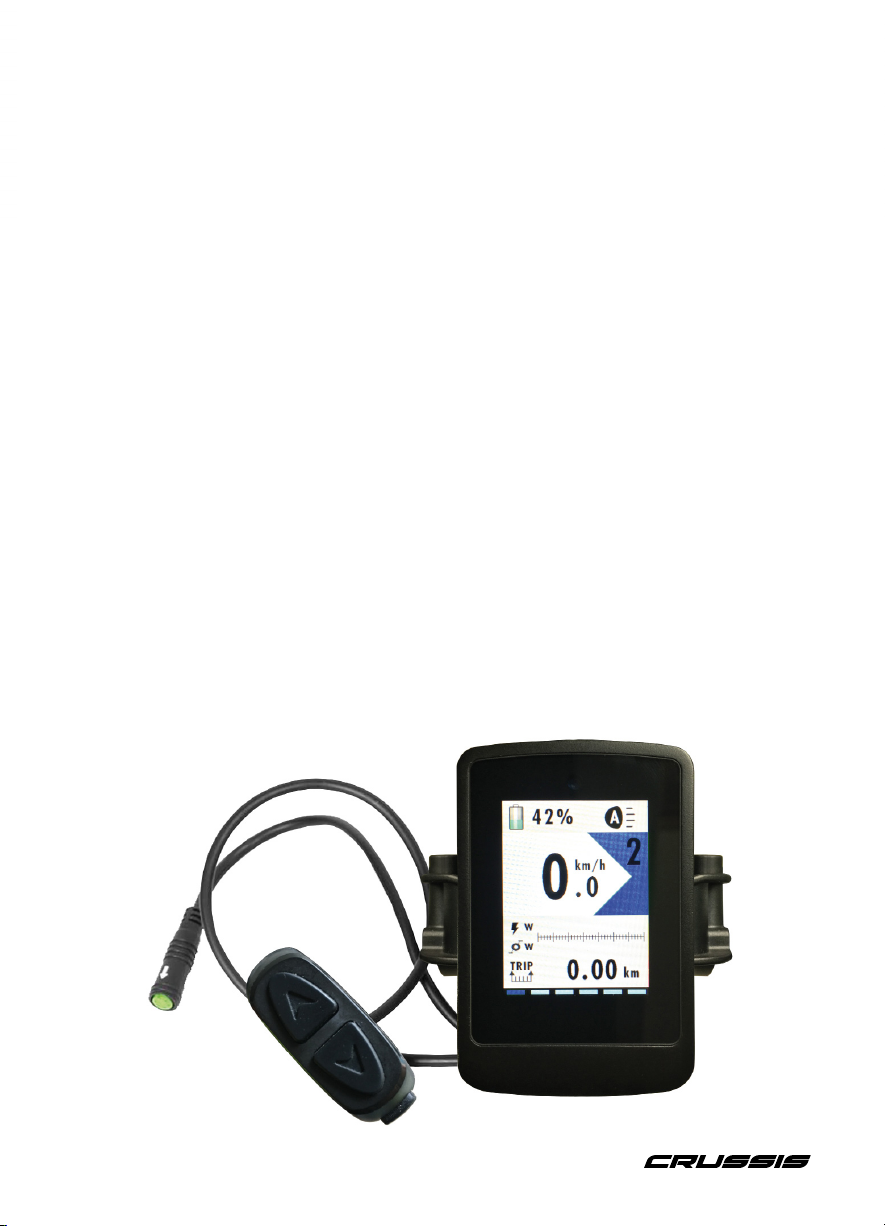
ELECTRIC BIKE CONTROL (COLOR LCD DISPLAY)
OLI control panel with high contrast LCD display. It provides all the important information, which it
displays without problems even in direct sunlight. The control from the handlebar provides good
feedback and ease of use. The user interface is clearly legible and intuitive. The control panel and
display are protected against water and dirt ingress. Meets protection class IP 65. The system must
be switched on when the e-bike is stationary (if the e-bike is not moving). If the system is switched
on while driving, assistance may not work. The assistance is then switched on only when the e-bike
is stopped and start move again.

14
Model: OLI
Specifications
Display type:
Weight:
Dimensions:
Handlebar holder Ø:
Rated voltage:
Operating temperature:
Protection class:
Do not expose the LCD display to prolonged sunlight in both offand on states.
If the e-bike is not in use, you should turn it offby long pressing the power button on the
battery to avoid unnecessarily draining the battery by powering the entire system.
A) battery state in percentage.
B) Current speed.
C) Wattmeter, pedaling power.
D) Mode selection.
E) Coloures shows which assistant level is in use.
F) Display backlight.
G) Currently selected pedal assistant level. The higher the help, the more the motor helps.
H) Current assistance scale of the motor.
I) TArrow buttons .They allow you to scroll up and down in the menu.
J) Mode button . A short press allows you to select the mode selection. This button is using as a
confirmation button in the display menu also.
LCD, active area 2“
114 g
76x50x76 mm
22.2 / 25.4 / 31.8 mm
12V
-20 ° C - + 60 ° C
IP 66

15
OPERATIONS
Switching the system on/off
Turn on the power by briefly pressing the power button on the battery.
This switches on the entire e-bike system.
To switch offthe e-bike, press and hold the power button on the battery again for approx. 2 se-
conds.
Selecting the level of pedal assist
In manual shift mode, briefly press the or buttons to set the desired level pedal assist. The
lowest level is 0, the highest level is 5. Level 0is the non-assisted mode.
The default setting when the display is switched on is 3.
(The default setting after turning on the display may change after a firmware update.)
Pedal assist color
The individual pedal assists are also separated by color on the display for better orientation.
0is grey, 1is light blue, 2is dark blue, 3is green, 4is orange-yellow and 5is red.
(The color scheme may change after a firmware update.)

16
Switching beatween modes
You can switch between the following modes by briefly pressing the button in following sequence:
distance traveled (TRIP) time of the distance traveled Current performance of the cyclist
calories motor help in watts General overview including ODO total mileage (cannot be deleted)
Walking assistant mode
Pedal assistant 1-5 must be selected othervise the walking assistant will not work. If 0 is selected,
walk mode will be displayed but the motor will not start. Press and hold the button to start wal-
king assistant mode, this symbol will appear on the display.
Release the button to exit the mode. You can choose the speed at which the e-bike rides when
pushing it by selecting the gear ratio with the shifter lever.
Access to the SETTINGS
After switching on the entire system, select assistance level 0. To prevent accidental activation of
the walking mode, press and hold the buttons at the same time until the settings MENU is
displayed.
The settings contains 4 basic menus, which divides into other menus, see the display diagram on
the next page. Use the buttons to move through the menu and press to select the desired
option. To return to the individual submenus, scroll to text back and press the button .
To return to the basic display interface (as if you had just turned on the bike), press and hold the
button from anywhere in the menu.
17
The menu may change depending on the firmware version.
Menu
Trip reset
Advanced
System info
Battery info
Back
1-10
Back
Italiano
English
Français
Deutsch
Español
Český
Zpět
Km
Miles
Back
50-150kg
Back
Male
Female
Back
Disable
Active
Automatic
Back
Brightness
Language
Measure unit
Weight
Gender
Night mode
Back
TRIP
clear
Firmware version
HMI
DU
Pack voltage
Charge cycles*
Last charge*
Battery temp.*
Cell voltages*
*This function is not supported.

18
Error messages
* Error 0106 is a signal error and 0105 is an intermittent signal error.
In both cases, the torque sensor must be replaced.
Example : Error 0104
This message appears on the display.
You will find in the table that this is a speed sensor error. Check the position of
the magnet and, if it is outside the sensor, adjust its position.
The error message does not disappear from the display until you switch the
e-bike offand on again.
The QR code below the error message contains a link to the motor manufactu-
rer‘s website. You can find the error explanation there.
Error Description of a fault Solution
1101 Communication problem
between display and motor
Have the connectors
between the display and the
control unit checked
0811 High voltage protection Please contact your retailer
0810 e signal from the current
sensor is abnormal
Please contact your retailer
0809 e battery voltage is above
the maximum allowed.
Please contact your retailer
0808 Motor blocked (Mechanical
or cabling problem)
Please contact your retailer
0806 Bus error Please contact your retailer
0805 Motor overheating Let the motor to cool down,
if the problem persists plea-
se contact your retailer
0804 Control unit overheating Let the motor to cool down,
if the problem persists plea-
se contact your retailer
0802 Pedal rotation sensor error Please contact your retailer
0801 Hall sensor error Please contact your retailer
0106 Torque sensor error * Please contact your retailer
0105 Torque sensor error * Please contact your retailer
0104 Speed sensor error Check the magnet position
If the problem persists, please
contact your retailer
0001 Battery communication
error
Please contact your retailer

19
TROUBLESHOOTING
If the e-bike does not work, first check if you can solved the problem yourself. Never interfere
with the motor, battery and electrical connection. In this case visit a service center.
1. If the e-bike range is low although the battery is fully charged
The range of the e-bike is affected by many factors, such as battery capacity, motor used, route
profile, level of assistance used, weight of the rider and his load, rider‘s condition, riding style and
smoothness, tire inflation and weather conditions.
If the e-bike range is short-term, have the battery capacity measured.
2. The motor does not respond even when the system is turned on.
Check that the sensing magnet is in the correct position, see picture. Check the display cable. If the
error persists, visit a service center.
3. The e-bike cannot be switched on.
Switch on the battery using the button on the battery.
Check the display cable connectors.
If the error persists, visit a service centre.
4. The charger does not charge the battery.
Verify that the charger is properly connected to the el. socket.
Check for damage to the cables. If so, the charger must be replaced.
The magnet on the spoke must be
placed exactly opposite the speed
sensor between the 4 marked points.
As on this picture.
The position of the magnet can be easily adjusted, there is a groove for a screwdriver on the
magnet. It is loosened counterclockwise. After loosening, the magnet can be moved along
the spoke. After reaching the correct position, tighten it again clockwise with a screwdriver.

20
MAINTENANCE AND STORAGE
Never immerse the battery, charger or other electrical components in water (any liquids).
Store the battery and e-bike in a well-ventilated and dry place, out of direct sunlight and
other heat sources. Optimal temperature for storing e-bikes, especially batteriesis 20 ° C.
Perform e-bike maintenance at regular intervals to ensure long product life. Always keep
all components clean. If you wash the bike with water, always remove the battery from the
e-bike before washing. We recommend drying the bike after each ride, especially all electrical
components. If you use the e-bike in the winter, always clean the battery contacts from salt
and moisture after riding. Before driving, always check that all bolts, nuts and pedal center
are properly tightened. Also check brake function and tire pressure.
Do not dispose of the battery yourself. There is a risk of fire, explosion, electric shock and
toxic substances may be released.
Do not store the battery in temperatures below 10 ° C and in extremely high temperatures
above 40 ° C.
Do not transport the e-bike on a car carrier in heavy rain, higher speeds result in higher
water pressure. We recommend using a bicycle transport case.
Bright colors incline more to fading. We recommend that you do not expose the e-bike to
long-term sunlight, as the color may change.
SAFETY WARNING
Failure to observe safety warnings may result in damage to you or another person, your property
or the property of others.
Always follow the safety warnings to avoid the risk of fire, electric shock and injury.
Before using the product, read the instruction manual of the electric bicycle thoroughly.
Always check for loose or damaged connections before riding. Check brake function and tire pres-
sure.
In case of damage to electronic parts, seek professional service.
Neither the manufacturer nor the importer is liable for incidental or consequential damages or for
damage caused directly or indirectly by the use of this product.
The following statement: the weighted emission sound pressure level-A to the driver‘s ears is less
than 70 db (A).
The CRUSSIS e-bike user manual is legally obliged to be attached to each product.
The e-bike meets the requirements of EN 14619 (class A).
This manual suits for next models
19
Table of contents
Other CRUSSIS Bicycle manuals


