manuals.online logo
Brands
  1. Home
  2. •
  3. Brands
  4. •
  5. Crux
  6. •
  7. Car Video System
  8. •
  9. Crux MRVLR-68Q User manual

Crux MRVLR-68Q User manual

- Rear-view camera input.
- Front-view camera input.
- Front-view camera and AV Inputs can still be used even if vehicle is equipped with an
OEM rear view camera.
- Provides an HMDI Input for Navigation or Wi-Fi Mirroring (Crux Part#: WVI-X, sold
separately).
- Add one Composite AV input.
- With OE type Dynamic Parking Guidelines.
- Toggle AV inputs from OE radio buttons, wireless remote control or wired push button
switch provided.
- On-screen display and setup.
- Compatible with 8” and 10.2” monitor.
MRVLR-68Q Module
Power/CAN Harness
(to Vehicle)
Power/Can Harness
(to Module)
Multi Cable
Remote Control
LVDS Cable
Power/CAN Harness
(for hardwired use only)
A/V Cable
Push Button Switch
IR Cable
Camera Power Cable
RGB Cable
rev.031918
1 / 9
rev.031918
2 / 9
Please make sure to disconnect the power cable of the interface before changing the DIP
switch settings.
KEY
FUNCTION
Power & PIP
Not Used
Menu
Activate Factory Menu
Enter
Make a Selection / Change the Image Display
Move UP
Move DOWN
Move LEFT (Press for 2 seconds to Access Factory Mode)
Move RIGHT (Press for 2 seconds to Reset User Data)
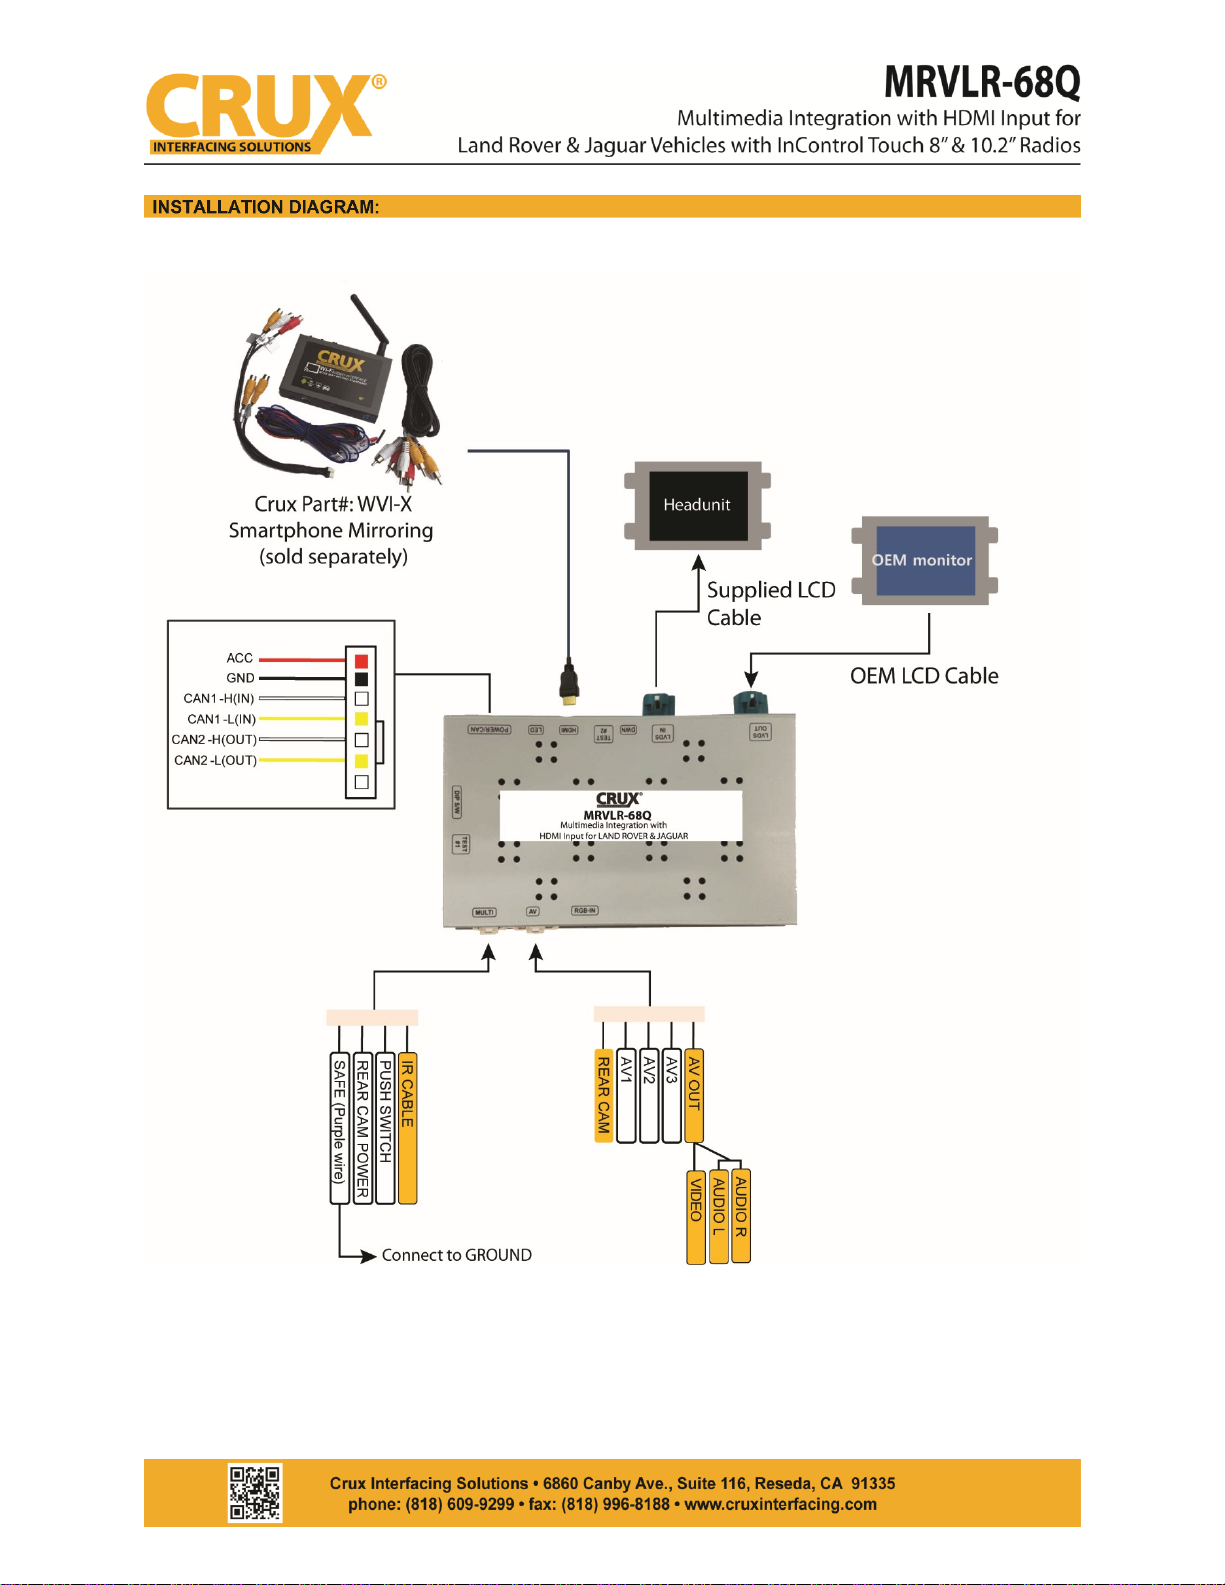
Connect the PURPLE wire, labeled “SAFE”, found on the Multi Cable to Ground in order to enter
the OSD Menu.
DIP #
FUNCTION
DIP Switch Setting
1
RGB
OFF: RGB Mode Display / ON: Skip RGB
2
HDMI
OFF: Display HDMI / Skip HDMI
3
AV1
OFF: AV1 Mode Display / ON: Skip AVI
4
AV2
OFF: AV2 Mode Display / ON: Skip AV2
5
Monitor Size
OFF: 10.2” Monitor / ON: 8” Monitor
6
NOT USED
7
Rear Camera Mode
OFF: OEM Rear Camera / ON: Aftermarket Rear Camera
8
CAN Setting
OFF: Jaguar XE, XF, F-PACE (CAN1)
ON: Discovery (CAN1)
If “OFF” setting fails to display the rear camera or PAS,
change the car model to “TYPE 2” on factory mode
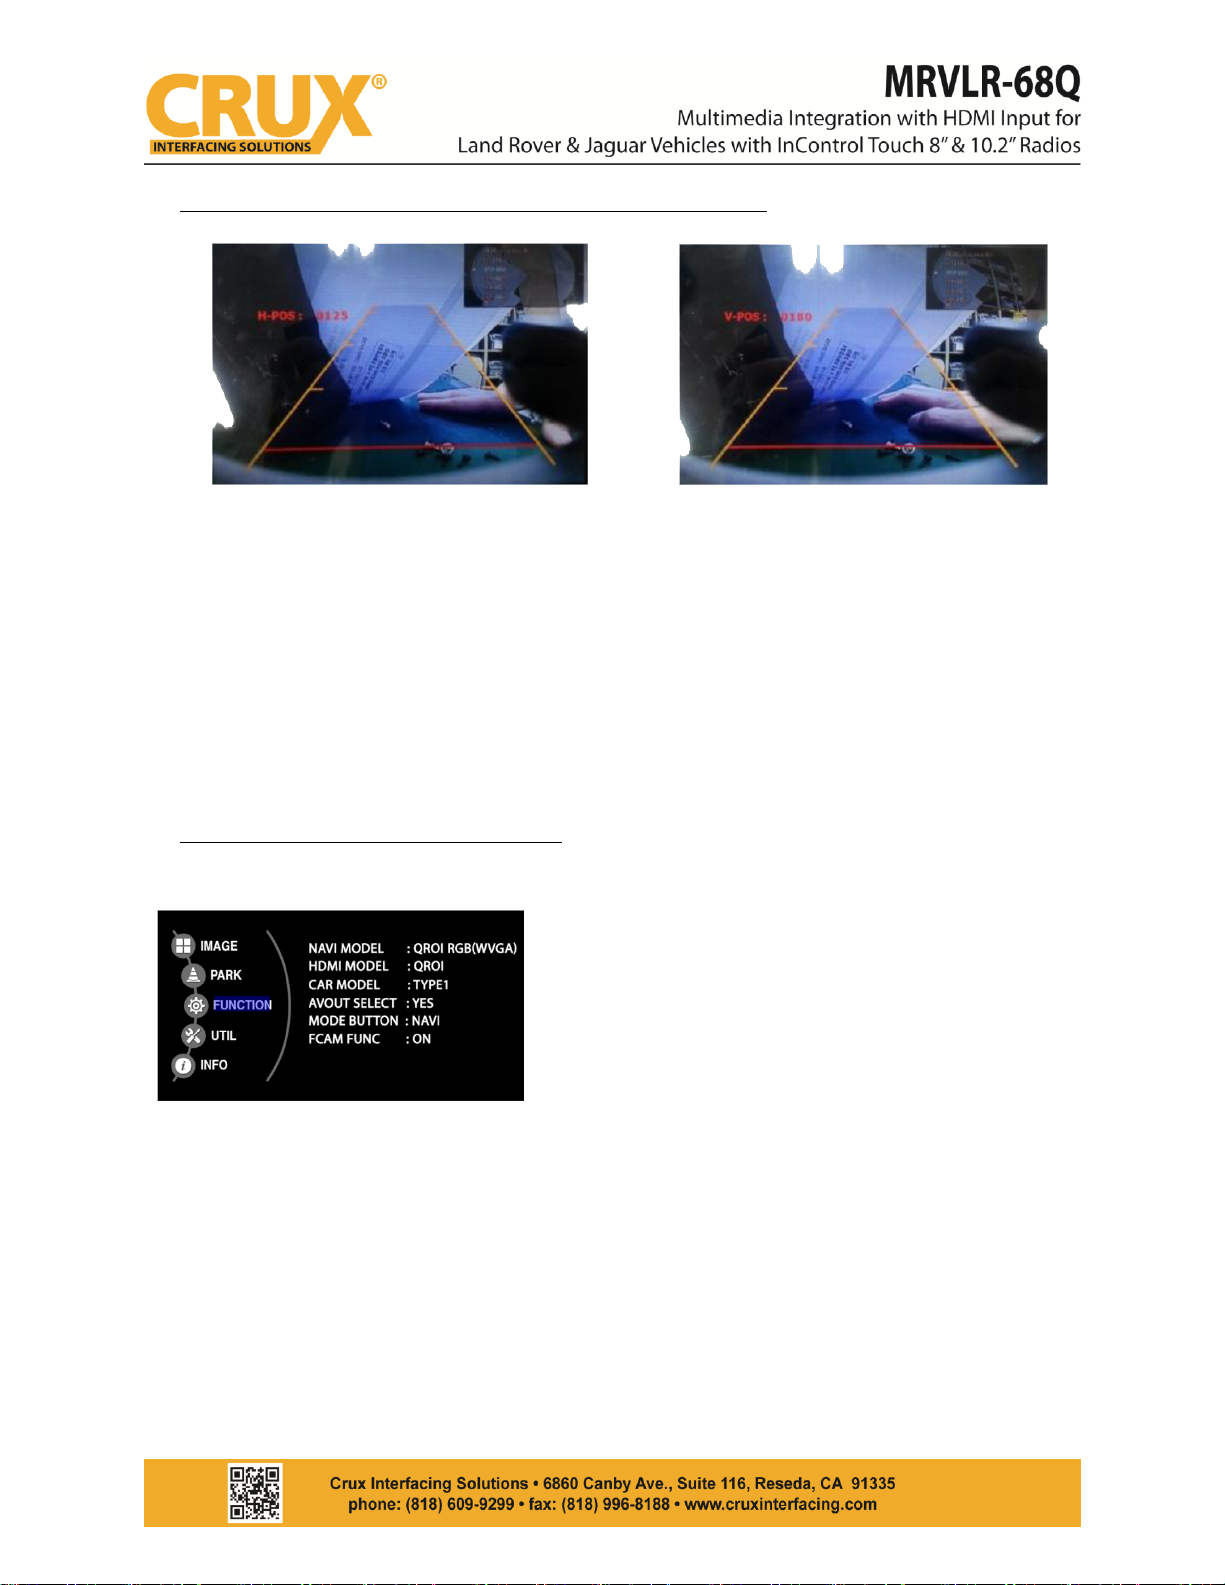
ADJUST A CURRENT SCREEN POSITION AND SIZE
H-POSITION: Move display horizontally
V-POSITION: Move display vertically
BRIGHTNESS: Adjust brightness of screen
CONTRAST: Adjust contrast of screen
ADJUST REAR VIEW CAMERA SETTINGS
PAS TYPE: Select type of parking guide line
- NOT USED: No parking guide line
- PAS ON: Selecting Dynamic parking guide line
- PASS OFF: Select static parking guide line
rev.031918
3 / 9
PAS SETUP: Adjusting the position of the parking guide line
<H-POSITION> <V-POSITION>
REAR TYPE: Select Rear Camera Recognition
- CAN: By connecting “CAN” cable of the rear car gear. Changing to rear camera mode when
shifting into reverse. (Connect “CAN” wire of the power cable to the “CAN” cable of car gear)
-LAMP: By connecting to the reverse light of the vehicle. Switch camera mode when shifting to
reverse gear. (Connect “Rear-C” wire of the power cable to the reverse light wire)
SAFE ENABLE: If enabled, HDMI, RGB, and A/V mode will be disabled while driving. (Default is OFF)
RADAR ENABLE: Setting parking distance alarm sensor (ON/OFF).
NAVIGATION AND CAR MODEL SET UP
rev.083017
5 / 7
NAVI MODEL: Setting for RGB navigation
(Default, Q-roi RGB, WP9230, HDMI (WVGA)
HDMI MODEL: Setting for HDMI Navigation
(Q-roi RGB, WP9230, HDMI, PAPAGO)
CAR MODEL: Select car model
(TYPE1, TYPE2)
AV OUT SELECT: Select background sound through car
AUX, HDMI1, HDMI2, AV)
MODE BUTTON: Select mode button
(NAVI, HOME) (only 8” monitor is
supported)
FACM FUNC: ON = Use front camera
OFF = Do not use front camera
rev.031918
4 / 9
8 Inch Screen
Switch modes by pressing HOME or
NAV button on touch screen. (only
available on the 8” screen) (Set up
this button option on the “MODE
BUTTON” setting section)
10.2 Inch Screen
CALIBRATE: Calibrate touch screen
REMOTE SELECT: Use remote control on DVD by selecting
“User” after IR memory is registered.
(Default is User)
AV1 REMOTE OSD: AV1 multimedia OSD setting
AV2 REMOTE OSD: AV2 multimedia OSD setting
IR MEMORY: Register IR memory of remote control for
DVD, or other AV sources.
FACTORY RESET: RESET to Factory mode
A long press of the “VOICE” button
on the steering wheel switches
between modes.
rev.031918
5 / 9
FOR 8” SCREEN
Unplug the Quadlock
connector from behind the
radio
Unplug the black 12-pin
connector circled above
Slide out the inner 12-pin
connector from the cover
Plug the inner female 12-pin
connector to the mating end
of the CAN IN/OUT cable
provided
Reassemble the male 12-pin
inner connector of the CAN
IN/OUT cable provided to the
cover
Plug the reassembled 12-pin
connector back to the Quadlock
connector
LCD Cable Connection for 8” and 10.2” Screens
Disconnect the OEM LCD
cable from behind the radio
and connect it to the “LVDS
OUT” of the MRVLR-68Q
interface.
Plug the provided LCD cable to
the “LVDS IN” of the interface
and plug the other end behind
the radio. See diagram to the
left.
OEM LCD Cable
rev.031918
6 / 9
F-PACE 8” SCREEN
The CAN wires on a Jaguar F-Pace can be found at the 32-pin connector located behind the air
conditioning unit.
GEAR DATA BUTTON DATA
Pin 8 = CAN High PIN 11 = CAN High
Pin 9 = CAN Low PIN 12 = CAN Low
The headunit is located under the driver seat. See pictures above.
rev.031918
7 / 9
FOR 10.2”SCREEN
The headunit is located under the driver’s seat. The connections are made at the headunit
harness as follows:
Connect CAN1-H from the power cable to the PURPLE/GREEN wire
Connect CAN1-L from the power cable to the PURPLE/WHITE wire
Connect LIN wire from the power cable to the YELLOW wire
NOTE: Wire colors stated above are from Crux research. OEM wire colors may vary.
rev.031918
8 / 9
CAN FAILURE:
In some Land Rover Discovery Sports model, there is only one CAN connection. In such case,
swap the wires on PIN 3 and PIN 4 of the provided power cable. Please see picture and
diagram below.
JAGUAR
2016 –2017
2016 –2017
2016 –2017
XE
XF
F-Pace
LAND ROVER
2016 –2017
Discovery Sport
Jaguar 8” Screen Discovery Sport 10.2” Screen
rev.031918
9 / 9

Other Crux Car Video System manuals

Crux Sightline VRFCH-75U User manual

Crux

Crux Sightline VRFCH-75U User manual

Crux RVCCH-75K User manual

Crux

Crux RVCCH-75K User manual

Popular Car Video System manuals by other brands

Audiovox PROV916 P installation guide

Audiovox

Audiovox PROV916 P installation guide

Soundstream VDVD-150 owner's manual

Soundstream

Soundstream VDVD-150 owner's manual

Setma E09UN00009 installation manual

Setma

Setma E09UN00009 installation manual

NavLinkz RL4-SY4 manual

NavLinkz

NavLinkz RL4-SY4 manual

Car Solutions GEMENI GE-100 Features and specifications

Car Solutions

Car Solutions GEMENI GE-100 Features and specifications

GROM Audio VLINE HON2M installation manual

GROM Audio

GROM Audio VLINE HON2M installation manual

Xtrons HD906 user manual

Xtrons

Xtrons HD906 user manual

Audiovox VME 9314TS manual

Audiovox

Audiovox VME 9314TS manual

VDO DTV 6500 user manual

VDO

VDO DTV 6500 user manual

Clarion CJ7100E Brochure & specs

Clarion

Clarion CJ7100E Brochure & specs

Pioneer AVIC-X930BT Operation manual

Pioneer

Pioneer AVIC-X930BT Operation manual

Pyle view PL90HRBK manual

Pyle view

Pyle view PL90HRBK manual

Alpine TME-M710 owner's manual

Alpine

Alpine TME-M710 owner's manual

Panasonic CQ-VAD7300U operating manual

Panasonic

Panasonic CQ-VAD7300U operating manual

Blaupunkt ASPEN IVDM-7003 installation instructions

Blaupunkt

Blaupunkt ASPEN IVDM-7003 installation instructions

Seat SOUND SYSTEM 1.0 owner's manual

Seat

Seat SOUND SYSTEM 1.0 owner's manual

VDO MS 3100 - datasheet

VDO

VDO MS 3100 - datasheet

Logic TS825i instruction manual

Logic

Logic TS825i instruction manual

manuals.online logo
manuals.online logoBrands
  • About & Mission
  • Contact us
  • Privacy Policy
  • Terms and Conditions

Copyright 2025 Manuals.Online. All Rights Reserved.