CucinaPro 220-06 User manual

1

2
220-06
EBELSKIVER BAKER

3
IMPORTANT SAFEGUARDS
When using electrical appliances, basic safety precautions should always be
followed, including:
1. Read all instructions
2. Do not touch hot surfaces, instead use the handles.
3. To protect against electrical shock, do not immerse power cord plug or
appliance in water or any other liquid.
4. If the power cord is damaged, the manufacturer (or a similarly
qualified person) must replace it in order to avoid a hazard.
5. Do not use outdoors
6. Close supervision is necessary when any appliance is being used by or
near children.
7. Avoid contact with moving parts.
8. The use of attachments not recommended or sold by the manufacturer
may cause fire, electric shock or injury.
9. Unplug from outlet when not in use and before cleaning. Allow
appliance to cool completely before putting on or taking off parts.
10. Do not operate any appliance with a damaged power cord or plug
or after the appliance malfunctions or is dropped or damaged in any
manner. Return appliance to manufacturer of its service agent for
examination, repair or electrical or mechanical adjustment.
11. Do not let the power cord hang over the edge of a table or counter or
touch any hot surface.
12. Do not use the appliance for other than intended use.
13. Do not place on or near a hot gas or electric burner, or in a heated
oven.
14. To disconnect, remove the plug from the wall outlet.
15. Do not clean the appliance with metal scouring pads. Pieces can
break off from the pad and touch electrical parts, creating a risk of
electrical shock.
POLARIZED PLUG
This appliance has a polarized plug (one blade is wider than the other). To
reduce the risk of electric shock, the plug will fit in a polarized outlet only one
way. If the plug does not fit fully in the outlet, reverse the plug. If it does not fit,
contact a qualified electrician. Do not modify the plug in any way.

4
For best result, follow these simple instructions. Note that when your
Ebelskiver baker is new, you may notice some slight smoking or odor. This is
normal with many heating appliance and will not recur. This does not affect
the safety of your appliance.
• Plug into a wall outlet. The indicator light will begin to glow, indicating
that the baker has begun preheating. It will take approximately 5 to 8
minutes to reach baking temperature.
• Before starting your iron heating, take some melted butter and using a
pastry brush, brush the insides of each depression. When you are done
for the day and the iron is cool, wipe each well thoroughly with dry paper
towel to absorb any oils left over. If you don’t do this, your ebelskivers will
start to stick.
• Do NOT use any sharp implements to position your ebelskivers. They might
scratch the non-stick surface. Bamboo skewers work wonderfully and can
be purchased at most grocery stores.
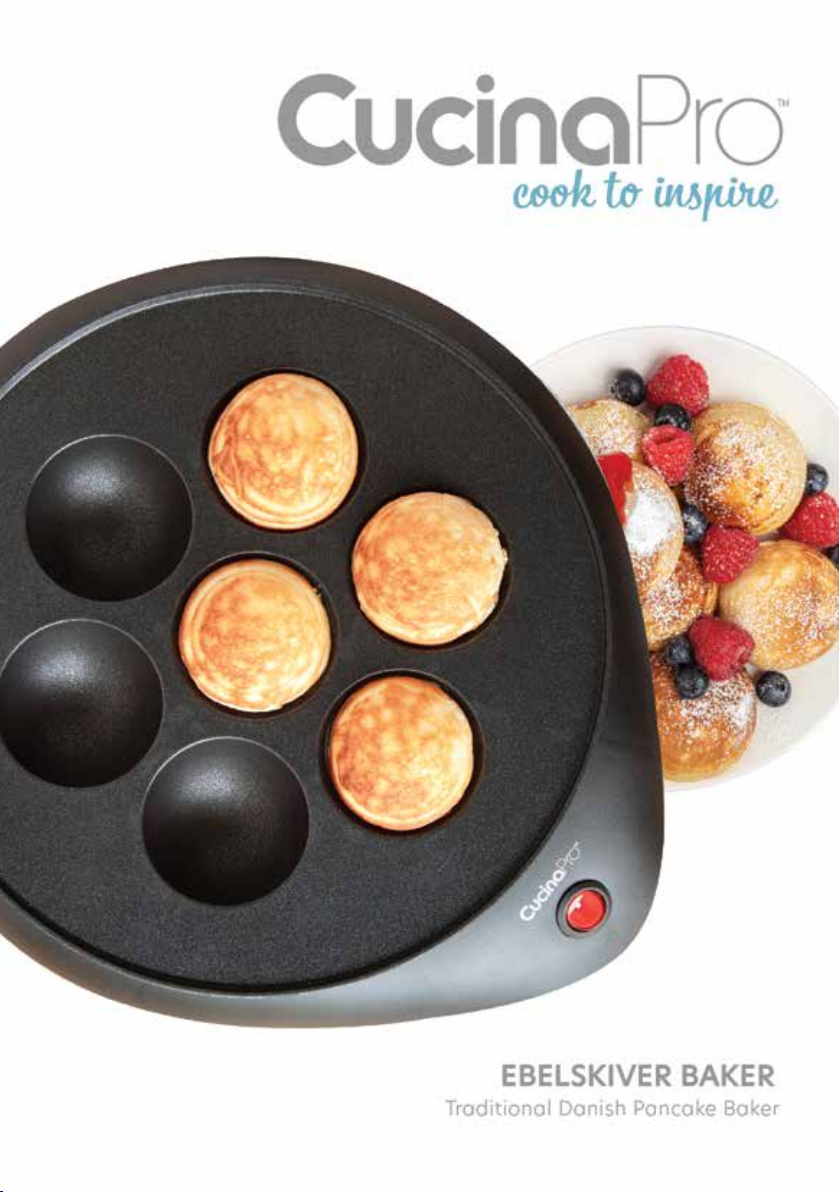
• Place about 2 tablespoons of batter into each well starting from the
center one. A disher or ice cream scoop would work well here. If you are
going to insert fruits or jellies or just about anything, this is where you
would put it in the middle. Allow to cook just until the edges of each puff
begin to brown and pull away from the side of the well.
• Cook your ebelskivers in the pan until they begin to bubble in the center
and are lightly browned on the bottom, approximately 3 to 5 minutes. Use
two wooden skewers to flip the ebelskivers. Slide the skewers between the
edge of the pan and the cooked edge of the puff pancake, lift it and flip it
over. Cook on the second side for an additional 3 to 5 minutes.
• Remove from the iron. You can roll your Ebelskivers in powdered sugar,
or plate them and sift powdered sugar on top. If no sugar is needed, let
them cool on a cake rack. If you’ve inserted fruit or jelly in the ball, we
recommend that you let them cool before taking a bite - the center will
be hot.
When you are through baking, simply unplug the power cord from the wall
outlet to turn the baker off and let it sit to allow it to cool. After it has cooled,
brush any crumbs from the wells and wipe off the plate with a dry paper towel
to absorb any excess margarine or shortening.
THIS DEVICE IS FOR HOUSEHOLD USE ONLY
SAVE THESE INSTRUCTIONS

5
CLEANING AND CARE
A few easy steps to keeping your Ebelskiver Baker looking and working like
new:
• Always allow the baker to cool before cleaning and always unplug it from
the wall outlet. There is no need to disassemble the baker for cleaning.
Never immerse the baker in water.
• To clean the cooking grids, just wipe thoroughly with a paper towel,
absorbing any oil or butter that might be down in the grooves of the
cookie pattern. Do not use anything abrasive that can scratch or damage
the non-stick coating.
• Wipe the outside of the baker with a damp cloth only. Do not clean the
outside with any abrasive scouring pad or steel wool, as this will damage
the finish. Do not immerse in water or any other liquid. Do not place in the
dishwasher.
BASIC EBELSKIVER RECIPE
3 large eggs – separated
2 cups buttermilk
2 tablespoons sugar
½ teaspoon salt
2 cups all-purpose flour
1 teaspoon baking powder
1 teaspoon baking soda
1 teaspoon cinnamon (optional)
1 tablespoon melted butter for oiling the grids
Beat the egg yolks in a bowl then whisk in the buttermilk and salt until
thoroughly mixed.
Sift the flour, baking powder, baking soda and cinnamon together in a
separate bowl. Add to the yolk mixture and whisk until smooth and most of
the lumps are gone.
Beat the egg whites until they form stiff peaks, electric mixer is easier to use
for this. Gently fold the whites into the mixture. This is to give the batter bulk.
Brush melted butter into the wells and turn on. When the light goes off and
the butter smells slightly nutty, fill each well full. Allow them to cook until
the bottoms are golden brown then turn over with a bamboo skewer to cook
the other side (approximately 1-2 minutes)

6
You can also use pancake mix as a basic batter, but should still separate the
eggs and beat/fold the whites into the batter.
The buttermilk in the above recipe is going to help make the outside of the
Ebelskiver look wonderfully golden.
You can make these ebelskivers without centers and dust them with powdered
sugar and then either plate them and drizzle syrups (fruit-chocolate-maple-
etc.) or dip them into small containers of dip.
You can put fresh fruit into the batter. Jelly, jams, marmalades, even the mini
candies that have just come out will be enjoyed by many. Mini peppermints in
chocolate or peanut butter ones work very well.
EBELSKIVER EASY BATTER
1 cup all-purpose flour
2 teaspoons sugar
½teaspoons baking powder
¼teaspoon salt
2 eggs, separated
1 cup milk
2 tablespoons melted butter
1 teaspoon vanilla extract
In a large bowl, whisk together all-purpose flour, sugar, baking powder and
salt. In a separate bowl, whisk together egg yolks, then add in milk, melted
butter and vanilla extract. Add the egg yolk mixture to the flour mixture and
stir until well mixed.
In a new bowl, beat the egg whites with an electric mixer on high until stiff
peaks form, approximately 2-3 minutes.
Using a spatula, gently fold in half of the egg white mixture into the batter,
then fold in the remainder of the egg whites.

7
CHOCOLATE EBELSKIVERS
2 tablespoons of butter and butter for greasing ebleskiver bread
2 large eggs, separated
1 tablespoon sugar
2 cups all-purpose flour
1 teaspoon baking powder
cup cocoa powder
1 ½cups of milk
1 cup miniature semisweet chocolate
(optional to double chocolate to 2 cups)
In a large bowl, whisk together all-purpose flour, sugar, baking powder and
salt. In a separate bowl, whisk together egg yolks, then add in milk, melted
butter and vanilla extract.
Add the egg yolk mixture to the flour mixture and stir until well mixed.
In a new bowl, beat the egg whites with an electric mixer on high until stiff
peaks form, approximately 2-3 minutes.
Using a spatula, gently fold in half of the egg white mixture into the batter,
then fold in the remainder of the egg whites.
Experiment with your flavors, think of what you like and work to make it so.
Look at the internet, there are lots of recipes out there that are delicious.
Enjoy!

8
ONE YEAR LIMITED WARRANTY
CucinaPro warrants to the original purchaser that this product will be free
from defects in material and workmanship under normal home use for one
year from the date of purchase with valid proof of purchase. During this
period, CucinaPro will either repair or replace, at its discretion, any defective
product at no charge to the owner. Replacement products or repaired parts
will be guaranteed for only the unexpired portion of the original warranty or
six months, whichever is greater.
This limited warranty does not apply to any defects resulting from accident,
misuse, improper maintenance, or normal wear and tear. The manufacturing
company is not liable for any incidental or consequential damages incurred
by such circumstances. If for any reason you’re not completely satisfied with
your purchase, you may return your selection with original proof of purchase
for an immediate exchange or refund (less shipping and processing) within 30
days of receipt with valid proof of purchase.
This warranty only applies to CucinaPro products operated in the United
States. CucinaPro products operated outside the United States, the original
purchaser will be responsible for shipping costs. If you believe your product is
defective, please contact CucinaPro Customer Service.
www.cucinapro.com
customerservice@cucinapro.com
Table of contents
Other CucinaPro Kitchen Appliance manuals

CucinaPro
CucinaPro 220-05NS User manual

CucinaPro
CucinaPro 447 User manual

CucinaPro
CucinaPro 1552 User manual

CucinaPro
CucinaPro 340 User manual

CucinaPro
CucinaPro 1447 User manual

CucinaPro
CucinaPro 1453 User manual

CucinaPro
CucinaPro 220-05NS User manual

CucinaPro
CucinaPro 1448 User manual

CucinaPro
CucinaPro 760 User manual

CucinaPro
CucinaPro 1445 User manual

CucinaPro
CucinaPro 1447 User manual

CucinaPro
CucinaPro 220-05P User manual

CucinaPro
CucinaPro 1551 User manual

CucinaPro
CucinaPro 1550 User manual

CucinaPro
CucinaPro 530 User manual

CucinaPro
CucinaPro 1550 Quick guide

CucinaPro
CucinaPro 1447 User manual

CucinaPro
CucinaPro 300 User manual

CucinaPro
CucinaPro 1448 User manual