Nutritional information per suggested serving:
Calories 339 (66% from fat) • carb. 2g •
pro. 27g • fat 24g • sat. fat 9g • chol. 68mg •
sod. 300mg • calc. 25mg • fiber 0g
COUNTRY BREAKFAST
SAUSAGE
Pork is paired with turkey to make this
breakfast favourite a little lighter.
Makes 4 pounds (1.8 kg) sausage
2 pounds (907 g) boneless,
skinless turkey thighs
2 pounds (907 g) boneless pork
butt
1 tablespoon (15 ml) browning
sauce, such as Gravy Master™
1 teaspoon (5 ml) kosher salt
1-½ tablespoons (25 ml) rubbed
sage
2 teaspoons (10 ml) freshly ground
black pepper
1 teaspoon (5 ml) crushed red
pepper, optional
Remove any visible gristle from meat. Cut
turkey and pork into 1 - inch (2.5 cm)
cubes. Place meats in a large bowl and
add the remaining ingredients. Stir well to
combine. Cover and refrigerate for at least
8 and up to 24 hours.
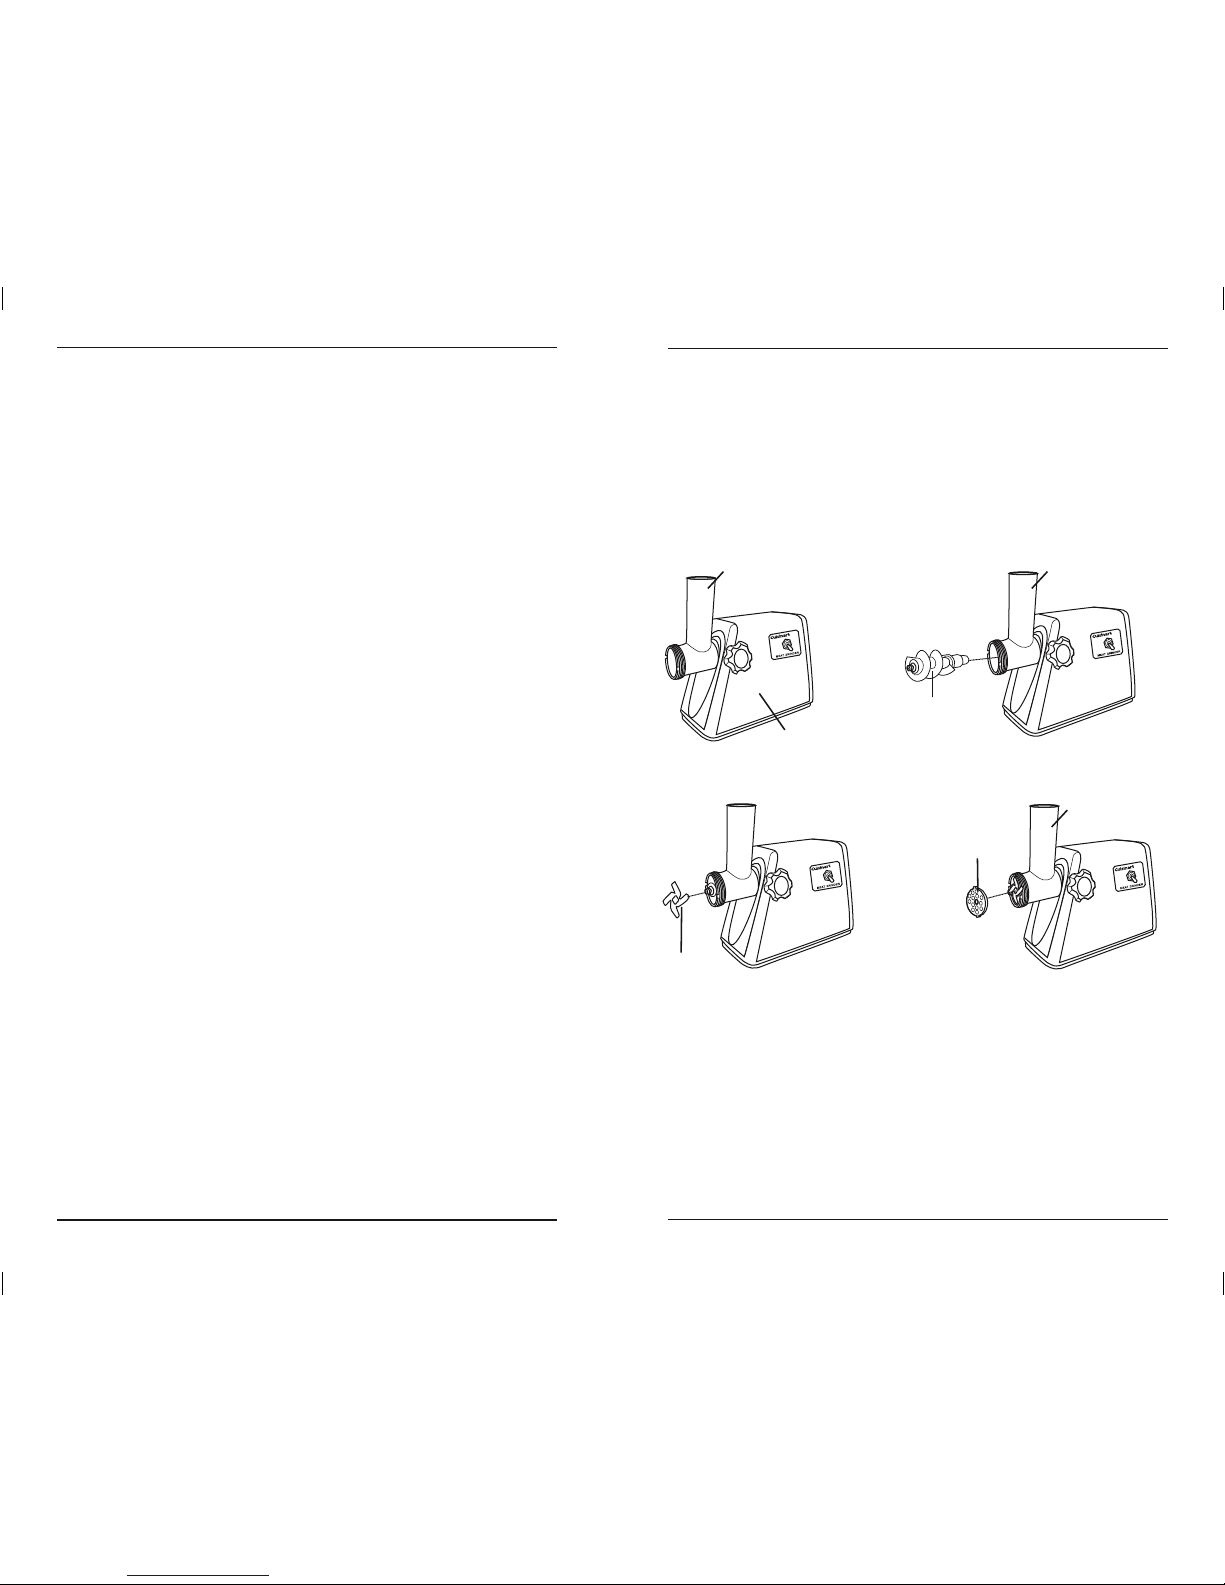
Assemble Cuisinart™ Meat Grinder with
the medium cutting plate. Grind meat,
mixingturkeyandporkevenlywhile
grinding. Ground sausage may be stuffed
into prepared casings or formed into
patties. Fresh sausage should be cooked
within 24 hours or double wrapped and
frozen. Cook thoroughly before serving -
internal temperature should register
170° F (77° C) when tested with an instant
read thermometer.
Nutritional information per suggested serving:
Calories 225 (45% from fat) • carb. 0g •
pro. 30g• fat 11g • sat. fat 4g • chol. 94mg •
sod. 173mg • calc. 14mg • fiber 0g
ITALIAN FENNEL SAUSAGE
Makes 4 pounds (1.8 kg) sausage
4 pounds (1.8 kg) pork butt
6 cloves garlic, peeled and minced
¼ cup (50 ml) Italian parsley leaves,
packed
1-½ tablespoons (25 ml) fennel seeds,
crushed
½ tablespoon (7 ml) oregano
2 teaspoons (10 ml) kosher salt
2 teaspoons (10 ml) freshly ground
pepper
Remove any gristle from meat. Cut into 1 -
inch (2.5 cm) cubes. Place meat in a large
bowl and combine with remaining
ingredients. Cover and refrigerate for at
least 8 and up to 24 hours for best flavour.
Assemble Cuisinart™ Meat Grinder with
Fine or Medium Cutting Plate. Grind
sausage. Stuff sausage into prepared
casings, form into patties or leave loose
as needed. Fresh sausage should be
cooked within 24 hours or double
wrapped and frozen. Cook thoroughly
before serving - internal temperature
should register 160° F (71° C) when tested
with an instant read thermometer.
Nutritional information per suggested serving:
Calories 183 (48% from fat) • carb. 1g •
pro. 22g • fat 9g • sat. fat 3g • chol. 73mg •
sod.244 • calc. 39mg • fiber 0g
ANDOUILLE SAUSAGE
With its distinctly smoky flavour,
traditional Andouille sausage is a
staple of Cajun cookery and an
important ingredient in jambalayas
and gumbos. The unsmoked
version is made in smaller links
and is known as Andouillette.
Makes 3 pounds (1.4 kg)
3 pounds (1.4 kg) boneless pork
butt (may substitute half turkey
for a lighter sausage)
4 - 6 large cloves garlic, peeled and
minced
1 teaspoon (5 ml) browning sauce
such as Gravy Master™
2 teaspoons (10 ml) kosher salt
2 tablespoons (25 ml) sweet
paprika
½-1 tablespoon (7-15 ml) cayenne
pepper, to taste
1 tablespoon (15 ml) onion powder
2 teaspoons (10 ml) dry thyme
½ teaspoon (2 ml) freshly ground
black pepper
½ teaspoon (2 ml) crushed red
pepper
½ teaspoon (2 ml) rubbed sage
¹⁄8teaspoon (0.5 ml) allspice
Remove any gristle from meat. Cut into
1 - inch (2.5 cm) cubes. Place meat in a
large bowl and combine with remaining
ingredients. Cover and refrigerate for at
least 12 and up to 24 hours for best
flavour.
Assemble Cuisinart™ Meat Grinder with
Medium or Large Cutting Plate. Grind
sausage. Stuff sausage into prepared
casings tying off links into desired
lengths. Sausage may then be smoked in
a homestyle smoker. Recommended
smoking temperature is 175° - 200° F
(79° - 93° C), and smoking time should be
4 to 6 hours. Suggested woods for
smoking Andouille are pecan or hickory.
Cook thoroughly before serving - internal
temperature should register 160° F (71° C)
when tested with an instant read
thermometer. The andouille may then be
used as is, sliced thinly as an hors
d’oeuvre, or as an ingredient in jambalaya,
gumbo or other Cajun dish. Smoked
Andouille may be frozen.