CUOGHI Nader Yard Pro Series User manual


A
AA
A
B
BB
B


Table of contents
Table of contentsTable of contents
Table of contents
References (A, B) ................................................................................................................... 2
Symbols used in the manual ................................................................................................... 2
Introduction ............................................................................................................................ 2
Operating principle (B)........................................................................................................ 2
Hot gas defrosting (A,B)...................................................................................................... 2
Installation rules ..................................................................................................................... 3
Condensate drain pipe.......................................................................................................... 3
Positioning ........................................................................................................................... 3
Start-up (B) .......................................................................................................................... 3
Humidistat (optional)...........................................................................................................4
Maintenance ........................................................................................................................... 4
Cleaning the heat exchange coil battery .............................................................................. 4
Storage.................................................................................................................................... 5
Check-up to carry out before and after a long period of inactivity......................................... 5
Before .................................................................................................................................. 5
After..................................................................................................................................... 5
Disposal of the product........................................................................................................... 5
Technical Data........................................................................................................................ 6
Dimensions and weight .......................................................................................................... 6

M510-2, page 2 Dehumidifier model NADER YARD PRO
References (A, B)
1. Humidistat (optional)
2. Relay
3. Compressor
4. Fan
5. Defrost pilot light
6. Defrost solenoid valve
7. Temperature probe
8. General switch
9. Electronic card
10. Air flow
11. Evaporator
12. Condenser
13. Capillary
14. Hour counter (optional)
Symbols used in the manual
SYMBOL MEANING DESCRIPTION
Note Carefully follow the instructions and suggestions given.
Attention ! Generic danger. Not keeping to the instructions could cause damage
to the machine, people or things.
Introduction
The machines of the NADER YARD PRO series are air dehumidifiers aimed at absorbing the humidity from the
environment. They are equipped with a refrigeration circuit, loaded with ecological gas, R407c, equipped
with an electronic controlled defrost system.
Operating principle (B)
The machine uses a fan (4) to suck in the air (10) to be dehumidified and which is passed through the
evaporator (11) of the refrigerator circuit. In this way, the air temperature is lowered below its dew point and
the water vapour condenses into drops of water that are conveyed to the drain by means of the special tray.
The degree of pollution of the water collected is proportional to the degree of environmental pollution. The
air that is so dehumidified is passed through a condenser (12) that raises its temperature to a value that is
slightly higher the initial temperature. In this way the amount of humidity contained in the environmental air
is gradually reduced to the desired value. This also entails lowering the humidity in the walls and floor of
the room, as well as in the materials contained in it.
Hot gas defrosting (A,B)
When the environmental temperature drops below 16°C ice may form on the evaporator coil (11). In the
dehumidifiers of the NADER YARD PRO series the defrosting cycle is automatic, and is controlled by a
temperature probe (7) that detects the presence of ice on the evaporator coil (11). The defrosting phase is
signalled by a yellow pilot light (5) lighting up on the control panel. During this phase the fan (4) is stopped
and the solenoid valve (6) is opened: in this way the compressor sends the hot gas directly into the
evaporation coil battery (11). The duration of the defrosting cycle depends on the environmental conditions
and the amount of ice formed on the evaporator (11).

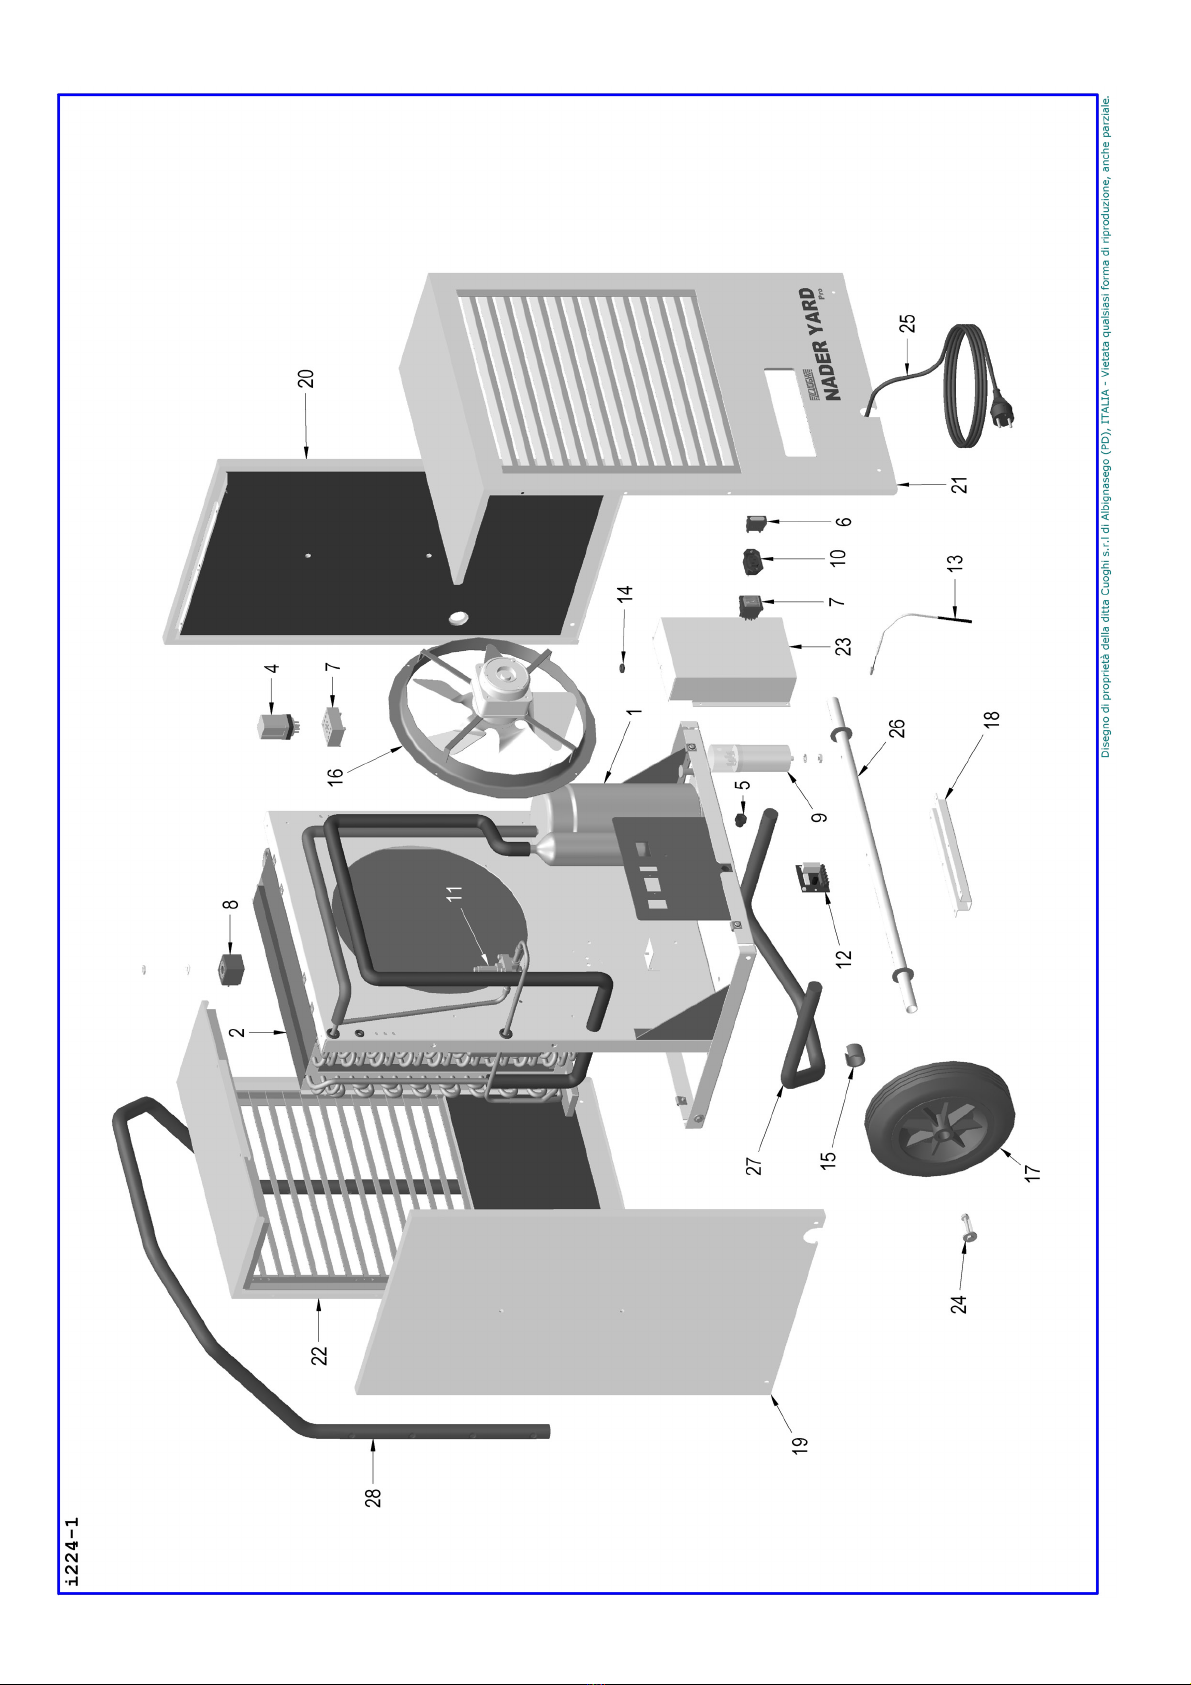
M510-2, page 3 Dehumidifier model NADER YARD PRO
Installation rules
Condensate drain pipe
The only installation required, for the dehumidifier to operate
correctly, is that of the condensate drain pipe: the condensate is
drained continuously through a connection on the right side of the
machine, as shown in Figure 1.
The drain pipe must be positioned so that the water may flow off:
there must not, therefore, be any obstacles along the way, the pipe
must not be kinked and must always have a certain slope, and, at
any rate, it must always be in a position lower than that of the
connection.
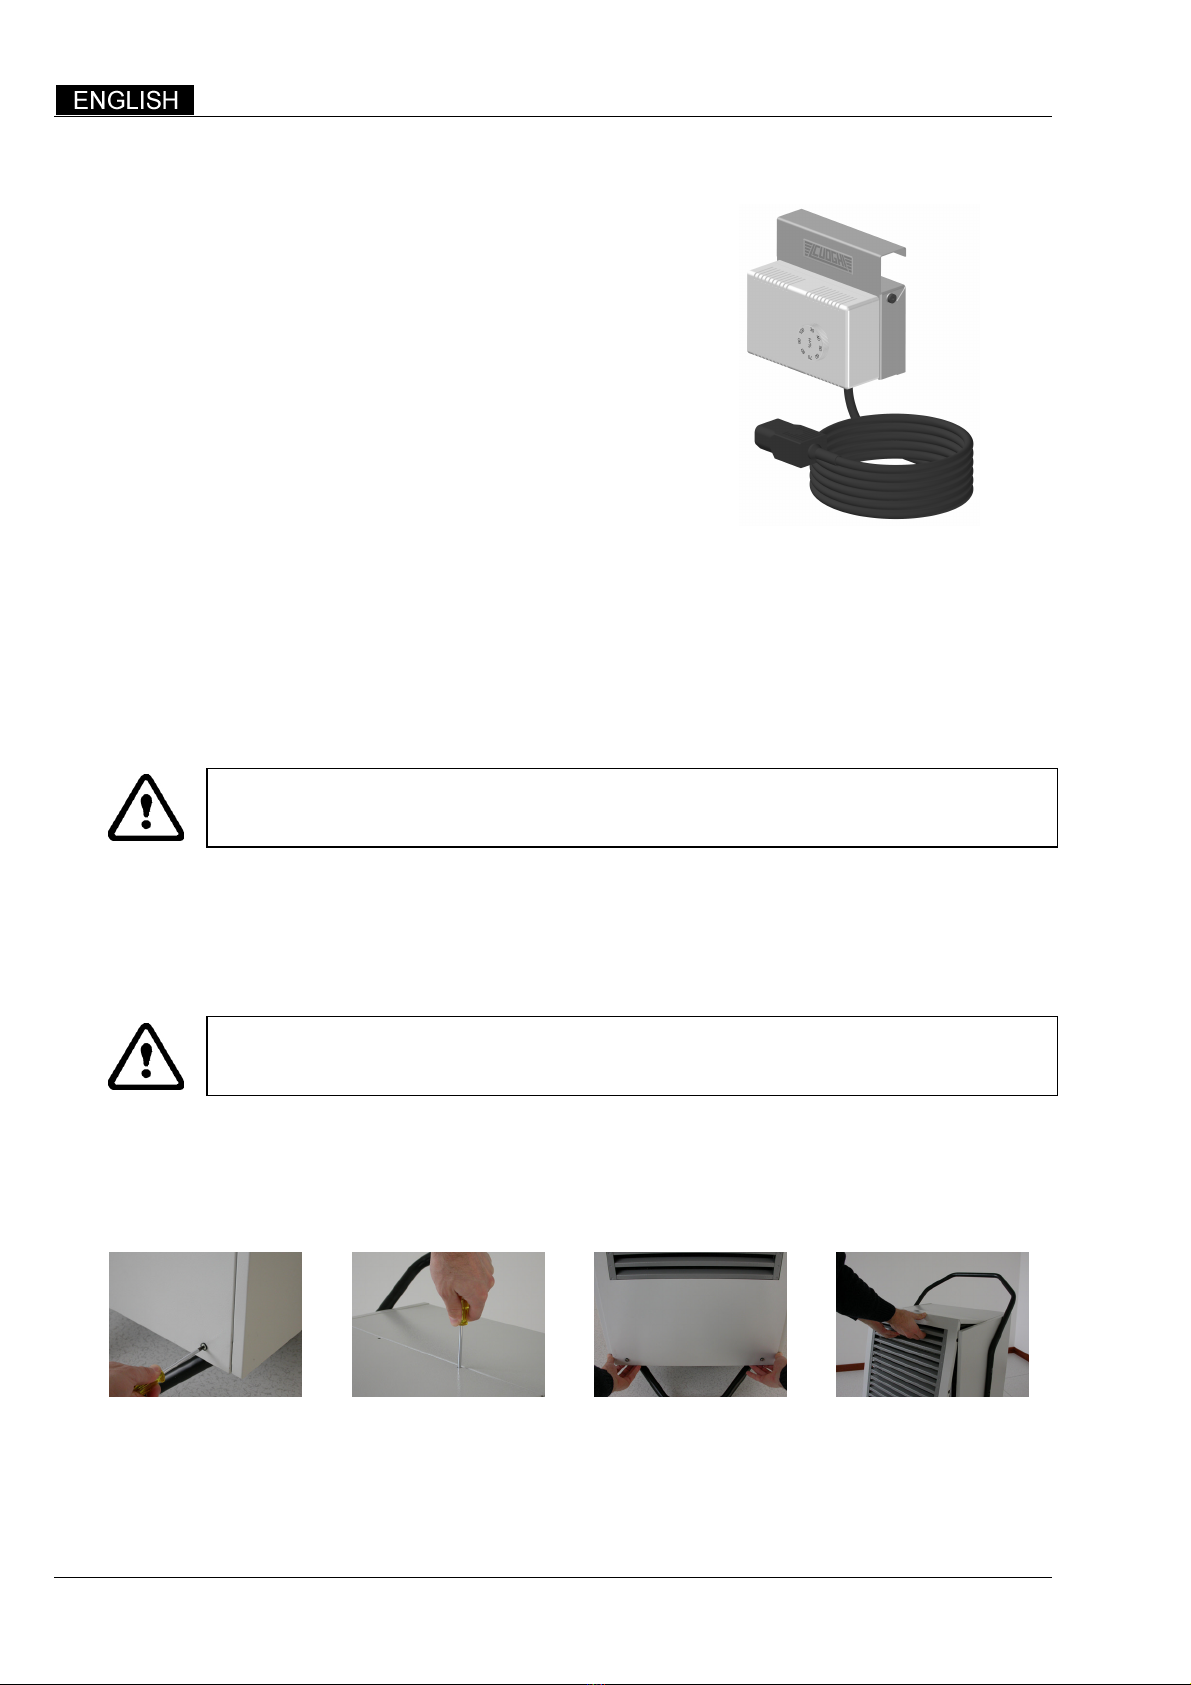
Figure 1 – Condensate drain pipe
Make sure that the water is drained regularly: if a bucket is used to collect the condensate it is
important to remember that it must be emptied regularly to avoid spilling.
Once the drainpipe has been installed, the dehumidifier has only to be placed in the room to be dehumidified
and then started up. For maximum efficiency, respect the following rules:
make sure that the room where the dehumidifier is to be placed in never exceeds the limit conditions
of operation of the machine (Table 1);
the room the dehumidifier is to be placed in must be closed;
the machine must always operate in a vertical position with the wheels facing downwards;
the dehumidifier must be placed in such a way as to leave the air inlet and outlet grids free (at least
10 cm of air space);
make sure that the power supply voltage corresponds to that indicated in Table 1 and that the electric
installation complies with the safety regulations in force;
it is advisable to put the dehumidifier in the coldest part of the room where the humidity normally
collects.
Positioning
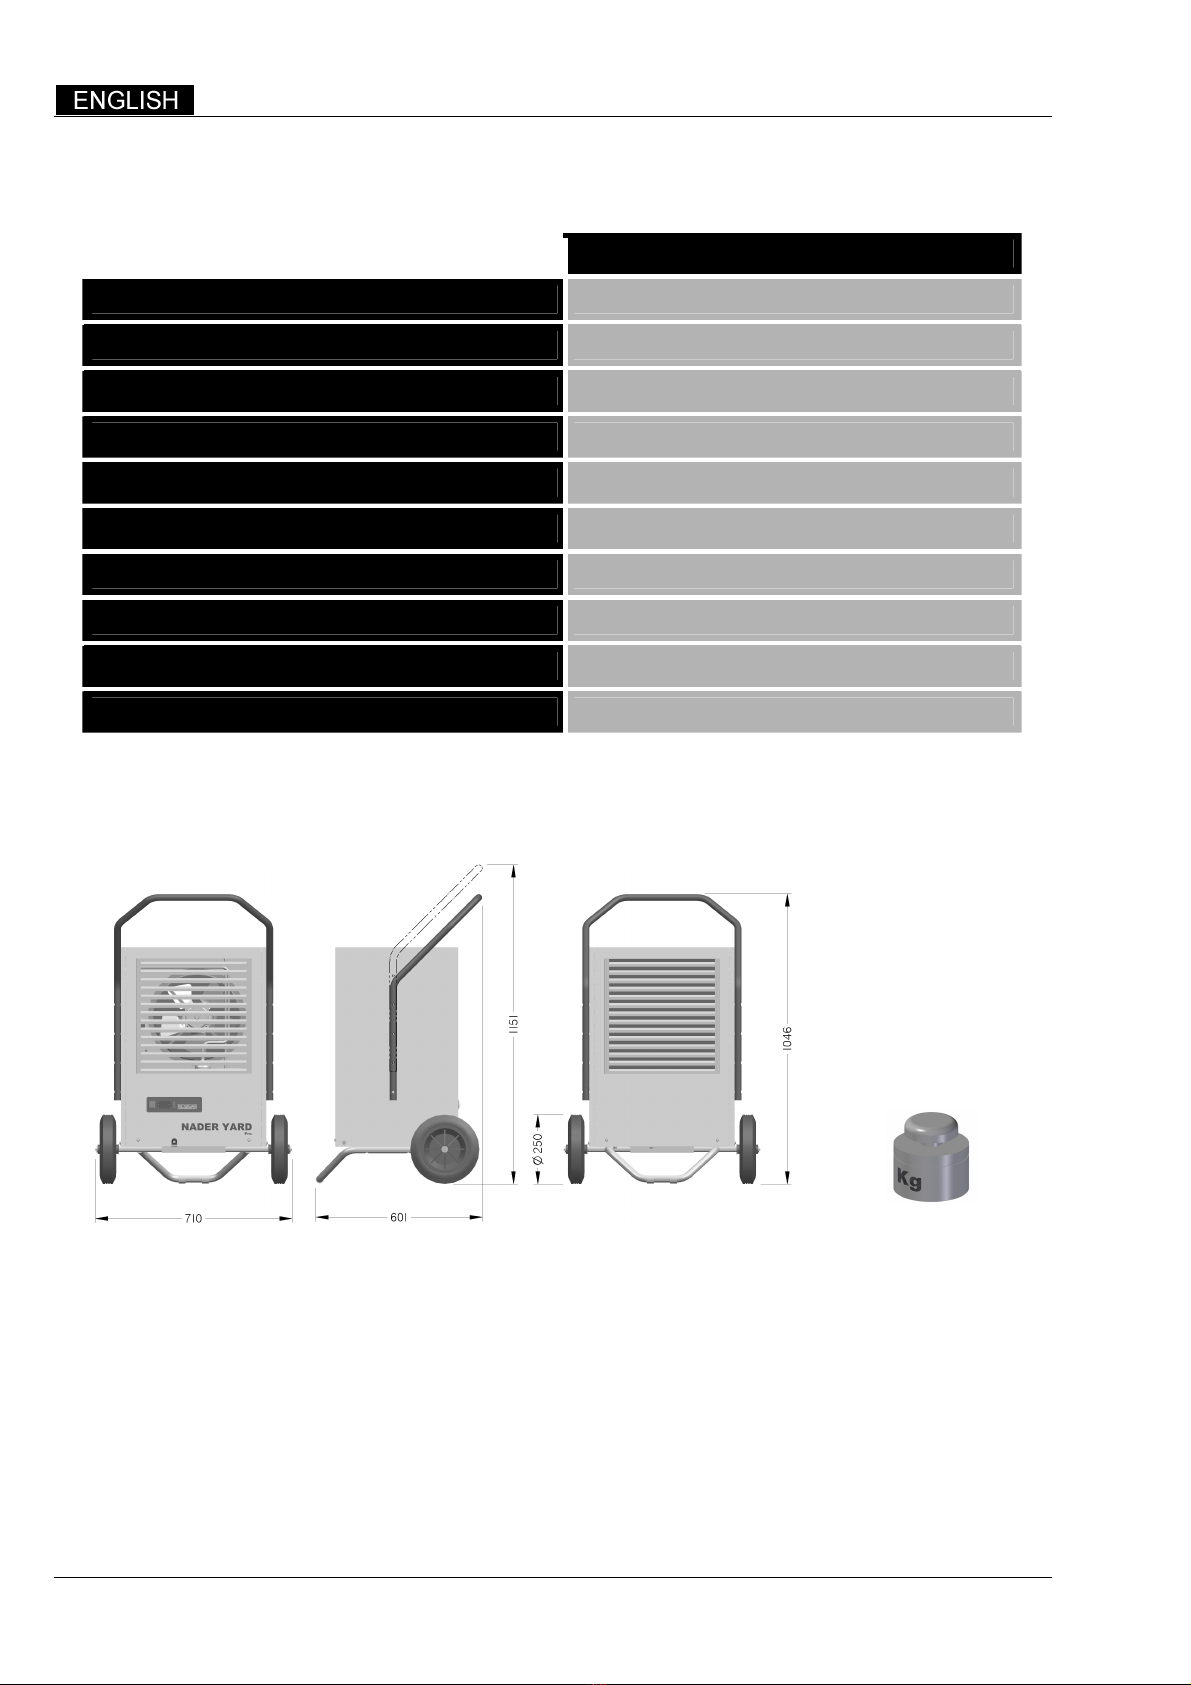
The dehumidifier of the NADER YARD PRO series is fitted with two 250-mm diameter wheels that make it
easy to handle and move, even on rough surfaces: furthermore the handle can be fitted in two different
positions to better adapt to personal needs. If necessary, the machine can easily be lifted from the ground by
using the two handles fitted to it.
NEVER try to lift the machine off the ground by yourself: if it must be lifted there must be at
least two people to do it.
It is advisable to put the dehumidifier near a mains socket.
Start-up (B)
Insert the plug into the 230V, 50Hz grounded socket. Set the general switch (8) to position I. If a humidistat
(optional) is fitted, set the knob to the desired humidity value.

M510-2, page 4 Dehumidifier model NADER YARD PRO
Humidistat (optional)
This optional device allows more accurate control of the
environmental humidity (Figure 2); installation: the humidistat
is simply connected to the dehumidifier by means of the special
socket on the control panel. The humidistat can be hung on the
wall or simply hooked onto the NADER YARD PRO handle.For
installation, see the instruction leaflet that comes with the
humidistat. The advantage of this device is that, when the pre-
set humidity conditions are reached, the machine switches off
and stays in standby, ready to start again, automatically, as soon
as the percentage of humidity starts rising again.
Figure 2 – remote humidistat
Maintenance
The dehumidifier of the NADER YARD PRO series requires no particular maintenance. It is advisable to dust it
and keep the air inlet and outlet grids clean. In case of malfunction or breakdown, get in touch with your
salesman. The power cable has an M-type connection: in case of damage the cable must be replaced with an
original one.
Before carrying out any kind of work or repair on the machine, set the general switch to position
Oand disconnect the power supply plug.
Cleaning the heat exchange coil battery
To guarantee optimal operation of the dehumidifier it is important to always keep the evaporator (11)
condenser (12) coil battery clean: how often this is done depends on the environment in which the
dehumidifier operates and, in particular, on the amount of dust contained in the air. The dehumidifier is pre-
set to facilitate this task to the utmost.
The finned coil battery is potentially dangerous: always wear protective gloves in order to avoid
getting cuts or abrasions from the heat exchanger fins.
The coil battery covering is fixed to the structure with a ¼ turn of the four unlosable crews: a Philips (cross-
tip) screwdriver will be sufficient to remove it (Figure 3 and Figure 4). Loosen the four screws, with a
simple movement detach the lower part of the mantle (Figure 5) and lift it, getting hold of it by the upper
part of the grid (Figure 6). Detach the ground wire connecting the internal part of the mantle to the body.
Figure 3
Figure 4
Figure 5
Figure 6
At this point it is possible to clean the coil battery: it is advisable to use compressed air.

M510-2, page 5 Dehumidifier model NADER YARD PRO
Protect your nose and mouth with the appropriate mask to avoid inhaling the dust when
cleaning with compressed air.
As far as possible, try not to touch the coil battery fins to avoid damaging them.
Once cleaning is done, refit the mantle by following the instructions by working in the reverse order (from
the last to the first), taking special care to re-connect the ground wire to the faston connector on the mantle:
first set down the upper part while at the same time slipping the sides into the appropriate lodgings that
keeps it with the panels.
Storage
Keep the appliance in a room with a temperature between –25°C and +55°C.
When the appliance is still packed keep to the instructions on the box.
Do not place other heavy material on the box.
Check-up to carry out before and after a long period of
inactivity
Before
Switch off the machine and disconnect the plug and empty the condensate collection tank;
cover the machine to protect it from dust.
After
The fan must turn freely without gripping;
put the machine working following this manual’s instructions.
Disposal of the product
The machine is made of different metals; all can be recycled. Its refrigeration circuit is charged with the
ecological refrigerant R407c under HIGH PRESSURE; it also contains synthetic oil. Both the gas and the
oil must not be dispersed in the environment. For the disposal is thus necessary to call a specialized
company.

M510-2, page 6 Dehumidifier model NADER YARD PRO
Technical Data
NADER YARD PRO
Condensate capacity * 48 L/24ore ** 81 L/24ore
Working limit temperatures +2°C / +32°C
Working limit relative humidity 35% ÷ 100%
Air Flow rate 236 L/s (850 m³/ora)
Power supply voltage 230V, 50Hz
Current absorption * 4,1A ** 4,8A
Power absorption * 885W ** 1050W
R407c refrigerating gas charge 1050g
Refrigerating circuit maximum pressure 2300kPa
Noise level at 1 m distance 60dBA
* 25°C, 65%U.R. ** 30°C, 80%U.R. Table 1
Dimensions and weight
61,1
Table of contents
Other CUOGHI Dehumidifier manuals
Popular Dehumidifier manuals by other brands

Wood’s
Wood’s MRD20 Silent operating instructions

DeLonghi
DeLonghi DEC 21 instruction manual

Fedders
Fedders 23-23-0466N-001 Installation, operation & maintenance instructions

Olimpia splendid
Olimpia splendid AQUARIA 18 P Instructions for installation, use and maintenance

Haier
Haier HM50E Use & care book

Magnavox
Magnavox D-60ES owner's manual