Cutler-Hammer Digitrip 220 User manual

Effective 2/2/2001
Page 1I.L. 70C1037H03
1.0 General Description of Digitrip Trip Units ................. 2
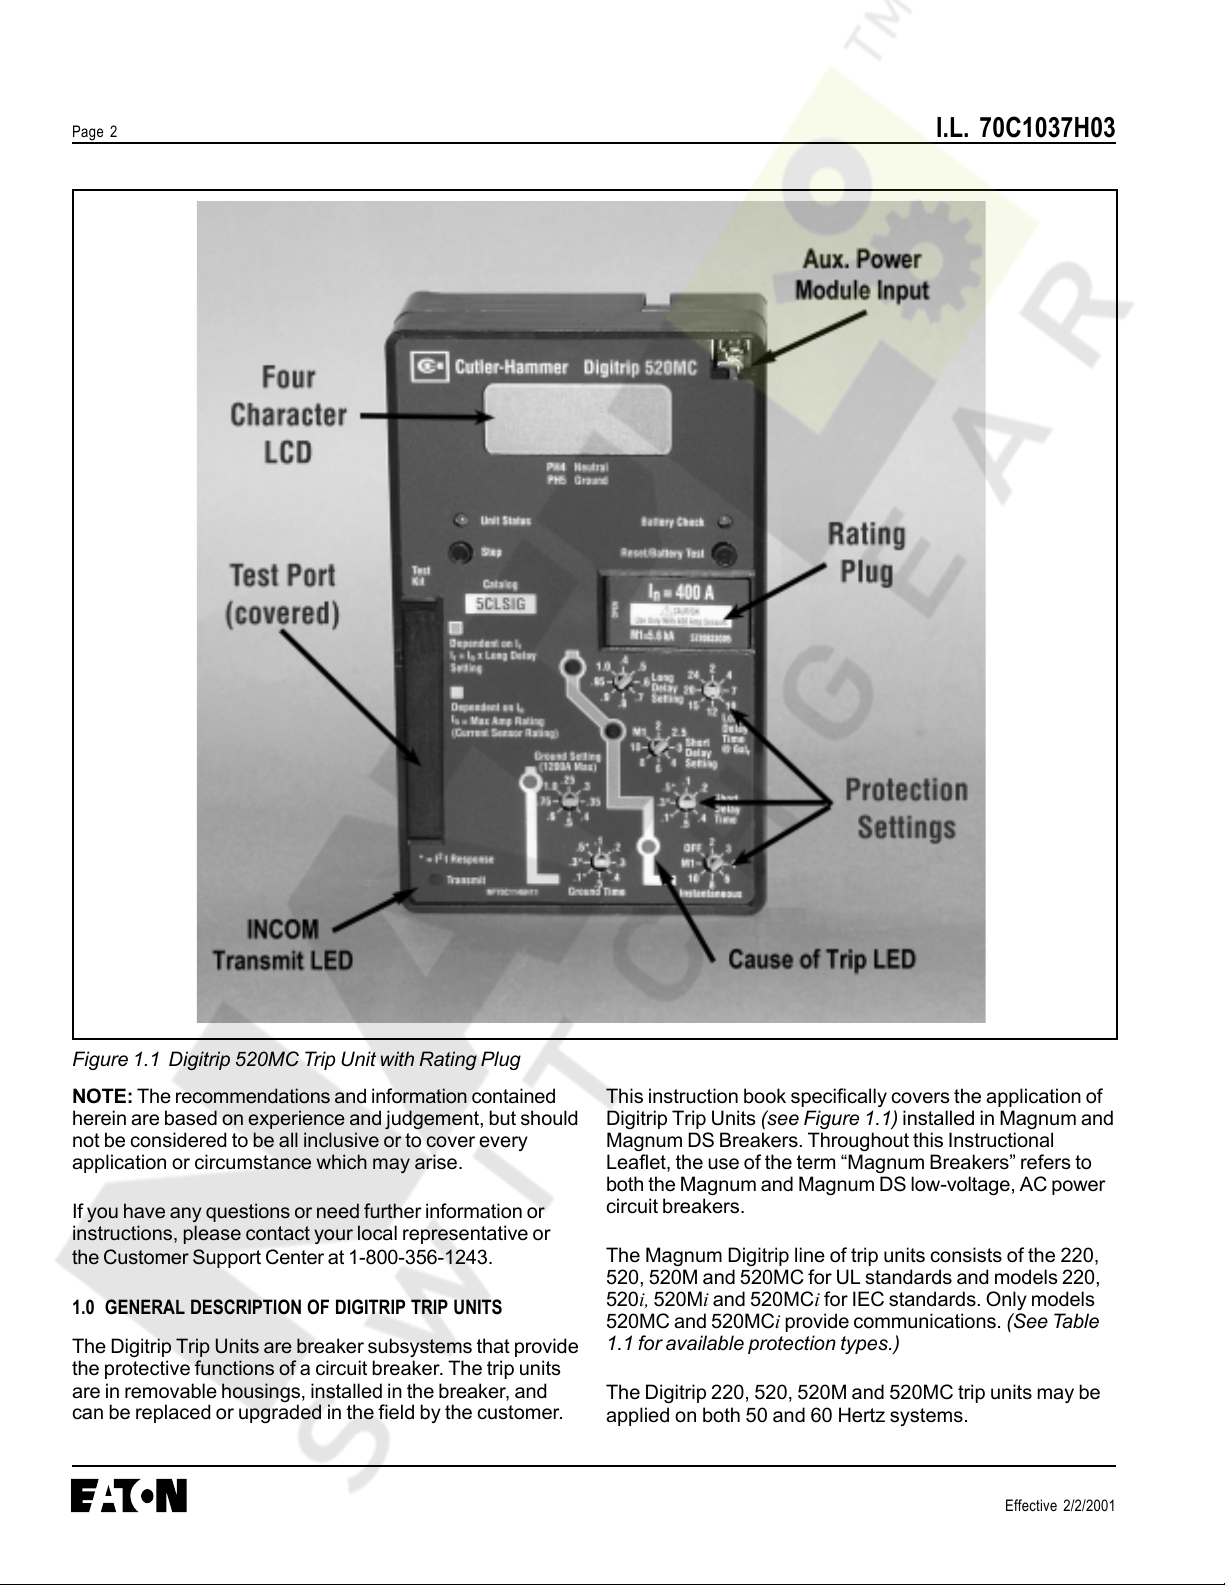
1.1 Protection ............................................................... 4
1.2 Mode of Trip and Status Information ........................ 4
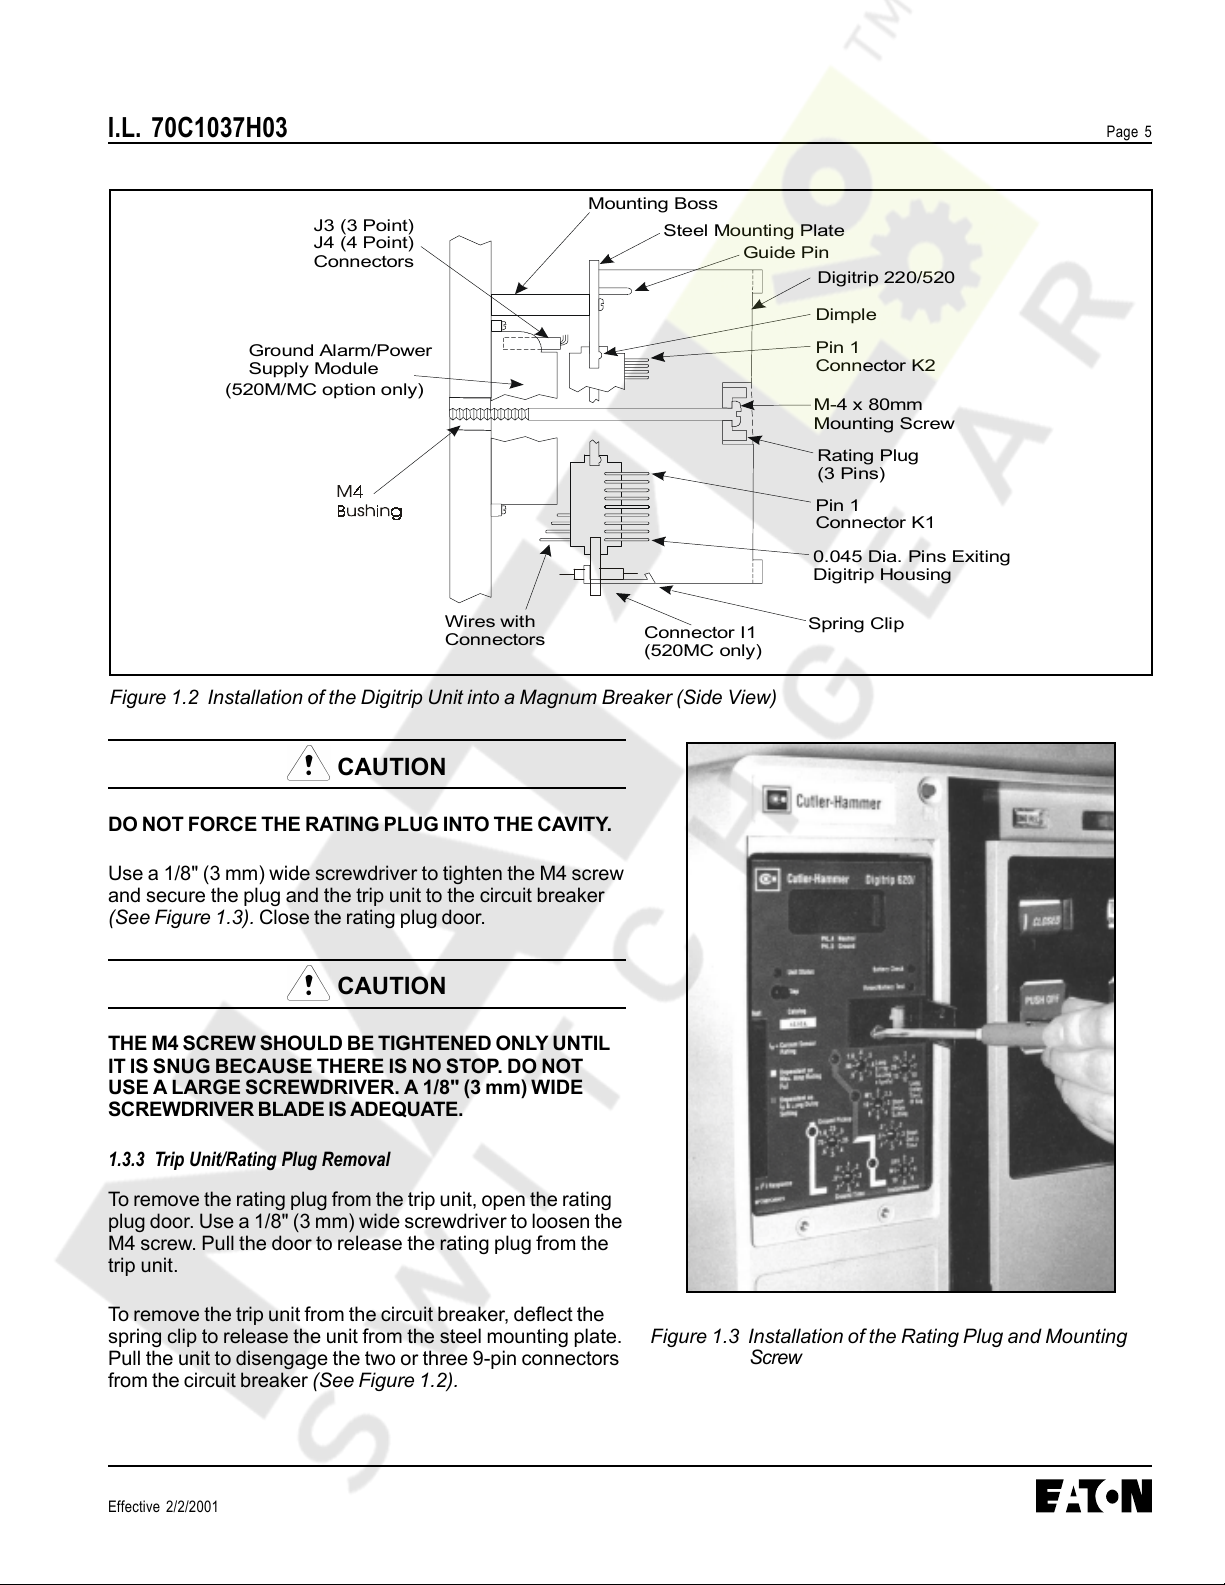
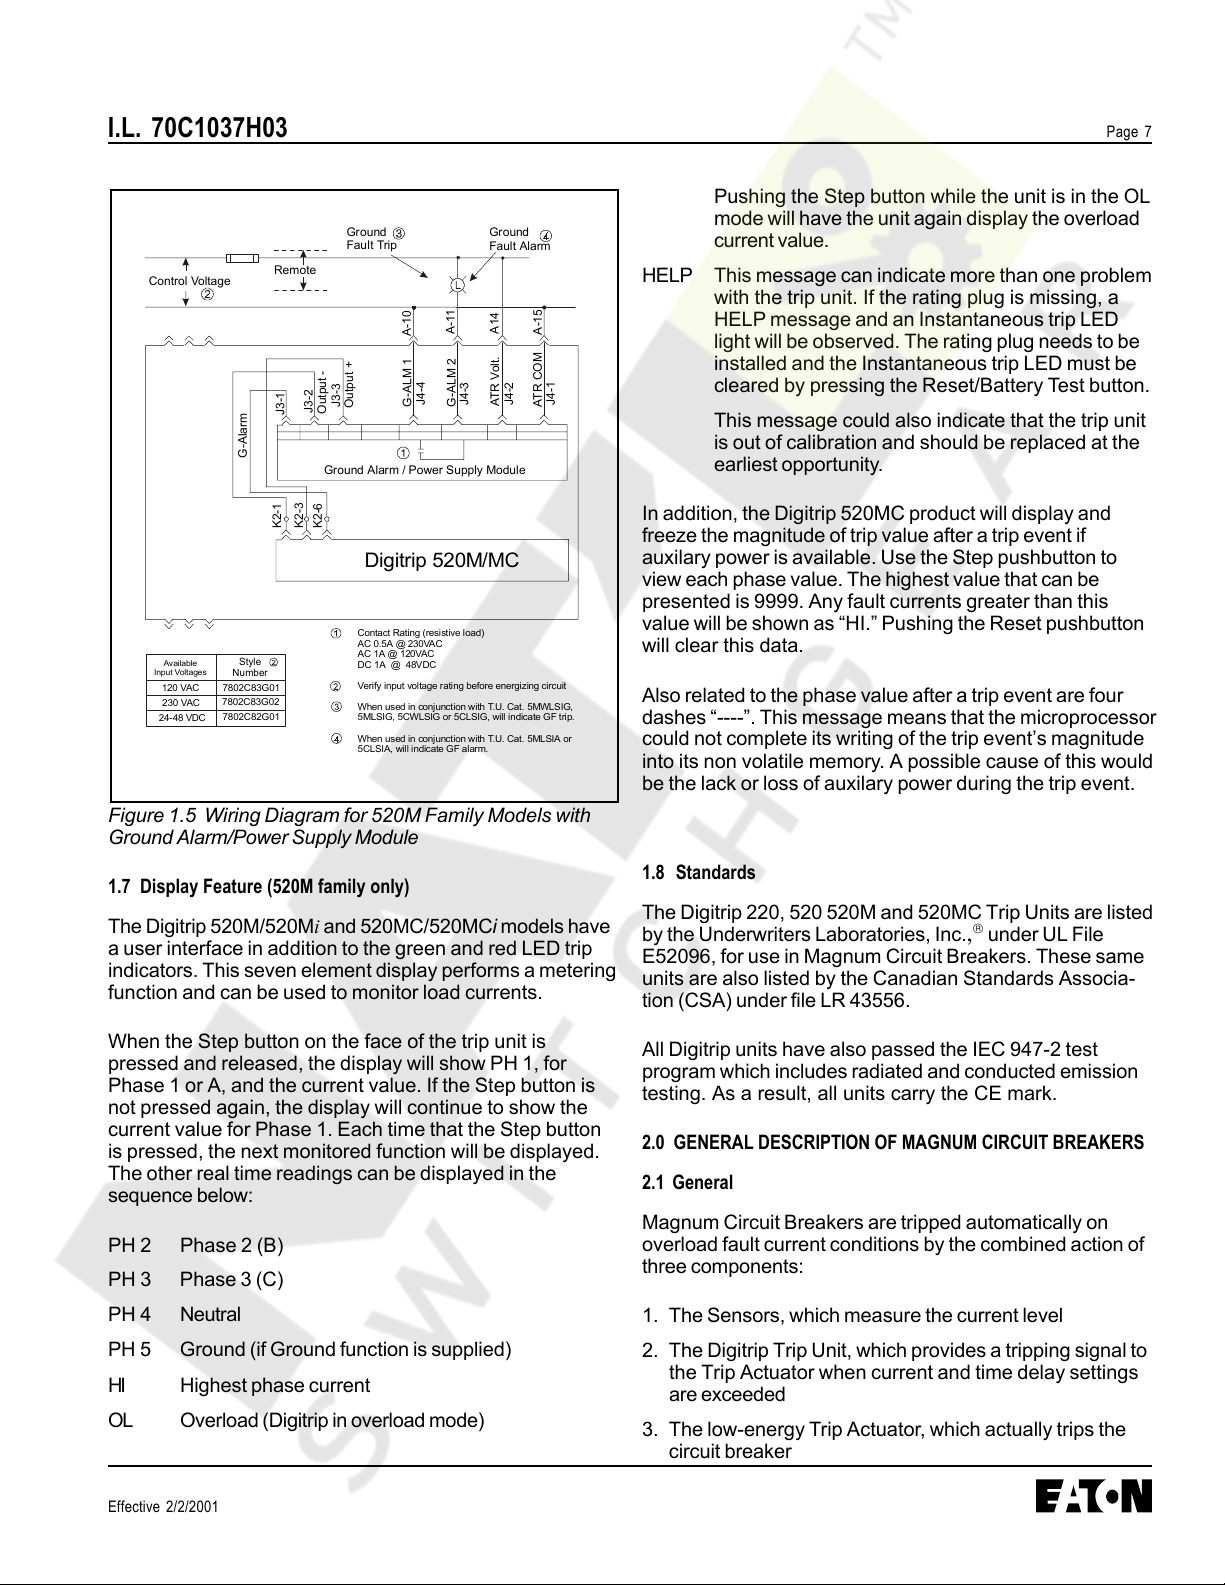
1.3 Installation and Removal .......................................... 4
1.3.1 Installation of the Trip Unit ............................ 4
1.3.2 Rating Plug Installation ................................ 4
1.3.3 Trip Unit/Rating Plug Removal ...................... 5
1.4 Wiring ..................................................................... 6
1.5 Plexiglass Cover ..................................................... 6
1.6 Ground Alarm/Power Supply Module
(520M & 520MC Models only) ................................. 6
1.6.1 Auxiliary Power ............................................ 6
1.6.2 Ground Alarm .............................................. 6
1.6.3 Ground Fault Trip ......................................... 6
1.6.4 Ground Fault Alarm ...................................... 6
1.7 Display Feature (520M family only) ......................... 7
1.8 Standards ............................................................... 7
2.0 General Description of
Magnum Circuit Breakers ........................................ 7
2.1 General ................................................................... 7
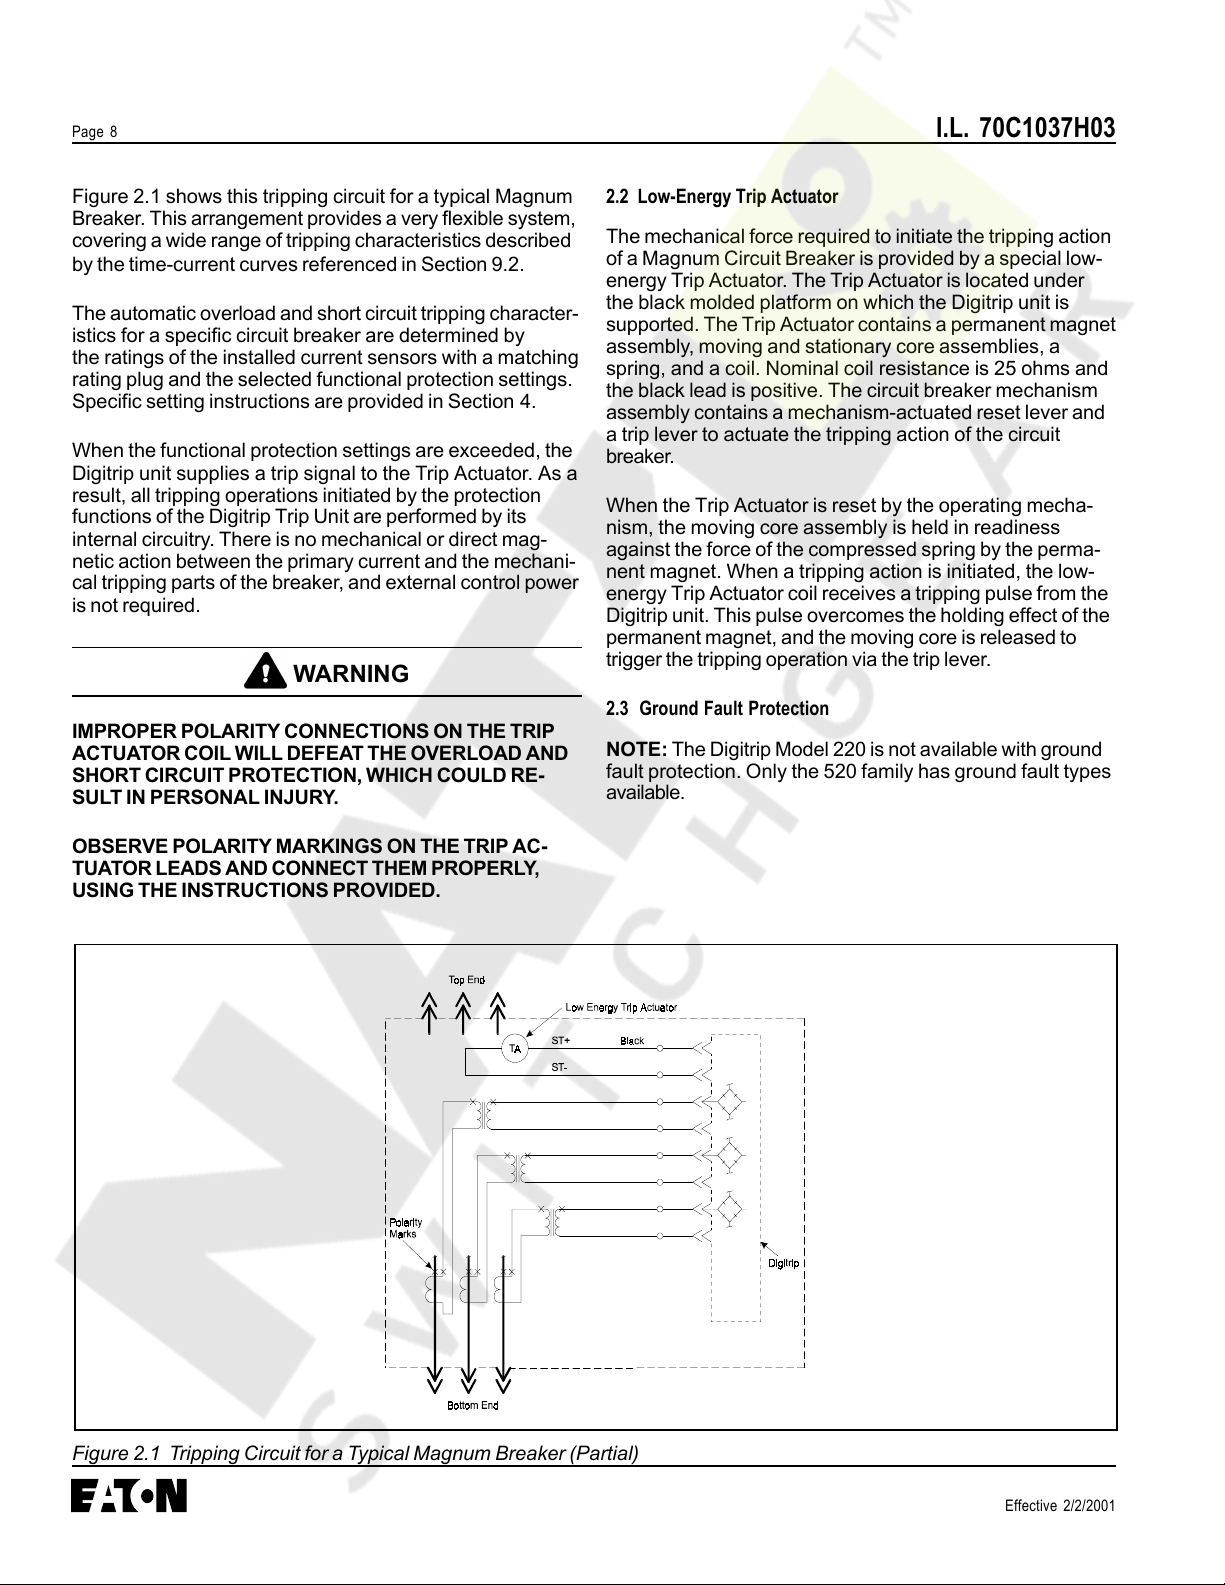
2.2 Low Energy Trip Actuator ........................................ 8
2.3 Ground Fault Protection .......................................... 8
2.3.1 General ........................................................ 9
2.3.2 Residual Sensing ......................................... 9
2.3.3 Source Ground Sensing ............................... 9
2.3.4 Zero Sequence Sensing ............................... 9
2.3.5 Multiple Source/Multiple Ground .................. 9
2.3.6 Ground Fault Settings .................................. 9
2.4 Current Sensors (Magnum Frames less than
or equal to 3200A) ................................................. 10
2.5 Current Sensors (Magnum Frames greater
than 3200A) .......................................................... 10
3.0 Principles of Operation .......................................... 10
3.1 General ................................................................. 10
3.2 Trip and Operation Indicators ................................. 15
3.3 Making Current Release ........................................ 15
3.4 Zone Interlocking (520 family only) ........................ 15
4.0 Protection Settings ............................................... 20
4.1 General ................................................................. 20
4.2 Long Delay Current Setting ................................... 20
4.3 Long Delay Time Setting ....................................... 20
4.4 Short Delay Current Setting................................... 21
4.5 Short Delay Time Setting ...................................... 21
4.6 Instantaneous Current Setting ............................... 21
4.7 Ground Fault Current Setting ................................. 22
4.8 Ground Fault Time Delay Setting .......................... 22
4.9 INCOM Communications (520MC model only) ....... 22
4.9.1 Breaker Interface Module (BIM) .................. 22
4.9.2 Remote Master Computer .......................... 23
4.9.3 INCOM Network Interconnections ............... 23
5.0 Test Procedures .................................................... 24
5.1 General ................................................................. 24
5.2 When to Test ........................................................ 24
5.3 Functional Field Testing ........................................ 24
5.3.1 Field Test Kit ............................................... 24
5.3.2 Handheld Functional Test Kit ...................... 25
5.3.2.1 Description of Handheld Test Kit ...... 25
5.3.2.2 Test Procedure ................................ 25
5.3.2.3 Currents .......................................... 25
5.3.2.4 Batteries ......................................... 25
5.4 Performance Testing for Ground Fault
Trip Units - Primary Injection ................................. 25
5.4.1 Code Requirements ................................... 25
5.4.2 Standards Requirements ............................ 25
5.4.3 General Test Instructions ........................... 25
6.0 Battery ................................................................. 26
6.1 General ................................................................. 26
6.2 Battery Check ....................................................... 26
6.3 Battery Installation and Removal ........................... 27
7.0 Frame Ratings
(Sensor Ratings and Rating Plugs) ................. 10, 27
8.0 Record Keeping .................................................... 28
9.0 References ............................................................ 28
9.1 Magnum and Magnum DS Circuit Breakers ........... 28
9.2 Time-Current Curves .............................................. 28
Appendix A Zone Interlocking Examples ....................... 32
Appendix B Troubleshooting Guide ................................ 34
Appendix C Typical Breaker Master
Connection Diagram .............................................. 36
WARNING
DO NOT ATTEMPT TO INSTALL OR PERFORM
MAINTENANCE ON EQUIPMENT WHILE IT IS
ENERGIZED. DEATH OR SEVERE PERSONAL INJURY
CAN RESULT FROM CONTACT WITH ENERGIZED
EQUIPMENT. ALWAYS VERIFY THAT NO VOLTAGE IS
PRESENT BEFORE PROCEEDING. ALWAYS FOLLOW
SAFETY PROCEDURES. CUTLER-HAMMER IS NOT
LIABLE FOR THE MISAPPLICATION OR
MISINSTALLATION OF ITS PRODUCTS.
WARNING
OBSERVE ALL RECOMMENDATIONS, NOTES, CAU-
TIONS, AND WARNINGS RELATING TO THE SAFETY
OF PERSONNEL AND EQUIPMENT. OBSERVE AND
COMPLY WITH ALL GENERAL AND LOCAL HEALTH
AND SAFETY LAWS, CODES, AND PROCEDURES.
I.L. 70C1037H03
Instructions for Digitrip Models 220, 520, 520i, 520M,
520Mi, 520MC and 520MCiTrip Units for use only in
Cutler-Hammer Magnum and Magnum DS Circuit Breakers
Table of Contents
G
*
Cutler
-
Hammer
F
;
T
*
N
Courtesy of NationalSwitchgear.com

Effective 2/2/2001
Page 2 I.L. 70C1037H03
NOTE: The recommendations and information contained
herein are based on experience and judgement, but should
not be considered to be all inclusive or to cover every
application or circumstance which may arise.
If you have any questions or need further information or
instructions, please contact your local representative or
the Customer Support Center at 1-800-356-1243.
1.0 GENERAL DESCRIPTION OF DIGITRIP TRIP UNITS
The Digitrip Trip Units are breaker subsystems that provide
the protective functions of a circuit breaker. The trip units
are in removable housings, installed in the breaker, and
can be replaced or upgraded in the field by the customer.
This instruction book specifically covers the application of
Digitrip Trip Units (see Figure 1.1) installed in Magnum and
Magnum DS Breakers. Throughout this Instructional
Leaflet, the use of the term “Magnum Breakers” refers to
both the Magnum and Magnum DS low-voltage, AC power
circuit breakers.
The Magnum Digitrip line of trip units consists of the 220,
520, 520M and 520MC for UL standards and models 220,
520i, 520Miand 520MCifor IEC standards. Only models
520MC and 520MCiprovide communications. (See Table
1.1 for available protection types.)
The Digitrip 220, 520, 520M and 520MC trip units may be
applied on both 50 and 60 Hertz systems.
Figure 1.1 Digitrip 520MC Trip Unit with Rating Plug
F
:
T
»
N
Courtesy of NationalSwitchgear.com

Effective 2/2/2001
Page 3I.L. 70C1037H03
Table 1.1 Protection Types Available for Digitrip Trip Units
Notes: 1. Limited to 1200 Amperes; this is only for UL versions, not for IEC models.
2. Four cause of trip LEDs–L, S, I, G. Making Current Release is indicated by the Instantaneous LED.
3. Requires Ground Alarm/Power Supply Module (see Section 1.6).
4. Additional setting is marked M1 where:
800-3200A Frame: M1 = 14 x /n for Plug Amps 200 through 1250A
M1 = 12 x /n for Plug Amps 1600, 2000, 2500A
M1 = 10 x /n for Plug Amps 3000, 3200A
4000-6300A Frame: M1 = 14 x /n for Plug Amps 2000, 2500A
M1 = 12 x /n for Plug Amps 3200, 4000, 5000A (see Section 2.5)
M1 = 10 x /n for Plug Amps 6300A
5. ZSI = Zone Selective Interlock (See Section 3.4)
Digitrip Trip Unit Type 220 520/520i520M/520Mi520MC/520MCi
Ampere Range 200A-3200A 200A-6300A 200A-6300A 200A-6300A
RMS Sensing Yes Yes Yes Yes
Communications No No No Yes3
Protection and Coordination
Protection Ordering Options
Fixed Rating Plug (In)
Overtemperature Trip
LI
Yes
Yes
LSI,LSIG/WLSIG
Yes
Yes
MLSI,MLSIG,
MLSIA/MWLSIG
Yes
Yes
CLSI, CLSIG,
CLSIA/CWLSIG
Yes
Yes
Long Long Delay Setting
Delay Long Delay Time I2t at 6 x (Ir)
Protection Long Delay Thermal Memory
Fixed @ 1 x (In)
Fixed @ 10 seconds
Yes
0.4-1.0 x (In)
2-24 Seconds
Yes
0.4-1.0 x (In)
2-24 Seconds
Yes
0.4-1.0 x (In)
2-24 Seconds
Yes
Short Short Delay Pick-Up4
Delay Short Delay Time I2t at 8 x (Ir)
Protection Short Delay Time FLAT
Short Delay Time ZSI5
No
No
No
No
200-1000% x (Ir)
100-500 ms
100-500 ms
Yes
200-1000% x (Ir)
100-500 ms
100-500 ms
Yes
200-1000% x (Ir)
100-500 ms
100-500 ms
Yes
Instan- Instantaneous Pick-Up4
taneous Off Position
Protection Making Current Release
200-1000% x (In)
No
Yes
200-1000% x (In)
Yes
Yes
200-1000% x (In)
Yes
Yes
200-1000% x (In)
Yes
Yes
Ground Ground Fault Option
(Earth) Ground Fault Alarm
Fault Ground Fault Pick-Up
Protection Ground Fault Delay I2t at .625 x (In)
Ground Fault Delay Flat
Ground Fault ZSI5
Ground Fault Memory
No
No
No
No
No
No
No
Yes
No
25-100% x (In)1
100-500 ms
100-500 ms
Yes
Yes
Yes
Yes3
25-100% x (In)1
100-500 ms
100-500 ms
Yes
Yes
Yes
Yes
25-100% x (In)1
100-500 ms
100-500 ms
Yes
Yes
System Diagnostics
Status/Long Pick-up LED
Cause of Trip LEDs
Yes
No
Yes
Yes2
Yes
Yes2
Yes
Yes2
Remote Ground Trip/Alarm Contacts No No Yes3Yes
System Metering
Digital Display No No 4 Char. LCD 4 Char. LCD
F
:
T
*
N
Courtesy of NationalSwitchgear.com

Effective 2/2/2001
Page 4 I.L. 70C1037H03
All trip unit models are microprocessor-based ac protec-
tion devices that provide true RMS current sensing for the
proper coordination with the thermal characteristics of
conductors and equipment. The primary function of the
Digitrip Trip Unit is circuit protection. The Digitrip analyzes
the secondary current signals from the circuit breaker
current sensors and, when preset current levels and time
delay settings are exceeded, will send an initiating trip
signal to the Trip Actuator of the circuit breaker.
In addition to the basic protection function, the Digitrip 520
family of trip units provides mode of trip information such
as:
•Long Time trip (overload)
•Short Time trip
•Instantaneous trip
•Ground (Earth) Fault trip (if supplied).
The current sensors provide operating power to the trip
unit. As current begins to flow through the breaker, the
sensors generate a secondary current which powers the
trip unit.
The Digitrip 520 family of trip units provides five phase and
two ground (time-current) curve shaping adjustments. To
satisfy the protection needs of any specific installation, the
exact selection of the available protection function adjust-
ments is optional. The short delay and ground fault pick-up
adjustments can be set for either FLAT or I2t response. A
pictorial representation of the applicable time-current
curves for the selected protection functions is provided, for
user reference, on the face of the trip unit as shown in
Figure 1.1.
1.1 Protection
Each trip unit is completely self-contained and requires no
external control power to operate its protection systems. It
operates from current signal levels derived through current
sensors mounted in the circuit breaker. The types of
protection available for each model are shown in Table 1.1
and Figures 3.2.1 through 3.4.4.
NOTE: The Digitrip 220 (LI model), 520 (LSI model), 520M
(MLSI model) and 520MC (CLSI model) can be used on 3-
pole or 4-pole circuit breakers for the protection of the
neutral circuit. Only these four models can provide neutral
protection, although models MLSIA,MLSIG, MWLSIG,
CLSIA, CLSIG and CWLSIG and can provide neutral
metering (see Figures 3.7, 3.8, and 3.9). Refer to the
National Electric Code (NEC) for the appropriate applica-
tion for 4-pole breakers.
1.2 Mode of Trip and Status Information
On all models, a green light emitting diode (LED), labeled
Status, blinks approximately once each second to indicate
that the trip unit is operating normally. This Status LED will
also blink at a faster rate if the Digitrip is in a pick-up, or
overload, mode.
Red LEDs on the face of the 520 family of trip units (for
Long Delay, Short Delay, and Instantaneous) flash to
indicate the cause, or trip mode, for an automatic trip
operation (for example, ground fault, overload, or short
circuit trip). A battery in the Digitrip unit maintains the trip
indication until the Reset/Battery Test button is pushed.
The battery is satisfactory if its LED lights green when the
Battery Check button is pushed (See Section 6).
NOTE: The Digitrip 520 family provides all protection
functions regardless of the status of the battery. The
battery is only needed to maintain the automatic trip
indication.
1.3 Installation and Removal
1.3.1 Installation of the Trip Unit
Align the Digitrip unit with the guide pins and spring clip of
the Magnum Circuit Breaker. Press the unit into the
breaker until the pins on the trip unit seat firmly into the
connector housing and the unit clicks into place (See
Figure 1.2).
1.3.2 Rating Plug Installation
WARNING
DO NOT ENERGIZE THE MAGNUM BREAKER WITH
THE DIGITRIP REMOVED OR DISCONNECTED FROM
ITS CONNECTOR. DAMAGE TO INTERNAL CURRENT
TRANSFORMERS MAY OCCUR DUE TO AN OPEN
CIRCUIT CONDITION.
CAUTION
IF A RATING PLUG IS NOT INSTALLED IN THE TRIP
UNIT, THE UNIT WILL TRIP WHEN IT IS ENERGIZED.
Insert the rating plug into the cavity on the right-hand side
of the trip unit. Align the three pins on the plug with the
sockets in the cavity. The plug should fit with a slight
insertion force.
F
:
T
»
N
Courtesy of NationalSwitchgear.com

Effective 2/2/2001
Page 5I.L. 70C1037H03
CAUTION
DO NOT FORCE THE RATING PLUG INTO THE CAVITY.
Use a 1/8" (3 mm) wide screwdriver to tighten the M4 screw
and secure the plug and the trip unit to the circuit breaker
(See Figure 1.3). Close the rating plug door.
CAUTION
THE M4 SCREW SHOULD BE TIGHTENED ONLY UNTIL
IT IS SNUG BECAUSE THERE IS NO STOP. DO NOT
USE A LARGE SCREWDRIVER. A 1/8" (3 mm) WIDE
SCREWDRIVER BLADE IS ADEQUATE.
1.3.3 Trip Unit/Rating Plug Removal
To remove the rating plug from the trip unit, open the rating
plug door. Use a 1/8" (3 mm) wide screwdriver to loosen the
M4 screw. Pull the door to release the rating plug from the
trip unit.
To remove the trip unit from the circuit breaker, deflect the
spring clip to release the unit from the steel mounting plate.
Pull the unit to disengage the two or three 9-pin connectors
from the circuit breaker (See Figure 1.2).
Figure 1.2 Installation of the Digitrip Unit into a Magnum Breaker (Side View)
Figure 1.3 Installation of the Rating Plug and Mounting
Screw
(520M/MC option only)
Ground Alarm/Power
Supply Module
J3 (3 Point)
J4 (4 Point)
Connectors
Mountin
g
Boss
Steel Mountin
g
Plate
Guide Pin
Dimple
Pin 1
Connector K2
M-4 x 80mm
Mounting Screw
Pin 1
Connector K1
Rating Plug
(3 Pins)
0.045 Dia. Pins Exitin
g
Digitrip Housing
Spring Clip
Wires with
Connectors
Digitrip 220/520
Connector I1
(520MC only)
f
f
F
:
T
*
N
Courtesy of NationalSwitchgear.com

Effective 2/2/2001
Page 6 I.L. 70C1037H03
1.4 Wiring
The internal components of the breaker, and how they are
wired out to the breaker secondary contacts, are shown in
the breaker master connection diagram provided as
Appendix C.
1.5 Plexiglass Cover
A clear, tamper-proof, plexiglass door sits on the breaker
cover. This door allows the settings to be viewed but not
changed, except by authorized personnel. The plexiglass
cover meets applicable tamper-proof requirements. The
cover is held in place by two cover screws. Security is
insured by the insertion of a standard meter seal through
the holes in both of the cover retention screws. The
plexiglass cover has an access hole for the Step and
Reset/Battery test pushbuttons.
1.6 Ground Alarm/Power Supply Module (520M/MC Models only)
The Ground Alarm/Power Supply Module (See Figure 1.4)
is an optional accessory for the Digitrip 520M, 520Mi and
is a required accessory to enable communications on the
Digitrip 520MC and 520MCimodels. The module can be
installed beneath the metal mounting plate of the trip unit
in the Magnum Circuit Breaker. The module covers the
following input voltage ratings: 120 VAC (7802C83G01),
230 VAC (7802C83G02), and 24-48 VDC (7802C82G01).
The burden of the Power/Relay Module is 10VA.
1.6.1 Auxiliary Power
When the module is wired as shown in Figure 1.5, it will
provide an auxiliary power supply so that the 520M/520Mi
or 520MC/520MCi liquid crystal display (LCD) will be
functional even when the circuit breaker has no load. A
Digitrip 520M or 520MC tripunit without auxiliary power
will not display data until load current reaches approxi-
mately 30% 1 phase or 10% 3 phase of the (In) rating.
1.6.2 Ground Alarm
A second function of the module is to provide either a
ground trip or ground alarm only output contact via the
relay supplied in the module. On Digitrip 520M models with
ground fault protection, an LED on the front of the unit also
provides an indication of ground fault trip.
1.6.2.1 Ground Fault Trip
When the Ground Alarm/Power Supply module is used
with the MLSIG model, this unit will provide ground fault
trip contacts when the circuit breaker trips on a ground
fault. You must then push the Reset button on the Digitrip
in order to reset the contacts (See Figure 1.5, Note 3).
Figure 1.4 Ground Alarm/Power Supply Module for the
520M or 520MC Trip Units
1.6.2.2 Ground Fault Alarm
A ground fault alarm alerts a user to a ground fault condi-
tion without tripping the circuit breaker. A red Alarm Only
LED on the front of the trip unit will indicate the presence
of a ground fault condition that exceeds the programmed
setting.
The ground fault alarm relay is energized when the ground
current continuously exceeds the ground fault pickup
setting for a time in excess of a 0.1 second delay. The
alarm relay will reset automatically if the ground current is
less than the ground fault pickup (See Figure 1.5, Note 4).
F
:
T
»
N
Courtesy of NationalSwitchgear.com

Effective 2/2/2001
Page 7I.L. 70C1037H03
Figure 1.5 Wiring Diagram for 520M Family Models with
Ground Alarm/Power Supply Module
1.7 Display Feature (520M family only)
The Digitrip 520M/520Miand 520MC/520MCimodels have
a user interface in addition to the green and red LED trip
indicators. This seven element display performs a metering
function and can be used to monitor load currents.
When the Step button on the face of the trip unit is
pressed and released, the display will show PH 1, for
Phase 1 or A, and the current value. If the Step button is
not pressed again, the display will continue to show the
current value for Phase 1. Each time that the Step button
is pressed, the next monitored function will be displayed.
The other real time readings can be displayed in the
sequence below:
PH 2 Phase 2 (B)
PH 3 Phase 3 (C)
PH 4 Neutral
PH 5 Ground (if Ground function is supplied)
HI Highest phase current
OL Overload (Digitrip in overload mode)
Pushing the Step button while the unit is in the OL
mode will have the unit again display the overload
current value.
HELP This message can indicate more than one problem
with the trip unit. If the rating plug is missing, a
HELP message and an Instantaneous trip LED
light will be observed. The rating plug needs to be
installed and the Instantaneous trip LED must be
cleared by pressing the Reset/Battery Test button.
This message could also indicate that the trip unit
is out of calibration and should be replaced at the
earliest opportunity.
In addition, the Digitrip 520MC product will display and
freeze the magnitude of trip value after a trip event if
auxilary power is available. Use the Step pushbutton to
view each phase value. The highest value that can be
presented is 9999. Any fault currents greater than this
value will be shown as “HI.” Pushing the Reset pushbutton
will clear this data.
Also related to the phase value after a trip event are four
dashes “----”. This message means that the microprocessor
could not complete its writing of the trip event’s magnitude
into its non volatile memory. A possible cause of this would
be the lack or loss of auxilary power during the trip event.
1.8 Standards
The Digitrip 220, 520 520M and 520MC Trip Units are listed
by the Underwriters Laboratories, Inc.,under UL File
E52096, for use in Magnum Circuit Breakers. These same
units are also listed by the Canadian Standards Associa-
tion (CSA) under file LR 43556.
All Digitrip units have also passed the IEC 947-2 test
program which includes radiated and conducted emission
testing. As a result, all units carry the CE mark.
2.0 GENERAL DESCRIPTION OF MAGNUM CIRCUIT BREAKERS
2.1 General
Magnum Circuit Breakers are tripped automatically on
overload fault current conditions by the combined action of
three components:
1. The Sensors, which measure the current level
2. The Digitrip Trip Unit, which provides a tripping signal to
the Trip Actuator when current and time delay settings
are exceeded
3. The low-energy Trip Actuator, which actually trips the
circuit breaker
Digitrip 520M/MC
Contact Rating (resistive load)
AC 0.5A @ 230VAC
AC 1A @ 120VAC
DC 1A @ 48VDC
Verify input voltage rating before energizing circuit
When used in conjunction with T.U. Cat. 5MWLSIG,
5MLSIG, 5CWLSIG or 5CLSIG, will indicate GF trip.
When used in conjunction with T.U. Cat. 5MLSIA or
5CLSIA, will indicate GF alarm.
Control Voltage Remote
Ground
Fault Trip
Ground
Fault Alarm
Ground Alarm / Power Supply Module
G-Alarm
K2-1
K2-3
K2-6
Output +
Output -
J3-1
J3-2
J3-3
J4-4
J4-3
J4-1
A-10
A-11
A14
A-15
G-ALM 1
G-ALM 2
ATR Volt.
ATR COM
J4-2
Available
Input Voltages
120 VAC 7802C83G01
230 VAC 7802C83G02
7802C82G01
Style
Number
24-48 VDC
¥
J
|
(
D
/
N
/
N
/
N
/
\
©
V V V
©
(
2
)
©
(
D
F
:
T
*
N
Courtesy of NationalSwitchgear.com

Effective 2/2/2001
Page 8 I.L. 70C1037H03
Figure 2.1 shows this tripping circuit for a typical Magnum
Breaker. This arrangement provides a very flexible system,
covering a wide range of tripping characteristics described
by the time-current curves referenced in Section 9.2.
The automatic overload and short circuit tripping character-
istics for a specific circuit breaker are determined by
the ratings of the installed current sensors with a matching
rating plug and the selected functional protection settings.
Specific setting instructions are provided in Section 4.
When the functional protection settings are exceeded, the
Digitrip unit supplies a trip signal to the Trip Actuator. As a
result, all tripping operations initiated by the protection
functions of the Digitrip Trip Unit are performed by its
internal circuitry. There is no mechanical or direct mag-
netic action between the primary current and the mechani-
cal tripping parts of the breaker, and external control power
is not required.
WARNING
IMPROPER POLARITY CONNECTIONS ON THE TRIP
ACTUATOR COIL WILL DEFEAT THE OVERLOAD AND
SHORT CIRCUIT PROTECTION, WHICH COULD RE-
SULT IN PERSONAL INJURY.
OBSERVE POLARITY MARKINGS ON THE TRIP AC-
TUATOR LEADS AND CONNECT THEM PROPERLY,
USING THE INSTRUCTIONS PROVIDED.
Figure 2.1 Tripping Circuit for a Typical Magnum Breaker (Partial)
2.2 Low-Energy Trip Actuator
The mechanical force required to initiate the tripping action
of a Magnum Circuit Breaker is provided by a special low-
energy Trip Actuator. The Trip Actuator is located under
the black molded platform on which the Digitrip unit is
supported. The Trip Actuator contains a permanent magnet
assembly, moving and stationary core assemblies, a
spring, and a coil. Nominal coil resistance is 25 ohms and
the black lead is positive. The circuit breaker mechanism
assembly contains a mechanism-actuated reset lever and
a trip lever to actuate the tripping action of the circuit
breaker.
When the Trip Actuator is reset by the operating mecha-
nism, the moving core assembly is held in readiness
against the force of the compressed spring by the perma-
nent magnet. When a tripping action is initiated, the low-
energy Trip Actuator coil receives a tripping pulse from the
Digitrip unit. This pulse overcomes the holding effect of the
permanent magnet, and the moving core is released to
trigger the tripping operation via the trip lever.
2.3 Ground Fault Protection
NOTE: The Digitrip Model 220 is not available with ground
fault protection. Only the 520 family has ground fault types
available.
Top
End
4
-
4
-
4
Low
Energy
Trip
Actuator
Black
«
TA
Ci
-
ST
-
«
O
XN
O
«
o
o
X
«
o
X
o
Polarity
Marks
o
IN
Digitrip
V
V
V
Bottom
End
F
:
T
*
N
Courtesy of NationalSwitchgear.com

Effective 2/2/2001
Page 9I.L. 70C1037H03
2.3.1 General
When the Digitrip 520 family includes ground fault protec-
tion features, the distribution system characteristics (for
example, system grounding, number of sources, number
and location of ground points, and the like) must be
considered along with the manner and location in which
the circuit breaker is applied to the system. These ele-
ments are discussed in Sections 2.3.3 through 2.3.6.
The Digitrip 520 family uses three modes of sensing to
detect ground fault currents: residual, source ground, and
zero sequence (see Table 2.1). Magnum Circuit Breakers
can accommodate all three types, except for 4-pole
breakers. The breaker secondary contact inputs B-6, B-7
are used to configure the breaker cell positions for the
three schemes. No jumper from B-6 to B-7 programs the
unit for a residual ground fault scheme, while a jumper from
B-6 to B-7 programs the trip unit for either a source ground
or zero sequence configuration. If present, this jumper
resides on the stationary side of the switchgear assembly.
In all three schemes, the proper current sensor input is
required on the external sensor input terminals B-4, B-5 of
the breaker secondary contacts.
Table 2.1 Digitrip Sensing Modes
2.3.2 Residual Sensing
Residual Sensing is the standard mode of ground fault
sensing in Magnum Circuit Breakers. This mode utilizes
one current sensor on each phase conductor and one on
the neutral for a 4-wire system (shown in Figures 2.2
and 2.3). If the system neutral is grounded, but no phase
to neutral loads are used, the Digitrip 520 family of units
includes all of the components necessary for ground fault
protection. This mode of sensing vectorially sums the
outputs of the three or four individual current sensors. For
separately-mounted neutrals, as long as the vectorial sum
is zero, then no ground fault exists. The neutral sensor
must have characteristics and a ratio which are identical to
the three internally-mounted phase current sensors.
Available types of neutral sensors are shown in Figure 2.4.
Residual ground fault sensing features are adaptable to
main and feeder breaker applications. Available ground
fault pick-up settings employing Residual Sensing are
given in Table 2.2. Figure 2.5 shows a 4-pole breaker with
Residual Ground Fault Sensing.
CAUTION
IF THE SENSOR CONNECTIONS ARE INCORRECT, A
NUISANCE TRIP MAY OCCUR. ALWAYS OBSERVE THE
POLARITY MARKINGS ON THE INSTALLATION DRAW-
INGS. TO INSURE CORRECT GROUND FAULT EQUIP-
MENT PERFORMANCE, CONDUCT FIELD TESTS TO
COMPLY WITH NEC REQUIREMENTS UNDER ARTICLE
230-95(C).
2.3.3 Source Ground Sensing
Depending upon the installation requirements, alternate
ground fault sensing schemes may be dictated (see
Figures 2.6 and 2.7). The ground return method is usually
applied when ground fault protection is desired only on the
main circuit breaker in a simple radial system. This method
is also applicable to double-ended systems where a mid-
point grounding electrode is employed. For this mode of
sensing, a single current sensor mounted on the
equipment-bonding jumper directly measures the total
ground current flowing in the grounding electrode conductor
and all other equipment-grounding conductors.
The settings shown in Table 2.1 will apply when the neutral
sensor is not the same as the frame rating in a ground
return sensing scheme.
2.3.4 Zero Sequence Sensing
Zero Sequence Sensing, also referred to as vectorial
summation (see Figure 2.8), is applicable to mains,
feeders, and special schemes involving zone protection.
Zero Sequence current transformers (4 ½"x13½" [114 mm
x 342 mm] rectangular inside dimensions) are available
with 100:1 and 1000:1 ratios.
2.3.5 Multiple Source/Multiple Ground
A Multiple Source/Multiple Ground scheme is shown in
Figure 2.9. In this figure, a ground fault is shown which has
two possible return paths, via the neutral, back to its
source. The three neutral sensors are interconnected to
sense and detect both ground fault and neutral currents.
Call Cutler-Hammer for more details on this scheme.
2.3.6 Ground Fault Settings
The adjustment of the ground fault functional settings (FLAT
response or I2t) is discussed in Section 4.8. The effect of
these settings is illustrated in the ground fault time-current
curve referenced in Section 9. Applicable residual ground
fault pick-up settings and current values are given in Table
2.2 as well as in the ground time-current curve.
Ground (Earth)
Fault
Sensing Method
Breaker
Secondary
Contacts Req’d
Applicable
Breakers
Figure
Reference
Digitrip GF
Sensing
Element
Used
Residual No Jumper 3 or 4 pole 2.2, 2.3, 2.5, 2.9 element R5
Source Ground Jumper B6 to B7 3 pole only 2.7 element R4
Zero Sequence Jumper B6 to B7 3 pole only 2.8 element R4
Note: This information applies to Trip Units with Ground
F
:
T
*
N
Courtesy of NationalSwitchgear.com

Effective 2/2/2001
Page 10 I.L. 70C1037H03
rating specified on the plug label. The current sensor rating
can be viewed through openings in the back of the breaker.
2.5 Current Sensors (Magnum Frames greater than 3200A)
The six (3-pole) or eight (4-pole) current sensors installed
in the circuit breaker are located on the lower conductors.
The poles are paralleled and the corresponding current
sensors are also paralleled (see Figure 2.3). For example,
a 4000A breaker phase rating has two 2000:1 current
sensors wired in parallel, which provides an overall ratio of
4000:2. The auxiliary current transformers have a ratio of
20:1 for this size breaker which further steps down the
rated current to 100 milliamperes and is equivalent to
100% (In) to the Digitrip.
3.0 PRINCIPLES OF OPERATION
3.1 General
All models of trip units are designed for industrial circuit
breaker environments where the ambient temperatures can
range from –20°C to +85°C but rarely exceed 70°to 75°
C. If, however, temperatures in the neighborhood of the trip
unit exceed this range, the trip unit performance may be
degraded. In order to insure that the tripping function is not
compromised due to an over-temperature condition, the
Digitrip 520 family microcomputer chip has a built-in over-
temperature protection feature, factory set to trip the
breaker if the chip temperature is excessive. On the 520
family, if over-temperature is the reason for the trip the red
Long Delay Time LED will flash.
The Digitrip uses the Eaton custom-designed CHip™
(Cutler Hammer Integrated Processor) chip, an integrated
circuit that includes a microcomputer to perform its
numeric and logic functions. The principles of operation of
the trip unit are shown in Figure 3.1.
All sensing and tripping power required to operate the
protection function is derived from the current sensors in
the circuit breaker. The secondary currents from these
sensors provide the correct input information for the
protection functions, as well as tripping power, whenever
the circuit breaker is carrying current. These current
signals develop analog voltages across the current viewing
resistors. The resulting analog voltages are digitized by the
CHip™ (Cutler Hammer Integrated Processor) chip.
The microcomputer continually digitizes these signals.
This data is used to calculate true RMS current values,
which are then continually compared with the protection
function settings and other operating data stored in the
memory. The embedded software then determines whether
Table 2.2 Ground (Earth) Fault Current Settings
2.4 Current Sensors (Magnum Frames less than or equal to
3200A)
The three (3-pole) or four (4-pole) primary current sensors
are installed internally in the circuit breaker on the lower
conductors of the breaker. The current sensor rating
defines the breaker rating (In). For example, 2000A:1A
sensors are used on a 2000A rated breaker. There are four
auxiliary current transformers with a ratio of 10:1 which
further step down the rated current to 100 milliamperes,
which is equivalent to 100% (In) to the Digitrip.
The primary current sensors produce an output proportional
to the load current and furnish the Digitrip DT20 family with
the information and energy required to trip the circuit
breaker when functional protection settings are exceeded.
If a set of current sensors with a different ratio are installed
in the field, the rating plug must also be changed. The
associated rating plug must match the current sensor
Ground Fault Current Settings
(Amperes)1
Installed
Sensor/
Rating Plug
(Amperes) In .25 .30 .35 .40 .50 .60 .75 1.0
200 50 60 70 80 100 120 150 200
250 63 75 88 100 125 150 188 250
300 75 90 105 120 150 180 225 300
400 100 120 140 160 200 240 300 400
600 150 180 210 240 300 360 450 600
630 158 189 221 252 315 378 473 630
800 200 240 280 320 400 480 600 800
1000 250 300 350 400 500 600 750 1000
1200 300 360 420 480 600 720 900 1200
1250 312 375 438 500 625 750 938 1250
1600 400 480 560 640 800 960 1200 16002
2000 500 600 700 800 1000 1200 1500220002
2500 625 750 875 1000 1250 1500 1875 2500
3000 750 900 1050 1200 15002180022250230002
3200 800 960 1120 1200 16002192022400232002
400031000 1200 140021600220002240023000240002
500031250215002175022000225002300023750250002
630031575 1890 2205 2520 3150 3780 4725 6300
1. Tolerance on settings are ±10% of values shown.
2. On Models 520 LSIG, 520M and 520MC LSIG, the shaded values are set to a
maximum trip value of 1200 amperes for NEC.
3. See Section 2.5.
F
:
T
»
N
Courtesy of NationalSwitchgear.com

Effective 2/2/2001
Page 11I.L. 70C1037H03
Figure 2.2 3-Pole, 4-Wire Breaker with Neutral Sensor Connections for 3200A Frame Using Residual GF Sensing
Figure 2.3 Neutral Sensor Connections for 4000A Frame Using Residual Ground Fault Sensing
In this scheme, all breaker secondary currents (at the 100 mA level) are summed together at the PC
board donut transformer to sense ground fault via element R5.
No jumper on secondary contacts B-6, B-7.
Neutral input (if 4-wire) is via contacts B-4, B-5. Neutral current input to secondary contacts is 1A,
equivalent to 1 per unit ground.
Source
L
N
R
5
Digitrip 520
with GF
R/1
R/1
3
3
2
2
1
1
K2-8
B-4
Load
Notes:
B-6
K1-4
K1-3
10:1
10:1 AUX. CT
K2-9
K2-1
K2-7
B-5
B-7
K1-5
K1-2
Black
Trip
Actuator
+
-
L
B
L
C
L
A
K1-6
K1-7
K1-8
K1-9
1
1
1
Source
Load
K2-8
K2-9
B-4
B-6
20:1 AUX. CTs
20:1
K1-3
K2-7
B-5
B-7
K1-2
Black
Trip
Actuator
+
-
LA2
LB1 LB2
LC1
LA1
LN1 LN2
L
C2
K1-4
K2-1
K1-5
K1-6
K1-7
K1-8
K1-9
2000:1
2000:1
2000:1
2000:1
2000:1
2000:1
2000:1
2000:1
1
2
R5
Digitrip 520
with GF
1
2
Notes:
In this scheme, all breaker secondary currents (at the 100 mA level) are summed together at the PC
board donut transformer to sense ground fault via element .
In this scheme, the current sensors in the breaker poles are parallel-wired to achieve a 4000 amp
breaker rating. Other available ratings in this double-wide configuration are 6300A, 5000A,
3200A, 2500A, and 2000A.
R5
444444
1
) )
)
)
))
\
/
v
/
/
\
/
\
*
-
<
4
*
*
K
<
-
<
4
«
*
-
«
*
o
(
^
<
4
*
4
o
*
<
4
*
}
4
<
4
E
I
<
4
«
1
-
:
:
«
1
-
s
/
:
4
*
4
4
>
?
i
?
.
'
>
V
V V
V
V
V
o
O
F
:
T
*
N
Courtesy of NationalSwitchgear.com

Effective 2/2/2001
Page 12 I.L. 70C1037H03
Figure 2.4 Digitrip Neutral Sensor Types
Figure 2.5 4-Pole–3200A Frame Using Residual Ground Fault (Earth-Fault) Sensing
In this scheme, all breaker secondary currents (at the 100 mA level) are summed together at the PC
board donut transformer to sense ground fault via element R5.
Do not jumper on secondary contacts B-6, B-7. This will defeat all ground fault protection in
application for 4 pole breaker.
Ground fault style trip unit is installed.
3
2
1
Notes:
Source
L
N
R
5
Digitrip 520
with GF
R/1
R/1
2
1
K2-8
Load
B-6
K1-4
K1-3
10:1
10:1 AUX. CT
K2-9
B-7
K1-5
K1-2
Black
Trip
Actuator
+
-
L
B
L
C
L
A
K1-6
K1-7
K1-8
K1-9
1
1
1
X
X
X
X
I
t
l
4
<
—
<
4
44
(
<
4
X
—
<
4
44
44
<
4
o
X
<
4
44
44
I
<
4
«
o
<
k
^
^
4
—
<
4
44
X
<
4
v
v
VV
o
o
o
F
:
T
»
N
Courtesy of NationalSwitchgear.com

Effective 2/2/2001
Page 13I.L. 70C1037H03
Figure 2.6 Source Ground Fault Sensing Scheme for 3200A Frame
Figure 2.7 Source Ground Fault Sensing Scheme for 4000A Frame
Source
L
*
LB
Lc
i
Black
K
1
-
2
±
«
Digitrip
520
with
GF
\
^
Trip
7
Actuator
K
1
-
3
«
10
:
1
1
K
1
-
9
Ei
«
«
-
AVv
V
:
K
1
-
8
«
«
-
1
R
/
1
R
2
K
1
-
7
«
K
1
-
6
R
,
1
K
1
-
5
<
4
\
/
«
AV
\
v
<
\
s
(
(
D
K
1
-
4
«
(
D
K
2
-
1
:
<
h
^
=
z
«
K
2
-
7
B
-
6
4
R
<
0
K
2
-
9
B
-
5
«
«
T
K
2
-
8
^
4
R
/
1
10
:
1
AUX
CTs
Load
Ground
Return
Electrode
Conductor
Notes
Typical
Application
-
Main
©
In
this
scheme
,
the
residual
sensing
element
R
5
is
not
used
.
The
ground
current
is
direct
true
ground
current
and
is
sensed
directly
via
element
R
4
.
©
A
jumper
is
required
on
B
-
6
,
B
-
7
(
secondary
contacts
)
to
program
the
Digitrip
520
to
use
element
R
4
and
input
on
B
-
4
,
B
-
5
directly
for
source
ground
sensing
.
(
1
)
This
scheme
is
not
applicable
to
4
-
pole
breakers
.
No
secondary
contacts
(
B
-
4
and
B
-
5
)
are
available
on
4
-
pole
breakers
.
Do
not
jumper
B
-
6
,
B
-
7
in
4
-
pole
applications
.
Source
l
“
A
'
I
—
B
1
LC
1
Lb
2
Lc
2
I
I
I
II
I
)
)
)
)
)
•
Black
K
1
-
2
Digitrip
520
with
GF
)
TriP
7
Actuator
K
1
-
3
•
I
R
,
20
:
1
w
X
-
K
1
-
9
2000
:
1
2000
:
1
K
1
-
8
<
4
R
2
-
VvA
.
''
K
1
-
7
2000
:
1
2000
:
1
(
_
*
w
K
1
-
6
R
3
v
AAA
<
4
K
1
-
5
2000
:
1
2000
:
1
(
4
)
K
1
-
4
«
B
-
7
K
2
-
1
B
-
6
K
2
-
7
©
:
<
f
R
4
(
DC
*
<
!
K
2
-
9
B
-
5
K
2
-
8
B
-
4
<
4
20
:
1
AUX
.
CTs
999
9
Load
Ground
Return
Electrode
Conductor
Notes
:
©
In
this
scheme
,
the
current
sensors
in
the
breaker
poles
are
parallel
-
wired
to
achieve
a
4000
Amp
breaker
rating
.
The
ground
fault
is
sensed
directly
via
element
R
4
.
©
A
jumper
is
required
on
B
-
6
,
B
-
7
secondary
contacts
to
program
the
Digitrip
520
to
use
element
R
4
directly
for
source
ground
sensing
.
®
Source
ground
sensor
input
is
via
B
-
4
,
B
-
5
.
Source
ground
current
input
to
secondary
contacts
is
2
A
,
equivalent
to
1
per
unit
ground
.
©
The
scheme
is
not
applicable
to
4
-
pole
breakers
.
No
secondary
contacts
(
B
-
4
and
B
-
5
)
are
available
on
4
-
pole
breakers
.
Do
not
jumper
B
-
6
,
B
-
7
in
4
-
pole
applications
.
F
;
T
*
N
Courtesy of NationalSwitchgear.com

Effective 2/2/2001
Page 14 I.L. 70C1037H03
Figure 2.8 Zero Sequence Sensing Scheme for 3200A Frame
Figure 2.9 Multiple Source/Multiple Ground Scheme
R5R5
R5
φφ
T
M2
M1
B5 B4
I/2
G
I/2
G
I/2
G
I/2
G
I
G
I
G
i
g
i
g
i/2
g
i/2
G
i/2
g
i/2
g
i/2
g
Neutral Sensors Wired
in a Loop Configuration
B5
B5
B4
B4
NN
Digitrip
Ground
Sensor
Breaker M2 trips since this is the only breaker seeing the I fault via element R .
No jumper on B-6, B-7 terminals - all breakers are programmed for standard Residual Ground Fault
protection.
AUX CTs not shown. Wiring needed at system level is shown as a dotted line.
Capital letters represent primary current. Lowercase letters represent secondary current.
The three breakers (M1, M2, and T) must all have the same breaker/sensor rating.
G5
Notes:
Source
LN
LA
La
Lc
A
A
A
Black
T T T
>
>
K
1
-
2
+
«
Digitrip
520
with
GF
h
Trip
Actuator
K
1
-
3
«
,
K
1
-
9
Ri
<
<
>
K
1
-
8
«
R
/
1
R
*
K
1
-
7
/
VA
x
K
1
-
6
«
«
R
3
K
1
-
5
:
«
(
(
D
(
K
1
-
4
<
<
r
B
-
7
K
2
-
1
<
r
K
2
-
7
B
-
6
:
4
R
<
B
-
5
K
2
-
9
«
r
«
yv
\
/
v
K
2
-
8
«
«
10
:
1
&
*
-
<
*
*
X
2
\
y
«
X
1
R
/
1
0
Load
Notes
:
0
This
scheme
uses
a
large
zero
sequence
CT
to
magnetically
sum
the
currents
and
the
output
is
sensed
via
element
R
4
.
(
2
)
A
jumper
is
required
on
B
-
6
,
B
-
7
to
program
the
Digitrip
to
use
element
R
4
.
(
3
)
The
scheme
is
not
applicable
to
4
-
pole
breakers
.
F
:
T
*
N
Courtesy of NationalSwitchgear.com

Effective 2/2/2001
Page 15I.L. 70C1037H03
to initiate protection functions, including tripping the
breaker through the Trip Actuator.
3.2 Trip and Operation Indicators
The LEDs on the face of the trip unit, shown in Figures 1.1
and 3.3 to 3.9, flash red to indicate the reason for any
automatic trip operation. Each LED is strategically located
in the related segment of the time-current curve depicted
on the face of the trip unit. The reason for the trip is
identified by the segment of the time-current curve where
the LED is illuminated. Following an automatic trip opera-
tion, the backup battery continues to supply power to the
LEDs as shown in Figure 3.1. The LED pulse circuit,
shown in Figure 3.1, is provided to reduce battery burden
and will supply a quick flash of the trip LED approximately
every 4 seconds. It is therefore important to view the unit
for at least 5 seconds to detect a flashing cause of trip
indicator.
Following a trip operation, push the Reset\Battery Test
button, shown in Figure 1.1, to turn off the LEDs.
A green LED, shown in Figure 1.1, indicates the opera-
tional status of the trip unit. Once the load current through
the circuit breaker exceeds approximately 10 percent (3
phase power) of the current sensor rating, the green LED
will flash on and off once each second to indicate that the
trip unit is energized and operating properly.
NOTE: A steady green status LED typically indicates that
a low level of load current, on the order of 5% of full load,
exists.
3.3 Making Current Release
All models of trip units have a Making Current Release
function. This safety feature prevents the circuit breaker
from being closed and latched-in on a faulted circuit. The
nonadjustable release is preset at to a peak current of 25 x
In which correlates to approximately 11 xIn (rms) with
maximum asymmetry.
The Making Current Release is enabled only for the first
two cycles following an initial circuit breaker closing
operation. The Making Current Release will trip the circuit
breaker instantaneously and flash the Instantaneous LED.
3.4 Zone Interlocking (520 family only)
CAUTION
IF ZONE INTERLOCKING IS NOT TO BE USED (I.E.,
ONLY STANDARD TIME-DELAY COORDINATION IS
INTENDED), THE ZONE INTERLOCKING TERMINALS
MUST BE CONNECTED BY A JUMPER FROM TERMI-
NAL B8 TO B9 OF THE BREAKER SECONDARY TERMI-
NALS SO THAT THE TIME-DELAY SETTINGS WILL
PROVIDE THE INTENDED COORDINATION.
Zone Selective Interlocking (or Zone Interlocking) is
available for the Digitrip 520 family on the Short Delay and
Ground Fault protection functions (see Figure 3.1). The
zone interlocking signal is wired via a single set of wires
labeled Zone In (Zin) and Zone Out (Zout) along with a Zone
Common wire. The Zone Selective Interlocking function on
the Digitrip 520 family has combined the logic interlocking
of Short Delay and Ground Fault. A zone out signal is sent
whenever the ground fault pick-up is exceeded or when the
short delay value of 2 x (Ir) is exceeded. Zone Selective
Interlocking provides the fastest possible tripping for faults
within the zone of protection of the breaker and yet also
provides positive coordination among all breakers in the
system (mains, ties, feeders, and downstream breakers)
to limit a power outage to only the affected parts of the
system. When Zone Interlocking is employed, a fault
within the zone of protection of the breaker will cause the
Digitrip 520 family of units to:
•Trip the affected breaker immediately and, at the same
time,
•Send a signal to upstream Digitrip units to restrain from
tripping immediately. The restraining signal causes the
upstream breakers to follow their set coordination times,
so that the service is only minimally disrupted while the
fault is cleared in the shortest time possible.
For an example of how Zone Selective Interlocking may be
used, see Appendix A of this Instructional Leaflet.
F
:
T
*
N
Courtesy of NationalSwitchgear.com

Effective 2/2/2001
Page 16 I.L. 70C1037H03
Figure 3.1 Block Diagram with Breaker Interface
(Load/Lower)
(Line/Upper)
NABC
AUX CTs
Residual
Ground
Detection
Typical Phase or
Ground Sensing
Resistor
Bridge
Circuits
Internal
Power
Supply
Making Current
Release Circuitry
(See Section 3.3)
Trip
Actuator
LED
Pulse
Circuit
Battery
+ 3V
Ground Alarm
Power Supply
Optional for 520M
Required for 520MC
FET
Trip
(See Section 1.2)
Trip LED
Rating Plug
Integrated
Processor
CipH
TM
Custom
Designed
TA
Status LED
(See Section 3.2)
(See Section 7.0)
(See Section 2.3) (See Section 3.4)
Zone Interlock
Circuitry
Display for 520M/MC
ZIn
ZOut
Current Sensors
(See Section 8)
(See Section 4.0)
Protection Setting
4 bit
Latch
Chip
Courtesy of NationalSwitchgear.com

Effective 2/2/2001
Page 19I.L. 70C1037H03
Figure 3.4.1 Digitrip 520MC CLSI Figure 3.4.2 Digitrip 520MC CLSIA
Figure 3.4.3 Digitrip 520MC CLSIG Figure 3.4.4 Digitrip 520MC CWLSIG
|
<
£
•
[
Cutler
-
Hammer
Digitrip
520
MC
f
<
£
>
|
Curler
-
Hammer
Digitrip
520
MIC
PH
4
HI
.
-
JIMI
PH
5
bund
PW
h
«
Liril
#
ilnis
SIPAI
*
^
Mp
mm
mu
#
<
iv
fc
*
•
Unfi
Status
&
Step
HAMIYBATOIY
lea
?
Tcs
.
1
Kil
Kit
Caliloj
.
HUB
D
:
p
:
rdrnlar
I
fr
-
liiL
:
nj
Urtap
RrtfAlrt
4
I
,
s
I
-
,
J
Laid
3
il
*
v
JI
:
T
il
|
»
i
3
4
,
cLI
.
ll
"
Delve
n
'
Scr
.
n
*
Oepetdenlatl
,
1
b
/
Till
r
Nil
p
Ha
;
JH
l
.
jnj
n
.
Alir
T
ma
Ditz
*
Tina
?
H
Sal
,
Z
fEurrerl
'
Sinsir
Riliiqj
PS
«
»
*
Shall
ft
fill
Dally
8
l
Srtflni
L
.
4
IlfiiA
"
-
1
*
1
Hasp
mi
*
9
rnirsTiil
1
Rcp
-
llSd
I
6
P
'
'
jnsmi
[
.
fi
'
II
«
I
3
II
*
-
I
|
QR
$
II
|
<
£
«
|
Cutler
-
Hammer
Digitrip
520
MC
^
•
Cutler
-
Hammer
Digitrip
520
MCJ
1
*
*
14
Msmal
PH
5
Braird
PM
IfeHral
PHI
Earfi
^
Ukiil
Slalis
^
Step
Hb
*
|
CM
tp
r
«
K
.
1
=
lM
-
-
a
,
'
,
-
IT
:
:
9
UwlSlilus
Billti
Cic
-
a
^
Step
R
-
zsri
-
.
E
alary
Tt
;
i
Tnri
Tan
Kil
Uilaap
4
il
iJlJlu
]
Cepairiarein
l
I
,
-
l
7
l
Larq
Dlldry
riKiKiirnrl
in
I
.
.
Ij
=
|
Q
i
LangUilOf
Ssllirg
.
I
!
5
+
1
a
/
iflliinj
1
^
9
I
*
r
“
a
*
ia
%
n
1
Dl
:
is
A
n
12
m
in
IT
_
WJ
3
I
*
IIT
|
I
|
CLI
'
till
3
^
11
ionj
n
-
Max
A
rep
Hitmj
|
Ci
?
r
»
enl
fer
^
jr
flalnpl
’
£
llAA
2.5
Tint
Ml
Hi
S
ill
.
linuid
Srtin
]
Delay
f
4
Sating
I
'
IIJM
Nail
ce
i
i
Tina
-
1
*
1
Hrumst
9
TrarsmP
J
=
P
1
Raipiiui
ifjl
Tihrllni
?
Gram
!
Trms
IW
4
H
9
I
8
IIIS
*
*
in
F
:
T
*
N
Courtesy of NationalSwitchgear.com

Effective 2/2/2001
Page 20 I.L. 70C1037H03
4.3 Long Delay Time Setting
There are 8 available Long Delay Time Settings, as
illustrated in Figure 4.2, ranging from 2 to 24 seconds.
These settings are the total clearing times when the
current value equals 6 times (Ir).
Figure 4.2 Long Delay Time Settings
NOTE: In addition to the standard Long Delay Protection
Element, trip units also have a Long Time Memory (LTM)
function, which protects load circuits from the effects of
repeated overload conditions. If a breaker is reclosed soon
after a Long Delay Trip, and the current again exceeds the
Long Delay Setting, (Ir), the LTM automatically reduces
the time to trip to allow for the fact that the load circuit
temperature is already higher than normal because of the
prior overload condition. Each time the overload condition
is repeated, the LTM causes the breaker to trip in a
progressively shorter time. When the load current returns
to normal, the LTM begins to reset; after about 10 minutes
it will have reset fully, so the next Long Delay trip time will
again correspond to the Setting value.
NOTE: In certain applications, it may be desirable to
disable the LTM function. Open the test port located at the
lower left-hand front of the trip unit and use small, long-
nose pliers to move the LTM jumper inside the test port
(see Figure 4.3) to its Inactive position. (The LTM function
can be enabled again at any time by moving the LTM
jumper back to its original Active position.)
4.0 PROTECTION SETTINGS
4.1 General
Before placing any circuit breaker in operation, set each
trip unit protection setting to the values specified by the
engineer responsible for the installation. The number of
settings that must be made is determined by the type of
protection supplied by each unit, as illustrated in Figures
3.2 through 3.9. Each setting is made by turning a rotary
switch, using a small screwdriver. The selected setting for
each adjustment appears on the trip unit label.
The installed rating plug must match the current sensors
which establish the maximum continuous current rating of
the circuit breaker (In). Instantaneous and ground current
settings are defined in multiples of (In).
To illustrate the effect of each protection curve setting,
simulated time-current curves are pictured on the face of
the trip unit. Each rotary switch is located nearest the
portion of the simulated time-current curve that it controls.
Should an automatic trip occur (as a result of the current
exceeding the pre-selected value), the LED in the appropri-
ate segment of the simulated time-current curve will light
red, indicating the reason for the trip.
The available settings, along with the effects of changing
the settings, are given in Figures 4.1 through 4.8. Sample
settings are represented in boxes 2.
4.2 Long Delay Current Setting
There are eight available Long Delay Settings, as illus-
trated in Figure 4.1. Each setting, called (Ir), is expressed
as a multiple (ranging from .4 to 1) of the current (In). The
nominal current pickup value is 110% of the setting.
NOTE: (Ir) is also the basis for the Short Delay Current
Setting (See Section 4.4).
Figure 4.1 Long Delay Current Settings
/
r
Long
Delay
Setting
/
r
U
]
X
/
n
=
fr
/
r
Available
Settings
0
.
4
,
.
5
,
.
6
,
.
7
.
8
,
.
9
,
.
95
,
1.0
In
Multiples
of
Amperes
(
In
)
F
:
T
»
N
Courtesy of NationalSwitchgear.com
This manual suits for next models
6
Table of contents
Other Cutler-Hammer Circuit Breaker manuals

Cutler-Hammer
Cutler-Hammer W-VAC Programming manual

Cutler-Hammer
Cutler-Hammer Digitrip OPTIM 550 Installation instructions

Cutler-Hammer
Cutler-Hammer VCP-TR Series User manual

Cutler-Hammer
Cutler-Hammer VCPW-ND User manual

Cutler-Hammer
Cutler-Hammer VCP-W User manual

Cutler-Hammer
Cutler-Hammer VCP-W User manual

Cutler-Hammer
Cutler-Hammer Digitrip RMS 610 User manual