CYP CSC-V101P User manual

CSC-V101P
4K UHD+ HDMI/VGA to HDMI Scaler
Operation Manual
Operation Manual


DISCLAIMERS
The information in this manual has been carefully checked and
is believed to be accurate. Cypress Technology assumes no
responsibility for any infringements of patents or other rights of third
parties which may result from its use.
Cypress Technology assumes no responsibility for any inaccuracies
that may be contained in this document. Cypress also makes no
commitment to update or to keep current the information contained
in this document.
Cypress Technology reserves the right to make improvements to this
document and/or product at any time and without notice.
COPYRIGHT NOTICE
No part of this document may be reproduced, transmitted,
transcribed, stored in a retrieval system, or any of its part translated
into any language or computer le, in any form or by any means—
electronic, mechanical, magnetic, optical, chemical, manual, or
otherwise—without express written permission and consent from
Cypress Technology.
© Copyright 2017 by Cypress Technology.
All Rights Reserved.
TRADEMARK ACKNOWLEDGMENTS
All products or service names mentioned in this document may be
trademarks of the companies with which they are associated.

SAFETY PRECAUTIONS
Please read all instructions before attempting to unpack, install or
operate this equipment and before connecting the power supply.
Please keep the following in mind as you unpack and install this
equipment:
• Always follow basic safety precautions to reduce the risk of re,
electrical shock and injury to persons.
• To prevent re or shock hazard, do not expose the unit to rain,
moisture or install this product near water.
• Never spill liquid of any kind on or into this product.
• Never push an object of any kind into this product through any
openings or empty slots in the unit, as you may damage parts
inside the unit.
• Do not attach the power supply cabling to building surfaces.
• Use only the supplied power supply unit (PSU). Do not use the PSU
if it is damaged.
• Do not allow anything to rest on the power cabling or allow any
weight to be placed upon it or any person walk on it.
• To protect the unit from overheating, do not block any vents or
openings in the unit housing that provide ventilation and allow for
sufcient space for air to circulate around the unit.
REVISION HISTORY
VERSION NO. DATE (DD/MM/YY) SUMMARY OF CHANGE
RDV1 08/11/16 Preliminary release
VS1 25/07/17 Updated text/diagrams

CONTENTS
1. Introduction......................................................1
2. Applications.....................................................1
3. Package Contents ..........................................1
4. System Requirements......................................1
5. Features............................................................2
6. Operation Controls and Functions.................3
6.1 Front Panel ................................................. 3
6.2 Rear Panel.................................................. 4
6.3 OSD Menu.................................................. 5
6.3.1 Unit's OSD Menu............................... 5
6.3.2 Conversion Rules.............................. 9
7. Connection Diagram ....................................10
8. Specications ................................................11
8.1 Technical Specications ........................ 11
8.2 Video Specications............................... 12
8.3 Audio Specications............................... 13
9. Acronyms .......................................................13

1
1. INTRODUCTION
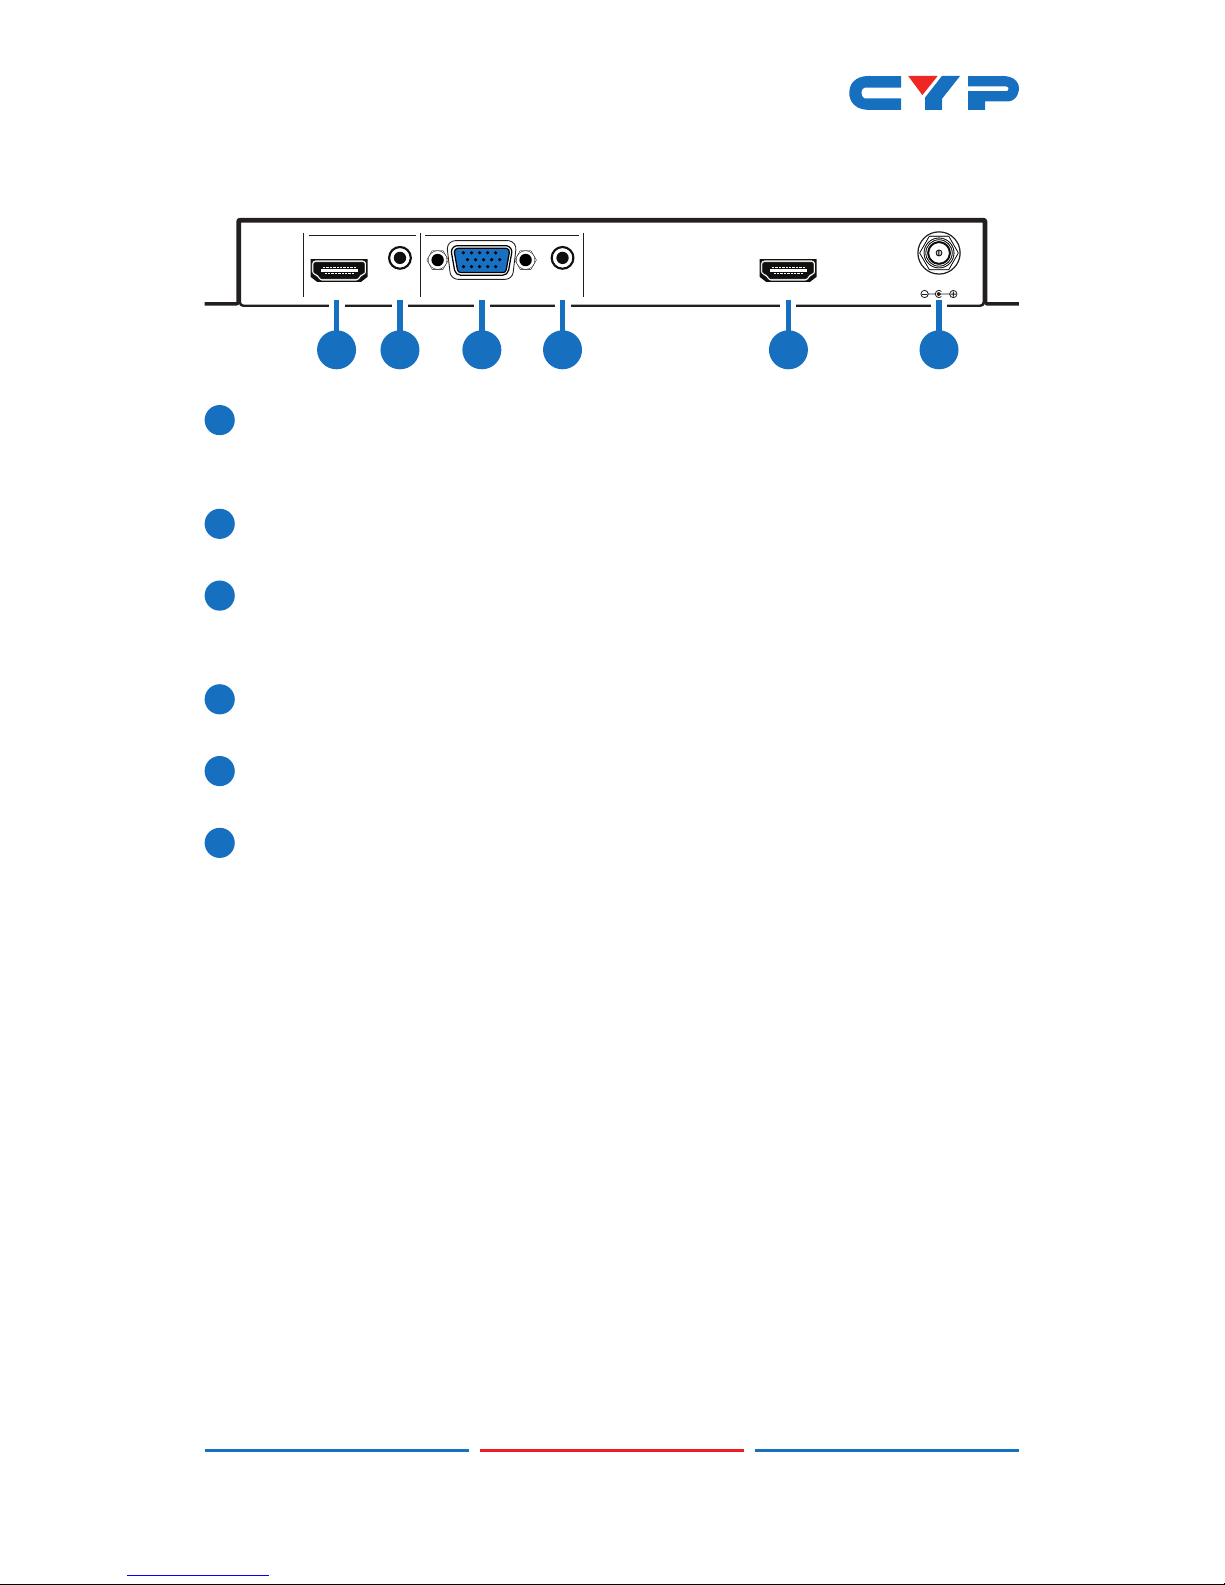
This HDMI/PC to HDMI Scaler is designed to scale and convert
HDMI, PC or Component video sources to an HDMI output with
optional analog audio insertion. Scaled output resolutions from VGA
(640×480@60Hz) all the way up to 4K@60Hz (4:4:4, 8-bit) are available.
HD component video (YUV) is supported with the use of a 3-RCA to
15-pin adapter via the VGA input. If desired, external audio can be
inserted into the HDMI output from the analog stereo 3.5mm input
associated with each input. This unit has a comprehensive OSD menu
which allows the user to select from a variety of output resolutions as
well as to adjust the video settings to provide the best picture quality.
2. APPLICATIONS
• Presenter device display in classrooms and lecture halls
• PC/Laptop presentation switching in boardrooms
• Using classic media players with 4K HDMI displays
3. PACKAGE CONTENTS
• 1×HDMI/PC to HDMI Scaler
• 1×5V/2.6A DC Power Adaptor
• 1×Operation Manual
4. SYSTEM REQUIREMENTS
• HDMI source equipment such as media players, video game
consoles or set-top boxes.
• VGA source equipment such as PCs, laptops or set-top boxes.
• HDMI receiving equipment such as HDTVs, monitors or audio
ampliers.
Notes: 4K UHD sources with HDR or equivalently high-bandwidth
signals require an appropriate compatible display and HDMI cables
in order to achieve the best image quality. The use of “Premium High
Speed HDMI” cables is highly recommended.

2
5. FEATURES
• HDMI with 18Gbps (600MHz) 4K UHD support
• DVI 1.0 compatible with the use of an HDMI-DVI adaptor
• HDCP 1.4 and 2.2 compliant
• 1 HDMI and 1 VGA input port, each with associated 3.5mm analog
stereo ports
• HD component video (YUV) is supported with the use of a 3-RCA to
15-pin adapter via the VGA input
• 1 HDMI output
• Advanced 4K upscaling and downscaling engine
• Supports digital PC and HD resolutions up to 3940×2160@60Hz (4:4:4,
8-bit) & 4096×2160@60Hz (4:4:4, 8-bit)
• Supports analog PC input resolutions from VGA to WUXGA (RB) and
analog HD input resolutions from 480i to 1080p60
• Supports Deep Color up to 1080p60, 48-bit
• Supports pass-through of LPCM 2.0/5.1/7.1, Bitstream and HD
Bitstream audio formats
• Analog stereo audio insertion support via 3.5mm mini-jack ports
• Integrated EDID management
• Optional automatic input selection on source loss
• Output picture adjustments include: contrast, brightness, hue,
saturation, sharpness, noise reduction, RGB levels and aspect ratio
• Controllable via front panel buttons with OSD

3
6. OPERATION CONTROLS AND FUNCTIONS
6.1 Front Panel
MENU
VGAHDMIINPOWER –+ENTER
720P SERVICE
XGA
1 2 3 4 5 6 7
1POWER LED: This LED will illuminate to indicate the unit is on and
receiving power.
2IN & LEDs: Press this button to switch between the HDMI and VGA
inputs. The LED will illuminate to indicate which source is currently
selected.
3MENU: Press to enter the OSD menu, or to back out from menu
items.
Note: Pressing “MENU” and “+” together will reset the output
resolution to XGA (1024×768@60Hz). Pressing “Menu” and “-”
together will reset the output resolution to 720p@60Hz.
4- (Minus): Press to move down or adjust selections within OSD
menus.
Note: When not in the OSD press “-” to activate the “Auto Adjust”
function (VGA sources only).
5+ (Plus): Press to move up or adjust selections within OSD menus.
6ENTER: Press to conrm a selection within the OSD or to go deeper
into a menu item.
7SERVICE: This slot is reserved for rmware update use only.

4
6.2 Rear Panel
HDMI IN HDMI OUT
DC 5V
VGA IN
AUDIO
IN
AUDIO
IN
1 2 3 4 5 6
1HDMI IN: Connect to HDMI source equipment such as a media
player, game console or set-top box. DVI sources are supported
with the use of an HDMI to DVI adapter.
2AUDIO IN: Connect to the stereo analog output of the device
connected to the HDMI input port if necessary.
3VGA IN: Connect to VGA source equipment such as a PC or
laptop. YUV sources, such as DVD players, are also supported with
the use of a 15-pin to 3-RCA adapter.
4AUDIO IN: Connect to the stereo analog output of the device
connected to the VGA input port.
5HDMI OUT: Connect to HDMI TVs, monitors or ampliers for digital
video and audio output.
6DC 5V: Plug the 5V DC power adapter into the unit and connect it
to an AC wall outlet for power.

5
6.3 OSD Menu
6.3.1 Unit's OSD Menu
LEVEL 1 LEVEL 2 LEVEL 3 LEVEL 4
PICTURE CONTRAST 0~100 (50)
BRIGHTNESS 0~100 (50)
EXIT
FINETUNE HDMI/YPbPr
INPUT
HUE 0~100 (50)
SATURATION 0~100 (50)
SHARPNESS 0~100 (0)
NR OFF
AUTO
LOW
MIDDLE
HIGH
PC INPUT PHASE 0~200
CLOCK 0~200
H-POSITION 0~200
V-POSITION 0~200
EXIT
COLOR RED 0~100 (50)
GREEN 0~100 (50)
BLUE 0~100 (50)
EXIT
OUTPUT SOURCE PC/YPbPr
HDMI
RESOLUTION 640×480@60
800×600@60
1024×768@60
1280×768@60
1360×768@60
1280×720@60

6
LEVEL 1 LEVEL 2 LEVEL 3 LEVEL 4
OUTPUT (cont.) RESOLUTION 1280×800@60
1280×1024@60
1440×900@60
1400×1050@60
1680×1050@60
1600×1200@60
1920×1080@60
480P@60
576P@50
720P@50
720P@60
1080P@24
1080P@25
1080P@30
1080P@50
1080P@60
4K2K@24
4K2K@25
4K2K@30
4K2K@50
4K2K@60
4K2K@50 (4:2:0)
4K2K@60 (4:2:0)
NATIVE
FORCE UHD
BYPASS
SCALER
BYPASS
SIZE OVERSCAN
FULL
BEST FIT
PAN SCAN

7
LEVEL 1 LEVEL 2 LEVEL 3 LEVEL 4
OUTPUT (cont.) SIZE LETTER BOX
UNDER 2
UNDER 1
MIRROR OFF
H
V
HV
EXIT
AUDIO HDMI INPUT AUTOMATIC
EMBEDDED
ANALOG
EXIT
OSD H-POSITION 0~100 (50)
V-POSITION 0~100 (50)
TIMER OFF
5~60S
BACKGROUND 0~100 (100)
DISPLAY OFF
ON
5S
10S
EXIT
EDID MANAGE EDID COPY DEF. 1080P
DEF. 4K2K (6G)
DEF. 4K2K (420)
DEF. 4K2K (3G)
OUTPUT
EXIT
ADVANCED AUTO SYNC OFF OFF
FAST

8
LEVEL 1 LEVEL 2 LEVEL 3 LEVEL 4
ADVANCED
(cont.)
AUTO SYNC OFF SLOW
AUTO SCAN OFF
ON
AUTO ADJUST OFF
ON
HDMI HDCP HDCP SUPPORT
OFF
REFER TO SOURCE
REFER TO DISPLAY
EXIT
INFORMATION SOURCE
INPUT
OUTPUT
VERSION
EXIT
FACTORY RESET
EXIT
Notes:
• Default settings are marked in a Bold font.
• The “EDID COPY” and “HDMI HDCP” functions are only available
when the HDMI input is selected.
• The “PHASE”, “CLOCK”, “H-POSITION”, and “V-POSITION” functions
are only available with VGA sources.
• The "PICTURE", “FINETUNE”, “COLOR”, “SIZE”and “MIRROR” functions
are not available in Bypass mode.

9
6.3.2 Conversion Rules
Input
Resolution
Output
Resolution
SCALER BYPASS
Bypass
Path
Scaler
Path
Bypass
Path
Scaler
Path
Non-4K Timing Any Timing
4K but not 24Hz 4K@24Hz N/A N/A
4K but not 25Hz 4K@25Hz N/A N/A
4K but not 30Hz 4K@30Hz N/A N/A
4K but not 50Hz 4K@50Hz N/A N/A
4K but not 60Hz 4K@60Hz N/A N/A
4K but not 50Hz 4K@50Hz (4:2:0) N/A N/A
4K but not 60Hz 4K@60Hz (4:2:0) N/A N/A
4K@50Hz (4:2:0) 4K@50Hz *N/A N/A
4K@60Hz (4:2:0) 4K@60Hz *N/A N/A
4K@50Hz 4K@50Hz (4:2:0) *N/A N/A
4K@60Hz 4K@60Hz (4:2:0) *N/A N/A
4K@24Hz 4K@24Hz
4K@25Hz 4K@25Hz
4K@30Hz 4K@30Hz
4K@50Hz 4K@50Hz
4K@60Hz 4K@60Hz
4K@50Hz (4:2:0) 4K@50Hz (4:2:0)
4K@60Hz (4:2:0) 4K@60Hz (4:2:0)
* = Only color subsampling conversion is performed.

10
7. CONNECTION DIAGRAM
HDMI IN HDMI OUT
DC 5V
VGA IN
AUDIO
IN
AUDIO
IN
DVD or Blu-ray Player
HDMI Output
(Scaled)
4K Display
HDMI
Input
Stereo Analog
Input
Stereo Analog
Input
VGA
Input
Power
Supply
PC or Notebook

11
8. SPECIFICATIONS
8.1 Technical Specications
Video Bandwidth 600MHz/18Gbps
Input Ports 1×HDMI
1×VGA
2×3.5mm (Stereo Audio)
Output Ports 1×HDMI
Supported Resolutions 480i@60Hz - 4K@60Hz (4:4:4, 8-bit)
VGA@60Hz - WUXGA@60Hz (RB)
HDMI Cable Length 10m (1080p@60Hz, 12-bit)
2m (4K@60Hz, 4:4:4, 8-bit)
Power Supply 5V/3A DC (US/EU standards, CE/FCC/UL
certied)
ESD Protection Human Body Model:
±12kV (Air Discharge)
±8kV (Contact Discharge)
Dimensions 231.5mm×25mm×108mm (W×H×D)
[Case Only]
231.5mm×25mm×117mm (W×H×D)
[All Inclusive]
Weight 652g
Chassis Material Metal
Silkscreen Color Black
Operating Temperature 0˚C - 40˚C/32˚F - 104˚F
Storage Temperature −20˚C - 60˚C/−4˚F - 140˚F
Relative Humidity 20 - 90% RH (Non-condensing)
Power Consumption 6.5W

12
8.2 Video Specications
Supported PC Resolutions (Hz)
HDMI
Input
VGA
Input
HDMI
Output
640×480@60/72/75/85 60Hz only
800×600@56/60/72/75/85 60Hz only
1024×768@60/70/75/85 60Hz only
1280×768@60
1360×768@60
1280×720@60
1280×800@60
1280×1024@60/75/85 60Hz only
1440×900@60
1400×1050@60
1680×1050@60
1600×1200@60
1920×1080@60
1920×1200@60 (RB)
Supported TV Resolutions (Hz)
HDMI
Input
YPbPr
Input
HDMI
Output
480i/576i
480p/576p
720p@50/60
1080i@50/60
1080p@50/60
3840×2160p@24/25/30
3840×2160p@50/60
4096×2160p@24/25/30 Bypassed
4096×2160p@50/60 Bypassed

13
8.3 Audio Specications
Input Output
THD+N
Frequence
Response SNR CrosstalkLevel/Freq. Terminal Channel
Sample
Rate Level
HDMI
HDMI
L
48kHz
0 ~ -1dB < 0.01
±1dB
> 80dB < -80dB
0dBFS/1kHz R0 ~ -1dB < 0.01 > 80dB < -80dB
DVI
HDMI
L
N/A
2Vrms±0.2 < 0.1
±1dB
> 70dB < -60dB
2Vrms/1kHz R 2Vrms±0.2 < 0.1 > 70dB < -60dB
VGA
HDMI
L
48kHz
0 ~ -1dB < 0.1
±1dB
> 70dB < -60dB
2Vrms/1kHz R0 ~ -1dB < 0.1 > 70dB < -60dB
9. ACRONYMS
ACRONYM COMPLETE TERM
CEC Consumer Electronics Control
DVI Digital Visual Interface
EDID Extended Display Identication Data
HD High-Denition
HDCP High-bandwidth Digital Content Protection
HDMI High-Denition Multimedia Interface
HDR High Dynamic Range
LPCM Linear Pulse-Code Modulation
OSD On-Screen Display
PC Personal Computer
UHD Ultra-High-Denition
USB Universal Serial Bus
VGA Video Graphics Array (640×480@60Hz)
WUXGA Wide Ultra Extended Graphics Array
(1920×1200@60Hz)


CYPRESS TECHNOLOGY CO., LTD.
www.cypress.com.tw
Table of contents
Other CYP Media Converter manuals
Popular Media Converter manuals by other brands

Bang & Olufsen
Bang & Olufsen Beolink 1611 Service manual

Keene Electronics
Keene Electronics APTUS 1 Instructions for use

Uhlenbrock Elektronik
Uhlenbrock Elektronik 67810 user manual

Moxa Technologies
Moxa Technologies TCF-90 Quick installation guide

Peachtree Audio
Peachtree Audio iDac owner's manual

Audionet
Audionet DAC user manual