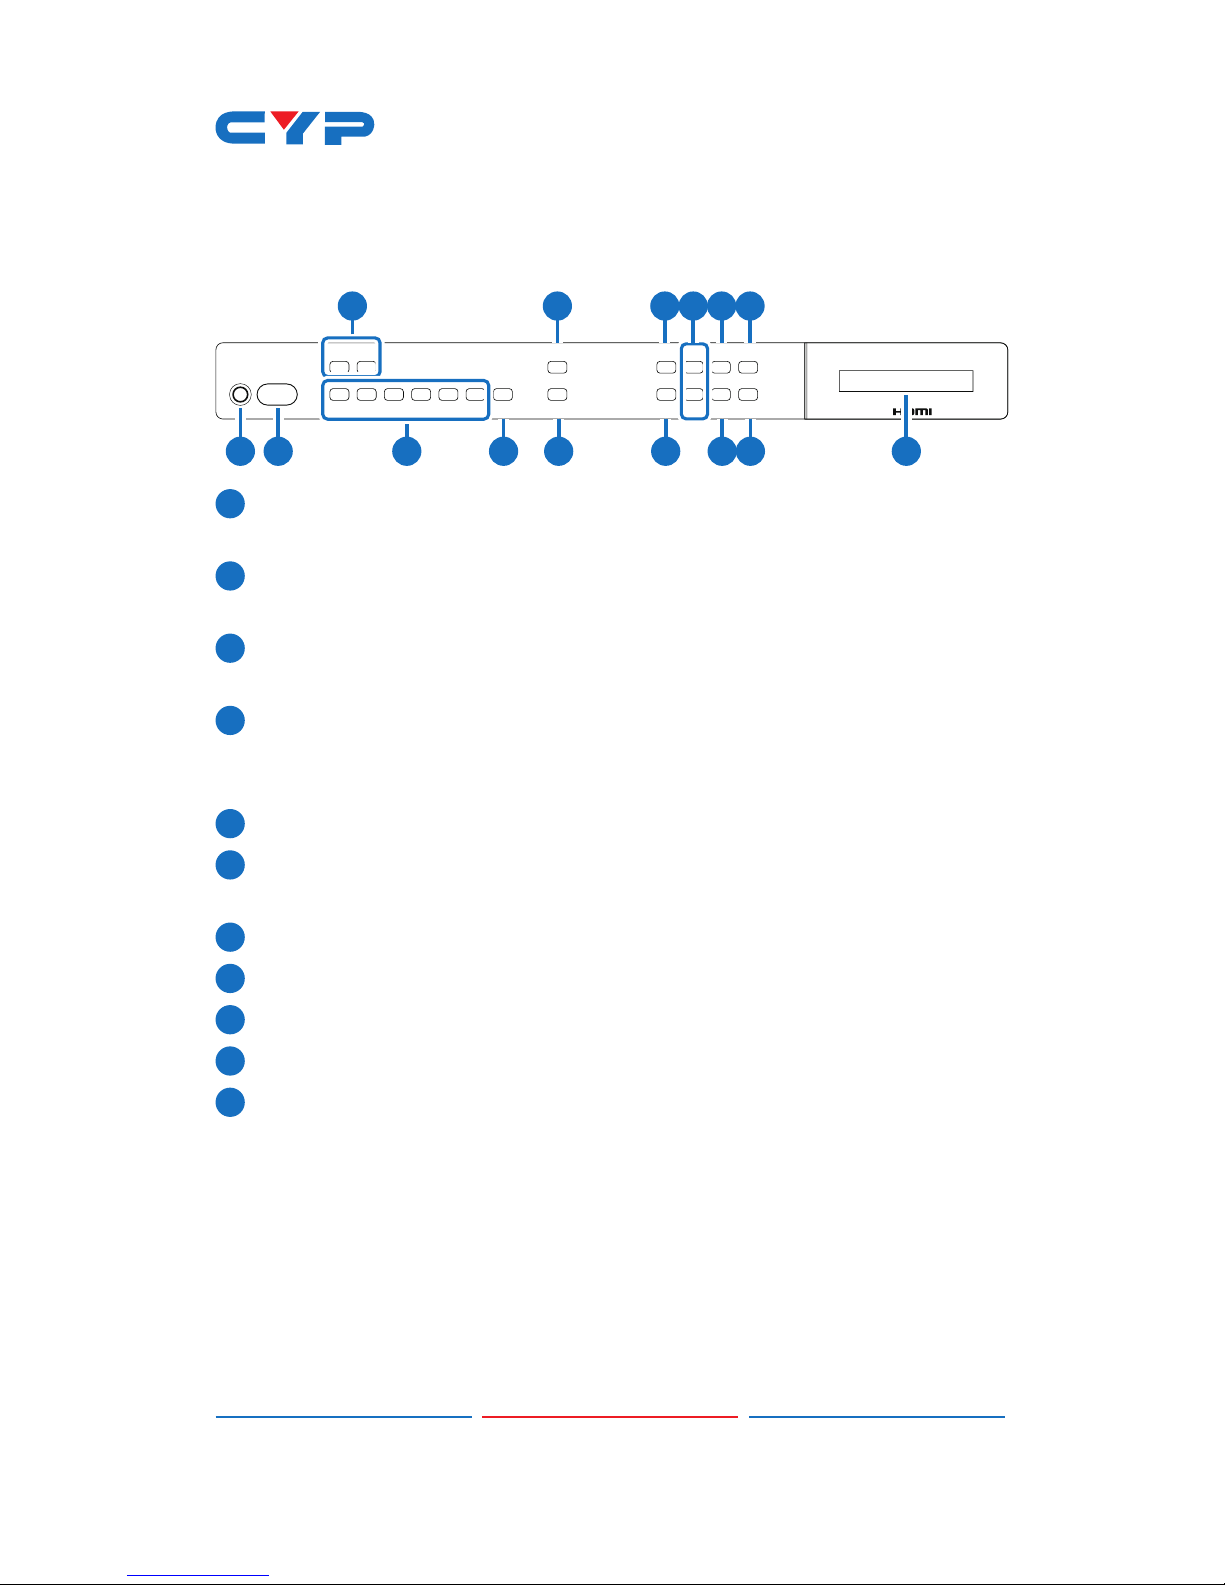
CYP CDPS-6H2HFS User manual

CDPS-6H2HFS
6 by 2 HDMI 4Kx2K Matrix
Operation Manual
Operation Manual


DISCLAIMERS
The information in this manual has been carefully checked and
is believed to be accurate. Cypress Technology assumes no
responsibility for any infringements of patents or other rights of third
parties which may result from its use.
Cypress Technology assumes no responsibility for any inaccuracies
that may be contained in this document. Cypress also makes no
commitment to update or to keep current the information contained
in this document.
Cypress Technology reserves the right to make improvements to this
document and/or product at any time and without notice.
COPYRIGHT NOTICE
No part of this document may be reproduced, transmitted,
transcribed, stored in a retrieval system, or any of its part translated
into any language or computer le, in any form or by any means—
electronic, mechanical, magnetic, optical, chemical, manual, or
otherwise—without express written permission and consent from
Cypress Technology.
© Copyright 2012 by Cypress Technology.
All Rights Reserved.
Version 1.0 October 2009
TRADEMARK ACKNOWLEDGMENTS
All products or service names mentioned in this document may be
trademarks of the companies with which they are associated.

SAFETY PRECAUTIONS
Please read all instructions before attempting to unpack, install or
operate this equipment and before connecting the power supply.
Please keep the following in mind as you unpack and install this
equipment:
• Always follow basic safety precautions to reduce the risk of re,
electrical shock and injury to persons.
• To prevent re or shock hazard, do not expose the unit to rain,
moisture or install this product near water.
• Never spill liquid of any kind on or into this product.
• Never push an object of any kind into this product through any
openings or empty slots in the unit, as you may damage parts
inside the unit.
• Do not attach the power supply cabling to building surfaces.
• Use only the supplied power supply unit (PSU). Do not use the PSU
if it is damaged.
• Do not allow anything to rest on the power cabling or allow any
weight to be placed upon it or any person walk on it.
• To protect the unit from overheating, do not block any vents or
openings in the unit housing that provide ventilation and allow for
sufcient space for air to circulate around the unit.
REVISION HISTORY
VERSION NO. DATE DD/MM/YY SUMMARY OF CHANGE
VR0 14/09/15 Preliminary Release

CONTENTS
1. Introduction............................................ 1
2. Applications........................................... 1
3. Package Contents ................................ 1
4. System Requirements............................ 1
5. Features.................................................. 2
6. Operation Controls and Functions....... 3
6.1 Front Panel ........................................3
6.2 Rear Panel.........................................5
6.3 OSD Menu.........................................6
6.4 Remote Control..............................11
6.5 RS-232 Protocols .............................12
6.6 Telnet & RS-232 Commands..........13
6.7 Telnet Control .................................18
6.8 Web GUI Control ............................20
7. Connection Diagram .......................... 22
8. Specications ...................................... 23
9. Acronyms ............................................. 25

1
1. INTRODUCTION
The 6 by 2 HDMI matrix which allows HDMI signal from any of its six
sources to be routed to and displayed on any of its two connected
HDMI displays simultaneously with View All Mode and Picture-in-
picture(PIP) supported. With fast switching technology the device can
greatly eliminate the time required by swapping or turning ON/OFF
the connected displays. It supports 4Kx2K, 3D, 36-bit Deep Color, Hi-
Def lossless audio and other features dened by HDMI specications.
The management of source/sink scenarios can be operated easily
through on-panel buttons, IR remote control, RS-232 or Ethernet
protocol.
2. APPLICATIONS
• Home Theater/Entertainment
• Lecture Room/Hall Presentation
• Show Room/Demo Room
• Public Commercial Display
• Information Board
3. PACKAGE CONTENTS
• 6 by 2 HDMI 4Kx2K Matrix
• Remote Control with Battery
• Left & Right Rack Ears
• 5V/2.6A DC Power Adaptor
• IR Receiver Cable
• Operation Manual
4. SYSTEM REQUIREMENTS
Input source equipments such as Blu-ray/DVD/PS3 player or Set-
Top-Box and output HDMI TV/Display and or audio amplier with
connection cables.

2
5. FEATURES
• HDMI with 3D & 4Kx2K supported, HDCP and DVI compliant
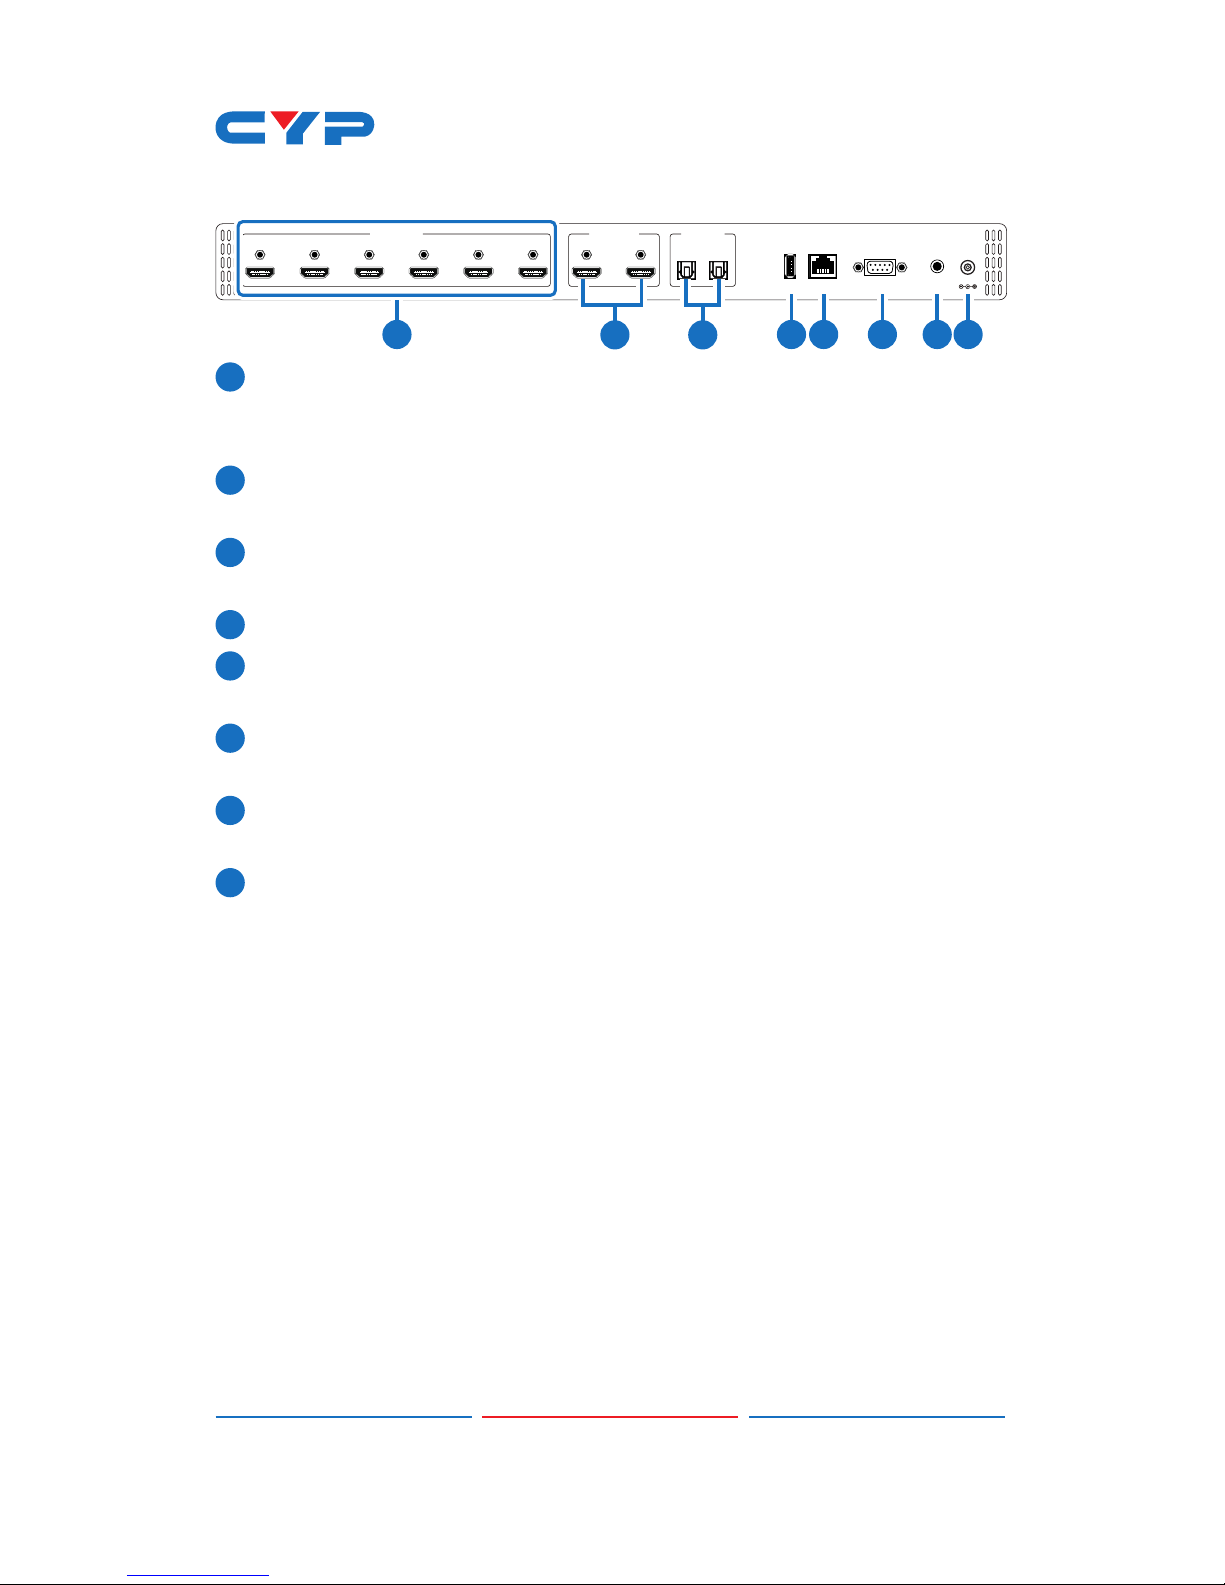
• Support six HDMI inputs and two HDMI outputs
• Displays any of six (6) High-Denition sources on two (2) HDTV
displays simultaneously with fast switch
• When in Preview mode, the system will be treated as Switcher (two
HDMI output same images at the same time)
• In Preview mode, it support View All (1 Main video source and 5
Sub video sources) and PIP (1 Main video source and 1 Sub video
source). 3D and 4K2K sources inputs are not supported for sub-
windows
Note: View All is TDM (Time Division Multiplexing display)
• 3DTV Pass-Through
• Supports HDTV resolutions up to 4Kx2K (3840x2160@24/25/30 &
4096x2160@30Hz, 50/60 @YUV420)
• Supports Optical audio extraction
• Supports Optical audio sampling rate output up to 192kHz
• Supports data rate from 300Mbps to 3Gbps and Deep Color up to
1080p 36-bit
• Supports individual EDID or common EDID
• Supports LPCM 2/5.1/7.1CH, Dolby Digital 2~5.1CH, DTS 2~5.1CH
(Pass through), Dolby TrueHD and DTS-HD Master Audio
• Supports 6 sets of Matrix preset functions for input/output setting
• Input port HDCP support Standard and Apple mode. The Apple
mode selection to guarantees the use of Apple devices
• Compliant with DVI source
Note: Support HDMI to DVI conversion when HDMI source is non-
deep color and color space RGB.
Not support HDMI to DVI conversion when HDMI source is deep
color and color space YCbCr 444/422
• Supports OSD on output B under Preview Mode

3
6. OPERATION CONTROLS AND FUNCTIONS
6.1 Front Panel
POWER
6X2 HDMI MATRIX FAST SWITCH CDPS-6H2HFS
IN 1IN 2IN 3IN 4IN 5IN 6 MUTE TAKE
OUT A OUT B CANCEL
ENTER
MENU
PRESET
ALL
MODE
LOCK
+
-
4K UHD
1 2 5 6 8 1113 153
4 7 9 10 12 14
1POWER: Press this button to turn ON the device and the LED will
illuminated.
2IR Window: This IR Receiver receives the IR signal from the package
included remote control only.
3IN 1~6: Press these IN buttons to select an input from the 6 input
sources.
4OUT A/B: Press these buttons once a time along with an IN buttons
to select an input source for an output display. i.e. OUT A→
IN1→TAKE or OUT B→ IN6→TAKE.
5MUTE: Press this button to mute both video and audio on OUT A or B.
6TAKE: Press this button to conrm the selection of an IN and an OUT
button.
7CANCEL: Press this button to cancel the IN/OUT selection.
8ENTER: Press to conrm the selection.
9MENU: Press to enter into the menu.
10 +/-: Press these buttons to move up/down under menu selection.
11 PRESET: (PV MUTE: Preview ON/OFF)
¾When select the MODE in Preview mode, press the button to
turn ON/OFF the Sub video windows.
¾When select the MODE in Matrix mode, press “PRESET” to
switch between Normal and Preset mode.
9Normal mode:
Press OUT A or OUT B or ALL and then press IN 1~6 or
MUTE to select the input sources. After the selection,
press “TAKE” to conrm the selection or press “CANCEL”
to cancel the selection.

4
9Preset mode:
Press “PRESET”, the OLED menu will show Preset then
select IN 1~6. Preset 1~6 after the selection, press “TAKE”
to conrm the selection or press “CANCEL” to cancel the
selection.
12 All: (SWAP)
Press this button to select all outputs to display with an input
source. When in PIP mode, press to swap between Main video
source and Sub video source.
13 MODE: Press to switch between Preview or Matrix mode.
¾Preview mode: From MENU option select View All (1 Main
video sources and 5 Sub video sources) or PIP mode (1 Main
video sources and 1 Sub video sources).
Note: Under Preview mode, OSD display on output B only.
9View All: Press IN 1~6 or MUTE to select the Main channel.
From OLED menu select “Preview Position” for Sub
screens position.
Note: All sub screens will be display rotatively for about 0.5
second and those screens that are not rotatived will be
freezed.
9PIP: Press OUT A (Main) or OUT B, then press IN1~6 or
MUTE to select Main or Sub video source. Press “ALL”
or Remote Control “ SWAP” to exchange Main/Sub
video source.
Note: When both Main and Sub select the same input source,
Sub will be muted.
¾Matrix mode: Press OUT A or OUT B or OUT A & B and then
press IN 1~6 or MUTE to select the input sources. After the
selection, press “TAKE” to conrm the selection or press
“CANCEL” to cancel the selection.
14 LOCK: Press this button to lock all button functions on the panel.
Press 3 seconds to relieve the lock function.
15 LCM: Displaying Input and Outputs selection and menu selection.

5
6.2 Rear Panel
CONTROLSERVICE
HDMI IN HDMI OUT S/PDIF OUT
AB
123456AB RS232 IR IN DC 5V
1 4 5 6 7 8
2 3
1HDMI IN: Connect from source equipments such as Blu-ray/DVD/
PS3 players, Set-Top-Box or any HDMI equipped source device for
input signal sending.
2HDMI OUT: Connect to HDMI TV/display or HD Amplier for output
image and or audio display.
3S/PDIF OUT: Connect to audio sound system or Amplier for digital
output sound.
4SERVICE: This slot is reserved for rmware update use only.
5CONTROL: Connect from PC/Laptop with active internet service
for Web GUI control with RJ-45 terminated cable.
6RS232: Connect from PC/Laptop for RS-232 command sending to
control the device.
7IR IN: Connect the IR Receiver included in the package for IR
signal receive from the included remote control.
8DC 5V: Connect the adaptor with power cord included in the
package and connect to AC wall outlet for power supply.

6
6.3 OSD Menu
Main Menu Sub Menu Description Default
EDID Mode All All Input port is using
same EDID.
In menu “EDID All”,
can select suitable
EDID.
All
Appoint Each Input port can
select individual
EDID.
In menu “EDID IN1~6”
select suitable EDID.
Exit
EDID All Sink A Copy Output A
display EDID
8/2D/
PCM/1080p
Sink B Copy Output B
display EDID
8/2D/
PCM/720p
Standard EDID,
Content: deep
color/2D3D/audio/
native resolution
8/2D/PCM/
AC3/720p
Standard EDID,
Content: deep
color/2D3D/audio/
native resolution
8/2D/
PCM/1080p
Standard EDID,
Content: deep
color/2D3D/audio/
native resolution
8/2D/PCM/
AC3/1080p
Standard EDID,
Content: deep
color/2D3D/audio/
native resolution
8/2D/
PCM/4K2K
Standard EDID,
Content: deep
color/2D3D/audio/
native resolution

7
Main Menu Sub Menu Description Default
8/2D/PCM/
AC3/4K2K
Standard EDID,
Content: deep
color/2D3D/audio/
native resolution
8/2D/PCM/
Y420
Standard EDID,
Content: deep
color/2D3D/audio/
native resolution
8/2D/PCM/
AC3/Y420
Standard EDID,
Content: deep
color/2D3D/audio/
native resolution
Exit
EDID IN1 Same EDID All Select Input 1’s EDID Same EDID All
EDID IN2 Same EDID All Select Input 2’s EDID Same EDID All
EDID IN3 Same EDID All Select Input 3’s EDID Same EDID All
EDID IN4 Same EDID All Select Input 4’s EDID Same EDID All
EDID IN5 Same EDID All Select Input 5’s EDID Same EDID All
EDID IN6 Same EDID All Select Input 6’s EDID Same EDID All
Matrix Preset Preset 1 IN/OUT default No.1 A=1 , B=2
Preset 2 No.2 A=1 , B=2
Preset 3 No.3 A=1 , B=2
Preset 4 No.4 A=1 , B=2
Preset 5 No.5 A=1 , B=2
Preset 6 N0.6 A=1 , B=2
Exit
HDCP Input IN1 Standard/
Apple
Set IN1 in Apple/
Standard mode
Standard
IN2 Standard
/Apple
Set IN2 in Apple/
Standard mode
Standard
IN3 Standard
/Apple
Set IN3 in Apple/
Standard mode
Standard
IN4 Standard
/Apple
Set IN4 in Apple/
Standard mode
Standard

8
Main Menu Sub Menu Description Default
IN5 Standard
/Apple
Set IN5 in Apple/
Standard mode
Standard
IN6 Standard
/Apple
Set IN6 in Apple/
Standard mode
Standard
Exit
Preview
Mode
View All 1 Main video source
and 5 Sub video
source
View All
PIP 1 Main video source
and 1 Sub video
source
Exit
Preview
Position
View
ALL
Top Preview 5 Sub
screens position
Top
Right Preview 5 Sub
screens position
Bottom Preview 5 Sub
screens position
Left Preview 5 Sub
screens position
PIP Top Left Preview Sub screen
position
Top Left
Top
Right
Preview Sub screen
position
Bottom
Right
Preview Sub screen
position
Bottom
Left
Preview Sub screen
position
Exit
OSD
Transparency
0~15 Preview OSD
background
transparency
6
Exit
Note: Under Preview mode, OSD display on output B only.

9
Main Menu Sub Menu Description Default
OSD Timeout OSD Off Preview without OSD
Info
OSD Always On
5~20 Preview with OSD
Info 5~20 sec and
disappear
OSD Always
On
Preview with OSD
Info remain ON
Exit
Network
Setup
IP Mode DHCP , Static DHCP
IP Setup Static IP 192.168.5.83
Mask Setup Static Netmask 255.255.255.0
Gate Setup Static
Gateway
192.168.5.254
Do Re-Link Re-Link.
After setup Network,
the system need to
re-link
---
Exit
Network
Status
Link Network status
DHCP,Static or Not
Linked
---
IP Get IP ---
Mask Get Netmask ---
Gate Get Gateway ---
MAC System MAC Address ---
Exit
Source
Detection
IN1 On/Off ,
IN2 On/Off
IN1 , IN2 detect
source with/without
the signal
---
IN3 On/Off ,
IN4 On/Off
IN3 , IN4 detect
source with/without
the signal

10
Main Menu Sub Menu Description Default
IN5 On/Off ,
IN6 On/Off
IN5 , IN6 detect
source with/without
the signal
Exit
Sink A Info Type, Manuf. Detect and Analysis
Output A display’s
EDID
Content: type(HDMI/
DVI/VGA),
Manufactory/Model
number
---
Native Content: native
resolution
Video Format Content: deep color,
2D or 3D, 4K2K
Audio Format Content:PCM,
BitStream, HBR
Exit
Sink B Info Same Sink A
Info
Detect and Analysis
Output B display’s
EDID
---
Firmware FW Version Display the model
number and FW
version
---
Update FW Update
Exit
Factory Reset Do Reset Do system Reset ---
Exit
Exit

11
6.4 Remote Control
1POWER: Press this button to switch
the system ON/OFF.
2OUT A/B: Press these buttons once a time
along with an IN buttons to select an input
source for an output display.
3MODE: Press to switch between Preview or
Matrix mode.
¾Preview mode: From MENU option
select View All (1 Main video sources
and 5 Sub video sources) or PIP mode
(1 Main video sources and 1 Sub
video sources).
9View All: Press IN 1~6 or MUTE to
select the Main channel.
From OLED menu select “Preview Position” for Sub
screens position.
9PIP: Press OUT A (Main) or OUT B, then press IN1~6 or
MUTE to select Main or Sub video source. Press “ALL” or
Remote Control “ SWAP” to change Main/Sub video
source.
¾Matrix mode: Press OUT A or OUT B or OUT A & B and then
press IN 1~6 or MUTE to select the input sources. After the
selection, press “TAKE” to conrm the selection or
press “CANCEL” to cancel the selection.
4PV DISP: Press to set ON/OFF the Preview Display.
5SWAP: In PIP mode, press to swap Main/Sub video source.
6MENU: Press to enter into the menu.
7ENTER: Press to conrm the selection.
8ALL: Press this button to select all outputs to display with an input
source.
9TAKE: Press this button to conrm the selection of an IN and an OUT
button.
10 CANCEL: Press this button to cancel the IN/OUT selection.
11 PRESET:
¾When select the MODE in Matrix mode, press “PRESET” to
switch between Normal and Preset mode.
IN 3
IN 5
MUTEENTER -
OUT A
OUT B
MODE
PV DISP. PRESET IN 4
SWAP LOCK
ALL IN 1
TAKE IN 2
CANCEL
+MENUIN 6
CR-136
1
15
14
13
2
3
4
5
6
7
8
9
10
11
12

12
9Normal mode:
Press OUT A or OUT B or ALL and then press IN 1~6 or
MUTE to select the input sources. After the selection,
press “TAKE” to conrm the selection or press “CANCEL”
to cancel the selection.
9Preset mode:
Press “PRESET”, the OLED menu will showing Preset and
select IN 1~6. After preset 1~6, press “TAKE” to conrm
the selection or press “CANCEL” to cancel the selection.
12 LOCK: Press this button to lock all button functions on the panel.
Press 3 seconds to relieve the lock function.
13 +/-: Press these buttons to move up/down under menu selection.
14 IN1~6: Press the IN buttons to select an input from the 6 input
sources.
15 MUTE: Press this button to mute both video and audio on the
selected OUT A/B selected.
6.5 RS-232 Protocols
CDPS-6H2HFS
►
◄
Remote Control
PIN Assignment PIN Assignment
1 NC 1 NC
2Tx 2Rx
3Rx 3Tx
4 NC 4 NC
5 GND 5 GND
6 NC 6 NC
7 NC 7 NC
8 NC 8 NC
9 NC 9 NC
Baud Rate: 115200bps
Data bit: 8 bits
Parity: None
Flow Control: None
Stop Bit: 1

13
6.6 Telnet & RS-232 Commands
Command Name Description Description of Parameter
P0 POWER OFF NONE
P1 POWER ON NONE
IPCONFIG DISPLAY THE CURRENT
IPCONFIG
NONE
SIPADDR XXX.XXX.
XXX.XXX
SET ETHERNET IP AD-
DRESS
XXX=0~255
SNETMASK XXX.
XXX.XXX.XXX
SET ETHERNET
NETMASK
XXX=0~255
SGATEWAY XXX.
XXX.XXX.XXX
SET ETHERNET
GATEWAY
XXX=0~255
HTTPPORT SET CURRENT HTTP
PORT NUMBER
NONE
HTTPPORT N SET CURRENT HTTP
PORT NUMBER TO N
N=0~65535
TELNETPORT SHOW CURRENT
TELNET PORT NUMBER
NONE
TELNETPORT N SET CURRENT TELNET
PORT NUMBER TO N
N=0~65535
RSTIP IP CONFIGURATION
RESET TO <DHCP>
NONE
A N SET OUTPUT A SOURCE N=1~6 inputs, 0 for Mute
B N SET OUTPUT B SOURCE N=1~6, 0 for Mute
I N SET ALL OUTPUTS
SOURCE
N=1~6, 0 for Mute
EDIDMODE SHOW EDID MODE NONE
EDIDMODE N SET EDID MODE N=(0)Appoint (1)All
EDIDALL SHOW EDID MODE
SOURCE FOR ALL
NONE

14
Command Name Description Description of Parameter
EDIDALL N SET EDID CONTENT
FOR ALL
N=0~9
(0)Sink A, (1)Sink B,
(2) 8/2D/PCM/720p,
(3)8/2D/PCM/AC3/720p,
(4) 8/2D/PCM/1080p,
(5)8/2D/PCM/
AC3/1080p, (6)8/2D/
PCM/AC3/4K2K, (7)8/2D/
PCM/AC3/4K2K, (8)8/2D/
PCM/Y420, (9)8/2D/
PCM/AC3/Y420
EDIDIN SHOW ALL INPUT EDID
SOURCE
NONE
EDIDIN N1 SHOW INPUT N1 EDID
SOURCE
N1=1~6
EDIDIN N1 N2 SET INPUT N1 EDID
SOURCE
N1=1~6
N2=0~9
(0)Sink A, (1)Sink B,
(2) 8/2D/PCM/720p,
(3)8/2D/PCM/AC3/720p,
(4) 8/2D/PCM/1080p,
(5)8/2D/PCM/
AC3/1080p, (6)8/2D/
PCM/AC3/4K2K, (7)8/2D/
PCM/AC3/4K2K, (8)8/2D/
PCM/Y420, (9)8/2D/
PCM/AC3/Y420
HDCPIN SHOW ALL INPUT
HDCP STATUS
NONE
HDCPIN N1 SHOW INPUT N1 HDCP
STATUS
N1=1~6
HDCPIN N1 N2 SET INPUT N1 HDCP
ON/OFF
N1=1~6
N2=(0)OFF (ON)

15
Command Name Description Description of Parameter
PRESET SHOW ALL PRESET
CONFIG
NONE
PRESET N1 RECALL PRESET N1 N1=1~6
PRESET N1 N2 SET PRESET N1
CONFIGURE
N1=1~6
N2=AXBX (X=1~6)
PVMODE SHOW PREVIEW
MODE
NONE
PVMODE N1 SET PREVIEW MODE N1=(0)View All/(1)PIP
PVPOS SHOW PREVIEW
POSITION
NONE
PVPOS N1 SET PREVIEW POSITION N1=0~3
In View All mode:
(0) Top
(1) Right
(2) Bottom
(3) Left
In PIP Mode:
(0) Top Left
(1) Top Right
(2) Bottom Right
Bottom Left
PVSRC SHOW PREVIEW
SOURCE SELECT
NONE
PVSRC N1 In View All Mode:
SET MAIN SCREEN
SOURCE
N1= INPUT 1~6
In PIP Mode: SHOW
MAIN/SUB SCREEN
SOURCE
N1= (0)MAIN/(1)SUB
Table of contents
Other CYP Media Converter manuals
Popular Media Converter manuals by other brands

BZB Gear
BZB Gear BG-HDMI4K-SC user manual

Wyrestorm
Wyrestorm NetworkHD 200 series Technical reference guide

SMART-AVI
SMART-AVI HDS-2PS installation manual

TV One
TV One 1T-FC-326 instruction manual

AutomationDirect
AutomationDirect ProSense SC6 Series quick start guide

Celabs
Celabs HSC11 instruction manual