CYP CSO-T2 User manual

1
CSO-T2
Instant HQV HD Scaler
Box
Operation Manual
CSO-T2

Disclaimers
The information in this manual has been carefully checked and
is believed to be accurate. Cypress Technology assumes no
responsibility for any infringements of patents or other rights of third
parties which may result from its use.
Cypress Technology assumes no responsibility for any inaccuracies
that may be contained in this document. Cypress also makes
no commitment to update or to keep current the information
contained in this document.
Cypress Technology reserves the right to make improvements to this
document and/or product at any time and without notice.
Copyright Notice
No part of this document may be reproduced, transmitted,
transcribed, stored in a retrieval system, or any of its part translated
into any language or computer le, in any form or by any means
- electronic, mechanical, magnetic, optical, chemical, manual,
or otherwise - without express written permission and consent from
Cypress Technology.
© Copyright 2009 by Cypress Technology.
All Rights Reserved.
Version 1.0 October 2009
Trademark Acknowledgments
All products or service names mentioned in this document may be
trademarks of the companies with which they are associated.

Safety Precautions
Please read all instructions before attempting to unpack or install or
operate this equipment, and before connecting the power supply.
Please keep the following in mind as you unpack and install this
equipment:
Always follow basic safety precautions to reduce the risk of
re, electrical shock and injury to persons.
To prevent re or shock hazard, do not expose the unit to rain,
moisture or install this product near water.
Never spill liquid of any kind on or into this product.
Never push an object of any kind into this product through
module openings or empty slots, as you may damage parts.
Do not attach the power supply cabling to building surfaces.
Do not allow anything to rest on the power cabling or allow it to
be abused by persons walking on it.
To protect the equipment from overheating, do not block the
slots and openings in the module housing that provide
ventilation.
Revision History
Version No Date Summary of Change
V1 20080704 Preliminary Release
V2 20091019 Add PIP & 1080@24
V3 20101022 Add 3 Output Timing
VS4 20101201 Add HDCP Description
VR5 20110914 8. HDMI input X 2 Typo

TABLE OF CONTENTS
1. Introduction .........................................................................................
2. Features ...............................................................................................
3. Package Contents...............................................................................
4. Operation Controls and Functions ....................................................
4.1 Front Panel ....................................................................................
4.2 Rear Panel .....................................................................................
5. Remote Control ...................................................................................
6. OSD Operation.....................................................................................
6.1 Input...............................................................................................
6.2 Picture..........................................................................................
6.3 Screen..........................................................................................
6.4 PIP.................................................................................................
6.5 Projection....................................................................................
6.5.1Keystone......................................................................................
6.5.2Anyplace.....................................................................................
6.5.3Rotation.......................................................................................
6.6 HQV..............................................................................................
6.7 Setup............................................................................................
7. Connection and Installation...............................................................
8. Specications ......................................................................................
9. Acronyms ............................................................................................
1
1
1
2
2
2
3
4
4
4
5
6
6
7
7
8
8
9
10
11
12

1
1. Introduction
The Instant HQV HD Scaler box allows you to maximize the full benets
of the today’s HDTV’s. Using the Industry leading HQV Realta Video
Processor to convert standard denition content (PAL/NTSC) into a crisp
and detailed HD version, this Scaler box is unlike anything you have ever
purchased. Giving you the freedom to enjoy the full benets of high
resolution video by recreating a cinema like experience in the comfort of
your home, this device is a worthy addition to any home entertainment
system. In addition, the HD inputs have been improved, allowing this HQV
scaler to deliver crisp, stunning and noise free full HD video.
2. Features
3D video decoder for optimal NTSC/PAL/SECAM video quality.
Supports HDMI1.3 Tx and Rx with Deep Color and xvYCC color gamut.
True 10-bit HQV video processing.
Motion adaptive four eld de-interlacing for SD and HD input.
AnyNoise™-Automatically detects different types of noise and applies
the appropriate reduction algorithm.
AnyCadence™-Automatically detects all different cadences including
3:2:3:2:2 and animation.
MDDF (Multi Directional Diagonal Filtering) eliminates jaggies for both SD
and HD input resolutions.
Lips sync audio delay.
HQV Detail Enhancement-Processes the SD input image quality to
approach HD output image quality.
Note: When receiving content that has HDCP encryption there will be no
video output except for HDMI output port.
3. Package Contents
Instant HQV scaler box.
5V/5A DC power supply adaptor.
Operation Manual.
HQV Benchmark DVD.
Remote Control with Battery.

2
4. Operation Controls and Functions
4.1 Front Panel
4.2 Real Panel
①Video with R/L input: Connect the Video with R/L input port to the source
equipment such as DVD player or set-top-box.
②S-Video with R/L input: Connect the S-Video with R/L input port to the
source equipment such as a DVD/Blu-Ray player or set-top-box.
③HDMI 1/2 inputs: Connect each of the input ports to the HDMI output of
your source. (NOTE: Component output will be disabled once there is an
H.DMI input)
④Component input: Connect the Component (Y, Pr/Cr, Pb/Cb, R, L) input
port to the source device such as a DVD/Blu-Ray player or set-top-box.
⑤Component output: Connect the Component (Y, Pr/Cr, Pb/Cb, R, L)
output port to the display.
⑥HDMI output: Connect the HDMI output port to the display.
⑦Power: Plug the 5V DC power supply into this unit and connect the
adaptor to an AC outlet.
①Power: Press to turn ON/OFF the device. The LED will illuminate when
power is ON.
②IR sensor
③Input selection: Press the button to select input source (HDMI 1/HDMI 2/
Composit/Vdieo/S-Video). The LED will illuminate to indicate which input
source is being selected.
④Output timing selection: Press this button to select output timing
(Auto/1080P/720P). The LED will illuminate to indicate which output timing
is being selected.
1 2 3 4
1 2 3 4 5 6 7

3
5. Remote Control
①Menu: Press this button to bring up the
OSD main menu page.
②Power: Press the button once to turn
the system on, press a second time to
enter standby mode.
③Cleaner: Press to switch the Noise
Reduction (NR) feature. There are four
adjustable levels Off/Low/Middle/High
and these features wor when the
input resolution is 480i / 480p / 576i /
576p / 1080i.
④Detail: Press to switch the Detail
Enhancement feature. There are ve
levels that we can adjust 0 / 25 / 50 /
75 / 100. The factory default value is 0
(OFF).
⑤Up/Down/Left/Right: Press the Up/
Down buttons to move the highlight
bar to your desired setting when using the OSD. Press the Left/Right
buttons to increase/decrease the setting values.
⑥Enter: Press the button to conrm the selection.
⑦Demo: Press to see the split window demo. This demo will display
half left and half right side in order to compare the video quality. On
the left side is the original video signal without the HQV process and
on the right side is the video after going through the HQV process. This
demo will work when input resolution i480i/480p/576i/576p/1080i.
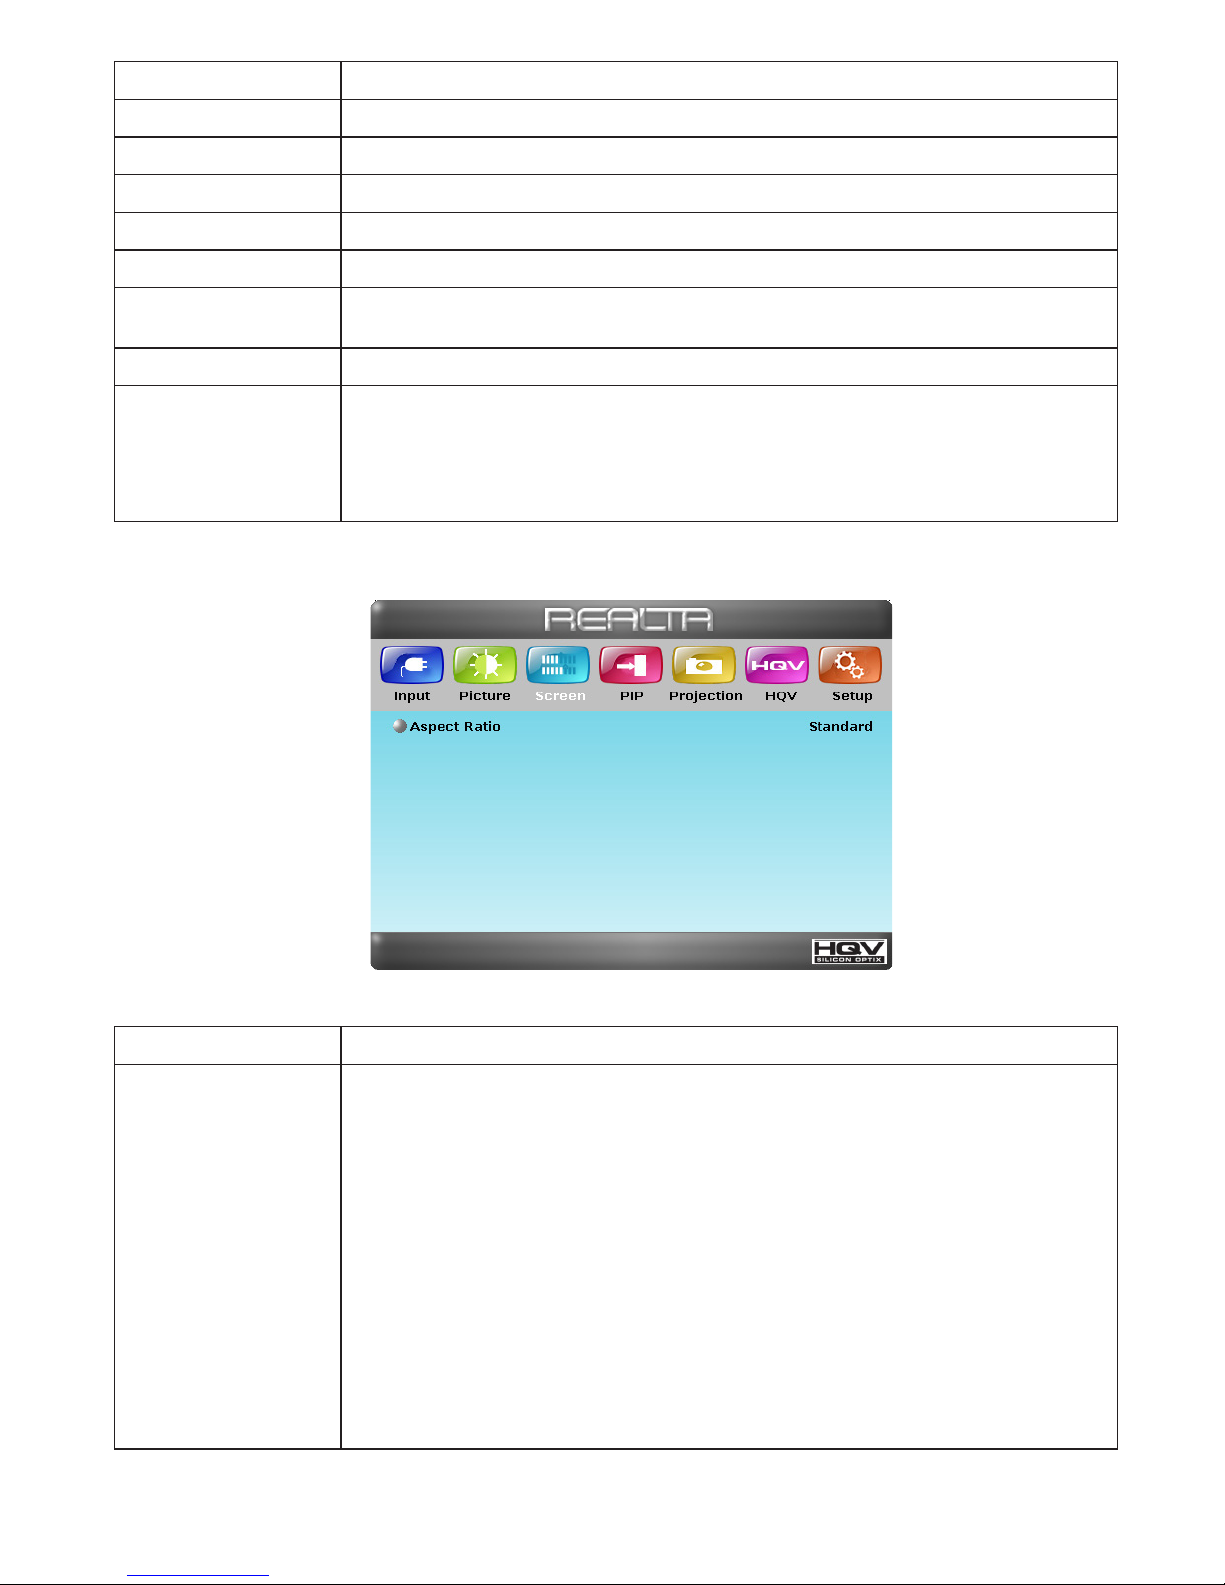
⑧Aspect Ratio: Press to select the Aspect Ratio format, there are
Standard/ Full Screen/ Crop/ Anamorphic/ Flexview/ 1_1/
Cinemascope and these features work when resolution is under
480i/480p/576i/576p. When input resolution is 720p/1080i/1080p, the
standard/1:1/Cinemascope can be adjusted, but other features are
non-adjustable. The factory default is standard.
⑨Input selection: Press each input selection button to choose the input
source.
⑩Output: Press this button to select the desired output resolution (Auto
mode/720p/1080p).
CR-60
POWERMENU
CLEANER DETAIL
A.RATIO
OUTPUT
DEMO
SVCOMP VIDEO
Instant
HQV
ENTER
HDMI 2
HDMI 1
INPUT
2 1
34
5
6
78
10
9
⑥HDMI output: This slot are where you connect the HDMI output port to
the displays with HDMI cable.
⑦Power: Plug the 5V DC power supply into this unit and connect the
adaptor to AC wall outlet.

4
6. OSD Operation
Press [MENU].
Press [▲/▼] to highlight an option.
Press [▲/▼] to adjust or press [◄] to return to the previous page.
Press [Enter] to conrm the selection
6.1 Input
Option Description
Input Browse through HDMI1, HDMI2, Component Video,
Composite and S-Video
6.2 Picture

5
Option Description
Brightness 0~100 of Brightness levels, the factory default value is at 50
Contrast 0~100 of Contrast levels, the factory default value is at 50
Color 0~100 of Color levels, the factory default value is at 50
Hue 0~360 of Hue levels, the factory default value is at 180
Sharpness 0~100 of Sharpness levels, the factory default value is at 50
Gamma Mode Adjust Gamma Correction levels, there are 1.0, 1.8, 2.0,
2.2 and 2.4; the factory default value is at 1.0
Black-Level 0 IRE (off), 7.5 IRE; the factory default value is 0 IRE (off)
Color Temp
9300K: Balanced color shade
Neutral: Neutral color shade
5500K: Dusky sky alike color shade; the factory default
value is on Neutral
6.3 Screen
Option Description
Aspect Ratio
Standard: Original content aspect ratio
Full Screen: Full screen by linear stretching
Crop: Full Screen by cropping
Anamorphic: Use in conjunction of 16:9 to 2.35:1
conversion lens. Morphing a 4:3 or 16:9 lm contents from
a 16:9 format to a 2.35:1 format
Flexview: full screen by non-linear stretching 1:1: 1:1 ratio
Cinemascope: Use in conjunction of 16:9 to 2.66:1
conversion lens. Morphing a 4:3 or 16:9 lm contents from
a 16:9 format to a 2.66:1 format

6
6.4 PIP
Option Description
PIP Enable PIP feature On or Off
PIP Inputs Select PIP input sources, the PIP input selection only
available when input source is connected
PIP Size Press ←/→to adjust the PIP size
PIP Position Select to show the PIP position form Top Left, Top Right,
Bottom Left or Bottom Right
6.5 Projection
There are three projection Application can be choosed:
Keystone
Anyplace
Rotation

7
6.5.1 Keystone
Option Description
Projection
Application Keystone
Horizontal
Keystone
-40~40 horizontal keystone adjustment, factory default
value is on 0
Vertical
Keystone
-30~30 vertical keystone adjustment, factory default value
is on 0
Anyplace N / A
Location Display location selection: Front Tabletop/Front Ceiling/
Rear Tabletop/Rear Ceiling
Pincushion/
Barrel Demo
-15~15 Pincushion/Barrel Demo adjustment, factory
default value is on 0
Rotation Demo N / A
6.5.2 Anyplace
Option Description
Projection
Application Anyplace
Horizontal
Keystone N / A
Vertical
Keystone N / A
Anyplace
To adjust the Horizontal/Vertical Keystone from Top Left or
Top Right, Bottom Left or Bottom Right, Reset Top Left or
Reset Top Right, Reset Bottom Left or Reset Bottom Right.
After selected the Horizontal/Vertical Keystone from Top
Left or Top Right, Bottom Left or Bottom Right selection
press up/down/left/right to adjust keystone angles. The
Horizontal Keystone’s maximum steps is 576 and Vertical
Keystone’s maximum steps is 324. When both Horizontal
and Vertical Keystone been adjusted at the same time
the Horizontal and Vertical Keystone steps will not meet
the maximum steps, the system will calculate and display
with the best ratio for Horizontal and Vertical Keystone
steps
Location Front Tabletop/Front Ceiling/Rear Tabletop/Rear Ceiling
Pincushion/
Barrel Demo N / A
Rotation Demo N / A

8
6.5.3 Rotation
Option Description
Projection
Application Anyplace
Horizontal
Keystone N / A
Vertical
Keystone N / A
Anyplace N / A
Location Front Tabletop/Front Ceiling/Rear Tabletop/Rear Ceiling
Pincushion/
Barrel Demo
-15~15 Pincushion/Barrel Demo adjustment, factory
default value is on 0
Rotation Demo -180~180 picture rotation, factory default value is on 0
6.6 HQV
Option Description
HQV
Processing HQV ON/OFF

9
6.7 Setup
Option Description
Output Mode
Auto
VGA 640x480@60Hz
SVGA 800x600@60Hz
XGA 1024x768@60Hz
SXGA 1280x1024@60Hz
UXGA 1600x1200@60Hz
480p 720x480@59Hz
720p 1280x720@60Hz
1080p 1920x1080@60Hz
576p 720x576@50Hz
720p_50 1280x720@50Hz
1080p_50 1920x1080@50Hz
1080p_24 1920x1080@24Hz
WXGA 1280x768@60Hz
WSXGA 1680x1050@60Hz
WUXGA 1920x1080@24Hz
Reset Press to reset the system back to factory setting
Menu Position Center, Top Left, Top Right, Bottom Left, Bottom Right
Menu
Transparency Select On/Off
Language
Select preferred languages: English, French, Italian,
Spanish, Portuguese, Japanese, Simple Chinese,
Traditional Chinese and Korean.
Audio Delay 0~400 Audio Delay adjustment, factory default value is on 0

10
7. Connection and Installation

11
8. Specications
Input ports Composite video + R/L x 1
S-Video + R/L x 1
Component + R/L x 1
HDMI x 2
Output port HDMI x 1
Output Mode Component + R/L x 1
Auto
VGA 640x480@60Hz
SVGA 800x600@60Hz
XGA 1024x768@60Hz
SXGA 1280x1024@60Hz
UXGA 1600x1200@60Hz
480p 720x480@59Hz
720p 1280x720@60Hz
1080p 1920x1080@60Hz
576p 720x576@50Hz
720p_50 1280x720@50Hz
1080p_50 1920x1080@50Hz
1080p_24 1920x1080@24Hz
WXGA 1280x768@60Hz
WSXGA 1680x1050@60Hz
WUXGA 1920x1080@24Hz
Power Supply 5V/5A DC (US/EU standards, CE/FCC/UL certied)
Dimensions (mm) 217(W) x 213(D) x 50(H)
Weight(g) 1430
Chassis Material Metal
Silkscreen Color Black
Operating Temperature 0°C ~ 40°C / 32°F~104°F

12
Acronyms A
Acronym Complete Term

A


20080704 MPM-CSOT2
Home page: http://www.cypress.com.tw
CYPRESS TECHNOLOGY CO., LTD.
Other manuals for CSO-T2
1
Table of contents
Other CYP Media Converter manuals