D-Link DCS-3714 User manual

User Manual
Version 1.00 | 09/01/2014
DCS-3714
HD Day and Night WDR Camera with Lowlight+

2D-Link DCS-3714 User Manual
D-Link reserves the right to revise this publication and to make changes in the content hereof without obligation to notify any
person or organization of such revisions or changes. Information in this document may become obsolete as our services and
websites develop and change.
Manual Revisions
Trademarks
D-Link and the D-Link logo are trademarks or registered trademarks of D-Link Corporation or its subsidiaries in the United States or
other countries. All other company or product names mentioned herein are trademarks or registered trademarks of their respective
companies.
Copyright © 2014 D-Link Corporation.
All rights reserved. This publication may not be reproduced, in whole or in part, without prior expressed written permission from D-Link
Systems, Inc.
Revision Date Description
1.0 April 11, 2014 DCS-3714 Revision A1 with rmware version V1.00
Preface

3D-Link DCS-3714 User Manual
Table of Contents
Product Overview........................................................ 4
Package Contents ...................................................4
Introduction..............................................................5
System Requirements ....................................... 5
Features .................................................................. 6
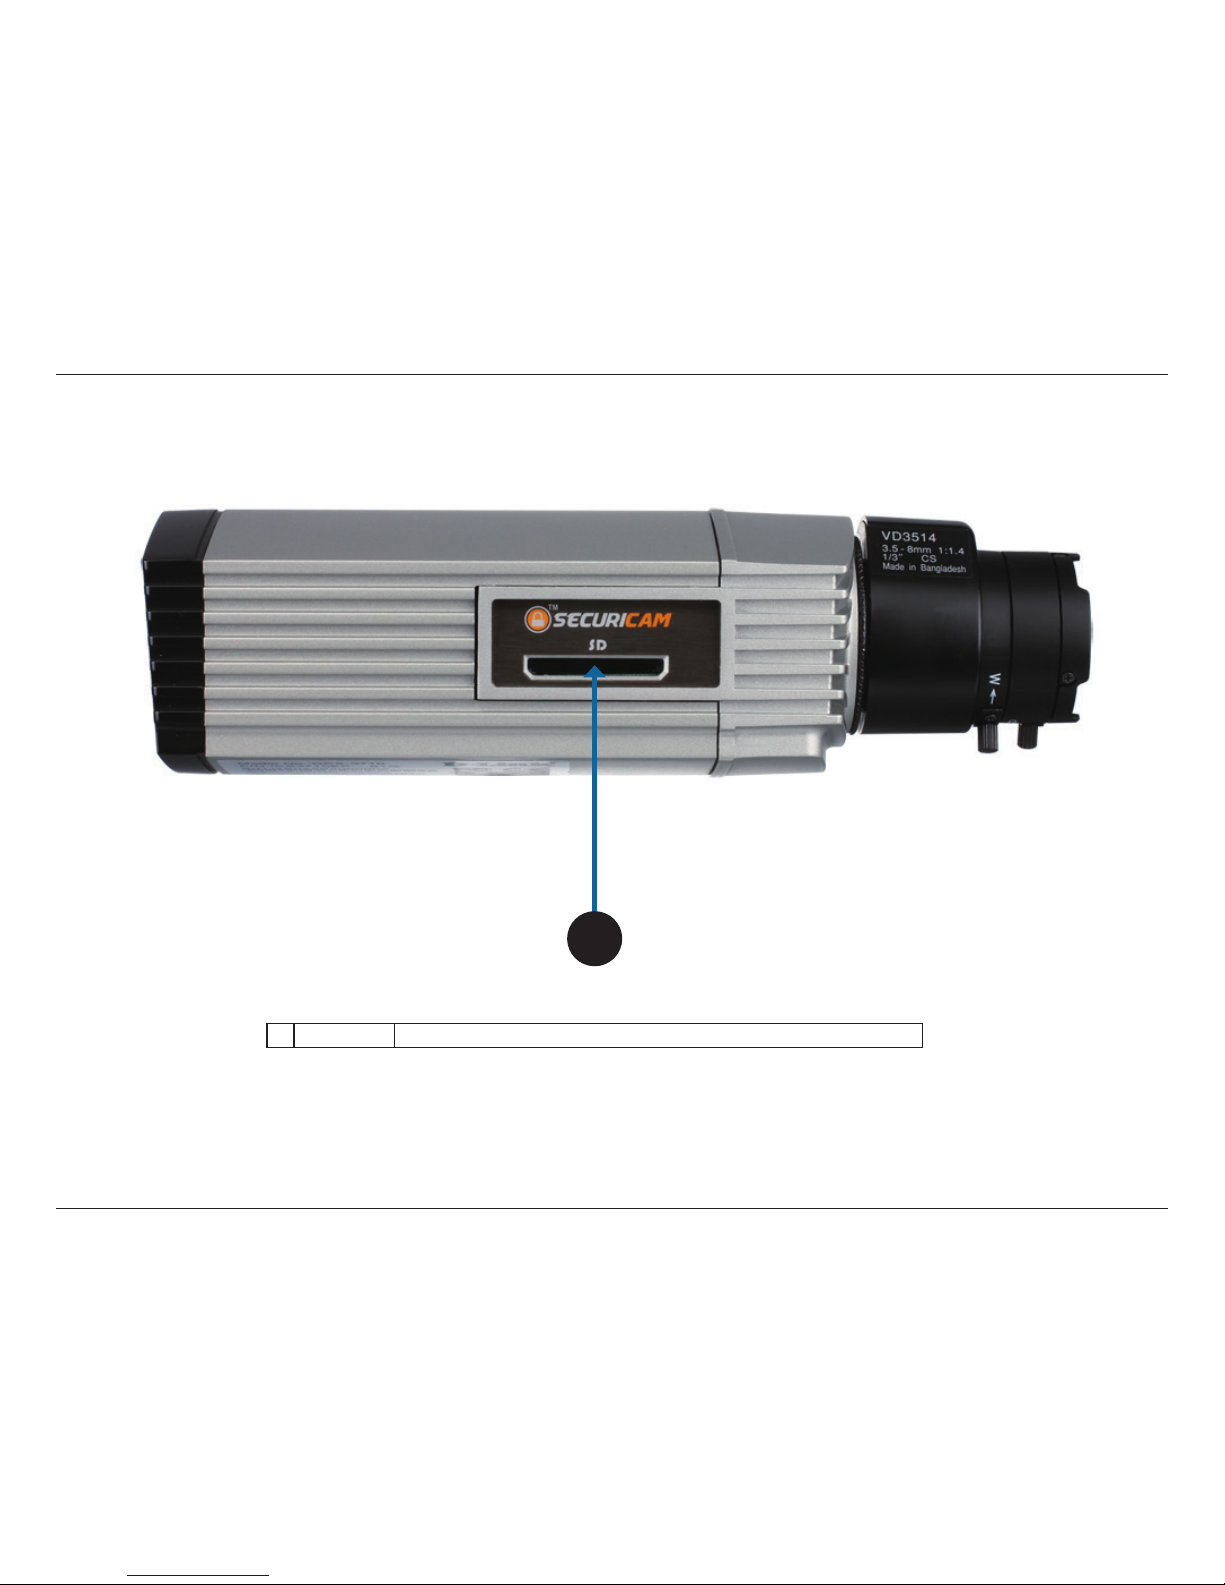
Hardware Overview ..................................................... 7
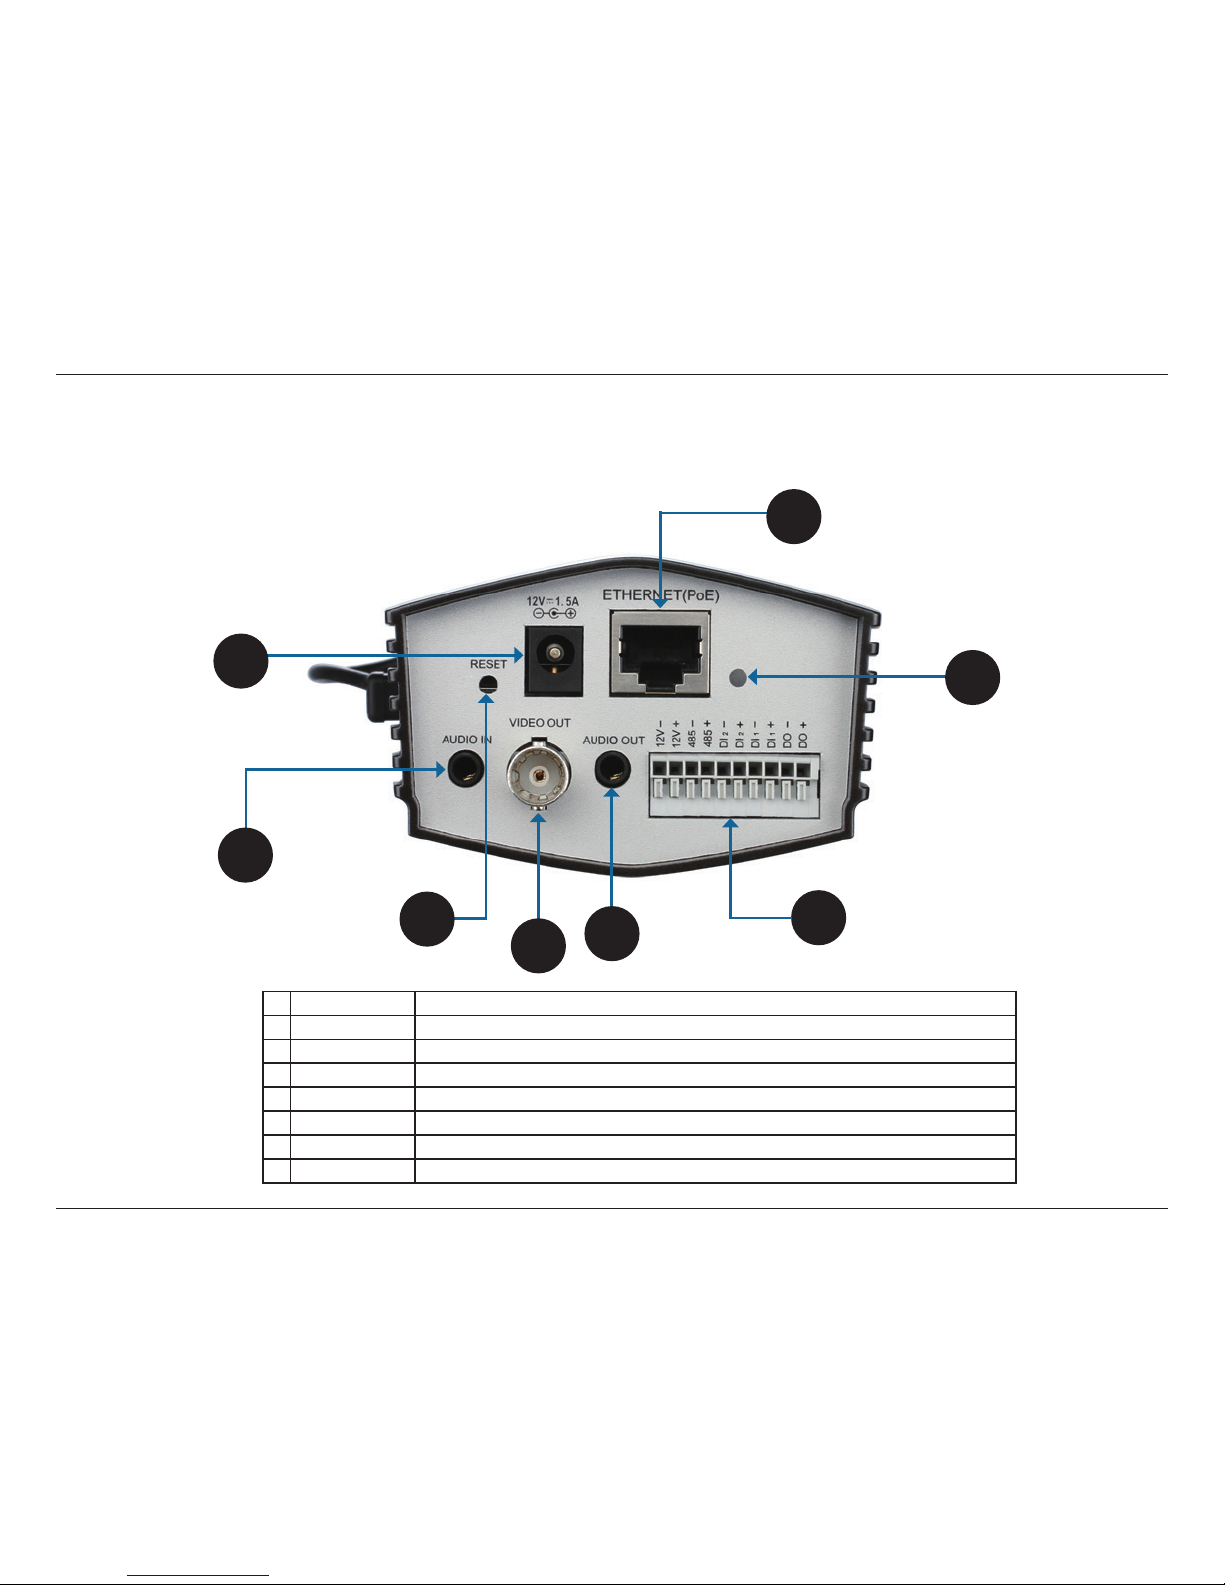
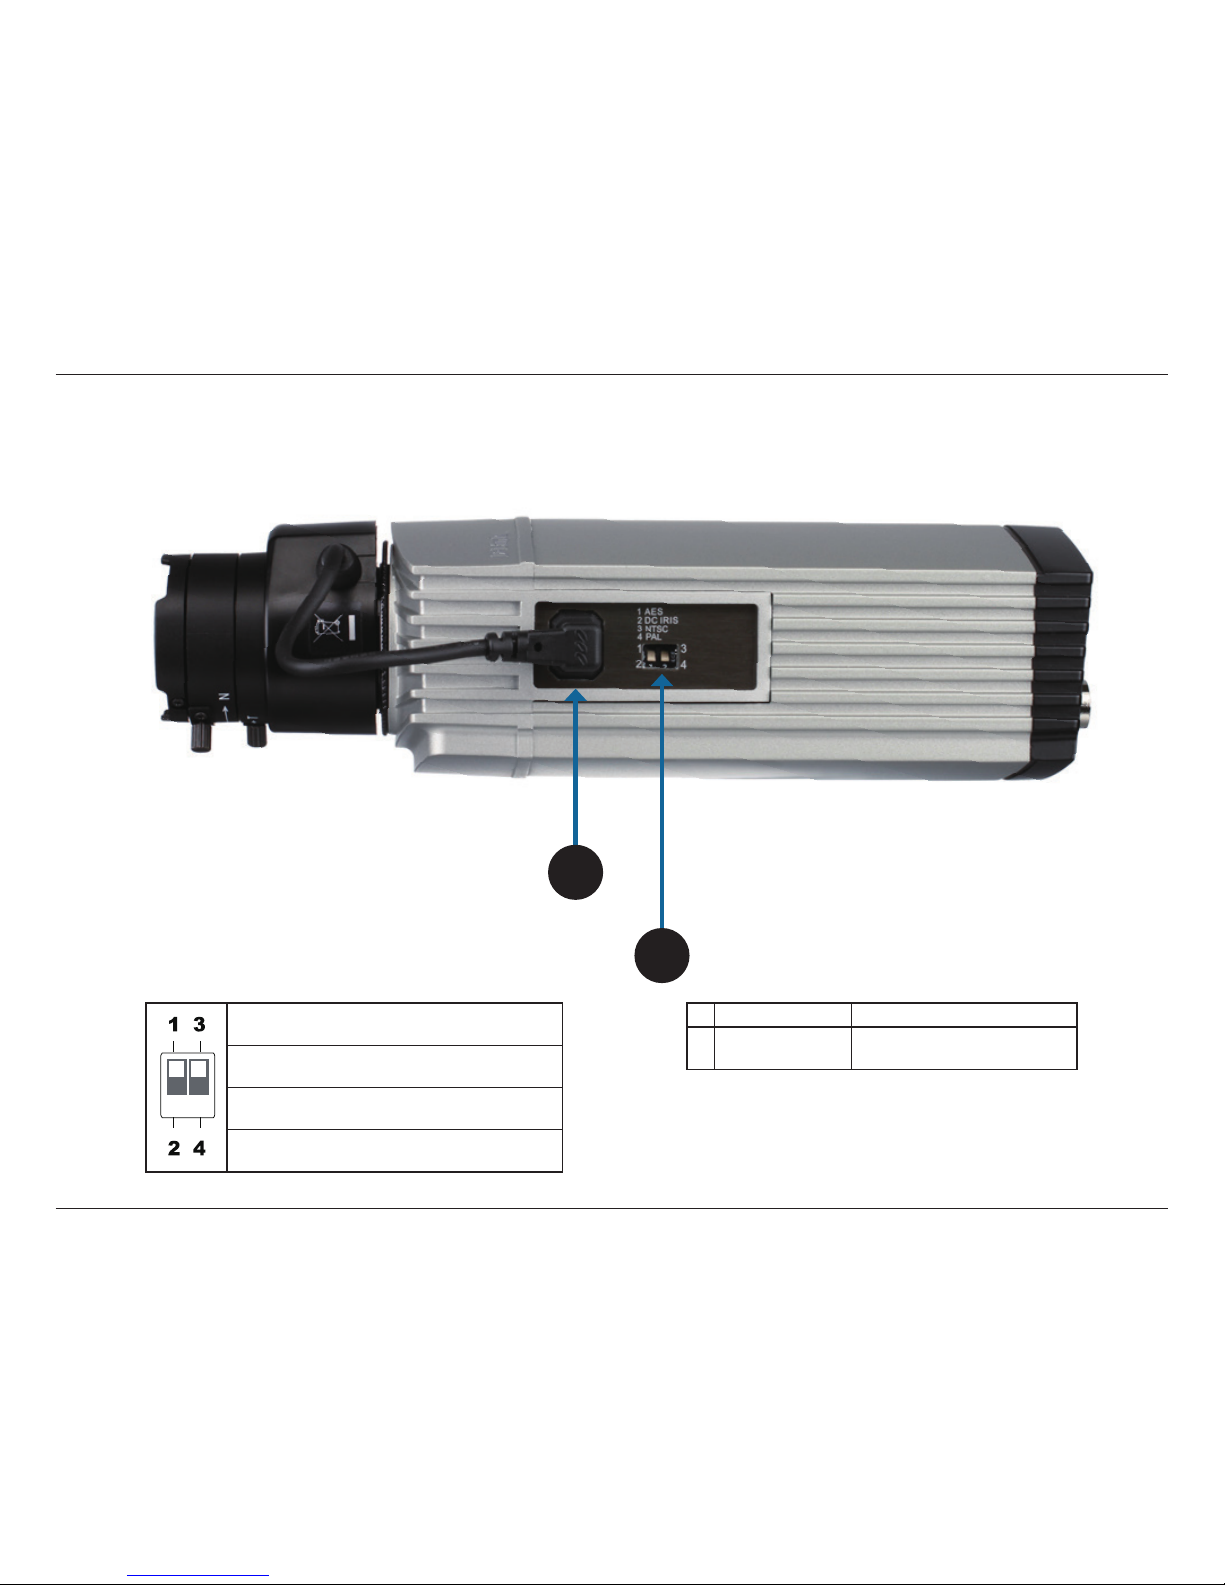
Hardware Overview .................................................7
Rear ...................................................................7
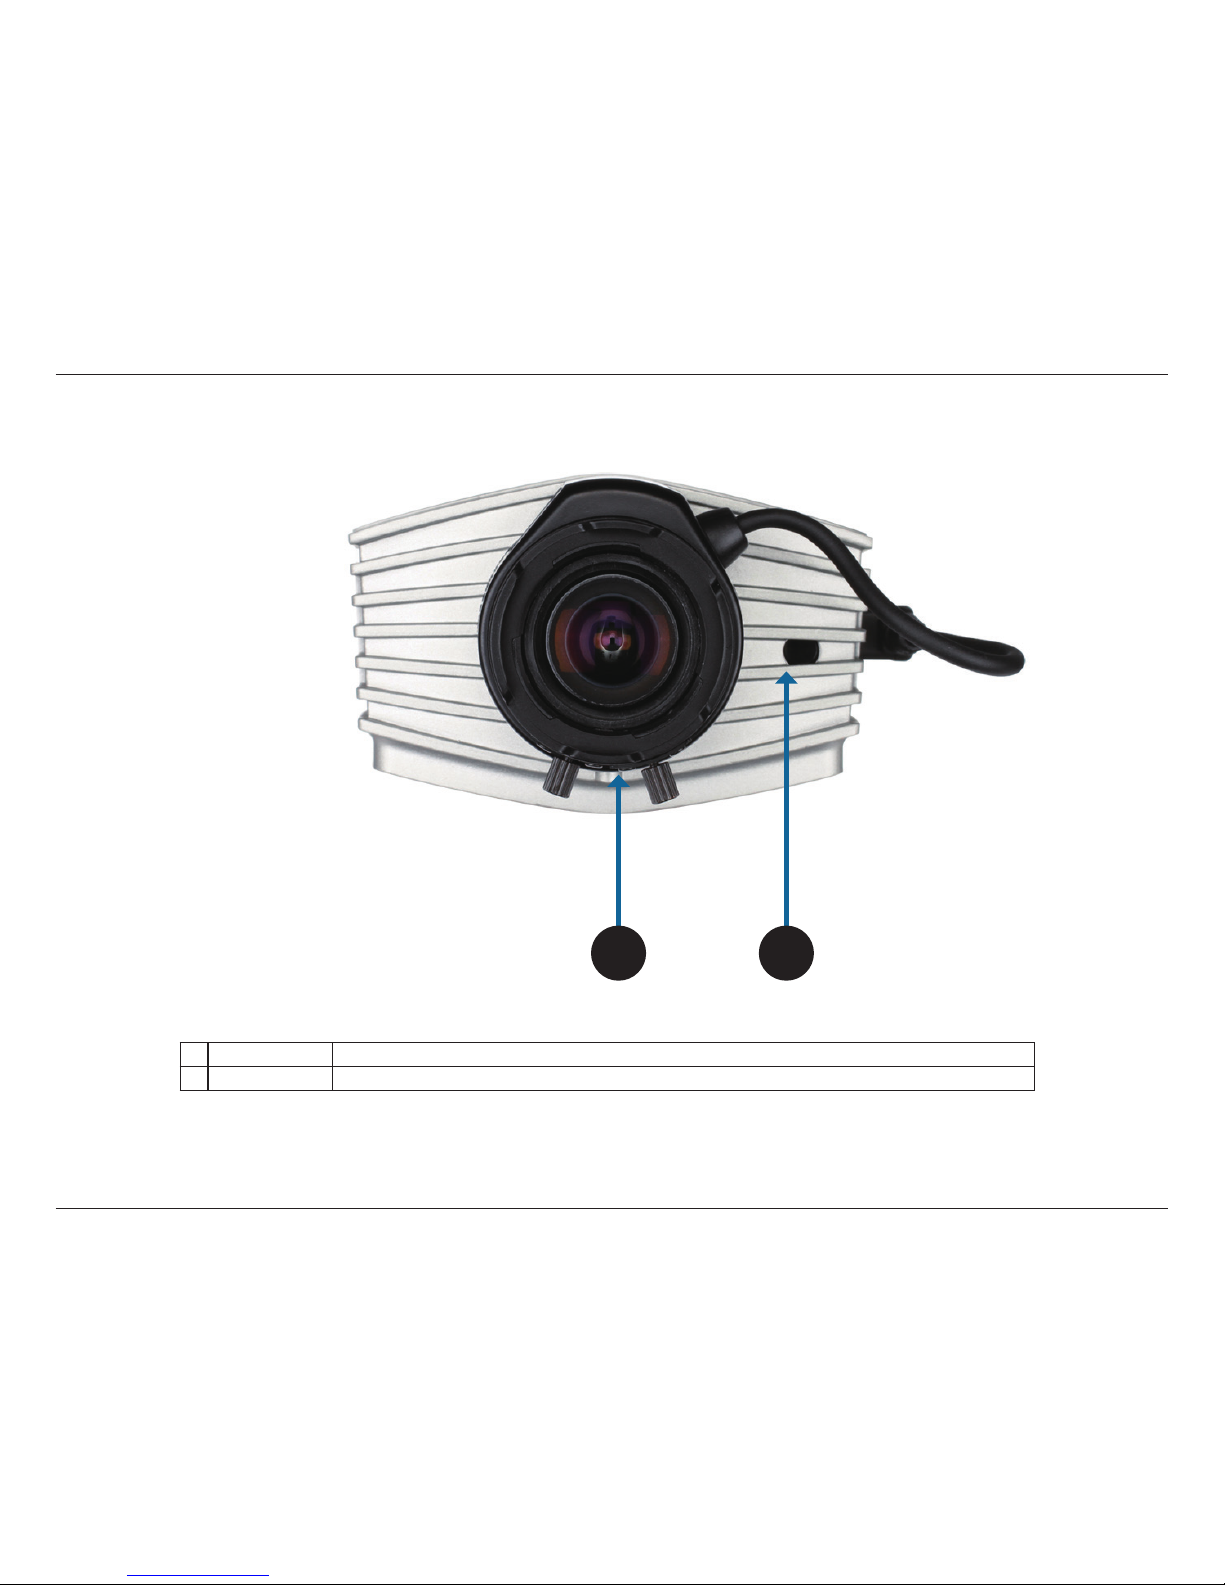
Front ..................................................................8
Conguration with Wizard......................................11
Conguration............................................................. 16
Web-based Conguration Utility ............................ 16
Live Video..............................................................18
Setup ..................................................................... 20
Wizard..............................................................20
Internet Connection Setup Wizard................... 20
Motion Detection Setup Wizard ....................... 23
Network Setup ................................................. 25
Dynamic DNS .................................................. 28
Image Setup .................................................... 29
Audio and Video .............................................. 31
Preset ..............................................................33
Motion Detection.............................................. 35
Time and Date ................................................. 36
Event Setup ..................................................... 37
Application ....................................................... 38
Add Server....................................................... 39
Add Media........................................................40
SD Card ...........................................................46
Advanced...............................................................47
Digital Input/Output .......................................... 47
RS-485.............................................................48
ICR...................................................................49
HTTPS .............................................................50
Access List....................................................... 51
SNMP .................................................................... 52
Maintenance ..........................................................54
Device Management........................................ 54
Backup and Restore ........................................ 55
Firmware Upgrade ........................................... 56
Status .................................................................... 57
Device Info....................................................... 57
Logs .................................................................58
Help .................................................................59
Appendix ....................................................................60
DI/DO Schematics .................................................60
DI/DO..................................................................... 60
Technical Specications ........................................ 61

4D-Link DCS-3714 User Manual
Product OverviewProduct Overview
If any of the above items are missing, please contact your reseller.
Package Contents
DCS-3714 Network Camera
CD-ROM with User Manual and Software
CAT5 Ethernet cable
Camera Stand
C-CS Mount Adapter (5mm Ring)
Power Adapter

5D-Link DCS-3714 User Manual
Product Overview
Introduction
The DCS-3714 HD Day and Night WDR Camera with Lowlight+ is a professional surveillance and security solution for small,
medium, and large enterprises. The DCS-3714 uses a 1.3 megapixel progressive scan CMOS sensor which produces high
quality images with low noise allowing the DCS-3714 to provide outstanding performance with color night vision in low light-
conditions, resulting in more vibrant color detail regardless of the amount of light available. The noise reduction feature has
been upgraded and enhanced as well to provide a level of detail in the image quality that is unmatched by other oerings in
the market. In addition, the DCS-3714 has Wide Dynamic Range (WDR) enhancement, users can identify image details in both
extremely bright and dark conditions.
The DCS-3714 has a built-in removable IR-cut lter for day/night functionality which provides clear detail and high quality
video at any hour of the day. The DCS-3714 incorporates Power over Ethernet (PoE) and an SD card slot, allowing it to be
easily installed in a variety of locations. The DCS-3714 input and output ports allow connectivity to external devices such as
IR sensors, switches, and alarm relays. It also comes with an RS-485 interface, providing connectivity to an optional pan/tilt
enclosure which eectively adds pan/tilt functionality to the DCS-3714. An additional 12 V interface provides power for an
optional LED illuminator. This combination of features makes the DCS-3714 a high-performance, reliable and cost-eective
24-hour megapixel surveillance solution.
• Computer with Microsoft Windows® 8, 7, Vista®, or XP (for CD-ROM Setup Wizard), Mac OS® X or Linux
• PC with 1.3GHz processor or above, and at least 128MB RAM
• Internet Explorer® 7 or above , Firefox® 3.5 or above, Safari® 4 and Chrome™ 8.0 or above
• Existing 10/100 Ethernet-based network
• A SD memory card (optional) is required for recording to onboard storage. SDHC Class 6 or above is recommended.
• Broadband Internet connection
System Requirements

6D-Link DCS-3714 User Manual
Product Overview
Features
High-Quality Color Night Vision
The DCS-3714 provides outstanding performance in low light-conditions, resulting in more vibrant color detail regardless of the amount of
lightavailable.
Wide Dynamic Range
Wide Dynamic Range technology corrects imperfect lighting conditions, providing clear images with the right amount of contrast even when a
subject is backlit.
Remote Monitoring Utility
The D-ViewCam application adds enhanced features and functionality for the DCS-3714 and allows administrators to congure and access the
Network Camera from a remote site via Intranet or Internet. Other features include image monitoring, recording images to a hard drive, viewing
up to 32 cameras on one screen, and taking snapshots.
PoE (Power over Ethernet) for Streamlined Installation
The DCS-3714 can get all the power it needs from a PoE switch or PoE injector, for a simple and clutter-free installation.
All-Day Surveillance with low light color image capability
The built-in Sony sensor allows you to monitor an area during the night with full color images. The DCS-3714 provides clear detail and high quality
video at any hour of the day by automatically adjusting its a built-in removable IR-cut lter.
Add External Controls or Devices
An integrated RS-485 interface provides connectivity to an optional pan/tilt enclosure which eectively adds pan/tilt functionality to the DCS-3714
while input and output ports allow connectivity to external devices such as IR sensors, switches, and alarm relays..

7D-Link DCS-3714 User Manual
Hardware Overview
Hardware Overview
Hardware Overview
Rear
1Ethernet (PoE) RJ-45 connector for Ethernet which can also be used to power the camera using PoE
2DC Power 12 V DC
3Audio In Audio input connector for a microphone
4Reset Press and hold this button for 5 seconds to reset the camera
5BNC Analog video output
6Audio Out Audio output for external speakers
7I/O Connector I/O connectors for external devices
8LED Power and network indicator
3
2
1
8
7
6
5
4

8D-Link DCS-3714 User Manual
Hardware Overview
Front
1Lens Connector Connect to a CS mount
2ICR Sensor The IR-Cut Removable sensor judges lighting conditions and switches from color to infrared accordingly
21

9D-Link DCS-3714 User Manual
Hardware Overview
1. AES: Auto Electric Shutter
2. DC IRIS: Use an auto iris (DC drive)
3. NTSC: TV output signal selector
4. PAL: TV output signal selector
1DC-Iris Connector Connector for DC auto Iris lens
2DIP Switch Toggles between several
regional formats
2
1

10D-Link DCS-3714 User Manual
Hardware Overview
1SD Card Slot Local SD Card for storing recorded images and video
1

11D-Link DCS-3714 User Manual
Hardware Overview
Conguration with Wizard
Insert the DCS-3714 CD into your computer's CD-ROM drive to begin the installation. If the Autorun function on your computer is
disabled, or if the D-Link Launcher fails to start automatically, click Start > Run. Type D:\autorun.exe, where D: represents the drive
letter of your CD-ROM drive.
Click Installation Wizard to begin the installation.
After clicking Setup Wizard, the window on the right will open.
Click Next to continue.

12D-Link DCS-3714 User Manual
Hardware Overview
Click Yes to accept the License Agreement.
To start the installation process, click Next.
Note: The installation may take several minutes to nish.

13D-Link DCS-3714 User Manual
Hardware Overview
Click Finish to complete the installation.
Click on the D-Link Setup Wizard SE icon that was created in your Windows
Start menu.
Start > D-Link > Setup Wizard SE

14D-Link DCS-3714 User Manual
Hardware Overview
Enter the Admin ID and password. When logging in for the rst time, the default
Admin ID is admin with the password left blank.
Click Next, to proceed to the next page.
The Setup Wizard will appear and display the MAC address and IP address of
your camera(s). If you have a DHCP server on your network, a valid IP Address
will be displayed. If your network does not use a DHCP server, the network
camera's default static IP address 192.168.0.20 will be displayed.
Click the Wizard button to continue.

15D-Link DCS-3714 User Manual
Hardware Overview
Take a moment to conrm your settings and click Restart.
Select DHCP if your camera obtains an IP address automatically when it boots up.
Select static IP if the camera will use the same IP address each time it is started.
Click Next, to proceed to the next page.

16D-Link DCS-3714 User Manual
Conguration
Web-based Conguration Utility
Conguration
This section explains how to congure your new D-Link Network Camera using the Web-based Conguration Utility.
Click on the D-Link Setup Wizard SE icon that was created in your Windows
Start menu.
Start > D-Link > Setup Wizard SE
Select the camera and click the button labeled "Link" to access the web
conguration.
The Setup Wizard will automatically open your web browser to the IP address of
the camera.
Alternatively, you may manually open a browser and enter the IP address of the
camera: 192.168.0.20

17D-Link DCS-3714 User Manual
Conguration
This section shows your camera’s live video. You can select your video prole and
view or operate the camera. For additional information about web conguration,
please refer to the user manual included on the CD-ROM or the D-Link website.
Enter admin as the default username and leave the password blank. Click OK to
continue.

18D-Link DCS-3714 User Manual
Conguration
Live Video
This section shows your camera’s live video. You may select any of the available icons listed below to operate the camera. You may
also select your language using the drop-down menu on the left side of the screen.
You can zoom in and out on the live video image using your mouse. Right-click to zoom out or left-click to zoom in on the image.
Digital Input
Indicator
This indicator will change color when a digital
input signal is detected.
Motion Trigger
Indicator
This indicator will change color when a trigger
event occurs.
Note: The video motion feature for your
camera must be enabled.
Recording
Indicator
When a recording is in progress, this indicator
will change color.
Video Prole 1
Video Prole 2
Video Prole 3
Full screen mode
Taking a Snapshot
Recording a Video Clip
Set a Storage Folder
Listen/Stop Listening
Talk/Stop Talking
Start/Stop Digital Output
Control Pad
This control pad can be used to pan, tilt, and zoom
within the camera's predened view area, if one
has been dened.

19D-Link DCS-3714 User Manual
Conguration
If any presets have been dened, selecting a preset from this list
will display it.
This option displays the status of the SD card. If no SD card has
been inserted, this screen will display the message "Card Invalid."
This option displays the status of your I/O device if a device has
been connected.
This camera uses electronic pan/tilt/zoom (ePTZ) to select and
view areas of interest in the eld of view. Please see "Audio and
Video" on page 31 for information about setting the frame size
and view window area.
You may select a value between 0 and 64. 0 is the slowest and 64
is the fastest.
This window indicates the total eld of view (FOV) of the camera.
The red box indicates the visible region of interest (ROI).
You may select the interface language using this menu. The
available options are English and Traditional Chinese.
Go To:
(Preset List)
SD Status:
IO Status:
PTZ Control:
ePTZ Speed:
Global View:
Language: Auto Pan Starts the automatic
panning function. The
ROI will pan from back
and forth within the
FOV
Stop Stops the camera
ePTZ motion
Preset Path Starts the camera's
motion along the
predened path

20D-Link DCS-3714 User Manual
Conguration
Setup
Wizard
To congure your Network Camera, click Internet Connection
Setup Wizard. Alternatively, you may click Manual Internet
Connection Setup to manually congure your Network Camera and
skip to "Network Setup" on page 25.
To quickly congure your Network Camera’s motion detection
settings, click Motion Detection Setup Wizard. If you want to
enter your settings without running the wizard, click Manual Motion
Detection Setup and skip to "Motion Detection" on page 35.
Internet Connection Setup Wizard
This wizard will guide you through a step-by-step process to
congure your new D-Link Camera and connect the camera to the
internet. Click Next to continue.
Note: Select DHCP if you are unsure of which settings to choose.
Click Next to continue.
Table of contents
Other D-Link Security Camera manuals

D-Link
D-Link DCS-3420 User manual

D-Link
D-Link DCS-3511 User manual

D-Link
D-Link DCS-P6000LH User manual

D-Link
D-Link DCS-6112 User manual

D-Link
D-Link DCS-6004L? DCS-6005L User manual

D-Link
D-Link DCS-1100 User manual

D-Link
D-Link DCS-960L User manual

D-Link
D-Link DCS-7000L User manual

D-Link
D-Link DCS-8325LH User manual

D-Link
D-Link DCS-2310L User manual

D-Link
D-Link DCS-F3611-L1 User manual

D-Link
D-Link DCS-6111 User manual

D-Link
D-Link DSB-C320 User manual

D-Link
D-Link DCS-6500LHV2 User manual

D-Link
D-Link DCS?6010L User manual

D-Link
D-Link DCS-936L Manual

D-Link
D-Link DCS-1201 User manual

D-Link
D-Link SECURICAM DCS-7110 User manual

D-Link
D-Link DCS-4603 User manual

D-Link
D-Link DCS-6112 User manual