Daktronics DMP-5000 Series User manual

201 Daktronics Drive
Brookings, SD 57006-5128
www.daktronics.com/support
800.325.8766
DMP-5000/8000 SERIES
DIGITAL MEDIA PLAYER
OPERATION MANUAL
P1603 & P1833
DD1881645
Rev 12
15 July 2020

Copyright © 2020
All rights reserved. While every precaution has been taken in the preparation of this manual, the publisher assumes no
responsibility for errors or omissions. No part of this book covered by the copyrights hereon may be reproduced or copied
in any form or by any means—graphic, electronic, or mechanical, including photocopying, taping, or information
storage and retrieval systems—without written permission of the publisher.
Daktronics trademarks are property of Daktronics, Inc. All other trademarks are property of their respective companies.

– i –
Table of Contents
1 Introduction.........................................1
Product Information ..................................1
First-Time Setup & Launch.........................2
Access.....................................................2
Display Connection................................2
Dashboard ..............................................2
2 User Interface Basics ..........................3
Interface Elements.....................................3
Right-Side Menu.........................................4
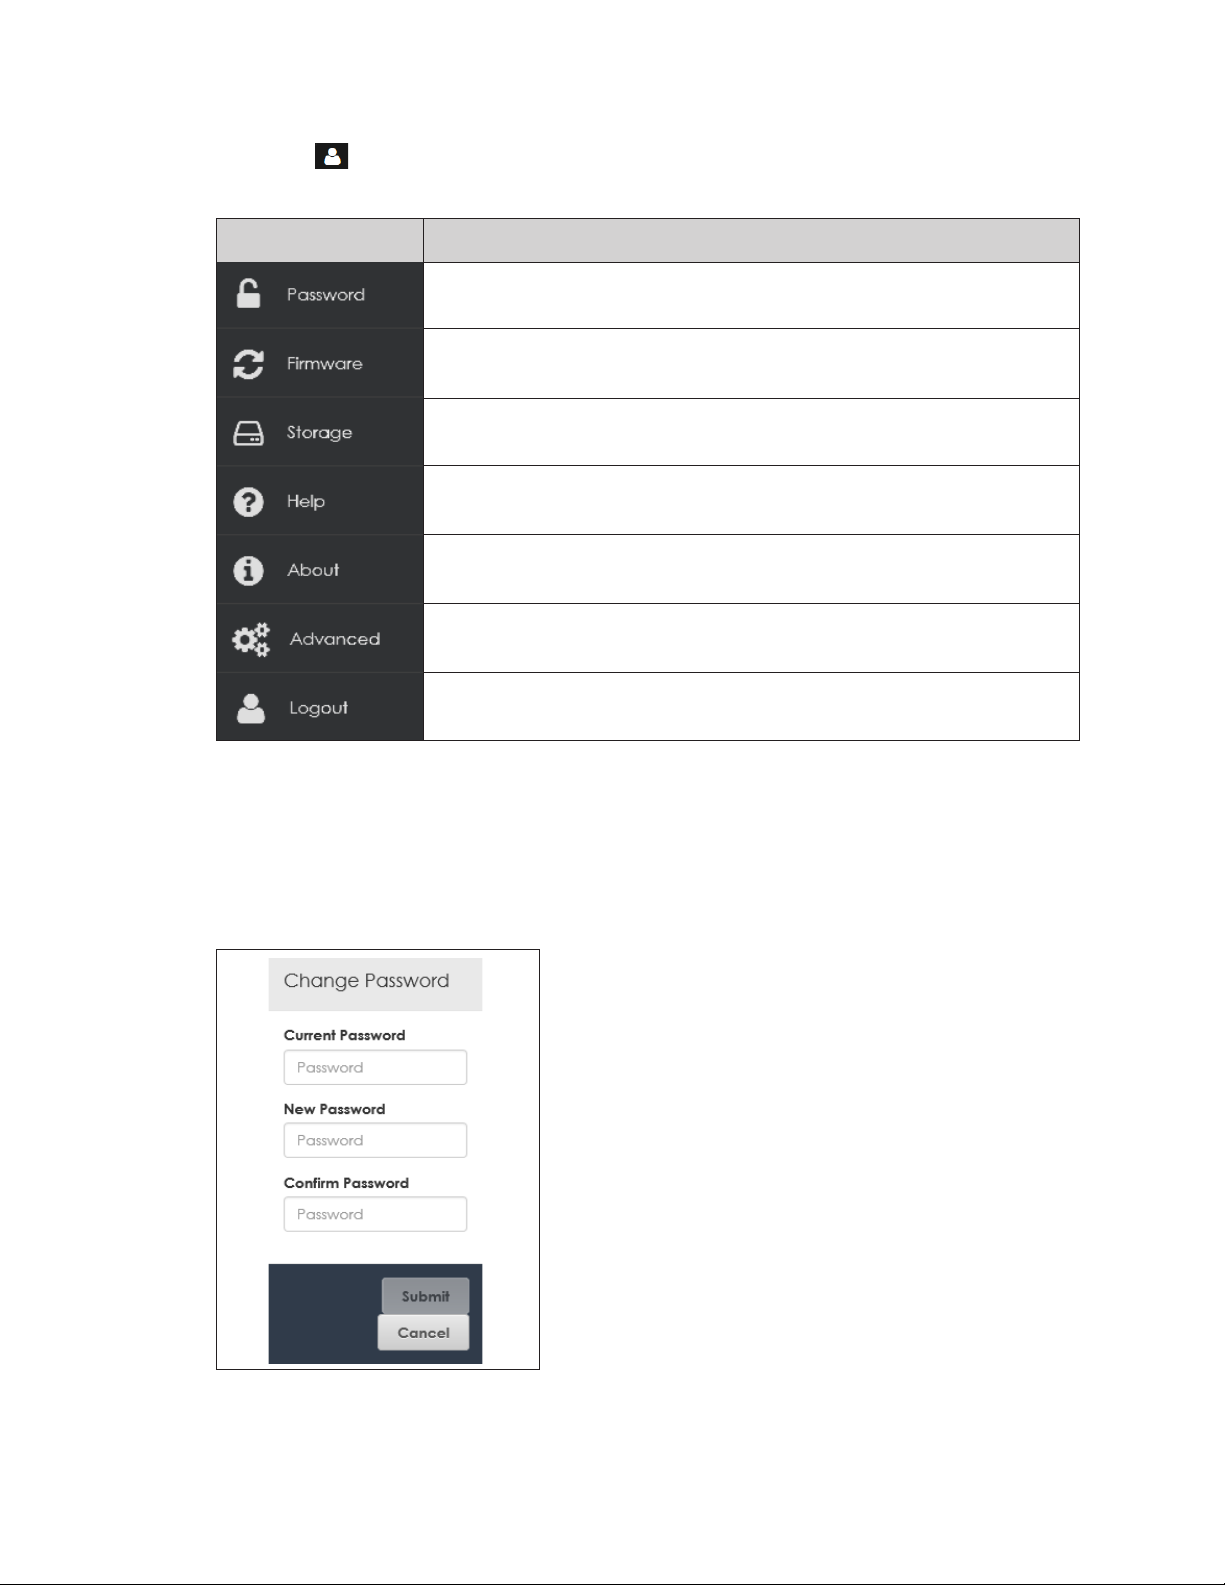
Password .................................................4
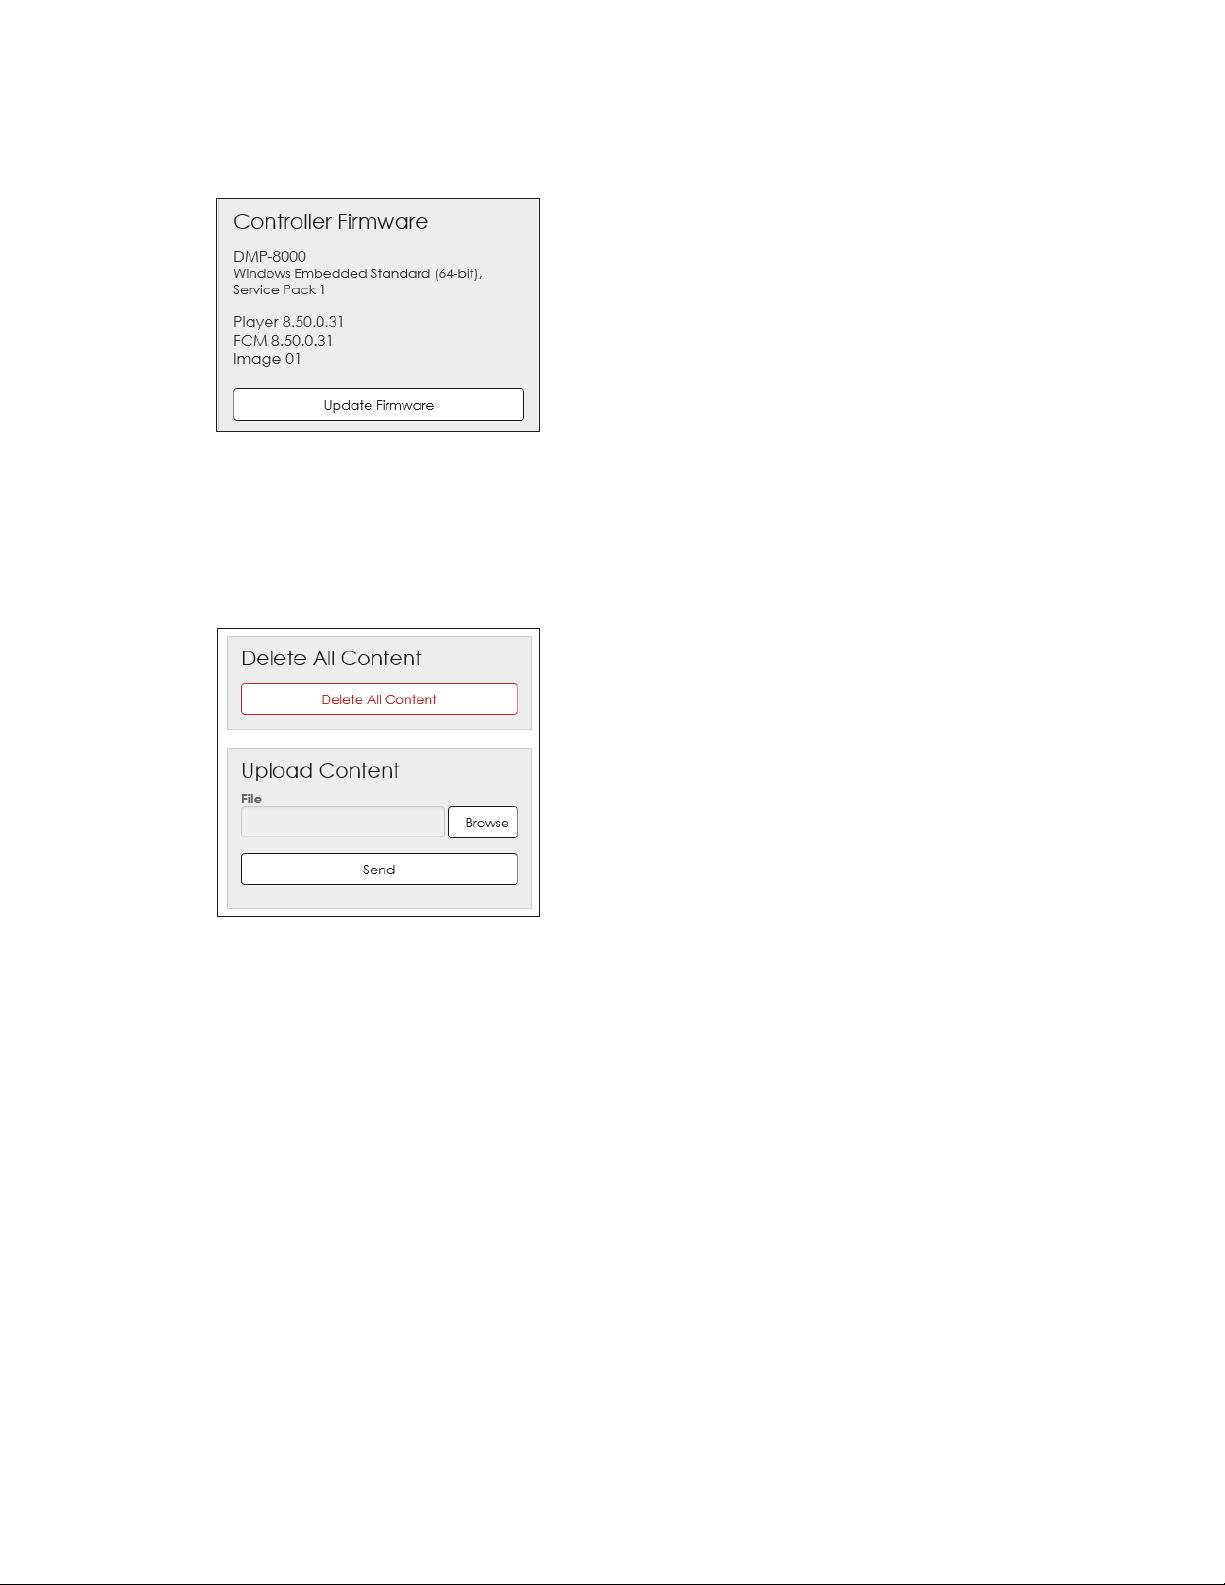
Firmware..................................................5
Storage ....................................................5
Help..........................................................5
About .......................................................5
Advanced ...............................................5
Login/Logout...........................................5
Main Menu .................................................6
3 Dashboard...........................................7
Dashboard Tiles..........................................7
4 Cong ..................................................9
Identication ............................................10
Network.....................................................11
IPConguration ....................................11
DNSConguration ................................12
Outputs .....................................................12
Daktronics Player..................................13
Outputs ..................................................13
Output Conguration ........................14
Signs.......................................................15
AudioConguration.............................16
Sign Conguration..............................17
Time ...........................................................18
Time Zone ..............................................18
NTP Servers ............................................18
Sync Date and Time .............................18
Services .....................................................19
Services .................................................19
Management .....................................19
Media Management Server .............19
Diagnostics............................................20
Restart .......................................................20
VIP..............................................................21
5000 Series.............................................21
Brightness.............................................21
Temperature .......................................22
Test Patterns ........................................22
4000 Series.............................................22
Brightness.............................................22
Temperature .......................................22
Test Patterns ........................................22
Security .....................................................23
RTD.............................................................23
Sign Mapping........................................24
Data Sources.........................................24
Color Mapping......................................25
Default Content.......................................25
PlaylistConguration ...........................25
Default Image Duration .......................26
5 Monitor...............................................27
6 NTCIP..................................................28
7 System Backup .................................29
8 Data Table Index ..............................30
9 Troubleshooting ................................31
System Restart ..........................................31
Diagnostics Information ..........................31
Network Tests............................................32
10 Player Control Systems &
Diagnostics........................................33
Control Systems & Content
Management...........................................33
Industry-Standard Content ..................33
Audio .....................................................33
Live Video Feeds ..................................33
Show Control System...............................33
Venus®Control Suite................................34
Intelligent Device Management ...........34
11 Show Control System........................35
Overview ..................................................35
Video Production ....................................35
Clip Server.............................................35
Character Generator ...........................35
Supported Video Inputs..........................36
Supported Video Outputs ......................36
Conguring DPF Input Files .....................36

– ii –
Table of Contents
Internal & External Keying.......................37
Internal Keying......................................37
Triggering Internal Keying ..................37
External Keying.....................................38
Triggering External Keying .................38
12 Zone Management...........................39
Planning the Layout ................................39
Changing Default Layout Files...............40
Editing Files............................................40
Copying Zones......................................41
Starting the LAYOUT File ..........................42
13 Maintenance Guide.........................43
Maintenance Frequency........................43
Maintenance Tools..................................43
General Cleaning Precautions ..............44
Exterior Computer Cleaning ..................44
Interior Computer Cleaning ...................44
14 System Troubleshooting ...................46
Initial Troubleshooting Checklist.............46
Retrieving Important Information...........46
GUID.......................................................46
DMP-5000/8000 Software ..................46
XML File ................................................46
Software Version Number....................47
Blanking or Flickering on SDI Input or
Output.......................................................47
Daktronics Contact Information ............47
15 Exchange/Repair & Return
Programs ...........................................48
Exchange Program .................................48
Repair & Return Program........................49
Shipping Address..................................49
Warranty & Limitation of Liability............49
A Supplementary Documents.............51
B Daktronics Warranty & Limitation
of Liability...........................................53

Introduction
1
1 Introduction
This manual helps Daktronics customers operate a DMP-5000/8000 series digital media
player (DMP). Review all of the information in this manual to understand the features that
these players offer.
This manual assumes the user has a basic working knowledge of personal computer
operations such as using menus and folders. Terms that describe commonly used
computer operations are used frequently in this manual.
Product Information
The DMP-5000/8000 series digital media player combines with a display control system
such as Show Control or Venus®Control Suite, in both scheduled and interactive control
scenarios. The player distributes graphics, animations, live video, real-time data, 3D
effects, web page content, and other types of creative content to a digital display
network.
DMP-5000 series players use a Linux®operating system; DMP-8000 series players use a
Windows®operating system.
Daktronics digital media players are either stand-alone units (normally rack mounted) or
embedded in the display cabinet itself. Refer to Figure 1.
Rack-mounted player Embedded player
Figure 1: Player Types
Within a display system, the player dynamically composites content onto a video output
to deliver playback to a single display or multiple displays. Compatible with large-screen
LED or at-panel displays, the player provides the following functions:
• Multiple Display Technologies: Supports LED, LCD, plasma, and projection display
technologies
• Live Data: Maintains fresh, informative content using real-time data feeds
• Scheduling: Manages les using web-based scheduling when combined with Venus®
Control Suite
• Playback Reporting: Provides proof-of-performance reports when combined with
Venus® Control Suite to indicate when les played and for how long
• Split Screen Capability: Splits the display screen into zones for additional display
options
• Direct Control: Pairs with the Show Control system and/or the Venus®Control Suite to
provide customers direct control in environments with or without internet access

Introduction
2
First-Time Setup and Launch
Access
While DMP-5000/8000 series players run on many different browsers and devices, use
the latest versions of Google Chrome®, Mozilla®Firefox®, Microsoft®Internet Explorer®, or
Apple®Safari®for the best experience.
Internet access is necessary to install additional components if needed.
Display Connection
The DMP-5000/8000 series digital media player must be connected to a display to
distribute content. Use the DisplayFind utility to nd a device on a local network if the IP
address is unknown. The computer running the DisplayFind utility must be on the same
subnet as the target player. Refer to the DisplayFind Utility Quick Guide (DD1961783) in
Appendix A: Supplementary Documents (p.51).
Dashboard
After logging onto the player, an initial Dashboard screen opens showing status tiles for
various aspects of the device. For a general overview of the system interface, refer to
Interface Elements (p.3). For details on the dashboard, refer to Section 3: Dashboard
(p.7).
Click Menu in the upper-left corner of the screen to expand the main menu. The
main menu commands are listed in Main Menu (p.6). For more detailed information
on each command, refer to Section 3: Dashboard (p.7) –Section 9: Troubleshooting
(p.31) in this manual.

User Interface Basics
3
2 User Interface Basics
Interface Elements
The player interface includes elements that are always visible to the user, including a
header bar, main menu, right-side menu, and main window. Refer to Figure 2.
Header bar Right-side menu
Status tiles Main window
Main menu
Figure 2: Interface Elements
• Header bar contains the application title across the top of the screen.
• Right-side menu is in the upper-right corner of the screen. Click User to expand
the menu panel. Refer to Right-Side Menu (p.4) for more information.
• Main menu is on the left side of the screen. Click Menu in the upper-left corner
of the screen to expand the menu panel. Refer to Main Menu (p.6) for more
information.
• Main window displays elements, information, and data related to current user
selections and system triggers. The example in Figure 2 shows the initial Dashboard
screen with status tiles in the main window.

User Interface Basics
4
Right-Side Menu
Click User in the upper-right corner of the screen to expand the menu panel or hover
over the icon to see the command name. Refer to the table below.
Command Description
Opens the Change Password window enabling a user to change the
system password
Opens the Controller Firmware window to update the controller rmware
Opens a window enabling a user to delete all content les or upload
content les
Downloads an electronic version of this manual
Opens a window showing Daktronics contact information and open
source/licenses used to build the player
Opens an advanced conguration window for use by Daktronics
Technical Support
Triggers general system Login or Logout; logging in enables authorized
users to make changes to system conguration settings
Password
Password opens a window that enables the user to change their password. Enter the
current password, new password, and conrm the change. Refer to Figure 3.
After entering a new password and conrming it, click Submit at the bottom to save the
changed password. Click Cancel to close the Change Password window without saving
the new password.
Figure 3: Password

User Interface Basics
5
Firmware
Firmware opens a window to update the player rmware. Refer to Figure 4. Click Update
Firmware, browse to the correct le, and click Open to start the update.
Figure 4: Firmware
Storage
Storage opens a window to delete all stored content les or upload content les. Refer
to Figure 5. Use caution when deleting content as all media les in the default content
folder will be permanently deleted. Click Browse under Upload Content to navigate to a
le. This content le is saved in the DMP folder: Content > Local.
Figure 5: Storage
Help
Help downloads a PDF version of this manual.
About
About opens a window with Daktronics customer service information and a link to the
Daktronics website. Click Licensing Information for a listing of the open source libraries/
licenses used to build the player.
Advanced
Advanced opens a window with advanced conguration options for use by Daktronics
Technical Support. Make changes to these settings only under the direction of Daktronics
personnel.
Login/Logout
Login opens a general system login window for administrative-level access. The user
interface can be used without this login; however, no changes can be made to the
conguration settings. If a user is not logged on and attempts to make a conguration
change, a login prompt window opens. Logout closes the administrative-level access.

User Interface Basics
6
Main Menu
Click Menu in the upper-left corner of the screen to expand the main menu panel or
hover over the icon to see the command name. Refer to the table below.
Command Description
Shows status tiles for various aspects of the player; clicking any tile
opens a command or triggers an operational window
Lists all current conguration settings and tools including tools for
setting the output, local time, and security
Opens a window showing a live video stream of the current display
content and triggers test content including test patterns
Launches the Vanguard®Field Controller (VCF) interface*
Saves the current system backup le or restores the system by
uploading a saved backup le
Shows the currently stored player application information including
diagnostic information and any data feeds received by the player
Restarts the system, saves the system error logs to a ZIP le, and
performs network tests
*Only available when the controller is congured for transportation applications
For more detailed information on each main menu command, refer to Section 3:
Dashboard (p.7) –Section 9: Troubleshooting (p.31) in this manual.

Dashboard
7
3 Dashboard
Click Dashboard to show the system status tiles. Refer to Figure 6.
Figure 6: Dashboard Status Tiles
Dashboard Tiles
Every dashboard status tile is interactive; click any tile to open an operational window or
command.
• Identication: This tile provides the player's descriptive data including the name,
description, and player ID number. Click this tile to open Identication under the
Cong menu.
• Time: This tile shows the current date, time, and time zone. Click this tile to open Time
under the Cong menu.
• Firmware: This tile shows the current version of the
player rmware. Click this tile to open a window to
trigger a rmware update. Browse to the correct
le and click Update Firmware to update the
player rmware. Refer to Figure 7.
• VIP: This tile shows information about any
system-congured video image processor (VIP).
If there is no associated VIP, the message No VIP
Congured is shown. Click this tile to open VIP
under the Cong menu.
• Brightness: This tile is present if there is an
associated VIP. Click this tile to open VIP under the Cong menu.
• Temperature: This tile is present if there is an associated VIP. Click this tile to open VIP
under the Cong menu.
Figure 7: Firmware Update Prompt

Dashboard
8
• Network: This tile shows network address information. Click this tile to open Network
under the Cong menu.
• Storage: This information tile shows how much
le storage is currently being used and how
much is available on the player. Click this tile to
open a window to delete all content les. Refer
to Figure 8. Use caution with this action as all
media les in the default content folder will be
permanently deleted.
• Monitor: This tile shows a thumbnail of the current display output. The content shown
in this thumbnail is not a live video stream; the image is refreshed once every 30
seconds. Click this tile to open Monitor . Refer to Section 5: Monitor (p.27).
• Scheduling: This tile shows details of the software program used to schedule and
manage the media les. Click this tile to open Services under the Cong menu.
• Security: This tile shows the security settings for the player. Click this tile to open
Security under the Cong menu.
• Outputs: This tile provides information about the display output conguration and size.
Click this tile to open Outputs under the Cong menu.
• Drive Health: This tile estimates the remaining health of the player’s hard drive based
on current usage versus the expected lifespan of the drive. If the hard drive does not
provide this data, the tile shows N/A. Click this tile to open a window that shows hard
drive details and to download a CSV le with more information. Refer to Figure 9.
Figure 9: Drive Health
Figure 8: Delete Content Prompt

Cong
9
4 Cong
Click Cong to open a conguration menu with a number of options. Refer to
Figure 10. The currently selected command is underlined. In the example in Figure 10,
Identication is selected.
Figure 10: Conguration Menu
When editing any conguration setting, a save icon appears next to the command.
Refer to Figure 11. If a change is made incorrectly, a red error icon appears next to
the command. Refer to Figure 12.
Changes are
not yet saved
Figure 11: Save Icon
After making a change to any conguration setting, click the Save button to save that
change. If a change is made but not saved, a You have pending changes warning
opens in a blue banner across the top of the screen. Refer to Figure 13.
Figure 13: Pending Changes to Conguration Settings
Cancel entered changes at any time before the change is saved. Click the Cancel
button as shown in Figure 13 to cancel the change and restore the previous information.
A prompt opens to conrm that the change will be discarded.
After a conguration change is made and saved, a Successfullysavedthecong
message opens in a green banner across the top of the screen. Refer to Figure 14.
Figure 14: Changes Made to Conguration Settings
Changes are
entered incorrectly
Figure 12: Error Icon

Cong
10
Identication
Identication shows general information about the player including the Dynamic
Host Conguration Protocol (DHCP) device name, a brief description, the device
identication number, and the chosen startup boot sequence. Refer to Figure 15.
Figure 15: Conguration - Identication
The information in the Device (DHCP) Name, Description, and Device ID elds is set by
Daktronics during system installation.
If the Device ID character string is needed for other operations, use the Copy to
Clipboard function to easily copy this information to the computer’s temporary
clipboard.
Click the red Change button to change the player ID number; however, changing the ID
will result in a loss of communication with any registered services.
Note: Use this feature only as instructed by Daktronics technicians.
The Boot Sequence drop-down list enables the user to select what is shown during the
primary display’s startup procedure. Refer to Figure 15.
• None shows no information and playback starts immediately following start-up.
• Compact shows only product and version information. Playback begins after this is
shown.
• Full shows the description, display dimensions, color depth, time zone, list of
communication services, rmware version, and the IP address. Playback begins after
this is shown. Full is the default mode.
After making a change to any Identication setting, click Save in the upper-left corner.

Cong
11
Network
Network congures the player for communication on the local area network (LAN)
including Internet Protocol (IP) conguration and DNS conguration. Refer to Figure 16.
Figure 16: Conguration - Network
IPConguration
To congure the IP address automatically or manually, follow these steps:
1. Select either automatic or manual conguration
by clicking Obtain an IP address automatically
or Use the following IP Address, respectively.
Refer to Figure 17.
• Automatic: Select Obtain an IP address
automatically to use Dynamic Host
Conguration Protocol (DHCP) to
automatically assign an IP address to the
player. A DHCP server is required on the
network for proper operation. If the network
conguration is left in this mode and no
DHCP server exists on the network, the
address will default to 169.254.x.y, where x
and yvary to assign a unique address on the network.
• Manual: Select Use the following IP Address to congure the IP address manually.
Congure the IP address manually when a DHCP server does not exist or when an
installation requires the player to always use a static IP address. Enter values for
the IP Address, Subnet Mask, and Default Gateway. Refer to Figure 17.
2. Click Save.
Figure 17: IP Conguration

Cong
12
DNSConguration
Daktronics remote diagnostic tools require that internet host names are resolved to their
dotted IP address format for communication. For example, the internet host name
www.daktronics.com is resolved to 64.233.169.147. To congure the Domain Name
System (DNS) address automatically or manually, follow these steps:
1. Select either automatic or manual conguration by clicking Obtain DNS server
address automatically or Use the following DNS server addresses, respectively. Refer
to Figure 18.
• Automatic: Select Obtain DNS server address
automatically to use information received
from a local DHCP server to congure DNS
information. This is the default setting.
• Manual: Select Use the following DNS
server addresses when a DHCP server is not
available on the local network. The user
congures the player to explicitly use a DNS
server on the network or on the internet to
provide name resolution. Both a preferred
and an alternate server can be congured. Refer to Figure 18.
Note: The player will query the alternate DNS server address in the event the
preferred server does not respond.
2. Click Save.
Outputs
Outputs congures the player outputs and the sign(s) associated with an output. Refer to
Figure 19.
Figure 19: Conguration - Output
Figure 18: DNS Conguration

Cong
13
Daktronics Player
Click Active or Inactive under the Daktronics Player section to enable or disable the
player. Normally, the player is Active. Set the player as Inactive only when third-party
playback software is installed.
When the player is Active, the Outputs section is visible with a list of congured outputs.
Outputs
The Outputs section lists all the added player outputs. Congured outputs are listed with
conguration details (e.g. Output 1 in Figure 20). All outputs are also shown in the left-side
menu (e.g. Output 1 in Figure 20).
Click Add Output to add a new player output. The new output is automatically added to
the Outputs list with a generic name such as Output 2 and its output parameters Not Set.
This new output is added but not yet congured. The new output is also listed in the
left-side menu in red with a red exclamation point. Refer to Figure 20.
Figure 20: Added Output
The new output must be congured before it can be saved to the DMP. Refer to Output
Conguration(p.14).

Cong
14
Output Conguration
After adding a new output, click the output name in the left-side menu to open the
OutputConguration, Signs, and AudioConguration window. Refer to Figure 21.
Figure 21: Congure Output
To congure a new output or edit an existing output, follow these steps:
1. Select the Device used to output video to the display from the drop-down list.
2. Select the output Resolution from the drop-down list.
3. Choose the Keying option from the drop-down list.
• Off - turns keying off
• dak-alpha - turns keying on
4. Select the display Color Mode from the drop-down list. Refer to Figure 22.
• sRGB - Standard Dynamic Range (SDR) displays
• HDR10 (PQ) - High Dynamic Range (HDR)
displays and systems with original VP-6000
processors
• HLG - HDR displays and systems with newer
VP-6000 processors; this mode is backward
compatible with SDR color content
• Linear - HDR displays in Windows®10 systems (e.g. when connected directly to a
TV or monitor)
5. Add one or more signs to the output. Refer to Signs (p.15).
6. Congure the audio settings. Refer to AudioConguration(p.16).
Figure 22: Color Mode

Cong
15
Signs
The Signs section lists any sign(s) associated with an output and show conguration
details such as Dimensions and Mode. All congured signs are also shown in the left-side
menu (e.g. primary in Figure 23).
Figure 23: Add Sign
Click Add Sign to add a new sign to an output. A new sign is automatically added with
a generic name such as Sign 1. This new sign is listed in the signs section and under the
output name in the left-side menu in red with a red exclamation point. Refer to Figure 24.
Figure 24: Conguration - Output
The new sign must be congured before it can be saved to the DMP. Refer to Sign
Conguration(p.17).

Cong
16
AudioConguration
The AudioConguration section lists the audio output settings. Refer to Figure 25.
Figure 25: Audio Conguration
Congure the audio output with the following parameters:
• Device sets the available audio output device from a drop-down list. Available
devices are detected on the player computer and depend on the system setup.
• Channels sets the number of audio channels to output. The number of available
channels depends on the selected audio device.
• Delay (ms) delays the start of the audio so it plays later relative to the video. Use this
setting to compensate for any video delay due to video processing.
• Stream Offset (ms) delays the start of the video stream relative to the start of the
audio stream. This causes the audio to start playing before the video to compensate
for the different speeds of light and sound.
• Mute Fade Duration (ms) sets the amount of time for audio to fade from full volume to
muted by the end of the clip when the mute setting is toggled on.
• Force Mono changes the player audio output to mono mode instead of the default
stereo mode.
• Clip Normalization applies audio normalization to pre-recorded content to balance
audio output and create a more even sound as content changes. Adjustments are
made to any audio level extremes (both loud and soft).
This manual suits for next models
3
Table of contents
Other Daktronics Media Player manuals
Popular Media Player manuals by other brands

Fujitsu
Fujitsu living home ACTIVY Media Player 150 user manual

Escient
Escient FireBall MP-150 user manual

JVC
JVC XA-A55CL - 256 MB Headband Digital Player instructions

Phonocar
Phonocar VM197 Mounting instructions

Philips
Philips Streamium NP3300/12 Specifications

NETGEAR
NETGEAR EVA700 - Digital Entertainer - Multimedia... user manual