dalap HW 6206 User manual

INSTRUCTIONS MANUAL
WALL MOUNTED HEATER
MODEL NO.: Dalap HW 6206
INTRODUCTION
•Before using your new heater, please carefully read through the
following instructions. KEEP THIS BOOKLET IN A SAFE PLACE SO
THAT YOU MAY CONSULT IT LATER.
•After removing the packaging, make sure that the appliance is in
good condition.
•The packaging materials may contain plastic, nails etc., which may
be hazardous and therefore should not be left within the reach of
children.
IMPORTANT SAFEGUARDS
Thank you for buying our product. Please read this instruction carefully
before operating the heater. Keep this operating instruction for future
reference.
•1.The heater should be hung on the wall and make the wind outlet down
or be placed on flat appliance. You must not place it precipitantly or
tipsily.
•2.Please do not use the heater in the place where full of combustible or
explosive gas. Don’t cover the wind outlet.
•3.If the supply cord is damaged, itmust be replaced by the manufacturer
or its service agent or a similarly qualified person in order to avoid a
hazard.
•4.The heater must not be located immediately below an electrical
socket. The electrical socket must be equipped with earth wire, its
capacity should be 250V~10A or exceed 250V~10A. The socket and
the power plug should be in good connecting condition.
•5.If nobody is in using or you are repairing the heater, please pull off the
plug.
•6.Please don’t touch the heater by the wet hand or other conductor.
•7.If motor is not working properly, please stop it immediately.
•8. During using the heater, please do not open the door or window
continually otherwise it will influence the heating effect.
•9. If want to shut off the heater, press the on/off switch to off, then the
heater will keep the fan working 30 seconds until it blowing out cool
wind, then the heater will stop working, and you may pull off the plug.
•10. Do not use this heater in bathroom.
•11. Timer sets the heater working time.
•12. Remote control, please use 2 batteries.
•13. The battery must be removed from the appliance before it is
scrapped.
•14. The battery is to be disposed of safely.

535
•15. The heater must be installed at least 2 m above the floor.
•16. If the heater needs repair, please ask for special person or our
company authorized maintenance department.
•17.This appliance can be usedby children aged from 8 years and above
and persons with reduced physical, sensory or mental capabilities or
lack of experience and knowledge if they have been given supervision
or instruction concerning use of the appliance in a safe way and
understand the hazards involved. Children shall not play with the
appliance. Cleaning and user maintenance shall not be made by
children without supervision.
•18. Children of less than 3 years should be kept away unless
continuously supervised.
•19. Children aged from 3 years and less than 8 years shall only switch
on/off the appliance provided that it has been placed or installed in its
intended normal operating position and they have been given
supervision or instruction concerning use of the appliance in a safe
way and understand the hazards involved. Children aged from 3 years
and less than 8 years shall not plug in, regulate and clean the
appliance or perform user maintenance.
•20. CAUTION —some parts of this product can become very hot and
cause burns. Particular attention has to be given where children and
vulnerable people are present.
SPECIFICATIONS
the appliance is securely and vertically fitted to the wall.
Get two holes on the wall 2 m above the floor and near the corner more
25 mm, be sure to make the diameter just as same as the expanding pipe.
Fix two screws on the expanding pipe, keep the tips of the screws out for
10mm, and hang up the machine after the screws are fixed enough.
Model names Voltage Power
Dalap HW 6206 220-240V
50-60Hz 2000W
INSTALLING THE DEVICE
The heater shall be installed and used according to the safe
standard.
To avoid all dangers, follow the safety instructions.
- The installation must be done by the service agent or similarly qualified
persons in order to avoid a hazard.
- Important! Make sure that there are no electric cables or other
installations (for example water pipes) near the drill holes. Make sure that
OPERATION INSTRUCTION
1. Before inserting the plug into an electrical outlet, make sure that the
electrical supply in your area matches that on the rating label on the
unit.
2. Carefully remove the heater from the plastic bag and the carton.
3. Place the heater on a firm level surface ,setting the master button to
“-”position.plug the cord set into a AC220-240V~ electrical outlet,with
“BEE” sounds the “Power”light is on and the heater will shows the
default temperature ,it will twinkle 5 seconds.

1) HEATING PERPARE
Set time
Before turn on the heater,set the time as right time.Press remote control
“ ” button,light on control panel,LED display shows 00:00 and
“Mo”light on.
HOUR Press “Set” button one time,LED display front “00” twinkle,
press“
two buttons set the Hours from 01--00(01=1 o’clock,02=2
o’clock...00=24 o’clock ect.)
MINUTE Press “Set” button again,LED display behind “00” twinkle, press
“two buttons set the minutes from 00--59(01=1 Minute,02=2
Minute ect.)
WEEK Press “Set” button again,“Mo”light twinkle ,press “ two
buttons set the week from Mo--Su (Mo=Monday...Su=Sunday ect.)
PS:Press “Set” button,screen shows number will twinkle 5 seconds,you
should operate in time ,otherwise appliance will get back to standby.
(Appliance will keep the right time until power off)
2)General Using OPERATION
1. Turn the heater ON by pressing the ON/OFF main button ,the unit will
blow the cold air and “ ” light is on.
2. Pressing the “MODE” button ,the unit will blow the warm air and
both“ ”and“ ” lights are on.
3. Pressing the “MODE” button second times,the unit will blow the hot
air and both “ ”“ ” lights are on.
4. Pressing the “MODE” button Three times,the unit will blow the cold air
and “Fan/M” light is on.
PS:On control panel “ ” button, press 1st time is COOL AIR; 2nd times
is WARM AIR; 3rd times is HOT AIR; 4th timers is SWING FUNCTION;
5th times is OFF,pls noted it.
3) 24H Timer FUNCTION
1.Open the appliance as working conditions,(fan,warm,hot are all
ok).Control panel “ ” button and remote control “ ” button are same
operate way.
2. Press “ ” button ,set the timer up to 24 hours,keep press “ ” button
to
increase
the hours from 00--24(00=close,01=1hour,02=2
hours...24=24 hours ect.) and the “ ” light is on.
PS:set as “00” means no set timer ,the “ ” light is off.
4)THERMOSTAT INSTRUCTIONS
1. Open the appliance as working conditions,(fan,warm,hot are all
ok).This function only through by Remote control.
2. To adjust temperature,press the “ ” to set the desired
temperature and the temperature set from 10℃to 49℃with the control
panel “ ” light on.
3. When the air temperature drops2 degree below the set temperature,the
heater will start heating with ”I/W”(1000W).
4. When the air temperature drops 4 degree below the set temperature
,the heater will start heating with”II/H”(2000W).
5. When the air temperature high 1 degree or ≤the set temperature,the
heater will blow the cold air .
5)Week Timer FUNCTION
1. Open the appliance as working conditions,(fan,warm,hot are all
ok).This function only through by Remote control.
2. Frist press “” button,then press “ ” two buttons select which
model you want.This function have 6 models, P1-P5 is smart model,
appliance have own schedule,pls check the details as below :
Week
Mo
Tu
We
Th
Fr
Sa
Fr
Model
P1
8:00-
17:00
8:00-
17:00
8:00-
17:00
8:00-
17:00
8:00-
17:00
8:00-
17:00
8:00-
17:00
P2
18:00-0
7:00
18:00-
07:00
18:00-
07:00
18:00-
07:00
18:00-
07:00
18:00-
07:00
18:00-
07:00
P3
8:00-
17:00
8:00-
17:00
8:00-
17:00
8:00-
17:00
8:00-
17:00
OFF
OFF
P4
18:00-0
7:00
18:00-
07:00
18:00-
07:00
18:00-
07:00
18:00-
07:00
OFF
OFF
P5
OFF
OFF
OFF
OFF
OFF
00:00-
24:00
00:00-
24:00

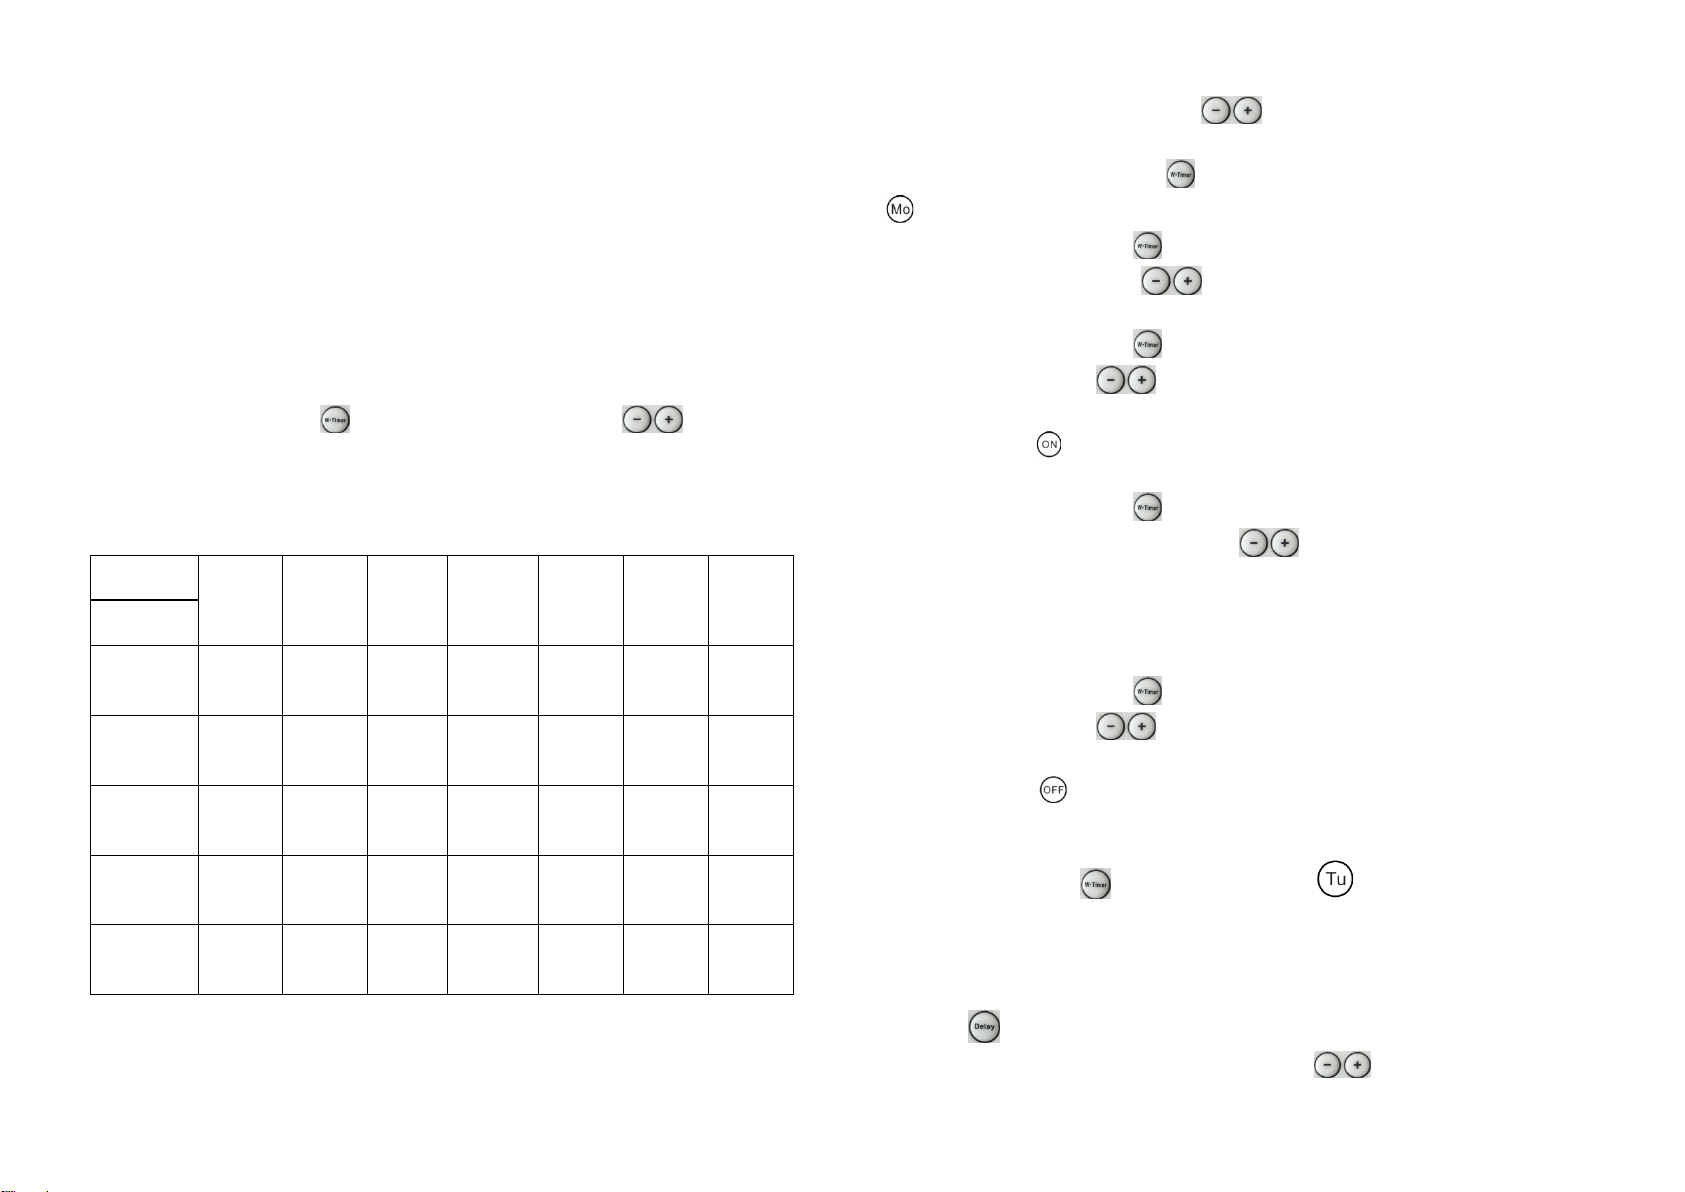
3.P6 is user-defined,press “ ” two buttons select P6 model,
WEEK Press “ ”button 1st time,” ” lights on,means “Monday”.
HOUR Press “ ” button 2nd times, LED display front “00” twinkle,
press“
” two buttons set the Hours from 01--00(01=1 o’clock,02=2
o’clock...00=24 o’clock ect.)
MINUTE Press “ ” button 3rd times,LED display behind “00” twinkle
“ ” two buttons set the Hours from 00--59(01=1 Minute,02=2
Minute ect.)
With the “” light on,it means open time.
HOUR Press “” button 4th times, LED display front “00” twinkle,
press“
” two buttons set the Hours from 01--00(01=1 o’clock,02=2
o’clock...00=24 o’clock ect.)
MINUTE Press “ ” button 5th times,LED display behind “00” twinkle
“ ” two buttons set the Hours from 00--59(01=1 Minute,02=2
Minute ect.)
With the “” light on,it means close time.
The above are finised set Monday Timer.
4.Press “ ” button once more,” ” lights on,means “Tuesday”.Pls
noted that the operate with open time HOUR/MINUTE and close time
HOUR/MINUTE are all same as before Monday.
5.From Monday-Sunday are all set finished,press “” button on remote
control 7th times to set from Monday to Sunday’s temperature and
press“
” two buttons,select the temperature which you need,the
temperature range from 10℃to 49℃.
PS:In Week timer function,when you set today’s temperature,the
thermostat function will start,the rules same as 4) THERMOSTAT
INSTRUCTIONS,pls noted.
You can set different open time ,closed time and temperature within
whole week.
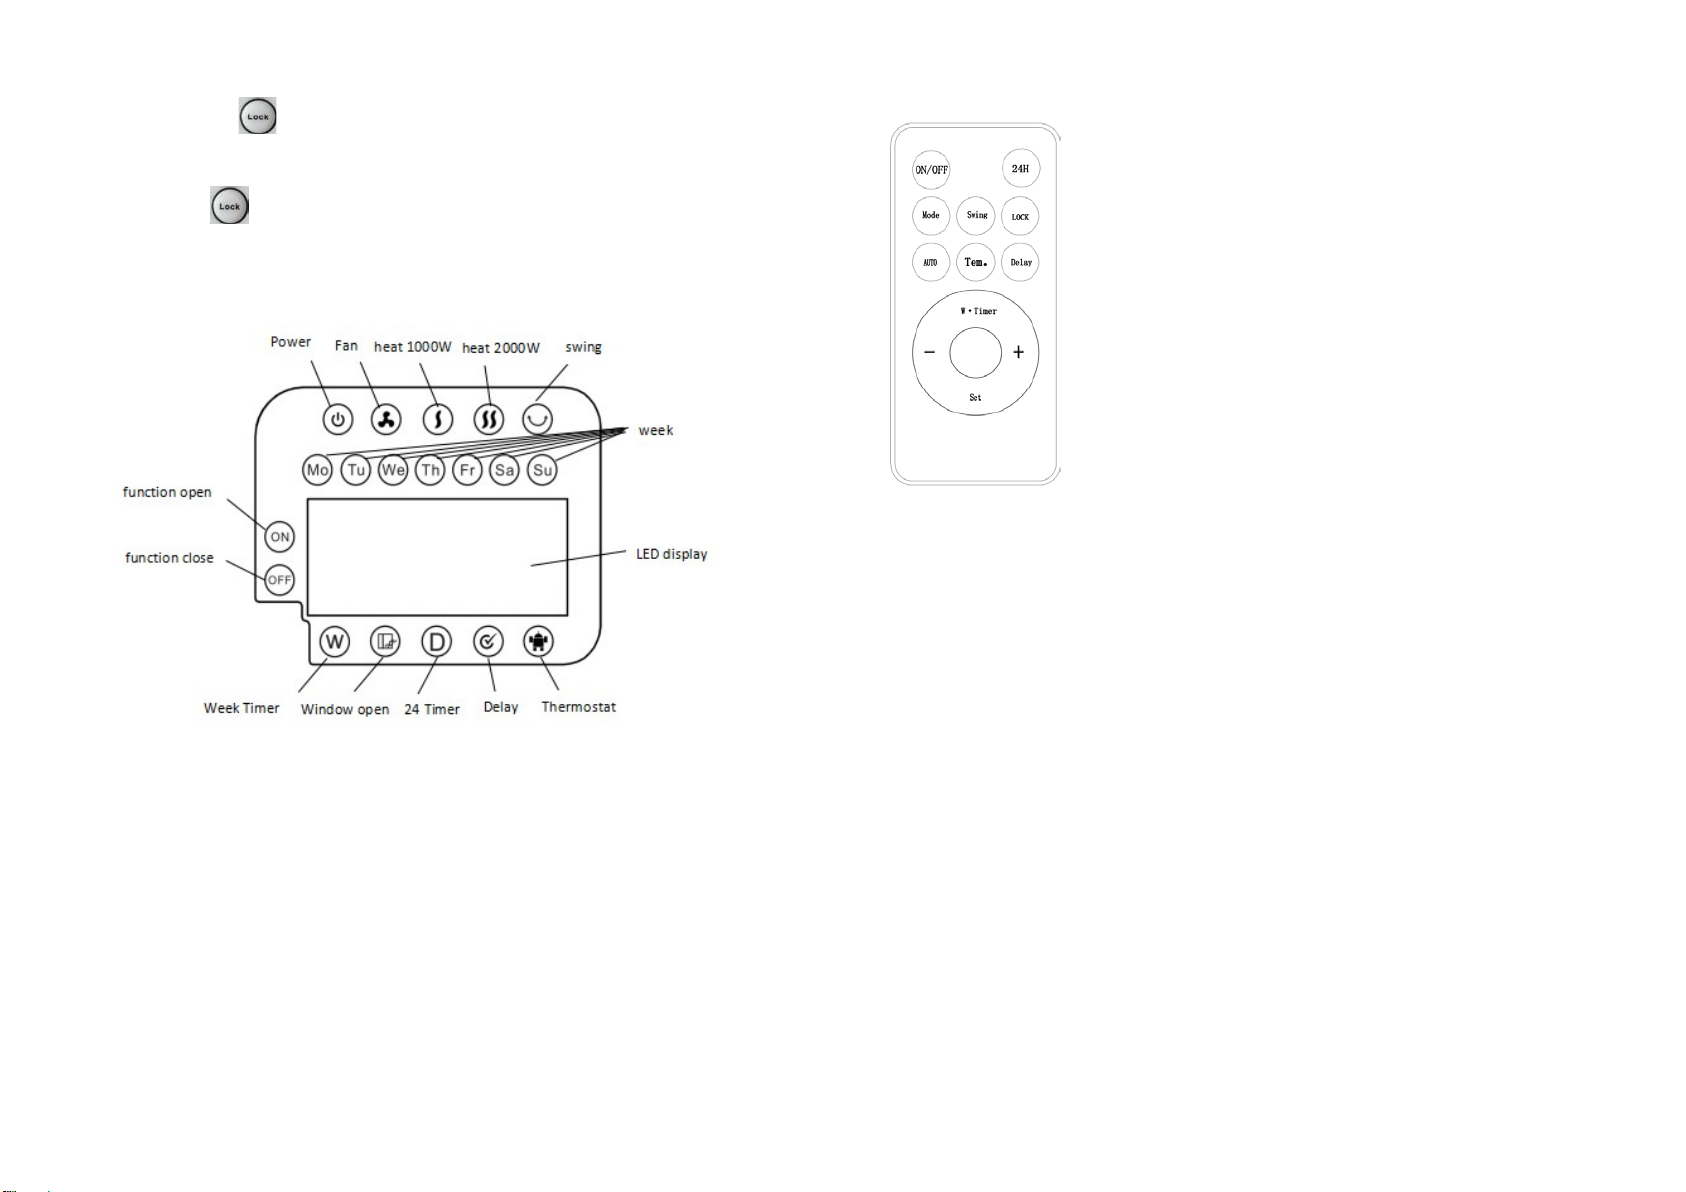
6) Window Open Function
1.Open the appliance as working conditions,(fan,warm,hot are all ok).This
function only through by Remote control.
2.Press “ ” button, the “ ” light is on.The appliance is working as
smart saving energy models.(In this function,the appliance is check and
record environment temperature in immediately.It will stop working,when
the appliance check the environment are drop ≧3 ℃.The user should
restart the appliance with “ON/OFF” button)
3..Press “ ” button again, the “ ” light is off.Window Open Function
is closed.
7)Delay Function ( This function only through by Remote control.)
1. This function can be use should be fit two points :
1. the appliance is in the standby state.
2. before the appliance working.
This function only through by Remote control.
2.Press “ ” button light on LED display ,then press “ ” button one
time, the “Delay” light and ”I/W” light are on.press “ two buttons
set the Hours from 01--24(01=1 o’clock,24=24 o’clock...00=Closed ect.)
---------------------------------------------------------This is open time
3.Press “ ” button again, the “Delay” light and ”II/H” light are on.
Press “
two
buttons
set
the
Hours
from
01--24(01=1
o’clock,24=24 o’clock...00=Closed ect.)
---------------------------------------------------------This is close time
PS:Press “ ” button,screen shows number will twinkle 5 seconds,you
should operate in time ,otherwise appliance will get back to standby, you
need press “” button to awaken the appliance and reset again all.
(This function is one-time and must be reset if the power is cut off.)
8)Child-Lock Function
1. This function only through by Remote control.When appliance are

plug in,this function can be used in any models.
2. Press “ ” button one time, all lights and LED display are
closed ,only “Power” light on.In this condition, either control panel or
remote control can not operate the appliance for any function.
3. Press “ ” button again, all lights are on and both control panel and
remote control are use to succeed.
CONTROL PANEL VIEW:
REMOTE CONTROL VIEW:
1.Remote control, please use Lithium battery CR2025 3V.
2.The remote control power button is labeled as such
1.”ON/OFF”Main power button
2.“24H” Setting timer from 1-24 hours
3.“MODE” COLD,WARM,HOT 3 setting for selection
4.“Swing” Louver swing up and down
5.“LOCK” Child-Lock function for heater
6.“AUTO” Window Open Function
7.“Tem.” Display room temperature
8.“Delay” Set the open and closed time of heater
9.“W.Timer”Set the timer of one week
10.“+” Increase
11.“-” Decrease
12
.“
Set
”
Set real time
OVERHEAT PROTECTION
This heater is protected with an overheat protection that switches off the
appliance automatically in case of overheating. For example: due to the
total or partial obstruction of the vents. In this case, unplug the appliance,
wait about 30 seconds for it to cool and remove the object which is
obstructing the vents. Then switch it back on as described above. The
appliance should now operate normally. If the problem persist, please
contact Customer Service for assistance.
CLEANING & MAINTENANCE
•Before undertaking any cleaning or maintenance on the appliance,
disconnect it from the power supply.
•For cleaning it is recommended to use a soft moist rag and neutral
detergent. Do not use an abrasive cloth or devices which could affect
the appearance of the appliance. Check that the hot air outlet and the
ventilation inlet are free of dust and dirt.
During cleaning, be careful not to touch the heating elements.
•To open the filter on the back for cleaning, press the top of plastic net
at back.
•In case of breakdown and/or poor functioning of the appliance,
disconnect the appliance from the power supply and contact an
authorised repairer.

NOTE: As a result of continual improvements, the design and
specifications of the product within may differ slightly to the unit illustrated
on the packaging.
Environment
Meaning of the crossed-out wheeled dustbin:
Do not dispose of electrical appliances as unsorted municipal
waste, use separate collection facilities. Contact your local council
for information regarding the collection systems available.
If electrical appliances are disposed of in landfills or dumps, hazardous
substances can leak into the groundwater and get into the food chain,
damaging your health and well-being.

BEDIENUNGSANLEITUNG
WANDMONTIERTEHEIZUNG
MODEL Nr.: Dalap HW 6206
EINFÜHRUNG
•
Lesen Sie die folgenden Anweisungen sorgfältig durch, bevor Sie Ihre neue Heizung
verwenden. Bewahren Sie dieses Handbuch an einem sicheren Ort auf, damit Sie
später darin nachschauen können.
•
Stellen Sie nach dem Entfernen der Verpackung sicher, dass sich das Gerät in einem
ordnungsgemäßem Zustand befindet.
•
Die Verpackungsmaterialien können Kunststoff, Nägel usw. enthalten, diese
können gefährlich sein und dürfen daher nicht in die Hände von Kindern gelangen.
WICHTIGE SICHERHEITSHINWEISE
Vielen Dank für den Kauf unseres Produkts. Bitte lesen Sie diese Anleitung sorgfältig
durch, bevor Sie das Heizgerät in Betrieb nehmen. Bewahren Sie diese
Bedienungsanleitung zum späteren Nachschlagen auf.
•
1.Die Heizung sollte an der Wand hängend mit dem Luftauslass nach unten oder
auf einer flachen Oberfläche platziert werden. Das Gerät darf nicht auf einer
unebenen Oberfläche platziert werden.
•
2.Bitte verwenden Sie die Heizung nicht an Orten, an denen brennbares oder
explosives Gas vorhanden ist. Decken Sie den Luftauslass nicht ab.
•
3.Wenn das Versorgungskabel beschädigt ist, muss es vom Hersteller, einem
seiner Servicemitarbeiter oder einer ähnlich qualifizierten Person ausgetauscht
werden, um eine Gefahr zu vermeiden.
•
4.Das Heizgerät darf sich nicht unmittelbar unter einer Steckdose befinden. Die
Steckdose muss mit einem Schutzkontakt ausgestattet sein. Die Stromversorgung
erfolgt mit 230 V Wechselstrom. Der Stromkreis muss mit mindestens 10A
abgesichert sein. Die Steckdose und der Netzstecker sollten sich in einem
einwandfreien Anschlusszustand befinden.
•
5.Wenn das Heizgerät nicht genutzt wird, ziehen Sie bitte den Stecker ab.
•
6.Bitte berühren Sie die Heizung nicht mit der nassen Hand oder einem anderen
Leiter.
•
7.Wenn der Motor nicht richtig funktioniert, stoppen Sie ihn bitte sofort.
•
8. Öffnen Sie während der Verwendung des Heizgeräts die Tür oder das Fenster
nicht ständig, da dies sonst den Heizeffekt beeinflusst.
•9. Wenn Sie die Heizung ausschalten möchten, drücken Sie den Ein / Aus-Schalter
auf Aus. Die Heizung hält den Lüfter 30 Sekunden lang in Betrieb, bis kühler Wind
ausgeblasen wird. Die Heizung funktioniert dann nicht mehr und Sie können den
Stecker der Heizung abziehen.
•
10. Verwenden Sie diese Heizung nicht im Badezimmer.

•
11. Der Timer stellt die Arbeitszeit des Heizgeräts ein.
•
12. Fernbedienung, bitte 2 Batterien verwenden.
•
13. Der Akku muss aus dem Gerät entfernt werden, bevor er verschrottet wird.
•
14. Der Akku ist sicher zu entsorgen.
•
15. Die Heizung muss mindestens 2 m über dem Boden installiert werden.
•
16. Wenn das Heizgerät repariert werden muss, wenden Sie sich bitte an eine
spezielle Person oder an die von unserem Unternehmen autorisierte
Wartungsabteilung.
•
17. Dieses Gerät kann von Kindern ab 8 Jahren und Personen mit eingeschränkter
körperlicher, sensorischer oder geistiger Leistungsfähigkeit oder mangelnder
Erfahrung und Wissen verwendet werden, wenn sie beaufsichtigt oder unterwiesen
wurden, das Gerät auf sichere Weise zu verwenden und die damit verbundenen
Gefahren verstehen. Kinder dürfen nicht mit dem Gerät spielen. Reinigung und
Wartung dürfen nicht von Kindern ohne Aufsicht durchgeführt werden.
•
18. Kinder unter 3 Jahren sollten ferngehalten werden, sofern sie nicht ständig
beaufsichtigt werden.
•19. Kinder ab 3 Jahren und unter 8 Jahren dürfen das Gerät nur dann ein- oder
ausschalten, wenn es in der vorgesehenen normalen Betriebsposition aufgestellt
oder installiert wurde und sie eine Aufsicht oder Anweisung zur Verwendung des
Geräts erhalten haben und die damit verbundenen Gefahren verstehen. Kinder ab 3
Jahren und unter 8 Jahren dürfen das Gerät nicht anschließen, regulieren und
reinigen oder Wartungsarbeiten durchführen.
•
20. VORSICHT: Einige Teile dieses Produkts können sehr heiß werden und
Verbrennungen verursachen. Besondere Aufmerksamkeit muss der Anwesenheit von
Kindern und schutzbedürftigen Personen gewidmet werden.
SPEZIFIKATIONEN
Model Name
Stromspannung
Leistung
Dalap HW 6206
230 V
50-60Hz
2000W
INSTALLATION DES GERÄTS
Die Heizung muss gemäß den geltenden Sicherheitsnormen installiert und
verwendet werden.
Befolgen Sie die Sicherheitshinweise, um alle Gefahren zu vermeiden.
-
Die Installation muss vom Servicemitarbeiter oder ähnlich qualifizierten Personen
durchgeführt werden, um eine Gefahr zu vermeiden.
-
Wichtig! Stellen Sie sicher, dass sich in der Nähe der Bohrlöcher keine elektrischen
Kabel oder andere Installationen (z. B. Wasserleitungen) befinden. Stellen Sie sicher,
dass das Gerät sicher und vertikal an der Wand montiert ist.
Bohren Sie zwei Löcher in die Wand. Die Höhe muss mindestens 2m über dem Boden
und der Abstand zur Ecke mehr als 25mm betragen. Achten Sie darauf, dass die
Bohrergröße zu den Dübeln passt. Drehen Sie zwei Schrauben in die Dübel, und
lassen Sie diese 10mm herausstehen. Hängen Sie daran das Gerät auf.

BEDIENUNGSANLEITUNG
1.
Vergewissern Sie sich vor dem Einstecken des Steckers in eine Steckdose, dass die
Stromversorgung mit der auf dem Typenschild des Geräts angegebenen
übereinstimmt.
2.
Nehmen Sie die Heizung vorsichtig aus der Plastiktüte und dem Karton.
3.
Stellen Sie die Heizung auf eine feste, ebene Fläche und stellen Sie den
Hauptknopf auf die Position „-“. Stecken Sie das Kabel in eine Steckdose AC 230 V.
Wenn „BEE“ ertönt leuchtet die Anzeige „Power“ und die Heizung zeigt die
Standardtemperatur an, sie blinkt 5 Sekunden.
1)
HEIZUNGVORBEREITEN
Zeit einstellen
Stellen Sie vor dem Einschalten der Heizung die Uhrzeit auf die richtige Zeit ein.
Drücken Sie die Taste „ “ der Fernbedienung, die LED-Anzeige auf dem Bedienfeld,
zeigt 00:00 an und die Anzeige „Mo“ leuchtet.
STUNDE Drücken Sie einmal die Taste „SET“, die LED-Anzeige auf der Vorderseite
„00“ blinkt, und drücken Sie die beiden Tasten „ “, um die Stunden von 01 bis
00 Uhr (01 = 1 Uhr, 02 = 2 Uhr ... 00 = 24 Uhr ect.) einzustellen.
MINUTE Drücken Sie erneut die Taste „Set“, die LED-Anzeige hinter „00“ blinkt, und
drücken Sie die beiden Tasten „ “, um die Minuten von 00 bis 59 einzustellen
(01 = 1 Minute, 02 = 2 Minuten usw.).
WOCHE Drücken Sie erneut die Taste "Set", "Mo" blinkt leicht und drücken Sie die
beiden Tasten" ", um die Woche von Mo - So einzustellen (Mo = Montag ... Su
= Sonntag usw.)
PS: Drücken Sie die Taste „Set. Der Bildschirm zeigt die Nummer, welche 5 Sekunden
lang blinkt. Sie sollten zügig arbeiten, da das Gerät sonst wieder in den Standby-
Modus wechselt.
(Gerät hält die richtige Zeit bis zum Ausschalten)
2)
BASISFUNKTIONEN
1.
Schalten Sie die Heizung ein, indem Sie die EIN / AUS-Taste Haupttaste drücken.
Das Gerät bläst kalte Luft aus und die Anzeige „ “ leuchtet.
2.
Durch Drücken der Taste „MODE“ bläst das Gerät warme Luft aus und die
Anzeigen „ “ und „ “ leuchten.
3.
Wenn Sie die Taste „MODE“ ein zweites Mal drücken, bläst das Gerät heiße Luft
aus und die Anzeigen „ “ und „ “ leuchten.
4.
Dreimaliges Drücken der Taste „MODE“ das Gerät bläst kalte Luft aus und die
Anzeige „Fan/M“ leuchtet.
PS: Einmal drücken der Taste „ “ KALTE LUFT, zweimal drücken WARME
LUFT, dreimal drücken HEISSE LUFT, viermal drücken SWING FUNCTION,
fünfmal drücken AUS. Bitte beachten Sie dies.
3)
24-Stunden-Timer-FUNKTION
1.
Starten Sie die Funktion während des Betriebes (Lüfter, warm, heiß ist alles ok).
Die Taste " " auf dem Bedienfeld des Gerätes und die Taste " " der
Fernbedienung haben die gleiche Funktion.
2.
Drücken Sie die Taste “ ”, stellen Sie den Timer innerhalb 24 Stunden ein und
halten Sie die Taste “ ” gedrückt, um die Stunden von 00 bis 24 zu erhöhen (00 =
Schließen, 01 = 1 Stunde, 02 = 2 Stunden ... 24 = 24 Stunden usw.) und die Anzeige “
“ leuchtet.
PS: Die Einstellung "00" bedeutet, dass der Timer nicht aktiviert ist. Die Anzeige "
" ist aus.
4)
THERMOSTATANLEITUNG
1.
Starten Sie die Funktion während des Betriebes (Lüfter, warm, heiß ist alles ok).
Diese Funktion wird nur über die Fernbedienung ausgeführt.
2.
Um die gewünschte Temperatur einzustellen, drücken Sie die Tasten“ ”,
Die Temperatur ist einstellbar in einem Bereich von 10 ° C bis 49 ° C im Bedienfeld
leuchtet das Symbol „ “.

3.
Wenn die Lufttemperatur 2 °C unter die eingestellte Temperatur fällt, beginnt die
Heizung mit „I / W“ (1000 W) zu heizen.
4.
Wenn die Lufttemperatur um 4 Grad unter die eingestellte Temperatur fällt,
beginnt die Heizung mit „II / H“ (2000 W) zu heizen.
5.
Wenn die Lufttemperatur 1 Grad über oder ≤gleich der eingestellten Temperatur
ist, bläst die Heizung die kalte Luft.
5)
Wochen-Timer-FUNKTION
1.
Starten Sie die Funktion während des Betriebes (Lüfter, warm, heiß ist alles ok).
Diese Funktion wird nur über die Fernbedienung ausgeführt.
2.
Drücken Sie die Taste " " danach drücken Sie die Tasten " ". Wählen Sie
mit den Tasten das gewünschte Modell aus. Diese Funktion umfasst 6 Modelle. P1-
P5 ist ein intelligentes Modell mit vorinstalliertem Zeitplan, bitte überprüfen Sie die
Details wie folgt:
3. P6 ist benutzerdefiniert, drücken Sie " " zwei Tasten, um das P6-Modell
auszuwählen.
WOCHE Drücken Sie die Taste " " zum 1. Mal leuchtet das Symbol "
"für
"Montag".
STUNDE Drücken Sie die Taste " " zum 2. Mal, blinkt die vordere LED-Anzeige
"00", drücken Sie beiden Tasten" ", um die Stunden von 01 bis 00 einzustellen
(01 = 1 Uhr, 02 d= 2 Uhr ... 00 = 24 Uhr usw.).
MINUTE Drücken Sie die Taste " " zum 3. Mal, blinkt die hintere LED-Anzeige “00”,
drücken Sie beiden Tasten" ", um die Minuten von 00-59 ein (01 = 1 Minute,
02 = 2 Minuten ect.)
Wenn die Anzeige “ “ leuchtet, bedeutet dies Startzeit.
STUNDE Drücken Sie die Taste " " zum 4. Mal, blinkt die vordere LED-Anzeige
"00", drücken Sie drücken Sie beiden Tasten" " um die Stunden von 01 bis 00
einzustellen (01 = 1 Uhr, 02 = 2 Uhr ... 00 = 24 Uhr usw.).
MINUTE Drücken Sie die Taste "" zum fünften Mal. Die LED-Anzeige hinter "00"
funkelt. "" Zwei Tasten stellen die Stunden von 00 bis 59 ein (01 = 1 Minute, 02 = 2
Minuten usw.).
MINUTE Drücken Sie die Taste " " zum 5. Mal, blinkt die hintere LED-Anzeige “00”,
drücken Sie beiden Tasten" ", um die Minuten von 00-59 ein (01 = 1 Minute,
02 = 2 Minuten ect.)
Wenn die Anzeige “ “ leuchtet, bedeutet dies Endzeit.
Die obenstehenden Angaben beziehen sich auf die Timer-Einstellung für Montag.
4.
Drücken Sie die Taste " " noch einmal, leuchtet " " und bedeutet" Dienstag
". Die danach folgenden Einstellungen von Startzeit STUNDE / MINUTE und Endzeit
STUNDE / MINUTE sind die gleichen, wie nach Montag.
5.
Wenn von Montag bis Sonntag alle Einstellungen abgeschlossen sind, drücken Sie
die Taste “ ” auf der Fernbedienung das 7. Mal, um die Temperatur von Montag
bis Sonntag einzustellen, und drücken Sie die Tasten “ ”, zum Wählen der
gewünschten Temperatur, im Temperaturbereich von 10 ° C bis 49 ° C.
Woche
Mo
Di
Mi
Do
Fr
Sa
So
Model
P1
8:00-
17:00
8:00-
17:00
8:00-
17:00
8:00-
17:00
8:00-
17:00
8:00-
17:00
8:00-
17:00
P2
18:00-
07:00
18:00-
07:00
18:00-
07:00
18:00-
07:00
18:00-
07:00
18:00-
07:00
18:00-
07:00
P3
8:00-
17:00
8:00-
17:00
8:00-
17:00
8:00-
17:00
8:00-
17:00
OFF
OFF
P4
18:00-
07:00
18:00-
07:00
18:00-
07:00
18:00-
07:00
18:00-
07:00
OFF
OFF
P5
OFF
OFF
OFF
OFF
OFF
00:00-
24:00
00:00-
24:00

PS: Wenn Sie in der Wochen-Timer-Funktion die heutige Temperatur einstellen, wird
die Thermostatfunktion gestartet. Es gelten die gleichen Regeln wie in 4)
THERMOSTAT-ANLEITUNG, bitte beachten Sie dies.
Sie können innerhalb einer Woche unterschiedliche Startzeiten, Endzeiten und
Temperatureneinstellen.
6)
Fensteröffnungsfunktion
1.
Starten Sie die Funktion während des Betriebes (Lüfter, warm, heiß ist alles ok).
Diese Funktion wird nur über die Fernbedienung ausgeführt.
2.
Drücken Sie die Taste “ ”, die Anzeige “ ” leuchtet. Das Gerät arbeitet im
intelligenten Energiesparmodus. (In dieser Funktion überprüft das Gerät die
Umgebungstemperatur und zeichnet sie auf. Der Betrieb wird eingestellt, wenn das
Gerät das erkennt, dass die Umgebungstemperatur um ≧3 ℃innerhalb von 1
Minute fällt. Das Gerät sollte dann mit der Taste „ON / OFF“ neu gestartet werden.
3.
Drücken Sie erneut die Taste “ ”, die “ ” Anzeige ist aus. Die
Fensteröffnungsfunktion ist geschlossen.
7)
Verzögerungsfunktion (Diese Funktion kann nur über die Fernbedienung
ausgeführt werden.)
1.
Diese Funktion kann genutzt werden, wenn:
1.
sich das Gerät sich im Standby-Zustand befindet.
2.
bevor das Gerät arbeitet.
Diese Funktion kann nur über die Fernbedienung ausgeführt werden.
2.
Drücken Sie die Taste " " auf dem LED-Display und dann einmal die Taste " ".
Die Anzeigen "Delay" und die "I/W" leuchten. Drücken Sie die Tasten " ", um
die Stunden von 01 bis 24 einzustellen (01 = 1) Uhr, 24 = 24 Uhr ... 00 = Ende ect.)
-------------------------------------------------- ------- Dies ist die Startzeit
3.
Drücken Sie erneut die Taste “ ”, die Anzeigen "Delay" und die "II/H" leuchten.
Drücken Sie die Tasten " ", um die Stunden von 01 bis 24 einzustellen (01 = 1)
Uhr, 24 = 24 Uhr ... 00 = Ende ect.)
-------------------------------------------------- ------- Dies ist die Endzeit
PS: Drücken Sie die Taste “ ”, der Bildschirm zeigt die Nummer, welche 5
Sekunden lang blinkt. Sie sollten zügig arbeiten, da das Gerät sonst wieder in den
Standby-Modus wechselt. Drücken Sie die Taste “ ”, um das Gerät zu reaktivieren
zurückzusetzen. (Diese Funktion ist einmalig und muss zurückgesetzt werden, wenn
die Stromversorgung unterbrochen wird.)
8)
Kindersicherungsfunktion
1.
Diese Funktion kann nur über die Fernbedienung ausgeführt werden. Wenn das
Gerät angeschlossen ist, kann diese Funktion in allen Modi verwendet werden.
2.
Drücken Sie einmal die Taste “ ”, alle Anzeigen und das LED-Display sind aus,
nur die “Power”-Anzeige leuchtet. In diesem Zustand kann das Gerät weder über das
Bedienfeld noch über die Fernbedienung bedient werden.
3.
Drücken Sie erneut die Taste “ ”, alle Anzeigen leuchten und sowohl das
Bedienfeld als auch die Fernbedienung können wieder verwendet werden.
BEDIENFELDANSICHT

FERNBEDIENUNG:
1.
Fernbedienung, bitte Lithiumbatterie CR2025 3V verwenden.
2.
Der Ein-/Ausschalter der Fernbedienung ist als solcher gekennzeichnet
REINIGUNG & WARTUNG
•
Trennen Sie das Gerät von der Stromversorgung, bevor Sie es reinigen oder warten.
•
Zur Reinigung wird empfohlen, einen weichen, feuchten Lappen und ein neutrales
Reinigungsmittel zu verwenden. Verwenden Sie kein Schleifmittel oder Geräte, die
das Erscheinungsbild des Geräts beeinträchtigen könnten. Überprüfen Sie, ob der
Heißluftauslass und der Lüftungseinlass frei von Staub und Schmutz sind.
Achten Sie beim Reinigen darauf, die Heizelemente nicht zu berühren.
1.
"EIN/AUS"
2. "24H”
3.
"MODE"
4.
"Swing"
5.
"LOCK"
6.
"AUTO"
7.
"Delay"
8.
"W.Timer"
9. "+"
10. "-"
11. "Set"
Hauptschalter
Einstellen des Timers von 1-24 h
3 Stufen: KALT,WARM,HEISS,
Oszillationsfunktion
Kindersicherung für die Heizung
Fensteröffnungsfunktion
Temperatur einstellen
Einstellen des Timers für eine Woche
Erhöhen
Verringern
Zeiteinstellung
•
Um den Filter auf der Rückseite zum Reinigen zu öffnen, drücken Sie auf die
Oberseite des Kunststoffnetzes auf der Rückseite.
•
Trennen Sie das Gerät bei einem Ausfall und / oder einer schlechten Funktion des
Geräts von der Stromversorgung und wenden Sie sich an einen autorisierten
Reparaturbetrieb.
HINWEIS: Aufgrund kontinuierlicher Verbesserungen können das Design und die
technischen Daten des Produkts geringfügig von der auf der Verpackung
angegebenen Einheit abweichen.
UMWELT
ÜBERHITZUNGSSCHUTZ
Die Heizung ist mit einem Überhitzungsschutz ausgestattet, der das Gerät bei
Überhitzung automatisch ausschaltet. Zum Beispiel: aufgrund der vollständigen oder
teilweisen Verstopfung der Lüftungsschlitze. Ziehen Sie in diesem Fall den
Netzstecker aus der Steckdose, warten Sie etwa 30 Sekunden, bis es abgekühlt ist,
und entfernen Sie den Gegenstand, der die Lüftungsschlitze blockiert. Schalten Sie es
dann wie oben beschrieben wieder ein. Das Gerät sollte jetzt normal funktionieren.
Wenn das Problem weiterhin besteht, wenden Sie sich an den Kundendienst.
Bedeutung des durchgestrichenen Mülleimers mit Rädern:
Abfall, verwenden Sie separate Sammeleinrichtungen. Informationen zu den
verfügbaren Sammelsystemen erhalten Sie von Ihrer Gemeindeverwaltung.
Wenn Elektrogeräte auf Mülldeponien oder Deponien entsorgt werden, können
gefährliche Substanzen in das Grundwasser gelangen und in die Nahrungskette
gelangen, was Ihre Gesundheit und Ihr Wohlbefinden schädigt.


INSTRUKCJA OBSŁUGI
GRZEJNIKA
NAŚCIENNEGO
MODEL NO.: Dalap HW 6206
WPROWADZENIE
•Przed użyciem nowego ogrzewacza ściennego należy uważnie
przeczytać niniejszą instrukcję. DOKUMENT NALEŻY
PRZCHOWYWAĆ, ABY W RAZIE KONIECZNOŚCI Z NIEGO
SKORZYTAĆ PÓŹNIEJ.
•Po rozpakowaniu upewnij się, że urządzenie jest w stanie
nieuszkodzonym.
•Materiały opakowaniowe mogą zawierać tworzywa sztuczne,
gwoździe itp., które mogą być niebezpieczne i dlatego nie należy ich
pozostawiać w zasięgu dzieci.
WAŻNE INFORMACJE NA TEMAT BEZPIECZEŃSTWA
•Dziękujemy za zakup tego produktu. Prosimy przeczytać uważnie
niniejszą instrukcję przed rozpoczęciem korzystania z grzejnika.
Dokument należy zachować, aby w razie potrzeby skorzystać z niego
w przyszłości.
•1.Grzejnik należy zawiesić na ścianie wylotem nawiewu skierowanym w
dół lub ustawić na płaskiej powierzchni. Nie wolno rzucać
urządzeniem ani narażać go na wpływ wody.
•2.Nie wolno używać grzejnika w pomieszczaniu wypełnionym
łatwopalnym lub wybuchowym gazem. Nie wolno zasłaniać wylotu
powietrza.
•3.Jeżeli przewód zasilający jest uszkodzony musi zostać wymieniony
przez producenta lub autoryzowany serwis w celu uniknięcia
zagrożenia porażenia prądem elektrycznym.
•4.Nie wolno umieszczać grzejnika bezpośrednio nad gniazdkiem
elektrycznym. Gniazdko zasilające musi wyposażone w uziemienie,
do obciążenia minimum 250V~10A lub więcej. Gniazdo i wtyczka
zasilania powinny być w nienagannym stanie technicznym.
•5.Jeśli grzejnik nie jest używany lub mają być prowadzone czynności
serwisowe, należy odłączyć wtyczkę.
•6.Nie wolno dotykać grzejnika wilgotnymi rękami lub innymi
przedmiotami będącymi przewodnikami
•7.Jeśli silnik nie działa poprawnie, natychmiast wyłącz urządzenie
•8.Podczas użytkowania grzejnika, nie należy otwierać bez potrzeby
okien ani drzwi, gdyż wpływa to na efekt ogrzewania.
•9.Jeśli chcesz wyłączyć grzejnik, naciśnij wyłącznik, urządzenie będzie
działać jeszcze przez 30 sekund, aby się schłodzić, następnie wyłączy
się i wtedy można już wyjąć wtyczkę.

535
•10. Nie należy używać tego grzejnika w łazience.
•11. Timer ustawia czas pracy grzejnika
•12. Pilot zdalnego sterowania wymaga 2 baterii.
•13. Baterie muszą być usunięte z urządzenia przed jego utylizacją.
•14. Baterie należy oddzielnie poddać utylizacji.
•15. Grzejnik należy zainstalować co najmniej 2 metry nad podłogą.
•16. W przypadku konieczności naprawy grzejnika prosimy o kontakt ze
specjalistą lub autoryzowanym serwisem naszej firmy.
•17. Urządzenie może być używane przez dzieci poniżej 8 roku życia
oraz osoby o ograniczonych możliwościach fizycznych sensorycznych
lub umysłowych, lub osoby bez doświadczenia i wiedzy na ten temat,
wyłącznie pod nadzorem lub gdy zostały poinstruowane w zakresie
korzystania z urządzenia w bezpieczny sposób i rozumieją zagrożenia
z tym związane. Dzieci nie mogą bawić się urządzeniem. Dzieci nie
mogą bez nadzoru czyścić ani konserwować urządzenia.
•18. Dzieci poniżej 3 roku życia nie powinny przebywać z pobliżu
urządzenia, chyba że są pod stałym nadzorem.
•19. Dzieci w wieku od 3 do 8 lat mogą włączać i wyłączać urządzenie
tylko pod warunkiem, że zostało one umieszczone lub zainstalowane
w przewidzianym dla niego położeniu roboczym oraz zostały one
objęte nadzorem lub zostały poinstruowane w zakresie bezpiecznego
użytkowania urządzenia oraz zrozumiały związane z tym zagrożenia.
Dzieci w wieku od 3 do 8 lat nie mogą podłączać, regulować i czyścić
urządzenia ani prowadzić czynności konserwacyjnych.
•20. UWAGA – niektóre części tego produktu mogą się mocno
nagrzewać i spowodować oparzenia. Szczególną uwagę należy
zwrócić na miejsca, w których obecne są dzieci i osoby szczególnie
narażone na urazy ze względu na stan zdrowia.
SPECYFIKACJA
Aby uniknąć wszelkich niebezpieczeństw, należy postępować zgodnie z
instrukcjami bezpieczeństwa.
- Instalacja musi być przeprowadzona przez pracownika serwisu lub
osobę o odpowiednich kwalifikacjach co pozwoli uniknąć zagrożenia.
- WAŻNE! Należy upewnić się, że w miejscu, w którym będą
wykonywane otwory montażowe nie przebiegają przewody elektryczne
czy inne instalacje ( na przykład rury wodociągowe). Należy sprawdzić,
że urządzenie jest stabilnie i bezpiecznie przymocowane do ściany,
przylegając całą powierzchnią obudowy.
Należy przygotować 2 otwory w ścianie na wysokości min. 2 metry nad
podłogą oraz w odległości od narożnika min 25 cm. Upewnij się, że
średnica otworów jest taka sama jak kołków montażowych. Wkręć obie
śruby, pozostawiając 10 mm wystającej główki do zawieszenia
urządzenia. Jeśli śruby są już poprawnie umieszczone, można zawiesić
urządzenie
Model Napięcie Moc
Dalap HW 6206 220-240V
50-60Hz 2000W
INSTALACJA URZĄDZENIA
Urządzenie powinno być zainstalowane i użytkowane zgodnie
z zasadami bezpieczeństwa.

INSTRUKCJA UŻYTKOWANIA
1. Przed podłączeniem urządzenia do gniazdka elektrycznego, upewnij
się, że zasilanie jest zgodne w tabliczką znamionową na urządzeniu.
2. Ostrożnie wypakuj urządzenia z opakowania foliowego i kartonu.
3. Umieść grzejnik na stabilnej, równej powierzchni, ustawiając włącznik
w pozycji „-„. Podłącz przewód do gniazdka elektrycznego AC220-
240V ~.Rozlegnie się sygnał dźwiękowy i zaświeci się kontrolka
„POWER”. Urządzenie pokazuje domyślną temperaturę, wyświetlacz
będzie mrugał przez 5 sekund.
1) PRZYGOTOWANIE GRZEJNIKA
Ustawienie czasu
Przed włączeniem grzejnika należy ustawić właściwy czas. Naciśnij na
pilocie przycisk “ ”, podświetlenie na panelu LED pokaże 00:00 and
“Mo”.
GODZINY Wciśnij przycisk “Set” jeden raz, wyświetlacz LED pokazuje
“00” migając, wciśnij “ dwa przyciski i ustaw godzinę od
01--00(01=1 godz.,02=2 godz. 00=24 godz. itd.)
MINUTY Wciśnij przycisk guzik “Set” jeszcze jeden raz, druga część
wyświetlacza pokazuje “00” migając, wciśnij “ dwa przyciski i
ustaw minuty od 00--59(01=1 minuta,02=2 minuty itd.)
DNI
Wciśnij przycisk “Set” jeszcze jeden raz, zaświeci się “Mo” i zacznie
migać wciśnij “ dwa przyciski i ustaw dzień tygodnia Mo--Su
(Mo=Poniedziałek...Su=Niedziela itd.)
PS:
Wciśnij przycisk “Set”, na wyświetlaczu pojawią się migające numery,
czas miganie to 5 sekund, wszystkie ustawienie należy przeprowadzać w
odpowiednim czasie, w przeciwnym razie urządzenie wróci do trybu
czuwania.
(Urządzenie zachowa ustawienia prawidłowego czasu do momentu
odłączenia zasilania)
2) KORZYSTANIE Z URZĄDZENIA
1. Włącz grzejnik poprzez wciśnięcie głównego włącznika ON/OFF,
urządzenie zacznie wydmuchiwać chłodne powietrze i podświetli się
kontrolka “”.
2. Wciśnij przycisk “MODE”, urządzenie zacznie wydmuchiwać ciepłe
powietrze, obie kontrolki “ ” oraz “ ” są podświetlone.
3. Wciśnij przycisk “MODE” po raz drugi, urządzenie zacznie
wydmuchiwać gorące powietrze, obie kontrolki “ ” oraz “ ” są
podświetlone
4. Wciśnij przycisk “MODE” po raz trzeci, urządzenie będzie
wydmuchiwać chłodne powietrze, podświetlona jest kontrolka “Fan/M”.
PS :Na panelu sterowania przycisk “ ”, wciśnięty pierwszy raz –
wydmuch chłodnego powietrza; drugi raz- wydmuch ciepłego powietrza;
trzeci raz- wydmuch gorącego powietrza; czwarty raz - funkcja
podmuchów; piaty raz – urządzenie się wyłączy. Zapamiętaj!
3) 24H STEROWNIK CZASOWY
1.Uruchom urządzenie w trybie pracy, który wybrałeś ,(wentylator, ciepły
nadmuch, gorący nadmuch). Przycisk “ ” na panelu oraz przycisk
“” na pilocie mają te same funkcje.
2. Naciśnij przycisk “ ” , ustaw wyłącznik w zakresie do 24H, aby
przedłużyć czas przytrzymaj przycisk “ ” do czasu ustawienie
odpowiedniej wartości od 00--24(00=wyłączenie natychmiast,01=1

godz,02=2 godz...24=24 godz itd.) , kontrolka “ ” będzie podświetlona.
PS: ustawienie „00” oznacza brak aktywności timera, kontrolka “ ”
będzie wyłączona.
4) USTAWIENIE TERMOSTATU
1. Uruchom urządzenie w trybie pracy, który wybrałeś ,(wentylator, ciepły
nadmuch, gorący nadmuch). Ustawienie tej funkcji możliwe jest wyłącznie
za pomocą pilota zdalnego sterowania.
2. Aby ustawić temperaturę naciśnij przyciski “ ”, aby ustawić
żądaną temperaturę i ustaw wartość w zakresie od 10℃do 49℃podczas,
gdy kontrolka “” jest podświetlona.
3. Jeśli temperatura spadnie o 2 stopnie poniżej ustawionej wartości,
urządzenie włączy tryb ogrzewania na 1 stopień ”I/W”(1000W).
4. Jeśli temperatura spadnie o 4 stopnie poniżej ustawionej wartości,
urządzenie włączy tryb ogrzewania na 1 stopień ”II/W”(2000W).
5. Jeśli temperatura jest wyższa o 1 stopień lub równa zaprogramowanej
wartości, urządzenie nie będzie dodatkowo podgrzewać powietrza,
działać będzie wyłącznie w trybie wentylatora.
5)TYGODNIOWY STEROWNIK CZASOWY
1. Uruchom urządzenie w trybie pracy, który wybrałeś ,(wentylator, ciepły
nadmuch, gorący nadmuch). Ustawienie tej funkcji możliwe jest wyłącznie
za pomocą pilota zdalnego sterowania.
2. Jako pierwszy wciśnij przycisk “ ” ,następnie przyciski “ ”
aby wybrać odpowiedni program pracy. Ten tryb ma 6 możliwych
ustawień, P1-P5 są programami automatycznymi, urządzenie ma
zaprogramowany harmonogram pracy – szczegóły w tabeli
3.P6 jest programem własnym dla użytkownika, wciśnij przyciski
“” i wybierz program P6
WEEK
(dzień tygodnia)
Naciśnij przycisk“
”pierwszy raz,
kontrolka” ” będzie podświetlona, oznacza Poniedziałek”.
HOUR (godziny) Naciśnij przycisk “ ” po raz drugi, panel LED
wyświetli mrugające “00”, naciśnij przyciski “ ” aby ustawić godzinę
od 01--00(01=1 godz.k,02=2 godz....00=24 godz.)
MINUTE (minuty) Naciśnij przycisk Press “ ” po raz trzeci, panel
LED wyświetli mrugające “00”, naciśnij przyciski “” aby ustawić
minuty od 00--59(01=1 min.,02=2 min. itd.)
Podświetlona kontrolka “”oznacza czas włączenia
HOUR (godziny) Naciśnij przycisk “ ” po raz czwarty, panel LED
wyświetli mrugające “00”, naciśnij przyciski “ ” aby ustawić godzinę
od 01--00(01=1 godz.k,02=2 godz....00=24 godz.)
MINUTE (minuty) Naciśnij przycisk “ ” po raz piaty, panel LED
wyświetli mrugające “00”, naciśnij przyciski “ ” aby ustawić minuty
od 00-59(01=1 min.k,02=2 min....itd.)
Podświetlona kontrolka “” oznacza czas wyłączenia.
Powyższe czynności zakończą programowanie pracy na
Poniedziałek / Mo
4. Naciśnij przycisk“ ”kolejny raz, podświetlona kontrolka ” ”
oznacza Wtorek. Ustawienia konkretnych godzin i minut czasu pracy dla
kolejnego dnia należy powtórzyć zgodnie w instrukcja powyżej dot.
Poniedziałku.
5.Gdy został określony czas pracy na od Poniedziałku do Niedzieli
naciśnij przycisk “ ” na pilocie 7 razy, aby ustawić temperaturę od
Poniedziałku do Niedzieli oraz naciśnij przyciski “ ”
aby
zaprogramować żądaną wartość od 10℃do 49℃.
PS: W programowaniu tygodniowym, można również wybrać sterowanie
termostatem, wówczas ustawiamy temperaturę dnia, zgodnie z punktem
Week
Mo-Po
n
Tu/Wt We/Śr Th/Czw Fr/Pt Sa/Sob Fr/Nd
Model
P1
8:00-
8:00-
8:00-
8:00-
8:00-
8:00-
8:00-
17:00
17:00
17:00
17:00
17:00
17:00
17:00
P2
18:00-0
18:00-
18:00-
18:00-
18:00-
18:00-
18:00-
7:00
07:00
07:00
07:00
07:00
07:00
07:00
P3
8:00-
8:00-
8:00-
8:00-
8:00-
OFF
OFF
17:00
17:00
17:00
17:00
17:00
P4
18:00-0
18:00-
18:00-
18:00-
18:00-
OFF
OFF
7:00
07:00
07:00
07:00
07:00
P5
OFF
OFF
OFF
OFF
OFF
00:00-
00:00-
24:00
24:00

4 niniejszej instrukcji USTAWIENIA TERMOSTATU.
Możliwe jest ustalenie indywidualnego czasu włączenia i wyłączenia
urządzenia oraz temperatury na każdy dzień tygodnia.
6) WYKRYWANIE OTWARTEGO OKNA
1. Uruchom urządzenie w trybie pracy, który wybrałeś ,(wentylator, ciepły
nadmuch, gorący nadmuch). Ustawienie tej funkcji możliwe jest wyłącznie
za pomocą pilota zdalnego sterowania.
2.Naciśnij przycisk “ ”, kontrolka “ ” jest podświetlona. Urządzenie
będzie pracować w inteligentnym trybie oszczędności energii. (W tym
trybie urządzenie sprawdza i zapisuje temperaturę otoczenia i wyłączy się
natychmiast, gdy wykryje, że odczytana wartość temperatury spadła o 3
℃lub więcej. W takiej sytuacji użytkownik musi restartować urządzenia
za pomocą przycisku “ON/OFF”
3..Naciśnij przycisk “ ” jeszcze raz, kontrolka “ ” wyłączy się. Tryb
Wykrywania otwartego okna zostanie wyłączony.
7) Funkcja opóźnienia (funkcja dostępna wyłącznie poprzez pilot
zdalnego sterowania.)
1. Aby uruchomić tę funkcję muszą być spełnione dwa warunki :
1. urządzenie musi być w stanie czuwania.
2. urządzenie jeszcze nie pracuje.
Ustawienie tej funkcji możliwe jest wyłącznie za pomocą pilota zdalnego
sterowania.
2.Naciśnij przycisk “ ” , kontrolka na wyświetlaczu LED się włączy,
następnie naciśnij przycisk “ ” jeden raz, kontrolka “Delay” oraz ”I/W”
włączą się, naciśnij przyciski “ aby ustawić godzinę od 01—24
(01=1 godz.k,02=2 godz....00=24 godzina itd.)
---------------------------------------W tej sposób ustawiamy czas włączenia
3. Naciśnij przycisk “ ” jeszcze raz kontrolka “Delay” oraz ”II/W”
włączą się, naciśnij przyciski “ aby ustawić godzinę od 01—24
(01=1 godz.k,02=2 godz....00=24 godzina itd.)
----------------------------------W tej sposób ustawiamy czas wyłączenia
PS: Naciśnij przycisk “ ”,wyświetlacz pokaże cyfry i zacznie migać
przez 5 sekund, należy prowadzić czynności w tym czasie, w przeciwnym
razi urządzenie przejdzie znów w stan czuwania, wtedy należy nacisnąć
przycisk “ ” aby aktywować urządzenie i odnowić ustawienia.
(Funkcja te
jest
jednokrotna,
ulega
anulowaniu
po
wyłączeniu
urządzenia.)
8)Blokada rodzicielska
1. Ustawienie tej funkcji możliwe jest wyłącznie za pomocą pilota
zdalnego sterowania. Gdy urządzenie jest włączone, te funkcje można
włączyć w dowolnym trybie pracy.
2. Naciśnij przycisk “ ” jeden raz, wszystkie kontrolki
oraz wyświetlacz LED zgasną, jedynie kontrolka “Power”
pozostanie podświetlona. W tym ustawieniu ani panel sterowania ani
pilot nie są aktywne, nie ma możliwości zmiany ustawień urządzenia.
3. Naciśnij przycisk “ ” jeszcze raz, wszystkie kontrolki się podświetlą
oraz zarówno panel jak i pilot zdalnego sterowania są aktywne.
WYGLĄD PANELU STEROWANIA:

PILOT ZDALNEGO STEROWANIA:
1.Pilot zdalnego sterowania, należy używać wyłącznie baterii typu Lithium
battery CR2025 3V.
2.Przyciski na pilocie mają oznaczenia
1.”ON/OFF”Główny włącznik urządzenia
2.“24H” Ustawienie timera 1-24 h
3.“MODE”ZIMNY,CIEPŁY, GORĄCY3 ustawienia do wyboru
4.“Swing” Nawiew falami góra- dół
5.“LOCK” Blokada rodzicielska urządzenia
6.“AUTO” Wykrywanie otwartego okna
7.“Tem.” Wyświetlacz temperatury pomieszczenia
8.“Delay” Ustawienie włączenia i wyłączenia grzejnika
9.“W.Timer”Ustawienie timera na 1 tydzień
10.“+” Więcej
11.“-” Mniej
12
.“
Set
”
Ustaw
ZABEZPIECZENIE PRZED PRZEGRZANIEM
Urządzenie jest zabezpieczone przed przegrzaniem – w razie
przegrzania automatycznie się wyłączy. Na przykład w przypadku
częściowej blokady wylotów powietrza. W takim przypadku należy
odłączyć urządzenie od zasilania, poczekać około 30 sekund, aby
urządzenie ostygło a następnie usunąć przedmioty blokujące wyloty
nawiewu. Następnie należy włączyć urządzenie zgodnie z instrukcją.
Urządzenie powinno rozpocząć pracę w normalnym trybie. Gdyby
problem się powtarzał, w celu uzyskania porady należy skontaktować się
z Serwisem.
CZYSZCZENIE I KONSERWACJA URZĄDZENIA
•Przed rozpoczęciem jakichkolwiek czynności konserwacyjnych
należy odłączyć urządzenia od źródła zasilania
•Do czyszczenia zaleca się używania miękkiej wilgotnej szmatki i
delikatnego detergentu. Nie należy używać ostrych czyściw ani
innych materiałów czy substancji, które mogłyby wpłynąć na wygląd
urządzenia. Należy sprawdzić, czy wylot gorącego powietrza i otwór
wlotowy wolne są od kurzu i brudu.
Podczas czyszczenia należy zachować ostrożność i nie dotykać
elementów grzewczych.
•Aby otworzyć tylny filtr w celu wyczyszczenia należy nacisnąć górną
część plastikowej siatki w tylnej części urządzenia.
•W przypadku awarii i/lub niepoprawnego działania urządzenia,
należy odłączyć je od zasilania i skontaktować się Serwisem.
UWAGA: W wyniku ciągłych ulepszeń wygląd i specyfikacja produktu
mogą nieznacznie różnić się od urządzenia przedstawionego na
opakowaniu
Środowisko
Znaczenie ikonografiki:
Nie wyrzucaj urządzeń elektrycznych razem z niesortowanymi
odpadami komunalnymi, korzystaj ze specjalnych punktów zbiórki
selektywnej. Skontaktuj się z lokalnymi władzami, aby uzyskać informacje
na ten temat.
Składowanie urządzeń elektrycznych na wysypiskach komunalnych jest
niebezpieczne ze względu na możliwość przedostawania się
niebezpiecznych substancji do wód gruntowych i łańcucha pokarmowego,
powodując negatywnym wpływ na zdrowie i samopoczucie.

NÁVODKOBSLUZE
NÁSTĚNNÝ OHŘÍVAČ
MODEL Dalap HW 6206
Úvod
1.
Předpoužitímnového ohřívačesipečlivěpřečtětenásledujícípokyny.
UCHOVÁVEJTE TUTO BROŽURU NA BEZPEČNÉM MÍSTĚ,
ABYSTE SEK NÍ MOHLIPOZDĚJI PODÍVAT.
2.
Po vyjmutí
z
obalu se ujistěte, že je přístroj v dobrém stavu.
3.
Obalové materiály mohou obsahovat plasty, spony v kartonu atd.,
které mohou být nebezpečné, aproto by neměly být ponechány v
dosahu dětí.
•
DŮLEŽITÉBEZPEČNOSTNÍINFORMACE
•
Děkujeme vám, že jste si koupili náš produkt. Před uvedením ohřívače do
provozu přečtěte pozorně tento návod.
•
1.
Nástěnný ohřívač by měl být zavěšen nastěnu tak, aby nefoukal na jiný
elektrický spotřebič
1.
2. Nepoužívejte nástěnný ohřívač v místě se zvýšeným rizikem
výbuchu nebo požáru.
2.
3.Je
-
li napájecí kabel poškozen, musí být vyměněn kvalifikovanou
osobou, aby se zabránilo nebezpečí úrazu elektrickým proudem.
3.
4.
Nástěnný ohřívač nesmí být umístěn bezprostředně pod
elektrickou zásuvkou.Elektrická zásuvkamusíbýtvybavena
zemnícímvodičem, jeho kapacitaby měla být 250V ~ 10A nebo vyšší
než 250V ~ 10A. Zásuvka azástrčka by měly být v nepoškozeném
stavu.
4.
5. Veškeré úkony s ohřívačem, musíbýt prováděny s
odpo
jeným el.
proudem.
5. 6. Nedotýkejte se ohřívače mokrou rukou nebo jiným vodičem.
6.
7.Pokudmotor nepracujesprávně, okamžitějejzastavte.
7.
8. Při používání ohřívače neotvírejte dveře nebo okno, jinak ovlivníte
topný efekt.
8.
9. Pokud chcete vypnout topení, stiskněte vypínač vypnout, poté se
ohřívač dochlazuje cca 30 sekund, až po vypnutí dochlazování je
možné vytáhnout zástrčku.
9.
10.Předpoužitímdálkovéhoovladačeodstraňteochranoufoliiu
baterii.
10.
11..Pokud nepoužíváte dálkové ovládánídelší dobu, vyjměte baterie
baterie z ovladače.
11.
12.N
ástěnný ohřívač musíbýt instalováno nejméně 2 mnad
podlahou.
Table of contents
Languages:
Other dalap Heater manuals
Popular Heater manuals by other brands

DeLonghi
DeLonghi HCA324FS Instructions for use

Honeywell
Honeywell HZ617 - Low Profile Silent Comfort Heater owner's manual

Reznor
Reznor UBX Series Installation operation & maintenance

Haverland
Haverland RCWave+ ANTHRACITE Instruction & installation manual

Charnwood
Charnwood CW50 Installation and operating instructions

Taurus
Taurus ALPATEC TROPICANO 5C manual