DANA Diabecare II User manual

1. Before using your DANA Diabecare®II pump, infusion set and reservoir
•Indications for use . . . . . . . . . . . . . . . . . . . . . . . . . . . . . . . . . . . . . . . . . . . . . . .3
•Safety precautions . . . . . . . . . . . . . . . . . . . . . . . . . . . . . . . . . . . . . . . . . . . . . . . 3
•Cleaning your DANADiabecare®II insulin pump . . . . . . . . . . . . . . . . . . . . . . . 5
•Explanation of “Warning”, “Caution”, and “Note” Symbols . . . . . . . . . . . . . . . . 5
•Contents of DANADiabecare®II insulin pump kit . . . . . . . . . . . . . . . . . . . . . .6
•Identification and description of your pump features . . . . . . . . . . . . . . . . . . . . . .7
•Easy Release Infusion set . . . . . . . . . . . . . . . . . . . . . . . . . . . . . . . . . . . . . . . . . .9
2. Set-up and basic functions
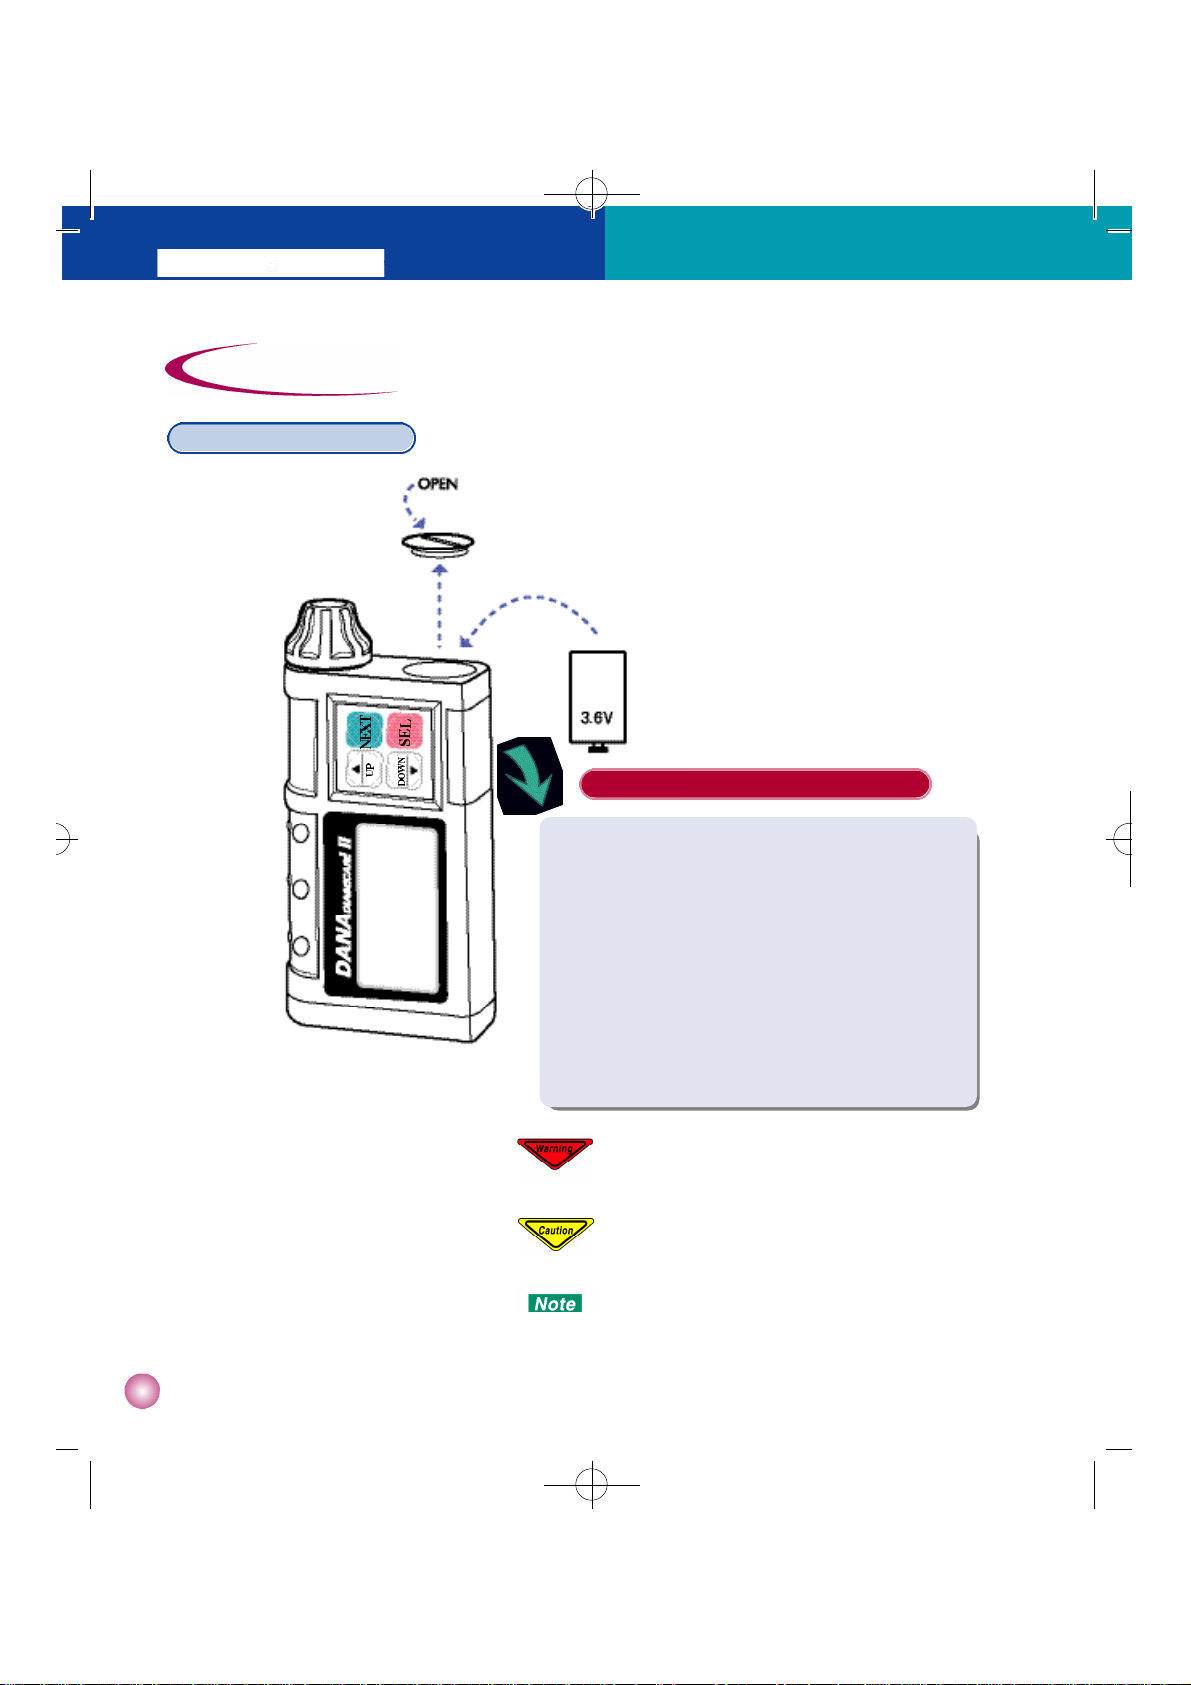
•Inserting the battery . . . . . . . . . . . . . . . . . . . . . . . . . . . . . . . . . . . . . . . . . . . . . .8
•Suspending the pump by programming . . . . . . . . . . . . . . . . . . . . . . . . . . . . . . .18
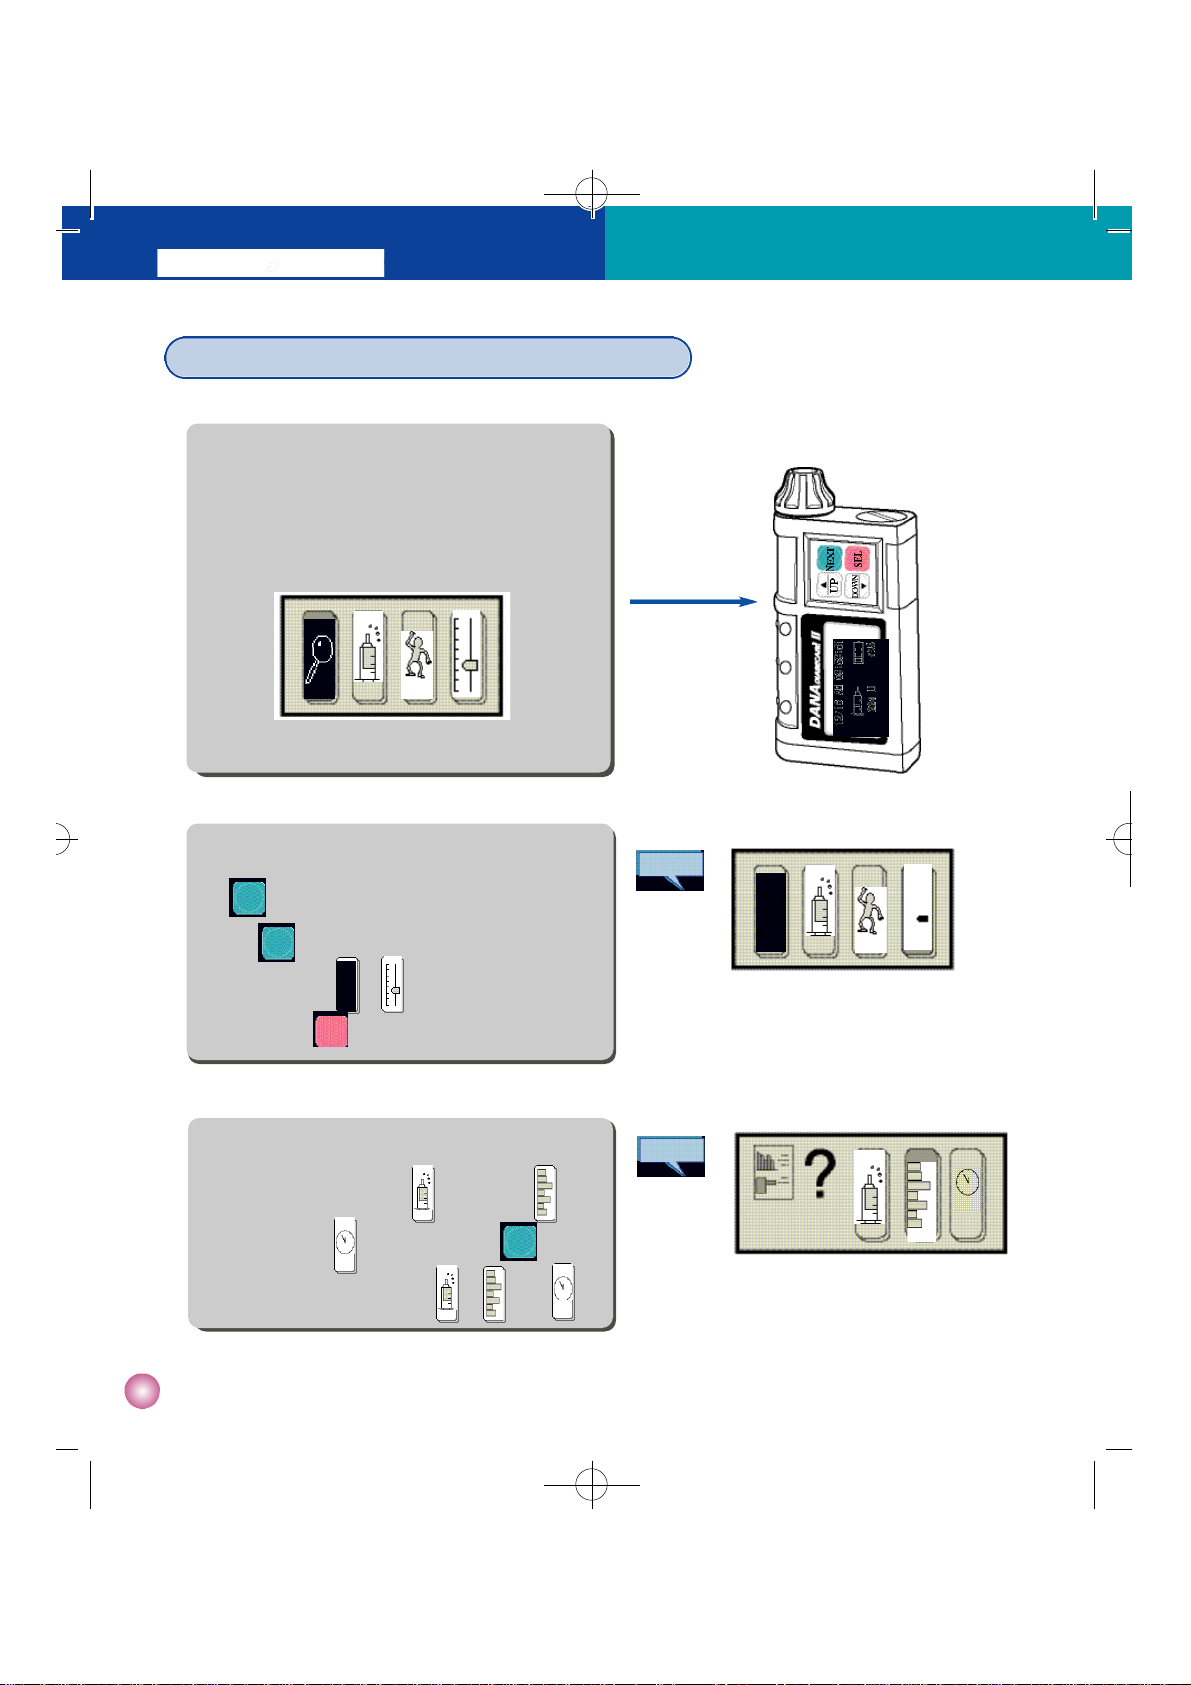
•Explanation of display screens . . . . . . . . . . . . . . . . . . . . . . . . . . . . . . . . . . . . . .9
- Initial display . . . . . . . . . . . . . . . . . . . . . . . . . . . . . . . . . . . . . . . . . . . . . . .10
- Basic display . . . . . . . . . . . . . . . . . . . . . . . . . . . . . . . . . . . . . . . . . . . . . . . .10
•Setting bolus doses, basal rates and the clock . . . . . . . . . . . . . . . . . . . . . . . . . . 10
- Setting a bolus . . . . . . . . . . . . . . . . . . . . . . . . . . . . . . . . . . . . . . . . . . . . . .11
- Pre-setting meal boluses . . . . . . . . . . . . . . . . . . . . . . . . . . . . . . . . . . . . . . . .12
- Setting the basal rate . . . . . . . . . . . . . . . . . . . . . . . . . . . . . . . . . . . . . . . . . .14
- Setting the clock . . . . . . . . . . . . . . . . . . . . . . . . . . . . . . . . . . . . . . . . . . . . .15
•Checking bolus doses, basal rates and reviewing memory data . . . . . . . . . . . . .16
•Checking the battery life and remaining insulin amount . . . . . . . . . . . . . . . . . .17
•How to fill and insert a new reservoir . . . . . . . . . . . . . . . . . . . . . . . . . . . . . . . .21
- Filling the reservoir with insulin . . . . . . . . . . . . . . . . . . . . . . . . . . . . . . . . .19
- Inserting the linking screw into the reservoir and into the Dana pump . . . . .20
3. Use of the DANADiabecare®II pump and infusion set
.[Easy Release]
• Priming the infusion set . . . . . . . . . . . . . . . . . . . . . . . . . . . . . . . . . . . . . . . . . .22
•Inserting, disconnecting and reconnecting infusion set . . . . . . . . . . . . . . . . . . . 25
- Inserting the infusion set . . . . . . . . . . . . . . . . . . . . . . . . . . . . . . . . . . . . . . .25
- Disconnecting the infusion set . . . . . . . . . . . . . . . . . . . . . . . . . . . . . . . . . . .30
- Reconnecting the infusion set . . . . . . . . . . . . . . . . . . . . . . . . . . . . . . . . . . . .34
•Delivering a bolus . . . . . . . . . . . . . . . . . . . . . . . . . . . . . . . . . . . . . . . . . . . . . . .28
•Programming temporary basal rates during exercise, illness, menses or stress .29
•Removing the infusion set . . . . . . . . . . . . . . . . . . . . . . . . . . . . . . . . . . . . . . . .27
.[Soft-Release-ST ]
• Indications for use . . . . . . . . . . . . . . . . . . . . . . . . . . . . . . . . . . . . . . . . . . . . . .28
•Precautions . . . . . . . . . . . . . . . . . . . . . . . . . . . . . . . . . . . . . . . . . . . . . . . . . . . .32
•Instructions . . . . . . . . . . . . . . . . . . . . . . . . . . . . . . . . . . . . . . . . . . . . . . . . . . . .33
- Connecting the Soft-Release-ST infusion set to the reservoir . . . . . . . . . . . .33
- Use of the
DANA Diabecare®II
pump and Soft-Release-ST infusion set . . . .33
- Using the disconnect feature . . . . . . . . . . . . . . . . . . . . . . . . . . . . . . . . . . . .34
- Removing the infusion set . . . . . . . . . . . . . . . . . . . . . . . . . . . . . . . . . . . . . .35
Contents
01last 2007.5.10 11:54 AM Page 1

.[Soft-Release-R ]
• Indications for use . . . . . . . . . . . . . . . . . . . . . . . . . . . . . . . . . . . . . . . . . . . . . .36
•Precautions . . . . . . . . . . . . . . . . . . . . . . . . . . . . . . . . . . . . . . . . . . . . . . . . . . . .37
•Instructions . . . . . . . . . . . . . . . . . . . . . . . . . . . . . . . . . . . . . . . . . . . . . . . . . . . .38
- Connecting the Soft-Release-R Infusion set to the reservoir . . . . . . . . . . . . .38
- Use of the DANADiabecare®II pump and Soft-Release-R Infusion set . . . .38
- Using the disconnect feature . . . . . . . . . . . . . . . . . . . . . . . . . . . . . . . . . . . .39
- Removing the infusion set . . . . . . . . . . . . . . . . . . . . . . . . . . . . . . . . . . . . . .40
.[Locking the pump ] . . . . . . . . . . . . . . . . . . . . . . . . . . . . . . . . . . . . . . . . . . . . .40
4. Troubleshooting
•When hypoglycemia (low blood sugar) occurs . . . . . . . . . . . . . . . . . . . . . . . . .41
•When hyperglycemia (high blood sugar) occurs . . . . . . . . . . . . . . . . . . . . . . . .42
•Problems - corrective actions . . . . . . . . . . . . . . . . . . . . . . . . . . . . . . . . . . . . . .43
•List of alarms and audible signals . . . . . . . . . . . . . . . . . . . . . . . . . . . . . . . . . . .45
5. Specifications, Symbols, Warranty
•General specifications . . . . . . . . . . . . . . . . . . . . . . . . . . . . . . . . . . . . . . . . . . . .46
•Classification and compliance with standards . . . . . . . . . . . . . . . . . . . . . . . . . .46
•Universal Symbols . . . . . . . . . . . . . . . . . . . . . . . . . . . . . . . . . . . . . . . . . . . . . .47
•Warranty . . . . . . . . . . . . . . . . . . . . . . . . . . . . . . . . . . . . . . . . . . . . . . . . . . . . . .48
01last 2007.5.10 11:54 AM Page 2

Before using yourDANADiabecare®II pump, infusion set and reservoir
INDICATIONS FOR USE: The DANA Diabecare®II insulin pump, infusion set and reservoir
are intended for the continuous delivery of insulin for the management of diabetes mellitus.
It is not intended for the delivery of blood or blood products.
Other infusion sets may be used if DANA Diabecare Universal Adaptor is utilized.
Please contact 1-866-342-2322 for details.
Indications for Use
➤The DANA Diabecare®II is classified as an internal powered equipment BF type in accordance
with standard IEC 60601-1 (Medical Electrical Equipment, General Requirements for Safety). Patients
must not open the pump housing or handle any internal components.
➤The DANADiabecare®II insulin pump is intended for use with a proprietary infusion set, reservoir,
and other accessories specified in this booklet. Do not use the pump with any other infusion system or
accessories.
➤If you experience any trouble with the pump, remove the battery from the pump immediately and
contact your sales representative.
➤Use the pad of your finger to press the buttons.DO NOTuse sharp objects to press the buttons.
Safety Precautions
Federal (US) law restricts this device to sale by or on the order of a physician.
3
01last 2007.5.10 11:54 AM Page 3

➤Avoid the following conditions for safe storage and transport of theDANA
Diabecare®II
:
◆
Temperatures below 32.9° F or above 104° F.
◆
Humidity above 90%.
◆
Exposure to dirt or excessive dust.
◆
Exposure to salty environment.
◆
Exposure to explosive gas.
◆
Exposure to rough handling.
◆
Exposure to direct sunlight.
◆
Atmospheric pressure below 500mmHg or above 1060mmHg.
➤The pump must not be used in the presence of intense electromagnetic fields, such as those generated
by certain electrically powered medical devices. The pump should be removed prior to the user having
a CTScan, MRI or X-ray.
➤The pump comes with factory default settings for alarms, maximum daily totals, basal and bolus doses.
These settings may be modified by a healthcare professional or the user through the Guided
Management
Programming Mode.
➤Remove the battery for long-term storage.
➤The reservoir and infusion set are intended for single use only. Do not reuse either the reservoir
or infusion set.
➤Change the reservoir and the infusion set regularly, as recommended by your healthcare professional.
Do not use either for longer than 72 hours.
➤The shelf life of the reservoir and the infusion set is 3 years. Please check the expiration dates
regularly and dispose of any expired accessories.
4
01last 2007.5.10 11:54 AM Page 4

“Warning” indicates the presence of a hazard which can cause severe personal injury,
death or substantial property damage if the warning is ignored.
“Caution” indicates the presence of a hazard which will or can cause
minor personal injury or property damage if the warning is ignored.
“Note” advises the user of installation, operation or maintenance information which is
important but not hazard-related.
Explanation of “Warning,” “Caution,” and “Note” Symbols
➤The outside of the pump should be cleaned monthly.
➤When cleaning the pump, use a cloth moistened with water or a neutral pH detergent and wipe it
with a dry cloth.
➤Do not use thinner, alcohol, benzene or similar solvents.
➤Please rinse your pump off with clean water after swimming, or after exposure to dust,
soot or other material that adheres to the pump.
➤Never insert a cloth or liquid into the battery compartment.
➤If the linking screw appears discolored, discard and use a new one. Contact technical
support at 1-866-326-2832 if additional screws are needed.
Cleaning your DANA Diabecare®IIinsulin pump
5
01last 2007.5.10 11:54 AM Page 5

Additional accessories
may be purchased separately.
INSULIN PUMP
Contents of the DANA Diabecare®IIInsulin Pump Kit
RESERVOIR
(6) INFUSION SETS
(6) INSULIN
SCALE TRAY
ADHESIVE TAPE
(1)
RESERVOIR
CAP
LEATHER CASES
(2)
TRANSPARENTCASE
BLACK CLOTH
BELT
BATTERY
(2)
LINKING SCREW
(2)
BRAPOUCH
TEGADERM
(2)
SHOWER
POUCH
MEFIX
(3)
BATTERY
COMPARTMENTKEY
(2)
TM
USER MANUAL
6
01last 2007.5.10 11:54 AM Page 6

1. Reservoir Compartment: The reservoir
and linking screw are inserted in this
compartment. Turn cap clockwise to open.
2. Battery Compartment :The battery is
inserted in this compartment. Turn cap
counterclockwise to open.
4. LCD Screen: Displays status of system
features and system messages, and serves as
the user interface with pump software.
Lights automatically when any button is
pressed.
Press to move to the next
choice on the LCD.
Press to select the function
highlighted on the LCD.
Press to increase insulin dosages,
time and date, and Guided Management
functions.
Press to decrease insulin dosages,
time and date, and Guided Management
functions.
➀
Reservoir Compartment
②
Battery Compartment
➂
Control Panel
➃
LCD Screen
Identification and Description of Your Pump Features
3. Control Panel: Contains the four buttons
which are used to increase and decrease
settings, switch screens and select functions.
UP
➃
➂
②
➀
➀
②
NEXT
SEL
DOWN
UP
DOWN
NEXT
➂
SEL
➃
7
01last 2007.5.10 11:54 AM Page 7

1. Open the battery compartment by
inserting the battery key into the battery
cap and turning counterclockwise.
2. Insert the battery with the positive end
down into the pump.
3. Close the battery cap by turning the
battery key clockwise until tight and
flush with the pump.
2. Set-up and basic functions
Inserting the Battery
Alway keep at least one power kit (2 batteries)
available for backup.
The date on the battery is the manufacture date.
The battery has a guaranteed shelf life of ten years.
Follow these steps
Failure to tighten the battery cap may result in
water entering the battery compartment, causing
the pump to malfunction.
8
01last 2007.5.10 11:54 AM Page 8

BASIC DISPLAY
INITIAL DISPLAY
1. CHECK/REVIEW icon - Choose the picture of a
magnifying glass to check basal rates, previous bolus
doses, the last bolus, previous daily totals and prime
history.
2. BOLUS icon - Choose the icon of a syringe to
deliver meal bolus doses.
3. TEMPORARY BASAL icon - Choose the picture of a
person for temporary changes in basal rates for exercising
or other events.
4. SET/ PROGRAM icon - Choose the picture of a sliding
scale to set basal rates and preprogrammed bolus doses.
The DANA Diabecare®II LCD screen will automatically go blank after one minute to conserve
battery power. Push any of the control buttons to return to the INITIAL DISPLAY. Any button
press will also activate the backlight for 10 seconds.
1. Displays current time and date.
3. Displays the amount of insulin remaining in the
reservoir in units. (1ml=100 units).
2. Displays remaining battery charge
as 100%, 75%, 50%, 25%, or 0%.
The remaining battery charge is updated
only after you deliver a bolus.
Explanation of the display screens
Push any of the control buttons while viewing the INITIAL DISPLAY
and the BASIC DISPLAY will appear.
➀
②
②
➂
➀
➂ ➃
9
01last 2007.5.10 11:54 AM Page 9

You cannot see the magnifying glass icon in
first box that says ‘from the INITIAL
DISPLAY screen press any of the control
buttons and the BASIC DISPLAY screen
will appear’.
1. In the BASIC DISPLAY screen press
to change the highlighted icon.
Press three times consecutively to
transfer from to as shown in figure1.
Then press .
2. The SET/PROGRAM screen in figure 2
appears. You can select (bolus) or
(basal rate) or (clock) . Press to
change the highlight from to or to .
fig. 1
fig. 2
Set
Setting bolus doses, basal rates and the clock
SET/PROGRAM SCREEN
BASIC DISPLAY SCREEN
The CHECK/REVIEW icon will be highlighted.
NEXT
NEXT
SEL
NEXT
10
01last 2007.5.10 11:54 AM Page 10

1. Indicates that you are setting a bolus.
2. Insulin amount of the bolus.
3. US indicates the amount of insulin used since midnight.
MA indicates the maximum allowed daily insulin amount.
4. Time and amount refer to the previous bolus.
1 . From the BASIC DISPLAY screen, go to the
SET/PROGRAM screen. In SET/PROGRAM
press when the is highlighted (figure 1).
The bolus setting screen will appear as shown
in figure 2.
fig.2
fig.1
3. After setting your bolus doses press .
The bolus settings will be saved in the DANA
memory.
We recommend you confirm that your bolus setting is saved to memory by
using the CHECK/REVIEWmode of the DANA Diabecare®II
(See page 17 ).
Setting a bolus
2. While in the BOLUS SETTING screen
select the proper insulin dose by using and
. The insulin dose appears in “units” in the
bottom right hand corner.
UP
Set
Bolus
US. 27 MA. 160
PM09:00= 5.0u
1
2
3
4
BOLUS SCREEN
SET/PROGRAM SCREEN
SEL
DOWN
SEL
11
01last 2007.5.10 11:54 AM Page 11

Make sure to press after the bolus is set to save the setting.
This setting is the amount of insulin that you will deliver the next time you bolus.
It becomes the “default” bolus setting on your pump. You may increase or decrease
your bolus prior to delivery but the bolus dose setting will not change unless you
change it in the SET/PROGRAM screen. Remember that you can always increase
or decrease your bolus prior to delivery.
Pre - setting meal boluses
If you or your healthcare professional
have chosen the “pre-set” option in
Guided Management, your BOLUS
screen will appear differently.
This option permits you to pre-set
boluses for breakfast, lunch and dinner.
If you pre-set meal boluses, the following time
periods correlate to the following schedule:
Breakfast =1:00 am - 9:59 am
Lunch = 10:00 am - 2:59 pm
Dinner = 3:00 pm - 12:59 am
Any bolus given during the breakfast period will be
pre-set for the amount selected for breakfast.
If you have a snack or multiple meals within a time
period, remember to adjust your bolus accordingly.
DINNER BOLUS SCREEN
BREAKFASTBOLUS SCREEN
LUNCH BOLUS SCREEN
SEL
12
01last 2007.5.10 11:54 AM Page 12

BREAKFASTBOLUS SCREEN
fig.1
Set
SET/PROGRAM SCREEN
fig.2
1 . From the BASIC DISPLAY screen, go to the
SET/PROGRAM screen. In SET/PROGRAM
press when the is highlighted (figure 1).
The bolus setting screen will appear as shown
in figure 2.
1. Indicates that you are setting a bolus for
Breakfast (Brfst), Lunch or Dinner. (See
preceding page for time periods.)
2. Insulin amount of the bolus.
3. US indicates the insulin amount used
since midnight. MA indicates the
maximum allowed daily insulin amount.
4. Time and amount refer to the previous
bolus.
1
2
3
4
2. While in the BREAKFASTBOLUS screen select the
proper insulin dose by using and .The insulin
dose appears in “units” in the bottom right hand corner.
4. After setting all of your meal boluses press .
The meal bolus settings will be saved
in the DANAmemory.
3. Press to go to the LUNCH BOLUS screen
and follow step 2.
Press to go to the DINNER BOLUS screen and
follow the same steps.
We recommend that you confirm that all adjusted settings
were saved to memory by using the CHECK/REVIEW
mode of the DANA Diabecare®II
(See page 17 ).
SEL
SEL
UP
DOWN
NEXT
NEXT
13
01last 2007.5.10 11:54 AM Page 13

fig.1
fig.2
1. Chronological time which corresponds to the
highlighted section of the basal profile.
3. Basal Profile, which shows basal rates in a graph
from midnight to midnight.
4. Basal Rate for the time period shown in ( and
graphed in ( )
2. TB=32.9 is the basal calculator for a 24
hour period.
1. Press when is highlighted (figure 1)
in the SET/PROGRAM screen. The BASAL RATE
SETTING screen will appear as in figure 2.
Setting the basal rates
TB=32.9
Set
4
2
1
3
SET/PROGRAM
BASALRATE SETTING SCREEN
Make sure to press after the meal boluses are set to save the settings.
The settings are the amount of insulin that you will deliver each time you bolus
during the time periods indicated on page 13.
They become the “default” bolus settings on your pump for each of these time
periods.
You may increase or decrease your meal boluses prior to delivery but the meal
bolus settings will not change unless you change them in the SET/PROGRAM
screen.
3
1
SEL
SEL
14
01last 2007.5.10 11:54 AM Page 14

Setting the clock
2. The Basal Profile appears in the lower right side
of the screen. Use to move between the 24
rates available - the corresponding chronological
time will appear in the upper right corner. Use the
and buttons to change the basal rate
for the highlighted time period.
3. After basal rates are set, press to save
the setting in the DANA memory.
Make sure to press after the basal profile is set to save the settings!
We recommend that you confirm all adjusted settings are saved to memory by
using the CHECK/REVIEW mode of
DANA Diabecare®II (See page 17 )
1. From the BASIC DISPLAY, go to
the SET/PROGRAM screen. Press to
highlight and press .
3. Use to move between the year and month,
as well as, hours and minutes and
and to make the desired changes.
After making the changes press to
return to the BASIC DISPLAY screen.
2. The CLOCK SETTING screen will
appear as shown in figure 1.
fig.2
fig.1
You must set a.m. and p.m. correctly. If the
clock shows 3:00 p.m. and you want 3:00
a.m. you must continue to press [UP] untill
the screen reflects your desired change.
Failure to do so might result in inappropriate
basal insulin delivery for that time period.
If you or your healthcare professional have
chosen the 24HR option in Guided
Management, your CLOCK SETTING
screen will appear as shown in figure 2.
NEXT
DOWN
UP
SEL
SEL
SEL
NEXT
NEXT
SEL
UP
DOWN
15
01last 2007.5.10 11:54 AM Page 15

4. The BOLUS screen (figure 4) or MEAL BOLUS
screen (figure 5) will appear. The number will be
the “default” bolus (figure 4) or pre-set meal
bolus (figure 5). Press to move from one
meal period to the next. Press to review
the history of the previous 50 boluses.
The icon is used for reviewing both basal rates and bolus settings.
Do not select ,which is immediately to the right. If you selected this in error
press to return to the BASIC DISPLAY, and go back to step 2.
2. The icon will be highlighted as in figure 2
(if not, press to change the highlighted
icon). Then press .
1. In the BASIC DISPLAY screen press
until the icon is highlighted as in figure 1.
Then press .
fig.3
Checking bolus doses, basal rates and reviewing memory data
Bolus
US. 27 MA. 160
PM09:00= 5.0u
TB=32.9
BASAL PROFILE SCREEN
BASIC DISPLAY SCREEN
3. The BASAL PROFILE screen (figure 3)
will appear. Press to move between basal
profiles and confirm settings. To review the
previous meal bolus press .
If your bolus and basal dose rate settings are
incorrect please return to the BASIC DISPLAY and
choose to make adjustments (see page 13 -
Setting Bolus Doses and Basal Rates).
fig.1
CHECK/REVIEW SCREEN
fig. 2
DINNER BOLUS SCREEN
BOLUS SCREEN
fig.5
Chk
NEXT
SEL
NEXT
SEL
NEXT
NEXT
SEL
NEXT
SEL
16
fig.4
01last 2007.5.10 11:54 AM Page 16

The battery life and remaining insulin amount can be confirmed in
the INITIALDISPLAY screen. The INITIALDISPLAY in figure 1
shows that 250 units of insulin remain in the reservoir and that the
battery is 100% charged. This screen is automatically display any
time a button is pressed to activate the screen.
fig.1
Checking the battery life and remaining insulin amount
INITIAL DISPLAY SCREEN
5. Use and to review the Bolus
History including date, time and amount
delivered. Press to review the 50
previous Daily Totals.
6. Use and to review the Daily
Total History including date and the total
amount of insulin. Press to review
the 50 previous PrimeAmounts.
7. Use and to review the Prime
History including date, time and amount.
Press to check factory ship date and
serial number.
8. Press to return to the
BASIC DISPLAY.
UP
DOWN
SEL
UP
DOWN
SEL
UP
DOWN
SEL
SEL
17
01last 2007.5.10 11:54 AM Page 17

1. In the CHECK/REVIEW SCREEN
press highlight as shown in figure 1.
Then press .
When you suspend the pump, it will beep 3 times every 4 minutes to remind
you that no insulin is being delivered.
Suspending the pump
2. The pump will give an audible tone and
the screen will indicate the pump is
suspended.
3. To take the pump out of suspend, press
you will again hear an audible
indicator and the BASIC DISPLAY will
appear as shown in figure 2.
fig. 1
fig. 2
Chk
CHECK/REVIEW SCREEN
BASIC DISPLAY
NEXT
SEL
SEL
18
01last 2007.5.10 11:54 AM Page 18

We recommend that you change the reservoir when there are 15 to
20 units of insulin remaining.
1. Place all materials on a clean, dry surface.
2. Remove the round cap at the end of the reservoir plunger and
discard. Athin white reservoir cap will fall out of the plunger -
keep this cap for later use. Pull back on plunger to the line marked
with the number 3 and push up and down three to four times to
properly lubricate the reservoir.
3. Carefully remove the clear needle protective cover. Pull plunger
down until you are at the desired amount of insulin needed then
insert needle into the insulin vial and inject the air in the syringe
into the vial. Draw out the desired amount of insulin. Withdraw the
needle from the vial and place the clear needle protective cover back
on the needle.
4. Remove any bubbles from the inside of the reservoir by gently
tapping on the sides making the bubbles rise to the top of the
syringe. Gently push on the plunger to remove the bubble at the top.
5. Remove the needle from the reservoir and cover with the thin white
reservoir cap. Please dispose of the needle properly. Use only short acting insulin in
your pump.
▼
▼▼▼
Insulin Pump Reservoir Insulin
Scale Tray Infusion Set
Transparent
Case Linking Screw Reservoir
Cap Battery Key
Filling the reservoir with insulin
Filling and inserting a new reservoir
Insulin
19
01last 2007.5.10 11:54 AM Page 19

4. Suspend your pump now and remove the old reservoir if you haven’t already done so.
3. Rotate until the end of the linking screw fits into the notch as shown in figure 1.
2. Place the filled reservoir with the attached linking screw into the insulin scale tray as
shown in figure 1.
1. Insert and fit the plastic component of the linking screw into the cavity of the plunger.
Be sure to note the amount of insulin in the reservoir as indicated on the insulin scale tray
and not on the reservoir body itself.
You will need this number when you remove air from the infusion set by priming (page 24 ).
The scale is in 0.2 cc increments.
5. Remove the reservoir and linking screw unit from the insulin tray.
The screw must lie in the groove of the tray’s neck as in figure 1. In some cases you must manually adjust
the screw length to match the neck before putting the reservoir in the tray.
fig.1
fig.2
Reservoir Cap
Linking
Screw
Notch
The tip of the linking screw, with the hexagonal (6 sided) end should enter the notch to point indicated
by the red line, and no further(FIGURE 2).
Inserting the linking screw into the reservoir and into the Dana Pump
Notch
20
01last 2007.5.10 11:54 AM Page 20
Table of contents
Other DANA Medical Equipment manuals