Dancover BW2300 Series User manual

27-02-2020
for
Retractable Awning 3,95x2,5m
w/Remote Control
Manual

RetractableAwning
3.95x2.5m

Saveenoughfreespacearoundthe awningwhilerolling or unrolling.
The installationcanbemadebynon-professionalsassumingtheinstructionis followedcorrectly.Shouldyou
haveany troubleduringassembly, pleaseconsultaqualified personforhelp.
Donotbarbecue under theawningorigniteafirenear totheawning
Theoperationinfrostyconditionsmay damage the awning.
1
Specification
Symbolexplanation:
Meansit is forbidden
Meansimportant
Precautionsandsafetywarningforinstallationandoperation
Neverinstallitinhighandwindyplaces,asthesunshade may drop and hurt people.
Don'tuseitinplacesthathavevibrations or impulsions.
Don'tuseitinplacesofhightemperaturesuchas walls near furnaces.
Don'thanganythingontheframeoronthefoldingarmsastheawningmay fall downand causedamage or
personalinjury.
Neveruseitinrainyandwindy days.
Neveruseitforotherpurposes.
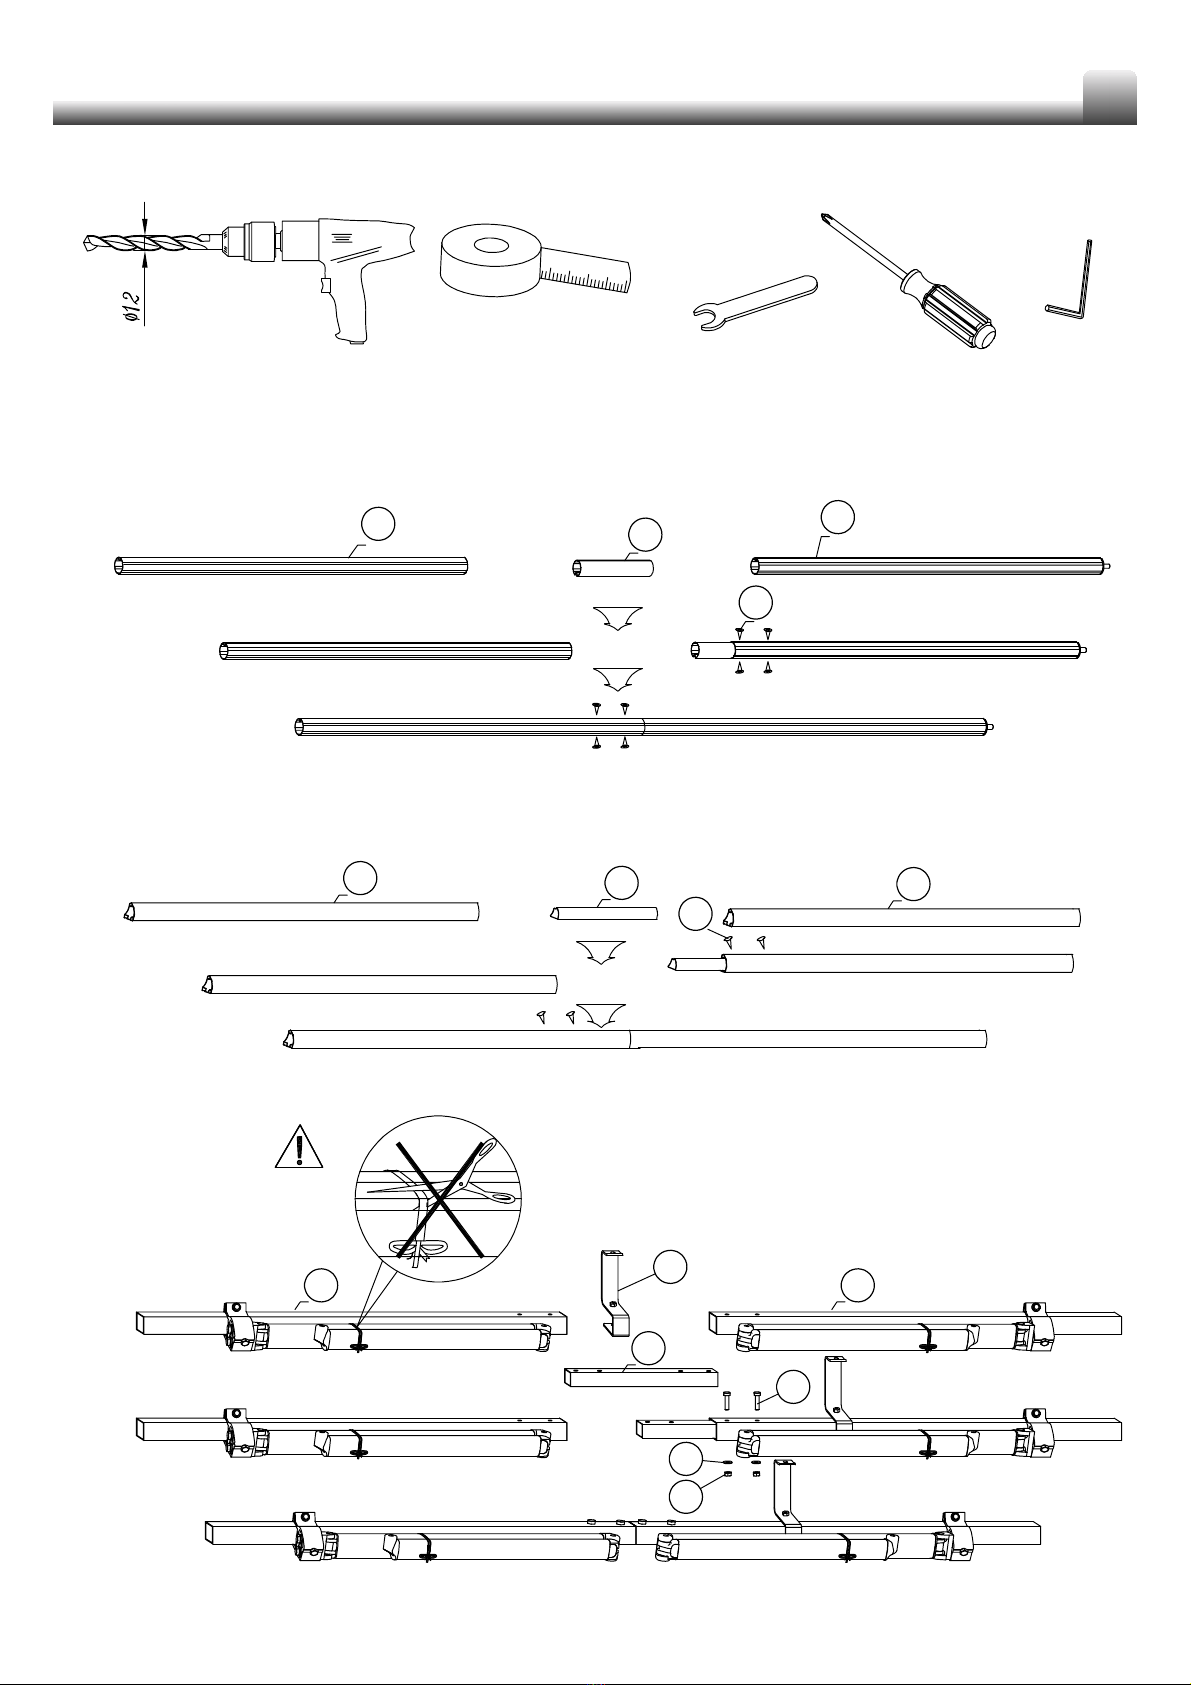
Becarefulwithyourfinger duringinstallation.
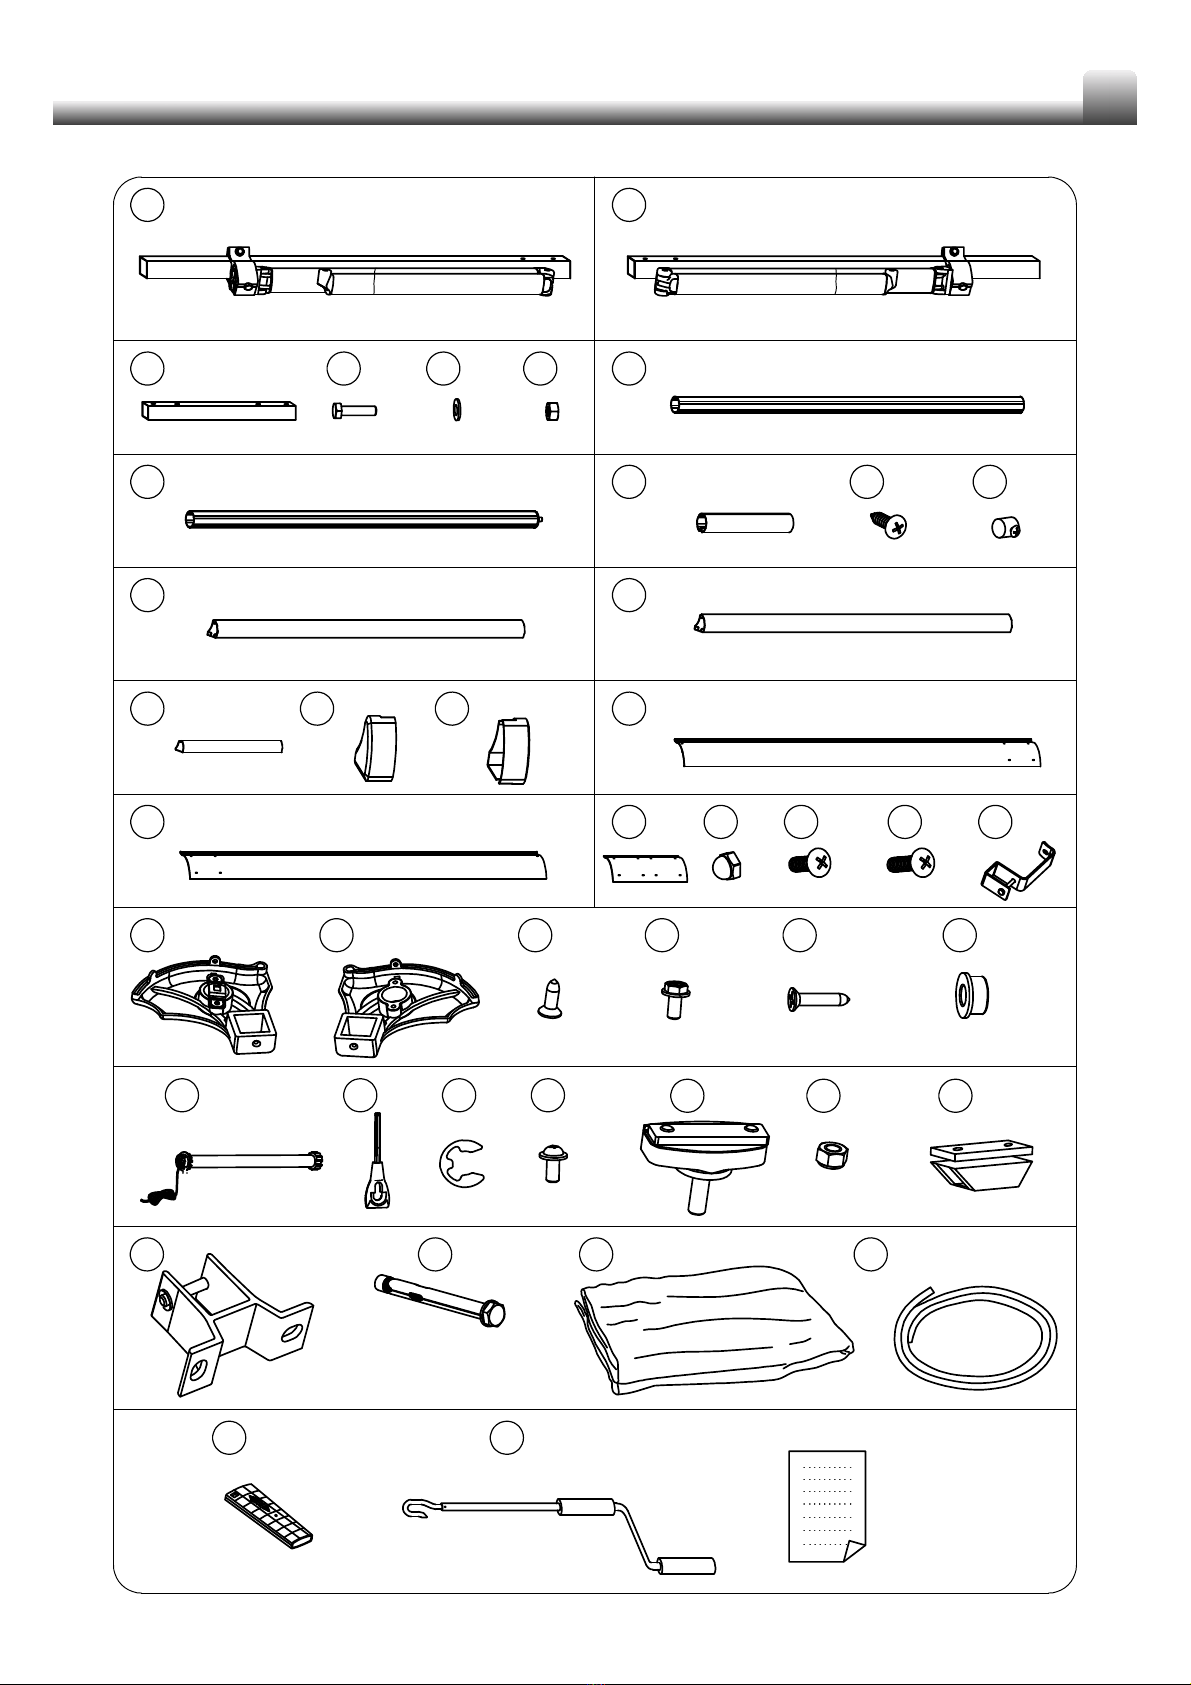
Whenyouarereadytounpackandassembletheawning,makesurethatyou havethe appropriatetools,
sufficientoperators (2personsaresuggested)andspace,andaclean anddry areatoperformtheinstallation."
Pleaseuseallthescrewsandnutscorrectlyduringinstallationasitisvery dangerous if you leaveit loose.
Pleaseclosetheawninginwindy and rainy days.
Nomodificationoftheawninginany kind is allowed.
Artical number
BW23000
Actualsize
(cm) Shade
Dimension
(cm)
Net weight
(Kg) Inclinationangle Windresistanceclass
295 200 0°45°Class1(28Km/h)
287 200
Fabric
Polyester
Donotopentheawningwhenmaintenance,suchaswindowcleaning,isbeing carried out in the vicinity.
ATTENTION,LIRELESINSTRUCTIONS
AVANTD'UTILISERLEPRODUIT
Checktheawningevery3monthstoensureallfixingaretightenedand no damage on the products.
Donotusetheawningifrepairisneeded.Donottrytorepairtheproduct by yourself,contact qaulified person
for repairing.
Attention!
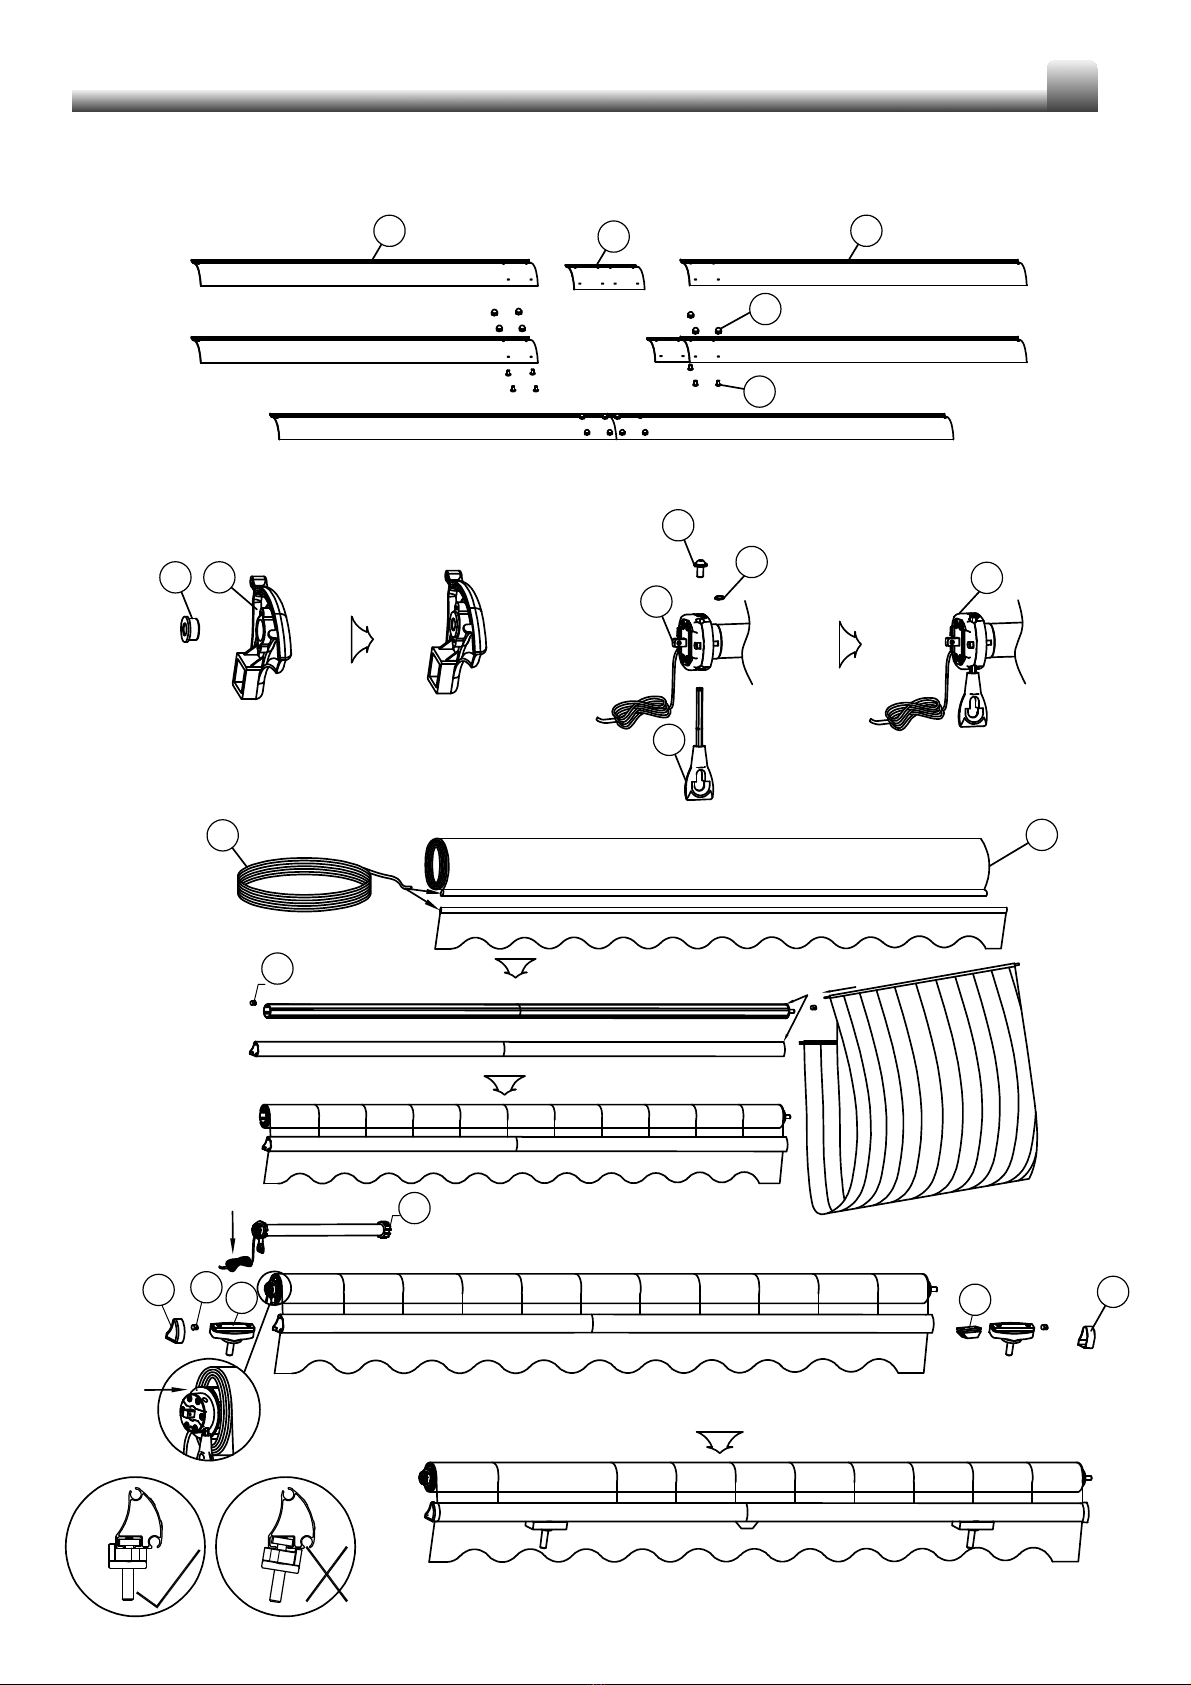
Beforeopeningtheawning,makesureallthefixingboltsandsecuritydevicesareproperlyinstalled
andtightened.
Alwaysclosetheawningduringrainydays,windydaysortheawningisnot inuse.
Failedtoobservetheinstrutionmayleadtomaterialandconstructionaldamageoftheawning.
Thefoldingarmsoftheawningareundertensionandcancausedamageandinjurywhenthey are
openupsuddenly.
Nevertrytodisassembletheawningorrepiartheawningbyyourself.Consultacompetent
technician for help.
BW23000 395 250 0°45°Class1(28Km/h)
387 250 Polyester

Accessoriesandrequiredtools 2
A1A2
A3B1
B2
E3
E1
E2
F G
Bolt M6 50
x1 x1
x1 x1
x1
x1
x1
x1
x1 x1
Washer Ø6.5 Nut M6
A4x4 A5x4 A6x4
Nut M6 Bolt M6 8
E4x8 E5x7
Hx2
Bolt ST5 15
Ix2
Bolt M5 15
x1
Jx2
Bolt ST5 25
Kx1
Nut M8
Mx2 Nx2
B3x1
Bolt ST4 15
B4x12 Cx6
D1D2
D3
x1 x1
x1 D4x1 D5x1
P R S
x1
T
x3
x1
Instruction
Ox1
Bolt M6 12
E6x1 E7x1
Ux1
Q
L1x1
L2x1
L3x1
L4
Bolt M4 10
x3 x6

1、
2、
Pleasepreparebelowtoolsbeforeinstallation:
B1B3B2
B4
D1D3D2
B4
A1A2
A3A4
A5
A6
3
3、
E7

4
5
6
Through the fabric into
roller and front bar
through from
7
E1E2
E3
E4
E5
4
K G
PicA
SR
C
D4CMOD5
L
PicB
L1
L2
L3L
L4

5
insertin
insertin
8、
H
insertin
J J
H
I I
9、
G
E1E2
B1
F
E7
E6
E4
12、
Bolt M6 55
E2
E3
I

6
tight tight
NN
13、
M M
tight tight
C=A+0.17*L
14、
3.95x2.5M:
3.95x2.5M:

15、
M10
7
P
Q
Installation of awning to wall brackets
Removetheboltsonthefrontofthewallbrackets.Installtheawningtothewallbracketsby
attachingthesquaretorsionbartothewallbrackets.Locktheawninginplaceby replacing the
boltsandnutsonwallbrackets.Tightenthenutstoensuretheawningisattached towall
bracketssecurely.
16、

Earth
Neutral
Live
Attention:Well finishthesettingprogram alreadyfor allelectricitems,finalclient no need
adjustthemotoragain.
Attention:the userscannotusetheawning morethantworounds,orifmorethan2
rounds,themotorwill automaticallyenterintooverheatingprotectionandwhen upush
the remotecontrol,the awning bodywouldnotmove,the usersmustcutoff the power
and waithalfan hour
Operationinstructions
8
Open
U
17、
tight
tight
Check if the awningis levelwiththeuse of the spirit
levelonthe frontbar.Adjust the angleadjuster at either
end bylooseningthelockingnutsoftheangleadjuster
,turnthe jack bolttoadjust the pitch.Adjustthe arm until
the frontprofileislevel.Tightenthelockingnutsagain
tofixthelevelofawning.
To adjusttheinclinationoftheawning,adjustthe angle
adjusteronbotharmshoulderstoachieve the desired
inclinaton.Fixthelockingnuts whentheawning islevel.
How to connect the motor:
The power connection must be carried out by an authorised electrician.
The cord on the awning is 1,8 m and must not be replaced.

Up
Stop
Down
FunctionPressbutton
Stop
Up
Down
Retract/ closetheawing
stopopening/closingprocess
extract /opentheawning
9
Remotecontrol
Shadetravellimitadjustment
Sun shade projection
limit setting
Sun shade closing
limit setting
Up
Down
P2
White:
Sun shade closing
limit setting
Red:
Sun shade projection
limit setting
1.Customers can adjust and set the positions of sun shade travel limit by themselves.
2.According tomotor rotating direction,adjust the travel limit withthe use of the 4mm hex
wrench:the direction of "+"isincreasing the travel limit and "-"istoreduce the travel limit .
3.After setting,open and close the awning withthe switch and check if the setting issatisfactory.If
not,repeat step 2.

Changethe batteriesoftheremotecontrol
1.Openthelidofthebattery.
2.Getoutthebattery,payattention tothe
direction ofinstallation.
3.Putinanewbattery .Closethe
lid ofthebattery.
Re-initializationoftheremotecontrol
Turnoffthepowersupply forabout10s, thenpoweron.Press P2”keyoftheremotecontrol
twice,afterwardpressthe UP”buttonforthesetupofretraction.Repeattheabovesteps, exceptpress
the DOWN”buttonforthesetupofextraction.
4.Aftersetting,openandclosetheawning withthe remotecontrol andcheckifthesettingissatisfactory.If
not,repeatstep 1.
10
Descriptionofmistake
Warning: Whenthefront bar touches the rollerasshowninthefigure,
don'ttrytomakethemcloser,otherwisetheproduct might be damaged.

◆endcap ◆arm
shoulder
◆arm stand
◆roller
cassette
◆torsion bar
※
Note:
1. Whentheparts with
◆
are damaged,don't usethe product beforethey are replaced.
Names oftheparts
◆motor
◆front bar
◆fabric

Contact information
Head office:
Dancover A/S
Nordre Strandvej 119 G
3150 Hellebæk
Denmark
For more information
please visit:
www.dancovershop.com
National contact
Denmark: 70 26 76 20
denmark@dancover.com
UK: 020 8099 7570
uk@dancover.com
Spain: 911 436 828
espana@dancover.com
Italy: 02 479 21 198
italia@dancover.com
Germany: 041 0266 7040
germany@dancover.com
Switzerland: 0840 000125
schweiz@dancover.com
France: 0975 181 800
france@dancover.com
Austria: 0662 626935
austria@dancover.com
Sweden: 040 233 262
sverige@dancover.com
Finland: 0 931 581 720
suomi@dancover.com
Nederland: 0 858 880 524
nederland@dancover.com
Poland: 22 300 8602
polska@dancover.com
Ireland: 0 151 33 003
ireland@dancover.com
Luxembourg: +49 041 0266 7040
luxembourg@dancover.com
Portugal: 308 800 899
portugal@dancover.com
Belgium: 0 28 08 08 09
belgique@dancover.com
Norway: 231 00 690
norge@dancover.com
Table of contents
Other Dancover Accessories manuals
Popular Accessories manuals by other brands

Oregon Scientific
Oregon Scientific Wireless Outdoor Temperature and Humidity Sensor THGR 238... user manual

MTS Sensors
MTS Sensors Temposonics T Series Operation manual

CORNING
CORNING LSE 71L instruction manual

Festo
Festo SPAE Operating instruction

Bühler technologies
Bühler technologies EGK 1 E 2 Series Brief instructions

Hafele
Hafele Pop-up Worktop Socket Assembly guide