Dartel LJ-110B User manual

User guide
Please read these instructions
carefully before use and keep
this User Guide for future
reference!
LJ-110B

1
User Guide
LJ-110B
Please read these instructions
carefully before use and keep this
User Guide for future reference.

2
Contents LJ- 110B
Contents
I. Introduction......................................................................................... 3
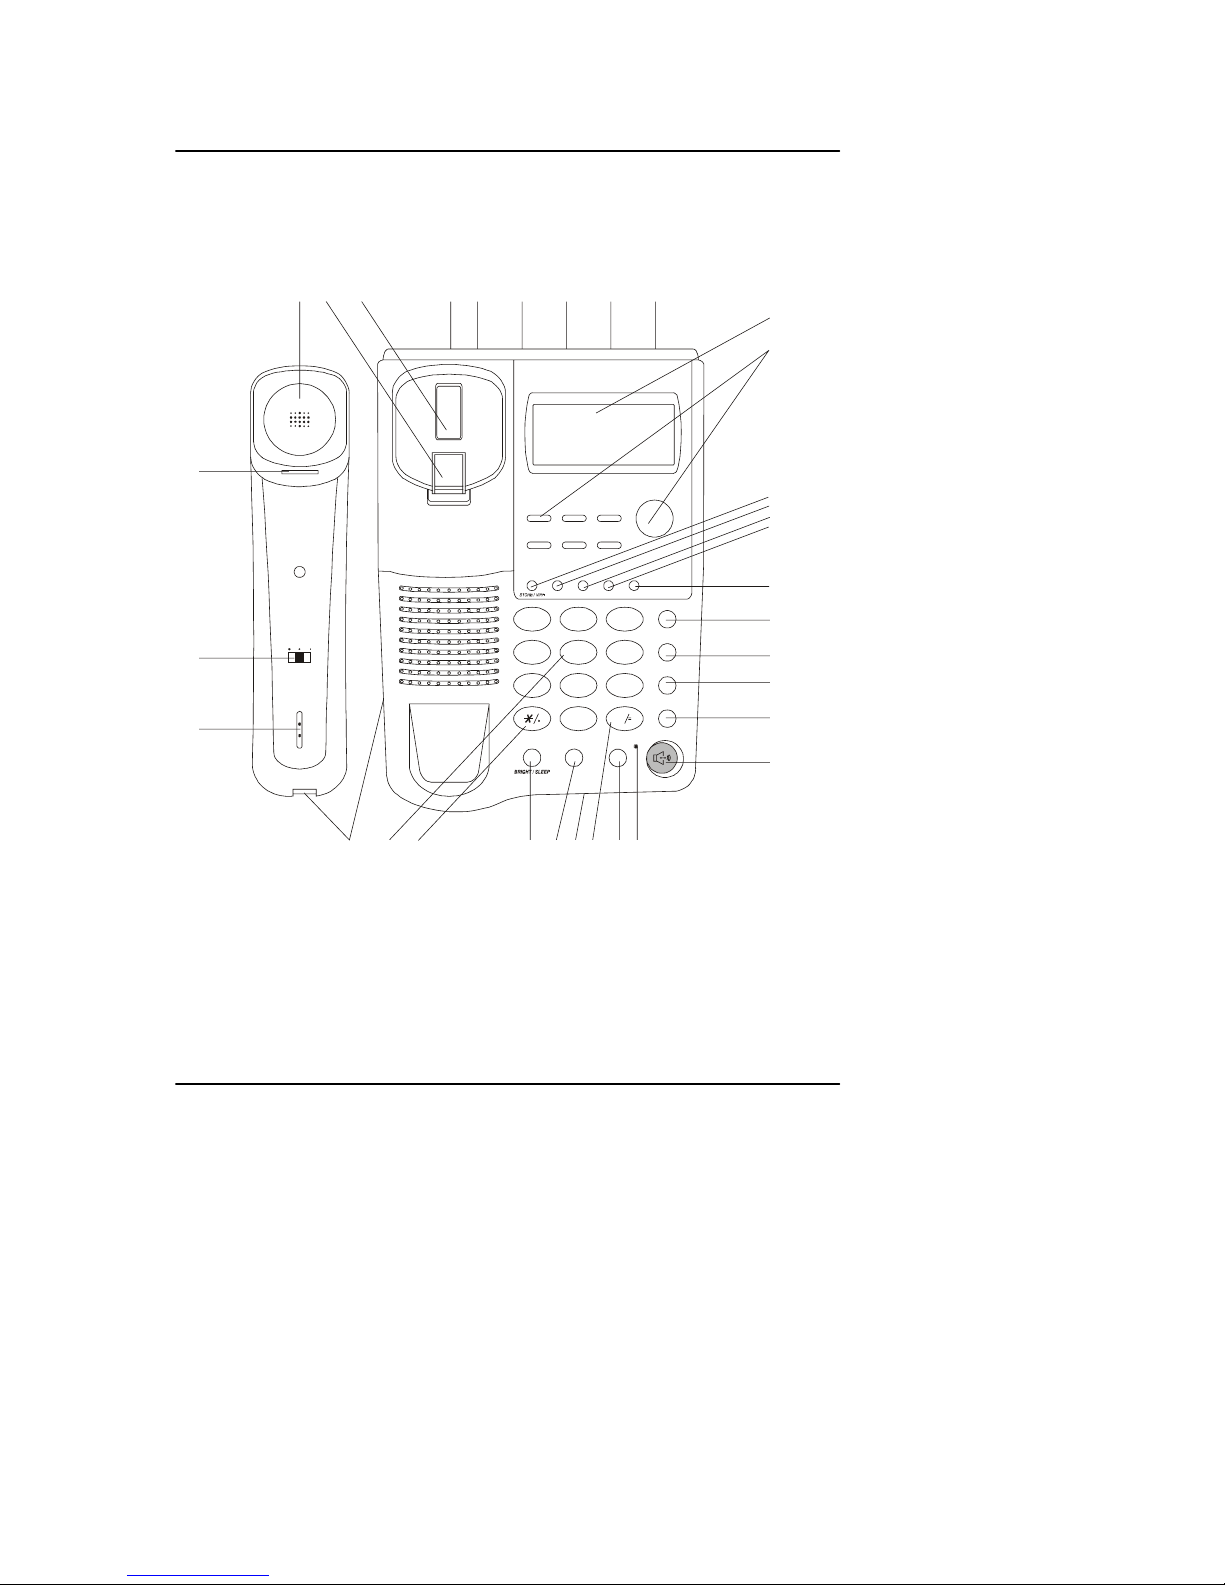
Telephone features............................................................................... 3
Function button index............................................................................ 5
II. Getting started................................................................................... 7
How to connect the batteries................................................................ 7
How to connect the handset and telephone line................................... 7
How to set the dial mode for your type of telephone exchange............ 8
III. Using the telephone......................................................................... 9
How to set the display contrast............................................................. 9
How to set date and time...................................................................... 10
Ringer volume control........................................................................... 11
How to select ringer melody.................................................................. 11
2-way speaker function......................................................................... 12
How to make a call............................................................................... 12
How to receive a call............................................................................. 13
OUT memory........................................................................................ 13
How to delete the OUT number............................................................ 14
Redial function...................................................................................... 15
How to enter a pause............................................................................ 15
Hold function......................................................................................... 15
Two touch dial memory......................................................................... 16
Flash function........................................................................................ 18
How to lock telephone numbers............................................................ 19
Alarm function....................................................................................... 19
“Don’t disturb” function.......................................................................... 21
Calculator.............................................................................................. 22
IV. Clip (Caller ID) – Calling line identification presentation............. 23
How to review Clip numbers................................................................. 24
How to delete Clip numbers.................................................................. 24
VIP function.......................................................................................... 25
How to make a call from the Clip memory............................................ 25
How to set the local area code.............................................................. 26
V. Wall mounting.................................................................................... 28
VI. Help................................................................................................... 29
Important advice.................................................................................. 30
Declaration of Conformity………………………………………………… 31

3
I. Introduction LJ-110B
I. Introduction
Important!
Please read these instructions carefully before use and keep this User Guide
for future reference.
Telephone components supplied:
! telephone set (base unit + handset),
! handset cord,
! line cord,
! user guide,
! guarantee card.
# Telephone features
♦ 16-digits, blue backlit LCD display
♦ 7 number memory
♦ Calculator
♦ CLIP(Caller ID) – calling line identification
presentation in FSK/DTMF European
system
- maximum of 52 memory locations
- telephone number review
- date and time display
- local area code enter
- call back
- VIP function
♦ Alarm-clock
♦ Call timer
♦ Adjustable display contrast
♦ Date and time setting
♦ Calendar
♦ Handset volume control
♦ Last numer redial
♦ Maximum of 28 redial memory
♦ Pause

4
I. Introduction LJ-110B
♦ 2-way speaker function
♦ Pre-dial function
♦ Flash
♦ 16 types of ringer sound selectable
(8 melody ringers)
♦ Ringer volume control
♦ „Don’t disturb” function
♦ Music on hold
♦ Tone/pulse dialing
♦ Lock for long distance calls
♦ Lighted keypad
♦ Wall mounting

5
I. Introduction LJ-110B
# Function button index
1. Handset loudspeaker
2. Wall clip
3. Hook switch
4. Line socket TEL IN
5. Second line socket TEL OUT
6. DIAL MODE T/P switch
7. RINGER Hi-Low switch
8. VOLUME Hi/Low switch
9. DC9V socket for connecting the adaptor
10. Display
11. M1...M7 buttons
12. STORE/VIP/÷
÷÷
÷button
13. OUT/X button
14. DOWN/- button
15. UP/+ button
16. CAL button
17. RECALL button
18. DEL button
19. SET/HOLD button
20. BACK button
21. SP-PHONE button
22. Handset hole
23. VOLUME HI/LOW switch
24. Handset microphone
25. Handset socket
26. Keypad
27. */. button
28. BRIGHT/SLEEP button
29. FLASH button
30. Base microphone
31. #/= button
32. RD/P button
33. IN USE indicator

6
I. Introduction LJ-110B
Note!
The line sockets, the RINGER Hi/Low switch, the VOLUME Hi/Low switch, the DIAL MODE
T/P switch, the DC9V socket, the handset socket are located on the side of the base unit. In
addition, on the bottom of the base unit, is the socket for blocking telephone numbers.
12
A
BC
3
DEF
4
GHI
5
JKL
6
MNO
7
PQRS
8
TUV
9
WXYZ
0
#
S
P
-
P
H
O
N
E
M1 M2 M3
M4 M5 M6
M7
OUT / X DOWN / - UP / + CAL
RECALL
DEL
SET / HOLD
BACK
FLASH RD / P
IN US E
VOLUME
HI LOW
123 456789
10
11
12
13
14
15
16
17
18
19
20
21
22
23
24
25 26 27 28 29 30 31 32 33

7
II. Getting started LJ-110B
II. Getting started
# How to connect the batteries
♦ Remove the cover of the battery
compartment on the underside of the base
unit.
♦ Fit three 1,5V AA batteries, being careful
to match the “+” and “-“ signs on the
batteries to the signs marked on the
battery compartment itself.
♦ Replace the battery compartment cover.
Note!
Instead of batteries, the adaptor to the DC9Vsocket, which is placed on the side of the base
unit can be connected. The parameters of the adaptor must be as follows:
! inside voltage –
UIN = 230V, f =50 Hz
! outside voltage–
Uout = 9V DC
! current
Ioutmin = 100 mA
! standard plug (
Φ
=2.1 mm)
with „-” inside.
Adaptor is not in complete!
# How to connect the handset and telephone line
♦ Plug one end of the coiled handset cord
into the handset and the other end into
the socket on the side of the telephone.
♦ Insert the base unit’s telephone line plugs
into the PTT wall socket and telephone
socket TEL IN as shown on the illustration.
Note!
The telephone is equipped with two line sockets. These sockets are connected in parallel. It does
not matter, where the telephone line and second telephone are connected.

8
II. Getting started LJ-110B
After connecting the telephone, the display shows the following settings:
! 00- counter of CLIP numbers,
! 00:00- clock,
! 1M- month,
! 1D- day,
! 2003 – year,
! WED – Wednesday.
These symbols will be always displayed in the
standby mode.
# How to set the dial mode for your type of telephone exchange
These are two different modes a telephone
can use to communicate with the local
exchange. Modern telephone exchanges
accept TONE dialling, but some older
exchanges accept only PULSE dialling. This
telephone is capable of either type of dialling-
but if your local telephone exchange is a
modern one that accepts TONE dialling, this is
the best type to use, because:
! it gives you much faster connections,
! it allows you to use special functions if
they are available in your area.
To set the right dial mode:
move the DIAL MODE T/P switch to T or P
position.
Note!
Special functions are available only if the relevant TP S.A. services have been subscribed to.
If more information is required, please contact the BOK office or your network provider.
YOUR TELEPHONE IS NOW READY FOR USE!!!
MD
IN
WED

9
III. Using the telephone LJ-110B
III. Using the telephone
# How to set the display contrast
The display contrast can be set in two ways.
1. The first way.
To set the display contrast:
♦ press the SET/HOLD button. The display
will show - 0 1 2 3 4 5 6 7 -.
♦ Press the 2button. The display will show
LCd - 3 -.
♦ Press the UP/+ or DOWN/- button to
select the right contrast.
♦ Press the SET/HOLD button to confirm
the setting. The display will show
- 0 1 2 3 4 5 6 7 – again.
♦ Press the DEL button to return to the
standby mode.
If no further buttons are pressed, the
telephone will return to standby mode after
several seconds. The setting will be stored.
2. The second way.
To set the display contrast:
♦ press the BRIGHT/SLEEP button until you
set the right contrast.
♦ Press the DEL button to return to the
standby mode.
If the DEL button is not pressed, the
telephone will return to standby mode
after several seconds. The setting will be
stored.
SET / HOLD
DOWN / - UP / +
DEL
DEL

10
III. Using the telephone LJ-110B
# How to set date and time
To set date and time:
♦ press the SET/HOLD button. The display
will show - 0 1 2 3 4 5 6 7 -.
♦ Press the 1button. The display will show
the symbol 2003 indicating the year. The
digits 03 will flash.
♦ Use the keypad to enter the right digits.
For example, if you want to set the year
2004, press the 0button and the 4button.
♦ After setting the year, the digit indicating
the month will start to flash. Use the
keypad to enter the right digits. For
example, if you want to set August, press
the 0button and the 8button.
♦ After setting the month, the digit indicating
the day will start to flash. Use the keypad
to enter the right digits. For example, if
you want to set the 27th day of month,
press the 2button and the 7button.
♦ After setting the day, the digits indicating
the hours will start to flash. Use the
keypad to enter the right digits. For
example, if you want to set 16.00, press
the 1button and the 6button.
♦ After setting the hour, the digits indicating
the minutes will start to flash. Use the
keypad to enter the right digits. For
example, if you want to set the 59th
minute, press the 5button and the 9
button.
After entering the minutes, the telephone will
return to standby mode automatically. All
settings will be stored.
Note!
♦ If incorrect buttons are pressed, the settings will not be
confirmed.
♦ After setting the date and time, the display will show one of
the following symbols:
SET / HOLD
1
12
A
BC
3
DEF
4
GHI
5
JKL
6
MNO
7
PQRS
8
TUV
9
WXYZ
0
#

11
III. Using the telephone LJ-110B
! MON- Monday,
! TUE- Tuesday,
! WED- Wednesday,
! THU- Thursday,
! FRI- Friday,
! SAT- Saturday,
! SUN- Sunday.
# Ringer volume control
The volume at which the base unit will ring for
an incoming call can be adjusted.
To select the volume you prefer:
♦ move the RING Hi/Low switch to:
! Low position– low ringing volume
or
! Hi position– high ringing volume.
#
# How to select the ringer melody
One ringer melody can be selected from
among 16 ringer melodies.The settings tONE
01-08 indicate the normal ringers and settings
tONE 09-16 indicate the melody ringers.
To select one ringer melody:
♦ press the SET/HOLD button. The display
will show - 0 1 2 3 4 5 6 7 -.
♦ Press the 7button. The display will show
an actual setting, for example: rING 01.
The ringer signal will be played.
♦ Press the UP/+ or DOWN/- button to
select the right signal (melody).
♦ Press the SET/HOLD button to confirm
the setting. The display will show the
symbol - 0 1 2 3 4 5 6 7 – again.
♦ Press the DEL button. The telephone will
return to the standby mode.
If the DEL button is not pressed, the
telephone will return to standby mode after
several seconds. The setting will be stored.
DOWN / - UP / +
7
PQRS
DEL
SET / HOLD

12
III. Using the telephone LJ-110B
Note!
a)The melody ringers are available only, when the batteries are
placed in the battery compartment. If there are no batteries,
only the normal ringer will sound.
b)If batteries are not inserted in the battery compartment, the
ringer signal (melody) will not sound during the set-up
procedure.
# 2-way speaker function
The 2-way speakerphone function allows a number to be dialled, or a call to be
made, without the handset needing to be lifted. The party on the other end of
the line will automatically be able to hear and to be heard through the speaker
located in the base unit of the telephone. When using this function, the user
needs to speak within a reasonable distance of the telephone microphone in
order that the microphone may pick-up voice sound.This function may also be
used to make a conference call between several parties in the same office.
Using the SP-PHONE button, the 2-way
speakerphone function can be switched off.
After pressing the SP-PHONE button, the
display will show the timer and the IN USE
indicator will light up.
In addition, the VOLUME Hi/Low switch can
be used to adjust the volume of the
loudspeaker:
! position Hi- high voice,
! position Low- low voice.
# How to make a call
To make a call:
♦ lift the handset from the base unit
or
♦ press the SP-PHONE button.
The display will show the timer and the
IN USE indicator will light up.
♦ When the PTT on-line signal is heard, the
required number should be dialled. The
number will be displayed. After several
seconds, the call time counter will be
switched on.
S
P
-
P
H
O
N
E
12
A
BC
3
DEF
4
GHI
5
JKL
6
MNO
7
PQRS
8
TUV
9
WXYZ
0
#

13
III. Using the telephone LJ-110B
♦ To end your conversation, replace the
handset on the base unit or press the
SP-PHONE button. The time of your last
call will continue to be displayed for
several seconds,after which the telephone
will return to the standby mode. The time
of your last call can be displayed by
pressing the OUT/X button (see the
chapter:”OUT memory”)
Note!
The telephone number in the standby mode can also be entered (before lifting the handset or
pressing the SP-PHONE button).If you wish to delete the last incorrect digit, press the DEL
button. If you wish to delete the whole number, press and hold this button until the number
disappears from the display. If you wish to make a call, press the BACK button. The 2-way
speaker function will be switched on and the number will be dialled automatically.
# How to receive a call When the telephone rings (the IN USE
indicator flashes):
♦ lift the handset from the base unit or press
the SP-PHONE button.
In addition, the VOLUME HI/LOW switch can
be used to adjust the volume of the handset or
the VOLUME Hi/Low switch to adjust the
volume of the loudspeaker.
♦ After completing your conversation,
replace the handset on the base unit or
press the SP-PHONE button.
# OUT memory
Your telephone can store up to 28 of the most recently dialled numbers in
the OUT memory. They can be reviewed by pressing the OUT/X button in
standby mode. Each number may consist of up to 16 digits.
To review OUT numbers:
♦ press the OUT/X button. The display
shows the last number dialled and the
time of the call.
VOLUME
HI LOW
S
P
-
P
H
O
N
E
S
P
-
P
H
O
N
E
S
P
-
P
H
O
N
E
OUT / X

14
III. Using the telephone LJ-110B
♦ Press the OUT/X button again. The
display shows the number, stored in the
lower memory location. By pressing the
OUT/X button, the remaining numbers can
be reviewed.
If the OUT/X button is not pressed, the telephone will return to standby mode
after several seconds. If the memory is empty, the display will show the
symbol - - - End - - -.
To make a call:
♦ press the OUT/X button to select the
number .
♦ Press the BACK button. The 2-way
speaker function will be switched on and
the number will be dialled automatically.
♦ After the call, replace the handset on the
base unit or press the SP-PHONE button.
# How to delete an OUT number
To delete an individual number:
♦ press the OUT/X button to select the
number, to be deleted.
♦ Press the DEL button twice. The number
will be removed.
To delete the all numbers:
♦ Press the OUT/X button.
♦ Press and hold the DEL button until
- - - End - - - is displayed. After several
seconds, the telephone will return to
standby mode. All numbers will be
removed.
OUT / X
BACK
S
P
-
P
H
O
N
E
OUT / X
DEL

15
III. Using the telephone LJ-110B
# Last number redial
Your telephone automatically stores the last number dialled of up to 16
digits long. This function can be used, when the number is busy.
To redial:
♦ lift the handset or press the SP-PHONE
button.
♦ Press the RD/P button. The last number
will be displayed and dialled.
# How to enter a pause
With some switchboards, after dialling the access code you may have to
wait for a moment while the switchboard picks up an outside line. To
compensate for this, you can enter a pause within a phone number.
To enter a pause:
♦ lift the handset or press the SP-PHONE
button.
♦ Enter the access code for an outside line,
for example 0.
♦ Press the RD/P button to enter a pause.
The symbol Pwill be showed on the
display.
♦ Enter the remaining digits of the telephone
number.
♦ After your call, replace the handset on the
base unit or press the SP-PHONE button.
# Hold function
The Hold function allows music to be switched on during the conversation.
After pressing the HOLD button, the person on the other end of the line
will automatically be able to hear music. This function may be used, for
example, in offices while a client is on hold.
S
P
-
P
H
O
N
E
RD / P
S
P
-
P
H
O
N
E
12
A
BC
3
DEF
4
GHI
5
JKL
6
MNO
7
PQRS
8
TUV
9
WXYZ
0
#
RD / P

16
III. Using the telephone LJ-110B
To switch the hold music on:
♦ inform the person on the other end of the
line about a music pause.
♦ Press the SET/HOLD button. The display
will show Hold. The telephone will start to
play music.
Note!
In activating this function using the UP/+ or DOWN/- button, you may select the melody you
wish the caller to hear. There are 8 melodies available, from which you can choose. These are
indicated by symbols from 00 to 07. ♦ You can replace the handset on the base.
The connection will not be interrupted.
The hold music will be heard through the
speaker located in the base unit of the
telephone.
♦ Lift the handset or press the SP-PHONE
button to continue speaking. The Hold
function will be switched off.
Note!
If the handset is not replaced on the base, press the SET/HOLD button again to switch the hold
music off.
# Two touch dial memory
Your telephone can store 7 telephone numbers in it’s memory. The
number can then be dialled by pressing two buttons. Each number that is
stored can have up to 16 digits.
To store a number in the memory:
♦ press the STORE/VIP/÷
÷÷
÷button. The
display will show INPUt.
♦ Enter the number, to be stored in the
memory. The number will be displayed.
Note!
The pause can be stored in the memory by pressing RD/P button.
SET / HOLD
S
P
-
P
H
O
N
E
12
A
BC
3
DEF
4
GHI
5
JKL
6
MNO
7
PQRS
8
TUV
9
WXYZ
0
#

17
III. Using the telephone LJ-110B
♦ Press the STORE/VIP/÷
÷÷
÷button a second
time.
♦ Now press one of the number buttons
(M1-M7). This gives you the code under
which your number will be stored. The
telephone will return to standby mode.
To dial a number using the memory :
♦ lift the handset or press the SP-PHONE
button.
♦ Press the RECALL button. The display
will show rECALL.
♦ Next press the appropriate code number
key. The number will be displayed and
dialled.
Note!
If there is no number under the code number key, the telephone displays symbol NO COdE.
♦ Replace the handset or press the SP-
PHONE button to end the call.
Note!
1. Storing a number in the memory automatically deletes any previous number kept under the
individual code number you choose.
2. The stored numbers can be reviewed in the standby mode.To display the number from the
code number key:
! press the RECALL button.
! next press the code number key.The number will be displayed.
M1 M2 M3
M4 M5 M6
M7
S
P
-
P
H
O
N
E
RECALL
M1 M2 M3
M4 M5 M6
M7
S
P
-
P
H
O
N
E

18
III. Using the telephone LJ-110B
To delete a number from it’s memory
location:
♦ press the RECALL button. The display will
show rECALL.
♦ Next press the appropriate code number
key. The number will be displayed.
♦ Press the DEL button twice. The number
will be removed. The telephone will return
to standby mode.
# Flash function
This allows various switchboard facilities such as call transfer and
conference calls to be used. Contact your communications manager or the
person responsible for maintaining your switchboard to find out what
facilities are available.
The telephone allows the following values to be set: 90ms, 120ms, 180ms,
300ms, 600ms and 1000ms
To set the right Flash value:
♦ press the SET/HOLD button. The display
will show - 0 1 2 3 4 5 6 7 -.
♦ Press the 4button. The display will show
an actual setting. The factory setting is
600ms.
♦ Press the UP/+ or DOWN/- button to
select the right value.
♦ Press the SET/HOLD button to confirm
the setting.
♦ Press the DEL button. The telephone will
return to standby mode.
If the DEL button is not pressed, the
telephone will return to standby mode after
several seconds. The setting will be stored.
RECALL
M1 M2 M3
M4 M5 M6
M7
DEL
SET / HOLD
DOWN / - UP / +
4
GHI
DEL

19
III. Using the telephone LJ-110B
How to transfer a call.
To transfer a call from one internal number
to another:
♦ press the FLASH button.
♦ Enter the number, to which you want to
transfer the call.
♦ Replace the handset on the base unit.
# How to lock the telephone numbers.
The telephone can be blocked so that it is impossible to make a call beginning
with the digit „0”,
for example:
a Long Distance or International call, a Party Line call, or, in the case of an
office switchboard, where the number „0” facilitates an outside line , it can
block an extension number from being used by an unauthorized person. This
is an invaluable feature in the prevention of unauthorized calls and the
safeguarding of a telephone bill from unauthorized expense.
In order to use this feature the key must be placed in the lock located on the
underside of the telephone, and then turned to the required position:
♦ “red dot”position - the telephone can be
used to dial all numbers on the keypad
including „0”.
♦ “green dot” position – the telephone can
used to block all numbers.
♦ “yellow dot”position - the telephone has
the lock activated and the number „0”
cannot be dialled.
# Alarm function
Your telephone may be used as alarm clock. Up to three different times
may be stored simultaneously, using the alarm function. The telephone will
emit the alarm signal for 40 seconds.
FLASH
12
A
BC
3
DEF
4
GHI
5
JKL
6
MNO
7
PQRS
8
TUV
9
WXYZ
0
#
This manual suits for next models
1
Table of contents
Other Dartel IP Phone manuals
Popular IP Phone manuals by other brands

Gamma+
Gamma+ Horizon Polycom VVX500 user guide

Flyingvoice
Flyingvoice P11W user guide

Black Box
Black Box mm146 user guide

Silvercrest
Silvercrest SGKT 50 A1 User manual and service information

Planet
Planet VIP-5060PT user manual

V-tech
V-tech ErisTerminal SIP Deskset VSP736 Administrator and provisioning manual