Data Harvest 1200 User manual

© Copyright Data Harvest Group Ltd - All Rights Reserved - Freely photocopiable for use within the purchaser’s
establishment
1200 - Wireless Light Gate Sensor
Version: 0 | DS166

1200 - Wireless Light Gate Sensor
2
/
21
| Version: 0
| DSXXXX
Table of contents
Introduction ...................................................................................................... 3
Pack Contents .................................................................................................... 4
Operational Overview ......................................................................................... 5
Connectivity ...................................................................................................... 8
Charging the Sensor ........................................................................................... 9
Firmware Updates ............................................................................................
10
Usage Information ............................................................................................
11
Practical Investigations .....................................................................................
13
Sensor Specifications ........................................................................................
15
Limited Warranty .............................................................................................
16
Compliance .....................................................................................................
17
Troubleshooting ...............................................................................................
18
Notices ............................................................................................................
19
Contact Information ..........................................................................................
20
PDF Translations ..............................................................................................
21
1200 - Wireless Light Gate Sensor
3
/
21
| Version: 0
| DSXXXX
Introduction
Thank you for purchasing the Smart Wireless Light Gate Sensor. We pride ourselves on producing
high quality products that meet with the demands of the busy classroom environment. If you have any
problems using this sensor, please read this documentation in full before contacting the Data Harvest
support team.
Overview
The Wireless Smart Dual Light Gate has a pair of light gates spaced at 1.5 cm to accurately measure
velocity. The smart wireless light gate also has a wide gate auxiliary infra-red port and a
synchronisation socket to link to another gate. The wide gate auxiliary port allows you to time the
movement of items that would not fit through the arms of the gate.
The nature of wireless communications means that there is a latency between devices. The latency is
in the region of 2 ms and makes the wireless synchronisation of two light gates unrealistic for accurate
data. If work requires a dual light gate set up, we recommend the use of a second dual light gate set
connected by a sync link cable to reduce latency to zero.

1200 - Wireless Light Gate Sensor
4
/
21
| Version: 0
| DSXXXX
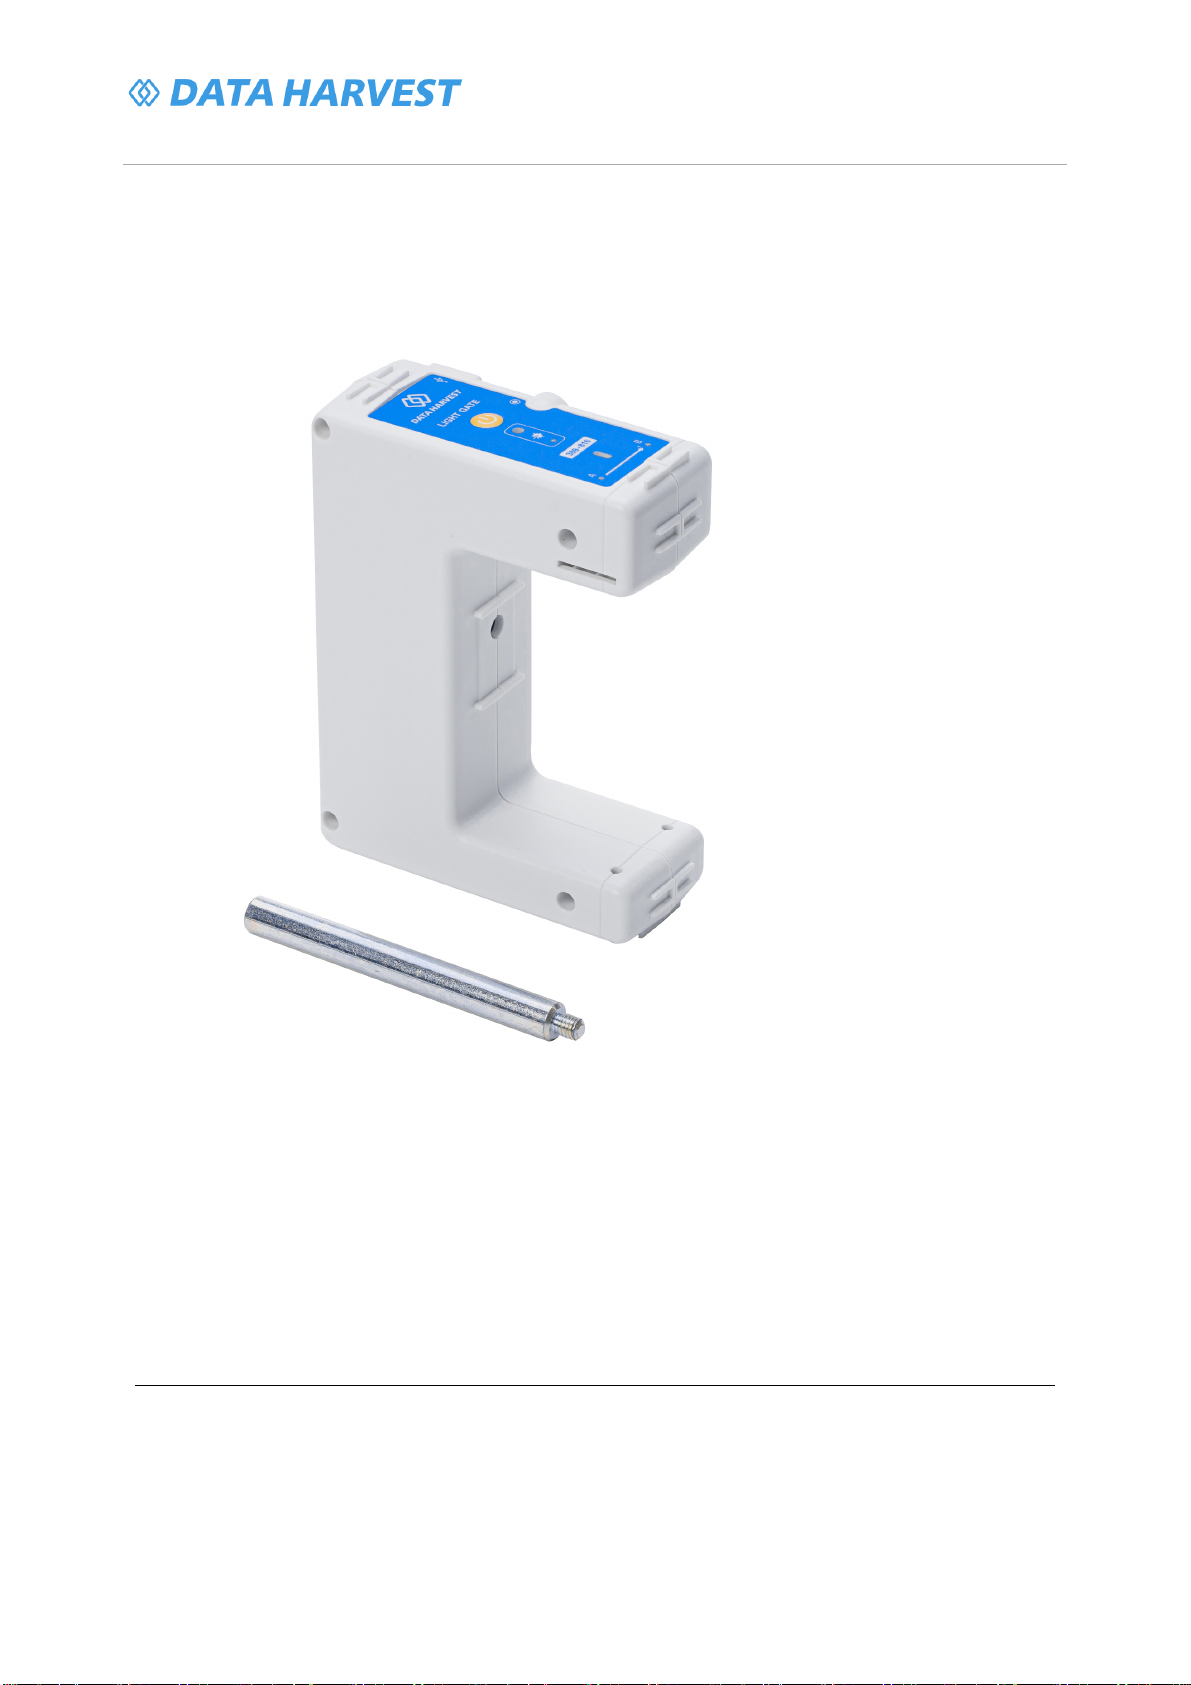
Pack Contents
This product is supplied with the following items:
·
1 x Smart Wireless Light Gate Sensor
·
1 x USB Connecting Lead
·
1 x Link Cable
·
1 x Mounting rod
Additional Accessories
To get the most from your Smart Wireless Light Gate Sensor, the following items should be considered:
·
Interrupt card set
·
Data Harvest - Wireless Dynamics System
·
Data Harvest - Spoked Pulley

1200 - Wireless Light Gate Sensor
5
/
21
| Version: 0
| DSXXXX
Operational Overview
The diagram below shows the specific parts of the sensor. Read further to explore the functionality of
each part of the sensor.
1.On/Off Switch
2.USB Port
3.Connection socket to attach Light Gates together
4.Unique ID Number
5.Status Indicator
6.Laser Gate
7.Laser Gate Indicator
8.A – Transmitter
9.B – Transmitter
10.A – Receiver and indicator
11.B – Receiver and indicator
12.Mounting Rod connection
13.Spoked Pulley Wheel Connection
On/Off Switch (1)
The sensor's on/off switch allows you to turn the sensor on, off or perform a hard reset.
USB Port (2)
Use to connect to a computer or a charging unit.
For specific USB or Bluetooth connectivity instructions, please see the 'Connectivity' section of this
documentation.
For instructions on charging your device, see the section on 'Charging the Sensor'.
Connection socket to attach Light Gates together (3)
A Jack plug connection lead is supplied with each Light Gate, this is used to connect two Light Gates
together when you want a physical separation using two Light Gates.
Unique ID Number (4)
All Smart Wireless Sensors are labelled with a unique ID number. This number is used in the
EasySense2 app, so that you can identify each sensor when making a connection wirelessly.

1200 - Wireless Light Gate Sensor
6
/
21
| Version: 0
| DSXXXX
The Status Indicators (5)
The sensor features a single status indicator that changes colour and flashes. See the table below for
further information.
Status Light
Indicates
No light
Sensor is Off. Short press the On/Off switch
Blue flashing Sensor On and Bluetooth advertising
White flashing Charging via USB mains charger or USB port
Green flashing Communication with the EasySense2 app (via USB
or Bluetooth) has been established
Orange flashing Recording data
Red flashing Battery is low
Laser Guide (6)
This can be used with any laser, when using a larger object that will not fit between the Light Gate
transmitter and receiver (a laser is not supplied with the light gate).
Laser Gate Indicator (7)
This will show a green light when the laser has been detected and will turn red when an object breaks
the laser beam.
A – Transmitter (8)
This is where the infrared beam for A starts. A measurement should be taken if needed for distance.
B – Transmitter (9)
This is where the infrared beam for B starts. A measurement should be taken if needed for distance.
A – Receiver and Indicator (10)
This is where the infrared beam for A ends. A red light will appear when the beam has been broken.
B – Receiver and Indicator (11)
This is where the infrared beam for B ends. A red light will appear when the beam has been broken.
Mounting Rod Connection (12)
This is used to secure the metal mounting rod bar which can then be used in the boss on a retort
stand.
Spoked Pulley Connection (13)
A spoked pulley can be purchased separately (product number 3177) and secured here. The spoked
pulley will block the infrared beam of the Light Gate as it rotates and can therefore be used for
continuous recording of time/distance, time/velocity and time/acceleration relationships. (A spoked
pulley is not supplied with a Light Gate)

1200 - Wireless Light Gate Sensor
7
/
21
| Version: 0
| DSXXXX
To switch the sensor off
·
Press and hold down the On/Off switch until the white light shows, then release.
·
If not communicating with the EasySense2 app, the sensor will turn off after a period of one hour of
inactivity.
Hard resetting the sensor
·
If necessary, attach the sensor to power.
·
Press and hold down the On/Off button for at least 8 seconds until the status LED gives a flash of
blue light, then release.
·
If the sensor fails to respond, contact Product Support at Data Harvest. Please provide details of:
oThe computer platform it is being used with and the EasySense2 app’s version number.
oA description of the problem being encountered.

1200 - Wireless Light Gate Sensor
8
/
21
| Version: 0
| DSXXXX
Connectivity
The sensor is both USB and Bluetooth compatible. Install the EasySense2 app, if it is not already on
your device. For details of how to operate the EasySense2 app, please refer to the EasySense2
documentation.
USB Connectivity
Quick Steps
1.Connect the sensor to the computer’s USB port using the USB cable supplied.
2.The computer will automatically detect a new device and depending on your operating system, will
install any applicable device drivers.
3.Start EasySense 2 app.
4.Within the EasySense2 app, the Devices icon will change to green to show that the sensor is
connected, and the status light on the sensor will also turn green.
5.Begin your practical investigations.
Bluetooth Connectivity
Using Bluetooth, the sensor can wirelessly connect to mobile devices such tablets and mobile phones,
as well as desktop or laptop computers, giving students the ability to run experiments independently
without being tethered to a device.
See the EasySense2 app user manual system requirements for further details.
Quick Notes on Bluetooth Connectivity
Only use with the EasySense2 app, you do not need to pair the device. If paired, the sensor will not be
available to the EasySense2 app.
Computers or devices will need to support Bluetooth Low Energy (BLE). For further information refer to
the instructions provided for the EasySense2 app.
Quick Steps
1.
Short press the on/off switch to turn the sensor on, blue LED will flash.
2.Open the EasySense2 app.
3.Select the Devices icon.
4.
Select your sensor from the list of available sensors to connect to the device. Your sensor is
identified by its unique ID in the list.
5.Click on connect at the side of your sensor in the list.
6.
The Devices icon will change to green and the status light on the sensor will flash green to indicate a
connection has been established.
7.Begin your practical investigations.

1200 - Wireless Light Gate Sensor
9
/
21
| Version: 0
| DSXXXX
Charging the Sensor
The Smart Wireless sensors are fitted with a rechargeable lithium-ion battery and can be charged via
the USB port. Use the supplied USB lead to connect the sensor either directly to a USB port on your
computer, a powered USB hub or a USB mains charger that outputs 5 V at 500 mA or more.
A full charge can take up to 4 hours.
Additional Information
Whenever the sensor is connected to the USB port on the computer or to a USB mains charger (output
5 V at 500 mA or more), it will automatically recharge the battery (LED status flashing white).
When connected to a computer, the computer should be turned on and not in sleep or standby mode,
as the battery may drain instead of charge.
The sensor will stay awake for 60 mins when Bluetooth advertising (LED status flashing blue).
Lithium-ion batteries are ‘memory-free’ and prefer a partial rather than a full discharge. Constant partial
discharges with frequent recharges will not cause any harm. Frequent full discharges should be
avoided whenever possible. Ideally the sensor should be stored at about 40% or more charge.
The speed at which a lithium-ion battery will age is governed by both its storage temperature
(preferably less than 40 C) and state-of-charge.

1200 - Wireless Light Gate Sensor
10
/
21
| Version: 0
| DSXXXX
Firmware Updates
Occasionally Data Harvest may release updated firmware which will contain improvements or new
features.
Updates will take place when you connect your sensor to the EasySense2 app. You will be given the
option to decline an update.
Updates can be performed over USB or Bluetooth and will typically take less than one minute. Updating
firmware over USB will be quicker than Bluetooth.
Do not disconnect the sensor, or power off during the update.
If you have a wireless connection to the EasySense2 app, the sensor will have to be reconnected after
performing the update.

1200 - Wireless Light Gate Sensor
11
/
21
| Version: 0
| DSXXXX
Usage Information
You need to make sure your EasySense2 app has updated to
V1.0.24 (4282)
You can check this by opening the software and selecting the settings icon on top of the screen.
The wireless Light Gate is a double light gate meaning it has A & B within one housing, so experiments
when you need to go from A to/and/then B can be completed with just the one wireless Light Gate.
You can also use two wireless Light Gates together when you want to have a physical separation.
When using 2 wireless Light Gates you need to connect them using a link cable which is supplied with
each wireless Light Gate.
To connect one wireless Light Gate
1. Open the EasySense2 app.
2.
Turn on the Light Gate using the button on the Light Gate.
3.
Select the red device button on the top left of the EasySense2 app. The Light Gate will
appear in the available list listed as Light Gate and a 6-digit number (unique to each Light
Gate).
4.
Select connect to the Light Gate - the number will match the label on the actual Light Gate.
5.
Select setup on the bottom left of EasySense2 app, then change the Mode to Timing and
set up the relevant experiment.
To connect two wireless Light Gates
1. Open the EasySense2 app.
2.
Turn on the wireless Light Gate using the button on the Light Gate that will be the first to be
interrupted in your practical.
3.
Select the red device button on the top left of the EasySense2 app. The Light Gate will
appear in the available list listed as Light Gate and a 6-digit number (unique to each Light
Gate).
4. Highlight the number of the light gate you want to connect and select connect.
5.
Select the drop-down menu to the right of the Light Gate and select two Light Gates. The
one you connected to will be Light Gate A.
6.
Connect the link cable between the two light gates and turn on the second (the one you did
not connect to the EasySense2 app) Light gate B.
7.
Select Setup on the bottom left of EasySense2 app, then change the Mode to Timing and
set up the relevant experiment.
If you connect with a USB connection the process is the same with the exception that USB connections
to Data Harvest data logging devices will automatically be identified as active connections in the
EasySense2 app. You will not need to worry about the identity number.
If you are connecting two Light Gates, the same requirement to connect only one Light Gate and link to
the second by cable is present. Only turn on the second Light Gate once the link cable is in place.
If you require power to the Light Gates and wish to use BT connectivity you will need to use a mains
powered USB charging port.
To Use the Laser receiver with one Light Gate
(a laser is not supplied with the Light Gate)
1. Open the EasySense2 app.
2.
Turn on the Light Gate using the button on the Light Gate.
3.
Select the red device button on the top left of the EasySense2 app, the Light Gate will
appear in the available list listed as Light Gate and a 6-digit number (unique to each Light
Gate).

1200 - Wireless Light Gate Sensor
12
/
21
| Version: 0
| DSXXXX
4.
Select the drop-down menu to the right of the Light Gate and select Lasers.
5.
You can use a laser by pointing it at the laser receiver area on the Light Gate. This allows
larger objects to be used with the Light Gate, as the laser beam can be broken by an
object.
6.
Select Setup on the bottom left of EasySense2 app, then change the Mode to Timing and
set up the relevant experiment.
Any laser can be used
When only using one Light Gate with the laser receiver, this means only at A experiments can be
conducted.
To Use the Laser receiver with two Light Gates
(a laser is not supplied with the Light Gate)
1. Open the EasySense2 app.
2.
Turn on the Light Gate using the button on the Light Gate.
3.
Select the red device button on the top left of the EasySense2 app, the Light Gate will
appear in the available list listed as Light Gate and a 6-digit number (unique to each Light
Gate).
4.
Select the drop-down menu to the right of the Light Gate and select Lasers.
5.
Connect the link cable between the two light gates and turn on the second (the one you did
not connect to the EasySense2 app) Light gate (Laser) B.
6.
You can use a laser by pointing it at the laser receiver’s area on the Light Gate A & B. This
allows larger objects to be used with the Light Gate, as the laser beam can be broken by
an object.
7.
Select Setup on the bottom left of EasySense2 app, then change the Mode to Timing and
set up the relevant experiment.
Any laser can be used.
By using two Light Gates with the laser receivers, you can conduct experiments at A to/and/then B.
If you connect with a USB connection the process is the same with the exception that USB connections
to Data Harvest data logging devices will automatically be identified as active connections in the
EasySense2 app. You will not need to worry about the identity number.
If you are connecting two Light Gates, the same requirement to connect only one Light Gate and link to
the second by cable is present. Only turn on the second Light Gate once the link cable is in place.
If you require power to the Light Gates and wish to use BT connectivity you will need to use a mains
powered USB charging port.

1200 - Wireless Light Gate Sensor
13
/
21
| Version: 0
| DSXXXX
Practical Investigations
The Smart Wireless Light Gate Sensor can be used to investigate a number of scientific experiments
such as:
·
Dynamics experiments involving calculating time, speed, velocity, acceleration using inclinable
planes and air track
·
Newtons 2nd law (f=ma)
·
Study collisions and momentum changes
·
Acceleration due to gravity investigations
·
Pendulum investigations
·
Measure the time period of an oscillating body
·
Used with the Force sensor to investigate: Impulse and change in momentum and centripetal force
in a pendulum
Online Videos
Learn how to use data logging in the classroom with our Secondary Science Academy demonstration
videos, which will walk you through using the new EasySense2 app and show you how to get hands-on
with the latest Bluetooth wireless sensors. The video experiments will show you how to get the best out
of your science lessons.
New online content is being continuously uploaded onto our YouTube channel, including practical
worksheets as well as videos.
See our website for further information and links.
Explore Bluetooth Sensors
Are you looking to make the jump to our smart
wireless sensors? Or have you recently purchased
them and want to know more about how they
work?
View video playlist
Explore EasySense2
The core of our science platform is our
EasySense2 software. In these videos you will
learn everything from the basics of our software to
the most in-depth features.
View video playlist


1200 - Wireless Light Gate Sensor
15
/
21
| Version: 0
| DSXXXX
Sensor Specifications
Please read the following table for sensor specifications.
Feature
Detail
Measurement Ranges Timing Data
Accuracy
1µs
Wavelength
940nm
Gate Separation 0.025m
Connectivity
Wired via USB
Wireless via Bluetooth
Bluetooth Specifications Bluetooth 4.2 low energy radio, single mode
compliant
Transmit (TX) power: 0 dBm
Receiver (RX) sensitivity: - 90 dBm
Usable transmission range: up to 30 m in open
air
Frequency Range: 2.402 to 2.480 GHz operation
Storage/Operating Temperature
0 - 40 C
Internal Battery Rechargeable internal lithium-ion 3.7 V
Power specification: 5 V at 500 mA
Physical Specifications Weight: approx. 144 g
External dimensions: approx. height 130 mm x
width 40 mm x length 100 mm

1200 - Wireless Light Gate Sensor
16
/
21
| Version: 0
| DSXXXX
Limited Warranty
For information about the terms of the product warranty, see the Data Harvest website at:
https://data-
harvest.co.uk/warranty
Product Repairs
When returning goods to Data Harvest, please download and complete the repair return
form
to ensure
you have sent us all the information we require, and send it to us alongside the item to be repaired. The
second page of this form includes a return address label.
If you have purchased a Data Harvest manufactured product via a different company, please also
supply proof of purchase.
Postage Charges
·
In the event of a fault developing, the product must be returned in suitable packaging to Data Harvest
for repair or replacement at no expense to the user other than postal charges.
·
There will be no postal charge for the return of repaired goods to any mainland UK address (for other
areas, additional shipping charges may apply).
Out of Warranty Repairs
Please visit https://data-harvest.co.uk/repairs for the most up to date charges for out of warranty
repairs.
Warranty on Repaired Items
Once an item has been serviced and repaired, the product will have 1 year warranty against further
failure of the component repaired.
International Returns
Please contact the authorised Data Harvest representative in your country for assistance in returning
equipment for repair.
1200 - Wireless Light Gate Sensor
17
/
21
| Version: 0
| DSXXXX
Compliance
This product complies to the following standards
Waste Electrical and Electronic Equipment Legislation
Data Harvest Group Ltd is fully compliant with WEEE legislation and is pleased to provide a disposal
service for any of our products when their life expires. Simply return them to us clearly identified as ‘life
expired’ and we will dispose of them for you.
FCC Details
This device complies with Part 15 of the FCC Rules. Operation is subject to the following two
conditions: (1) this device may not cause harmful interference, and (2) this device must accept any
interference received, including interference that may cause undesired operation.
CE
This product conforms to the CE specification. It has been assessed and deemed to meet EU safety,
health and environmental protection requirements as required for products manufactured anywhere in
the world that are then marketed within the EU.

1200 - Wireless Light Gate Sensor
18
/
21
| Version: 0
| DSXXXX
Troubleshooting
The wireless Light Gates work using an infra-red beam, natural light is infra-red and can affect the
beam of the Light Gate. Use away from direct sunlight.
When using two Light Gates with the connection lead, make sure the connection lead is fully inserted.
If you experience any problems with your product, please try the following troubleshooting tips before
contacting the Data Harvest support team.
Feature
Detail
Loss of Bluetooth Connectivity If the sensor loses Bluetooth connection and
will not reconnect try:
Closing and reopening the EasySense 2 app.
Switching the sensor Off and then On again.
If you are using a Bluetooth Smart USB Adaptor
on your computer, unplug the adaptor, plug back
in again and try to reconnect.
Hard reset the sensor and then try to reconnect.
How do I use 2 Light Gates at the same time for
A-B type experiments? Only one Light Gate can be connected to the
EasySense2 software at a time. Once
connected, you need to connect each light gate
with the Light Gate connection lead ACC-24

1200 - Wireless Light Gate Sensor
19
/
21
| Version: 0
| DSXXXX
Notices
Please read the following notices with regards to using your sensor
1.
The sensor is much smarter than traditional Bluetooth sensors and you are not required to pair the
device. If paired, the sensor will not be available to the EasySense 2 app.
2. When the sensor is connected to a computer, the computer should be turned on and not in sleep
or standby mode or the battery may drain instead of charge.
3.
Data Harvest products are designed for educational use and are not intended for use in industrial,
medical or commercial applications.
4. The sensor is not waterproof.
5. Plastic parts may fade or discolour over time if exposed to UV light. This is normal and will not
affect the operation of the sensor.
6. Only one Light Gate can be connected to the EasySense2 software at a time.

1200 - Wireless Light Gate Sensor
20
/
21
| Version: 0
| DSXXXX
Contact Information
To contact Data Harvest directly, please use any of the following channels
Traditional Communications
Data Harvest Group Ltd.
1 Eden Court, Eden Way,
Leighton Buzzard,
Bedfordshire,
LU7 4FY
United Kingdom
Tel:
+44 (0) 1525 373666
Fax:
+44 (0) 1525 851638
Sales email: [email protected]
Support email: [email protected]
Online Communications
We have active social media support channels using the following platforms
·
Facebook
·
Twitter
·
YouTube
Office Opening Hours
Monday to Thursday - 08:30 to 16:45
Friday - 08:30 to 13:30
Saturday & Sunday & UK Bank Holidays - Closed
Table of contents
Other Data Harvest Accessories manuals


