DAYTEK MK2 MINI User manual
Fold Down Clotheslines
PRODUCT MANUAL
100% Australian Owned Since 1954 daytek.com.au
IMPORTANT – READ THESE INSTRUCTIONS
BEFORE USING YOUR CLOTHESLINE
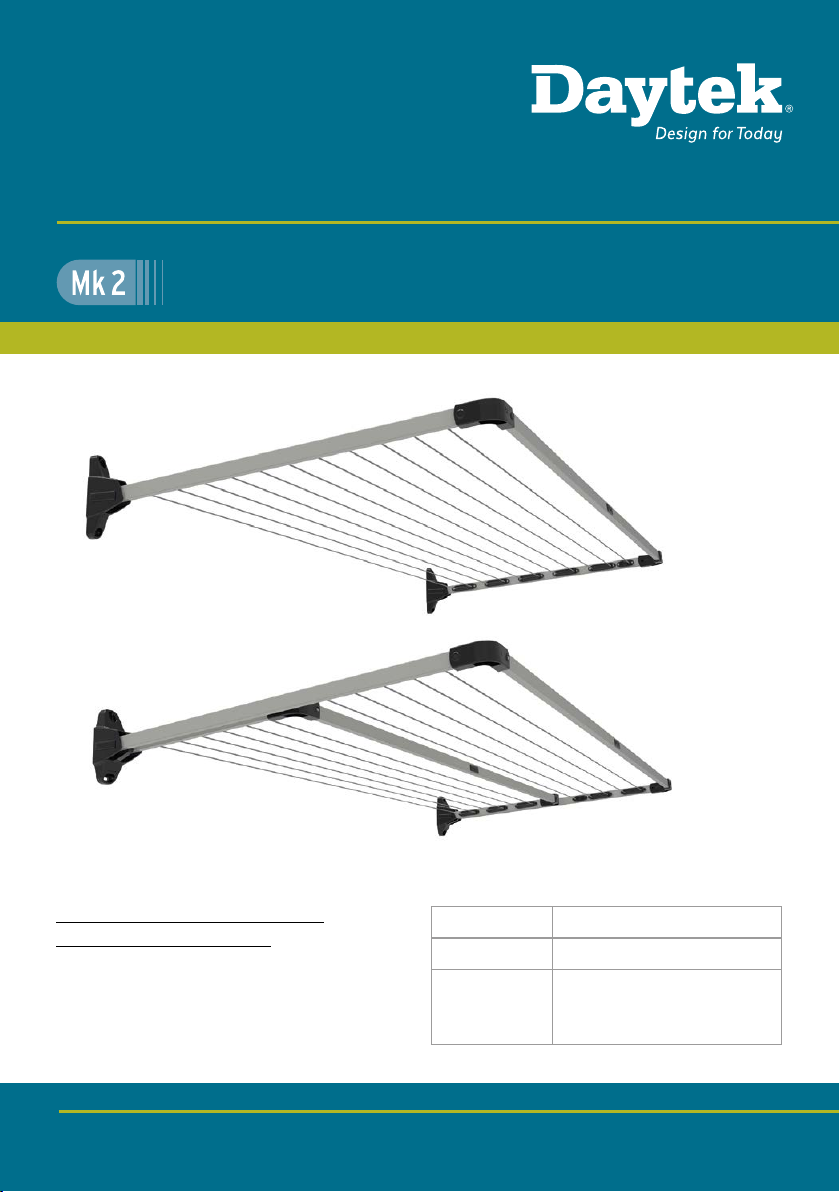
Suitable for models
MINI / SLIM / SINGLE / TWIN
Product Code
Date of purchase
Name & location
of supplier
FD1219-V3
2
BEFORE YOU BEGIN
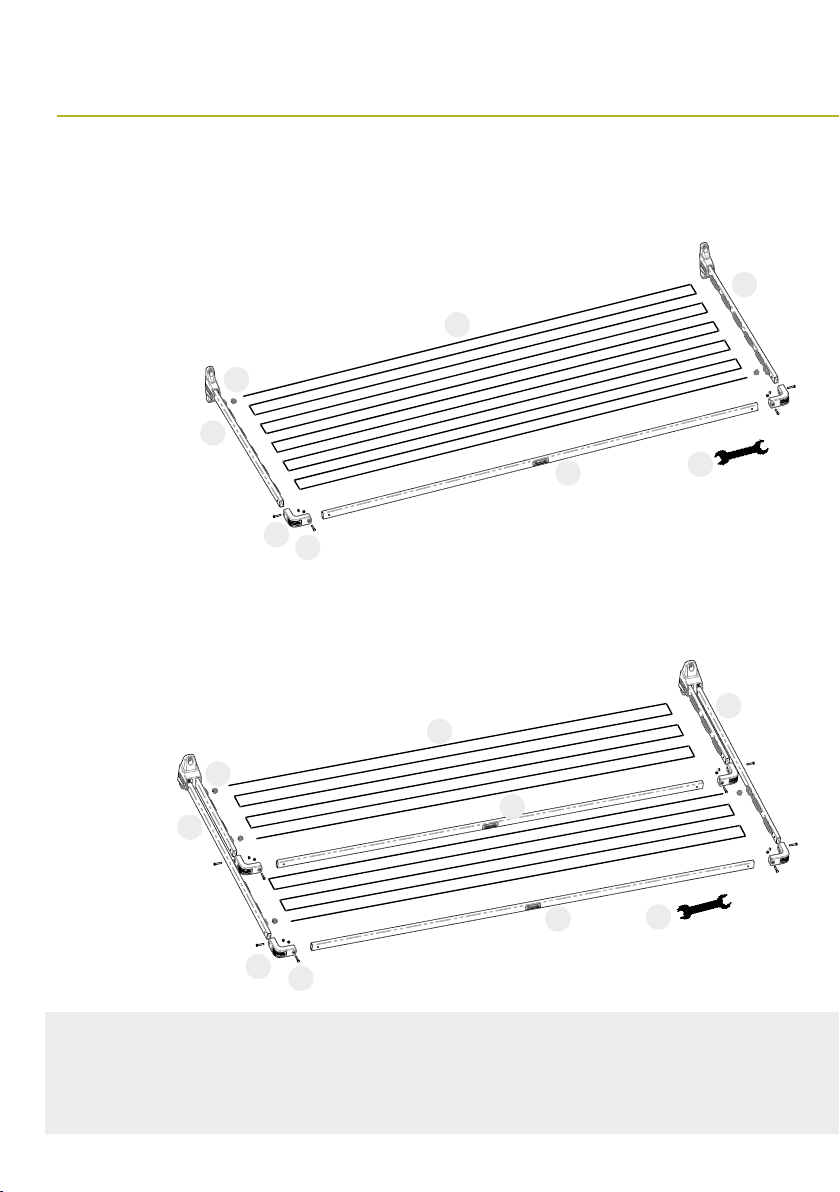
Please check that the carton contains all the required parts before assembly.
Your MINI/SLIM/SINGLE Fold Down carton should contain the following:
Identify the type of installation required.
1. Wall mounting installation – follow Wall mounting
installation below.
Your TWIN Fold Down carton should contain the following:
A – Right hand Pre-assembled Side Arm x 1
B – Left Hand Pre-assembled Side Arm x 1
C – Outer Front Bar x 1
D – Inner Front Bar x 1
E – Clothesline Cord
F – Nuts & Bolts x 4
G – Corner Brackets x 4
H – Line Locking Cap x 4
I - Spanner x 1
A – Right hand Pre-assembled Side Arm x 1
B – Left Hand Pre-assembled Side Arm x 1
C – Front Bar x 1
D – Clothesline Cord
E – Nuts & Bolts x 4
F – Corner Brackets x 2
G – Line Locking Cap x 2
H - Spanner x 1
浙江贝特日用品有限公司
BETTER HOME PRODUCTS(Zhejiang)CO.,LTD
A
E
F
D
C
B
G
H
浙江贝特日用品有限公司
BETTER HOME PRODUCTS(Zhejiang)CO.,LTD
F
A
G
E
H
D
C
B
I
2. Free standing – use Daytek Ground Mount Kit
*Sold separately (available in standard in ground
installation or with base).
Bonus Pegs with Peg Bag (12 pcs)
Bonus Sock Holder
Bonus Pegs with Peg Bag (12 pcs)
Bonus Sock Holder
3
WALL MOUNTING INSTALLATION
Important:
Mounting hardware required will vary depending on the surface
of the wall the Clothesline will be mounted to.
When mounting to concrete, brick or masonry walls we recommend
Daytek 8mm Marine Grade Anchor Bolts (Sold separately).
For wood or other specialised materials please consult your local
hardware store or professional for advice.
Never attach clothesline to mortar between brickwork. Ensure fixing
surface is structurally sound. Install away from Heating or Cooling Units.
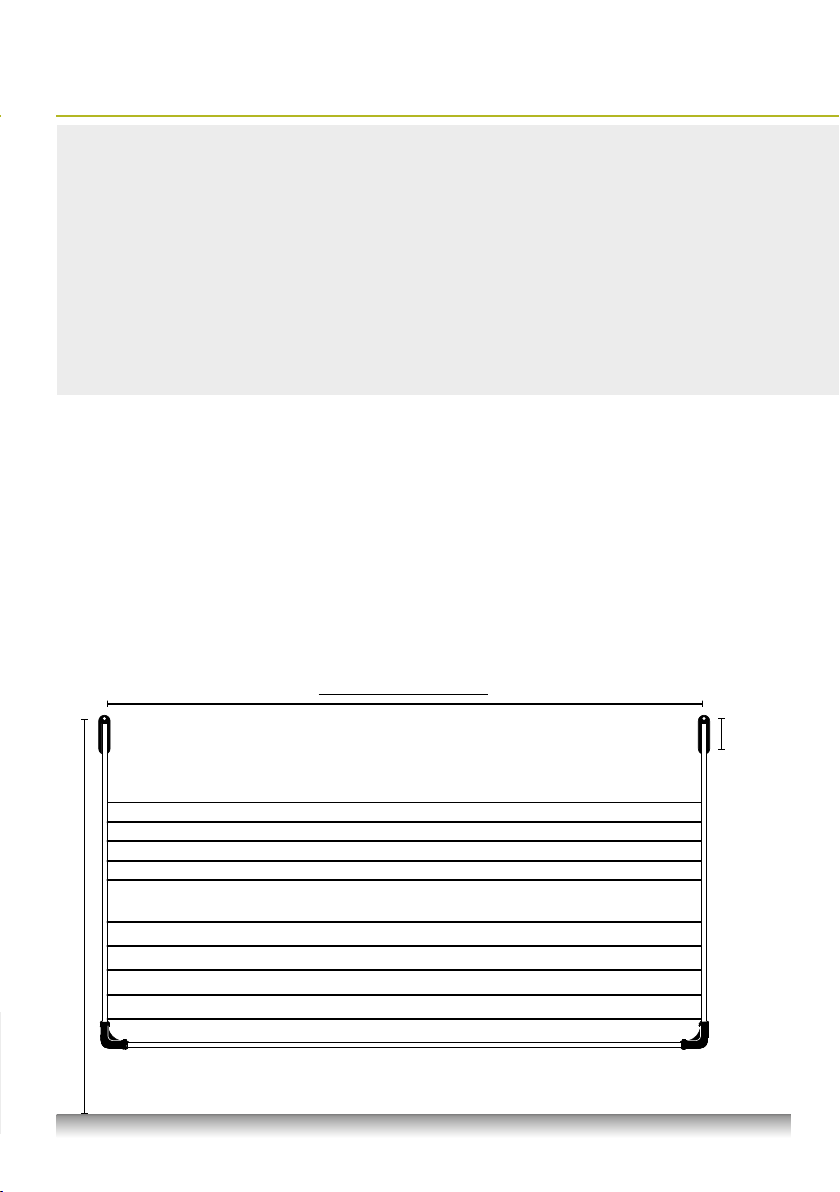
MINI FOLD DOWN 1.52m
SLIM, SINGLE & TWIN FOLD DOWNS 2.22m
CUSTOM MADE – refer to custom size wall bracket centres position
WALL BRACKET CENTRES
GROUND LEVEL
Note: Clothesline shown in fold down position
Figure 1
Users
Height
+
100mm
170mm
Distance
between
mounting
holes
Tools required for installation:
• Measuring tape and pencil
• Hammer Drill
• Socket set and adjustable wrench
• Hammer
• Scissors
• Hammer drill
• Spirit level
MOUNTING LOCATION
For best drying results, select a location that receives maximum
sunlight and airflow. Ensure that the area has sufficient clearance
around the clothesline. We recommend 100mm clearance each side
and 500mm in front of clothesline frame when open.
Mounting Width – Centre to centre fixing points
MINI Fold Down 1.52m
SLIM, SINGLE & TWIN Fold Down 2.22m
CUSTOM MADE – refer to custom size wall bracket centres position
Mounting Height – The recommended
mounting height for the top hole in the
wall bracket is:
User height +100mm
Minimum mounting height is 1.5m
Note: always consider the main users
height and the length of the items you
plan on drying.
4
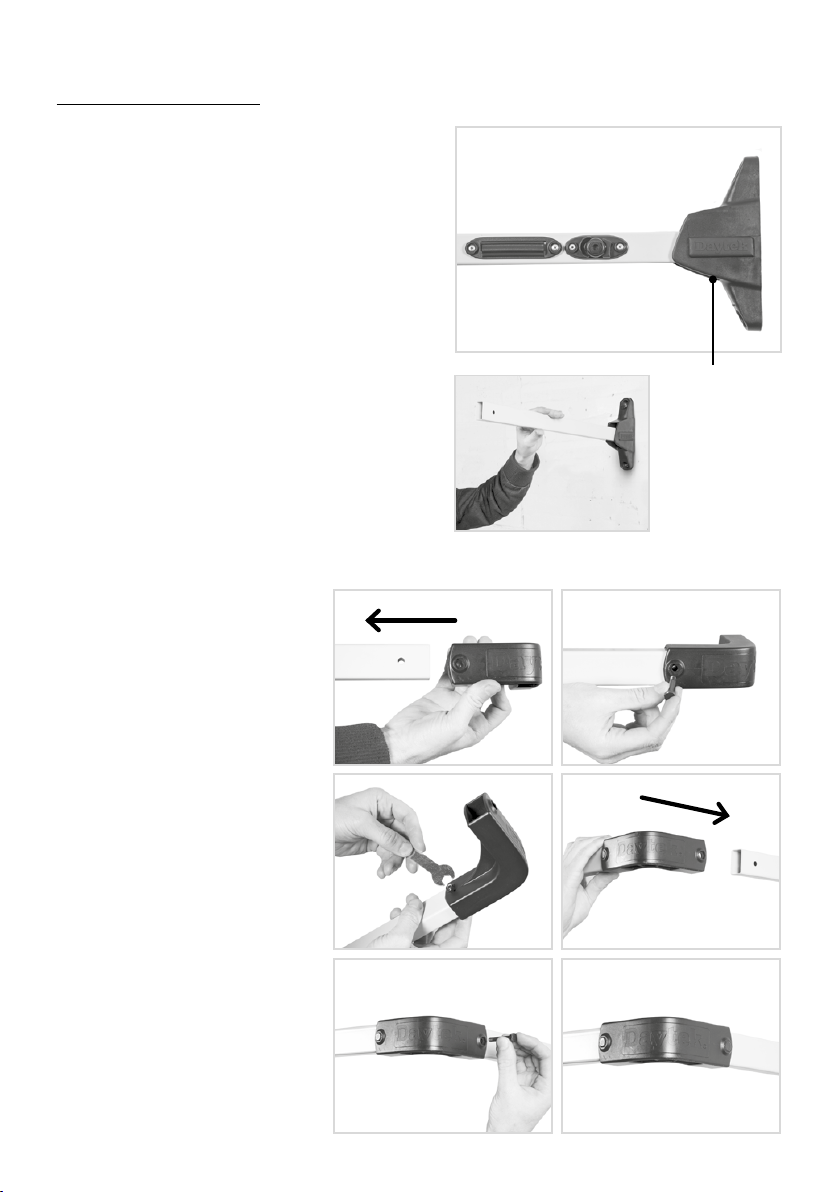
INSTALLATION PROCEDURE
1. MOUNT SIDE ARMS TO WALL
Note: For ground mount kits installation skip
to step 1.4
1.1 Mark wall bracket positions and centres. Refer
to Figure 1 for fixing centres measurements for
the model you are installing. The vertical distance
between wall bracket mounting holes is 170mm.
Take note of the recommended installation height.
1.2 Use 8mm x 50mm masonry anchors or suitable
wood screws to fasten to your selected surface.
Consult a hardware store or builder if unsure.
1.3 Drill holes suitable to your chosen fixings
squarely into your wall at the marked location.
1.4 Fix the pre-assembled Side Arms to the wall.
Note the Left and Right hand assemblies (Daytek
logo should always be upright – refer to Fig. 1A)
2. CONNECT CORNER BRACKETS
AND FRONT BAR
1A
2A
2C
2E
2B
2D
2F
TO DETERMINE LEFT
AND RIGHT
PRE-ASSEMBLED
SIDE ARMS ALWAYS
ENSURE DAYTEK
LOGO ON BRACKET
IS UPRIGHT AND
LINE BRACKETS ARE
FACING INWARDS
2.1 Attach a Corner Bracket over
each end of the Front Bar and
secure with the supplied nuts &
bolts (See Fig. 2A – 2C). For Twin
model, assemble and attach the
Inner Front Bar first (shorter one).
2.2 Lock each side arm into the
upright position. To do this lift
each side arm upwards to the
maximum point of travel and push
inwards until it hits a hard stop, then
release (refer to operating diagrams
on page 7).
2.3 Install Front Bar to the Side Arms
and secure with supplied nuts &
bolts (See Fig. 2D – 2F).
5
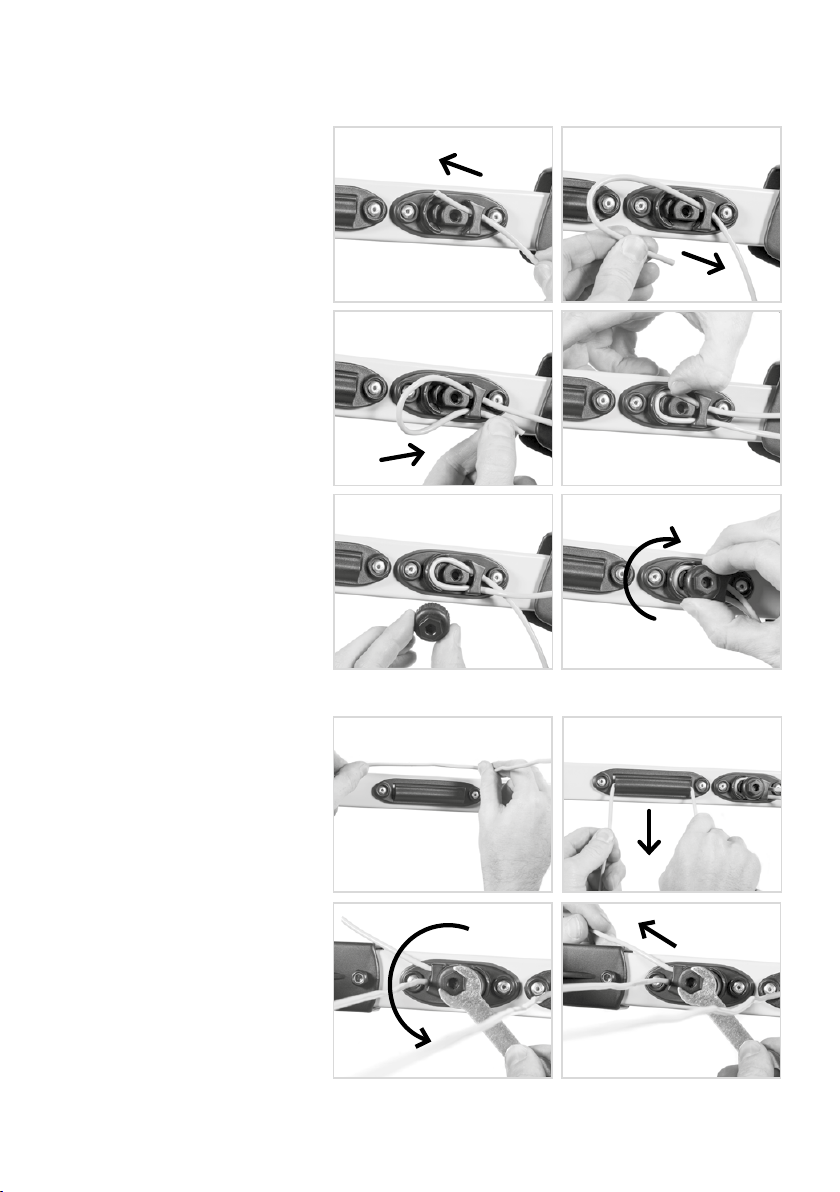
3. STRINGING YOUR CLOTHESLINE
3.1 Begin threading (stringing)
the clothesline with the cord,
beginning at the inner line
tensioner. To do this insert the
line through the tensioner and
press into the outer groove as
shown. (See Fig. 3A – 3D)
3.2 Attach Line Locking Cap and
tighten to secure the line end.
Use provided spanner if necessary.
Do not over tighten!
(See Fig. 3E – 3F)
3.3 Proceed to string the clothesline
by locking the cord behind the
line brackets at either side of the
clothesline. Use the diagrams
on next page as a guide.
(See Fig. 3G & 3H)
3.4 Finish by inserting the line
through the outer line clamp,
pulling tight (hand tension only)
and secure with the Line locking
Cap. Be sure to work all of the slack
line towards the end.
3.5 Trim end of cord leaving approx
100mm excess.
3.6 The Line Locking Cap can be
loosened to re-tension the line as
necessary. (See Fig. 3J – 3K)
3A
3C
3E
3G
3B
3D
3F
3H
3I 3J
6
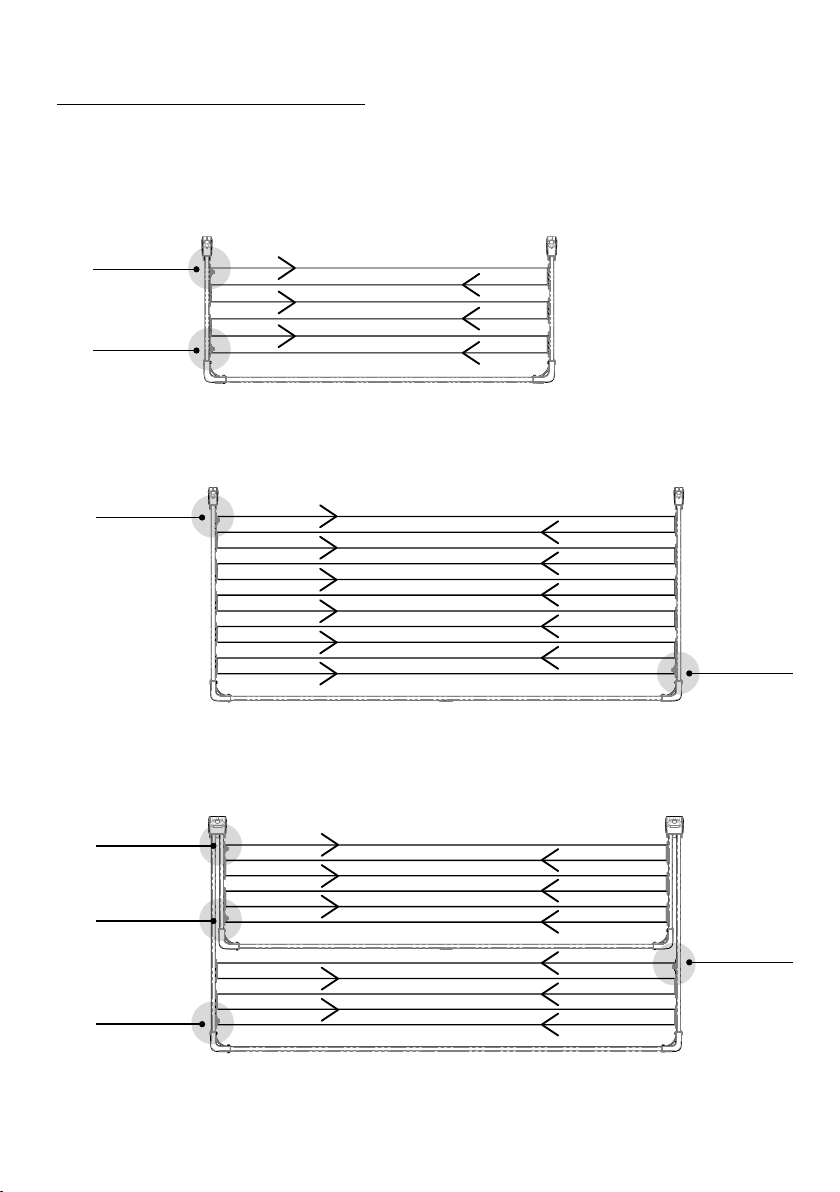
3. STRINGING YOUR CLOTHESLINE (CONTINUED)
START HERE
FINISH HERE
SINGLE
START HERE
FINISH HERE
MINI / SLIM
FINISH HERE
START HERE
TWIN
START HERE
FINISH HERE
INSTALLATION PROCEDURE (CONTINUED)

7
OPERATING YOUR FOLD DOWN CLOTHESLINE
TO RAISE
Grip the center of the Front Bar with one or two hands
as shown below. Gently raise the bar to the maximum
point of travel, push inwards with even force until it
hits a hard stop and then release.
The clothesline will be locked into the upright position.
TO LOWER
Grip the centre of the Front Bar and gently lift the
clothesline upwards to the maximum point of travel.
Pull outwards to unlock the bracket and lower.
Note: Raising the frame without gripping the
center may result in only one arm locking
correctly. If this occurs, raise the affected arm
to max height and press inwards until it hits a
hard stop and release.
IMPORTANT! Maximum recommended loading of this clothesline is 1kg per meter of line.
Refer to your individual clothesline for specified line space.
1
2 2
1
3
LIFT LOWER
LIFT
PULLPUSH

Over time the cord may stretch causing the lines to
sag. To remove excessive slack from the line, start at
the rear line and work your way to the front line to
remove all the slack. Whilst holding the excess line,
release the cord from the tensioner and pull the slack
through before locking back into place.
Note: Do not over tension the line as this may bow the
side arms and affect the clotheslines operation.
Having some slack in your cord is not a bad thing
provided your items of washing are clear from
touching the ground.
If you are living within close proximity to a seaside
location, salt in the air will build up a thin layer on your
clothesline over time. To ensure longevity it is important
to regularly wipe down the surface of your clothesline
with a damp cloth.
Wipe away dust and dirt regularly to prevent build up
and ensure smooth operation.
Regularly check your clothesline for damage or wear
and tear. Any damaged part should be replaced or
repaired before using again. A full range of spares are
available through Daytek.
Manufactured/Supplied by Daytek Australia Pty. Ltd.
77-81 Gower Street, Preston
Victoria 3072 Australia
T +61 3 9470 1755
F +61 3 9470 5381
E [email protected]om.au
daytek.com.au
25 YEAR PRODUCT WARRANTY
directly. You must bear the cost of claiming the warranty.
This warranty is in addition to other rights and remedies of
the customer under law. Where it is deemed necessary, Daytek
Australia will arrange for the inspection of your product.
Warranty exclusions
Defects caused by incorrect installation, adjustment,
modification, overloading or misuse. Paint deterioration caused
by exposure to sea air where the product is installed in coastal
areas. Product damage or deterioration due to abnormal
environmental conditions including storm damage, fire, wind,
humidity and similar. Damage to frame or line through accident
or negligence. Warranty does not cover bonus items.
The warranty covers domestic use only and does not apply to
commercial applications.
Our goods come with guarantees that cannot be excluded
under the Australian Consumer Law. You are entitled
to a replacement or refund for a major failure and for
compensation for any loss or damage. You are also entitled
to have the goods repaired or replaced if the goods fail to
be acceptable quality and the failure does not amount to
a major failure.
If any part of this clothesline fails to operate correctly
due to faulty workmanship or defective material Daytek
Australia will repair or replace free of cost within 25
years from the original date of purchase (receipt of
purchase required). The PVC line cord is covered by a 2
year warranty from the date of purchase. Any evidence of
misuse or incorrect adjustment will void the warranty. To
claim a product warranty, please contact Daytek Australia
CORD TENSIONING CARE AND MAINTENANCE
CONTACT DAYTEK
[email protected]om.au
daytek.com.au
facebook.com/daytekAU
www.productreview.com.au/listings/daytek
This manual suits for next models
3
Table of contents
Other DAYTEK Household Appliance manuals


Popular Household Appliance manuals by other brands

Chandler And Me
Chandler And Me The Candle Maker +PLUS instruction manual

Spirit
Spirit NOZZLES THE CLOWN Assembly and operating instructions

OYPLA Home
OYPLA Home 3764 user manual

Pettiti Giuseppe
Pettiti Giuseppe SPD14 quick start guide

Kermi
Kermi ZC0102000 Series Instructions for installation and use

Energenie
Energenie EG-PM1W-001 user manual


