DAYTEK Flexi-Dry User manual

Flexi-Dry Retractable Clothesline
Single and Twin Line
INSTALLATION INSTRUCTIONS
100% Australian Owned Company daytek.com.au
Please check the carton contains all the
required parts before installing the clothesline.
Your carton should contain the following:
1. Daytek Flexi-Dry Retractable Clothesline x 1
2. Wall to Wall fixing pack including detailed
installation instructions x 1
(Fixing pack provided is for installing to bricks and
timber walls only. For fixing to other type of wall
structures consult your local hardware specialist)
Tools required for installation.
• 5m measuring tape
• Pencil or marker
• Hammer
• Hammer Drill
• Masonry drill bit (8mm diameter)
• Screw Driver (Phillip Head)
• Twist drill 2mm diameter (optional)

INSTALLATION OPTIONS.
1. Mark recommended installation
height, cabinet and retaining hook
position.
2. In cabinet wall side, turn mounting bracket facing
against the wall and mark two hole positions.
Drill two holes with 8mm diameter x 35 – 40mm depth.
GROUND LEVEL
Users
Height
+
100mm
Maximum 15 metres
CABINET
WALL
SIDE
RETAINING
HOOK
WALL
SIDE
Wall to Wall – All fixing required included inside pack
INSTALLATION INSTRUCTIONS.
Important: Recommended installation height of
line from ground level is USER HEIGHT + 100mm
Maximum wall to wall distance of 15 metres. Ensure
selected position has a clearance of 0.5 - 1 metre
minimum on either side.
For timber wall installations, follow instructions and
use 2mm diameter to drill all mounting hole positions
and discard plastic plugs when installing cabinet and
retaining hook.

3. In retaining hook wall side, drill hook position
with 8mm diameter x 35 – 40mm depth. (For
Twin Line model, repeat Step 3 to drill second
hook position. Recommended centre to centre
hole positions 50mm – 80mm.)
4. To install retaining hook, insert plug into the hole and
screw hook into position. (For Twin Line model, repeat
Step 4 to install second retaining hook)
5. To install cabinet, insert plastic plug into the hole
and affix screws leaving 6–8mm distance from
shoulder head to the wall.
6. Align and locate cabinet
mounting hole into screw and
pull down slightly to secure
correctly. Tighten screws into
positions.
MOUNTING HOLE
6 – 8mm
50 – 80mm
PRODUCT
CENTRE LINE
WALL
WALL
160R01
2 YEAR PRODUCT WARRANTY.
SAFETY HINT.
Daytek Australia will repair or replace free of cost
within 2 years from the date of purchase (Receipt
of purchase required). Any evidence of misuse or
incorrect adjustment will void the warranty. To claim
a product warranty, please contact Daytek Australia
directly. You must bear the cost of claiming the
warranty. This warranty is in addition to other rights
and remedies of the consumer under law.
Our goods come with guarantees that cannot be
excluded under the Australian Consumer Law. You are
entitled to a replacement or refund for a major failure
and for compensation for any other loss or damage. You
are also entitled to have the goods repaired or replaced
if the goods fail to be of acceptable quality and the
failure does not amount to a major failure.
If any part of this clothesline fails to operate correctly
due to workmanship or defective material
Manufactured/Supplied by Daytek Australia Pty. Ltd.
77-81 Gower Street, Preston
Victoria 3072 Australia
T +61 3 9470 1755
F +61 3 9470 5381
E [email protected]om.au
daytek.com.au
1
0
0
%
A
U
S
T
R
A
L
I
A
N
O
W
N
E
D
C
O
M
P
A
N
Y
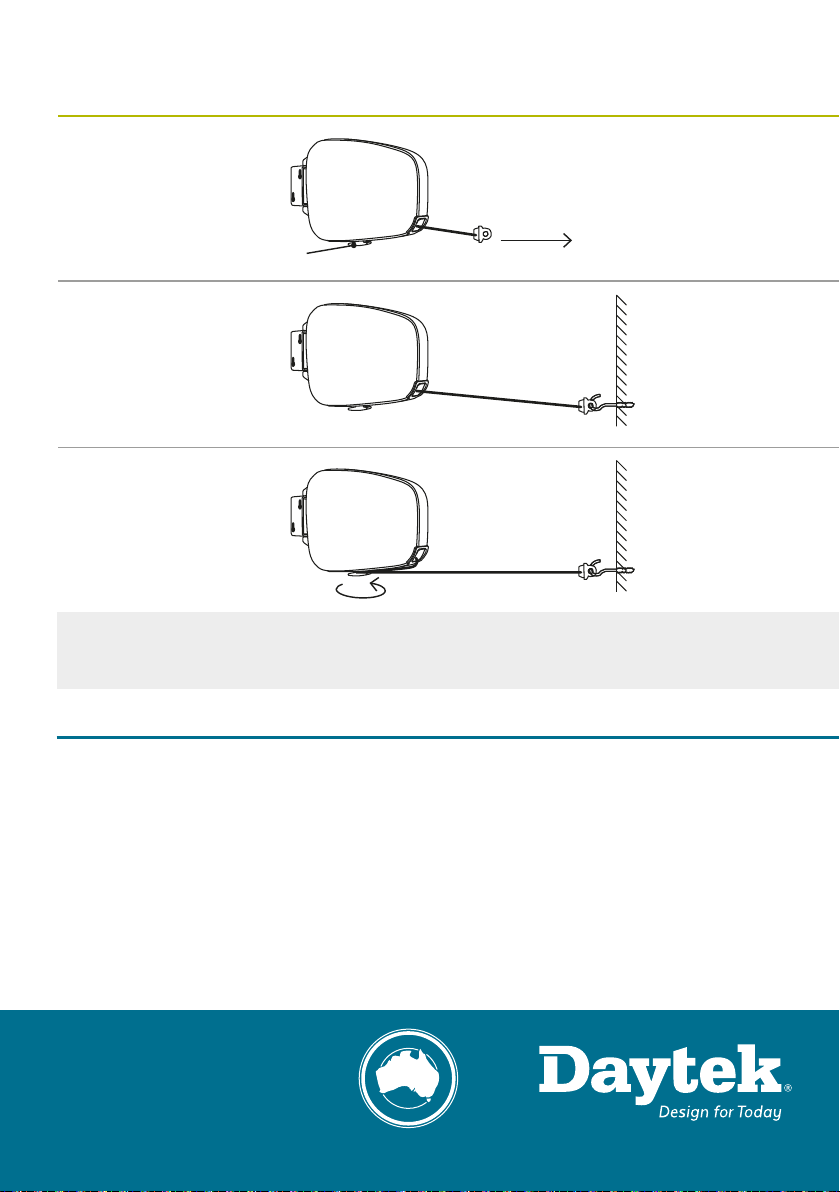
OPERATING INSTRUCTIONS.
1. Gently pull line out of the
cabinet.
2. Extend line and securely hook
onto the retaining hook on
the opposite wall.
3. From cabinet side, pull the
line taut and loop around
safety anchors twice to
secure the line. (For Twin Line
model, repeat Step 1 – 3 to
extend second line)
Do not use clothesline other than to hang and dry washing.
Ensure clothesline is not used as play item by children swinging or hanging on lines.
SAFETY ANCHOR
Other DAYTEK Household Appliance manuals


Popular Household Appliance manuals by other brands

SEVERIN
SEVERIN CS 7976 - Instructions for use

Morphy Richards
Morphy Richards SPILLMASTER - AUTRE instructions

Aztech
Aztech In-Home Display Configuration manual

Household Essentials
Household Essentials Lifter Hamper LH1002 manual

Westfalia
Westfalia 85 14 14 instruction manual

HSPT Golden Rainbow
HSPT Golden Rainbow AUTOMATIC GOLDEN RAINBOW 10 PLUS instruction manual


