DCS CTD-365 User manual

PROFESSIONAL DROP-IN COOKTOPS
•36” – 5 BURNER COOKTOP
•30” – 4 BURNER COOKTOP
Use and Care Manual
MODELS:
CTD-365 (shown)
CTD-304


1
AMESSAGE TO OUR CUSTOMERS
Thank you for selecting this DCS Professional Drop-In Cooktop. Because of this appliance’s unique features we
have developed this Use and Care Manual. It contains valuable information on how to properly operate and
maintain your new appliance for years of safe and enjoyable cooking.
To help serve you better, please fill out and submit your Product Registration by visiting our website at
www.dcsappliances.com and selecting “Customer Care” on the home page and then select “ Product
Registration”. In addition, keep this manual handy, as it will help answer questions that may arise as you use
your new appliance.
For your convenience, product questions can be answered by a DCS Customer Care Representative by phone:
WARNING
Improper installation, adjustment alteration, service or maintenance can cause property damage, injury or death.
Read the installation, operating and maintenance instructions thoroughly before use, installing or servicing this
equipment.
WARNING
Do Not storeor use gasoline or any other flammable vapors and liquids in the vicinity of this or any other appliance.
DANGER
If you smell gas:
1 Do not turn on any electrical switch; do not use any phone in your building.
2. Immediately call your gas supplier from a neighbor’s phone. Follow the gas supplier’s instructions.
3. If you cannot reach your gas supplier,call the firedepartment. Installation and service must be performed by a
qualified installer,service agency or the gas supplier.
PLEASE RETAIN THIS MANUAL FOR FUTURE REFERENCE.
NOTE: Please write the Model and Serial Numbers on this page for references (located at the bottom of the
chassis, right corner).
MODEL NUMBER SERIAL NUMBER
NOTE:Inspect the product to verify that there is no shipping damage. If any damage is detected, call the
shipper and initiate a damage claim. DCS by Fisher & Paykel is not responsible for shipping damage.
DO NOT discard any packing material (box, pallet, straps) until the unit has been inspected.

2
TABLE OF CONTENTS
SAFETY PRACTICES AND PRECAUTIONS 3-5
COOKTOP USE 6-7
Control Knobs 6
Cooking Utensils 6
Burners 6
Electronic Igniters 7
Burner Efficiency 7
Flame Height 7
Burner Grates 7
CARE AND MAINTENANCE 8-9
Cleaning the Cooktop 8
Cleaning the Burner Grates 8
Cleaning the Burners 9
Cleaning the Igniters 9
PRODUCT MEASUREMENT SPECIFICATIONS 10-11
SERVICE 12
WARRANTY 13-14

3
SAFETY PRACTICES & PRECAUTIONS
When properly cared for, your new DCS Appliance has been designed to be a safe, reliable cooking appliance.
When using this restaurant caliber appliance, use it with extreme care, as this type appliance provides intense
heat and can increase the accident potential. Basic safety precautions must be followed when using kitchen
appliances, including the following:
■
Read this Use and Care Manual thoroughly before using your new appliance. This will help to reduce the risk of
fire, electric shock, or injury to persons.
■
Begin by insuring proper installation and servicing. Follow the installation instructions which came with this
appliance. Be sure to have a qualified technician install and ground this appliance before using.
■
Have the installer show you where the gas supply shut-off valve is located so you will know how and where to
turn off the gas to the appliance.
■
If you smell gas, the installer has not done a proper job of checking for leaks. You can have a small leak and
therefore a faint gas smell if the connections are not completely sealed. Finding a gas leak is not a
“do-it-yourself” procedure. Some leaks can only be found with the burner control in the ON position and for your
protection it must be done by a qualified service technician.
■
If by some chance a burner goes out and does not re-ignite and gas escapes, open a window or a door to let the
room air out. Donot attempt touse the appliance until the gas has had time to dissipate.
■
This appliance has been factory assembled for Natural Gas or Liquid Propane as indicated by the model number.
■
Do not repair or replace any part of this appliance unless it is specifically recommended in this manual. All other
servicing should be referred to a qualified service technician.
WARNING:
Children should not be left alone or unattended in an area where appliances are in use. They should never be
allowed to turn knobs, push buttons, sit or stand on any part of an appliance.
WARNING:
Do not storeitems of interest tochildren on or around the Drop-In Cooktop.
Children could be seriously injured if they should climb onto or reach across the appliance to reach these items.
■
Never store anything on the cooktop. Flammable materials can accidentally catch fire, plastic items may melt or
igniteand other types of items could be ruined.
■
Do not hang articles from any part of the appliance. Some fabrics are quite flammable and may catch on fire.
■
If the appliance is near a window be certain the curtains do not blow over or near the cooktop burners; they
could catch on fire.
■
Never let clothing, pot holders, or other flammable materials come in contact with, or too close to any burner or
burner grate until it has cooled. Fabric may ignite and result in personal injury.

4
SAFETY PRACTICES & PRECAUTIONS
■
Be certain to use only dry pot holders; moist or damp pot holders on hot surfaces may cause burn injury from
steam. Do not use a towel or other bulky cloth in place of pot holders. Do not let pot holders touch hot burners,
or burner grates.
■
For personal safety, wear proper apparel. Loose fitting garments or hanging sleeves should never be worn while
using this appliance. Some synthetic fabrics are highly flammable and should not be worn while cooking.
■
Do not use aluminum foil to line any part of the cooktop. Using a foil liner could result in a
fire hazard.
WARNING:
This appliance is for cooking. Based on safety considerations, never use the cooktop to warm or heat a room.
WARNING:
When using the cooktop: Do not touch the burner grates or the immediate surrounding area. Areas adjacent to the
burners may become hot enough to cause burns.
■
Never leave the cooktop unattended when using high flame settings. A possible boil over could cause smoking
or greasy spill overs may ignite. More importantly, if the burner flames are smothered by a severe boil over
which effects the igniter, the unburned gas will escape into the room, which would be extremely dangerous.
■
Only certain types of glass, heat-proof glass-ceramic, ceramic, earthen ware, or other glazed utensils are suitable
for use on the open flame of the cooktop. Utensils that are not thermally heat safe may break with sudden
temperature changes.
■
Donot heatunopened food containers; a build up of pressure may cause the container to burst.
■
During cooking,set the burner control so thatthe flame heats atthe bottom of the pan and does not curl around
the bottom edges of the pan. This could heatand/or melt the handles.
■
Always use utensils that have flat bottoms large enough to cover the burner. The use of undersized utensils will
expose a portion of the flame todirect contact and may result in ignition of clothing.
■
To minimize burns, ignition of flammable materials and accidental spill overs, position handles of utensils inward
so they do not extend over adjacent work areas, cooking areas, or the outside edges of the cooktop.
■
Hold the handle of the pan to prevent movement of the utensil when stirring or turning food.
■
Grease is flammable. Do not use water on grease fires. Turn OFF the burner, then smother the fire with baking
soda or use a dry chemical or foam-type fire extinguisher. Let hot grease cool before attempting to handle it.
Avoid letting grease deposits collect around the base of the cooktop burners. Clean after each use or boil over.
■
Use splatter screens over pans when frying foods to minimize possible grease burns. Be sure not to use a flame
thatis too high.
■
For proper lighting and performance of the cooktop burners, keep the burner ports clean. It may be necessary to
clean these when there is a boil over or when the burner does not light, even though the electronic igniters
click.
■
Clean the cooktop with caution. Avoid steam burns; do not use a wet sponge or cloth to clean the cooktop while
it is hot. Some cleaners produce noxious fumes if applied to a hot surface. Follow directions provided by the
cleaner manufacturer.

5
SAFETY PRACTICES & PRECAUTIONS
■
Be sure all the cooktop controls are turned off and the appliance is cool before using any type of aerosol cleaner
on or around the appliance. The chemical that produces the spraying action could, in the presence of heat, ignite
or cause metal parts to corrode.
■
Clean the ventilator hood and filters above the cooktop frequently so grease from cooking vapor does not
accumulate.
■
Turn the ventilator OFF in case of fire. The blower, if in operation, could unsafely spread the flames.
■
Do not obstruct the flow of combustion or ventilation air to the appliance. Be sure a fresh air supply is available.
■
For safety reasons and to avoid damage to the appliance never sit, stand, or lean on the cooking surface.
■
Service should only be done by authorized technicians. Service technicians must disconnect the power supply
before servicing this appliance.
■
California Proposition 65 - Warning: The burning of gas cooking fuel generates some by-products which are
known by the State of California to cause cancer or reproductive harm. California law requires businesses to warn
customers of potential exposure to such substances. To minimize exposure to these substances, always operate
this unit according to the instructions contained in this booklet and provide good ventilation to the room when
cooking with gas.
Note:
This product must be installed by a licensed plumber or gas fitter when installed within the Commonwealth of
Massachusetts.
Installer supplied
shut-off valve
must be easily
accessible inside
cabinetry.
Gas Supply

6
COOKTOP USE
CAUTION:
For warranty coverage, DCS requires that burner adjustments be made by a qualified technician at the time of instal-
lation. Extreme care should be used when adjustments are made after installation.
CONTROL KNOBS:
The control knobs and knob bezels are readily associated with the burners they control and are located on the
right hand side of the Cooktop. The sealed top burners have an infinite number of heat settings and there are no
fixed positions on the control knobs between HI and SIM (with the exception of LOW). To light the burner push
control knob in and rotate counterclockwise. An audible clicking sound will be heard and the burner should light
immediately. To use, turn the knob to the desired setting.
COOKING UTENSILS:
For best results we recommend using Professional Cookware. These
can be found at your finer department stores, specialty cooking
shops, or restaurant supply stores. If using regular cookware be
very careful if the pans have plastic handles, as these large profes-
sional size burners can flame up on the outside of the pan and
melt or bubble the handles.
THESE GRAPHICS
SHOW BURNER
LOCATION:
RIGHT FRONT
BURNER
BURNERS:
Your new Drop-In Cooktop is equipped with burners
typical of those used in restaurants. These restaurant
style burners are comprised of high strength die cast
aluminum burner bases and simmer portrings,
precision forged brass port rings, and cast iron
burner caps.
Model CTD-365 cooktop is equipped with 4 burners
rated at 11,000 Btu/hr, and one high-output burner
rated at 17,500 Btu/hr. Model CTD-304 is equipped
with 2 burners rated at 11,000 Btu/hr, 1 burner rated
at 10,000 and 1 high-output burner rated at 15,500
Btu/hr (for natural gas). All Drop-In Cooktop burners
have exceptionally low simmer capabilities (See chart
on page 7). The burner system is designed for
maximum cleanability and control. All the cooktop
burners have electronic spark re-ignition to eliminate
continuously burning pilot; if the flame is blown out,
it will relight.
TOP VIEW OF KNOB BEZEL
“ON”
INDICATOR LIGHT
Cap
Main Burner
Port Ring
Burner Base
Simmer Ring
Electrode
Venturi
Locating
Notch
Locating Pin
Hole Inside
Brass Ring
Locating Pin
Locating Pin
Hex Nut
Locating Pin

7
ELECTRONIC IGNITERS:
Ifaburner does not light or re-ignite, listen for the clicking sound. If all the igniters are not clicking, turn off the
burner. Check the circuit panel for a blown fuse or a tripped circuit breaker. If one burner is not lighting, see
page 9 for cleaning instructions.
BURNER EFFICIENCY:
It is necessary to keep the burner ports and the igniters clean for proper lighting and efficient performance. The
burner flame should burn completely around the burner with no excessive noise or lifting. The flame should be
blue in color and stable with no yellow tips.
FLAME HEIGHT:
The correct height of the flame mainly depends on the size of the bottom
of the cooking utensil, the material of the cooking utensil, the amount
and type of food and the amount of liquid in the utensil. Following are
some basic rules for selecting flame height.
■
For safety reasons the flame must never extend beyond the bottom of the
cooking utensil.
■
Never allow flames to curl up the side of the pan.
■
Utensils which conduct heat slowly (such as glass-ceramic) should be
used with medium to low flames. If you are cooking with a large amount
of liquid a slightly larger flame can be used.
BURNER GRATES:
The cast iron burner grates are fully porcelain coated for long life and rust
prevention. Hi-Temperature cushions allow the grate to rest softly on the
cooktop without scratching. The grates are designed for easy sliding of
pots across the grate tops. They were designed in interlocking sections to
make them safer, easier to remove and clean. For additional cleaning tips
see the care and maintenance section.
PROPER FLAME HEIGHT
COOKTOP USE
4
5
2
3
1
Cabinet front
1
2
3
4
CTD-365
CTD-304
Cabinet front
Burner
Location MAX. Btu/hr LOW
Btu/hr SIMMER
Btu/hr
NATLP NAT&LP NAT&LP
1, 2, 4, 5 11,000 10,000 3,000 1,200
3 17,500 15,000 3,000 1,200
Burner
Location MAX. Btu/hr LOW
Btu/hr SIMMER
Btu/hr
NAT LP NAT & LP NAT & LP
110,000 10,000 3,000 1,200
2, 3 11,000 10,000 3,000 1,200
415,500 15,000 3,000 1,200

CARE AND MAINTENANCE
8
CLEANING THE COOKTOP
WARNING:
Be careful cleaning any part of this appliance while hot.
All parts of the appliance can be cleaned with a small amount of hot soapy water, rinsed, dried
and buffed to a shine with a soft, heavy pile cloth. Always try this first, as it is the mildest
cleaning procedure.
1. Use the mildest cleansers first. Some brands of cleaners are harsher than others and may cause
metal parts to discolor or corrode, read their directions. Be sure all the cooktop controls are
turned OFF and the appliance is COOL before using any type of aerosol cleaner on or around the
appliance. The chemical that produces the spraying action could, in the presence of heat, ignite.
2. To avoid marring the surfaces, always rub metal finishes in the direction of the polish lines.
The cleaner will be more effective when used in the direction of the polish lines.
3. Use only clean sponges, soft cloths, paper towels, and plastic non-metal for cleaning or scouring
(use only soap pads with soap still in them, an empty pad can scratch), as recommended in this
section.
4. Be sure to rinse all parts thoroughly and wipe dry to avoid water marks.
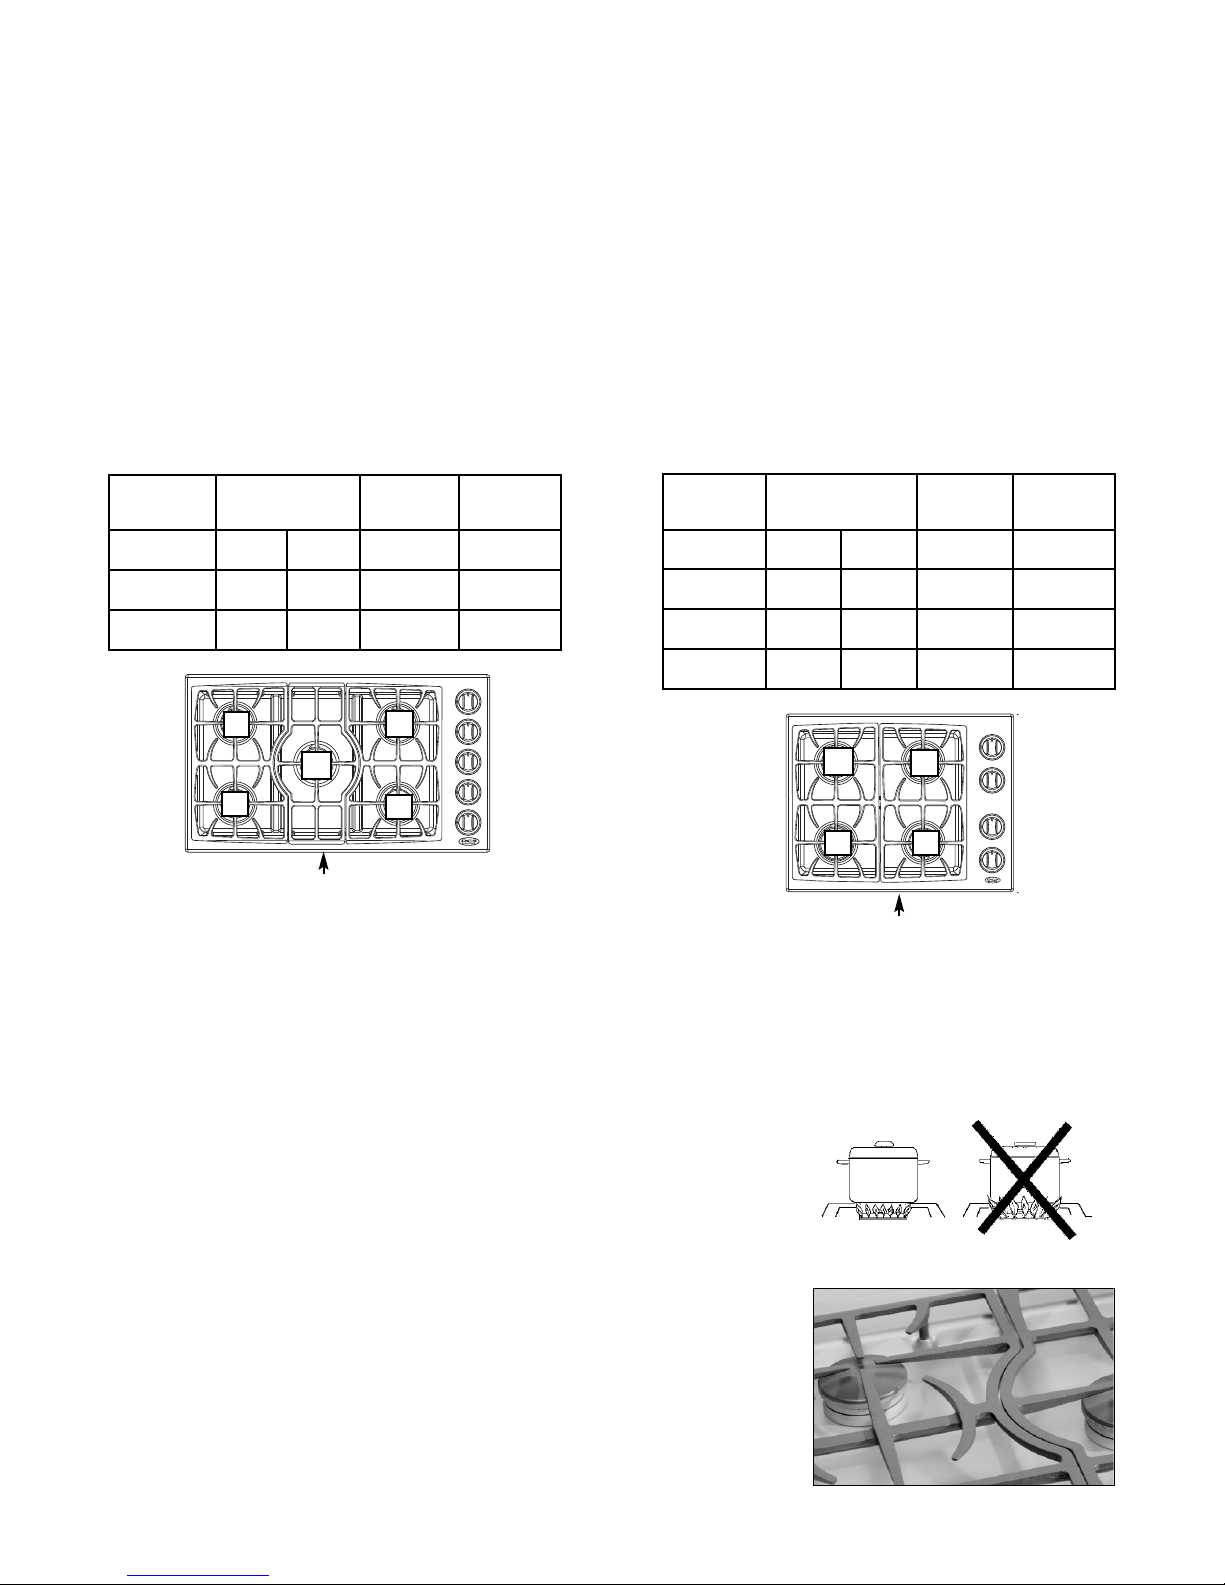
5. Ifstains remain on the bottom of the cooktop sump, use this easy procedure. Place a paper collar
around the burner and igniter, tape it together. This will cover the aluminum under the burner
cap and the igniter.Spraythe dirtyarea with Easy Off® or SOS Oven Cleaner® when cool. Cover
with paper towel. Leave on for 4 hours or overnight. With a warm wet sponge, wipe clean and
polish with a lint free soft towel. You should never use anything stronger than a sponge or a
plastic non-metal sponge on your cooktop.
BRAND NAMES:
Inthis section, the use of name brands is intended only to indicate a type of cleaner. This does
not constitute an endorsement. The omission of any name brand cleaner does not imply its
adequacyor inadequacy. Manyproducts are regional in distribution and can be found in the
local markets and department stores.
CLEANING THE BURNER GRATES:
Turn off all the burners and allow the grates to cool before starting to clean the cooktop.
Rapid cooling of the grates, for instance, placing hot grates in cool or tepid water to clean, can
thermally shock the porcelain coating and cause cracking or chipping. If you wipe off any part of
the cooktop while it is hot, do so carefully as using a wet sponge or cloth can result in steam
burns.
Once the grates are cool they may be wiped clean while on the cooktop using hot soapy water,
then rinsed and wiped dry or they may be placed in the dishwasher for easy cleaning. The
occasional use of mild abrasivecleansers such as Bon-Ami®, Soft Scrub® or a soap-filled plastic or
non-metal pad is okay.Abrasivecleansers,used vigorously or too often, can eventually harm the
enamel. Apply with a damp sponge, rinse thoroughly and dry.

CARE AND MAINTENANCE
9
CLEANING THE BURNERS:
For proper lighting and performance, keep the burners
clean and dry. It is necessary to clean the burners if they do
not light although the igniter clicks, whenever there has
been a severe boil over or when the flame doesn’t burn
blue.
Be certain all burner knobs are in the OFF position before
attempting to clean the burners. The burners have been
designed for ease of cleaning. When the grates and burners
are cool, remove the grate. The Burner Cap and the Brass
Port Ring can easily be lifted off. Wash these parts in hot
soapy water, rinse and dry thoroughly. The Burner Caps are
porcelain enamel, follow the directions on page 8 that were
given to clean the burner grates. A bristle brush can be
used to clean out the toothed burner ports, if necessary.
Disassembly of the Simmer Ring is not recommended,
however, it may become necessary to do so if the ports
remain clogged after normal cleaning. If it is necessary to
disassemble the Simmer Ring from the Base, removethe
Hex Nut atthe top of the Simmer Ring. Clean the Simmer
Ring with hot soapy water using a soft wire or plastic
bristle brush then drythoroughly. Re-assemble the parts
using the Hex Nut.
After cleaning, it is important to make sure the Locating Pin on the bottom side of the Simmer Ring is properly
aligned with the corresponding hole in the Base and that the Locating Pin (see above) in the bottom side of the
Brass Port Ring is properly aligned with the Locating Notch on the top side of the Simmer Ring. Incorrect
alignment will produce a potentially dangerous flame and poor burner performance. See the illustration above.
CLEANING THE IGNITERS:
Be certain all burner knobs are in the OFF position before attempting to clean the igniters. Gently wipe with an
alcohol dampened cotton swab and be careful not to damage the igniter.
IGNITER
COOKTOP BURNER
Center Burner Base shown
Cap
Main Burner
Port Ring
Burner
Base
Simmer
Ring
Electrode
Venturi
Locating
Notch
Locating Pin
Hole Inside
Brass Ring
Locating Pin
Locating
Pin
Hex Nut
Locating Pin

PRODUCT MEASUREMENT SPECIFICATIONS
10
Dimensions shown below are for product reference only. REFER TO THE PRODUCT INSTALLATION
GUIDE FOR CABINET PREPARATION AND CUTOUT SPECIFICATIONS.
36"
Top View
FrontView
RightSide View
21"
19-1/2"
5-1/2"
4"
34-1/2"
2-3/4"
2-7/8"
Grate (P/N 12368)(2 pcs)
Grate (P/N 12369)
Knob (P/N 14301)(5 pcs)
CTD-365
‘D’ Burner Cap (P/N 12272)(1 pcs) ‘C’ Burner Cap
(P/N 12273)(4 pcs)

PRODUCT MEASUREMENT SPECIFICATIONS
11
Dimensions shown below are for product reference only. REFER TO THE PRODUCT INSTALLATION GUIDE FOR
CABINET PREPARATION AND CUTOUT SPECIFICATIONS.
30"
Top View
FrontView
21"
19-1/2"
5-1/2"
4"
28-5/16"
RightSide View
1-1/2"
2-11/16"
Grate (P/N 12325)(2 pcs)
Knob (P/N 14301)(4 pcs)
CTD-304
‘D’ Burner Cap (P/N 12272)(1 pcs)
‘C’ Burner Cap
(P/N 12273)(3 pcs)

SERVICE
12
HOW TO OBTAIN SERVICE:
For warranty service, contact our DCS Customer Care Representative at (888) 936-7872. Before you call, please
have the following information ready:
■
Model Number (located at the bottom of chassis, right corner)
■
Serial Number (located at the bottom of chassis, right corner)
■
Date of installation
■
Abrief description of the problem
Your satisfaction is of the utmost importance to us. If a problem cannot be resolved to your satisfaction, please
write to Customer Care or email:
customer[email protected]
Write:
Fisher & Paykel Appliances, Inc.
Attention: DCS Customer Care
5900 Skylab Road
Huntington Beach, CA 92647

WARRANTY
13
LIMITED WARRANTY
When you purchase a new DCS Drop-in Cooktop you automatically receive a One Year Limited Warranty covering
parts and labor for the entire product, and a Five Year Limited Warranty on the structural integrity of the exterior
and interior body parts for servicing within the 48 mainland United States, Hawaii, Washington D.C. and Canada.
In Alaska the Limited Warranty is the same except that you must pay to ship the Product to the service shop or
the service technician’s travel to your home. Products for use in Canada must be purchased through the Canadian
distribution channel to ensure regulatory compliance. Should rusting occur to the degree of non-performance,
replacement parts will be furnished. This does not apply if the unit was subjected to other than normal
residential use.
If the Product is installed in a motor vehicle, boat or similar mobile facility, you receive the same One Year Limited
Warranty, but you must bring the vehicle, boat or mobile facility containing the Product to the service shop at
your expense or pay the service technician’s travel to the location of the Product.
FISHER & PAYKEL UNDERTAKES TO:
Repair without cost to the owner either for material or labor any part of the Product, the serial number of which
appears on the Product, which is found to be defective. In Alaska, you must pay to ship the Product to the service
shop or for the service technician’s travel to your home. If the Product is installed in a motor vehicle, boat or
similar mobile facility, you must bring it to the service shop at your expense or pay for the service technician’s
travel tothe location of the Product.
If we are unable to repair a defective part of the Product after a reasonable number of attempts, at our option we
may replace the part or the Product, or we may provide you a full refund of the purchase price of the Product (not
including installation or other charges).
This warranty extends to the original purchaser and any succeeding owner of the Product for products purchased
for ordinary single-family home use. All service under this Limited Warranty shall be provided by Fisher & Paykel
Appliances Inc. or its Authorized Service Agent during normal business hours.
HOW LONG DOES THIS LIMITED WARRANTY LAST?
Our liabilityunder this Limited Warranty for the entire product expires One Year from the date of purchase of the
Product by the first consumer. Our liability under this Limited Warranty for the structural integrity of the exterior
and interior body parts expires Five Years from the date of purchase of the Product by the first consumer.
Our liability under any implied warranties, including the implied warranty of merchantability (an unwritten
warranty that the Product is fit for ordinary use) also expires One Year (or such longer period as required by
applicable law) from the date of purchase of the Product by the first consumer. Some states do not allow
limitations on how long an implied warranty lasts, so this limit on implied warranties may not apply to you.
THIS WARRANTY DOES NOT COVER:
A. Servicecalls that are not related to any defect in the Product. The cost of a service call will be charged if the
problem is not found to be a defect of the Product. For example:
1. Correct faulty installation of the Product.
2. Instruct you how to use the Product.
3. Replace house fuses, reset circuit breakers, correct house wiring or plumbing, or replace light bulbs.
4. Correct fault(s) caused by the user.
5. Change the set-up of the Product.
6. Unauthorized modifications of the Product.
7. Noise or vibration that is considered normal, for example, drain/fan sounds, regeneration noises or user warn-
ing beeps.

WARRANTY
14
8. Correcting damage caused by pests, for example, rats, cockroaches etc.
B. Defects caused by factors other than:
1. Normal domestic use or
2. Use in accordance with the Product’s Use and Care Guide.
C. Defects to the Product caused by accident, neglect, misuse, fire, flood or Act of God.
D. The cost of repairs carried out by non-authorized repairers or the cost of correcting such unauthorized repairs.
E. Travel Fees and associated charges incurred when the product is installed in a location with limited or restricted
access (i.e. airplane flights, ferry charges, isolated geographic areas).
F. Normal recommended maintenance as set forth in the Product’s Use and Care Guide.
If you have an installation problem contact your dealer or installer. You are responsible for providing adequate
electrical, exhausting and other connection facilities. We are not responsible for consequential or incidental
damages (the cost of repairing or replacing other property damaged if the Product is defective or any of your
expenses caused if the Product is defective). Some states do not allow the exclusion or limitation of incidental or
consequential damages, so the above limitation or exclusion may not apply to you.
HOW TO GET SERVICE
Please read your Use and CareGuide. Ifyou then have any questions about operating the Product, need the
name of your local DCS Authorized Service Agent, or believe the Product is defective and wish service under this
Limited Warranty, please contact your dealer or call us at:
TOLL FREE 1-888-936-7872 or contact us through our web site: www.dcsappliances.com
You maybe required to provide reasonable proof of the date of purchase of the Product before the Product will
be serviced under this Limited Warranty.
COMMERCIAL USE
This warrantyapplies toappliances used in residential applications; it does not cover their use in commercial
situations.
NO OTHER WARRANTIES
This Limited Warranty is the complete and exclusive agreement between you and Fisher & Paykel Appliances Inc.
regarding any defect in the Product. None of our employees (or our Authorized Service Agents) are authorized to
make any addition or modification to this Limited Warranty.
Warrantor: Fisher & Paykel Appliances, Inc.
If you need further help concerning this Limited Warranty, please call us at the above number, or write to:
Fisher & Paykel Appliances, Inc.
Attention: DCS Customer Care
5900 Skylab Road, Huntington Beach, CA 92647
This Limited Warranty gives you specific legal rights, and you may also have other rights which vary from state to
state.
Fisher & Paykel Appliances Inc. is a leading manufacturer of premium quality cooking and specialty appliances
under the Fisher & Paykel and DCS brands.

Fisher & Paykel Appliances, Inc.
5900 Skylab Road, Huntington Beach, CA 92647
Customer Care: 888.936.7872
Fax: 714.372.7003
www.dcsappliances.com
As product improvement is an ongoing process, we reserve the
right to change specifications or design without notice.
Part No. 239355 Rev. B
Litho in USA 08/2008
Nous améliorons constammentses produits et se réserve le droit
de modifier les spécifications ou la conception de ses produits
sans aucun préavis.
Other manuals for CTD-365
1
This manual suits for next models
1
Table of contents
Other DCS Cooktop manuals